2016 FORD EXPEDITION mirror
[x] Cancel search: mirrorPage 87 of 421
WARNINGS
When closing the moonroof, you
should verify that it is free of
obstructions and make sure that
children and pets are not in the proximity
of the roof opening. You can manually open or close the sliding
shade when the moonroof is closed. Pull
the shade toward the front of your vehicle
to close it.
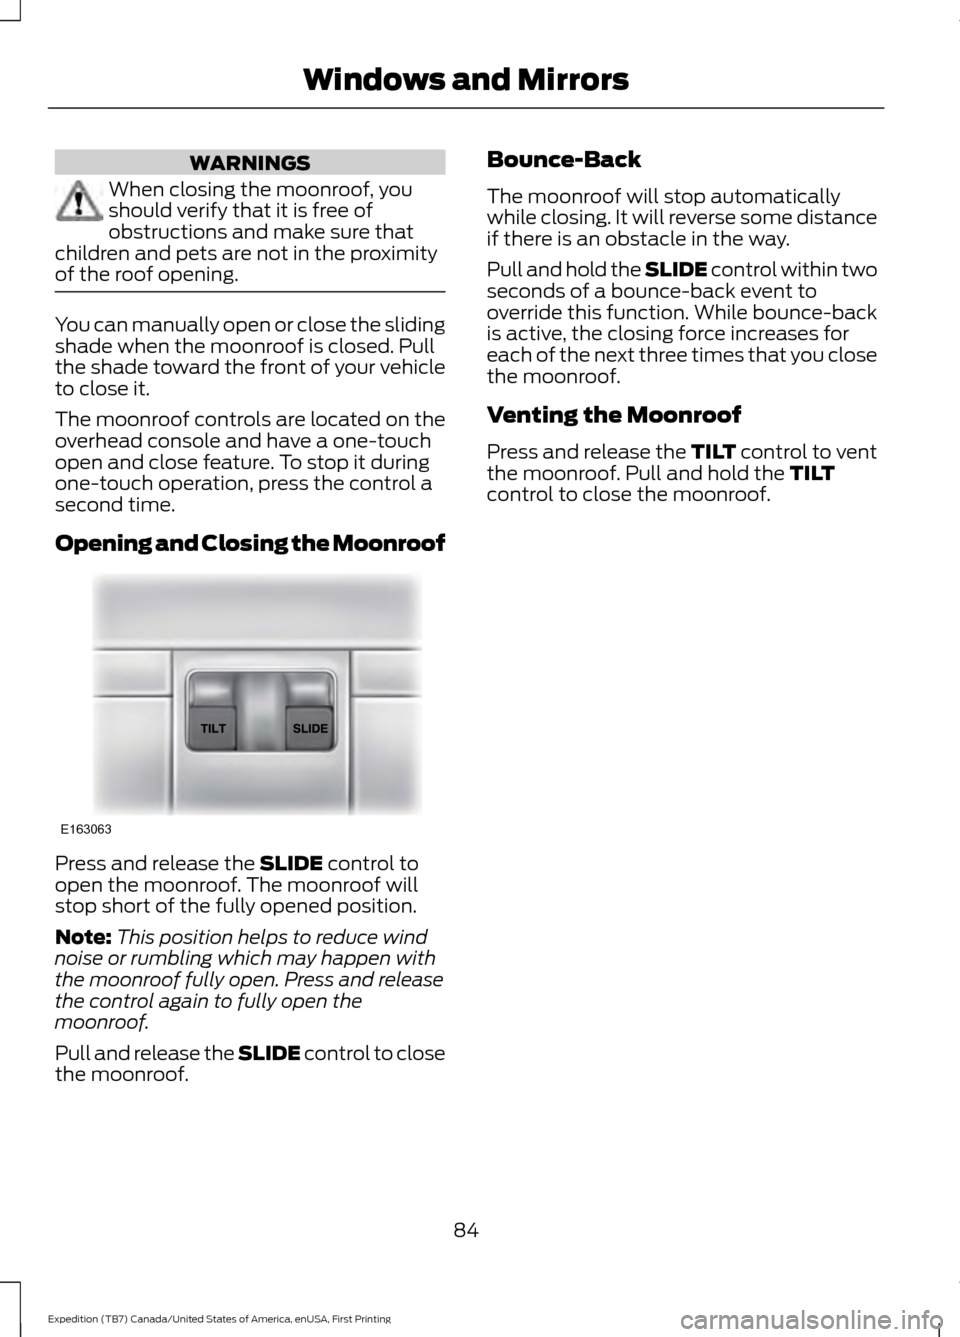
The moonroof controls are located on the
overhead console and have a one-touch
open and close feature. To stop it during
one-touch operation, press the control a
second time.
Opening and Closing the Moonroof
Press and release the SLIDE control to
open the moonroof. The moonroof will
stop short of the fully opened position.
Note: This position helps to reduce wind
noise or rumbling which may happen with
the moonroof fully open. Press and release
the control again to fully open the
moonroof.
Pull and release the SLIDE control to close
the moonroof. Bounce-Back
The moonroof will stop automatically
while closing. It will reverse some distance
if there is an obstacle in the way.
Pull and hold the SLIDE control within two
seconds of a bounce-back event to
override this function. While bounce-back
is active, the closing force increases for
each of the next three times that you close
the moonroof.
Venting the Moonroof
Press and release the TILT control to vent
the moonroof. Pull and hold the
TILT
control to close the moonroof.
84
Expedition (TB7) Canada/United States of America, enUSA, First Printing Windows and MirrorsE163063
Page 100 of 421
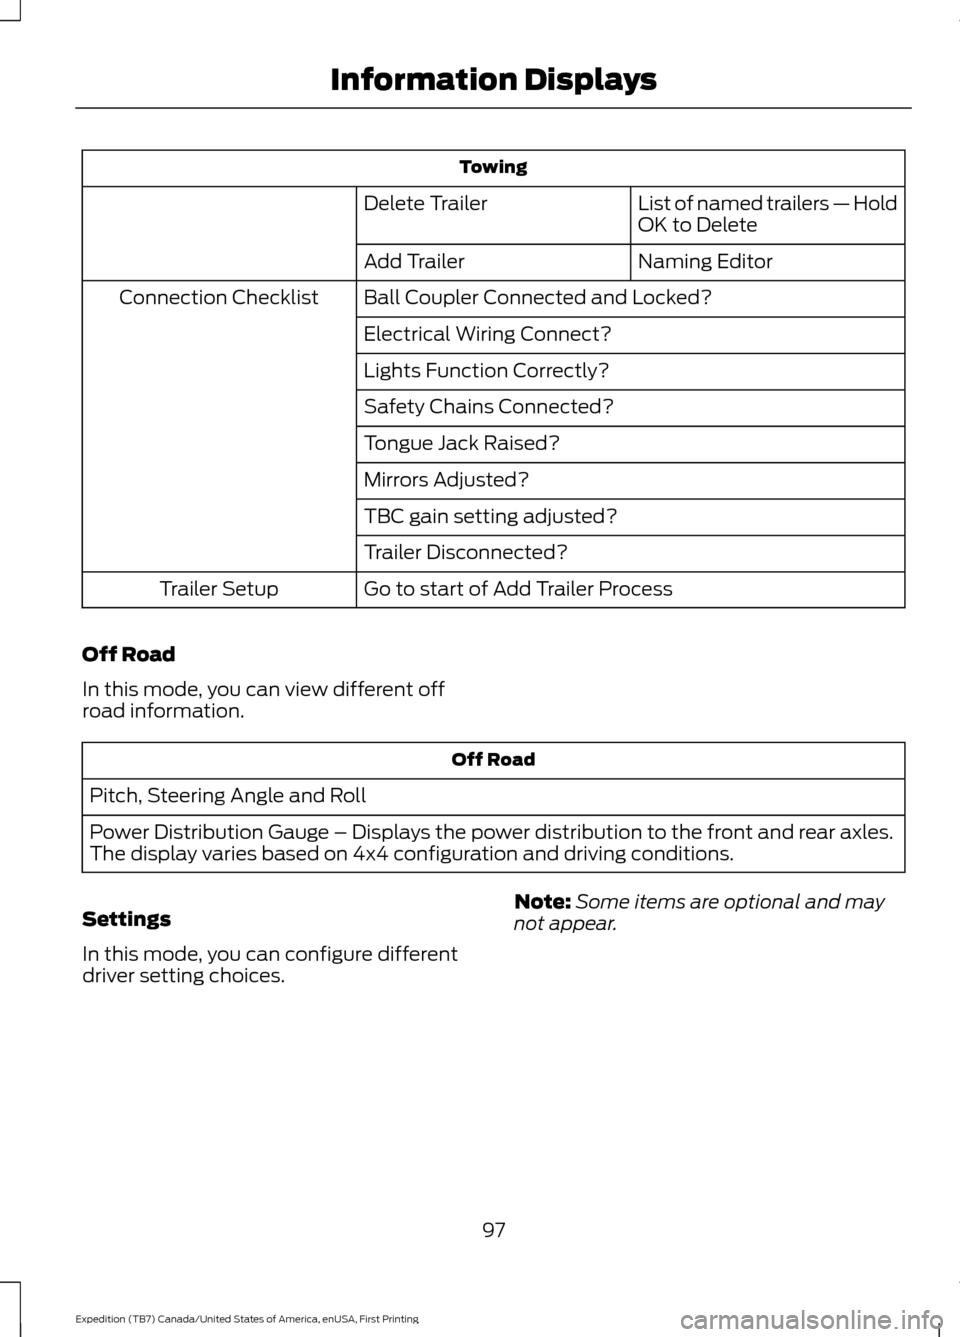
Towing
List of named trailers — Hold
OK to Delete
Delete Trailer
Naming Editor
Add Trailer
Ball Coupler Connected and Locked?
Connection Checklist
Electrical Wiring Connect?
Lights Function Correctly?
Safety Chains Connected?
Tongue Jack Raised?
Mirrors Adjusted?
TBC gain setting adjusted?
Trailer Disconnected?
Go to start of Add Trailer Process
Trailer Setup
Off Road
In this mode, you can view different off
road information. Off Road
Pitch, Steering Angle and Roll
Power Distribution Gauge – Displays the power distribution to the front and rear axles.
The display varies based on 4x4 configuration and driving conditions.
Settings
In this mode, you can configure different
driver setting choices. Note:
Some items are optional and may
not appear.
97
Expedition (TB7) Canada/United States of America, enUSA, First Printing Information Displays
Page 104 of 421
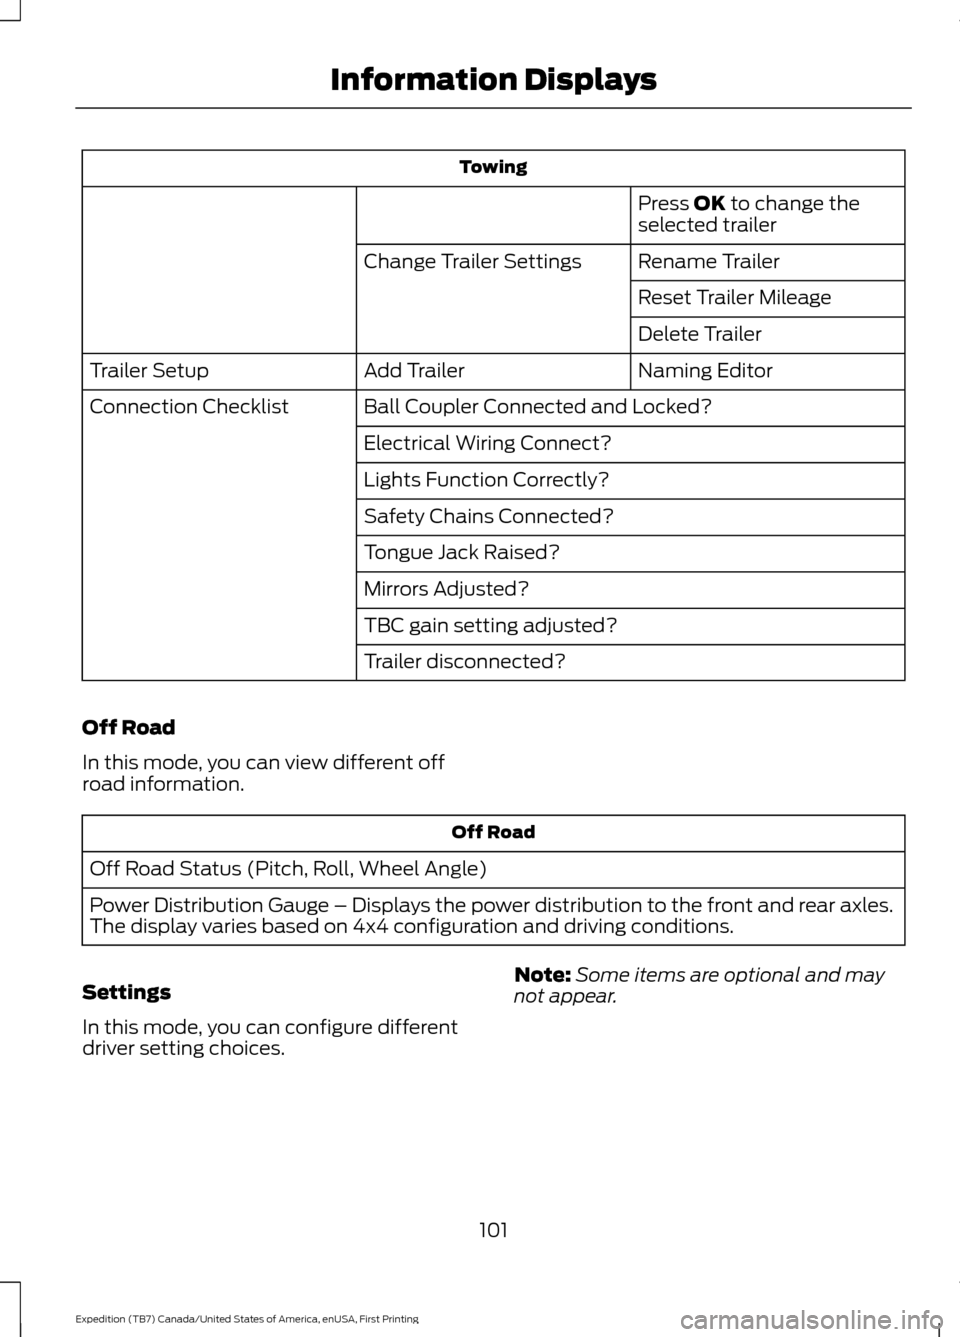
Towing
Press OK to change the
selected trailer
Rename Trailer
Change Trailer Settings
Reset Trailer Mileage
Delete Trailer
Naming Editor
Add Trailer
Trailer Setup
Ball Coupler Connected and Locked?
Connection Checklist
Electrical Wiring Connect?
Lights Function Correctly?
Safety Chains Connected?
Tongue Jack Raised?
Mirrors Adjusted?
TBC gain setting adjusted?
Trailer disconnected?
Off Road
In this mode, you can view different off
road information. Off Road
Off Road Status (Pitch, Roll, Wheel Angle)
Power Distribution Gauge – Displays the power distribution to the front and rear axles.
The display varies based on 4x4 configuration and driving conditions.
Settings
In this mode, you can configure different
driver setting choices. Note:
Some items are optional and may
not appear.
101
Expedition (TB7) Canada/United States of America, enUSA, First Printing Information Displays
Page 119 of 421
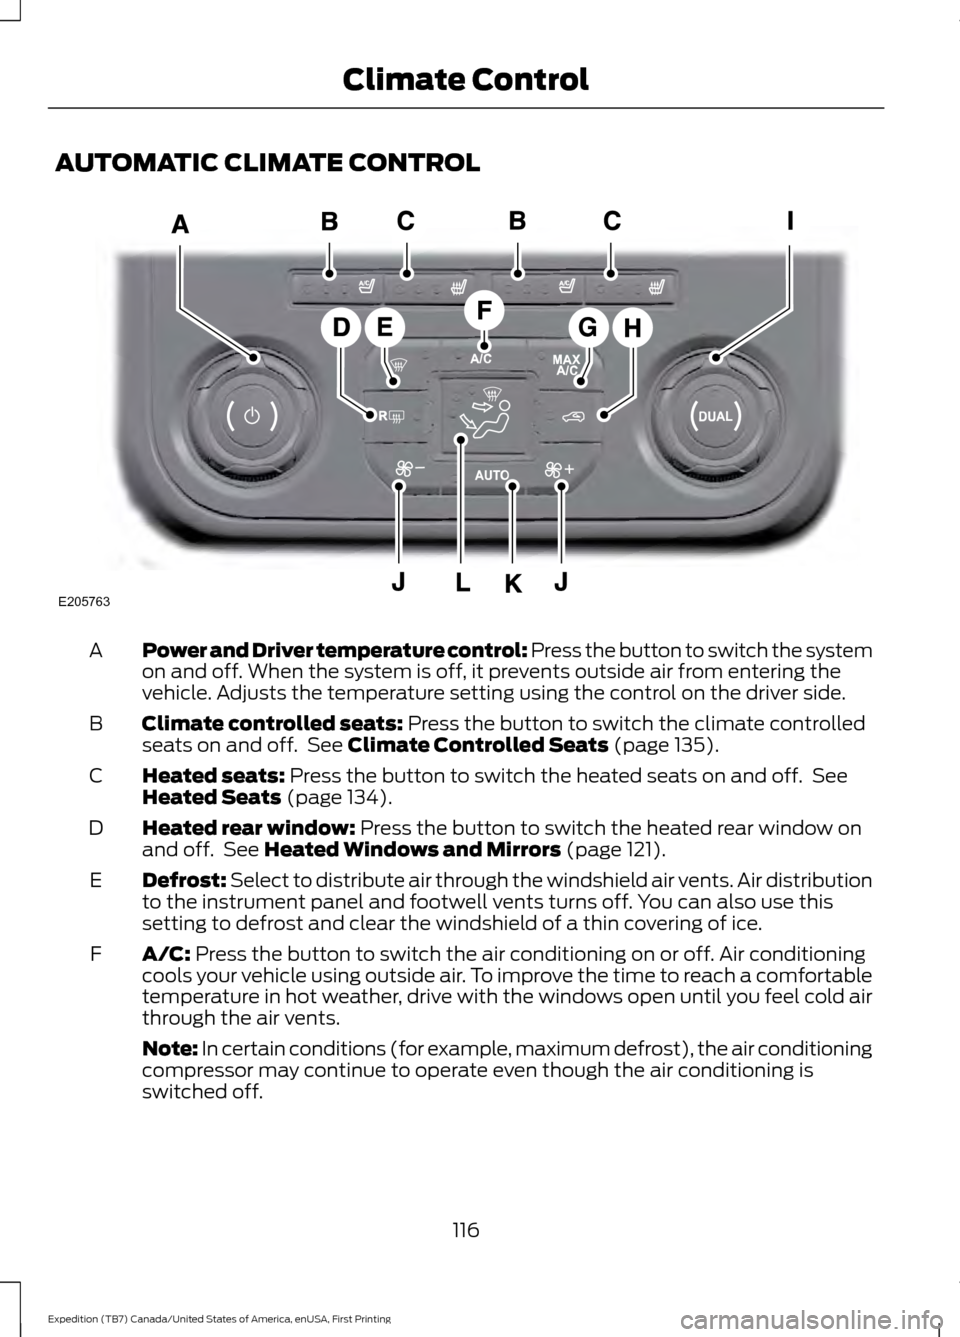
AUTOMATIC CLIMATE CONTROL
Power and Driver temperature control: Press the button to switch the system
on and off. When the system is off, it prevents outside air from entering the
vehicle. Adjusts the temperature setting using the control on the driver side.
A
Climate controlled seats: Press the button to switch the climate controlled
seats on and off. See Climate Controlled Seats (page 135).
B
Heated seats:
Press the button to switch the heated seats on and off. See
Heated Seats (page 134).
C
Heated rear window:
Press the button to switch the heated rear window on
and off. See Heated Windows and Mirrors (page 121).
D
Defrost: Select to distribute air through the windshield air vents. Air distribution
to the instrument panel and footwell vents turns off. You can also use this
setting to defrost and clear the windshield of a thin covering of ice.
E
A/C:
Press the button to switch the air conditioning on or off. Air conditioning
cools your vehicle using outside air. To improve the time to reach a comfortable
temperature in hot weather, drive with the windows open until you feel cold air
through the air vents.
F
Note: In certain conditions (for example, maximum defrost), the air conditioning
compressor may continue to operate even though the air conditioning is
switched off.
116
Expedition (TB7) Canada/United States of America, enUSA, First Printing Climate ControlE205763
Page 124 of 421
HEATED WINDOWS AND
MIRRORS
Heated Rear Window
Note:
Make sure the engine is running
before operating the heated windows. Press the button to clear the
heated rear window of thin ice
and fog. The heated rear window
will automatically turn off after a short
period of time. Start the engine before you
switch the heated rear window on.
Note: Do not use razor blades or other
sharp objects to clean or remove decals
from the inside of the heated rear window.
The vehicle warranty does not cover
damage caused to the heated rear window
grid lines.
Heated Exterior Mirror (If Equipped)
When you switch the heated rear window
on, the heated exterior mirrors will
automatically turn on.
Note: Do not remove ice from the mirrors
with a scraper or adjust the mirror glass
when it is frozen in place.
Note: Do not clean the mirror housing or
glass with harsh abrasives, fuel or other
petroleum-based cleaning products.
REMOTE START
(If Equipped)
The remote start feature allows you to
pre-condition the interior of your vehicle.
The climate control system works to
achieve comfort according to your previous
settings.
Note: You cannot adjust the system during
remote start operation. Turn the ignition on to return the system
to its previous settings. You can now make
adjustments normally, but you need to turn
certain vehicle-dependent features back
on, such as:
•
Heated seats.
• Cooled seats.
• Heated steering wheel.
• Heated mirrors.
• Heated rear window.
You can adjust the default remote start
settings using the information display
controls. See
Information Displays
(page 92).
Automatic Settings
In hot weather, the system is set to
72°F
(22°C). The cooled seats are set to high
(if available, and selected to AUTO in the
information display).
In moderate weather, the system either
heats or cools (based on previous
settings). The rear defroster, heated
mirrors and heated seats do not
automatically turn on.
In cold weather, the system is set to
72°F
(22°C). The heated seats are set to high
(if available, and selected to AUTO in the
information display). The rear defroster
and heated mirrors automatically turn on.
121
Expedition (TB7) Canada/United States of America, enUSA, First Printing Climate ControlE184884
Page 129 of 421
2. Continue pressing the control until it
reaches the end of the seat track.
3. Continue pressing the control for about
two seconds. You will feel the seat
bounce back slightly.
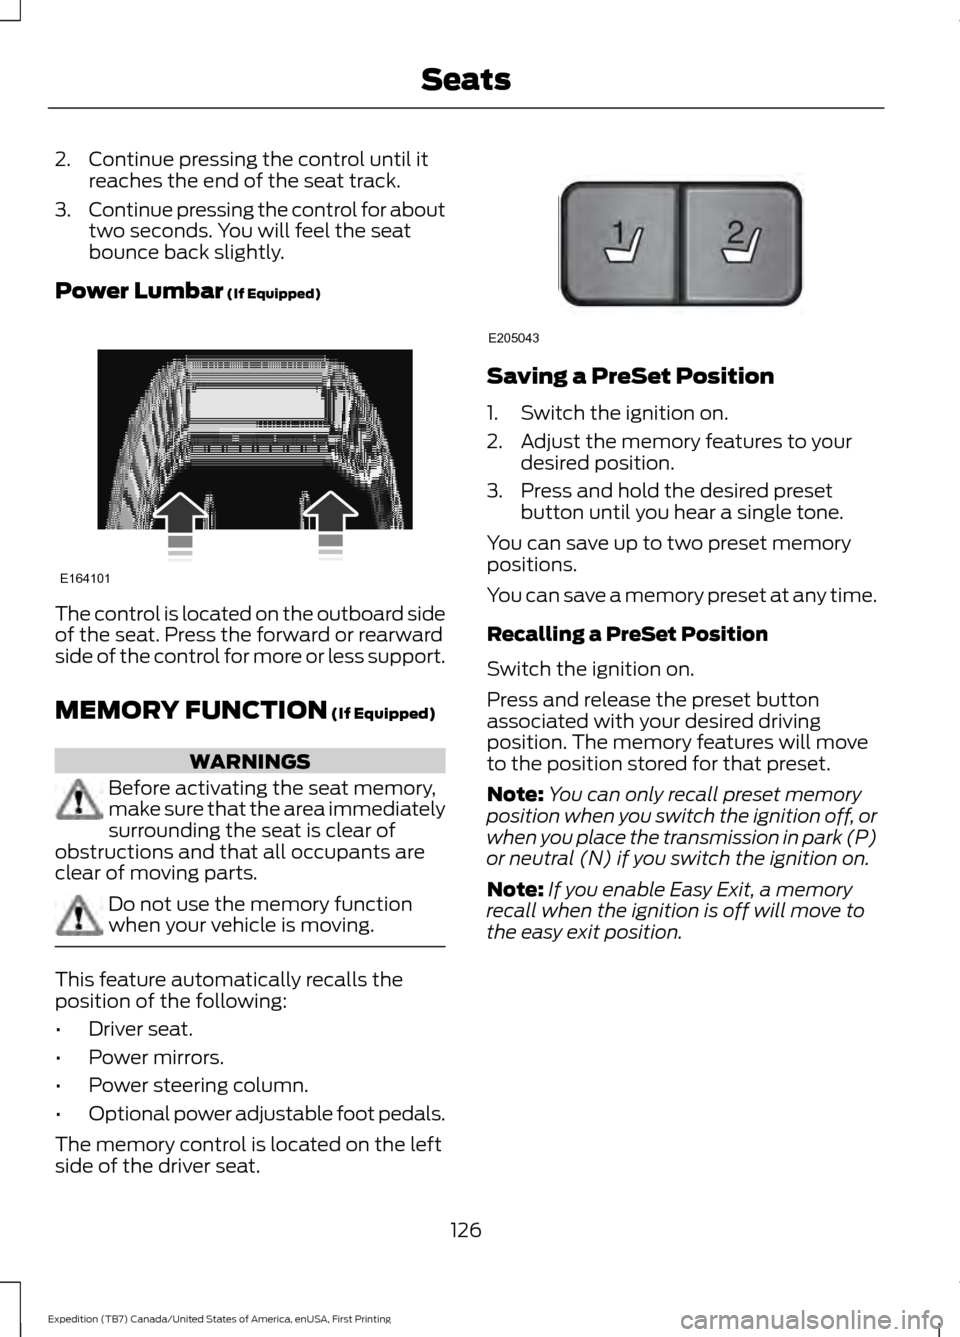
Power Lumbar (If Equipped) The control is located on the outboard side
of the seat. Press the forward or rearward
side of the control for more or less support.
MEMORY FUNCTION
(If Equipped)
WARNINGS
Before activating the seat memory,
make sure that the area immediately
surrounding the seat is clear of
obstructions and that all occupants are
clear of moving parts. Do not use the memory function
when your vehicle is moving.
This feature automatically recalls the
position of the following:
•
Driver seat.
• Power mirrors.
• Power steering column.
• Optional power adjustable foot pedals.
The memory control is located on the left
side of the driver seat. Saving a PreSet Position
1. Switch the ignition on.
2. Adjust the memory features to your
desired position.
3. Press and hold the desired preset button until you hear a single tone.
You can save up to two preset memory
positions.
You can save a memory preset at any time.
Recalling a PreSet Position
Switch the ignition on.
Press and release the preset button
associated with your desired driving
position. The memory features will move
to the position stored for that preset.
Note: You can only recall preset memory
position when you switch the ignition off, or
when you place the transmission in park (P)
or neutral (N) if you switch the ignition on.
Note: If you enable Easy Exit, a memory
recall when the ignition is off will move to
the easy exit position.
126
Expedition (TB7) Canada/United States of America, enUSA, First Printing SeatsE164101 21
E205043
Page 130 of 421
You can also recall a preset memory
position by:
•
Pressing the unlock button on your
remote control if it is linked to a preset
position.
• Unlocking the intelligent driver door
handle if a linked key fob is present.
• Entering a personal entry code on the
Securicode keypad. See Locks (page
53).
Note: Using a linked key fob to recall your
memory position when the ignition is off
moves the seat and steering column to the
Easy Entry position.
Note: Pressing any active memory feature
control - power seat, mirror (or steering
column switch) (or any memory button)
during a memory recall cancels the
operation.
Linking a PreSet Position to your
Remote Control or Intelligent Access
Key Fob
Your vehicle can save the preset memory
positions for up to two remote controls.
1. With the ignition on, move the memory
positions to the desired positions.
2. Press and hold the desired preset button for about five seconds. A tone
will sound after about two seconds.
Continue holding until a second tone
is heard.
3. Within three seconds, press the lock button on the remote control you are
linking.
To unlink a remote control, follow the
same procedure – except in step 3, press
the unlock button on the remote control.
Note: If more than one linked remote
control or intelligent access key is in range,
the memory function moves to the settings
of the first key to initiate a memory recall. Easy Entry and Exit Feature
(If
Equipped)
This feature adjusts the position of the seat
and steering column to allow easier exit
and entry to the vehicle.
The driver seat automatically moves 2
inches (5 centimeters) rearward when the
transmission is in park (P) and you remove
the key from the ignition or you switch the
ignition off.
The driver seat returns to the previous
position when you put the key in the
ignition or switch the ignition on.
You can enable or disable this feature in
the information display. See Information
Displays
(page 92).
REAR SEATS
Folding Down the Second Row
40% Seat WARNINGS
Use caution when folding the
seatback to the flat back position as
the system will move forward when
you lift the release handle. Before returning the seatback to its
original position, make sure that
cargo or any objects are not trapped
behind the seatback. After returning the
seatback to its original position, pull on the
seatback to make sure that it has fully
latched. An unlatched seat may become
dangerous in the event of a sudden stop
or crash. Make sure that the head restraint is in the
down position and no objects such as
books, purses or briefcases are on the floor
in front of the second row seats before
folding them down.
127
Expedition (TB7) Canada/United States of America, enUSA, First Printing Seats
Page 186 of 421
REAR VIEW CAMERA
WARNINGS
The rear view camera system is a
reverse aid supplement device that
still requires the driver to use it in
conjunction with the interior and exterior
mirrors for maximum coverage. Objects that are close to either
corner of the bumper or under the
bumper, might not be seen on the
screen due to the limited coverage of the
camera system. Back up as slow as possible since
higher speeds might limit your
reaction time to stop your vehicle.
Use caution when using the rear
video camera and the luggage
compartment door is ajar. If the
luggage compartment door is ajar, the
camera will be out of position and the
video image may be incorrect. All
guidelines disappear when the luggage
compartment door is ajar. Use caution when turning camera
features on or off. Make sure your
vehicle is not moving.
The rear view camera system provides a
video image of the area behind your
vehicle.
During operation, lines appear in the
display which represent your vehicle
’s path
and proximity to objects behind your
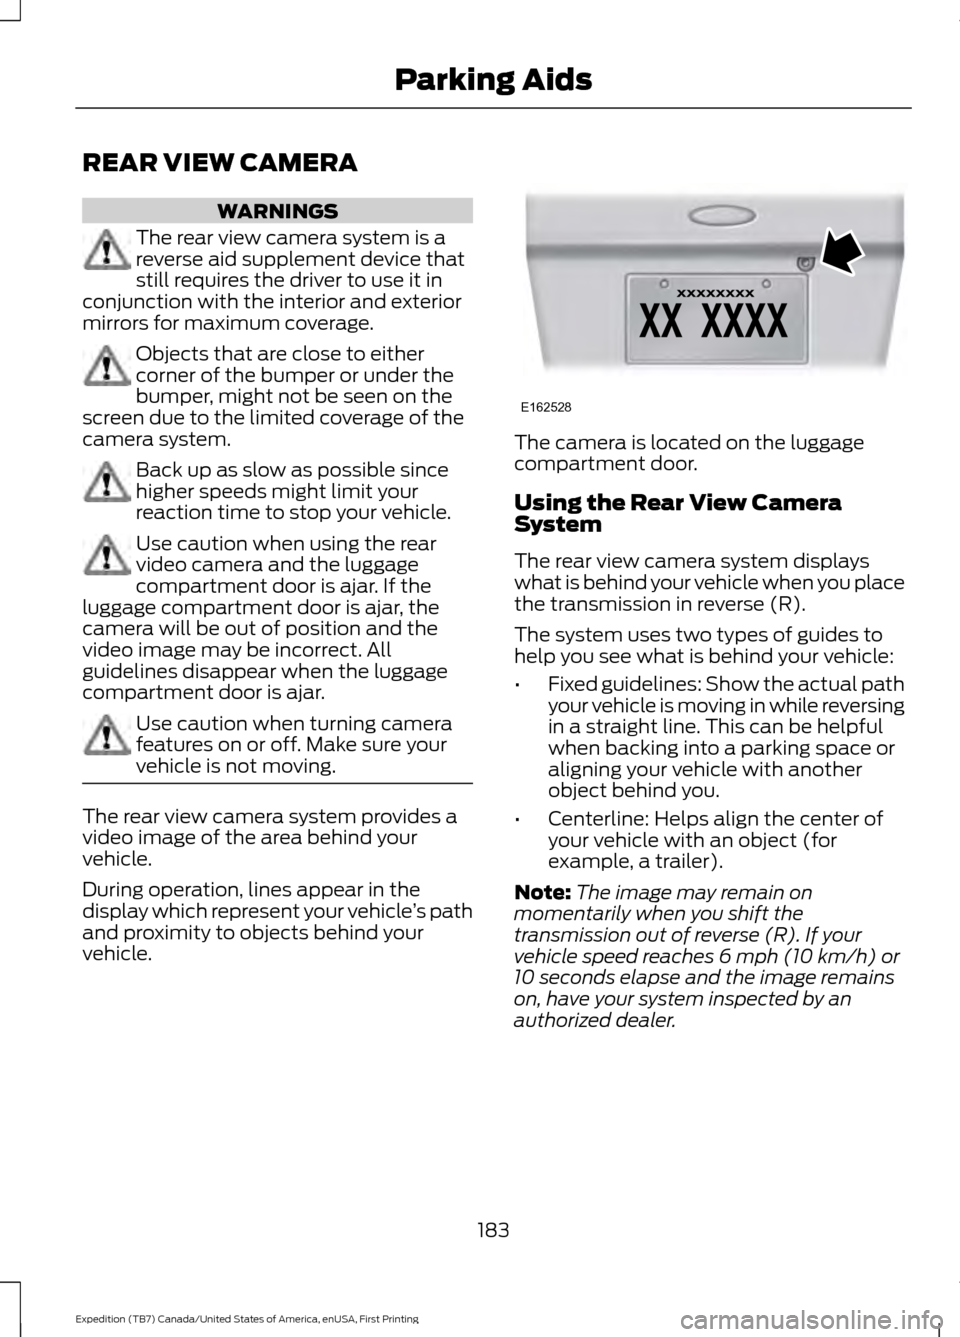
vehicle. The camera is located on the luggage
compartment door.
Using the Rear View Camera
System
The rear view camera system displays
what is behind your vehicle when you place
the transmission in reverse (R).
The system uses two types of guides to
help you see what is behind your vehicle:
•
Fixed guidelines: Show the actual path
your vehicle is moving in while reversing
in a straight line. This can be helpful
when backing into a parking space or
aligning your vehicle with another
object behind you.
• Centerline: Helps align the center of
your vehicle with an object (for
example, a trailer).
Note: The image may remain on
momentarily when you shift the
transmission out of reverse (R). If your
vehicle speed reaches 6 mph (10 km/h) or
10 seconds elapse and the image remains
on, have your system inspected by an
authorized dealer.
183
Expedition (TB7) Canada/United States of America, enUSA, First Printing Parking AidsE162528