Page 33 of 312

27)Once the dead lock system is engaged
it is impossible to open the doors from
inside the vehicle. Therefore, before
engaging the system check that there is no
one left inside. If the remote control battery
is flat, the system can be disengaged only
by inserting the key metal insert in either of
the door locks as described previously: in
this case the device remains active only for
the rear doors.
28)This spring loaded system has
activation forces that were designed for
optimum comfort. Accidental knocks or a
strong gust of wind may release the
springs and close the doors
spontaneously.
29)On vehicles with the rear bumper,
never swing down the rear gate because
the rear gate could be damaged.
30)Never close the rear gate with the link
or wire left unhooked.SEATS
SEAT ADJUSTMENT
Adjust the driver’s seat so that you are
comfortable and that you can reach the
pedals, steering wheel, switches etc.
while retaining a clear field of vision.
31) 32) 33) 34) 35) 36) 37) 38) 39) 40) 41) 42)
10)
FRONT SEATS
Manual type
1—
To adjust forward or backward: Lift
the handle and adjust the seat to the
desired position, and release the handle.
2 — To recline the seatback: Pull the
lever up and then lean backward to the
desired position, and release the lever.
3 — To adjust seat cushion height
(driver’s side only): Turn the dial and
adjust the seat cushion height to the
desired position.Power type
1 — To adjust forward or backward:
Operate the switch as indicated by the
arrows and adjust the seat to the
desired position.
2 — To recline the seatback: Operate
the switch as indicated by the arrows
and adjust the seatback angle to the
desired position.
3 — To adjust seat height: Operate the
switch as indicated by the arrows and
adjust the seat height to the desired
position. If the entire switch is operated,
then the entire seat moves.
4 — To adjust seat cushion angle:
Operate the switch as indicated by the
arrows and adjust the seat cushion
angle to the desired position.
NOTE To prevent the battery from
running down, operate the switch with
the engine running.
312
37AHA105626
3
4
1
2
38AHA105639
31
Page 34 of 312

Passenger’s seat (Single cab and
Double cab)
To access the onboard tool kit (Single
cab): fold forward the seatback of the
passenger’s seat. Refer to “Tools, jack
and jack handle”. Pull the band and fold
the seatback forward.
To recline the seatback: pull the band
and then learn backward to the desired
position, and release the band.REAR SEAT
When a person is sitting in the middle
position of the rear seat, adjust the
head restraint to height at which it lock
in position. Refer to “Head restraints”.
Folding the seatback forward
(Double cab)
Pull up the band on the top of the
seatback and fold it forward.To return
Raise the seatback until it is locked
securely in place.
Push and pull the seatback lightly to be
sure it is secure.
Folding up the seat cushion (Club
cab)
The right and left seat cushions can be
folded up separately.
To fold the seat cushions up, raise the
seat cushions.
Securely retain the seat cushion by
hooking the retaining band (A) onto the
head restraint (B) of the rear seat.
Armrest (Double cab)
To use the armrest, fold it down.
To return to the original position, push it
backward (into the seatback) until it is
flush with the seat. (Double cab).
39AHA105642
40AHA102999
41AHA103996
A
B
42AHA105121
32
GETTING TO KNOW YOUR VEHICLE
Page 35 of 312

NOTE Do not climb or sit on the
armrest. Doing so could damage the
armrest.
NOTE The top surface of the armrest
contains a cup holder for rear seat
occupants. Refer to “Cup holder”.
WARNING
31)Do not attempt to adjust the seat while
driving. This can cause loss of vehicle
control and result in an accident. After
adjustments are made, ensure the seating
is locked in position by attempting to move
the seat forward and rearward without
using the adjusting mechanism.
32)After releasing the adjustment lever,
always check that the seat is locked on the
guides by trying to move it back and forth.
If it is not locked, the seat may move
unexpectedly and make you lose control of
the vehicle.33)For maximum safety, keep the back of
your seat upright, lean back into it and
make sure the seat belt fits closely across
your chest and pelvis.
34)Make sure the backrests are properly
secured at both sides (not visible "red
notches) to prevent them from moving
forward, in the event of sharp braking, with
possible impact with of the passengers.
35)It is extremely dangerous to ride in the
cargo area (inside or outside) of a vehicle.
Also, the cargo area and rear seats should
never be used as a play area by children. In
a collision, people or children riding
unrestrained in these areas are more likely
to be seriously injured or killed.
36)Do not allow people or children to ride
in any area of your vehicle that is not
equipped with seats and seat belts, and
make sure that everyone travelling in your
vehicle is in a seat and wearing a seat belt,
or in the case of a child is strapped in a
child restraint.
37)To minimize the risk of personal injury in
the event of a collision or sudden braking,
the seatbacks should always be in the
almost upright position while the vehicle is
in motion. The protection provided by the
seat belts may be reduced significantly
when the seatback is reclined. There is
greater risk that the passenger will slide
under the seat belt, resulting in serious
injury, when the seatback is reclined.
38)Make sure the seat is adjusted by an
adult or with adult supervision for correct
and safe operation.
39)Do not place a cushion or the like
between your back and the seatback while
driving. The effectiveness of the head
restraints will be reduced in the event of an
accident.40)The reclining mechanism of the front
manual seat's seatback is spring loaded,
causing it to fold the seatback forward
when the lock lever is operated. When
using the lever, sit close to the seatback or
hold it with your hand to control its return
motion.
41)When sliding the seats, be careful not
to catch your hand or foot.
42)If your vehicle is equipped with the rear
seat, when sliding or reclining the seat
rearward, pay careful attention to the rear
seat passengers.
IMPORTANT
10)The fabric upholstery of the seats has
been designed to withstand long-term wear
deriving from normal use of the car. Some
precautions are however required. Avoid
prolonged and/or excessive rubbing
against clothing accessories such as metal
buckles and Velcro strips which, by
applying a high pressure on the fabric in a
small area, could cause it to break, thereby
damaging the upholstery.
43AHA103000
33
Page 36 of 312

HEAD RESTRAINTS
43) 44) 45) 46) 47) 48)
NOTE The head restraint height of the
outer seat in the rear seat cannot be
adjusted.
To adjust height
Adjust the head restraint height so that
the centre of the head restraint is as
close as possible to ear level to reduce
the chances of injury in the event of
collision. Any person too tall for the
head restraint to reach their seated ear
level, should adjust the restraint as high
as possible. To raise the head restraint,
move it upward. To lower the restraint,
move it downward while pushing the
height adjusting knob (A) in the direction
of the arrow. After adjustment, push the
head restraint downward and make
sure that it is locked.To remove
Lift the head restraint with the height
adjusting knob (A) pushed in.
To install
Make sure that the head restraint is
facing the correct direction, and then
insert it into the seatback while pressing
the height adjusting knob (A) in the
direction indicated by the arrow. The
head restraint stalk with the adjustment
notches (B) must be installed in the hole
with the adjusting knob (A).
44AHA103013
A
45AHA103026
A
B
A
46AHA103039
AA
47AHA103042
34
GETTING TO KNOW YOUR VEHICLE
48AHA103055
Page 37 of 312

WARNING
43)All adjustments must only be carried
out with the vehicle stationary and the
engine off. Head restraints must be
adjusted so that the head, rather than the
neck, rests on them. Only in this case can
they protect your head correctly. To take
best advantage of the protection provided
by the head restraint, adjust the seat back
so that you are sitting up straight and your
head is as close to the head restraint as
possible.
44)Driving without the head restraints in
place can cause you and your passengers
serious injury or death in an accident. To
reduce the risk of injury in an accident,
always make sure the head restraints are
installed and properly positioned when the
seat is occupied.45)Never place a cushion or similar device
on the seatback. This can adversely affect
head restraint performance by increasing
the distance between your head and the
restraint.
46)When a person sits in the middle
seating position of the rear seat, pull up the
head restraint to a height at which it locks
in position. Be sure to make this
adjustment before starting to drive. Serious
injuries could otherwise be suffered in the
result of an impact (Double cab).
47)Make sure that the height adjusting
knob (A) is correctly adjusted as shown in
the illustration, and also lift the head
restraints to ensure that they do not come
out of the seatback.
48)The shape and size of the head
restraint differs according to the seat.
Always use the correct head restraint
provided for the seat and do not install the
head restraint in the wrong direction.
STEERING WHEEL
STEERING WHEEL
HEIGHT AND REACH
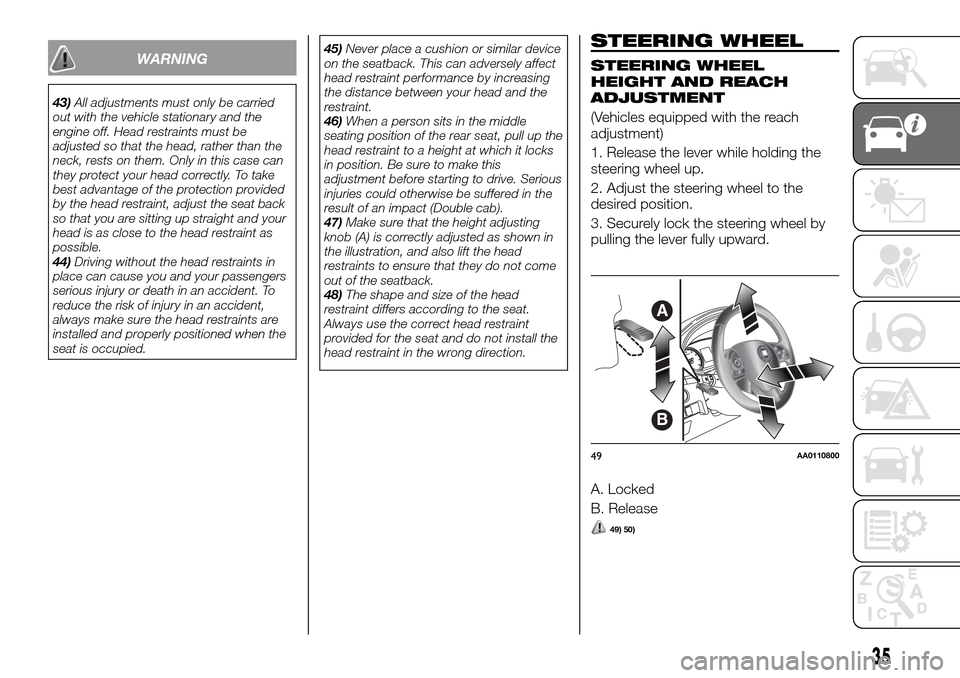
ADJUSTMENT
(Vehicles equipped with the reach
adjustment)
1. Release the lever while holding the
steering wheel up.
2. Adjust the steering wheel to the
desired position.
3. Securely lock the steering wheel by
pulling the lever fully upward.
A. Locked
B. Release
49) 50)
A
B
49AA0110800
35
Page 38 of 312

STEERING WHEEL LOCK
Except for vehicles equipped with
the keyless operation system
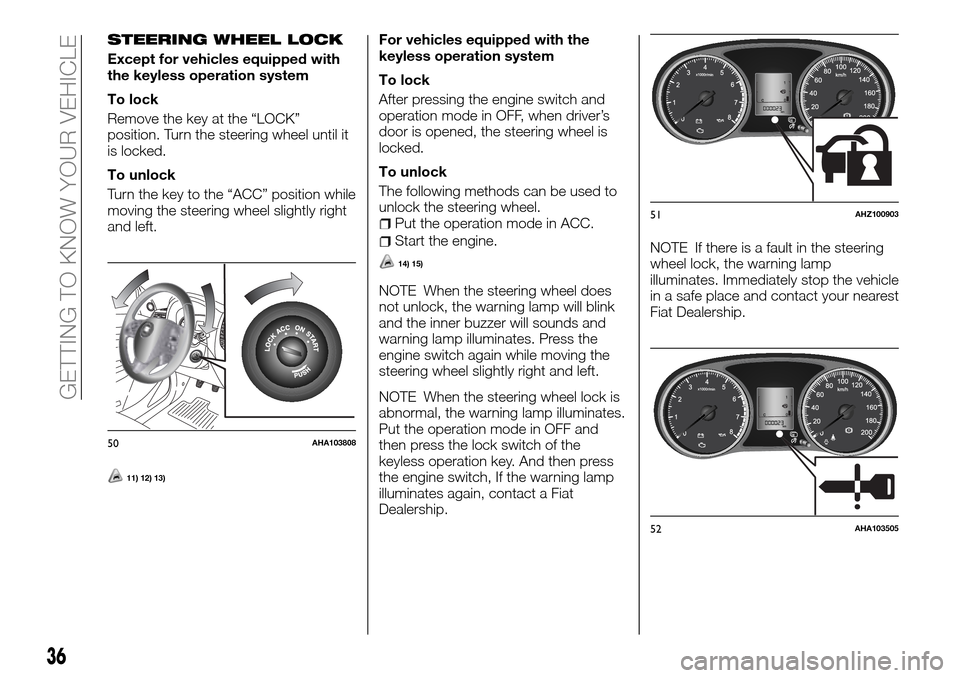
To lock
Remove the key at the “LOCK”
position. Turn the steering wheel until it
is locked.
To unlock
Turn the key to the “ACC” position while
moving the steering wheel slightly right
and left.
11) 12) 13)
For vehicles equipped with the
keyless operation system
To lock
After pressing the engine switch and
operation mode in OFF, when driver’s
door is opened, the steering wheel is
locked.
To unlock
The following methods can be used to
unlock the steering wheel.
Put the operation mode in ACC.
Start the engine.
14) 15)
NOTE When the steering wheel does
not unlock, the warning lamp will blink
and the inner buzzer will sounds and
warning lamp illuminates. Press the
engine switch again while moving the
steering wheel slightly right and left.
NOTE When the steering wheel lock is
abnormal, the warning lamp illuminates.
Put the operation mode in OFF and
then press the lock switch of the
keyless operation key. And then press
the engine switch, If the warning lamp
illuminates again, contact a Fiat
Dealership.NOTE If there is a fault in the steering
wheel lock, the warning lamp
illuminates. Immediately stop the vehicle
in a safe place and contact your nearest
Fiat Dealership.
50AHA103808
51AHZ100903
52AHA103505
36
GETTING TO KNOW YOUR VEHICLE
Page 39 of 312

WARNING
49)Do not attempt to adjust the steering
wheel while you are driving the vehicle.
50)It is absolutely forbidden to carry out
any after-market operation involving
steering system or steering column
modifications (e.g.: installation of anti-theft
device). This could badly affect
performance and safety, invalidate the
warranty and also result in the
non-compliance of the vehicle with
approval requirements.
IMPORTANT
11)Remove the key when leaving the
vehicle. In some countries, it is prohibited
to leave the key on the vehicle when
parked.
12)When the following operation is
performed with the operation mode in OFF,
the steering wheel is locked: 1 – open or
close the driver’s door. 2 – Close all the
doors. 3 – Open one of the doors when all
the doors are closed. 4 – Lock all the doors
with the keyless entry system or the keyless
operation function. 5 – The selector lever is
the “P” (PARK) position (A/T).
13)When the door is opened while the
steering wheel does not lock, the buzzer
sounds to alert the steering wheel is
unlocked.14)If the engine is stopped while driving,
do not open a door or press the LOCK
switch on the key until the vehicle stops in
a safe place. This could cause the steering
wheel to lock, making it impossible to
operate the vehicle.
15)Carry the key with you when leaving the
vehicle. If your vehicle needs to be towed,
perform the following operation to unlock
the steering wheel: on vehicles with M/T,
put the operation mode in ACC or ON, on
vehicles with A/T, put the operation mode
in ON.
REARVIEW MIRRORS
INSIDE REARVIEW
MIRROR
51) 52) 53) 54)
Adjust the rearview mirror only after
making any seat adjustments so you
have a clear view to the rear of the
vehicle.
Adjust the rear-view mirror to maximize
the view through the rear window.
To adjust the vertical mirror
position
It is possible to move the mirror up and
down to adjust its position.
53AA0022369
37
Page 40 of 312

To adjust the mirror position
It is possible to move the mirror up/ down
and left/right to adjust its position.
To reduce the glare
The lever (A) at the bottom of the mirror
can be used to adjust the mirror to
reduce the glare from the headlamps of
vehicles behind you during night driving.
1. Normal 2. Anti-glare
OUTSIDE REARVIEW
MIRRORS
To adjust the mirror position
51) 52) 53)
Manual outside rear-view mirrors
Adjust the mirror surface by hands as
indicated by the arrows.
Electric remote-controlled outside
rear-view mirrors (where provided)
The electric remote-controlled outside
rearview mirrors can be operated when
the ignition switch is in the “ON” or
“ACC” position or the operation mode
is put in ON or ACC.1. Place the lever (A) to the same side
as the mirror whose adjustment is
desired.
2. Press the switch (B) to the left, right,
up or down to adjust the mirror
position.
3. Return the lever (A) back to the
middle position.
Retracting and extending the
outside mirrors
The outside mirror can be folded in
towards the side window to prevent
damage when parking in narrow areas.
16)
54AA0108151
21
A
55AA0001425
56AHA105280
57AH3100434
38
GETTING TO KNOW YOUR VEHICLE