2016 BMW M4 child restraint
[x] Cancel search: child restraintPage 52 of 228
Seat beltsNumber of seat belts
Your vehicle has been fitted with four seat
belts for the safety of you and your passen‐
gers. However, they can only offer protection
when adjusted correctly.
General Before a journey, always make sure that all oc‐
cupants have fastened their seat belts.
To protect vehicle occupants, belt interlock is
triggered early. When it is applied, guide the
belt slowly from the bracket.
The airbags are a complementary safety fea‐
ture and not a substitute for the seat belts.
The belt anchorage is suitable for adults of any
stature as long as the seat is correctly adjus‐
ted.
Notes WARNING
Using a seat belt to restrain more than
one person nullifies the protective effect of the
seatbelt. Danger of injury or life. Only restrain one person with each seat belt. Do not place
infants and children on your lap, but instead re‐
strain them with the child restraint systems
provided, and secure them accordingly.◀
WARNING
The protective effect of the seat belts
can be restricted or they can be rendered inef‐
fective if put on incorrectly. If a seat belt is not
worn correctly, additional injuries can be
caused, for example in the event of an accident
or braking and evasive manoeuvres. Danger of
injury or life. Make sure that all vehicle occu‐
pants have fastened their seat belts cor‐
rectly.◀WARNING
Seat belts are designed to bear upon the
bony structure of the body and should be worn
low across the front of the pelvis, or the pelvis,
chest and shoulders, as applicable. Wearing
the lap section of the belt across the abdomi‐
nal area must be avoided.
Seat belts should be adjusted as firmly as pos‐
sible, consistent with comfort, to provide the
protection for which they have been designed.
A slack belt will greatly reduce the protection
afforded to the wearer.
Care should be taken to avoid contamination of
the seat belt strap by polishes, oils and chemi‐
cals and particularly battery acid. Cleaning may
safely be carried out using mild soap and wa‐
ter. The seat belt strap should be replaced if
webbing becomes frayed, contaminated or
damaged. Seat belts should not be worn with
seat belt straps twisted. Each seat belt assem‐
bly must only be used by one occupant; it is il‐
legal to carry an infant or a child on the occu‐
pant's lap.
It is essential to replace the entire assembly af‐
ter it has been worn in a severe impact even if
damage to the assembly is not obvious.◀
WARNING
No modifications or additions should be
made by the user that will either prevent the
seat belt adjusting devices from operating to
remove slack, or prevent the seat belt assem‐
bly from being adjusted to remove slack.◀
Correct seat belt use▷Place the seat belt tightly over the pelvis
and shoulder as close as possible to the
body and without twisting.▷Make sure that it is positioned low at the
hip in the area of the pelvis. The seat belt
must not press on the midriff.▷The seat belt must not pass across the
neck. It should not be pulled or jammed
across sharp edges or breakable objects.Seite 52ControlsAdjusting52
Online Edition for Part no. 01 40 2 964 013 - VI/15
Page 59 of 228

GroupWeight of childApproximate
ageFront pas‐
senger's seatRear seats,
outer – b)Rear seat,
middleIII22 – 36 kg7 years or
moreUUXU: suitable for child restraint systems in Universal category that have been approved for use in
this weight group.
X: not suitable for child restraint systems in Universal category that have been approved for use
in this weight group.
b) When using child seats on the rear seats, adapt the front/back position of the front seat if nec‐
essary, and also adjust the head restraint of the rear seat, or remove it.Always carry children at the rear
WARNING
Persons less than 150 cm, 5 ft in height
cannot put on the seat belt correctly without
using additional restraint systems. The protec‐
tive effect of the seat belts can be restricted or
they can be rendered ineffective if put on in‐
correctly. If a seat belt is not worn correctly,
additional injuries can be caused, for example
in the event of an accident or braking and eva‐
sive manoeuvres. Danger of injury or life. Per‐
sons less then 150 cm, 5 ft must be secured in
suitable restraint systems.◀
Accident research has shown that the safest
place for children is on the rear seat.
Children younger than 12 years old or less
than 150 cm, 5 ft in height are only allowed to
be transported in the rear using child restraint
systems appropriate for their age, weight and
stature.
Not for Australia/New Zealand:
Children on the front passenger's seat
When using a child restraint system on the
front passenger seat, make sure that the front
and side airbags on the passenger's side are
deactivated. Front passenger airbags can only
be deactivated with the key switch for front
passenger airbags, see page 106.Note
WARNING
Active front passenger airbags can injure
a child in a child restraint system if they are
triggered. Danger of injury. Make sure that the
front passenger airbags are deactivated and
the PASSENGER AIRBAG OFF indicator light
is illuminated.◀
WARNING
If the seat adjustment or child seat instal‐
lation is incorrect, the stability of the child re‐
straint system will be restricted or rendered in‐
effective. Danger of injury or life. Make sure the
child restraint system is firmly positioned
against the backrest. In all relevant backrests,
adapt the backrest angle if possible and set the
seats correctly. Make sure that the seats and
their backrests are correctly engaged. If possi‐
ble, adjust the height of the head restraints, or
remove them.◀
Fitting child restraints Child restraintsChild restraints for every age and weight class
are available from a Service Partner or a quali‐
fied specialist workshop.Seite 59Carrying children in safetyControls59
Online Edition for Part no. 01 40 2 964 013 - VI/15
Page 60 of 228

Notes
When selecting, installing and using child re‐
straint systems, comply with the information
provided by the manufacturer of the child re‐
straint system.
WARNING
If child restraint systems and their at‐
tachment systems have been damaged or sub‐
jected to stresses in an accident, their protec‐
tive function may be restricted or rendered
ineffective. A child might not be adequately re‐
strained, for example, in the event of an acci‐
dent or braking and evasive manoeuvres. Dan‐
ger of injury or life. If child restraint systems
and their attachment systems have been dam‐
aged or subjected to stresses in an accident,
have them checked by the Service Partner or a
qualified specialist workshop and renewed if
necessary.◀
WARNING
If the seat adjustment or child seat instal‐
lation is incorrect, the stability of the child re‐
straint system will be restricted or rendered in‐
effective. Danger of injury or life. Make sure the
child restraint system is firmly positioned
against the backrest. In all relevant backrests,
adapt the backrest angle if possible and set the
seats correctly. Make sure that the seats and
their backrests are correctly engaged. If possi‐
ble, adjust the height of the head restraints, or
remove them.◀
For Australia/New Zealand:
installation of child restraints
Please note the following warning because
your vehicle has been equipped with a front
airbag for the front passenger's seat that can‐
not be deactivated:
It is recommended not to use any kindof child restraint system on the front
passenger's seat.Extreme hazard
Do not use a rearward facing child re‐
straint on a seat protected by an airbag in front
of it.◀
Not for Australia/New Zealand: On the
front passenger's seat
Deactivating airbags WARNING
Active front passenger airbags can injure
a child in a child restraint system if they are triggered. Danger of injury. Make sure that the
front passenger airbags are deactivated and
the PASSENGER AIRBAG OFF indicator light
is illuminated.◀
Before fitting a child restraint in the front pas‐
senger's seat, make sure that the front and
side airbags on the passenger's side are disa‐
bled.
Deactivating the front passenger airbags with
key switch, see page 106.
Rear-facing child restraints DANGER
Active front passenger airbags can fatally
injure a child in a rearward-facing child re‐
straint system if they are triggered. Danger of
injury or life. Make sure that the front passen‐
ger airbags are deactivated and the PASSEN‐
GER AIRBAG OFF indicator light is illumina‐
ted.◀Seite 60ControlsCarrying children in safety60
Online Edition for Part no. 01 40 2 964 013 - VI/15
Page 61 of 228
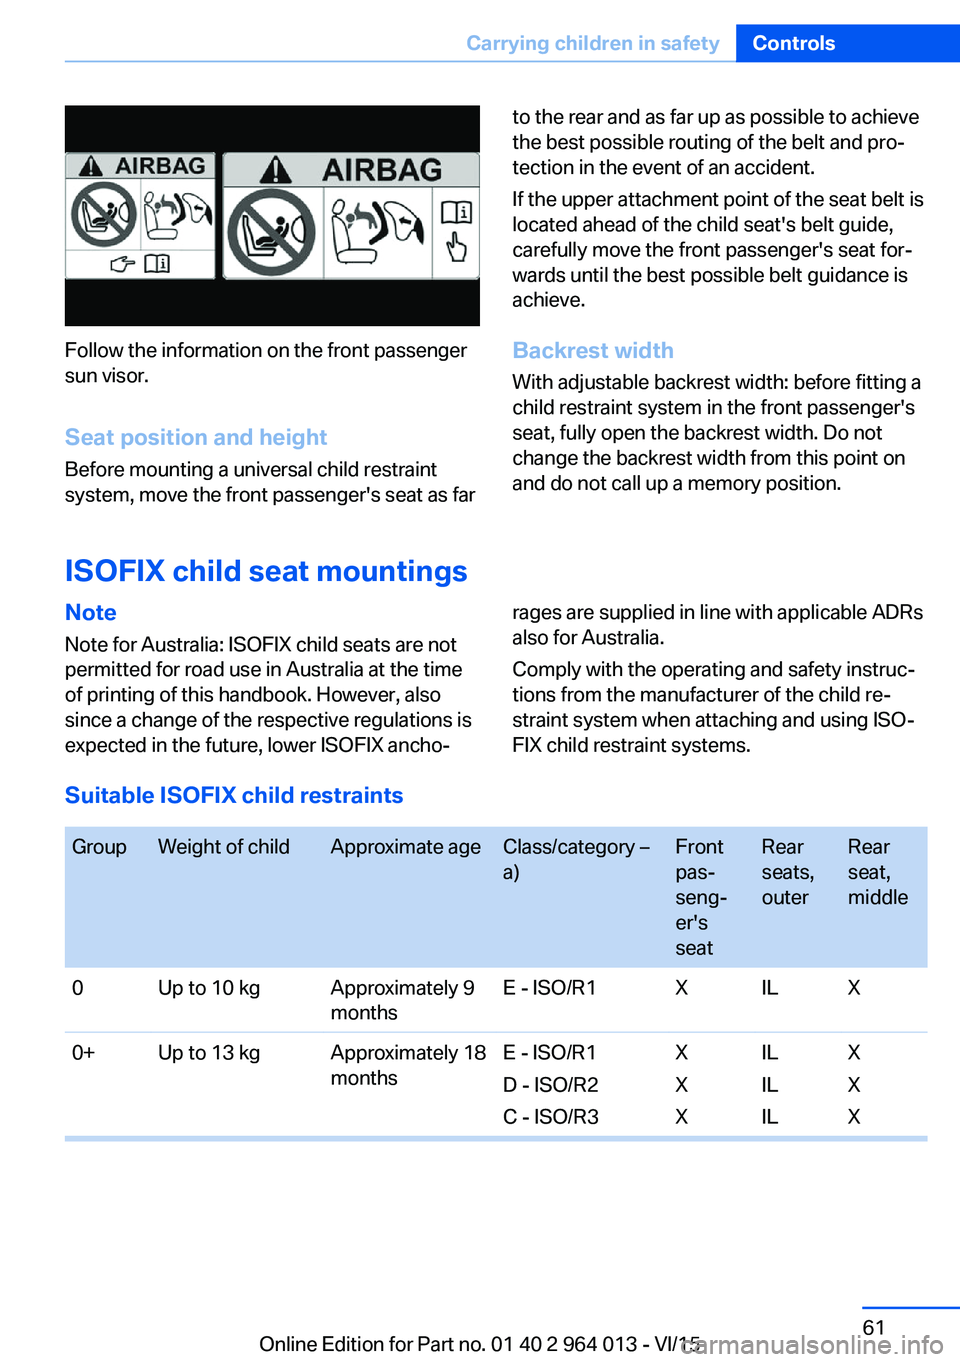
Follow the information on the front passenger
sun visor.
Seat position and height
Before mounting a universal child restraint
system, move the front passenger's seat as far
to the rear and as far up as possible to achieve
the best possible routing of the belt and pro‐
tection in the event of an accident.
If the upper attachment point of the seat belt is
located ahead of the child seat's belt guide,
carefully move the front passenger's seat for‐
wards until the best possible belt guidance is
achieve.
Backrest width With adjustable backrest width: before fitting a
child restraint system in the front passenger's
seat, fully open the backrest width. Do not
change the backrest width from this point on
and do not call up a memory position.
ISOFIX child seat mountings
Note
Note for Australia: ISOFIX child seats are not
permitted for road use in Australia at the time
of printing of this handbook. However, also
since a change of the respective regulations is
expected in the future, lower ISOFIX ancho‐rages are supplied in line with applicable ADRs
also for Australia.
Comply with the operating and safety instruc‐
tions from the manufacturer of the child re‐
straint system when attaching and using ISO‐
FIX child restraint systems.
Suitable ISOFIX child restraints
GroupWeight of childApproximate ageClass/category –
a)Front
pas‐
seng‐
er's
seatRear
seats,
outerRear
seat,
middle0Up to 10 kgApproximately 9
monthsE - ISO/R1XILX0+Up to 13 kgApproximately 18
monthsE - ISO/R1
D - ISO/R2
C - ISO/R3X
X
XIL
IL
ILX
X
XSeite 61Carrying children in safetyControls61
Online Edition for Part no. 01 40 2 964 013 - VI/15
Page 62 of 228
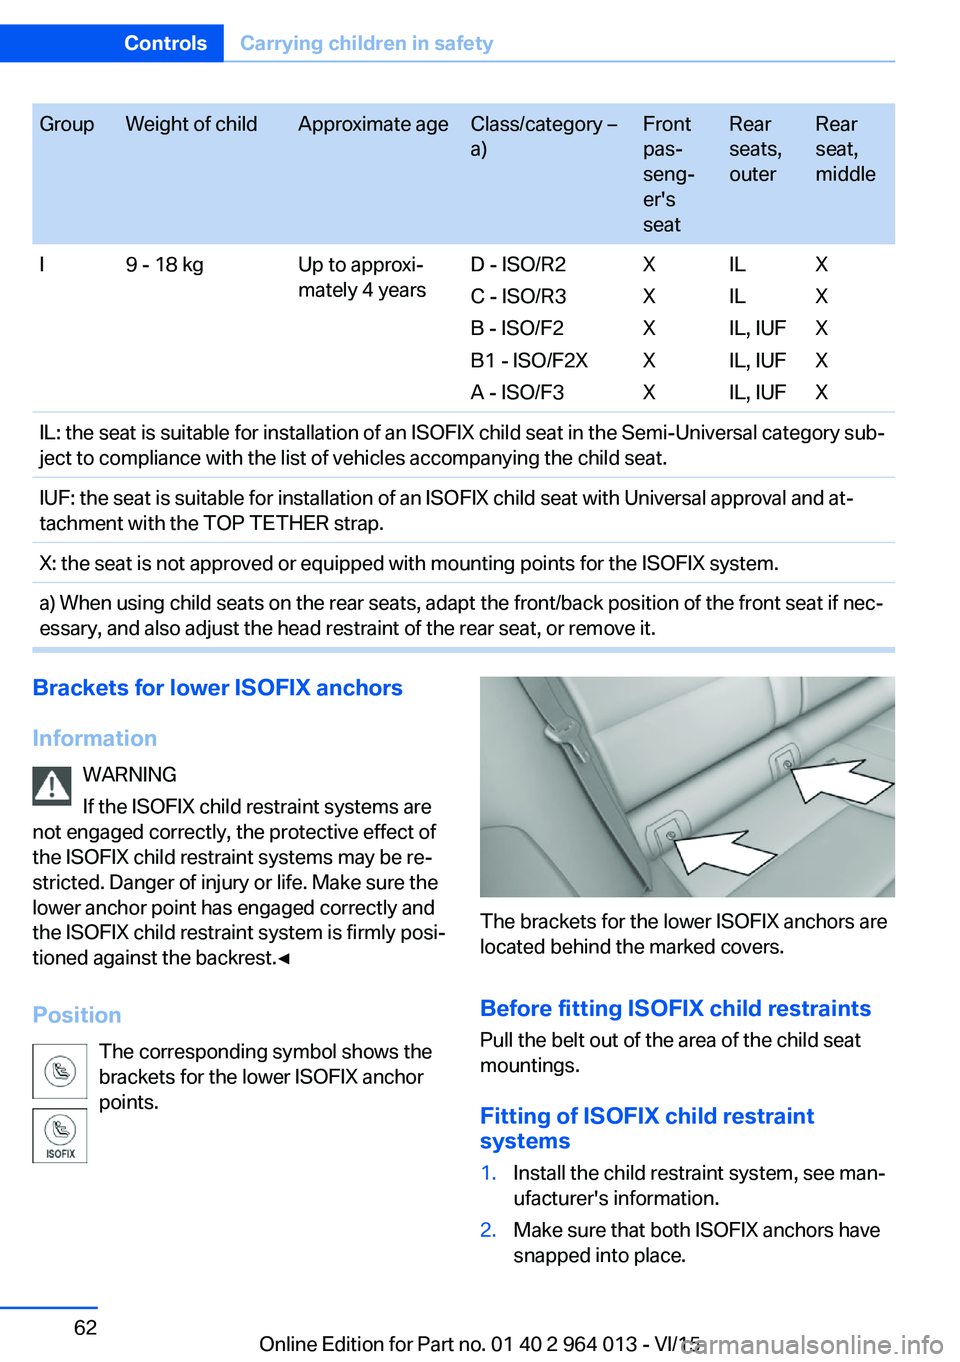
GroupWeight of childApproximate ageClass/category –
a)Front
pas‐
seng‐
er's
seatRear
seats,
outerRear
seat,
middleI9 - 18 kgUp to approxi‐
mately 4 yearsD - ISO/R2
C - ISO/R3
B - ISO/F2
B1 - ISO/F2X
A - ISO/F3X
X
X
X
XIL
IL
IL, IUF
IL, IUF
IL, IUFX
X
X
X
XIL: the seat is suitable for installation of an ISOFIX child seat in the Semi-Universal category sub‐
ject to compliance with the list of vehicles accompanying the child seat.IUF: the seat is suitable for installation of an ISOFIX child seat with Universal approval and at‐
tachment with the TOP TETHER strap.X: the seat is not approved or equipped with mounting points for the ISOFIX system.a) When using child seats on the rear seats, adapt the front/back position of the front seat if nec‐
essary, and also adjust the head restraint of the rear seat, or remove it.Brackets for lower ISOFIX anchors
Information WARNING
If the ISOFIX child restraint systems are
not engaged correctly, the protective effect of
the ISOFIX child restraint systems may be re‐
stricted. Danger of injury or life. Make sure the
lower anchor point has engaged correctly and
the ISOFIX child restraint system is firmly posi‐
tioned against the backrest.◀
Position The corresponding symbol shows the
brackets for the lower ISOFIX anchor
points.
The brackets for the lower ISOFIX anchors are
located behind the marked covers.
Before fitting ISOFIX child restraints
Pull the belt out of the area of the child seat
mountings.
Fitting of ISOFIX child restraint
systems
1.Install the child restraint system, see man‐
ufacturer's information.2.Make sure that both ISOFIX anchors have
snapped into place.Seite 62ControlsCarrying children in safety62
Online Edition for Part no. 01 40 2 964 013 - VI/15
Page 63 of 228
Upper ISOFIX retaining strap
Mounting points The symbol shows the mounting point
for the upper retaining strap.
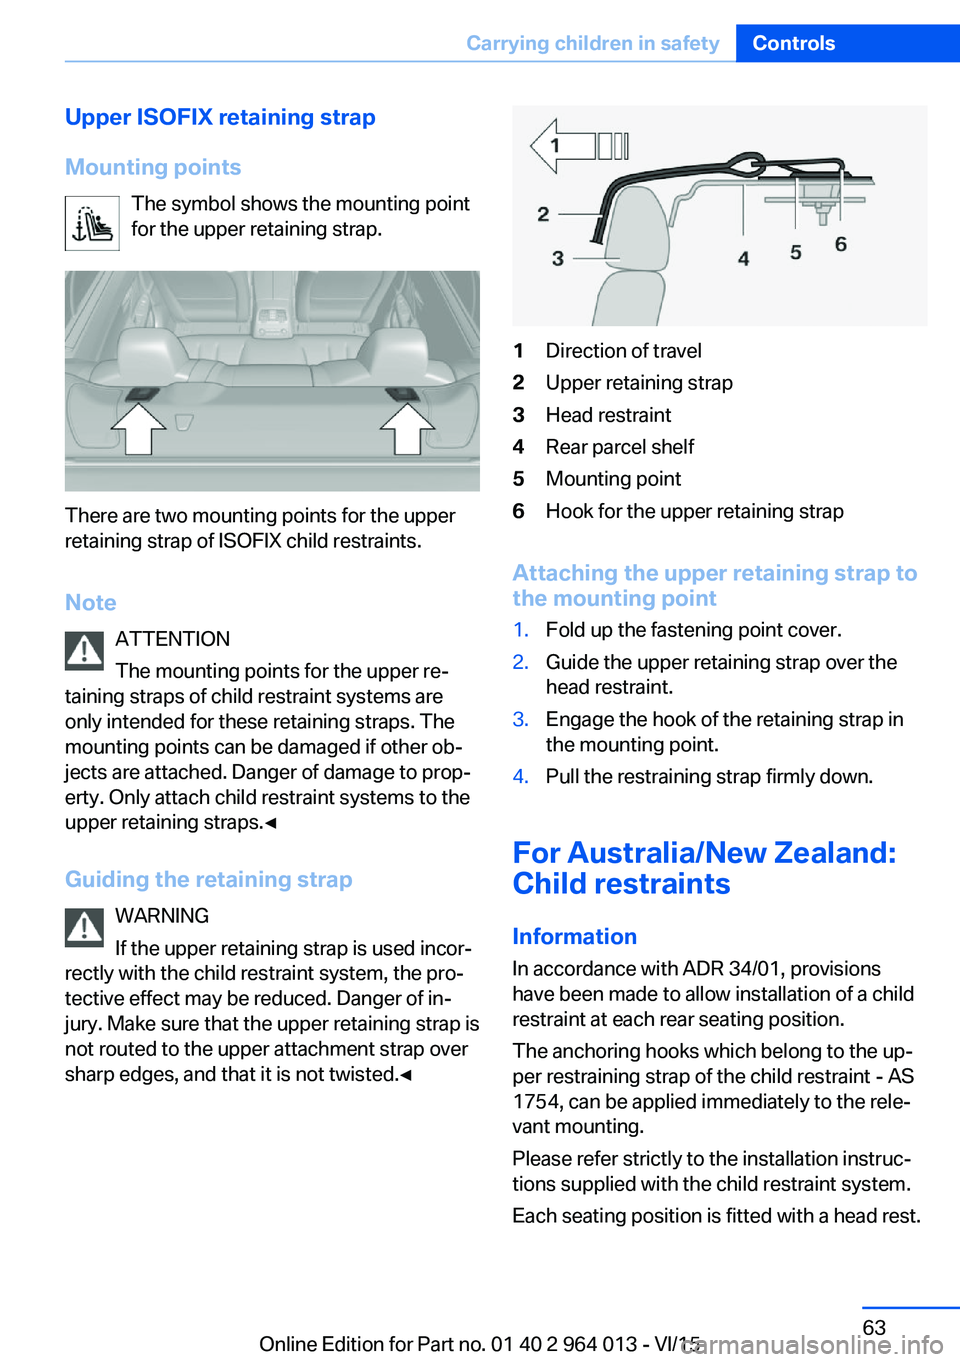
There are two mounting points for the upper
retaining strap of ISOFIX child restraints.
Note ATTENTION
The mounting points for the upper re‐
taining straps of child restraint systems are
only intended for these retaining straps. The
mounting points can be damaged if other ob‐
jects are attached. Danger of damage to prop‐
erty. Only attach child restraint systems to the
upper retaining straps.◀
Guiding the retaining strap WARNING
If the upper retaining strap is used incor‐
rectly with the child restraint system, the pro‐
tective effect may be reduced. Danger of in‐
jury. Make sure that the upper retaining strap is
not routed to the upper attachment strap over
sharp edges, and that it is not twisted.◀
1Direction of travel2Upper retaining strap3Head restraint4Rear parcel shelf5Mounting point6Hook for the upper retaining strap
Attaching the upper retaining strap to
the mounting point
1.Fold up the fastening point cover.2.Guide the upper retaining strap over the
head restraint.3.Engage the hook of the retaining strap in
the mounting point.4.Pull the restraining strap firmly down.
For Australia/New Zealand:
Child restraints
Information
In accordance with ADR 34/01, provisions
have been made to allow installation of a child
restraint at each rear seating position.
The anchoring hooks which belong to the up‐
per restraining strap of the child restraint - AS
1754, can be applied immediately to the rele‐
vant mounting.
Please refer strictly to the installation instruc‐
tions supplied with the child restraint system.
Each seating position is fitted with a head rest.
Seite 63Carrying children in safetyControls63
Online Edition for Part no. 01 40 2 964 013 - VI/15
Page 64 of 228
WARNING
Child restraint anchorages are designed
to withstand only those loads imposed by cor‐
rectly fitted child restraints. Under no circum‐
stances are they to be used for adult seat
belts, harnesses or for attaching other items or
equipment to the vehicle. After using the child
restraints, the anchor fittings may need to be
folded down.◀
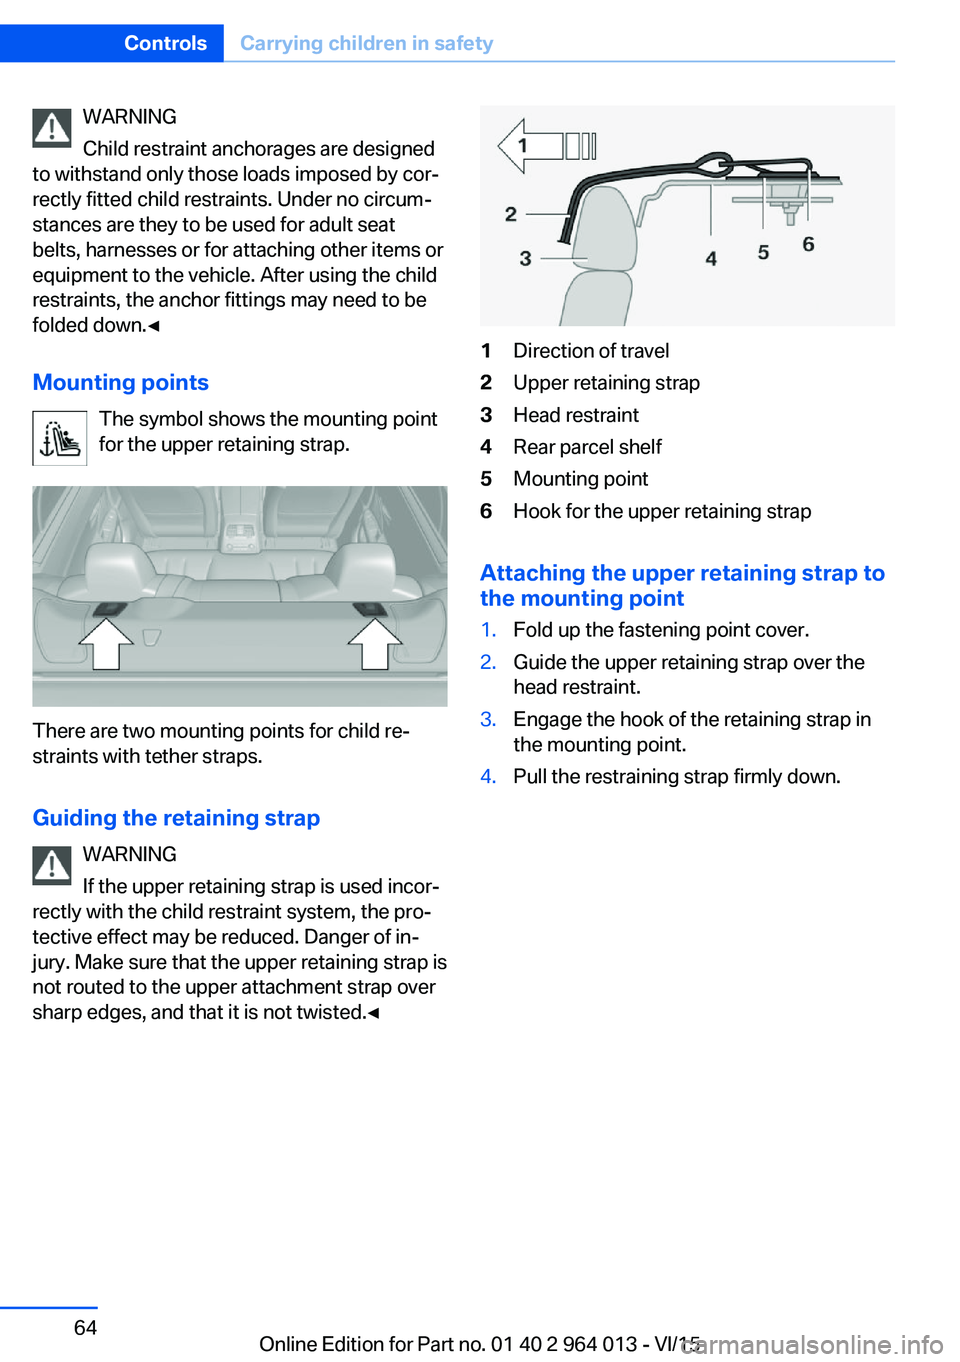
Mounting points The symbol shows the mounting point
for the upper retaining strap.
There are two mounting points for child re‐
straints with tether straps.
Guiding the retaining strap WARNING
If the upper retaining strap is used incor‐
rectly with the child restraint system, the pro‐
tective effect may be reduced. Danger of in‐
jury. Make sure that the upper retaining strap is
not routed to the upper attachment strap over
sharp edges, and that it is not twisted.◀
1Direction of travel2Upper retaining strap3Head restraint4Rear parcel shelf5Mounting point6Hook for the upper retaining strap
Attaching the upper retaining strap to
the mounting point
1.Fold up the fastening point cover.2.Guide the upper retaining strap over the
head restraint.3.Engage the hook of the retaining strap in
the mounting point.4.Pull the restraining strap firmly down.Seite 64ControlsCarrying children in safety64
Online Edition for Part no. 01 40 2 964 013 - VI/15
Page 106 of 228
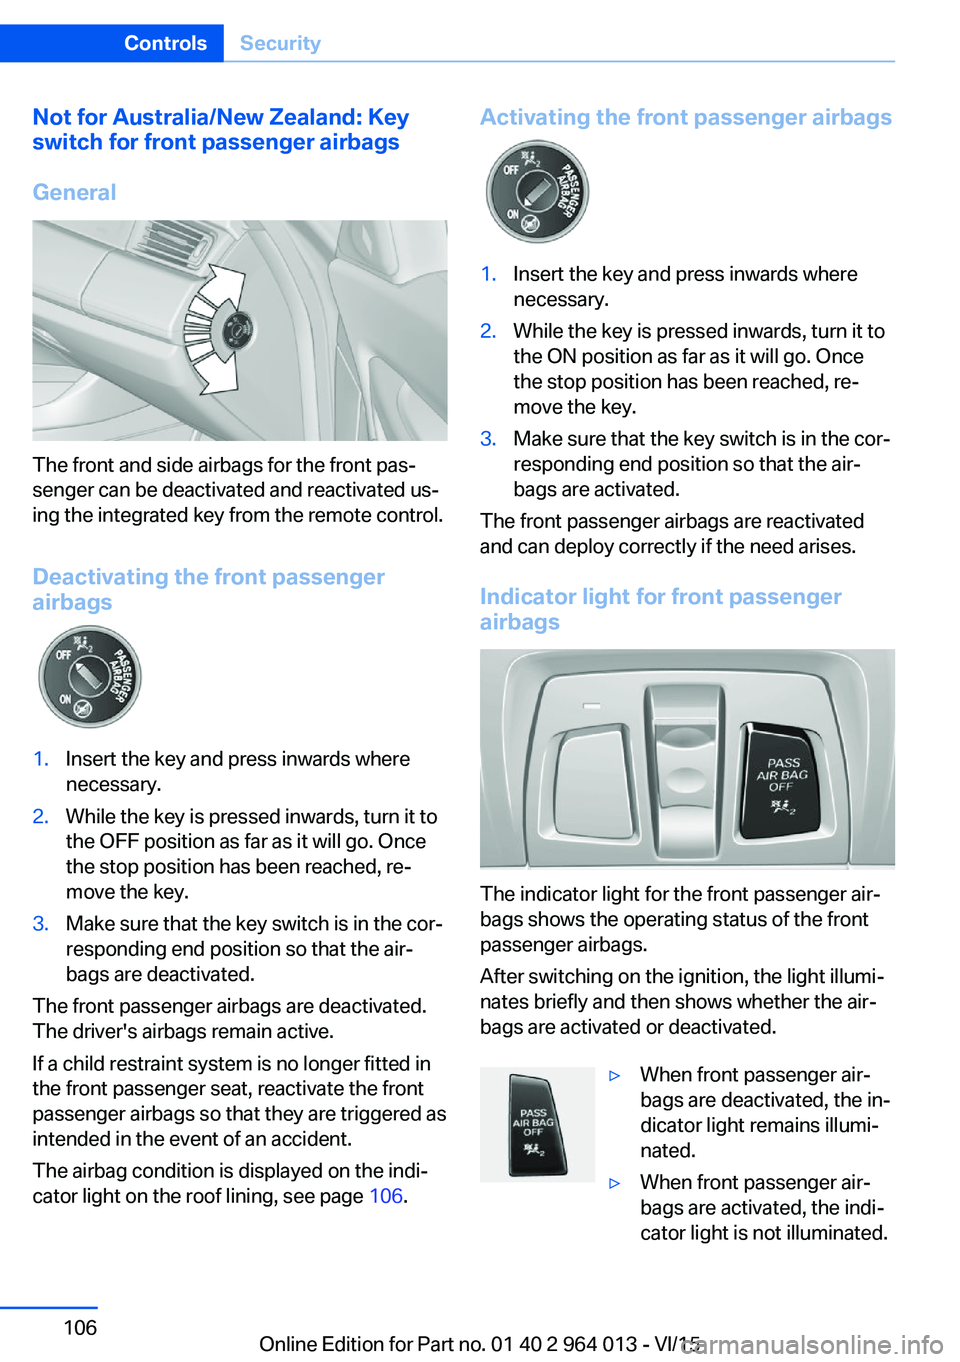
Not for Australia/New Zealand: Key
switch for front passenger airbags
General
The front and side airbags for the front pas‐
senger can be deactivated and reactivated us‐
ing the integrated key from the remote control.
Deactivating the front passenger
airbags
1.Insert the key and press inwards where
necessary.2.While the key is pressed inwards, turn it to
the OFF position as far as it will go. Once
the stop position has been reached, re‐
move the key.3.Make sure that the key switch is in the cor‐
responding end position so that the air‐
bags are deactivated.
The front passenger airbags are deactivated.
The driver's airbags remain active.
If a child restraint system is no longer fitted in
the front passenger seat, reactivate the front
passenger airbags so that they are triggered as
intended in the event of an accident.
The airbag condition is displayed on the indi‐
cator light on the roof lining, see page 106.
Activating the front passenger airbags1.Insert the key and press inwards where
necessary.2.While the key is pressed inwards, turn it to
the ON position as far as it will go. Once
the stop position has been reached, re‐
move the key.3.Make sure that the key switch is in the cor‐
responding end position so that the air‐
bags are activated.
The front passenger airbags are reactivated
and can deploy correctly if the need arises.
Indicator light for front passenger airbags
The indicator light for the front passenger air‐
bags shows the operating status of the front
passenger airbags.
After switching on the ignition, the light illumi‐
nates briefly and then shows whether the air‐
bags are activated or deactivated.
▷When front passenger air‐
bags are deactivated, the in‐
dicator light remains illumi‐
nated.▷When front passenger air‐
bags are activated, the indi‐
cator light is not illuminated.Seite 106ControlsSecurity106
Online Edition for Part no. 01 40 2 964 013 - VI/15