Page 129 of 305

Air conditioning
CAUTION
Never place food, medicines or other heat-
sensitive objects close to the air vents. Being
heat-sensitive, they may be damaged or
made unsuitable for use by the air coming
from the air vents. Note
The air from the vents flows through the vehi-
cle interior and out through the outlets below
the rear window. The slots must not be cov-
ered with items of clothing or other objects. Air recirculation mode
Air recirculation mode prevents the ambient
air from entering the interior.
When the outside temperature is very high,
selecting manual air recirculation mode for a
short period refreshes the vehicle interior
more quickly.
For safety reasons, air recirculation mode is
switched off when the
button is press-
ed or the air distributor turned to ››› .
Switching the recirculation mode on and off
manually on the air conditioning (Electronic
manual air conditioning)
Switching on : press the button
u
nti l the
lamp on the button lights up. Switching off: press the button
until the
lamp on the button switches off.
Switching the recirculation mode on and off
manually on the Climatronic
Switching on: press the button until the
l
amp on the button lights up.
Switching off
: press the button until the
lamp on the button switches off.
Automatic air recirculation mode
Fresh air enters the vehicle interior in posi-
tion . If the system detects a high con-
centration of hazardous substances in the
ambient air, air recirculation mode is switch-
ed on automatically. When the level of impur-
ities drops to within a normal range, recircu-
lation mode is switched off.
The system is unable to detect unpleasant
smells.
With the following outside temperatures and
conditions the air recirculation does not
switch on automatically:
● The cooling system is switched on (the A/C button is lit up) and the outside temperature
is below +3 °C (+38 °F).
● The cooling system and the windscreen
wipers are switched off and the outside tem-
perature is below +10 °C (+50 °F).
● The cooling system is switched off and the
outside temperature is below +15 °C (+59 °F). The windscreen wiper is switched
on.
Switching the automatic air recirculation
mode on and off
Switching on
: press the button
until the
right
lamp on the button lights up.
Switching off
: press the button until all
the lamps on the button are switched off.
Switching the automatic air recirculation
mode off temporarily
● Press the button once to temporarily
switch to manual air recirculation mode in
the event of unpleasant smells from outside.
The left indicator lamp turns on.
● After more than two seconds, press the
button again to restart automatic air recircu-
lation. The right indicator lamp turns on. WARNING
Observe the safety warnings ››› in Intro-
duction on page 122.
● If the c
ooling system is switched off and air
recirculation mode switched on, the windows
can mist over very quickly, considerably limit-
ing visibility.
● Switch air recirculation mode off when it is
not required. » 127
Technical specifications
Advice
Operation
Safety
Page 130 of 305

Operation
CAUTION
Do not smoke when air recirculation is
switched on in vehicles with an air condition-
er. The smoke taken in could lie on the cool-
ing system vaporiser and on the activated
charcoal cartridge of the dust and pollen fil-
ter, leading to a permanently unpleasant
smell. Note
Climatronic: air recirculation mode switches
on to prevent exhaust gas from entering the
vehicle interior when it is in reverse and
while the automatic windscreen wipers are
working. Auxiliary heater* (additional
heater)
Introduction The auxiliary heater is powered by fuel from
the vehicle's fuel tank and can be used while
the vehicle is in motion and at a standstill.
Select the mode required (
heat
or fan
)
››› page 130 on the dash panel.
In w int
er, the auxiliary heater can be used in
heat mode before switching on the ignition to
remove any ice, mist or snow from the wind-
screen (thin layers only). WARNING
The auxiliary heater fumes contain carbon di-
oxide, an odourless and colourless toxic gas.
Carbon monoxide can cause people to lose
consciousness. It can also cause death.
● Never switch on the auxiliary heater or
leave it running in places that are enclosed or
unventilated.
● Never program the independent heating
system to be activated and operated in
closed, unventilated areas. WARNING
The components of the auxiliary heater ex-
haust system heat up a great deal. This could
cause a fire.
● Always park your vehicle so that no part of
the exhaust system can come in contact with
flammable materials (such as dried grass). CAUTION
Never place food, medicines or other heat-
sensitive objects close to the air vents. Food,
medicines and other heat-sensitive objects
may be damaged or made unsuitable for use
by the air coming from the air vents. Switching the auxiliary heater on and
off
Switching the auxiliary heater on:
Manually using the instant on/off
button.›››
page
123
ONManually using the remote control.››› page
129
Automatically at the programmed
and enabled on time.››› page
130
Switching the auxiliary heater off:
Manually using the instant on/off
button for the air conditioner.›››
page
123
OFFManually using the remote control.››› page
129
Automatically after the programmed
time.››› page
130
Automatically when the light comes
on (fuel reserve).››› page
206
Automatically when the battery pow-
er drops to a very low level.››› page
227 Things to note
After switching the auxiliary heater off, it con-
tinues to run for a short period to completely
128
Page 131 of 305

Air conditioning
burn any fuel remaining in the auxiliary heat-
er. The exhaust gases are also extracted from
the system.
Remote control Fig. 124
Auxiliary heater: remote controlFig. 124Meaning
ONSwitch the auxiliary heater on.
OFFSwitch the auxiliary heater off:
AAerial.
BLight. The auxiliary heater may accidentally switch
on if a button is pressed on the remote con-
trol by mistake. This may also occur outside
the range of the remote control or if the light
flashes. Remote control light
The remote control light provides users with
different information at the push of a button:
Battery light
Fig. 124
BMeaning
Lights up green for
around two seconds.The auxiliary heater has been
switched on using the ON but-
ton.
Lights up red for
around two seconds.The auxiliary heater has been
switched off using the OFF but-
ton.
Slowly flashes green
for around two sec-
onds.No on a)
signal has been re-
ceived.
Quickly flashes green
for around two sec-
onds.The auxiliary heater is locked.
Possible causes: the fuel tank
is almost empty, the battery
charge is very low or there is a
fault.
Flashes red for
around two seconds.No off a)
signal has been re-
ceived.
Lights up orange for
around two seconds,
then green or red.The remote control battery is
almost flat. However, the on or
off signal has been received,
respectively.
Lights up orange for
around two seconds,
then flashes green or
red.The remote control battery is
almost flat. The on or off signal
has not been received, respec-
tively.
Battery light
Fig. 124 BMeaning
Flashes orange for
around five seconds.The remote control battery is
flat. The on or off signal has
not been received, respective-
ly.
a)
Within its range, the remote control might not receive the sig-
nal sent by the vehicle receiver. In this case, the remote control
will send an error message whether the auxiliary heater is on or
off. Come closer to the vehicle and press the corresponding but-
ton on the remote control once again.
Replacing the remote control battery
When the light ›››
Fig. 124 B on the remote
control does not come on when the button is
pressed, the remote control battery should
soon be replaced.
The battery is located beneath a cover on the
back of the remote control. Turn the slot to
the left using a flat, blunt object (e.g. a coin).
When changing the battery, use another bat-
tery of the same model and observe the po-
larity when fitting it ››› .
Range
The receiver is in the interior of the vehicle.
The remote control, when fitted with new bat-
teries, has a range of several hundred me-
tres. Obstacles between the remote control
and the vehicle, bad weather conditions and
discharged batteries can considerably reduce
the range of the remote control. »
129
Technical specifications
Advice
Operation
Safety
Page 132 of 305

Operation
An optimum range is obtained by keeping
the remote control vertical, with the aerial
››› Fig. 124 A pointing upwards. When doing
so, do not cover the aerial with your fingers
or with the palm of your hand.
There must be a minimum distance of 2 me-
tr e
s between the remote control and the vehi-
cle. CAUTION
● The radio frequency remote control con-
tains electronic components. Therefore, avoid
getting it wet and being knocked and protect
it from direct sunlight.
● Use of inappropriate batteries may damage
the remote control. For this reason, always re-
place the used battery with another of the
same voltage, size and specifications. For the sake of the environment
● Please dispose of old batteries so that they
do not harm the environment.
● The remote control battery may contain
perchlorate. Observe the legal requirements
for their disposal. Programming the auxiliary heater
The heater or ventilation inside the vehicle
can be programmed for a certain period. Before programming, check that the day is
correctly set in the
Auxiliary heater - day of the
week menu ››› .
Enabling the Auxiliary heater
menu on the
in s
trument panel
● From the main menu, select the Auxiliary
heater submenu and press the OK button on
the windscreen wiper lever.
● OR: press the or
arrow buttons on the
multi-function steering wheel until the Auxili-
ary heater menu is displayed.
Menu op-
tionsDescription
Switching on
Switching off
The auxiliary heater can be set to come
on automatically if required. To do so,
select a timer:
– The timer is displayed marked with a
.
– Only one timer can be selected. If a
timer has been selected, Prog. ON will be
displayed on the screen. If no timer has
been selected, the dash panel display
will show Prog. OFF.
– To modify the programmed timer, se-
lect another timer or select the Off op-
tion.
Timer 1
Timer 2
Timer 3
Three different timers (hh.mm) can later
be selected using the On option. If the
auxiliary heater is to be switched on for
just a certain day of the week, select the
day of the week and the time for the aux-
iliary heater to come on.
Menu op-
tionsDescription
DurationThe operating time may vary between 10
and 60 minutes and can be set to 5-mi-
nute intervals.
Operating
modeSet to heat or ventilate the vehicle interi-
or when the auxiliary heater is switched
on.
DaySet the current day of the week.
Factory set-
tingsThe predefined factory values for the
functions of this menu are restored.
BackThis returns to the main menu. Checking programming
If the
timer has been switched on after
switching the ignition off, the light on button will remain lit for around 10 seconds.
WARNING
Never program the independent heating sys-
tem to be activated and operated in closed,
unventilated areas. The auxiliary heater
fumes contain carbon dioxide, an odourless
and colourless toxic gas. Carbon monoxide
can cause people to lose consciousness. It
can also cause death. 130
Page 133 of 305

Driving
Operating instructions The auxiliary heater exhaust system located
below the vehicle must be kept clear of snow,
mud and other objects. The exhaust gases
must not be obstructed in any way. The ex-
haust gases generated by the auxiliary heater
are removed via an exhaust pipe fitted under-
neath the vehicle.
On heating the vehicle interior, depending on
the outside temperature the warm air is first
directed at the windscreen and then to the
rest of the vehicle interior through the air
vents. If the air vents are turned towards the
windows, for example, the form of air distri-
bution may be affected.
Depending on the outside temperature, the
temperature at which the auxiliary heater
warms the vehicle interior may be somewhat
higher if the heating or air conditioner tem-
perature control is set to maximum before
switching the heating on.
Depending on the engine, vehicles with aux-
iliary heater may be fitted with a second bat-
tery in the luggage compartment that is re-
sponsible for powering the auxiliary heater.
Cases in which the auxiliary heater will not
switch on
● The auxiliary heater requires about as
much power as the dipped beam headlights.
If the battery charge is low, the auxiliary heat- er will switch off automatically or will not
even switch on. This avoids problems when
starting the engine.
●
The heater will switch on just once each
time. The timer will also have to be switched
back on every time it is required. Note
● Noise will be heard while the auxiliary
heater is running.
● When the air humidity is high and the out-
side temperature low, the heating system
may evaporate condensation from the auxili-
ary heater. In this case, steam may be re-
leased from underneath the vehicle. This is
completely normal and there is no need to
suspect a fault!
● If the auxiliary heater runs several times
over a prolonged period, the vehicle battery
may run flat. To re-charge the battery, drive
the vehicle for a long distance. As a general
rule, drive for as much time as the auxiliary
heating was working. Driving
Address Introduction The power steering is not hydraulic but elec-
tromechanical. The advantage of this steer-
ing system is that it disposes of hydraulic
tubes, hydraulic oil, the pump, filter and oth-
er components. The electromechanical sys-
tem saves fuel. While a hydraulic system re-
quires oil pressure to be maintained, electro-
mechanical steering only requires energy
when the steering wheel is turned.
With the power steering system, the assisted
steering function automatically adjusts ac-
cording to the vehicle speed, the steering tor-
que and the wheel turning angle. The power
steering only works when the engine is run-
ning.
WARNING
If the power steering is not working then the
steering wheel is much more difficult to turn
and the vehicle more difficult to control.
● The power steering only works when the
engine is running.
● Never allow the vehicle to move when the
engine is switched off.
● Never remove the key from the ignition if
the vehicle is in motion. The steering may » 131Technical specifications
Advice
Operation
Safety
Page 134 of 305
Power steering
faulty.
The steering system
should be checked")
Operation
lock and it will not be possible to turn the
steering wheel.
Control and warning lampsIt lights
upPossible causeSolution
(red)Power steering
faulty.
The steering system
should be checked by
a specialised work-
shop as soon as pos-
sible.
(yellow)
Power steering
operation re-
duced.
The steering system
should be checked by
a specialised work-
shop as soon as pos-
sible.
If, after restarting the
engine and driving for
a short distance, the
yellow warning lamp
no longer comes on, it
will
not be necessary
to take the vehicle to
a specialised work-
shop.
The vehicle bat-
tery was discon-
nected and has
been reconnec-
ted.Drive for a short dis-
tance at 15-20 km/h
(9-12 mph).
FlashesPossible causeSolution
(red)
Fault in the steer-
ing column elec-
tronic lock. Do not drive on!
Seek professional ad-
vice.
(yellow)
Steering column
deviation.Gently turn the steer-
ing wheel to and fro.
Steering wheel
not unlocked or
locked.
Remove the key from
the ignition and then
switch the ignition
back on. Check the
messages displayed
on the instrument
panel at the same
time.
Do not drive on, if
the
steering column re-
mains locked after the
ignition has been
switched on. Seek
specialist assistance. Several warning and control lamps light up
for a few seconds when the ignition is switch-
ed on, signalling that the function is being
verified. They will switch off after a few sec-
onds.
WARNING
Observe the safety warnings ››› in Control
and warning lamps on page 47. Information on the steering
Steering column electronic lock
Vehicles with Keyless Access: the steering
column locks when the driver's door is
opened and the ignition is switched off.
Therefore, the vehicle should be at a stand-
still and, where applicable, the selector lever
in position P
.
If
the driver door is opened before the igni-
tion is switched off, the steering column elec-
tronic lock is activated via the ignition key or
the sensor built into the door handle.
Mechanical steering lock
To prevent theft, we recommend you lock the
steering before leaving the vehicle.
Please engage steer-
ing lockUnlocking the steering
Parking the vehicle
››› page 137.Turn the steering wheel
slightly to release the
steering lock.
Remove the key from the
ignition.Insert the key in the igni-
tion lock.
Turn the steering wheel
slightly until you hear the
steering lock.Hold the steering wheel in
this position and switch
on the ignition. 132
Page 135 of 305

Driving
Electromechanical power steering
With the power steering system, the assisted
steering function automatically adjusts ac-
cording to the vehicle speed, the steering tor-
que and the wheel turning angle. The power
steering only works when the engine is run-
ning.
You should remember that you will need con-
siderably more power than normal to steer
the vehicle if the power steering is not work-
ing correctly or not at all.
Counter steering assistance system
The counter steering assistance system helps
the driver in critical situations. Additional
steering power helps the driver when counter
steering. WARNING
The counter steering assistance system com-
bined with ESC helps the driver to steer the
vehicle in critical driving conditions. At all
times, it is the driver who steers the vehicle.
The counter steering system does not steer
the vehicle. Stopping and starting the
engine
Introduction Immobiliser display
When an invalid key is used or in the event of
a system fault,
or Immobiliser on is dis-
played on the instrument panel. The engine
cannot be started.
Pushing or towing
For technical reasons, the vehicle must not
be push- or tow-started. Jump starting is pref-
erable. WARNING
Turning off the engine while driving will make
stopping the vehicle difficult; this could even
result in the loss of control causing an acci-
dent with serious consequences.
● The assisted braking and steering systems,
the airbag system, seat belts and certain
safety equipment are only active while the
engine is running.
● The engine should only be switched off
when the vehicle is at a standstill. WARNING
While the engine is running or starting it
could help reduce the risk of serious injury. ●
Never start or leave the engine running in
poorly ventilated or closed spaces. Exhaust
gas contains carbon monoxide, a toxic, col-
ourless and odourless gas. Carbon monoxide
can cause people to lose consciousness. It
can also cause death.
● Never leave the vehicle unattended if the
engine is running. The vehicle could move off
suddenly or something unexpected could
happen resulting in damage and serious in-
jury.
● Never use start boosters. Cold start sprays
could explode or increase the engine speed
unexpectedly. WARNING
The components of the exhaust system reach
very high temperatures. This could cause a
fire and considerable damage.
● Always park your vehicle so that no part of
the exhaust system can come in contact with
flammable materials (such as wood, leaves,
dried grass, spilled fuel, etc.).
● Do not apply additional underseal or anti-
corrosion coatings to the exhaust pipes, cata-
lytic converter, heat shields or the diesel par-
ticulate filter. 133
Technical specifications
Advice
Operation
Safety
Page 136 of 305

Operation
Ignition lock Fig. 125
Vehicle key positions Car keys ››› Fig. 125
No key in the ignition lock: The steering lock may
be activated.
0Ignition off, all electrical devices disconnected.
Key can be removed from the vehicle.
1Ignition is switched on. Pre-heating of diesel en-
gine. The steering lock can be unlocked.
2Switch on the engine. Release the key when the
engine has started. When it is released, the key
returns to position 1
.Key not authorised for the vehicle
If a key which is not authorised for this vehi-
cle is inserted in the ignition lock, it can be
removed as follows:
●
Automatic gearbox: the key cannot be re-
moved from the ignition lock. Press and re- lease the selector lever locking button. Key
can be removed from the vehicle.
●
Manual gearbox: remove the key from the
ignition. WARNING
Unsuitable or careless use of the vehicle key
could result in serious injury.
● Always take all the keys with you whenever
you leave the vehicle. If not, the engine could
accidentally be started and electrical equip-
ment such as the windows could accidentally
be operated which may result in serious in-
jury.
● Never leave children or disabled people
alone in the car. Passengers could be trapped
in the car in an emergency and not be able to
get themselves to safety. For example, de-
pending on the time of the year, tempera-
tures inside a locked and closed vehicle can
be extremely high or extremely low resulting
in serious injuries and illness or even death,
particularly for young children.
● Never remove the key from the ignition if
the vehicle is in motion. The steering may
lock and it will not be possible to turn the
steering wheel. Note
● If the key is left in the ignition lock with the
engine off for long periods, the vehicle bat-
tery will run flat. ●
For automatic gearbox vehicles the key can
only be removed from the ignition lock if the
gear selector lever is in position P. In this
case, press and release the selector lever
locking button. 134
 1
1 2
2 3
3 4
4 5
5 6
6 7
7 8
8 9
9 10
10 11
11 12
12 13
13 14
14 15
15 16
16 17
17 18
18 19
19 20
20 21
21 22
22 23
23 24
24 25
25 26
26 27
27 28
28 29
29 30
30 31
31 32
32 33
33 34
34 35
35 36
36 37
37 38
38 39
39 40
40 41
41 42
42 43
43 44
44 45
45 46
46 47
47 48
48 49
49 50
50 51
51 52
52 53
53 54
54 55
55 56
56 57
57 58
58 59
59 60
60 61
61 62
62 63
63 64
64 65
65 66
66 67
67 68
68 69
69 70
70 71
71 72
72 73
73 74
74 75
75 76
76 77
77 78
78 79
79 80
80 81
81 82
82 83
83 84
84 85
85 86
86 87
87 88
88 89
89 90
90 91
91 92
92 93
93 94
94 95
95 96
96 97
97 98
98 99
99 100
100 101
101 102
102 103
103 104
104 105
105 106
106 107
107 108
108 109
109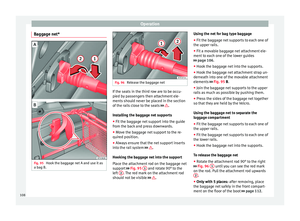 110
110 111
111 112
112 113
113 114
114 115
115 116
116 117
117 118
118 119
119 120
120 121
121 122
122 123
123 124
124 125
125 126
126 127
127 128
128 129
129 130
130 131
131 132
132 133
133 134
134 135
135 136
136 137
137 138
138 139
139 140
140 141
141 142
142 143
143 144
144 145
145 146
146 147
147 148
148 149
149 150
150 151
151 152
152 153
153 154
154 155
155 156
156 157
157 158
158 159
159 160
160 161
161 162
162 163
163 164
164 165
165 166
166 167
167 168
168 169
169 170
170 171
171 172
172 173
173 174
174 175
175 176
176 177
177 178
178 179
179 180
180 181
181 182
182 183
183 184
184 185
185 186
186 187
187 188
188 189
189 190
190 191
191 192
192 193
193 194
194 195
195 196
196 197
197 198
198 199
199 200
200 201
201 202
202 203
203 204
204 205
205 206
206 207
207 208
208 209
209 210
210 211
211 212
212 213
213 214
214 215
215 216
216 217
217 218
218 219
219 220
220 221
221 222
222 223
223 224
224 225
225 226
226 227
227 228
228 229
229 230
230 231
231 232
232 233
233 234
234 235
235 236
236 237
237 238
238 239
239 240
240 241
241 242
242 243
243 244
244 245
245 246
246 247
247 248
248 249
249 250
250 251
251 252
252 253
253 254
254 255
255 256
256 257
257 258
258 259
259 260
260 261
261 262
262 263
263 264
264 265
265 266
266 267
267 268
268 269
269 270
270 271
271 272
272 273
273 274
274 275
275 276
276 277
277 278
278 279
279 280
280 281
281 282
282 283
283 284
284 285
285 286
286 287
287 288
288 289
289 290
290 291
291 292
292 293
293 294
294 295
295 296
296 297
297 298
298 299
299 300
300 301
301 302
302 303
303 304
304