Page 89 of 305

Lights and visibility
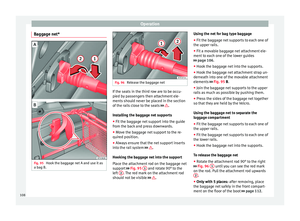
● Adjust the front passenger side exterior
mirror so that you can see, for example, the
kerb area.
● The new position of the mirror will be stor-
ed automatically and allocated to the vehicle
key that was used to unlock the vehicle. For
vehicles with seat memory, please see
››› page 93 .
A ctiv
ating the passenger exterior mirror
settings
● Turn the exterior mirror knob to position R.
● With the ignition switched on, select re-
verse gear.
● The stored position of the passenger exteri-
or mirror for reverse gear is deleted when
driving forwards at 15 km/h (9 mph), or if the
knob is turned from position R to another po-
sition. WARNING
Fold and unfold the exterior mirror, taking
care to avoid injuries.
● Only fold or unfold the exterior mirror when
there is no-one in the way of the mirror.
● When moving the mirror, take care not to
trap fingers between the mirror and the mir-
ror bracket. WARNING
Failure to correctly estimate the distance of
the vehicle behind could lead to serious acci-
dent.
● Rear-view convex or aspheric mirrors in-
crease the field of vision, however objects ap-
pear smaller and further away in the mirrors.
● The use of these mirrors to estimate the
distance to the next vehicle when changing
lane is imprecise and could result in serious
accident.
● If possible, use the rear vision mirror to es-
timate distances to vehicles behind you or in
other circumstances.
● Make sure that the rear visibility is ade-
quate. CAUTION
● Before entering a car wash, always ensure
that the exterior mirrors are correctly folded
in.
● Electrically-folding exterior mirrors should
not be folded and unfolded mechanically as
this may damage the electrical operation. For the sake of the environment
The exterior mirror heating should be switch-
ed off when it is no longer needed. Other-
wise, it is an unnecessary fuel waste. Note
● The exterior mirror heating initially heats
up with a high power, after two minutes the
heat will depend upon the ambient tempera-
ture.
● In the event of faults, the electric exterior
mirrors can be adjusted manually by pressing
the edge of the mirror surface. 87Technical specifications
Advice
Operation
Safety
Page 90 of 305

Operation
Seats and head restraints
Adjusting the seats and head
restraints Manually adjusting the front seat Fig. 72
Front left seat controls The controls are mirrored for the front right-
hand seat.
Mechanically and electrically adjusted con-
trols can be combined on the seat.Fig. 72FunctionNecessary operations
1
Moving the
head restraint
backwards or
forwards.Pull the lever and move
the seat forwards. The
front seat must be engag-
ed when the lever is re-
leased!
Fig. 72FunctionNecessary operations
2Adjusting the
lumbar sup-
port*.Turn the lever.
3Adjusting the
seat backrest
angle.Turn the wheel.
4Adjusting the
seat height.Pull the lever up or push
down (several times if
necessary) from its home
position. Electrical controls on the front seat*
Fig. 73
Adjusting the front left seat forwards
or backwards, the height, the seat angle and
the front seat backrest Fig. 74
Adjusting the lumbar support The controls are mirrored for the front right-
hand seat.
Mechanically and electrically adjusted con-
trols can be combined on the seat.
Fig. 73 Press the control in the direction of the
arrow:
A
1Move the seat backwards or for-
wards.
2 and
3Raise or lower the seat.
2 or 3Adjust the seat angle.
BForwards
or back- wards.Adjust the seat backrest angle. 88
Page 91 of 305

Seats and head restraintsFig. 74 Press the corresponding area of the
switch:
1 or
2Adjust the curve of the lumbar support.
3 or 4Adjust the height of the lumbar support. WARNING
Using the front electric seats in a careless or
uncontrolled manner may lead to severe inju-
ries.
● The front seats can also be electrically ad-
justed when the ignition is switched off. Nev-
er leave children or disabled people alone in
the vehicle.
● In the event of an emergency, stop electri-
cal adjustment by pressing any button. CAUTION
So as not the damage the electrical compo-
nents of the front seats, do not kneel on the
seats or apply specific pressure to one point
of the seat or seat backrest. Note
● It may not be possible to electrically adjust
the seat if the vehicle battery is very low.
● Seat adjustment is stopped when the en-
gine is started. Adjusting the rear seats
Fig. 75
Adjusting rear seats
Fig. 75FunctionNecessary opera-
tions
1Adjusting the
seat backrest
angle.
Pull the lever and adjust
the seat backrest to the
required position ›››
.
The seat backrest must
be engaged when the
lever is released! There is
a handle instead of the
lever on the third row of
seats and on the central
seat of the second row. It
is used in the same man-
ner as the lever.
2
On the second
row of seats
only: moving
the seat back-
wards or for-
wards.Pull the lever and move
the seat forwards or
backwards. The seat
must be engaged when
the lever is released! CAUTION
● Tilting the seat backrest of the second row
of seats fully back could damage the luggage
compartment tray. Remove the tray before
adjusting the seat backrest.
● Objects in the luggage compartment could
cause damage when moving the rear seats
forwards or backwards. 89
Technical specifications
Advice
Operation
Safety
Page 92 of 305

Operation
Adjusting the head restraints Fig. 76
A: Adjust the head restraints with no
possibility of lengthways direction adjust-
ment; B: Adjust the head restraints with
lengthways direction adjustment Fig. 77
Adjust the head restraints in the sec-
ond or third row of seats All seats are equipped with a head restraint.
Adjusting height
● Raise the head restraint in the direction of
the arrow or lower it ››› Fig. 76 or
›
›› Fig. 77 1 with the button pressed
››› .
● The head restraint must engage securely in
position. There are three possible positions
on the second row of seats and two possible
positions on the third row of seats.
Adjusting the front head restraints
● Push the head restraint forward in the di-
rection of the arrow or backward ››› Fig. 76 1 B
with the button pressed.
● The he a
d restraint must engage securely in
position. Correct adjustment of head restraints
Adjust the head restraint so that its upper
edge is at the same level as the top of your
head, or as close as possible to the same lev-
el as the top of your head and under no cir-
cumstances below eye level. Keep the back
of your neck as close as possible to the head
restraint.
Adjusting the head restraint for short people
Lower the head restraint completely, even if
your head is below its upper edge. When the
head restraint is at its lowest, it is possible
that a small gap remains between it and the
seat backrest.
Adjusting the head restraint for tall people
Raise the head restraint completely.
WARNING
Travelling with the head restraints removed
or improperly adjusted increases the risk of
severe or fatal injuries in the event of acci-
dents and sudden braking or manoeuvres.
● Always fit and adjust the head restraint
properly whenever a person is occupying a
seat.
● All vehicle occupants must correctly adjust
the head restraint according to their height to
reduce the risk of back injuries in the event of
an accident. The upper edge of the head re-
straint must be as close as possible to the 90
Page 93 of 305

Seats and head restraints
same level as the top of your head and under
no circumstances below eye level. Keep the
back of your neck as close as possible to the
head restraint.
●
Never adjust the head restraint while the
vehicle is in motion. Removing and fitting the head
restraints
Fig. 78
A: Fitting the head restraints with no
possibility of lengthways direction adjust-
ment; B: Fitting the head restraints with
lengthways direction adjustment Fig. 79
Fitting the head restraints in the sec-
ond or third row of seats All seats are equipped with a head restraint.
Removing the front head restraints in
vehicles without the lengthways direction
adjustment of the head restraints
● If necessary, adjust the seat backrest so
that the head restraint can be fitted.
● Push the head restraint up as far as it will
go ››› .
● Pull out the head restraint pressing the but-
ton completely ››› Fig. 78 1
A
.
Fittin
g the front head restraints in vehicles
without the lengthways direction adjustment
of the head restraints
● Correctly place the head restraint into the
guides on the seat backrest and insert it.
● Completely press the button 1 A
and push
the he a
d restraint downwards. »
91
Technical specifications
Advice
Operation
Safety
Page 94 of 305

Operation
● Adjust the head restraint according to the
correct seat position and secure it
››› page 90 .
R emo
ving the front head restraints in
vehicles with the lengthways direction
adjustment of the head restraints
● If necessary, adjust the seat backrest so
that the head restraint can be fitted.
● Push the head restraint up and backward
as far as it will go ››› .
● Place a flat object, e.g. a plastic card 2
B
,
on both s
ides between the seat backrest cov-
er and the end protector of the seat backrest
retaining bar and unlock the retaining bars
with a little pressure.
● Completely pull out the head restraint.
Fitting the front head restraints in vehicles
with the lengthways direction adjustment of
the head restraints
● Pull out the two retaining bars from the
head restraint as far as possible.
● Correctly place the head restraint into the
guides on the seat backrest and insert it.
● Push the head restraint down as far as pos-
sible until the two retaining bars are secured.
● Adjust the head restraint according to the
correct seat position and secure it
››› page 90. Remo
ving the head restraints from the
second and third row of seats
● Fold the seat backrest of the rear seat for-
wards ››› page 100
.
● Push the head restraint up as far as it will
go ››› .
● Pull out the head restraint ››› Fig. 79 1 with the button pressed.
●
Fold the seat backrest of the rear seat back-
wards until it is engaged.
Fitting the head restraints in the second and
third row of seats
● Fold the seat backrest of the rear seat for-
wards ››› page 100 .
● Inser
t the head restraint into the guides on
the seat backrest.
● Push the head restraint down while press-
ing the button 1 .
● Fold the backrest of the rear seat backward
again until it is engaged.
● Adjust the head restraint to the correct po-
sition ››› page 90 . WARNING
Travelling with the head restraints removed
or improperly adjusted increases the risk of
severe or fatal injuries in the event of acci-
dents and sudden braking or manoeuvres. ●
Always fit and adjust the head restraint
properly whenever a person is occupying a
seat.
● Refit any removed head restraints immedi-
ately so that passengers are properly protec-
ted. CAUTION
When removing and fitting the head restraint,
make sure it does not hit the headliner of the
vehicle or the front seat backrest. Otherwise,
the interior roof and other parts of the vehicle
could be damaged. 92
Page 95 of 305

Seats and head restraints
Seat functions Seat heating* Fig. 80
Detailed view of the centre console:
front seat heating controls, here with the sec-
ond temperature level set Fig. 81
Detailed view of the centre console:
controls for the front seat heating in vehicles
equipped with Climatronic The seat cushions can be heated electrically
when the ignition is switched on. The back-
rest is also heated in some versions.
Switch off seat heating if there is nobody in
the seat.FunctionAction
››› Fig. 80, ››› Fig. 81
ActivatePress button . Seat heating is
switched on fully.
Adjusting the
heating outputKeep pressing button until the re-
quired intensity is set.
DeactivatingKeep pressing button until all of
the lights are switched off ››› Fig. 80,
››› Fig. 81. WARNING
Inappropriate use of the seat functions can
cause severe injuries.
● Assume the proper sitting position before
your trip and remain in it throughout. This al-
so applies to the other occupants.
● Only adjust the seat position memory when
the vehicle is stationary.
● Only switch the lumbar massage function
on and off when the vehicle is stationary.
● Keep hands, fingers, feet and other limbs
away from the seat operating and adjustment
radius. WARNING
People whose pain and temperature thresh-
old has been affected by some kind of medi-
cine, paraplegia or chronic illness (e.g. diabe-
tes) may sustain burns to the back, buttocks
and legs from using the seat heaters that
may lead to a long healing process or that
may never completely heal. Seek medical ad-
vice if you have doubts regarding your health.
● People with limited pain and temperature
thresholds must never use seat heating. CAUTION
● To avoid damaging the heating elements of
the seat heaters, please do not kneel on the
seat or apply sharp pressure to a single point
on the seat cushion or backrest.
● Liquids, sharp objects and insulating mate-
rials on the seat could damage the seat heat-
ing.
● In the event of smells, switch off the seat
heating immediately and have the unit in-
spected by a specialised workshop. For the sake of the environment
The seat heating should remain on only when
needed. Otherwise, it is an unnecessary fuel
waste. 93
Technical specifications
Advice
Operation
Safety
Page 96 of 305

Operation
Seat with position memory* Fig. 82
Memory buttons on the outside of the
driver seat Memory buttons
Individual settings for the driver seat and the
exterior mirror can be assigned to each mem-
ory button.
Storing exterior mirror settings for driving
forwards
● Connect the automatic parking brake.
● Move the gear lever to neutral.
● Switch the ignition on.
● Adjust the front seat and the exterior mir-
rors.
● Keep the SET button held down for more
than one second ››› Fig. 82 .
● Pr e
ss the required memory button for the
following 10 seconds. An audible warning
confirms the settings have been stored. Storing front passenger exterior mirror
settings for driving in reverse gear
●
Connect the automatic parking brake.
● Move the gear lever to neutral.
● Switch the ignition on.
● Press the required memory button.
● Select reverse gear.
● Adjust the front passenger side exterior
mirror so that you can see, for example, the
kerb area.
● The new position of the mirror will be stor-
ed automatically and allocated to the vehicle
key that was used to unlock the vehicle.
Activating exterior mirror settings
● With the driver door open and the ignition
turned off, push the memory button of the
corresponding door briefly.
● OR: with the ignition switched on, hold in
the corr
esponding memory button until the
memorised position is reached.
To activate the memory function of the
vehicle key
Important: a position must be memorised in
the memory.
● Open the driver-side door.
● Press and hold any memory button.
● Within the following three seconds, push
the button to open the vehicle on the vehi-cle key. An audible warning confirms the set-
tings have been activated.
Adjusting the wing mirrors for driving and
assigning driver seat settings to a vehicle
key
● Activate the memory function of the vehicle
key
● Adjust the front seat and the exterior mir-
rors.
● Lock the vehicle. The settings are assigned
to the vehicle key.
To deactivate the memory function of the
vehicle key
Important: a position must be memorised in
the memory.
● Press and hold the SET button.
● Within the following 10 seconds, push the
open button on the vehicle key. An audi-
ble warning confirms the settings have been
deactivated.
Initialising the seat position memory
The position memory system must be restar-
ted if, for example, the driver seat has been
changed.
Restarting deletes all memories and assign-
ments for the seat with position memory. The
memory buttons can then be reprogrammed
and the vehicle keys re-assigned.
94