Page 117 of 348
. Before the pointer reaches the red area,
ease up on the accelerator to prevent engine damage.
8. Transmission Gear Status")
7. Tachometer
This gauge measures engine revolutions per minute
(RPM x 1000). Before the pointer reaches the red area,
ease up on the accelerator to prevent engine damage.
8. Transmission Gear Status
This area of the cluster displays the current gear selected.
9. Outside Temperature
This area of the cluster displays the outside temperature
in degrees Fahrenheit or degrees Celsius.
10. Fuel Gauge
The digital display shows the amount of fuel in the tank.
The switching on of the digital warning light indicates
that 1 – 1.3 gallons of fuel are left in the tank; in this
situation, refuel as soon as possible.Do not travel with the fuel tank almost empty; any gaps
in fuel delivery could damage the catalytic converter.
11. Park/Headlight ON Indicator
This indicator will illuminate when the park
lights or headlights are turned on.
12. High Beam Indicator
This indicator shows that the high beam head-
lights are on. Push the multifunction lever for-
ward to switch the headlights to high beam, and pull
toward yourself (normal position) to return to low beam.
13. Malfunction Indicator Light (MIL)
The Malfunction Indicator Light (MIL) is part of
an onboard diagnostic system, called OBD II, that
monitors engine and automatic transmission con-
trol systems. The light will illuminate when the key is in
the ON/RUN position, before engine start. If the bulb
4
UNDERSTANDING YOUR INSTRUMENT PANEL 115
Page 120 of 348

18. Fuel Door Reminder
The arrow in this symbol is a reminder that the
Fuel Filler Door is located on the right side of
the vehicle.
19. Trip Odometer
This area of the cluster displays the total distance trav-
eled since the last Trip reset.
20. Electronic Throttle Control (ETC) Light
This light informs you of a problem with the
Electronic Throttle Control (ETC) system. The
light will come on when the ignition is first
turned ON and remain on briefly as a bulb
check. If the light does not come on during starting, have
the system checked by an authorized dealer.
If a problem is detected, the light will come on while the
engine is running. Cycle the ignition key when the
vehicle has completely stopped and the gear selector isplaced in the 1st position. The light should turn off.
If the light remains lit with the engine running, your
vehicle will usually be drivable. However, see an autho-
rized dealer for service as soon as possible. If the light is
flashing when the engine is running, immediate service is
required. You may experience reduced performance, an
elevated/rough idle or engine stall and your vehicle may
require towing.
21. Speedometer
Indicates vehicle speed.
22. “Alfa DNA” Driving Mode Indicator
This area of the cluster displays which driving mode the
vehicle is currently in. A letter (d, n, or a) corresponding
to the active driving mode (dynamic or race, natural, all
weather) and a dedicated message is shown on the
display.
118 UNDERSTANDING YOUR INSTRUMENT PANEL
Page 121 of 348
 Dis-
play
The Electronic Vehicle Information Center (EVIC) fea-
tures a driver-interactive display that is located in the
instrument cluster. For furth")
23. Electronic Vehicle Information Center (EVIC) Dis-
play
The Electronic Vehicle Information Center (EVIC) fea-
tures a driver-interactive display that is located in the
instrument cluster. For further information, refer to
“Electronic Vehicle Information Center (EVIC)” in “Un-
derstanding Your Instrument Panel.”
EVIC Service Item Display
•Service Warning light – If Equipped
NOTE:The “Scheduled Servicing Plan” in-
cludes car maintenance at fixed intervals, refer
to the�Maintenance�chapter. This message is
displayed automatically along with the warn-
ing light when the key is turned to MAR-ON - 1242 miles
(2,000 km) before these deadlines and reappears every
124 miles (200 km). Below 124 miles (200 km) servicing
indications are more frequent. The indication will appearin miles or kilometers according to the�Unit Of Measure-
ment�settings. When the next scheduled service is ap-
proaching and the key is turned to MAR-ON, the word
Service will appear on the display, followed by the
number of miles or kilometers left. Contact a dedicated
Alfa Romeo Dealership. The operations in the “Sched-
uled Servicing Plan” will be performed and the message
will be reset.
24. Odometer Display
The odometer display shows the total distance the ve-
hicle has been driven.
U.S. Federal regulations require that upon transfer of
vehicle ownership, the seller certify to the purchaser the
correct mileage that the vehicle has been driven. If your
odometer needs to be repaired or serviced, the repair
technician should leave the odometer reading the same
as it was before the repair or service. If s/he cannot do so,
4
UNDERSTANDING YOUR INSTRUMENT PANEL 119
Page 127 of 348
ELECTRONIC VEHICLE INFORMATION CENTER
(EVIC)The Electronic Vehicle Information Center (EVIC) fea-
tures a driver-interactive display that is located in the
instrument cluster.
The EVIC consists of the following:
•Digital Speedometer
•Vehicle Info
•Fuel Economy Info
•Trip Info
•Screen Setup
•Vehicle Settings
Electronic Vehicle Information Center (EVIC)
4
UNDERSTANDING YOUR INSTRUMENT PANEL 125
Page 139 of 348
.
Pus")
Exit Menu
This function closes the initial menu screen.
Briefly push theSET/BACKbutton to go back to the
main screen.
Push and release the
button to return to the first
menu option (Speed Buzzer).
Push and releasethebutton to return to the last
menu option (Daylights).
Change Engine Oil Indicator System
Your vehicle is equipped with an engine oil
change indicator system. The “Change Engine Oil” mes-
sage will flash in the EVIC display for approximately 10
seconds and the Oil Pressure Warning Light will illumi-
nate. The “Change Engine Oil” message in the EVIC and
the Oil Pressure Warning Light will turn off after ap-
proximately 10 seconds.NOTE:The reset of the Oil Change message must be
performed by an authorized dealer.
Trip Computer
The Trip Computer is located in the instrument cluster. It
features a driver-interactive display (displays informa-
tion such as trip information, range, fuel consumption,
average speed, and travel time).
Trip Button
TheTRIPbutton, located on the right steering column
stalk, can be used to display and to reset the trip values.
4
UNDERSTANDING YOUR INSTRUMENT PANEL 137
Page 160 of 348
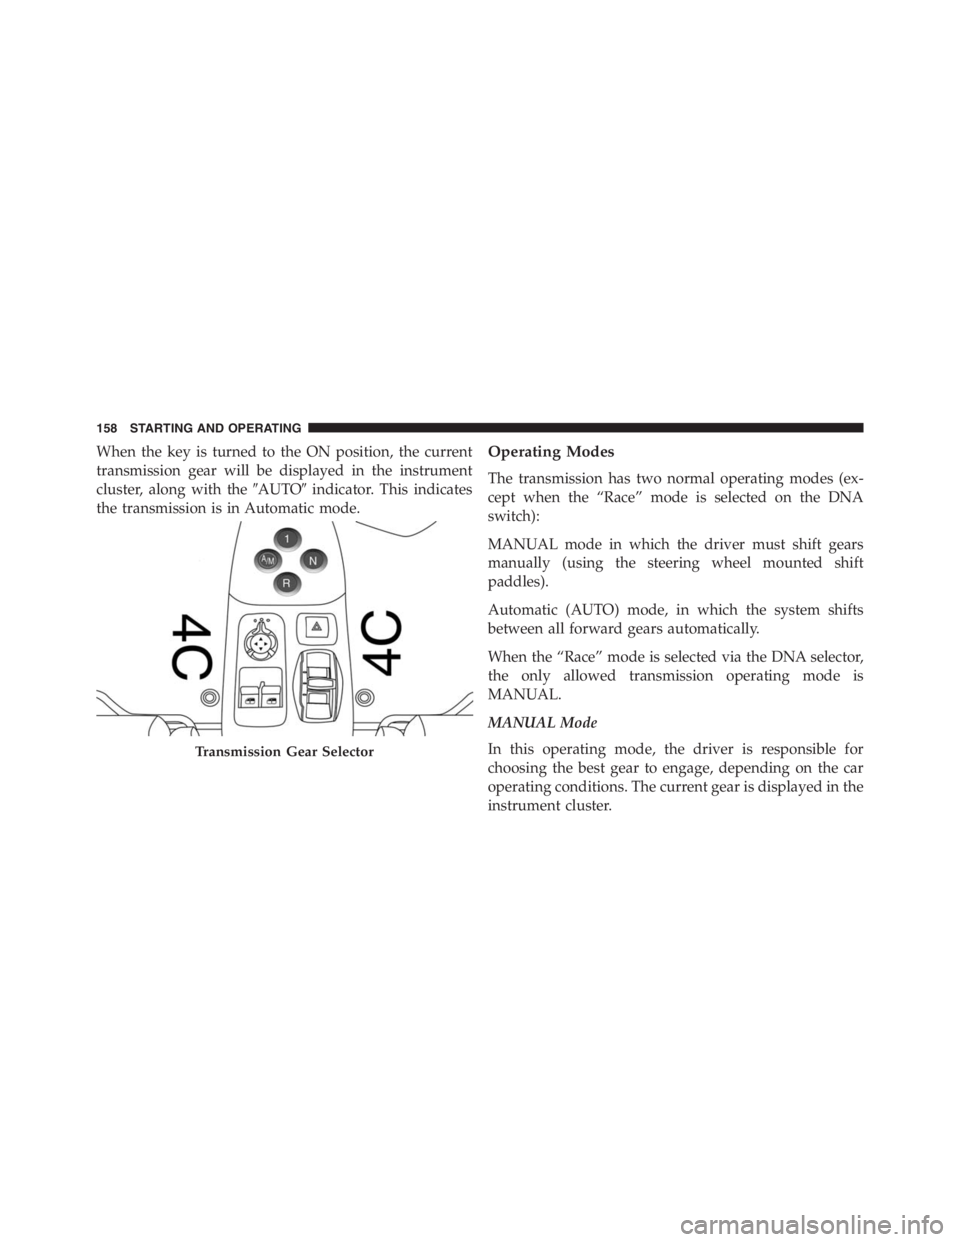
When the key is turned to the ON position, the current
transmission gear will be displayed in the instrument
cluster, along with the�AUTO�indicator. This indicates
the transmission is in Automatic mode.Operating Modes
The transmission has two normal operating modes (ex-
cept when the “Race” mode is selected on the DNA
switch):
MANUAL mode in which the driver must shift gears
manually (using the steering wheel mounted shift
paddles).
Automatic (AUTO) mode, in which the system shifts
between all forward gears automatically.
When the “Race” mode is selected via the DNA selector,
the only allowed transmission operating mode is
MANUAL.
MANUAL Mode
In this operating mode, the driver is responsible for
choosing the best gear to engage, depending on the car
operating conditions. The current gear is displayed in the
instrument cluster.
Transmission Gear Selector
158 STARTING AND OPERATING
Page 161 of 348

To activate/deactivate MANUAL mode, press the A/M
button on the center console when the transmission is in
any forward gear.
Use the “+” shift paddle to engage a higher gear, or the
“–” paddle to engage a lower gear.
If a requested gear shift is not allowed (typically, because
it would cause engine overspeed or lugging), an audible
signal will sound and the transmission will remain in the
existing gear.
The transmission will automatically downshift during
closed-throttle decelerations, to prevent engine lugging.
When coming to a stop, the transmission will automati-
cally select FIRST (1st) gear. The driver must manually
upshift the transmission (by tapping the + shift paddle)
as the vehicle accelerates.NOTE:To provide better comfort, the transmission will
up-shift to the next available gear if the engine speed
limit is reached. This feature is only available in NATU-
RAL and ALL WEATHER Modes.
AUTO Mode
In AUTO mode the transmission shifts gears automati-
cally depending on vehicle speed, engine RPM, and
accelerator pedal position.
AUTO is the default operating mode at startup. When in
AUTO mode,�AUTO�appears in the instrument cluster,
adjacent to the current gear display.
To toggle between AUTO and MANUAL modes, press
the A/M button on the center console.
5
STARTING AND OPERATING 159
Page 162 of 348
 and REVERSE (R) can only be engaged (at a
stop) by pressing “1” or “R” when the brake pedal is
pressed.
To drive, press the brake pedal, and select 1 (One)")
Accelerating From A Stop
FIRST (1st) and REVERSE (R) can only be engaged (at a
stop) by pressing “1” or “R” when the brake pedal is
pressed.
To drive, press the brake pedal, and select 1 (One) or R
(Reverse) by pressing “1” or “R” using the transmission
gear selector buttons on the center console. Then release
the brake pedal and smoothly press the accelerator pedal.
NOTE:When starting on a fairly steep incline, it may be
advisable to engage the parking brake.
The vehicle can only be launched (from a stop) in FIRST
(1st) or REVERSE (R). SECOND (2nd) gear (or higher)
cannot be engaged when the vehicle is stationary.
FIRST (1st) and REVERSE (R) gears can only be engaged
at vehicle speeds below 2 mph (3 km/h). At speeds
below 6 mph (10 km/h), attempts to shift from 1st to R
(or R to 1st) will only be allowed if the vehicle speeddrops below the 2 mph (3 km/h) threshold within three
seconds of the request; otherwise, the transmission will
shift to NEUTRAL (N). The driver should then repeat the
request for 1st or R once the vehicle has come to a stop.
Shift Paddles
In MANUAL mode, the steering wheel mounted shift
paddles (labeled + and -) control the transmission shift-
ing.
Tapping the (+) paddle will upshift the transmission to
the next higher gear, while tapping the (-) paddle will
downshift to the next lower gear. The current gear is
displayed in the instrument cluster. If a requested shift
would cause engine lugging or overspeed, that request
will be ignored.
In AUTO mode, tapping a shift paddle will temporarily
place the transmission in MANUAL mode, and execute
the requested upshift or downshift (if allowable). The
160 STARTING AND OPERATING
The Electronic Vehicle Information Center (EVIC) fea-
tures a driver-interactive display that is located in the
instrument cluster.
The EVIC consists of the")