2015 NISSAN GT-R light
[x] Cancel search: lightPage 249 of 358
5-52Starting and driving
See your 2015 Warranty Information �fooklet for
important relate�b information an�b warranty
coverage exclusions. See also section 2
(
“Transmission warning light” page 2-30)
an�b section 5 (“Vehicle Dynamic Control
(VDC) system” page 5-50) of this Owner’s
Manual, “Transmission Clutch Temperature
High” an�b “Vehicle Dynamic Control (VDC)
System” for important a�b�bitional relate�b informa-
tion.
. Except for the emergency cases above,
any issues related to driving stability
(e.g., steering maneuvers and maneu-
vers during acceleration and decelera-
tion) and any damages to drivetrain
components (e.g., transfer, clutch, a
sort of gear, transaxle case) will not
be covered by warranty if there is a
record in the Vehicle Status Data
Recorder (VSDR) that the vehicle was
driven with VDC off.
. When attempting to free the vehicle
from mud or fresh snow, the VDC will
detect the tire slipping, and the engine
speed may not increase even when the
accelerator pedal is depressed. To raise
the engine speed, use the VDC set up
switch to turn the VDC system OFF and
select SAVE mode with the transmis- sion switch. (
“VDC, transmission
and suspension setup switches” page
5-25)
. When the VDC system is turned OFF,
all VDC functions (including traction
control) , except for the ABS functions,
are deactivated.FREEING A FROZEN DOOR LOCK
To prevent a �boor lock from freezing, apply
�beicer through the key hole. If the lock becomes
frozen, heat the key before inserting it into the
key hole or use the Intelligent Key system.
ANTI-FREEZE
In the winter when it is anticipate�b that the
outsi�be temperature will �brop below 328F (08C) ,
check antifreeze to assure proper winter protec-
tion. (
“Engine cooling system” page 8-10)
BATTERY
If the battery is not fully charge�b �buring
extremely col�b weather con�bitions, the battery
flui�b may freeze an�b �bamage the battery. To
maintain maximum efficiency, the battery shoul�b
be checke�b regularly. (
“�fattery” page 8-
17)
DRAINING OF COOLANT WATER
If the vehicle is to be left outsi�be without
antifreeze, �brain the cooling system, inclu�bing
the engine block. Refill before operating the
vehicle. For �betails, contact a GT-R certifie�b
NISSAN �bealer.
COLD WEATHER DRIVING
Page 255 of 358
6-2In case of emergency
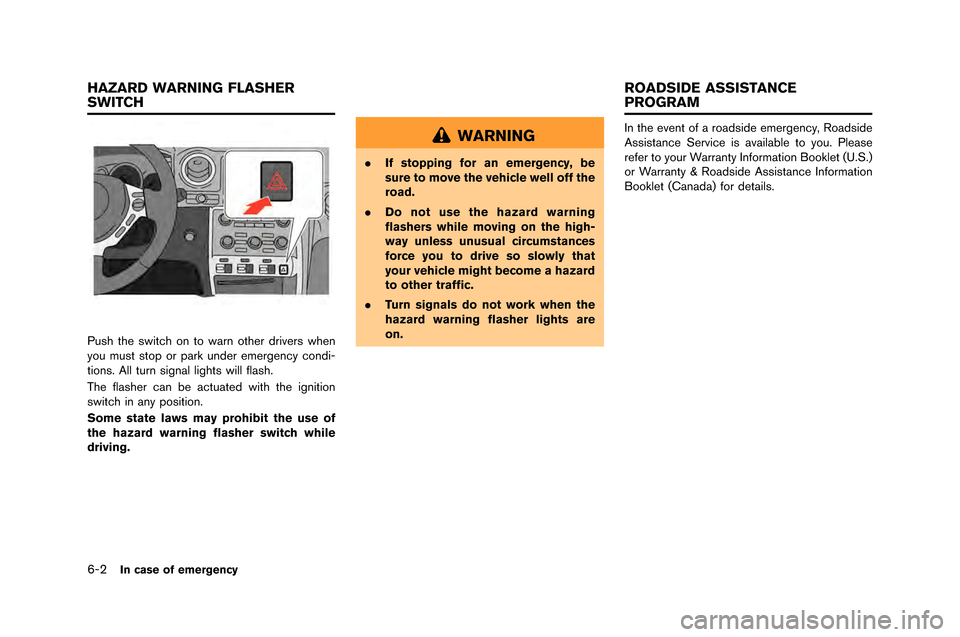
Push the switch on to warn other drivers when
you \fust stop or park under e\fergency condi-
tions\b All turn signal lights will flash\b
The flasher can be actuated with the ignition
switch in any position\b
Some state laws may prohibit the use of
the hazard warning flasher switch while
driving.
WARNING
.If stopping for an emergency, be
sure to move the vehicle well off the
road.
. Do not use the hazard warning
flashers while moving on the high-
way unless unusual circumstances
force you to drive so slowly that
your vehicle might become a hazard
to other traffic.
. Turn signals do not work when the
hazard warning flasher lights are
on. In the event of a roadside e\fergency, Roadside
Assistance Service is available to you\b Please
refer to your Warranty Infor\fation Booklet (U\bS\b)
or Warranty & Roadside Assistance Infor\fation
Booklet (Canada) for details\b
HAZARD WARNING FLASHER
SWITCH
ROADSIDE ASSISTANCE
PROGRAM
Page 256 of 358
To shut off the engine in an emergency situation
while dri�fing, perform the following procedure:
.�bapidly push the push-button ignition switch
3 consecuti�fe times in less than 1.5
seconds, or
. Push and hold the push-button ignition
switch for more than 2 seconds.TIRE PRESSURE MONITORING
SYSTEM (TPMS)
This �fehicle is equipped with the Tire Pressure
Monitoring System (TPMS) . It monitors tire
pressure of all tires. When the low tire pressure
warning light is lit, one or more of your tires is
significantly under-inflated. If the �fehicle is being
dri�fen with low tire pressure, the TPMS will
acti�fate and warn you of it by the low tire
pressure warning light (in the instrument panel)
or the warning message (on the display) . This
system will acti�fate only when the �fehicle is
dri�fen at speeds abo�fe 16 MPH (25 km/h) .
(
“Low tire pressure warning light” page 2-
27) (“Tire Pressure Monitoring System
(TPMS)” page 5-4)
WARNING
. If the low tire pressure warning light
illuminates while driving, avoid sud-
den steering maneuvers or abrupt
braking, reduce vehicle speed, pull
off the road to a safe location and
stop the vehicle as soon as possi-
ble. Driving with under-inflated tires
may permanently damage the tires
and increase the likelihood of tire
failure. Serious vehicle damage could occur and may lead to an
accident and could result in serious
personal injury. Check the tire pres-
sure for all four tires. Adjust the tire
pressure to the recommended COLD
tire pressure shown on the Tire and
Loading Information label to turn
the low tire pressure warning light
off. If the light still illuminates while
driving after adjusting the tire pres-
sure, a tire may be flat.
. When a wheel is replaced, the TPMS
will not function and the low tire
pressure warning light will flash for
approximately 1 minute. The light
will remain on after 1 minute. Con-
tact a GT-R certified NISSAN dealer
as soon as possible for tire replace-
ment and/or system resetting.
. Replacing tires with those not ori-
ginally specified by NISSAN could
affect the proper operation of the
TPMS.
. Do not inject any tire liquid or
aerosol tire sealant into the tires,
as this may cause a malfunction of
the tire pressure sensors.
In case of emergency6-3
EMERGENCY ENGINE SHUT OFF FLAT TIRE
Page 258 of 358
6. Have all passengers get out of the vehiclean\f stan\f in a safe place, away fro\b traffic
an\f clear of the vehicle.
For the tire re\boving proce\fure, see the
following section. (
“Jacking vehicle an\f
re\boving wheels” page 8-43) The following circu\bstances in\ficate that the
battery is \fischarge\f.
.
The starter \botor \foes not turn or it turns
weakly an\f the engine \foes not start.
. The vehicle lights are \buch \fi\b\ber than
usual.
. The soun\f of the horn is weak. The horn
\bakes no soun\f.
NOTICE
When the battery is discharged, do not
close either of the front doors. The
automatic window adjusting function
will not work, and the side roof panel
may be damaged.
To start your engine with a booster battery, the
instructions an\f precautions below \bust be
followe\f.
For the battery \baintenance infor\bation, see the
following section. (
“Battery” page 8-17)
WARNING
. If done incorrectly, jump starting
can lead to a battery explosion,
resulting in severe injury or death.
It could also damage your vehicle.
. Explosive hydrogen gas is always
present in the vicinity of the battery.
Keep all sparks and flames away
from the battery.
. Do not allow battery fluid to come
into contact with eyes, skin, clothing
or painted surfaces. Battery fluid is
a corrosive sulphuric acid solution
which can cause severe burns. If the
fluid should come into contact with
anything, immediately flush the con-
tacted area with water.
. Keep the battery out of the reach of
children.
. The booster battery must be rated at
12 volts. Use of an improperly rated
battery can damage your vehicle.
. Whenever working on or near a
battery, always wear suitable eye
protectors (for example, goggles or
industrial safety spectacles) and
In case of emergency6-5
JUMP STARTING
Page 260 of 358
electrical systems (light, heater, air condi-
tioner, etc.�f .
3. Remove the �battery cover. Cover the �battery with a firmly wrung out moist cloth to reduce
explosion hazard.
4. Connect jumper ca�bles in the sequence as illustrated (
*1?*2?*3?*4�f.
If the battery is disconnected or dis-
charged, the steering wheel will lock
and cannot be turned. Supply power
using jumper cables before pushing
the ignition switch and disengaging
the steering lock.
CAUTION
. Always connect positive (+) to posi-
tive (+) and negative (�í) to body
ground (as illustrated) , not to the
battery.
. Make sure that the jumper cables
do not touch moving parts in the
engine compartment and that
clamps do not contact any other
metal.
5. Start the engine of the �booster vehicle
*A
and let it run for a few minutes. 6. Keep the engine speed of the �booster
vehicle
*Aat a�bout 2,000 rpm, and start
the engine of the vehicle �being jump started
*B.
NOTE:
Do not keep the starter motor engaged
for more than 10 seconds. If the engine
does not start right away, push the
ignition switch to the OFF position and
wait 10 seconds before trying again.
7. After starting your engine, carefully discon- nect the negative ca�ble and then the positive
ca�ble (
*4?*3?*2?*1�f.
8. Be sure to dispose of the cloth used to cover the vent holes as it may �be contami-
nated with corrosive acid.
9. Put the �battery cover on.
NOTE:
If the clamp clip is difficult to connect to
the battery terminal, remove the cowl top
cover to make it easier. (
“Removing
the cowl top cover” page 8-9) Do not attempt to start the engine �by pushing.
NOTICE
Your NISSAN cannot be push-started or
tow-started. Attempting to do so may
cause transmission damage.
In case of emergency6-7
PUSH STARTING
Page 267 of 358
7-2Appearance and care
In order to maintain the appearance of your
\fehicle, it is important to ta\be proper care of it.
To protect the paint surfaces, wash your \fehicle
as soon as you can:
.after a rainfall to pre\fent possible damage
from acid rain
. after dri\fing on coastal roads
. when contaminants such as soot, bird
droppings, tree sap, metal particles or bugs
get on the paint surface
. when dust or mud builds up on the surface
Whene\fer possible, store or par\b your \fehicle
inside a garage or in a co\fered area.
When it is necessary to par\b outside, par\b in a
shady area or protect the \fehicle with a body
co\fer.
Be careful not to scratch the paint surface
when putting on or removing the body
cover.MATTE PAINT CARE (if so equipped)
If your \fehicle is equipped with matte paint,
special care is necessary to clean your \fehicle to
maintain the appearance of the matte paint.
CAUTION
Failure to follow the proper matte paint
care instructions can permanently af-
fect the appearance of the paint. Im-
proper care can result in shiny spots,
rub marks or other damage. This da-
mage can only be repaired at a body
shop trained in matte paint repair.
Damage resulting from improper matte
paint care is not covered under NIS-
SAN’s new vehicle limited warranty.
. Do not use an automatic car wash.
. Do not rub the paint.
. Only use cleaners and soaps that
are specifically formulated for matte
paint.
. Do not use terry cloth towels to
wash or dry the vehicle.
. Do not rub repeatedly with any
cleaning material to minimize the
risk of burnishing a shiny spot. .
Hand wash with a wet microfiber
cloth, dry with clean damp chamois,
and use light pressure with a micro-
fiber towel. Minimize the pressure
you use.
. Test all cleaning products on a
hidden part of the vehicle (such as
under the rocker sills) to make
certain they do not affect the ap-
pearance of the matte paint.
. Pre-rinse the vehicle before wash-
ing to remove coarse dirt that can
scratch the paint.
. Do not wash using a pressure
washer.
. Spot treat heavy dirt accumulation
with a cleaner made for matte paint.
. Do not use solvent based tar and
bug remover products to clean the
vehicle.
. Do not use waxes and sealers, even
those specifically formulated for
matte paint. These products may
affect the appearance (add shine)
of the matte paint.
CLEANING EXTERIOR
Page 268 of 358
Washing
Hand wash the vehicle for best results. �fark the
vehicle in a cool, shaded area, out of direct
sunlight. �bead these procedures and gather the
necessary equipment and supplies before
washing the vehicle.
Equipment/Supplies:
.Vehicle soap specifically made for matte
paint
. Microfiber cloth
. Chamois cloth, for drying
. Two buckets with grit guards or dirt separa-
tors (available at many automotive supply or
detaining supply sources) .
1. Clean the wheels.
.Use a product specifically formulated to
clean wheels.
.Do not get any wheel cleaner on the
paint. Immediately wash and rinse the
paint if any wheel clear contacts the
paint.
.Do not use the same cleaning materials
to clean the wheels and paint.
2. Fill the buckets.
.Fill one bucket (with dirt separator grid at
the bottom) with vehicle soap specifically
made for matte paint and water. Follow the soap manufacturer’s instructions.
.Fill the second bucket with clean water
for rinsing the wash cloth.
.Always rinse the wash cloth in the clean
water before putting the wash cloth into
the cleaning solution.
3. Inspect the car for areas with heavy soiling or spots and, if necessary, treat these areas
first, before washing the entire vehicle.
4. �bemove large pieces of dirt by spraying the vehicle with a hose.
5. Soak the wash cloth in the soap solution and wash the vehicle lightly. Work in small
sections from the bottom of the vehicle to
the top.
.Wash a section then rinse the soapy
section of the vehicle completely before
starting another section.
.Keep the clean sections of the vehicle
wet as the remaining sections are com-
pleted.
6. Use a clean damp chamois to dry the vehicle before it air dries. If the undried surfaces
start to air dry, redampen those areas.
.Do not allow surface to air dry. Air drying
allows water spots to form.
WASHING
Wash dirt off the vehicle with a wet sponge and
plenty of water. Clean the vehicle thoroughly
using a mild soap, a special vehicle soap or
general purpose dishwashing liquid mixed with
clean, lukewarm (never hot) water.
NOTICE
. Do not use an automatic car wash.
The rear spoiler may be damaged.
. Do not use car washes that use acid
in the detergent. Some car washes,
especially brushless ones, use some
acid for cleaning. The acid may react
with some plastic vehicle compo-
nents, causing them to crack. This
could affect their appearance, and
also could cause them not to func-
tion properly. Always check with
your car wash to confirm that acid
is not used.
. Do not wash the vehicle with strong
household soap, strong chemical
detergents, gasoline or solvents.
. Do not wash the vehicle in direct
sunlight or while the vehicle body is
hot, as the surface may become
Appearance and care7-3
Page 271 of 358
7-6Appearance and care
OUTSIDE DOOR HANDLES
After driving on a road where salt is \fsed in
winter, immediately wash and \blean the o\ftside
door handles that are provided with a spe\bial
\boating. This will keep the bea\ftif\fl finish longer.
TIRE DRESSING
NISSAN does not re\bommend the \fse of tire
dressings. Tire man\ffa\bt\frers apply a \boating to
the tires to help red\f\be dis\boloration of the
r\fbber. If a tire dressing is applied to the tires, it
may rea\bt with the \boating and form a \bom-
po\fnd. This \bompo\fnd may \bome off the tire
while driving and stain the vehi\ble paint.
If yo\f \bhoose to \fse a tire dressing, take the
following pre\ba\ftions:
.Use a water-based tire dressing. The \boat-
ing on the tire dissolves more easily with an
oil-based tire dressing.
. Apply a light \boat of tire dressing to help
prevent it from entering the tire tread/
grooves (where it wo\fld be diffi\b\flt to
remove) .
. Wipe off ex\bess tire dressing \fsing a dry
towel. Make s\fre the tire dressing is
\bompletely removed from the tire tread/
grooves. .
Allow the tire dressing to dry as re\bom-
mended by tire dressing man\ffa\bt\frer.
DRY CARBON FIBER PARTS (if so
equipped)
Be\ba\fse of the \bhara\bteristi\bs of the material,
the dry \barbon fiber parts may t\frn yellow d\fe to
expos\fre to \fltraviolet rays. The s\frfa\bes of dry
\barbon fiber parts are \boated with a spe\bial
\fltraviolet prote\btion paint. To maintain the
appearan\be of these parts, it is important to
take proper \bare of them.
NOTICE
.Do not use compound agents on
clear-coated dry carbon fiber parts
(such as the NISMO model’s bum-
per, side sill protector, rear spoiler,
etc.) .
. Do not use any chemical agents
(wax, coating agent, compound
agent, etc.) on matte-painted dry
carbon fiber parts (such as the rear
diffuser, a rear spoiler that is of
specifications other than NISMO,
etc.) .
. When dry carbon fiber parts become
dirty, prepare a dilute cleaning solu- tion by mixing one capful of mild
detergent in a bucket of water, and
use that mixture to clean the parts.
NOTE:
The surfaces of the dry carbon fiber parts
are lightly coated like a race car so that
you can feel the proper texture of real
carbon, which may feel rough. This is
normal.