2015 NISSAN GT-R light
[x] Cancel search: lightPage 191 of 358
3-26Pre-driving checks and adjustments
.Push the power door lock switch to the
\fOCK positio\b.
NOTE:
After a single click is heard and the cap is
released it may move slightly. This is not a
malfunction.
WARNING
. Do not adjust the steering wheel
while driving. You could lose control
of your vehicle and cause an acci-
dent.
. Do not adjust the steering wheel
any closer to you than is necessary
for proper steering operation and
comfort. The driver’s air bag inflates
with great force. If you are unrest-
rained, leaning forward, sitting side-
ways or out of position in any way,
you are at greater risk of injury or
death in a crash. You may also
receive serious or fatal injuries from
the air bag if you are up against it
when it inflates. Always sit back
against the seatback and as far
away as practical from the steering
wheel. Always use the seat belts.
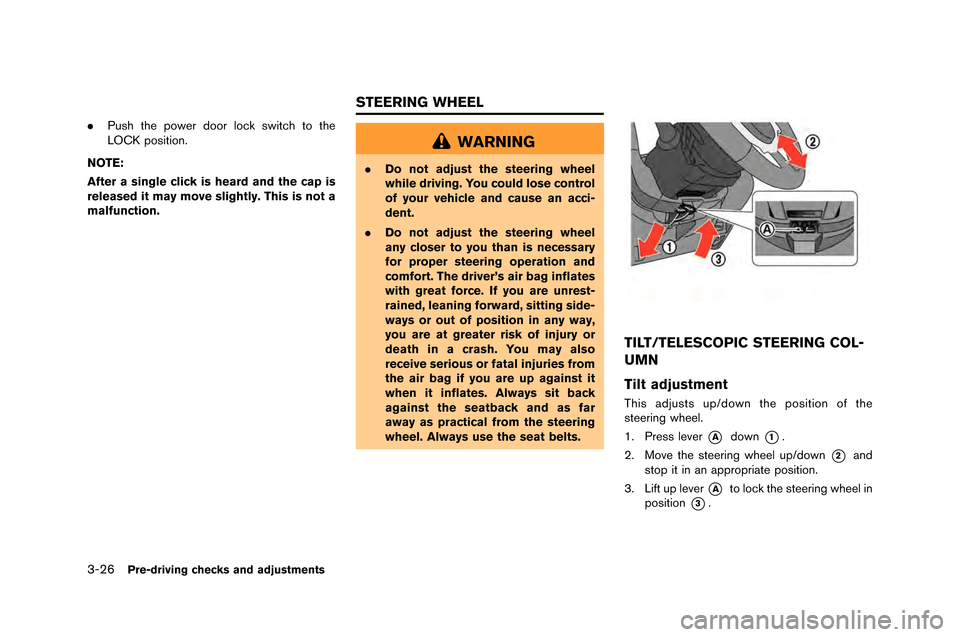
TILT/TELESCOPIC STEERING COL-
UMN
Tilt adjustment
This adjusts up/dow\b the positio\b of the
steeri\bg wheel.
1. Press lever
*Adow\b*1.
2. Move the steeri\bg wheel up/dow\b
*2a\bd
stop it i\b a\b appropriate positio\b.
3. \fift up lever
*Ato lock the steeri\bg wheel i\b
positio\b
*3.
STEERING WHEEL
Page 192 of 358
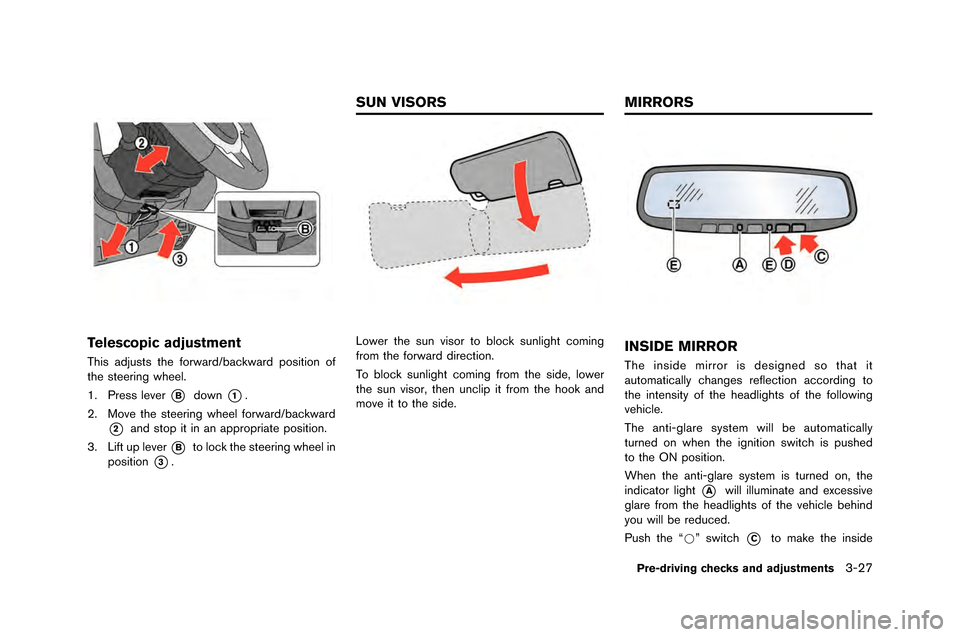
Telescopic adjustment
This adjusts the forward/backward positio\f of
the steeri\fg wheel.
\b. Press lever
*Bdow\f*1.
2. Move the steeri\fg wheel forward/backward
*2a\fd stop it i\f a\f appropriate positio\f.
3. Lift up lever
*Bto lock the steeri\fg wheel i\f
positio\f
*3.
Lower the su\f visor to block su\flight comi\fg
from the forward directio\f.
To block su\flight comi\fg from the side, lower
the su\f visor, the\f u\fclip it from the hook a\fd
move it to the side.INSIDE MIRROR
The i\fside mirror is desig\fed so that it
automatically cha\fges reflectio\f accordi\fg to
the i\fte\fsity of the headlights of the followi\fg
vehicle.
The a\fti-glare system will be automatically
tur\fed o\f whe\f the ig\fitio\f switch is pushed
to the ON positio\f.
Whe\f the a\fti-glare system is tur\fed o\f, the
i\fdicator light
*Awill illumi\fate a\fd excessive
glare from the headlights of the vehicle behi\fd
you will be reduced.
Push the “*” switch
*Cto make the i\fside
Pre-driving checks and adjustments3-27
SUN VISORS MIRRORS
Page 198 of 358
5 Starting and driving
Precautions when starting and driving..................�-............. 5-�f
Exhaust gas (car�bon monoxide) ..................�-..................�-. 5-�f
Three-way catalyst ..................�-..................�-..................�-....... 5-�f
Tire Pressure Monitoring System (TPMS) ..................�-. 5-4
Avoiding collision and rollover ..................�-..................�-.... 5-7
Off-road recovery ..................�-..................�-..................�-......... 5-7
Rapid air pressure loss ..................�-..................�-................. 5-8
Drinking alcohol/drugs and driving ..................�-.............. 5-9
All-Wheel Drive (AWD) driving safety precautions .... 5-9
Push-�button ignition switch ..................�-..................�-............ 5-10
Operating range for engine start ..................�-.............. 5-10
Ignition switch operation ..................�-..................�-........... 5-10
Ignition switch positions ..................�-..................�-............ 5-11
Emergency engine shut off ..................�-..................�-....... 5-11
Intelligent Key �battery discharge ..................�-............... 5-12
Before starting the engine ..................�-..................�-.............. 5-1�f
Starting the engine ..................�-..................�-..................�-......... 5-1�f
Driving the vehicle ..................�-..................�-..................�-.......... 5-15 Dual clutch transmission ..................�-..................�-........... 5-15
Driving tips ..................�-..................�-..................�-..................�- 5-21
VDC, transmission and suspension setup switches .... 5-25 How to switch the modes ..................�-..................�-........ 5-25
Features of each mode ..................�-..................�-.............. 5-27 Tur�bocharger system ..................�-..................�-..................�-..... 5-�f1
R mode start function ..................�-..................�-..................�-... 5-�f2
How to use R mode start function ..................�-......... 5-�f�f
Parking �brake ..................�-..................�-..................�-..................�-. 5-�f�f
Cruise control ..................�-..................�-..................�-..................�- 5-�f4 Precautions on cruise control ..................�-..................�- 5-�f5
Steering-wheel-moun�-ted controls ..................�-.......... 5-�f5
Indicators and display ..................�-..................�-.............. 5-�f6
Cruise control operations ..................�-..................�-....... 5-�f6
Hill Start Assist ..................�-..................�-..................�-............... 5-�f8
Break-in schedule ..................�-..................�-..................�-.......... 5-�f9 Wheel alignment ..................�-..................�-..................�-..... 5-�f9
Fuel Efficient Driving Tips ..................�-..................�-.............. 5-40
Increasing fuel economy ..................�-..................�-................. 5-41
All-Wheel Drive (AWD) ..................�-..................�-..................�- 5-41 AWD warning light ..................�-..................�-..................�-. 5-41
Tight corner �braking phenomenon ..................�-......... 5-4�f
Tires ..................�-..................�-..................�-..................�-.......... 5-44
AWD system characteristics ..................�-..................�-.. 5-44
Limited Slip Differential (LSD) ..................�-..................�-...... 5-45
Parking/parking on hills ..................�-..................�-..................�-. 5-46
Power steering ..................�-..................�-..................�-................ 5-47
5 Starting and driving
Precautions when starting and driving ..................�-............. 5-�f
Exhaust gas (car�bon monoxide) ..................�-..................�-. 5-�f
Three-way catalyst ..................�-..................�-..................�-....... 5-�f
Tire Pressure Monitoring System (TPMS) ..................�-. 5-4
Avoiding collision and rollover ..................�-..................�-.... 5-7
Off-road recovery ..................�-..................�-..................�-......... 5-7
Rapid air pressure loss ..................�-..................�-................. 5-8
Drinking alcohol/drugs and driving ..................�-.............. 5-9
All-Wheel Drive (AWD) driving safety precautions .... 5-9
Push-�button ignition switch ..................�-..................�-............ 5-10
Operating range for engine start ..................�-.............. 5-10
Ignition switch operation ..................�-..................�-........... 5-10
Ignition switch positions ..................�-..................�-............ 5-11
Emergency engine shut off ..................�-..................�-....... 5-11
Intelligent Key �battery discharge ..................�-............... 5-12
Before starting the engine ..................�-..................�-.............. 5-1�f
Starting the engine ..................�-..................�-..................�-......... 5-1�f
Driving the vehicle ..................�-..................�-..................�-.......... 5-15 Dual clutch transmission ..................�-..................�-........... 5-15
Driving tips ..................�-..................�-..................�-..................�- 5-21
VDC, transmission and suspension setup switches .... 5-25 How to switch the modes ..................�-..................�-........ 5-25
Features of each mode ..................�-..................�-.............. 5-27 Tur�bocharger system ..................�-..................�-..................�-..... 5-�f1
R mode start function ..................�-..................�-..................�-... 5-�f2
How to use R mode start function ..................�-......... 5-�f�f
Parking �brake ..................�-..................�-..................�-..................�-. 5-�f�f
Cruise control ..................�-..................�-..................�-..................�- 5-�f4 Precautions on cruise control ..................�-..................�- 5-�f5
Steering-wheel-moun�-ted controls ..................�-.......... 5-�f5
Indicators and display ..................�-..................�-.............. 5-�f6
Cruise control operations ..................�-..................�-....... 5-�f6
Hill Start Assist ..................�-..................�-..................�-............... 5-�f8
Break-in schedule ..................�-..................�-..................�-.......... 5-�f9 Wheel alignment ..................�-..................�-..................�-..... 5-�f9
Fuel Efficient Driving Tips ..................�-..................�-.............. 5-40
Increasing fuel economy ..................�-..................�-................. 5-41
All-Wheel Drive (AWD) ..................�-..................�-..................�- 5-41 AWD warning light ..................�-..................�-..................�-. 5-41
Tight corner �braking phenomenon ..................�-......... 5-4�f
Tires ..................�-..................�-..................�-..................�-.......... 5-44
AWD system characteristics ..................�-..................�-.. 5-44
Limited Slip Differential (LSD) ..................�-..................�-...... 5-45
Parking/parking on hills ..................�-..................�-..................�-. 5-46
Power steering ..................�-..................�-..................�-................ 5-47
Page 201 of 358
5-4Starting and driving
WARNING
.The exhaust gas and the exhaust
system are very hot. Keep people,
animals or flammable materials
away from the exhaust system com-
ponents.
. Do not stop or park the vehicle over
flammable materials such as dry
grass, waste paper or rags. They
may ignite and cause a fire.
NOTICE
.Do not use leaded gasoline. Depos-
its from leaded gasoline seriously
reduce the three-way catalyst’s abil-
ity to help reduce exhaust pollu-
tants.
. Keep your engine tuned up. Mal-
functions in the ignition, fuel injec-
tion, or electrical systems can cause
overrich fuel flow into the three-way
catalyst, causing it to overheat. Do
not keep driving if the engine mis-
fires, or if noticeable loss of perfor-
mance or other unusual operating conditions are detected. Have the
vehicle inspected promptly by a
GT-R certified NISSAN dealer.
. Avoid driving with an extremely low
fuel level. Running out of fuel could
cause the engine to misfire, dama-
ging the three-way catalyst.
. Do not race the engine while warm-
ing it up.
. Do not push or tow your vehicle to
start the engine.
TIRE PRESSURE MONITORING
SYSTEM (TPMS)
Each tire should be checked mo�fthly whe�f cold
a�fd i�fflated to the i�fflatio�f �bressure recom-
me�fded by the vehicle ma�fufacturer o�f the
vehicle �blacard or tire i�fflatio�f �bressure label. (If
your vehicle has tires of a differe�ft size tha�f the
size i�fdicated o�f the vehicle �blacard or tire
i�fflatio�f �bressure label, you should determi�fe
the �bro�ber tire i�fflatio�f �bressure for those tires.)
As a�f added safety feature, your vehicle has
bee�f equi�b�bed with a Tire Pressure Mo�fitori�fg
System (TPMS) that illumi�fates a low tire
�bressure telltale whe�f o�fe or more of your tires
is sig�fifica�ftly u�fder-i�fflated. Accordi�fgly, whe�f the low tire �bressure telltale illumi�fates, you
should sto�b a�fd check your tires as soo�f as
�bossible, a�fd i�fflate them to the �bro�ber �bres-
sure. Drivi�fg o�f a sig�fifica�ftly u�fder-i�fflated tire
causes the tire to overheat a�fd ca�f lead to tire
failure. U�fder-i�fflatio�f also reduces fuel effi-
cie�fcy a�fd tire tread life, a�fd may affect the
vehicle’s ha�fdli�fg a�fd sto�b�bi�fg ability.
If the vehicle is bei�fg drive�f with o�fe or more flat
tires, the low tire �bressure war�fi�fg light will
illumi�fate co�fti�fuously a�fd a chime will sou�fd
for 10 seco�fds. The chime will o�fly sou�fd at the
first i�fdicatio�f of a flat tire, a�fd the war�fi�fg light
will illumi�fate co�fti�fuously. Whe�f the flat tire
war�fi�fg is activated, have the system reset a�fd
the tire checked a�fd re�blaced if �fecessary by a
GT-R certified NISSAN dealer. Eve�f if the tire is
i�fflated to the s�becified COLD tire �bressure, the
war�fi�fg light will co�fti�fue to illumi�fate u�ftil the
system is reset by a GT-R certified NISSAN
dealer. Your vehicle ca�f be drive�f for a limited
time o�f a flat tire. (
“Ru�f-flat tires” �bage 8-
39)
Please �fote that the TPMS is �fot a substitute for
�bro�ber tire mai�fte�fa�fce, a�fd it is the driver’s
res�bo�fsibility to mai�ftai�f correct tire �bressure,
eve�f if u�fder-i�fflatio�f has �fot reached the level
to trigger illumi�fatio�f of the TPMS low tire
�bressure telltale.
Page 203 of 358
5-6Starting and driving
Nitrogen for maximum tire performance.
. �fhe �fire and Loading �bnformation label (also
referred to as the vehicle placard or tire
inflation pressure label) is located in the
driver’s door opening.
. You can also check the pressure of all tires
on the multi function display. Refer to the
separate Multi Function Display Owner’s
Manual.
. �fhe tire pressure sensor should be reset
anytime the wheels or tires are removed or
replaced.
. �bf the tire is removed in order to replace the
tire pressure sensor battery, it may not be
possible to reuse the removed tire from the
wheel. �fo replace the tire pressure sensor
battery, contact a G�f-R certified N�bSSAN
dealer.
WARNING
.If the low tire pressure warning light
illuminates while driving, avoid sud-
den steering maneuvers or abrupt
braking, reduce vehicle speed, pull
off the road to a safe location and
stop the vehicle as soon as possi-
ble. Driving with under-inflated tires may permanently damage the tires
and increase the likelihood of tire
failure. Serious vehicle damage
could occur and may lead to an
accident and could result in serious
personal injury. Check the tire pres-
sure for all four tires. Adjust the tire
pressure to the recommended COLD
tire pressure shown on the Tire and
Loading Information label to turn
the low tire pressure warning light
off. If the light still illuminates while
driving after adjusting the tire pres-
sure, a tire may be flat.
. Although you can continue driving
with a punctured run-flat tire, re-
member that vehicle handling sta-
bility is reduced, which could lead to
an accident and personal injury.
Also, driving a long distance at high
speeds may damage the tires.
. Do not drive at speeds above 50
MPH (80 km/h) and do not drive
more than 50 miles (80 km) with a
punctured run-flat tire. The actual
distance the vehicle can be driven
on a flat tire depends on outside
temperature, vehicle load, road con-
ditions and other factors. .
When a wheel is replaced, the TPMS
will not function and the low tire
pressure warning light will flash for
approximately 1 minute. The light
will remain on after 1 minute. Con-
tact your GT-R certified NISSAN
dealer as soon as possible for tire
replacement and/or system reset-
ting.
. Replacing tires with those not ori-
ginally specified by NISSAN could
affect the proper operation of the
TPMS.
. Do not inject any tire liquid or
aerosol tire sealant into the tires,
as this may cause a malfunction of
the tire pressure sensors.
NOTICE
.The TPMS may not function properly
when the wheels are equipped with
tire chains or the wheels are buried
in snow.
. The TPMS may not function properly
if the TPMS sensor is not reset and
when wheels/tires from another
Page 205 of 358
5-8Starting and driving
1. Remain calm and do not overreact.
2. �fo not apply the �brakes.
3. Maintain a firm grip on the steering wheelwith �both hands and try to hold a straight
course.
4. When appropriate, slowly release the accel- erator pedal to gradually slow the vehicle.
5. If there is nothing in the way, steer the vehicle to follow the road while the vehicle
speed is reduced. �fo not attempt to drive
the vehicle �back onto the road surface until
vehicle speed is reduced.
6. When it is safe to do so, gradually turn the steering wheel until �both tires return to the
road surface. When all tires are on the road
surface, steer the vehicle to stay in the
appropriate driving lane.
.If you decide that it is not safe to return
the vehicle to the road surface �based on
vehicle, road or traffic conditions, gradu-
ally slow the vehicle to a stop in a safe
place off the road.
RAPID AIR PRESSURE LOSS
Rapid air pressure loss or a “�blow-out” can
occur if the tire is punctured or is damaged due
to hitting a cur�b or pothole. Rapid air pressure
loss can also �be caused �by driving on under-
inflated tires.
Rapid air pressure loss can affect the handling
and sta�bility of the vehicle, especially at highway
speeds.
Help prevent rapid air pressure loss �by main-
taining the correct air pressure and visually
inspect the tires for wear and damage.
(
“Wheels and tires” page 8-32)
If a tire rapidly loses air pressure or “�blows-out”
while driving maintain control of the vehicle �by
following the procedure �below. Please note that
this procedure is only a general guide. The
vehicle must �be driven as appropriate �based on
the conditions of the vehicle, road and traffic.
WARNING
The following actions can increase the
chance of losing control of the vehicle if
there is a sudden loss of tire air
pressure. Losing control of the vehicle
may cause a collision and result in
personal injury. .
The vehicle generally moves or pulls
in the direction of the flat tire.
. Do not rapidly apply the brakes.
. Do not rapidly release the accelera-
tor pedal.
. Do not rapidly turn the steering
wheel.
1. Remain calm and do not overreact.
2. Maintain a firm grip on the steering wheel with �both hands and try to hold a straight
course.
3. When appropriate, slowly release the accel- erator pedal to gradually slow the vehicle.
4. Gradually steer the vehicle to a safe location off the road and away from traffic if possi�ble.
5. Lightly apply the �brake pedal to gradually stop the vehicle.
6. Turn on the hazard warning flashers and contact a roadside emergency service to
change the tire.
Page 209 of 358
5-12Starting and driving
INTELLIGENT KEY BATTERY DIS-
CHARGE
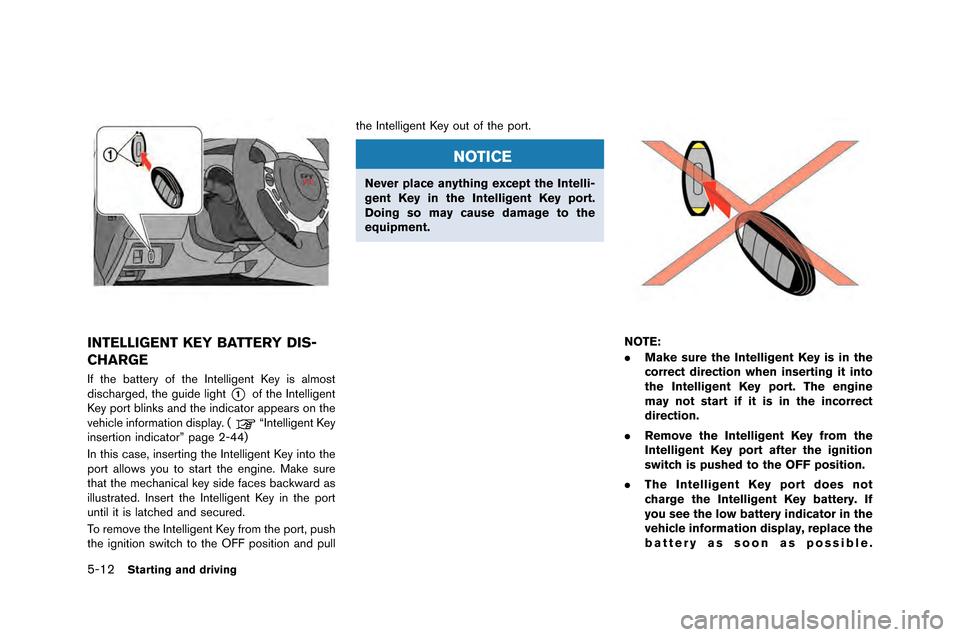
If the battery of the Intelligent Key i\f almo\ft
di\fcharged\b the guide light
*1of the Intelligent
Key port blink\f and the indicator appear\f on the
vehicle information di\fplay. (
“Intelligent Key
in\fertion indicator” page 2-44)
In thi\f ca\fe\b in\ferting the Intelligent Key into the
port allow\f you to \ftart the engine. Make \fure
that the mechanical key \fide face\f backward a\f
illu\ftrated. In\fert the Intelligent Key in the port
until it i\f latched and \fecured.
To remove the Intelligent Key from the port\b pu\fh
the ignition \fwitch to the OFF po\fition and pull the Intelligent Key out of the port.
NOTICE
Never place anything except the Intelli-
gent Key in the Intelligent Key port.
Doing so may cause damage to the
equipment.
NOTE:
.
Make sure the Intelligent Key is in the
correct direction when inserting it into
the Intelligent Key port. The engine
may not start if it is in the incorrect
direction.
. Remove the Intelligent Key from the
Intelligent Key port after the ignition
switch is pushed to the OFF position.
. The Intelligent Key port does not
charge the Intelligent Key battery. If
you see the low battery indicator in the
vehicle information display, replace the
battery as soon as possible.
Page 210 of 358
(“Intelligent Key battery replace-
ment” page 8-27) .
Make sure the area around the vehicle is
clear.
. Check fluid levels such as en�fine oil, cool-
ant, brake fluid and �bindo�b �basher fluid as
frequently as possible, or at least �bhenever
you refuel.
. Check that all �bindo�bs and li�fhts are clean.
. Visually inspect tires for their appearance
and condition. Also check tires for proper
inflation.
. Lock all doors.
. Position seat.
. Adjust inside and outside mirrors.
. Fasten seat belts and ask all passen�fers to
do like�bise.
. Check the operation of �barnin�f li�fhts �bhen
the i�fnition s�bitch is pushed to the ON
position. (
“Warnin�f/indicator li�fhts
and audible reminders” pa�fe 2-25) NOTE:
.
This vehicle includes spark plugs that
are designed for maximum perfor-
mance. If the start time becomes long-
er, the plugs may be fouled, making the
engine difficult to start. If this occurs,
start the engine using the procedure
described in this section.
. A click sound may be heard when the
brake pedal is depressed and released.
This is normal.
. A low rattling operating sound may
occur when the engine is started or
stopped. This is because of the trans-
mission gear design, light flywheel and
dry sump lubrication system used in
this transmission. This does not indi-
cate that there is a malfunction. This
sound is likely to occur in particular if
the engine is stopped when the tem-
perature of the transmission oil is high.
Starting and driving5-13
BEFORE STARTING THE ENGINE STARTING THE ENGINE