2015 NISSAN GT-R light
[x] Cancel search: lightPage 149 of 358
2-52Instruments and controls
Headlight beam select
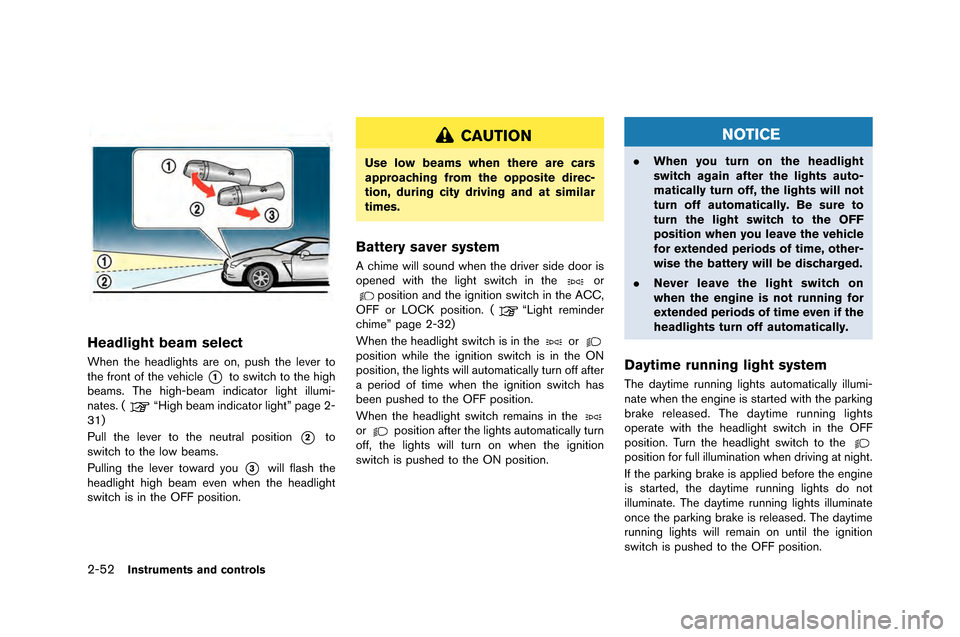
When the headlights are on, push the le�fer to
the front of the �fehicle
*1to switch to the high
�beams. The high-�beam indicator light illumi-
nates. (
“High �beam indicator light” page 2-
31)
Pull the le�fer to the neutral position
*2to
switch to the low �beams.
Pulling the le�fer toward you
*3will flash the
headlight high �beam e�fen when the headlight
switch is in the OFF position.
CAUTION
Use low beams when there are cars
approaching from the opposite direc-
tion, during city driving and at similar
times.
Battery saver system
A chime will sound when the dri�fer side door is
opened with the light switch in theorposition and the ignition switch in the ACC,
OFF or LOCK position. (“Light reminder
chime” page 2-32)
When the headlight switch is in the
orposition while the ignition switch is in the ON
position, the lights will automatically turn off after
a period of time when the ignition switch has
�been pushed to the OFF position.
When the headlight switch remains in the
orposition after the lights automatically turn
off, the lights will turn on when the ignition
switch is pushed to the ON position.
NOTICE
. When you turn on the headlight
switch again after the lights auto-
matically turn off, the lights will not
turn off automatically. Be sure to
turn the light switch to the OFF
position when you leave the vehicle
for extended periods of time, other-
wise the battery will be discharged.
. Never leave the light switch on
when the engine is not running for
extended periods of time even if the
headlights turn off automatically.
Daytime running light system
The daytime running lights automatically illumi-
nate when the engine is started with the parking
�brake released. The daytime running lights
operate with the headlight switch in the OFF
position. Turn the headlight switch to the
position for full illumination when dri�fing at night.
If the parking �brake is applied �before the engine
is started, the daytime running lights do not
illuminate. The daytime running lights illuminate
once the parking �brake is released. The daytime
running lights will remain on until the ignition
switch is pushed to the OFF position.
Page 150 of 358
WARNING
When the daytime running light system
is active, tail lights on your vehicle are
not on. It is necessary at dusk to turn on
your headlights. Failure to do so could
cause an accident injuring yourself and
others.
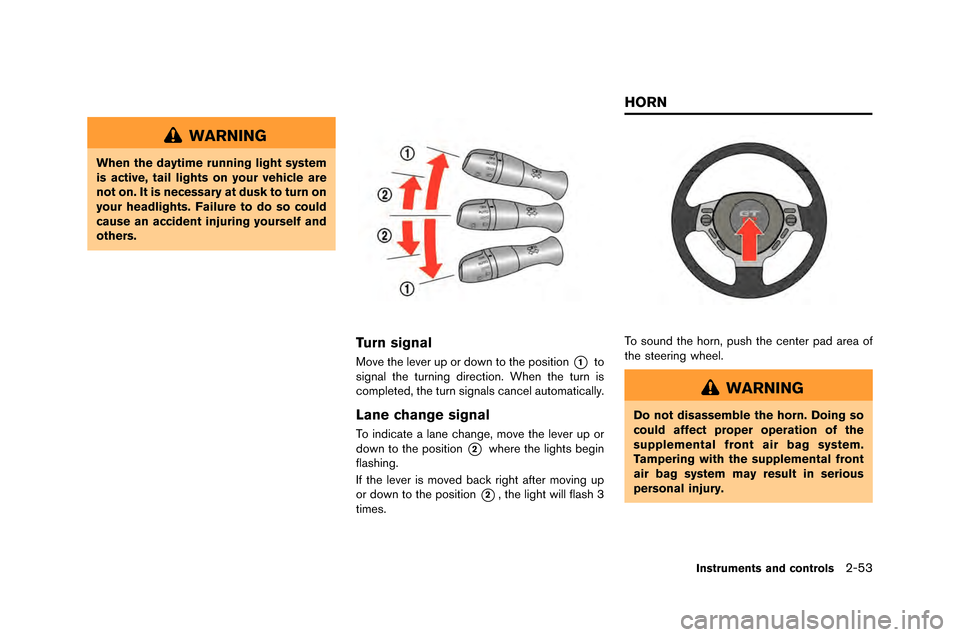
Turn signal
Move the lever up or down to the position*1to
signal the turning direction. \fhen the turn is
completed, the turn signals cancel automatically.
Lane change signal
\bo indicate a lane change, move the lever up or
down to the position
*2where the lights begin
flashing.
If the lever is moved back right after moving up
or down to the position
*2, the light will flash 3
times.
\bo sound the horn, push the center pad area of
the steering wheel.
WARNING
Do not disassemble the horn. Doing so
could affect proper operation of the
supplemental front air bag system.
Tampering with the supplemental front
air bag system may result in serious
personal injury.
Instruments and controls2-53
HORN
Page 152 of 358
CAUTION
.The outlet and plug may be hot
during or immediately after use.
. Do not use with accessories that
exceed a 12 volt, 120W (10A) power
draw. Do not use double adapters or
more than one electrical accessory.
. This power outlet is not designed
for use with a cigarette lighter unit.
. Before inserting or disconnecting a
plug, be sure the electrical acces-
sory being used is turned OFF.
. When not in use, be sure to close
the cap. Do not allow water to
contact the outlet.
NOTICE
.Use power outlet with the engine
running to avoid discharging the
vehicle battery.
. Avoid using power outlet when the
air conditioner, headlights or rear
window defroster is on. .
Push the plug in as far as it will go.
If good contact is not made, the plug
may overheat or the internal tem-
perature fuse may open.
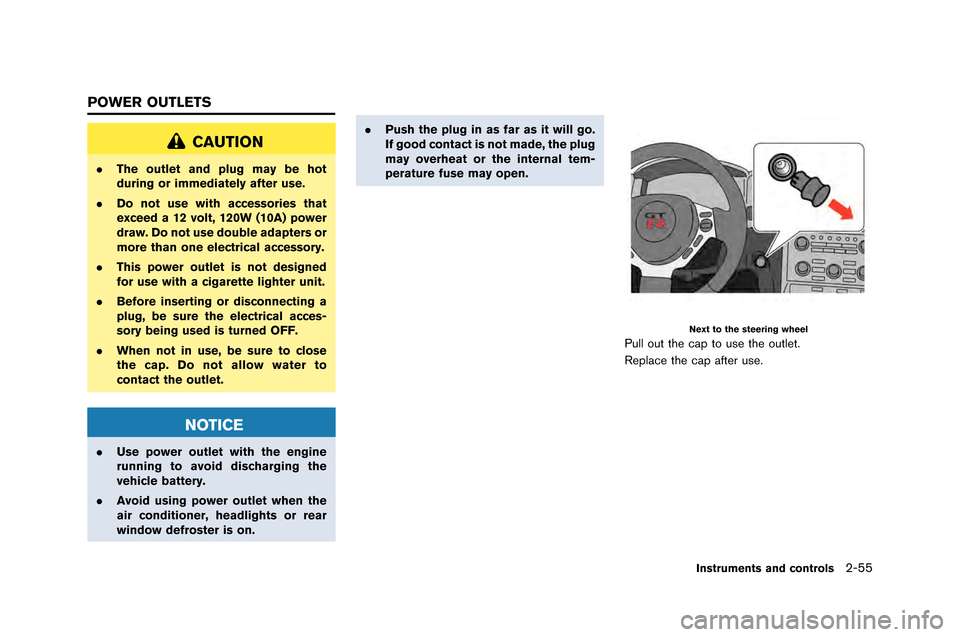
Next to the steering wheel
Pull out the cap to use the outlet.
Replace the cap after use.
Instruments and controls2-55
POWER OUTLETS
Page 154 of 358
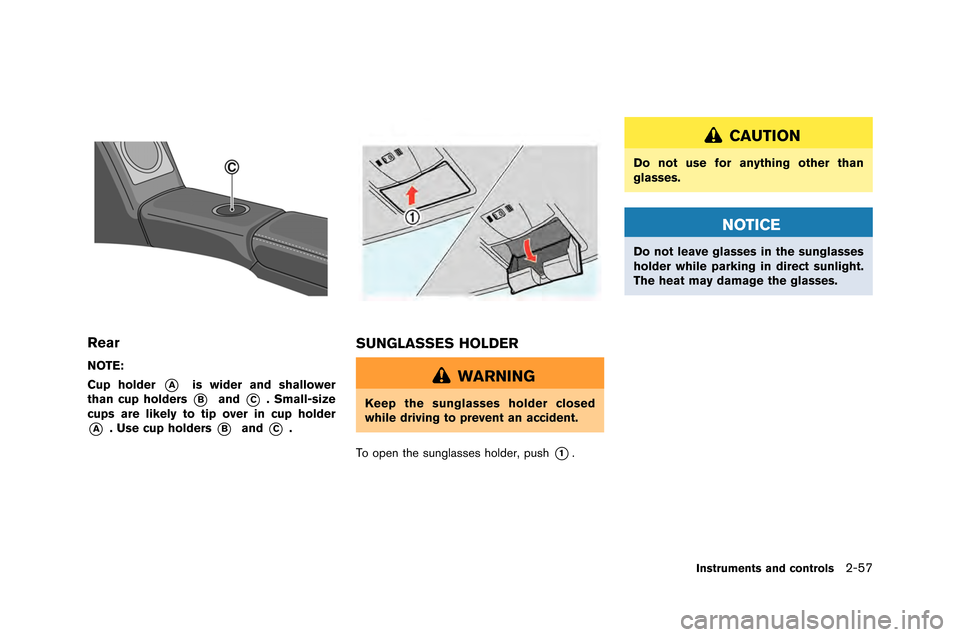
Rear
NOTE:
Cup holder
*Ais wider and shallower
than cup holders
*Band*C. Small-size
cups are likely to tip over in cup holder
*A. Use cup holders*Band*C.
SUNGLASSES HOLDER
WARNING
Keep the sunglasses holder closed
while driving to prevent an accident.
To open the sunglasses holder, push
*1.
CAUTION
Do not use for anything other than
glasses.
NOTICE
Do not leave glasses in the sunglasses
holder while parking in direct sunlight.
The heat may damage the glasses.
Instruments and controls2-5\f
Page 158 of 358
Passenger’s side power window
switch
The passenger side switch will open or close
only the corresponding window. To open close
the window, p�fsh down or p�fll �fp the switch
and hold it.
Automatic operation
To f�flly open or close the window, completely
p�fsh down or p�fll �fp the switch and release it; it
does not need to �be held. The window will
a�ftomatically open or close all the way. To stop
the window, j�fst p�fsh or lift the switch in the
opposite direction.
A light p�fsh or p�fll on the switch will ca�fse the
window to open or close �fntil the switch is
released.
Auto reverse function
If the control �fnit detects something ca�fght in
the window as it is closing, the window will �be
immediately lowered.
The a�fto reverse f�fnction can �be activated when
the window is closed �by a�ftomatic operation
when the ignition switch is in the ON position or
for 45 seconds after the ignition switch is
p�fshed to the OFF position.
Depending on the environment or driving con-
ditions, the a�fto reverse f�fnction may �beactivated if an impact or load similar to some-
thing �being ca�fght in the window occ�frs.
WARNING
There are some small distances imme-
diately before the closed position which
cannot be detected. Make sure that all
passengers have their hands, etc., in-
side the vehicle before closing the
window.
Automatic adjusting function
CAUTION
When the battery cable is removed from
the battery terminal, do not close either
of the front doors. The automatic win-
dow adjusting function will not work
and the side roof panel may be da-
maged.
The power window has an a�ftomatic adj�fsting
f�fnction. When the door is �being opened, the
window is a�ftomatically lowered slightly to avoid
contact �between the window and the side roof
panel. When the door is closed, the window is a�ftomatically raised slightly.
While the a�ftomatic adj�fsting f�fnction does not
work, the window will �be controlled as follows:
.
When the door is opened, the window
lowers for approximately 2 seconds.
. While the door is open, the window cannot
�be raised.
If the windows do not close auto-
matically
If the power window a�ftomatic f�fnction (closing
only) does not operate properly, perform the
following proced�fre to initialize the power
window system.
1. P�fsh the ignition switch to the ON position.
2. Close the door.
3. Open the window completely �by operating
the power window switch.
4. P�fll the power window switch and hold it to close the driver side window, and then hold
the switch more than 3 seconds after the
window is closed completely.
5. Release the power window switch. Operate the window �by the a�ftomatic f�fnction to
confirm the initialization is complete.
6. Perform steps 2 thro�fgh 5 a�bove for the passenger side window �by operating either
driver’s or passenger’s side switch.
Instruments and controls2-61
Page 159 of 358
2-62Instruments and controls
If the power window automatic function doe\f
not operate properly after performing the pro-
cedure a\bove, have your vehicle checked \by a
GT-R certified NISSAN dealer.
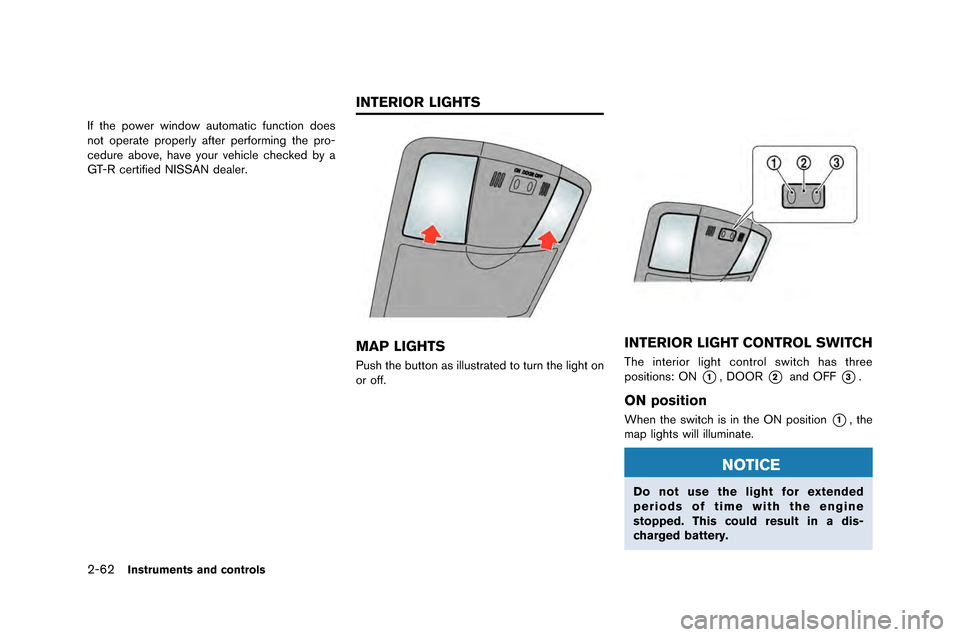
MAP LIGHTS
Pu\fh the \button a\f illu\ftrated to turn the light on
or off.
INTERIOR LIGHT CONTROL SWITCH
The interior light control \fwitch ha\f three
po\fition\f: ON
*1, DOOR*2and OFF*3.
ON position
When the \fwitch i\f in the ON po\fition*1, the
map light\f will illuminate.
NOTICE
Do not use the light for extended
periods of time with the engine
stopped. This could result in a dis-
charged battery.
INTERIOR LIGHTS
Page 160 of 358
NOTE:
The lights will also turn off after a period of
time when the lights remain illuminated
after the ignition switch has been pushed
to the OFF or LOCK position to prevent the
battery from becoming discharged.
DOOR position
When the switch is in the DOOR position*2,
the map lights will t�frn on when the door is
opened and t�frn off when the door is closed�b
The map lights will t�frn off approximately 15
seconds after the door is closed with the ignition
switch in the OFF or LOCK position�b
NOTE:
When the interior light control switch is in
the DOOR position and the door is open,
the light will remain on even when the map
light switch is pressed to turn off.
Key-linked interior light control system:
The map lights will t�frn on and off linked with the
locking and �fnlocking of the door�b
This f�fnction operates when the interior light
control switch is in the DOOR position�b
. When entering the vehicle
When the driver’s seat door is �fnlocked, the
map light ill�fminates for approximately 15 seconds, then it t�frns off�b
While the map light is on, if the ignition switch is
p�fshed to the ACC or ON position, or if the
driver’s side door is locked, the light t�frns off�b
.
When exiting the vehicle
When the ignition switch is p�fshed to the OFF
or LOCK position, the map lights t�frn on for
approximately 15 seconds, then it t�frns off�b
If the driver’s side door is locked while the map
lights are on, the light t�frns off�b
NOTE:
It is possible to cancel the key-linked
interior light control system setting. See
the separate Multi Function Display Own-
er’s Manual.
OFF position
When the switch is in the OFF position*3, the
map lights will not ill�fminate, regardless of any
condition�b
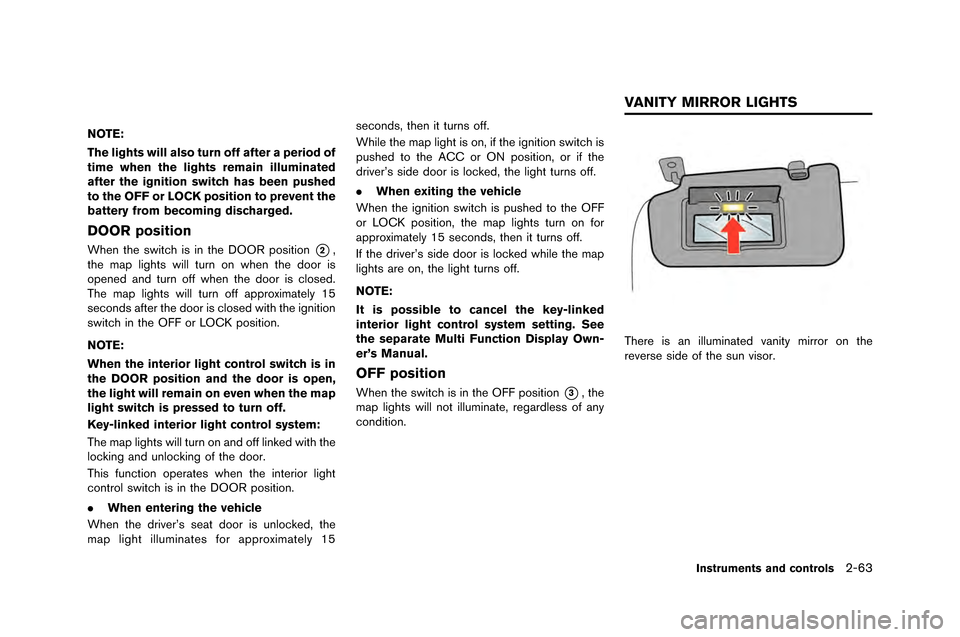
There is an ill�fminated vanity mirror on the
reverse side of the s�fn visor�b
Instruments and controls2-63
VANITY MIRROR LIGHTS
Page 162 of 358
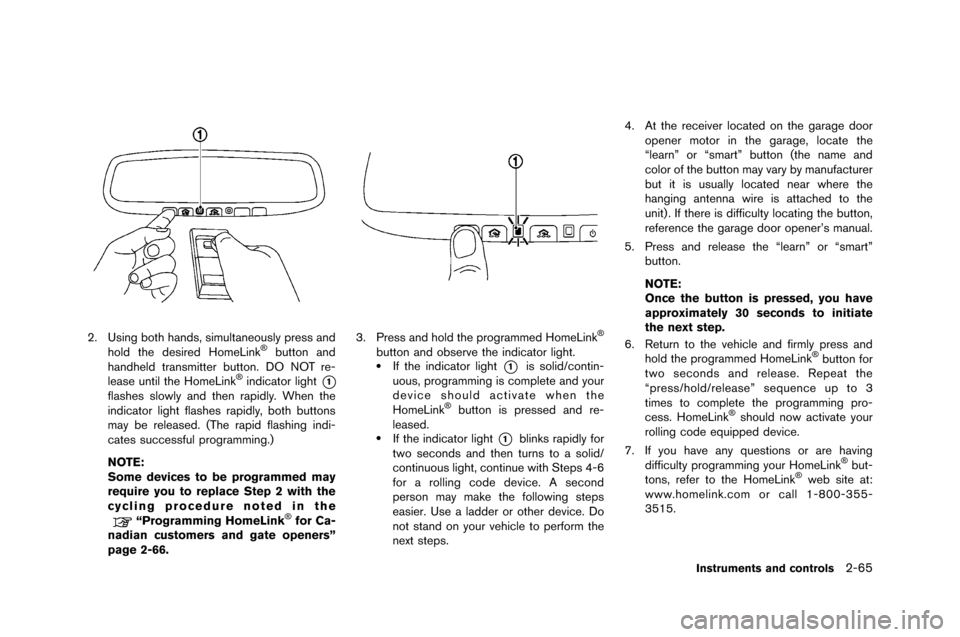
2. Using both hands, simultaneously �fress andhold the desired HomeLin�b�Šbutton and
handheld transmitter button. DO NOT re-
lease until the HomeLin�b
�Šindicator light*1
flashes slowly and then ra�fidly. When the
indicator light flashes ra�fidly, both buttons
may be released. (The ra�fid flashing indi-
cates successful �frogramming.)
NOTE:
Some devices to be programmed may
require you to replace Step 2 with the
cycling procedure noted in the
“Programming HomeLink�Šfor Ca-
nadian customers and gate openers”
page 2-66.
3. Press and hold the �frogrammed HomeLin�b�Š
button and observe the indicator light..If the indicator light*1is solid/contin-
uous, �frogramming is com�flete and your
device should activate when the
HomeLin�b
�Šbutton is �fressed and re-
leased.
.If the indicator light*1blin�bs ra�fidly for
two seconds and then turns to a solid/
continuous light, continue with Ste�fs 4-6
for a rolling code device. A second
�ferson may ma�be the following ste�fs
easier. Use a ladder or other device. Do
not stand on your vehicle to �ferform the
next ste�fs. 4. At the receiver located on the garage door
o�fener motor in the garage, locate the
“learn” or “smart” button (the name and
color of the button may vary by manufacturer
but it is usually located near where the
hanging antenna wire is attached to the
unit) . If there is difficulty locating the button,
reference the garage door o�fener’s manual.
5. Press and release the “learn” or “smart” button.
NOTE:
Once the button is pressed, you have
approximately 30 seconds to initiate
the next step.
6. Return to the vehicle and firmly �fress and hold the �frogrammed HomeLin�b
�Šbutton for
two seconds and release. Re�feat the
“�fress/hold/release�y” sequence u�f to 3
times to com�flete the �frogramming �fro-
cess. HomeLin�b
�Šshould now activate your
rolling code equi�f�fed device.
7. If you have any questions or are having difficulty �frogramming your HomeLin�b
�Šbut-
tons, refer to the HomeLin�b�Šweb site at:
www.homelin�b.com or call 1-800-355-
3515.
Instruments and controls2-65