2015 MITSUBISHI OUTLANDER III light
[x] Cancel search: lightPage 131 of 446
Outside rearview mirrors 5-54 Features and controls
5
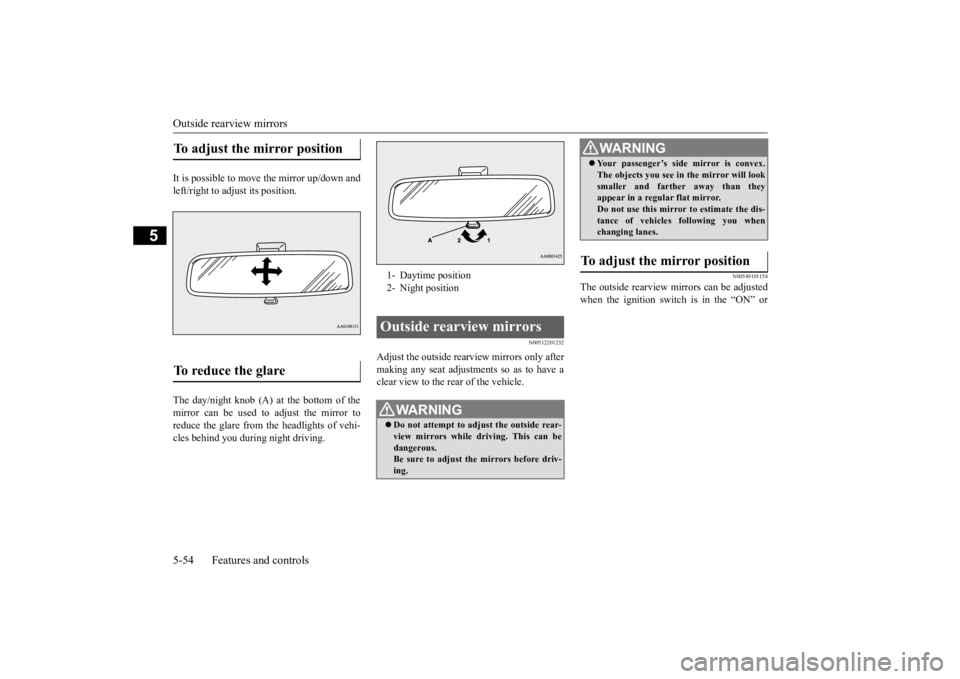
It is possible to move the mirror up/down and left/right to adjust its position. The day/night knob (A) at the bottom of the mirror can be used to adjust the mirror to reduce the glare from the headlights of vehi- cles behind you during night driving.
N00512201232
Adjust the outside rearview mirrors only aftermaking any seat adjustme
nts so as to have a
clear view to the rear of the vehicle.
N00549101154
The outside rearview mirrors can be adjustedwhen the ignition switch is in the “ON” or
To adjust the mirror position To reduce the glare
1- Daytime position 2- Night positionOutside rearview mirrors
WA R N I N G Do not attempt to adjust the outside rear- view mirrors while driving. This can be dangerous. Be sure to adjust the mirrors before driv-ing.
Your passenger’s side mirror is convex. The objects you see in
the mirror will look
smaller and farthe
r away than they
appear in a regular flat mirror. Do not use this mirror to estimate the dis- tance of vehicles following you whenchanging lanes.
To adjust the mirror position
WA R N I N G
BK0211800US.book 54 ページ 2014年3月12日 水曜日 午後2時42分
Page 132 of 446
Ignition switch
Features and controls 5-55
5
“ACC” position or the ope
ration mode is put
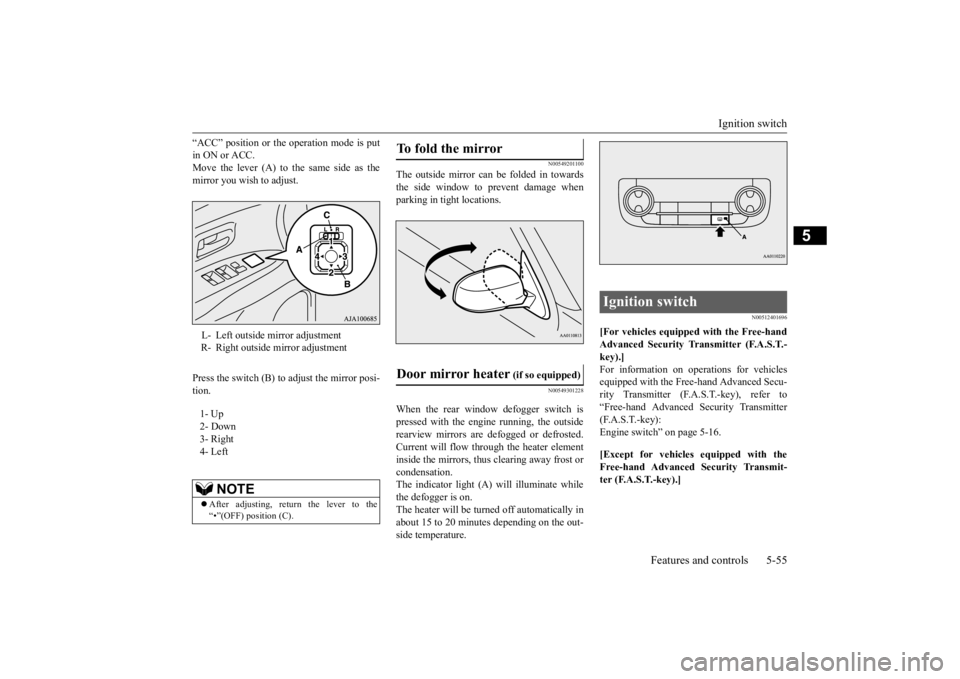
in ON or ACC.Move the lever (A) to the same side as the mirror you wish to adjust. Press the switch (B) to adjust the mirror posi- tion.
N00549201100
The outside mirror can be folded in towards the side window to prevent damage when parking in tight locations.
N00549301228
When the rear window defogger switch is pressed with the engine running, the outside rearview mirrors are defogged or defrosted.Current will flow through the heater element inside the mirrors, thus clearing away frost or condensation.The indicator light (A) will illuminate while the defogger is on. The heater will be turned off automatically inabout 15 to 20 minutes depending on the out- side temperature.
N00512401696
[For vehicles equipped with the Free-hand Advanced Security Tr
ansmitter (F.A.S.T.-
key).] For information on operations for vehiclesequipped with the Free-hand Advanced Secu- rity Transmitter (F.A
.S.T.-key), refer to
“Free-hand Advanced
Security Transmitter
(F.A.S.T.-key): Engine switch” on page 5-16. [Except for vehicles equipped with the Free-hand Advanced Security Transmit-ter (F.A.S.T.-key).]
L- Left outside mirror adjustment R- Right outside mirror adjustment 1- Up 2- Down 3- Right 4- Left
NOTE
After adjusting, return the lever to the “•”(OFF) position (C).
To fold the mirror Door mirror heater
(if so equipped)
Ignition switch
BK0211800US.book 55 ページ 2014年3月12日 水曜日 午後2時42分
Page 135 of 446

Starting the engine 5-58 Features and controls
5
Remove the key at
the “LOCK” position.
Turn the steering wheel until it is locked. Turn the key to the “ACC” position while moving the steering
wheel slightly.
N00512601803
[For vehicles equipped with the Free-hand Advanced Security Transmitter (F.A.S.T.- key).] For information on operation for vehiclesequipped with the Free-hand Advanced Secu- rity Transmitter (F.A.S.T.-key), refer to
“Free-hand Advanced
Security Transmitter
(F.A.S.T.-key): Starting” on page5-12. [Except for vehicles equipped with the Free-hand Advanced Se
curity Transmit-
ter (F.A.S.T.-key).] Do not operate the starter motor continu- ously for longer than 15 seconds as this could run the battery
down or damage the
starter motor. If the engine does not start, turn the ignition switch back to the “OFF” or “LOCK” position, wait a few seconds,and then try again. Trying repeatedly with the engine or starter motor still turning will damage the starter mechanism. If the engine will not
start because the bat-
tery is weak or discharged, refer to “Jump-starting the engine” (on page 8-2)for instructions. A longer warm up period will only con- sume extra fuel. The engine is warmed upenough for driving when the bar graph of engine coolant temper
ature display starts
to move or the low coolant temperatureindicator goes out. Refer to “Engine cool- ant temperature display” on page 5-128 or “Low coolant temper
ature indicator” on
page 5-166.
This model is equipped with an electronically controlled fuel injection system. This is a sys-tem that automatically controls fuel injection. There is usually no need to depress the accel- erator pedal when starting the engine.The starter should not be run for more than 15 seconds at a time. To prevent battery drain, wait a few secondsbetween attempts to restart the engine. 1. Make sure all occupants are properly seated with seat belts fastened.
To l o c k
To u n l o c k
CAUTION Remove the key when leaving the vehicle.NOTE
If the front wheels are turned, the anti-theft lock may sometimes make it difficult to turn the key from “LOCK” to “ACC”. Firmlyturn the steering wheel to the left or to the right as you turn the key.
Starting the engine
Tips for starting
WA R N I N G Never run the engine in
a closed or poorly
ventilated area any longer than is neededto move your vehicle
out of the area. Car-
bon monoxide gas, wh
ich is odorless and
extremely poisonous, could build up and cause serious injury or death.CAUTION Do not push-start the vehicle.Do not run the engine at high rpms or drive at high speeds until
the engine has had a
chance to warm up. Release the ignition sw
itch as soon as the
engine starts. Otherwis
e, the starter motor
will be damaged
Starting the engine
BK0211800US.book 58 ページ 2014年3月12日 水曜日 午後2時42分
Page 136 of 446

Starting the engine
Features and controls 5-59
5
2. Insert the ignition key. 3. Press and hold the
brake pedal down with
your right foot. 4. Make sure the selector
lever is in the “P”
(PARK) position.5. Turn the ignition switch to the “ON” posi- tion and make certain that all warning lights are functioning properly beforestarting the engine. 6. Turn the ignition switch to the “START” position without pressi
ng the accelerator
pedal. Release the ignition switch when the engine starts.
After several attempts, you may experience that the engine still does not start. 1. Make sure that all electric devices, such as lights, air conditio
ning blower and rear
window defogger, are turned off.
2. While depressing the brake pedal, press the accelerator peda
l halfway and hold it
there, then crank th
e engine. Release the
accelerator pedal, immediately after the engine starts.3. If the engine still will not start, the engine could be flooded with too much gasoline. While depressing the brake pedal, pushthe accelerator pedal all the way down and hold it there, then crank the engine for 5 to 6 seconds. Retu
rn the ignition switch
to the “OFF” or “LOCK” position and release the accelerator pedal. Wait a fewseconds, and then crank the engine again for 5 to 6 seconds while depressing the brake pedal, but do no
t push the accelera-
tor pedal. Release the ignition key if the engine starts. If the
engine fails to start,
repeat these procedures
. If the engine still
will not start, cont
act your local Mitsubi-
shi Motors dealer or
a repair facility of
your choice for assistance.
When the ambient temperature is -22 °F (-30 °C) or lower, it may not be possible to startfrom a standstill even with the selector lever
in the “D” (DRIVE) or “R” (REVERSE) position.This occurs because the transaxle has not warmed up sufficiently
; it does not indicate a
problem. If this occu
rs, place the selector
lever in the “P” (PAR
K) position and let the
engine idle for at
least 10 minutes.
The transaxle will wa
rm up, and you will be
able to start normally. Do not leave the vehicle during warm-up operation. The MIVEC engine automatically switches its intake-valve control between a low-speed mode and a high-speed mode in accordance with driving conditions for maximum engineperformance.
NOTE
Minor noises may be heard on engine start- up. These will disappear as the engine warmsup.
When the engine is hard to start
Startability of automatic transaxle vehicle and CVT vehicle with ambient temperature of -22 °F (-30 °C) or lower
Using the MIVEC engine
NOTE
To protect the engine
, the high-speed mode
may not be selected wh
ile the engine coolant
temperature is low. In such a case, the engine revolutions do not rise to over 5,000 rpmeven if the accelerato
r pedal is depressed.
BK0211800US.book 59 ページ 2014年3月12日 水曜日 午後2時42分
Page 143 of 446
Automatic transaxle (if so equipped) 5-66 Features and controls
5
N00514501369
To gain extra acceleration in “D” (DRIVE) position (when passing another vehicle) push
the accelerator to the floor. The automatic transaxle will automatically downshift. For short waiting periods, such as at traffic lights, the vehicle can be
left in gear and held
stationary with the service brake. For longer waiting periods with the engine running, place th
e selector lever in the “N”
(NEUTRAL) position a
nd apply the parking
brake, while holding the vehicle stationary with the service brake.Prior to moving off after having stopped the vehicle, make sure that
the selector lever is in
“D” (DRIVE) position or Sports mode posi-tion.
NOTE
While driving in sports mode, the sports mode display may change to show “D” andshifting in sports
mode may no longer be
possible. This indicates that controls to drive in the “D” position are operati
ng normally in order
to lower the temperature of the automatic transaxle fluid; it doe
s not indicate a mal-
function. Once the temperature of the auto-matic transaxle fluid
drops, shifting in the
sports mode will be possible again.
Operation of the automatic transaxle
CAUTION Before selecting a gear
with the engine run-
ning and the vehicle
stationary, firmly
depress the brake pedal to prevent the vehi-cle from creeping. The vehicle will begin to
move as soon as the
gear is engaged, espe
cially when the engine
speed or idle speed is
high, or with the air
conditioning operating. Do not release the br
ake pedal until you are
ready to drive away. Depress the brake pedal with the right foot at all times.Using the left foot c
ould cause driver move-
ment delay in case of an emergency.
To prevent sudden acce
leration, never run
the engine at high rpms when shifting fromthe “P” (PARK) or “N” (NEUTRAL). Operating the accelerator pedal while the other foot is resting on the brake pedal willaffect braking efficiency and may cause pre- mature wear of brake pads. Use the selector lever in the correct shift position in accordance with driving condi- tions.Never coast downhill backward in the driv- ing shift position {“D” (DRIVE), “L” (LOW) position or sports mode} or coastforward in the “R” (REVERSE) position. Engine stopping and increased brake pedal and steering effort could
lead to an accident.
Do not rev the engine
with the brake pedal
pressed when the vehicle is stationary.This can damage the transaxle. Also, when you depress
the accelerator pedal
while holding down the brake pedal with theselector lever in th
e “D” (DRIVE) position,
the engine revolutions
may not rise as high
as when performing the same operation withthe selector lever in the “N” (NEUTRAL) position.
Passing acceleration
CAUTION
NOTE
In sports mode, downshi
fts do not take place
when the accelerator is depressed all the way to the floor.
Waiting
CAUTION To avoid transaxle over
heating, never try to
keep your vehicle stationary on a hill byusing the accelerator
pedal. Always apply
the parking brake and/or service brake.
BK0211800US.book 66 ページ 2014年3月12日 水曜日 午後2時42分
Page 151 of 446

Electronically controlled 4W
D system (if so equipped)
5-74 Features and controls
5
For short waiting periods, such as at traffic lights, the vehicle can be
left in selector lever
position and held stationary with the servicebrake. For longer waiting periods with the engine running, place th
e selector lever in the “N”
(NEUTRAL) position a
nd apply the parking
brake, while holding the vehicle stationary with the service brake.Prior to moving off after having stopped the vehicle, make sure that
the selector lever is in
“D” (DRIVE) position or
Sports mode posi-
tion.
To park the vehicle, fi
rst bring it to a com-
plete stop, fully engage the parking brake, and then move the sele
ctor lever to the “P”
(PARK) position. If the CVT does not shift while driving, or your vehicle does not pick up enough speed when starting on an uphill slope, it may be that there is something unusual happening inthe transmission, causing a safety device to activate. Have your ve
hicle checked at an
authorized Mitsubishi Motors dealer or arepair facility of your c
hoice as soon as possi-
ble.
N00548301029
The electronically controlled 4WD systemhelps improve accelera
tion and vehicle stabil-
ity by controlling the front-rear distribution ofdriving torque using
the electronic control
coupling in the rear differential assembly.
NOTE
In sports mode, downshifts do not take place when the accelerator is depressed all the wayto the floor.
Waiting
CAUTION To avoid transmission
overheating, never try
to keep your vehicle
stationary on a hill by
using the accelerator
pedal. Always apply
the parking brake and/or service brake. Do not rev the engine unnecessarily while the vehicle is stationary. Unexpected acceler- ation may occur if the selector lever is in aposition other than “P” (PARK) or “N” (NEUTRAL).
Parking
When the CVT makes no speed change
NOTE
[For vehicles equipped with mono-color liq- uid crystal display meter]When the selector le
ver position indicator
blinks while you are driving, there could be a malfunction in the automatic transmission system or CVT fluid
temperature becomes
abnormally high. [For vehicles equippe
d with color liquid
crystal display meter] When the warning display and “SLOW DOWN” or the wa
rning display and
“SERVICE REQUIRED” appear on the information screen in the multi-informationdisplay, there could be
a malfunction in the
CVT. Refer to “Continuously variable trans- mission (CVT): Warning display” on page5-69.
Electronically controlled 4WD system
(if so equipped)
BK0211800US.book 74 ページ 2014年3月12日 水曜日 午後2時42分
Page 158 of 446
4-wheel drive operation
Features and controls 5-81
5
When turning a sharp corner in “4WD LOCK” or “LOCK” position at low speed, a slight difference in
steering may be experi-
enced similar to feeling as if the brakes wereapplied. This is called tight corner braking and results from each of the four tires being at a different distance from the corner. The phe-nomenon is typical of 4-
wheel drive vehicles.
If this occurs, either straighten out the steer- ing wheel or change to another mode. Set the drive mode-selector to “4WD AUTO”, “4WD LOCK” or “SNOW” inaccordance with the road conditions, and then gradually depress the accelerator pedal for a smooth start.
Set the drive mode-selector to “4WD LOCK” or “LOCK” and then gradually depress theaccelerator pedal for a
smooth start. Keep the
pressure on the accelera
tor pedal as constant
as possible, and drive at low speed.
NOTE
Driving on rough roads can be hard on a vehicle. Before you le
ave the pavement, be
sure all scheduled ma
intenance and service
has been done, and that
you have inspected
your vehicle. Pay spec
ial attention to the
condition of the ti
res, and check the tire pres-
sures. Mitsubishi Motors is not responsible to the operator for any damage or injury caused or liability incurred by improper and negligent operation of a vehicl
e. All techniques of
vehicle operation depend on the skill and experience of the opera
tor and other partici-
pating parties. Any de
viation from the rec-
ommended operating instru
ctions above is at
their own risk. Note that the stopping distance required of the 4-wheel drive vehicle differs very little from that of the front-wheel drive vehicle.When driving on a snow-covered road or a slippery, muddy surface, make sure that you keep a sufficient dist
ance between your vehi-
cle and the one ahead of you. The driving posture s
hould be more upright;
adjust the seat to a good position for easy steering and pedal operati
on. Be sure to wear
the seat belt. After driving on rough roads, check each part of the vehicle
and wash it thoroughly
with water. Refer to the “Inspection and maintenance followi
ng rough road opera-
tion” section and “Vehicle care and Mainte-nance” sections.
CAUTION Setting the drive mode-selector to “4WD LOCK” or “LOCK” position to drive on drypaved road will increa
se fuel consumption,
with possible noise generation.
Turning sharp corners On snowy or icy roads
NOTE
The use of snow tires is recommended.
Maintain a safe distan
ce between
vehicles,
avoid sudden braking, and use engine brak-ing (downshifting).CAUTION Avoid sudden braking,
sudden acceleration
and sharp turning. Sk
idding occurs and con-
trol of the vehicle could be lost.
Driving on sandy or muddy roads
CAUTION Do not force the vehicle or drive recklessly on sandy surfaces. In comparison with nor- mal road surfaces, the engine and otherdrive-system components are put under excessive strain when driving on such a sur- face. This could lead to accidents. If any of the follow
ing conditions occur
while the vehicle is
being driven, immedi-
ately park your vehicle in a safe place and follow these procedures:NOTE
BK0211800US.book 81 ページ 2014年3月12日 水曜日 午後2時42分
Page 159 of 446
Inspection and maintenance following rough road operation 5-82 Features and controls
5
Your vehicle may not provide sufficient hill climbing ability and engine braking on steep slope. Avoid driving on steep slopes even though the vehicle is an 4-wheel drive vehi-cle.
N00537800085
If the electrical circuits become wet, furtheroperation of the vehicl
e will be impossible;
therefore, avoid drivi
ng through water unless
absolutely necessary. If driving through wateris unavoidable, use the following procedure: Check the depth of the water and the terrain before attempting to drive through it. Drive
slowly to avoid creating excessive water splashing.
N00530700085
After operating the vehicle in rough road con-ditions, be sure to perform the following inspection and maintenance procedures: Check that the vehicle has not been dam- aged by rocks, gravel, etc.
• If the engine coolan
t temperature display
flashes on the information screen in the multi-information di
splay or the engine
power drops suddenly. Refer to “Engine overh
eating” on page 8-4.
• If the “ ” warning display and “SLOW DOWN” or the “ ” wa
rning display and
“SERVICE REQUIRED” appear on the information screen in the multi-information display. Refer to “Warning disp
lay” on page 5-62,
5-69.WA R N I N G When attempting to rock your vehicle out of a stuck position, be sure that the area around the vehicle is clear of people and physical objects. The rocking motion maycause the vehicle to suddenly launch for- ward/backward, caus
ing injury or dam-
age to nearby people or objects.NOTE
Avoid sudden braking,
sudden ac
celeration
and sharp turning; such operations couldresult in the vehicle becoming stuck.CAUTION
If the vehicle become
s stuck in sandy or
muddy roads, it can often be moved with arocking motion. Move the selector leveralternately between the “D” (DRIVE) and “R” (REVERSE) positi
ons while pressing
lightly on the ac
celerator pedal.
Driving on rough road can cause rust on the vehicle; wash the vehi
cle thoroughly as soon
as possible after such use.
Climbing/descending sharp grades Driving through water
NOTE
CAUTION Never drive through water that is deep enough to cover wheel hubs, axles or exhaust pipe. Do not change th
e selector lever posi-
tion while driving through water.Frequent driving through water can adversely affect the life
span of the vehicle;
consult an authorized Mitsubishi Motorsdealer or a repair fac
ility of your choice and
take the necessary measures to prepare, inspect, and repair the vehicle. After driving through water, apply the brakes to be sure they are
functioning properly. If
the brakes are wet and not functioning prop- erly, dry them out by driving slowly while lightly depressing the brake pedal. Inspecteach part of the vehicle carefully.
Inspection and maintenance following rough road opera-tion
BK0211800US.book 82 ページ 2014年3月12日 水曜日 午後2時42分