2015 MITSUBISHI OUTLANDER III tow
[x] Cancel search: towPage 11 of 446

If this warning light comes on or flashes while you’re driving... 2-2 Quick index
2
Selector lever position indicator in the instrument cluster flashes rapidly
(once per second)
(Vehicles equipped with mono-color
liquid crystal display)
Park your vehicle in a safe place. Idle the engine until the selector le
ver position indicato
r stops flashing.
If the indicator does not go off, have the
system checked at an
authorized Mitsubi-
shi Motors dealer or a repair facili
ty of your choice as soon as possible.
P. 5-62, 5-69
or
Engine malfunction indicator (“SERVICE ENGINE SOON” or
“Check engine light”)
Although your vehicle will usually be dr
ivable and not need towing, have the
engine system checked at an authorized Mi
tsubishi Motors dealer
or a repair facility
of your choice as soon as possible. If the
vehicle is not drivab
le, contact emergency
roadside assistance at 1-888-648-7820 (for
vehicles sold in U.S.A.) or 1-888-576-
4878 (for vehicles sold in Canada), an aut
horized Mitsubishi Moto
rs dealer, or local
towing company for assistance.
P. 5-167
Electric power stee
ring system (EPS)
warning light
(Vehicles equipped with mono-color
liquid crystal display)
If this light comes on while the engine is
running, it may become harder to turn the
steering wheel. Have your ve
hicle inspected at an aut
horized Mitsubishi Motors
dealer or a repair facility of
your choice as soon as possible.
P. 5-88
Warning lights
Do this
Ref. Page
BK0211800US.book 2 ページ 2014年3月12日 水曜日 午後2時42分
Page 17 of 446

If this problem occurs... 2-8 Quick index
2
If your vehicle becomes stuck in sand, mud or snow
1. Slowly press down on the accelerator pedal to
get your vehicle moving again. For an all-
wheel drive vehicle, set the drive mode-sel
ector to the “4WD AUTO” or “4WD LOCK”
position and then slowly press down on the ac
celerator pedal to get your vehicle moving.
2. If there is nothing to stop your tires from sli
pping, rock your vehicle out of the stuck posi-
tion.
P. 8-15
WA R N I N G When attempting to rock your vehi
cle out of a stuck position, be su
re that no one is near the ve
hicle. The rocking motion may c
ause the vehicle to
suddenly lurch forward or backward, possibly injuring bystanders. Avoid revving the engine or spinning the wh
eels. Prolonged efforts to free a stuck ve
hicle may result in
overheating and transa
xle failure.
If the vehicle remains stuck after
several rocking attempts
, have a towing service pull the vehicle out.
Problem
Do this
Ref. Page
The brakes are not functioning properly after crossing a puddle or stream.
Dry out the brakes by driving slowly
while lightly pressing the brake pedal.
P. 5-82, 6-5
The automatic transaxle makes no gear change when accelerat- ing. The initial movement of the vehicle is slow when the vehicle starts moving. (for vehicles with automatic transaxle)
There may be a problem in the automatic transaxle. Have the system inspected by your
authorized Mitsubishi Motors de
aler or a repair facility of
your choice.
P. 5-66
Problem
Do this
Ref. Page
BK0211800US.book 8 ページ 2014年3月12日 水曜日 午後2時42分
Page 32 of 446

Front seats
Seat and restraint systems 4-5
4
N00401901326
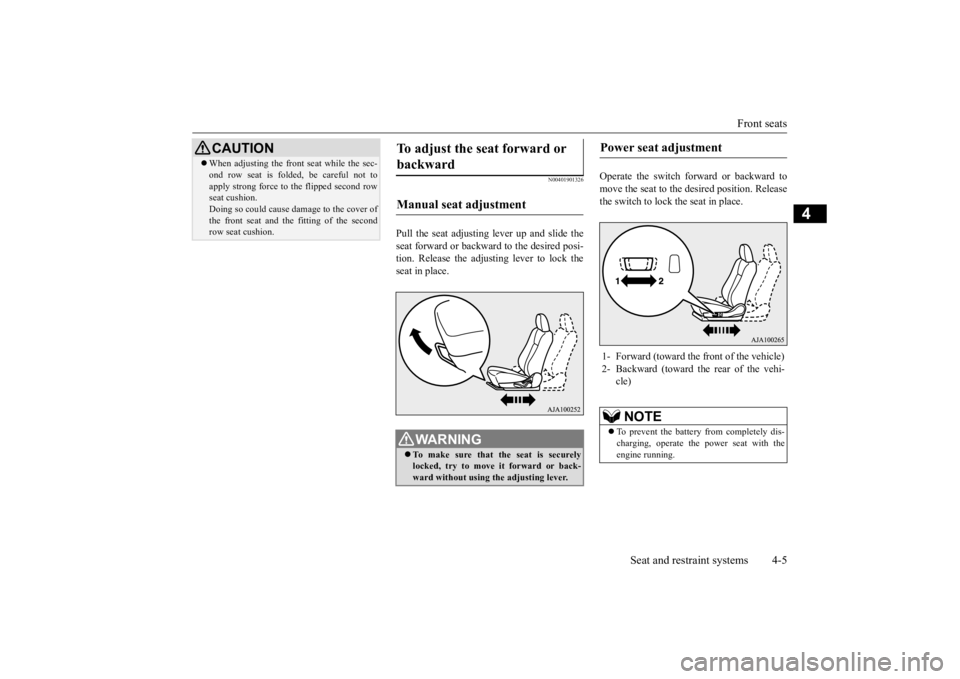
Pull the seat adjusting lever up and slide the seat forward or backward to the desired posi-tion. Release the adjusting lever to lock the seat in place.
Operate the switch forward or backward to move the seat to the de
sired position. Release
the switch to lock the seat in place.
When adjusting the front seat while the sec- ond row seat is folded, be careful not toapply strong force to the flipped second rowseat cushion. Doing so could cause da
mage to the cover of
the front seat and the
fitting of the second
row seat cushion.CAUTION
To adjust the seat forward or backward Manual seat adjustment
WA R N I N G To make sure that the seat is securely locked, try to move
it forward or back-
ward without using
the adjusting lever.
Power seat adjustment 1- Forward (toward the front of the vehicle) 2- Backward (toward the rear of the vehi-
cle)NOTE
To prevent the battery from completely dis- charging, operate the
power seat with the
engine running.
BK0211800US.book 5 ページ 2014年3月12日 水曜日 午後2時42分
Page 43 of 446

Making a flat seat 4-16 Seat and restraint systems
4
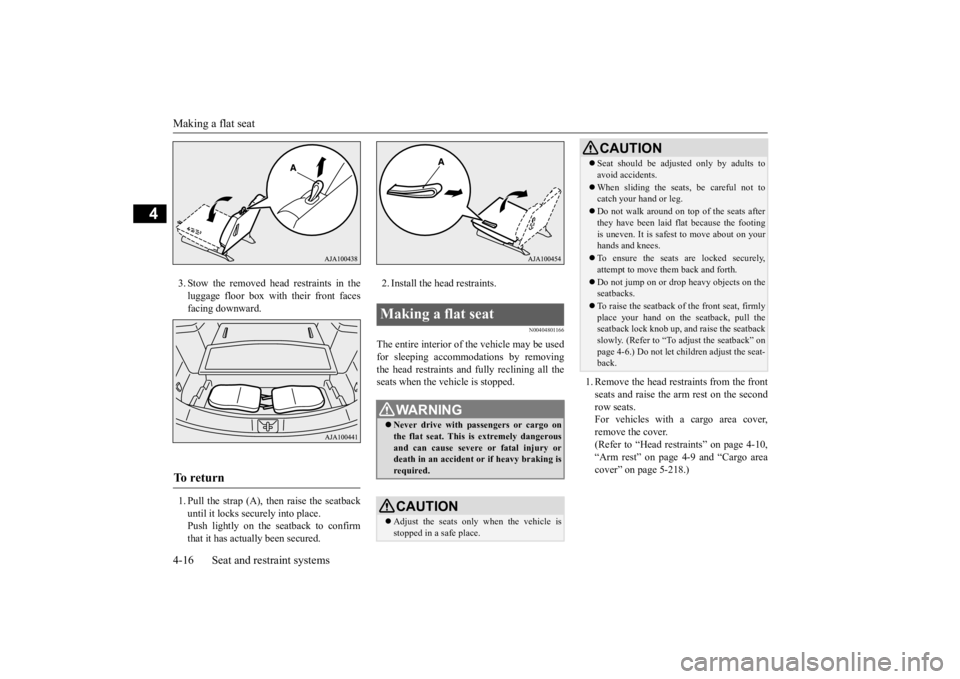
3. Stow the removed head restraints in the luggage floor box with their front facesfacing downward. 1. Pull the strap (A), then raise the seatback until it locks securely into place.Push lightly on the seatback to confirm that it has actually been secured.
2. Install the head restraints.
N00404801166
The entire interior of the vehicle may be used for sleeping accomm
odations by removing
the head restraints and fully reclining all theseats when the vehicle is stopped.
1. Remove the head re
straints from the front
seats and raise the arm rest on the second row seats. For vehicles with a cargo area cover,remove the cover. (Refer to “Head restraints” on page 4-10, “Arm rest” on page 4-9 and “Cargo areacover” on page 5-218.)
To r e t u r n
Making a flat seat
WA R N I N G Never drive with passengers or cargo on the flat seat. This is extremely dangerous and can cause severe or fatal injury or death in an accident
or if heavy braking is
required.CAUTION Adjust the seats only
when the vehicle is
stopped in a safe place.
Seat should be adjusted only by adults to avoid accidents. When sliding the seat
s, be careful not to
catch your hand or leg. Do not walk around on top of the seats after they have been laid flat because the footing is uneven. It is safest to move about on yourhands and knees. To ensure the seats are locked securely, attempt to move them back and forth. Do not jump on or drop heavy objects on the seatbacks. To raise the seatback of the front seat, firmly place your hand on th
e seatback, pull the
seatback lock knob up,
and raise the seatback
slowly. (Refer to “To adjust the seatback” onpage 4-6.) Do not let ch
ildren adjust the seat-
back.CAUTION
BK0211800US.book 16 ページ 2014年3月12日 水曜日 午後2時42分
Page 51 of 446

Seat belt use during pregnancy 4-24 Seat and restraint systems
4
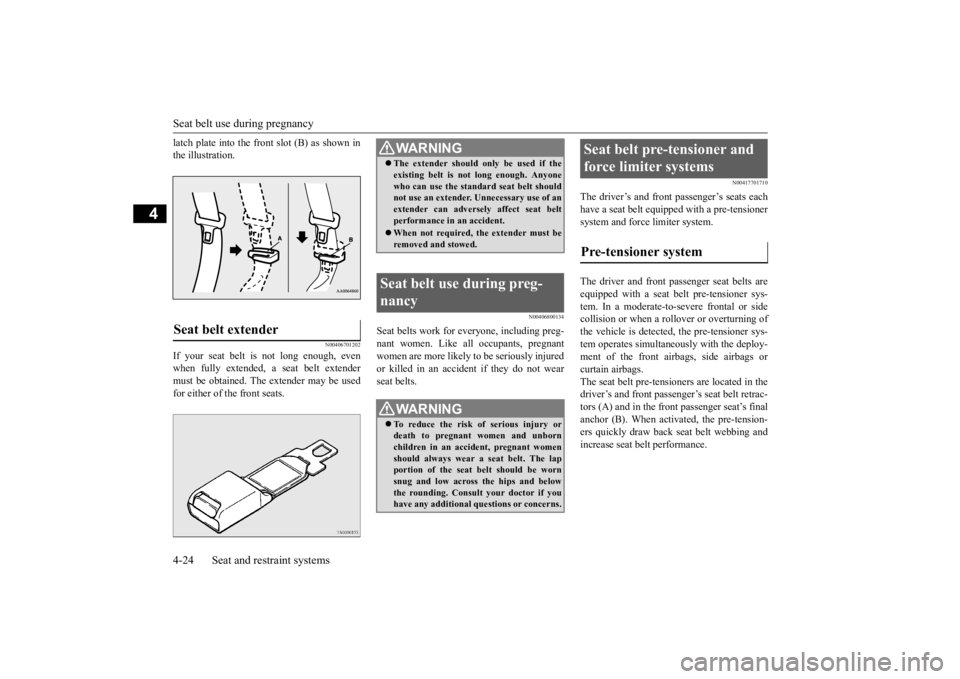
latch plate into the front slot (B) as shown in the illustration.
N00406701202
If your seat belt is not long enough, evenwhen fully extended, a seat belt extender must be obtained. The extender may be used for either of the front seats.
N00406800134
Seat belts work for everyone, including preg- nant women. Like al
l occupants, pregnant
women are more likely to be seriously injuredor killed in an accide
nt if they do not wear
seat belts.
N00417701710
The driver’s and front passenger’s seats eachhave a seat belt equippe
d with a pre-tensioner
system and force limiter system. The driver and front pa
ssenger seat belts are
equipped with a seat belt pre-tensioner sys- tem. In a moderate-to-severe frontal or side collision or when a rollover or overturning ofthe vehicle is detected, the pre-tensioner sys- tem operates simultaneous
ly with the deploy-
ment of the front airb
ags, side airbags or
curtain airbags. The seat belt pre-tensi
oners are located in the
driver’s and front passenge
r’s seat belt retrac-
tors (A) and in the front
passenger seat’s final
anchor (B). When activated, the pre-tension- ers quickly draw back seat belt webbing andincrease seat belt performance.
Seat belt extender
WA R N I N G The extender should only be used if the existing belt is not long enough. Anyonewho can use the standard seat belt shouldnot use an extender.
Unnecessary use of an
extender can adversel
y affect seat belt
performance in an accident. When not required, the extender must be removed and stowed.
Seat belt use during preg- nancy
WA R N I N G To reduce the risk of serious injury or death to pregnant women and unbornchildren in an accident, pregnant womenshould always wear
a seat belt. The lap
portion of the seat belt should be worn snug and low across the hips and belowthe rounding. Consult your doctor if you have any additional qu
estions or concerns.
Seat belt pre-tensioner and force limiter systems Pre-tensioner system
BK0211800US.book 24 ページ 2014年3月12日 水曜日 午後2時42分
Page 80 of 446

Break-in recommendations
Features and controls 5-3
5
N00508701366
Advanced automobile
manufacturing tech-
niques permit you to operate your new vehi- cle without requiring a long break-in periodof low-speed driving. However, you can add to the future perfor- mance and economy of your vehicle byobserving the following precautions during the first 300 miles (500 km). Drive your vehicle at m
oderate speeds during
the break-in period. Avoid revving the engine. Avoid rough driving such as sudden starts, sudden accelerati
on, prolonged high-
speed driving and sudden braking. These actions would have a detrimental effect onthe engine and lead to increased fuel and oil consumption; th
is could ultimately
result in the malfunction of engine com-ponents. Be particularly careful to avoid full acceleration while in low shift posi- tion (low gears). Do not overload the vehicle. Stay within the seating capacity. (Refer to “Cargo load precautions” on page 6-10.) Refrain from towing a trailer or other vehicle (Refer to “T
railer towing” on page
6-11).
N00508801628
Two keys are provided. The keys fit all locks. Keep one in a safe place as a spare key. Two F.A.S.T.-keys and two emergency keys are provided. Keep one F.A.S.T.-key and one emergency key in a safe place together as a set of sparekeys.
Break-in recommendations
Keys Ty p e 1 1- Key for the electronic immobilizer and
keyless entry system
2- Key number plateTy p e 2
1- F.A.S.T.-key
(with electronic im
mobilizer and key-
less entry system function)
2- Emergency key3- Key number plate
NOTE
The key is a precision
electronic device with
a built-in signal transm
itter. Please observe
the following in order to prevent damage. • Do not leave where it may be exposed to heat caused by direct
sunlight, such as on
top of the dashboard. • Do not take the remote
control transmitter
apart. • Do not excessively bend the key or subject it to strong impacts. • Keep the remote control transmitter dry. • Keep away from magne
tic objects such as
key rings.
BK0211800US.book 3 ページ 2014年3月12日 水曜日 午後2時42分
Page 87 of 446

Keyless entry system (if so equipped) 5-10 Features and controls
5
3. Within 5 seconds of pressing the LOCK button, release the LOCK and UNLOCKbuttons in sequence. At this time, ID codes for all remote con- trol transmitters except for the transmitterused in steps 2 and 3 are erased and the answerback function (door is locked and unlocked) informs you that the registra-tion mode has been activated. 4. Within 60 seconds after step 3, complete the following ID code
registration opera-
tion using the next remote control trans- mitter you wish to register within 4seconds. i) Press both the LOCK and UNLOCK buttons for 2 seconds.ii) Release both the LOCK and UNLOCK buttons for 1 second. iii) Press the UNLOCK button. Theanswerback function informs you that the ID code registration
of the transmitter is
completed.5. To register the ID codes of additional remote control transmitters, repeat step 4 within 60 seconds after step 4.6. If no ID code of a remote control trans- mitter is registered within 60 seconds after step 4, the regi
stration mode is can-
celed and the normal mode returns.
N00546101124
Your keyless entry syst
em operates on a radio
frequency subject to
Federal Communica-
tions Commission (FCC)
Rules (For vehicles
sold in U.S.A.) and Industry Canada Rules (For vehicles sold in
Canada). This device
complies with Part 15 of FCC Rules andIndustry Canada licenc
e-exempt RSS stan-
dard(s). Operation is subject to
the following two con-
ditions. This device may not
cause harmful inter-
ference.
NOTE
For verification purposes, try to lock and unlock the doors after the registration iscompleted. The indicator light (4)
comes on each time a
button is pressed. The keyless entry system does not work if the key is in the ignition switch. The remote control tr
ansmitter can be used
from about 40 feet (12 m) away. However,this distance may cha
nge if your vehicle is
near a TV transmitting tower, a power sta- tion, or a radio station. If the UNLOCK button (2) is pressed when all doors and the liftgate are locked and nodoors or the liftgate are opened within about 30 seconds, the doors and the liftgate will automatically re-lock.On a vehicle equippe
d with a Mitsubishi
Multi-Communication System, the functions can be adjusted on the screen. For details,refer to the separa
te operation manual.
If the following conditi
ons are observed after
pressing the LOCK (1) or UNLOCK (2) but- ton on the remote control transmitter, the battery in the remote control transmitter mayneed to be replaced. • The doors and the liftgate cannot be locked or unlocked. • The panic alarm cannot be operated.• The indicator light
(4) is dim or does not
come on.
If you lose your remote control transmitter, please contact an au
thorized Mitsubishi
Motors dealer for a replacement. If you wish to obtain
an additional remote
control transmitter, please contact an autho-rized Mitsubishi Moto
rs dealer. A maximum
of 8 remote control tr
ansmitters can be pro-
grammed for your vehicle. To use the new remote control transmitters, it is necessary to register
the key with both the
electronic immobilizer
and keyless entry sys-
tem. Also refer to “Electronic immobilizer (Anti-theft starting system): Customer key pro- gramming” on page 5-6.
General information
NOTE
BK0211800US.book 10 ページ 2014年3月12日 水曜日 午後2時42分
Page 90 of 446

Free-hand Advanced Securi
ty Transmitter (F.A.S.T.-key) (if so equipped)
Features and controls 5-13
5
The operations possible with the F.A.S.T.- key can be modified as stated below.(Keyless entry operations are possible.) For details, contact an
authorized Mitsubi-
shi Motors dealer.• Enabling only the locking and unlocking of the doors and the liftgate • Enabling only the starting of the engine• Deactivating the F.A.S.T.-key
N00503201177
When a person enters the operating range ofthe F.A.S.T.-key while carrying the F.A.S.T.- key and presses the driver’s or front passen- ger’s door lock/unlock switch, the liftgateLOCK switch or the li
ftgate OPEN switch,
verification of the ID
code is performed.
The doors and the liftgate can be locked andunlocked and the engine can be started only when the ID codes of the vehicle and F.A.S.T.-key match.
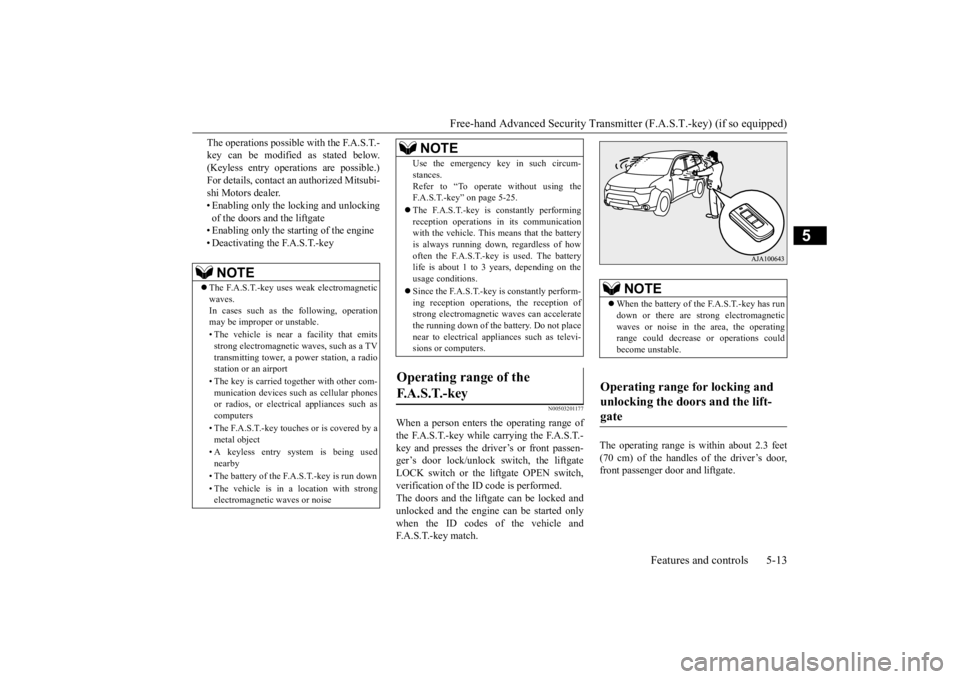
The operating range is
within about 2.3 feet
(70 cm) of the handles of the driver’s door, front passenger door and liftgate.
NOTE
The F.A.S.T.-key uses weak electromagnetic waves.In cases such as the following, operation may be imprope
r or unstable.
• The vehicle is near a facility that emits strong electroma
gnetic waves, such as a TV
transmitting tower, a po
wer station, a radio
station or an airport • The key is carried together with other com- munication devices such
as cellular phones
or radios, or electric
al appliances such as
computers • The F.A.S.T.-key touches or is covered by a metal object • A keyless entry system is being used nearby • The battery of the F.A.S.T.-key is run down • The vehicle is in a location with strong electromagnetic
waves or noise
Use the emergency key in such circum- stances.Refer to “To operate
without using the
F.A.S.T.-key” on page 5-25. The F.A.S.T.-key is constantly performing reception operations
in its communication
with the vehicle. This means that the battery is always running down, regardless of howoften the F.A.S.T.-key is used. The battery life is about 1 to 3 years, depending on the usage conditions. Since the F.A.S.T.-key is constantly perform- ing reception operati
ons, the reception of
strong electrom
agnetic waves
can accelerate
the running down of the
battery. Do not place
near to electrical appliances such as televi-sions or computers.
Operating range of the F. A . S . T. - k e y
NOTE
NOTE
When the battery of the F.A.S.T.-key has run down or there are st
rong electromagnetic
waves or noise in the area, the operating range could decrease
or operations could
become unstable.
Operating range for locking and unlocking the doors and the lift- gate
BK0211800US.book 13 ページ 2014年3月12日 水曜日 午後2時42分