2015 MERCEDES-BENZ SPRINTER light
[x] Cancel search: lightPage 10 of 54

RSS-210 standard. Operation is subject to
the following two conditions:
1. These devices may not cause interfer-
ence, and
2. These devices must accept any interfer-
ence, including interference that may
cause undesired operation of the device. Information on copyright
Registered trademarks
Bluetooth
®
technology is the standard for
short-range wireless data transmission of up
to approximately 10 meters.
Bluetooth ®
is a registered trademark of Blue-
tooth Special Interest Group (SIG) Inc. An SD memory card is a digital storage
medium.
SD memory cards carry the logo displayed
above. This logo is a registered trademark of
SanDisk Corporation. Qualified specialist workshops
Always have all work on or modifications to
electronic components carried out at a quali- fied specialist workshop. This workshop has
the necessary specialist knowledge and tools
to carry out the work required. In particular,
work relevant to safety or on safety-related systems must be carried out at a qualified
specialist workshop.
An authorized Mercedes-Benz Center is a
qualified specialist workshop. Protection against theft
This device is equipped with technical meas-
ures to protect it against theft.
i You can obtain further information from
an authorized Mercedes-Benz Center. Cleaning
To clean, use a slightly damp cloth. The cloth must be soft and lint-free. For stubborn dirt,
you can use a mild cleaning agent. In partic-
ular, do not clean the display with alcohol,
acid or an abrasive cleaning agent. 8
Int
roduction
Page 17 of 54

The rear view camera is only an aid. It cannot
replace your own awareness of the immedi-
ate surroundings. You are responsible for
safe maneuvering, parking and pulling away.
When maneuvering and parking, make sure
that there are no persons, animals or objects
in the maneuvering area.
The rear view camera may show obstacles in perspectival distortion, incorrectly or not at
all. The rear view camera cannot display all
objects located very near and/or under the
rear bumper. It does not warn you of a colli-
sion, persons or objects.
The area behind the vehicle is displayed in a
mirrored fashion, as in the rear-view mirror or
the exterior mirrors.
The rear view camera covers the immediate
surroundings of the vehicle and assists you,
for example, when parking.
Under the following circumstances, the rear
view camera will not function, or will function
in a limited manner:
R there is very heavy rain, snow or fog
R at night or when the vehicle is in very dark
places
R if you are parked somewhere very dark
R the surrounding area is illuminated with flu-
orescent light. The display may flicker
R if there is a sudden change in temperature,
e.g. when driving into a heated garage in
winter
R if the ambient temperature is very high
R if the camera lens is dirty or obstructed
R the rear of the vehicle is damaged. In this
case, have the camera position and setting
checked at a qualified specialist workshop
Rear view camera operation The image from the rear view camera is
shown in the display when reverse gear is
engaged if:
R your vehicle is equipped with a rear view
camera
R the ignition is switched on Guide lines in the display (depending on the
vehicle's equipment) help you with backing
up.
Static guide lines Depending on the vehicle's equipment, the
rear view camera image displays static guide
lines. These guide lines assist you with back-
ing up.
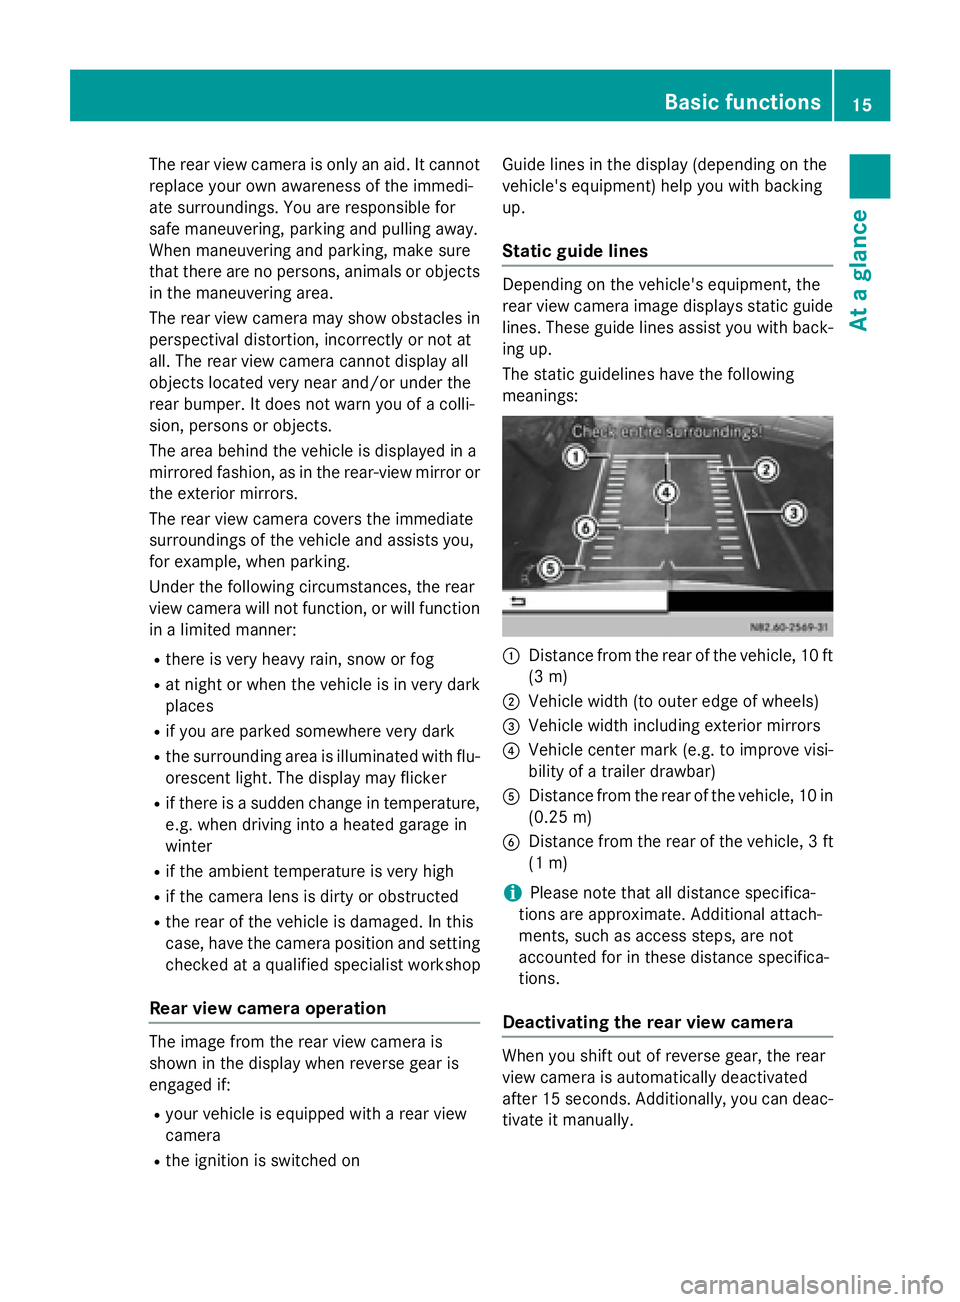
The static guidelines have the following
meanings: 0043
Distance from the rear of the vehicle, 10 ft
(3 m)
0044 Vehicle width (to outer edge of wheels)
0087 Vehicle width including exterior mirrors
0085 Vehicle center mark (e.g. to improve visi-
bility of a trailer drawbar)
0083 Distance from the rear of the vehicle, 10 in
(0.25 m)
0084 Distance from the rear of the vehicle, 3 ft
(1 m)
i Please note that all distance specifica-
tions are approximate. Additional attach-
ments, such as access steps, are not
accounted for in these distance specifica-
tions.
Deactivating the rear view camera When you shift out of reverse gear, the rear
view camera is automatically deactivated
after 15 seconds. Additionally, you can deac-
tivate it manually. Basic functions
15At a glance
Page 20 of 54

Display settings
Setting the brightness
X Press the 003Bbutton.
X Select Settings
Settings.
X Select Display
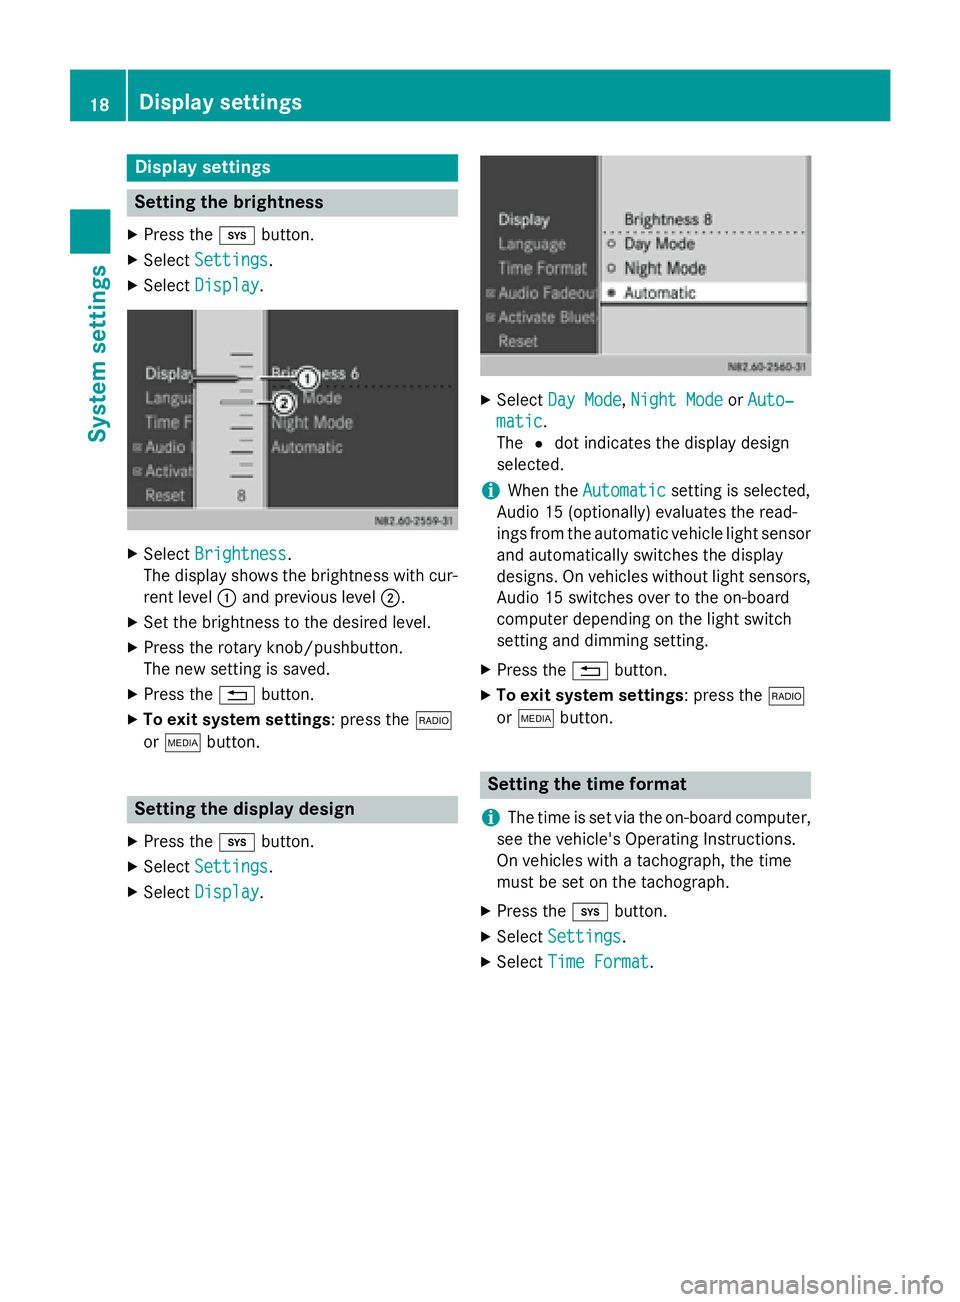
Display. X
Select Brightness
Brightness.
The display shows the brightness with cur-
rent level 0043and previous level 0044.
X Set the brightness to the desired level.
X Press the rotary knob/pushbutton.
The new setting is saved.
X Press the 0038button.
X To exit system settings : press the002A
or 00FD button. Setting the display design
X Press the 003Bbutton.
X Select Settings Settings.
X Select Display
Display. X
Select Day Mode
Day Mode, Night Mode
Night Mode orAuto‐
Auto‐
matic
matic.
The 0036dot indicates the display design
selected.
i When the
Automatic Automatic setting is selected,
Audio 15 (optionally) evaluates the read-
ings from the automatic vehicle light sensor
and automatically switches the display
designs. On vehicles without light sensors, Audio 15 switches over to the on-board
computer depending on the light switch
setting and dimming setting.
X Press the 0038button.
X To exit system settings : press the002A
or 00FD button. Setting the time format
i The time is set via the on-board computer,
see the vehicle's Operating Instructions.
On vehicles with a tachograph, the time
must be set on the tachograph.
X Press the 003Bbutton.
X Select Settings Settings.
X Select Time Format
Time Format .18
Display settingsSys
tem settings
Page 30 of 54

Important safety notes
G
WARNING
If you operate information systems and com-
munication equipment integrated in the vehi- cle while driving, you will be distracted from
traffic conditions. You could also lose control of the vehicle. There is a risk of an accident.
Only operate the equipment when the traffic
situation permits. If you are not sure that this
is possible, park the vehicle paying attention
to traffic conditions and operate the equip-
ment when the vehicle is stationary.
Observe the legal requirements of the coun-
try in which you are currently driving.
The navigation system calculates the route to
the destination without taking account of the following, for example:
R traffic lights
R stop and give way signs
R parking or stopping restrictions
R road narrowing
R other road and traffic rules and regulations
The navigation system may provide incorrect
navigation announcements if the surround-
ings do not correspond to the data on the
digital map. For example, a route may have
been diverted or the direction of a one-way
street may have changed.
For this reason, you must always observe
road and traffic rules and regulations during
your journey. Road and traffic rules and reg-
ulations always have priority over the sys-
tem's driving recommendations. Becker
®
MAP PILOT navigation mod-
ule
With the Becker ®
MAP PILOT navigation mod-
ule, you can upgrade Audio 15 to a fully-
fledged navigation system.
Further information can be found under
http://www.beckermappilot.com. GPS (Global Positioning System)
Position finding and route guidance take
place using GPS ( GlobalPositioning System).
For this purpose, the navigation module has
an integrated GPS receiver that receives the
satellite signals and determines your geo-
graphical location.
i Without GPS reception, route guidance is
not possible. Preparing navigation
Inserting the navigation module
i Switch off the ignition before removing or
inserting the navigation module.
X Open the glove box.
X Insert the navigation module into the
device holder.
The battery built into the navigation module
starts charging when the vehicle ignition is
switched on.
X Remove the catch on the front side of the
device holder.
This way, the navigation module is secured,
as well as protected against theft.
X Close the glove box. Switching on the navigation system
X Press the 00CBbutton.
or
X Press the 0063button repeatedly until the
main menu bar is selected.
X Select Navi Navi.
The display shows the main menu of the
navigation system.
i If the battery was completely discharged,
it takes up to 1 minute before the naviga-
tion system is ready. 28
Preparing navigationNavigation system