Page 225 of 290

sary service work has been carried out. You
can also obtain further information on main-
tenancew ork, for example.
! If the service interval displayh
as been
reset unintentionally,h ave the setting cor-
rected at aMercedes-Benz Center.
Have service work carried out as described in the Maintenance Booklet. This may oth-
erwise lead to increased wear and damage
to the major assemblies or the vehicle.
Special service requirements
The specified maintenance interval takes only the normal operation of the vehicle into
account. Under arduouso perating conditions
or increased load on the vehicle, mainte-
nance work must be carried out more fre-
quently, for example:
R regularc ity driving with frequent intermedi-
ate stops
R if the vehicle is primarily used to travel
short distances
R use in mountainous terrain or on poor road
surfaces
R if the engine is often left idling for long peri-
ods
Under these or similarc onditions, have, for
example, the air filter, engine oil and oil filter
replaced or changed more frequently. Under
arduouso perating conditions, the tires must
be checked more often. Further information
can be obtained at aqualified specialist work-
shop, e.g. an authorized Mercedes-Benz
Center.
Driving abroad
An extensive Mercedes-Benz Service network is also available in other countries. You can
obtain further information from any author-
ized Mercedes-Benz Center. Care
General notes
Regular care of your vehicle is acondition for
retaining the quality in the long term.
Use care products and cleaning agents rec-
ommended and approved by Mercedes-Benz.
! For cleaning your vehicle, do not use any
of the following:
R dry, rough or hard cloths
R abrasive cleaning agents
R solvents
R cleaning agents containing solvents
Do not scrub.
Do not touch the surfaces or protective
films with hard objects, e.g. aring or ice
scraper. You could otherwise scratch or
damage the surfaces and protective film. H
Environmental note
Dispose of empty packaging and cleaning
cloths in an environmentally responsible man-
ner.
! Do not park the vehicle for an extended
period straight after cleaning it, particularly after having cleaned the wheels with wheel cleaner. Wheel cleaners could cause
increased corrosion of the brake discs and
brake pads/linings. For this reason, you
should drive for afew minutes after clean-
ing. Braking heats the brake discs and the
brake pads/linings, thus drying them. The
vehicle can then be parked. Exterior care
Automatic car wash G
WARNING
Braking efficiency is reduced after washing
the vehicle. There is arisk of an accident.
After the vehicle has been washed, brake
carefully while paying attention to the traffic
conditions until full braking power is restored. Care
223Maintenance and care Z
Page 226 of 290

You can wash the vehicle in an automatic car
wash fro mthe very start.
If the vehicle is very dirty, pre-wash it before
cleaning it in an automatic car wash.
! Never clean your vehicle in
aTouchless
Automatic Car Wash as these use special
cleaning agents. These cleaning agent scan
damage the paintwork or plastic parts.
! When washing your vehicle in
atow-
through car wash, use the SmartKey
instead of the Start/Stop button.
Start the engin eusing the SmartKey.. Move
the transmission to Nwith the E-SELECT
lever .Use the SmartKey to switc hthe
engin eoff again and the nturn the Smart-
Key to position 2.Make sure that you then
leave the SmartKey in position 2.You may
otherwise damage the vehicle, the trans-
missio northe car wash.
Check the transmission position in the
instrumen tcluster.
! Use the E‑SELECT lever to shift the trans-
missio ntoNbefore switching the engine
off .Ify ou open the driver's or front-
passenger door, the transmission remains
in this position for up to 30 minutes if the
SmartKey is in the ignition, even if the
engin eisswitched off .Ifyou do not shift the
transmission to Nusing the E‑SELECT lever
beforehand, it shift sautomatically to park-
ing position Pand lock sthe wheels if the
driver's or front-passenge rdoor is opened
and the engin eisswitched off .This may
damage the vehicle, the transmission or
the car wash.
Observe the information on maneuvering
(Y page 131). !
Before drivin
gintoana utomatic car wash,
make sure that it is suitable for the dimen- sion soft he vehicle. In particular, make
sure that:
R there is enough groun dclearance
betwee nthe vehicle underbody and the
guide rails of the automatic car wash.
R the clearance width of the automatic car
wash is sufficient ,particularly the width
of the guide rails.
R you enter the automatic car wash
straight and in the center of the guide
rails in order to avoid damagin gthe tires
or wheel rims.
Fold in the exterior mirrors befor ethe vehi-
cle is washed. The exterior mirrors could
otherwise be damaged.
! Make sure that:
R the side windows and the roof are com-
pletely closed
R the climat econtrol blower is switched off
R the windshield wiper switc hisatposition
0
The vehicle could otherwise be damaged.
! In portal car washes, the windshield wip-
ers may be move dupthe windshield by the
cleaning brushes when the ignition is
switched off.
Set the Start/Stop button to key position 2
to reset the windshield wipers to their orig-
inal position.
! Preferably use automatic car washes with
adjustable high-pressure pre-cleaning. This corresponds with the specification for the
Cabriolet program. In car washes that use
high water pressures, there is arisk that a
small amount of water may leak int othe
vehicle.
! Cabriolet:
do not treat the vehicle with
hot wax under any circumstances.
After using an automatic car wash, wipe off
wax and drying agent sfromt he windshield
and the wiper blades. This will prevent smears 224
CareMaintenance and care
Page 227 of 290

and reduc
ewipin gnoises caused by residue
on th ewindshield.
Washin gbyhand In som
ecountries ,washin gbyh andiso nly
allowed at specially equippe dwashin gbays.
Observ ethe legal requirements in each coun-
try.
X Do no tuse hot wate rand do no twash the
vehicle in direct sunlight.
X Use asofts ponge to clean.
X Use amild cleanin gagent, suc hasacar
shampoo approved by Mercedes-Benz.
X Thoroughl yhosed own th evehicle wit ha
gentle je tofwater.
X Do no tpoin tthe wate rjet directly towards
th ea ir inlet.
X Use plenty of wate rand rinse out the
sponge frequently.
X Rins ethe vehicle wit hclean wate rand dry
thoroughly wit hachamois.
X Do no tlet th ecleanin gagen tdry on the
paintwork.
Carefully remove all deposits of road salt as
soon as possible when driving in winter.
Power washers G
WARNING
The wate rjet from acircular je tnozzle (dirt
blasters )can caus einvisible exterior damage
to th etires or chassis components. Compo-
nent sdamaged in this way may fail unexpect-
edly. Ther eisariskofana ccident.
Do no tuse power washers wit hcircular jet
nozzles to clean th evehicle .Haved amaged
tires or chassis component sreplace dimme-
diately.
! Always maintain
adistanc eofatl east
11.8 in (30 cm)between thev ehicle and the
power washe rnozzle .Inf ormation about
th ec orrec tdistanc eisavailabl efromt he
equipmen tmanufacturer. Mov
ethe power washe rnozzle around
when cleanin gyour vehicle.
Do no taim directly at any of th efollowing:
R tires
R door gaps, roo fgaps, joints, etc.
R electrical components
R battery
R connectors
R lights
R seals
R trim
R ventilatio nslots
Damaged seals or electrical components
can lead to leak sorfailures.
Cleaning th ewheels !
Do no
tuse acidic wheel cleanin gproducts
to remove brak edust .This could damage
wheel bolt sand brak ecom ponents.
! Do no
tpark th evehicle for an extended
period straigh tafter cleanin git, particularly
after havin gcleane dthe wheels wit hwheel
cleaner. Whee lcleaners could cause
increased corrosio nofthebrak ediscsa nd
brak epads/linings. For this reason ,you
should driv efor afew minute safter clean-
ing .Brakin gh eat sthe brak ediscsa nd the
brak epads/linings, thus dryin gthem. The
vehicle can then be parked.
Cleaning th epaintwork Scratches, corrosiv
edeposits ,areas affected
by corrosio nand damag ecaused by inade-
quat ecarec anno talways be completely
repaired. In suc hcases, visit aqualified spe-
cialist workshop, e.g .anauthorized
Mercedes-Ben zCenter.
X Remove impurities immediately, where
possible, whils tavoiding rubbing to ohard.
X Soak insect remains wit hinsect remover
and rinse off th etreated areas afterwards.
X Soak bird droppings wit hwaterand rinse
off th etreated areas afterwards. Care
225Maintenance and care Z
Page 228 of 290

X
Remove coolant, brak efluid ,tre er esin,
oils ,fuel sand greases by rubbin ggently
wit hac loth soaked in petroleum ether or
lighte rfluid.
X Use tar remove rtoremove tar stains.
X Use silicon eremove rtoremove wax.
! Do no
taffix:
R stickers
R films
R magneti cplates or similar items
to painte dsurfaces. You could otherwise
damag ethe paintwork.
If water no longer forms "beads "onthe paint
surface, use th epaintcarep roducts recom-
mended and approve dbyMercedes-Benz.
This is th ecasea pproximately every three to
fiv em onths, dependin gontheclimat econ-
dition sand th ecarep roduc tused.
If dir thas penetrated th epaintsurfac eort he
pain thas become dull, th epaintcleane rrec-
ommended and approve dbyMercedes-Benz
should be used.
Do no tuse these car eproducts in th esun or
on th ehoodw hile th ehoodish ot.
X Use asuitable touch-up stick ,e.g.MB
Touch-Up Stick ,toc orrect smaller area sof
pain tdamag equickl yand provisionally.
Matt efinish care If your vehicl
ehasac lear matte finish,
observ ethe followin ginstructions in order to
avoid damag etothepaintwork due to incor-
rec tcare.
These note salso apply to ligh talloy wheels
wit hac lear matte finish.
! Never polis
hthe vehicl eortheligh talloy
wheels. Polishing causes th efinish to
shine. !
The followin
gmay caus ethe pain tto
become shiny and thus reduce th ematte
effect:
R Vigorous rubbin gwithu nsuitable mate-
rials.
R Frequen tuse of car washes.
R Washin gthe vehicl eindirectsunlight.
! Never use pain
tcleaner, buffin gorpol-
ishin gproducts suc hasglossp reserver
(wax). These products are only suitable for
high-gloss surfaces. Their use on vehicles
wit hm atte finish leads to considerable sur-
fac ed amag e(shiny, spotted areas).
If wax comes into contact wit hthe painted
surfac ebyaccident, remove it immediately
wit hc omme rcially available petroleum
ether .Dosoc arefully and do no tapply too
muc hpressur etothepainte dsurface.
Ensur ethatnor esinous, greasy or oily sub-
stances come into contact wit hthe paint,
as these can leav earesidue. If suc hsub-
stances do come into contact wit hthe
painte dsurfac eaccidentally, remove these
immediately wit hcomme rcially available
petroleum ether .Dosocarefully and do not
apply to omuchp ressur etothepainted
surface.
Tar stain sormarks on th epainte dsurface
can be remove dwithac omme rcially avail-
able tar remover. Do so carefully and do not
apply to omuchp ressur etothepainted
surface.
Always hav epaintwork repairs carrie dout
at aq ualified specialist workshop ,e.g.an
authorize dMercedes-Ben zCenter.
! Do no
tuse wash programs wit hahot wax
treatmen tunder any circumstances.
i The vehicl
eshould preferably be washed
by han dusingas ofts ponge, car shampoo
and plenty of water.
i Use only insec
tremove rand car shampoo
from th erange of recommended and
approve dMercedes-Ben zcarep roducts. 226
CareMaintenance and care
Page 229 of 290

Cleaning th
eRoadster soft top X
Light soiling: you can clean th esoftt op
while it is dry or rinse it wit hclear water.
X Norma ltoheavy soiling: clean thesoft
to pw ithab rushand clear water. Clean
stains and other dirt wit habrushand soft
to pc leanin gagents that have been recom-
mended and approved by Mercedes-Benz.
Always brus hfromf ront to back ,following
th eg rain of th efabric.
! Never use any of th
efollowin gtoclean the
sof ttop:
R gasoline
R thinner
R tar or stain remover
R other organic solvents
! Remov
ebird droppings immediately, as
they are corrosiv eand can therefor ecause
th es oft-to pfabric to leak .Donotwash the
vehicle wit hapower washe rorinacar
wash that uses power washers. Do no tuse
sharp-edged equipmen ttoremove ice and
snow.
Frequen tcleanin greduces th esoftt op 's
resistanc etodirt.
To restore this resistanc etodirt,c lean the
sof ttop usin gsoftt op cleanin gagents that
have been recommended and approved by
Mercedes-Benz.
Incorrect cleanin gand care, as well as aging,
can caus ethe soft-to pseam stol eak.Have
th es oft-to pseam ssealed at aqualified spe-
cialist workshop, e.g .atanauthorized
Mercedes-Ben zCenter.
i Cove
rthe softtop appropriately if you
plan to leave th evehicle outside for along
period of time.
Cleaning th ewindows G
WARNING
You coul dbecome trapped by th ewindshield
wiper siftheys tart moving while cleanin gthe windshield or wiper blades
.Ther eisar iskof
injury.
Always switch off th ewindshield wiper sand
th ei gnition before cleanin gthe windshield or
wiper blades.
! Only fold th
ewindshield wiper saway from
th ew indshield when vertical. Otherwise,
you will damag ethe hood.
X Clean th einside and outside of th ewin-
dows wit hadamp cloth and acleaning
product that is recommended and
approved by Mercedes-Benz.
! Do no
tuse dry cloths, abrasive products,
solvents or cleanin gagents containing sol-
vents to clean th einside of th ewindows. Do
no ttou ch th einsides of th ewindows with
hard objects, e.g .anice scraper or ring.
Ther eiso therwise ariskofd amaging the
windows.
! Clean th
ewaterdrainage channels of the
windshield and th erear window at regular
intervals. Deposits suc hasleaves, petals
and pollen may unde rcertain circumstan-
ces preven twate rfro md raining away. This
can lead to corrosio ndamag eand damage
to electronic components.
Cleaning wiper blades G
WARNING
You coul dbecome trapped by th ewindshield
wiper siftheys tart moving while cleanin gthe
windshield or wiper blades .Ther eisar iskof
injury.
Always switch off th ewindshield wiper sand
th ei gnition before cleanin gthe windshield or
wiper blades.
! Only fold th
ewindshield wiper saway from
th ew indshield when vertical. Otherwise,
you will damag ethe hood.
! Do no
tpull th ewiper blade. Otherwise,
th ew iper blade could be damaged. Care
227Maintenance and care Z
Page 230 of 290

!
Do not clean wiper blades too often and
do not rub them too hard. Otherwise, the
graphite coating could be damaged. This
could cause wiper noise.
X Switch off the engine.
X Remove your foot from the brake pedal.
X Set the windshieldw iper to the00AAposi-
tion on the combination switch.
X Press the Start/Stop button repeatedly
until the windshieldw iper starts.
X When the wiper arms have reached aver-
tical position, press the Start/Stop button.
X Fold the wiper arm awayf rom the wind-
shield until it engages.
X Set the wiper bladeatr ight angles to the
wiper arm.
X Carefully clean the wiper blades with a
damp cloth.
X Fold the windshieldw iper arms back again
before switching on the ignition.
! Hold the wiper arm securely when folding
back. The windshieldc ould be damagedif
the wiper arm smacks against it suddenly.
Cleaning the exterior lighting X
Cleant he plastic lenses of the exterior
lighting using awet sponge and amild
cleaning agent, e.g. Mercedes-Benz car
shampoo or cleaning cloths.
! Only use cleaning agents or cleaning
cloths which are suitablef or plastic light
lenses. Unsuitable cleaning agents or
cleaning cloths could scratch or damage
the plastic light lenses.
Cleaning the mirror turns ignals!
Only use cleaning agents or cleaning
cloths that are suitablef or plastic lenses.
Unsuitable cleaning agents or cleaning
cloths could scratch or damage the plastic
lenses of the mirror turn signals.
X Cleant he plastic lenses of the mirror turn
signals in the exterior mirror housing using aw
et sponge and amild cleaning agent,
e.g. Mercedes-Benz car shampoo or clean-
ing cloths.
Cleaning the sensors !
If you clean the sensors with
apower
washer, make sure that you keep adis-
tance of at least 11.8 in (30 cm) between
the vehicle and the power washer nozzle.
Information aboutt he correct distance is
available from the equipment manufac-
turer. X
Cleans ensors0043of the driving systems
with water, car shampoo and asoft cloth.
Cleaning the rear view camera X
Use clear water and asoft cloth to clean
camera lens 0043.228
CareMaintenance and care
Page 231 of 290

!
Do not clean the camera lens and the area
around the rear view camera with apower
washer.
Cleaning the exhaust pipes G
WARNING
The exhaust tail pipe and tail pipe trim can
become very hot. If you come into contact
with these parts of the vehicle, you could burn
yourself. There is arisk of injury.
Alwaysbep articularlycareful around the
exhaust tail pipe and the tail pipe trim. Allow
these componentstoc ool down before touch-
ing them.
! Do not clean the exhaust pipe with acid-
based cleaning agents such as sanitary
cleansers or wheel cleaners.
Impurities combined with the effects of road
grit and corrosive environmental factors may cause flash rust to form on the surface. You
can restore the original shine of the exhaust
pipe by cleaning it regularly, especially in win- ter and after washing.
X Cleant he exhaust pipe with achrome care
product tested and approved by Mercedes-
Benz. Interior care
Cleaning the display !
For cleaning, do not use any of the fol-
lowing:
R alcohol-based thinner or gasoline
R abrasive cleaning agents
R commercially-available householdc lean-
ing agents
These may damage the displays urface. Do
not put pressure on the displays urface
when cleaning. This could lead to irrepara-
ble damage to the display. X
Before cleaning the display, make sure that
it is switched off and has cooled down.
X Cleant he displays urface using acommer-
cially available microfiber cloth and
TFT/LCD displayc leaner.
X Dry the displays urface usingadry micro-
fiber cloth.
Cleaning the plastic trim G
WARNING
Care products and cleaning agents containing solvents cause surfaces in the cockpit to
become porous. As aresult, plastic parts may
come loose in the event of air bag deploy-
ment. There is arisk of injury.
Do not use any care products and cleaning
agents to clean the cockpit.
! Do not affix the following to plastic surfa-
ces:
R stickers
R films
R scented oil bottles or similari tems
You can otherwise damage the plastic.
! Do not allowc
osmetics, insect repellent
or sunscreen to come into contact with the
plastic trim. This maintains the high-quality look of the surfaces.
X Wipe the plastic trim with adamp, lint-free
cloth, e.g. amicrofiber cloth.
X Heavy soiling: use car care and cleaning
products recommended and approved by
Mercedes-Benz.
The surface may change color temporarily.
Wait until the surface is dry again.
Cleaning the steering wheela nd selec-
tor lever X
Thoroughlyw ipe withadamp cloth or use
leather care agents that have been recom- mended and approved by Mercedes-Benz. Care
229Maintenance and care Z
Page 232 of 290

Cleaning genuine wood and trim ele-
ments !
Do no
tuse solvent-based cleanin gagents
suc hast ar remover, wheel cleaners, pol-
ishe sorw axes. Ther eisotherwise ariskof
damaging th esurface.
! Do no
tuse chrom epolis hont rimp ieces.
The trim pieces have achrom elook but are
mostly made of anodized aluminum and
can lose their shin eifchrom epolis his
used. Use adamp, lint-free cloth instead
when cleanin gthe trim pieces.
If th echrome-plated trim pieces are very
dirty, you can use achrom epolish. If you
are unsure as to whether th etrimp ieces
are chrome-plated or not, consult an
authorized Mercedes-Ben zCenter.
X Wipe th ewoode ntrima nd trim pieces with
ad amp, lint-free cloth ,e.g.am icrofiber
cloth.
X Heavy soiling: use careand cleanin gprod-
uct srecommended and approved by
Mercedes-Benz.
Cleaning th eseat covers General notes
! Do no
tuse microfiber cloth stoclean gen-
uine leather ,artificial leather or DINAMICA
covers. If used often ,the se can damag ethe
cover.
i Not
ethatregular car eisessential to
ensure that th eappearanc eand comfort of
th ec oversisr etaine dovertime.
Genuine leather seat covers
Leather is anatural product.
It exhibit snatural surface characteristics, for
example:
R differences in th etexture
R sign sofs tretching and marking
R sligh tnuances of color
Thes eare characteristic sofleather and not
material defects. !
To retain th
enatural appearanc eofthe
leather ,observ ethe followin gcleaning
instructions:
R Clean genuine leather cover scarefully
wit had amp cloth and then wipe th ecov-
ers down wit hadry cloth.
R Mak esure that th eleather does not
become soaked. It may otherwise
become roug hand cracked.
R Only use leather car eagents that have
been tested and approved by Mercedes-
Benz. You can obtain these from aquali-
fied specialist workshop.
Seat cover sofother materials
! Observ
ethe followin gwhen cleaning:
R clean artificial leather cover swithac loth
moistene dwithas olution containing 1%
detergen t(e.g. dish washin gliquid).
R clean cloth cover switham icrofiber cloth
moistene dwithas olution containing 1%
detergen t(e.g. dish washin gliquid). Rub
carefully and always wipe entir eseat sec-
tions to avoid leavin gvisible lines. Leave
th es eat to dry afterwards. Cleaning
results depen donthetype of dirt and
how lon githas been there.
R clean DINAMICA cover swithad amp
cloth .Makes ure that you wipe entire
seat sections to avoid leavin gvisible
lines.
Cleaning th eseat belts G
WARNING
Seat belt scan become severely weakened if
bleached or dyed. This coul dcaus ethe seat
belt stot earorf ail, for instance, in th eevent of
an accident. This pose sanincreased ris kof
injury or fatal injury.
Never bleac hordye theseat belts.
! Do no
tclean th eseat belt susin gchemical
cleanin gagents .Don otdry th eseat belts
by heating at temperatures abov e176 ‡
(80 †) or in direct sunlight. 230
CareMaintenance and care
 1
1 2
2 3
3 4
4 5
5 6
6 7
7 8
8 9
9 10
10 11
11 12
12 13
13 14
14 15
15 16
16 17
17 18
18 19
19 20
20 21
21 22
22 23
23 24
24 25
25 26
26 27
27 28
28 29
29 30
30 31
31 32
32 33
33 34
34 35
35 36
36 37
37 38
38 39
39 40
40 41
41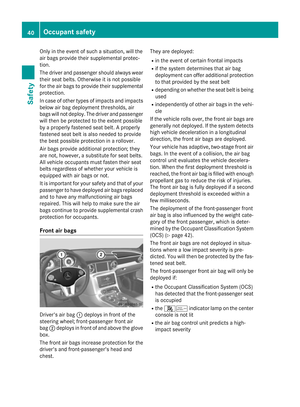 42
42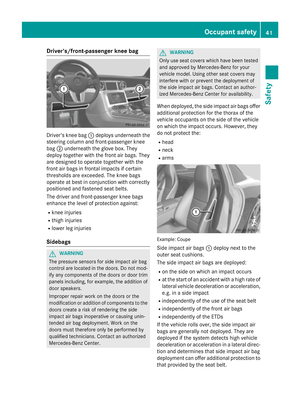 43
43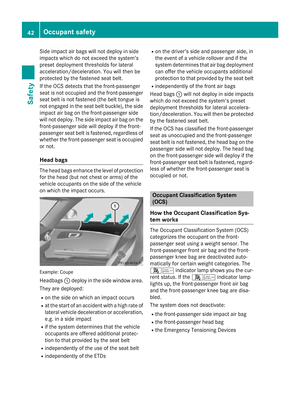 44
44 45
45 46
46 47
47 48
48 49
49 50
50 51
51 52
52 53
53 54
54 55
55 56
56 57
57 58
58 59
59 60
60 61
61 62
62 63
63 64
64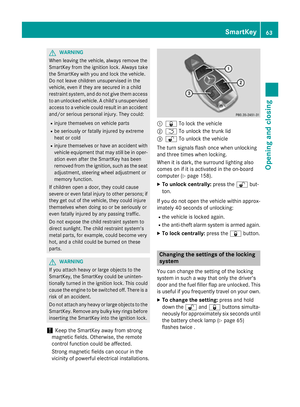 65
65 66
66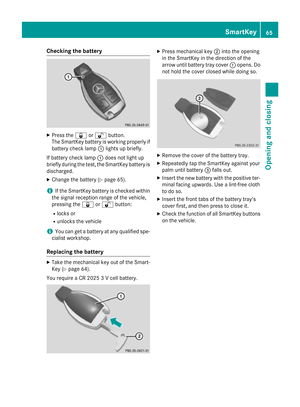 67
67 68
68 69
69 70
70 71
71 72
72 73
73 74
74 75
75 76
76 77
77 78
78 79
79 80
80 81
81 82
82 83
83 84
84 85
85 86
86 87
87 88
88 89
89 90
90 91
91 92
92 93
93 94
94 95
95 96
96 97
97 98
98 99
99 100
100 101
101 102
102 103
103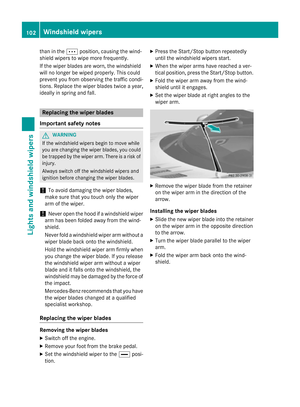 104
104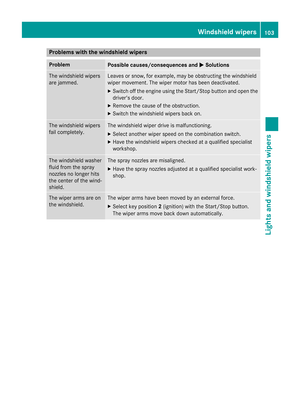 105
105 106
106 107
107 108
108 109
109 110
110 111
111 112
112 113
113 114
114 115
115 116
116 117
117 118
118 119
119 120
120 121
121 122
122 123
123 124
124 125
125 126
126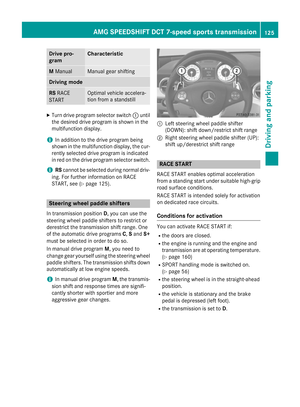 127
127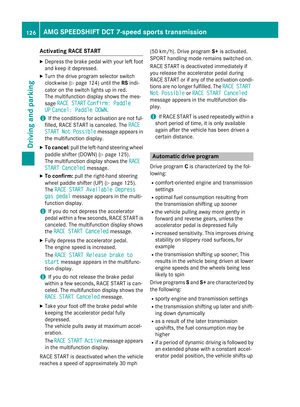 128
128 129
129 130
130 131
131 132
132 133
133 134
134 135
135 136
136 137
137 138
138 139
139 140
140 141
141 142
142 143
143 144
144 145
145 146
146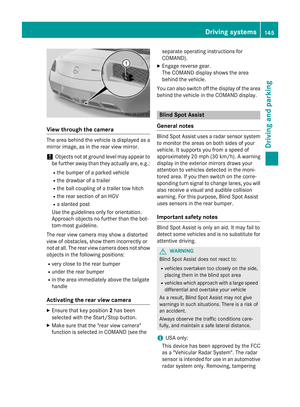 147
147 148
148 149
149 150
150 151
151 152
152 153
153 154
154 155
155 156
156 157
157 158
158 159
159 160
160 161
161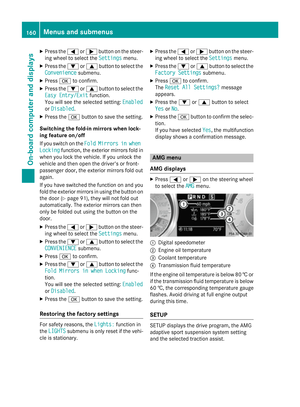 162
162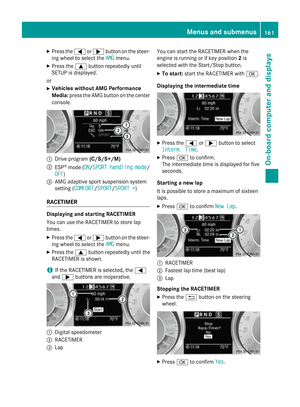 163
163 164
164 165
165 166
166 167
167 168
168 169
169 170
170 171
171 172
172 173
173 174
174 175
175 176
176 177
177 178
178 179
179 180
180 181
181 182
182 183
183 184
184 185
185 186
186 187
187 188
188 189
189 190
190 191
191 192
192 193
193 194
194 195
195 196
196 197
197 198
198 199
199 200
200 201
201 202
202 203
203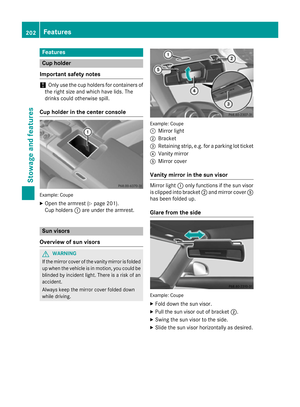 204
204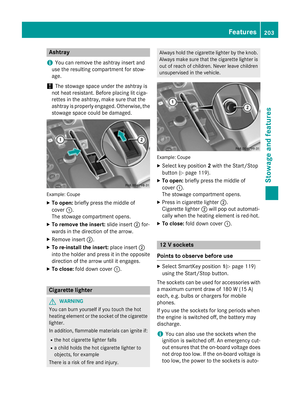 205
205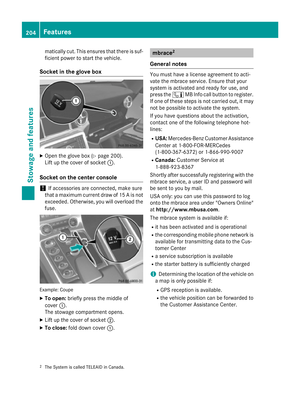 206
206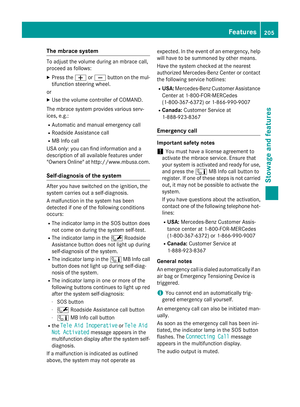 207
207 208
208 209
209 210
210 211
211 212
212 213
213 214
214 215
215 216
216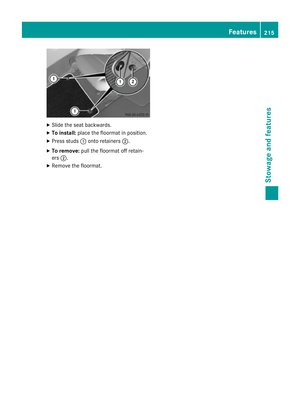 217
217 218
218 219
219 220
220 221
221 222
222 223
223 224
224 225
225 226
226 227
227 228
228 229
229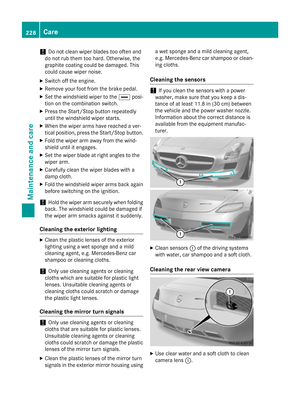 230
230 231
231 232
232 233
233 234
234 235
235 236
236 237
237 238
238 239
239 240
240 241
241 242
242 243
243 244
244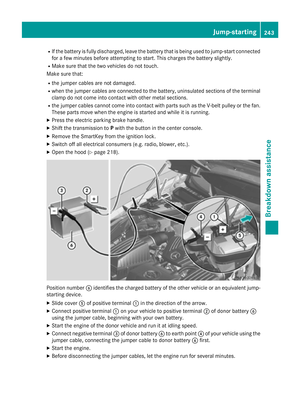 245
245 246
246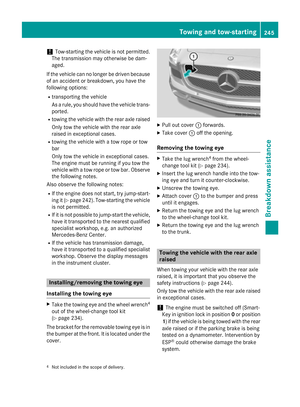 247
247 248
248 249
249 250
250 251
251 252
252 253
253 254
254 255
255 256
256 257
257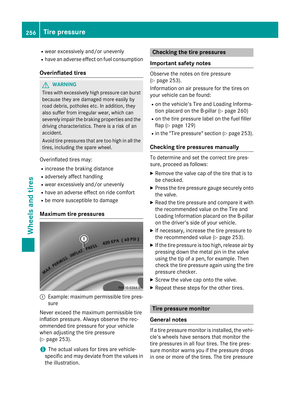 258
258 259
259 260
260 261
261 262
262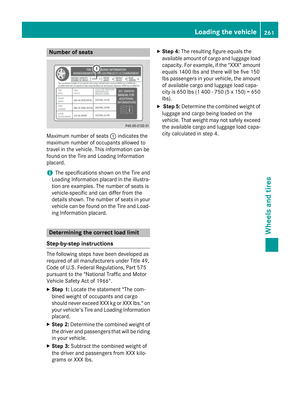 263
263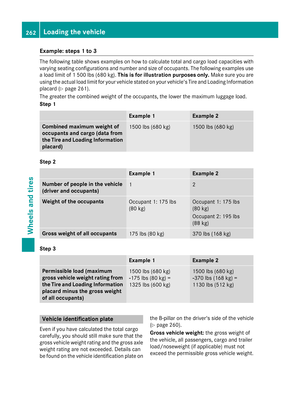 264
264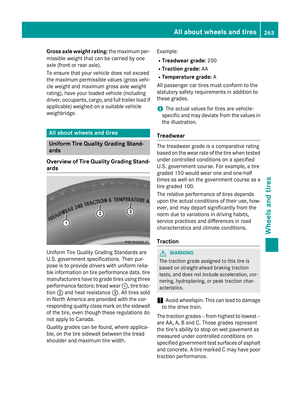 265
265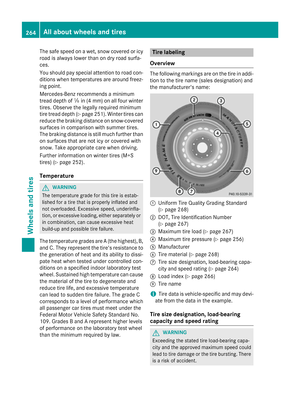 266
266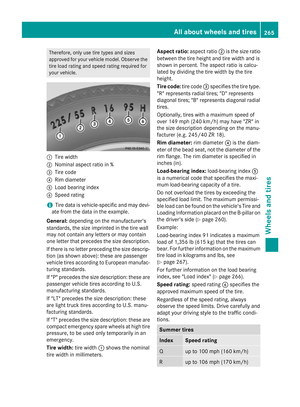 267
267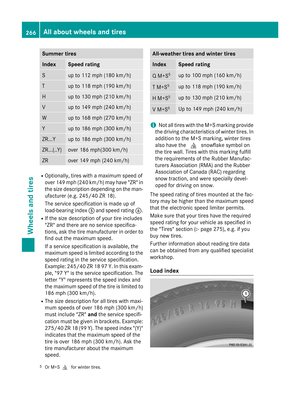 268
268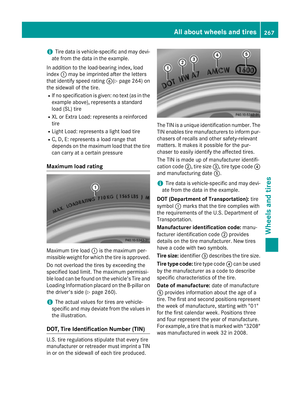 269
269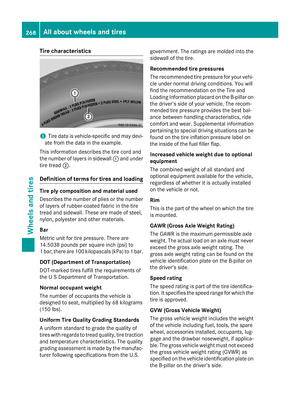 270
270 271
271 272
272 273
273 274
274 275
275 276
276 277
277 278
278 279
279 280
280 281
281 282
282 283
283 284
284 285
285 286
286 287
287 288
288 289
289