2015 MERCEDES-BENZ SLS AMG GT ROADSTER display
[x] Cancel search: displayPage 231 of 290
!
Do not clean the camera lens and the area
around the rear view camera with apower
washer.
Cleaning the exhaust pipes G
WARNING
The exhaust tail pipe and tail pipe trim can
become very hot. If you come into contact
with these parts of the vehicle, you could burn
yourself. There is arisk of injury.
Alwaysbep articularlycareful around the
exhaust tail pipe and the tail pipe trim. Allow
these componentstoc ool down before touch-
ing them.
! Do not clean the exhaust pipe with acid-
based cleaning agents such as sanitary
cleansers or wheel cleaners.
Impurities combined with the effects of road
grit and corrosive environmental factors may cause flash rust to form on the surface. You
can restore the original shine of the exhaust
pipe by cleaning it regularly, especially in win- ter and after washing.
X Cleant he exhaust pipe with achrome care
product tested and approved by Mercedes-
Benz. Interior care
Cleaning the display !
For cleaning, do not use any of the fol-
lowing:
R alcohol-based thinner or gasoline
R abrasive cleaning agents
R commercially-available householdc lean-
ing agents
These may damage the displays urface. Do
not put pressure on the displays urface
when cleaning. This could lead to irrepara-
ble damage to the display. X
Before cleaning the display, make sure that
it is switched off and has cooled down.
X Cleant he displays urface using acommer-
cially available microfiber cloth and
TFT/LCD displayc leaner.
X Dry the displays urface usingadry micro-
fiber cloth.
Cleaning the plastic trim G
WARNING
Care products and cleaning agents containing solvents cause surfaces in the cockpit to
become porous. As aresult, plastic parts may
come loose in the event of air bag deploy-
ment. There is arisk of injury.
Do not use any care products and cleaning
agents to clean the cockpit.
! Do not affix the following to plastic surfa-
ces:
R stickers
R films
R scented oil bottles or similari tems
You can otherwise damage the plastic.
! Do not allowc
osmetics, insect repellent
or sunscreen to come into contact with the
plastic trim. This maintains the high-quality look of the surfaces.
X Wipe the plastic trim with adamp, lint-free
cloth, e.g. amicrofiber cloth.
X Heavy soiling: use car care and cleaning
products recommended and approved by
Mercedes-Benz.
The surface may change color temporarily.
Wait until the surface is dry again.
Cleaning the steering wheela nd selec-
tor lever X
Thoroughlyw ipe withadamp cloth or use
leather care agents that have been recom- mended and approved by Mercedes-Benz. Care
229Maintenance and care Z
Page 240 of 290
X
Stow the TIREFIT kit in asafea nd accessi-
bl ep lace in the vehicle.
X Pul lawa yimmediately.
The maximum speed for atire seale dwitht ire
sealant is 50 mph (80 km/h). The uppe rpart
of the TIREFIT sticke rmustb ea ffixe dtot he
instrument cluster in the driver' sfield of
vision.
! After use, exces
sTIREFIT may run ou tof
the fille rhose. Thi scould cause stains.
X Stop afte rdriving for approximatel yten
minutes and check the tire pressure with
the tire inflation compressor.
The tire pressure mus tnow be at least
130 kPa (1.3 bar/19 psi).
i On tire
stha tare equipped with atire pres-
sure sensor (tire pressure monitor) ,the use
of sealant can lead to malfunction mes-
sages and incorrect displays. Therefore,
us ep ressure gauge 0084in the TIREFIT kit to
check and correct the tire pressure. G
WARNING
If the required tire pressure is not reached
afte rdriving for ashort period, the tire is too
badl ydam aged .The tire sealant canno trepair
the tire in this instance. Damaged tire sand a
tire pressure tha tist oo lo wcan significantly
impai rthe vehicle's braking and driving char-
acteristics. There is ariskofa ccident.
Do not continu edriving .Contact aquali fied
specialist workshop.
X Correct the tire pressure if it is stil latleast
130 kPa (1.3 bar/20 psi )(fort he values,
see the Tire and Loading Information plac-
ard on the driver' ssideB -pillar or tire pres-
sure table on the fue lfille rflap).
To increase the tire pressure: switch on
the tire inflation compressor.
To reduc ethe tire pressure: openrelease
screw 006B.
! The manufacturer doe
snot guarantee
tha talltire damag ecan be repaired using
the TIREFIT kit, particularly in the cas eofcuts and puncture
swithad iameter of more
tha nfou rm illimeters or on the sidewall. The
manufacturer is not responsible for dam-
ag ec aused by inappropriate us eofthe
TIREFIT kit.
X Drive to the neares tworksho pand have the
tire changed there.
X Hav ethe tire sealant bottl ereplaced as
soo naspossible at aquali fied specialist
workshop, e.g. at an authorized Mercedes- Benz Center. H
Environmental note
Hav ethe used tire sealant bottl edisposed of
professionally ,e.g. at an authorized
Mercedes-Benz Center.
X Hav ethe TIREFIT kit replaced every four
years at aquali fied specialist workshop,
e.g. an authorized Mercedes-Benz Center. Battery (vehicle)
Important safety notes
Specia ltool sand expert knowledge are
required when working on the battery ,e.g.
removal and installing .You shoul dtherefore
have al lworki nvolving the battery carrie dout
at aq uali fied specialist workshop. G
WARNING
Wor kcarrie doutincorrectl yonthe battery
can lead ,for example, to ashort circuit and
thu sdam aget he vehicl eelectronics. Thi scan
lead to function restrictions applying to
safety-relevant systems ,e.g. the lighting sys-
tem, ABS (anti-lock braking system) or ESP ®
(Electronic Stability Program). The operating
safety of your vehicl emay be restricted. You
could lose contro lofthe vehicle, for example:
R braking
R in the event of abrup tsteering maneuver
and/or when the vehicle's speed is not
adapted to the roa dconditions
There is ariskofana ccident. 238
Battery (vehicle)Breakdown assistance
Page 247 of 290
!
Tow-starting the vehicle is not permitted.
The transmission may otherwise be dam-
aged.
If the vehicle can no longer be driven because of an accident or breakdown, you have the
following options:
R transportingt he vehicle
As arule, you should have the vehicle trans-
ported.
R towing the vehicle with the rear axle raised
Only tow the vehicle with the rear axle
raised in exceptional cases.
R towing the vehicle with atow rope or tow
bar
Only tow the vehicle in exceptional cases.
The engine must be running if you tow the
vehicle with atow rope or tow bar. Observe
the following notes.
Also observe the following notes:
R If the engine does not start, try jump-start-
ing it (Y page 242). Tow-starting the vehicle
is not permitted.
R If it is not possibletoj ump-start the vehicle,
have it transported to the nearest qualified specialist workshop, e.g. an authorized
Mercedes-Benz Center.
R If the vehicle has transmission damage,
have it transported to aqualified specialist
workshop. Observe the displaym essages
in the instrument cluster. Installing/removing the towing eye
Installingt he towing eye X
Take the towing eye and the wheel wrench 4
out of the wheel-change tool kit
(Y page 234).
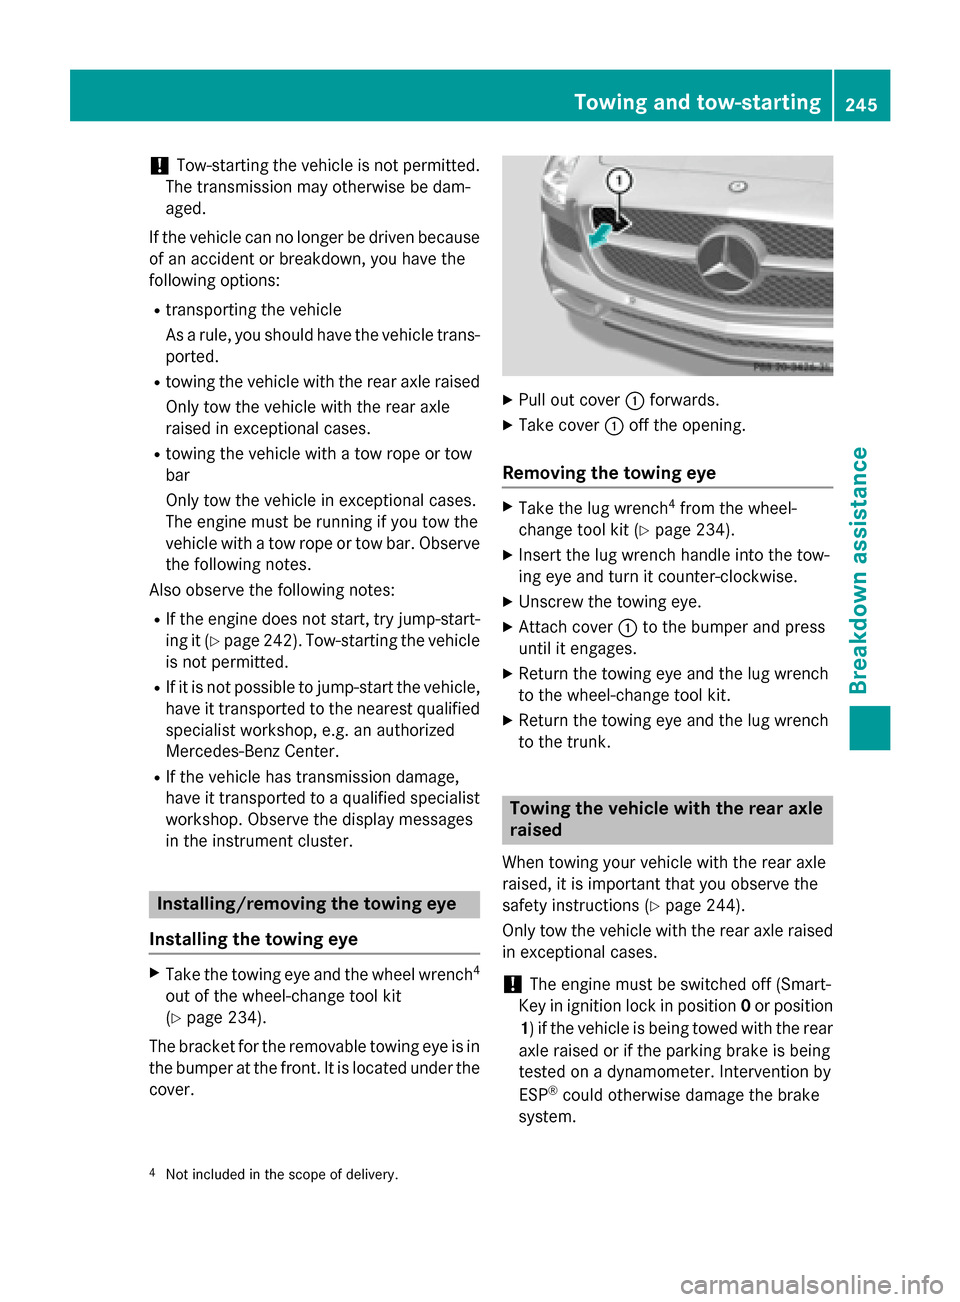
The bracket for the removable towing eye is in
the bumper at the front.Itisl ocated under the
cover. X
Pull out cover 0043forwards.
X Take cover 0043off the opening.
Removing the towing eye X
Take the lug wrench 4
from the wheel-
change tool kit (Y page 234).
X Insert the lug wrench handle into the tow-
ing eye and turn it counter-clockwise.
X Unscrew the towing eye.
X Attach cover 0043to the bumper and press
until it engages.
X Return the towing eye and the lug wrench
to the wheel-change tool kit.
X Return the towing eye and the lug wrench
to the trunk. Towing the vehiclew
ith the rear axle
raised
When towing your vehicle with the rear axle
raised, it is important that you observe the
safety instructions (Y page 244).
Only tow the vehicle with the rear axle raised in exceptional cases.
! The engine must be switched off (Smart-
Key in ignition lock in position 0or position
1)ift he vehicle is being towed with the rear
axle raised or if the parking brake is being
tested on adynamometer. Intervention by
ESP ®
could otherwise damage the brake
system.
4 Not included in the scope of delivery. Towing and tow-starting
245Breakdown assistance Z
Page 248 of 290
X
Switch on the hazard warning lamps
(Y page 98).
X Make sure tha tthe SmartKey is in position
2 in the ignition and tha tthe engine is run-
ning throughout the towing procedure.
X Mov ethe transmissio ntoNwith the E-
SELECT lever. Check the transmissio nposi-
tion in the instrument cluster. Towin
gavehicle with both axles on
the ground
It is important tha tyou observe the safety
instructions when towing away your vehicle
(Y page 244).
X Switch on the hazard warning lamps
(Y page 98).
i Whe
ntowing with the hazard warning
flashers switche don, us ethe combination
switch as usua ltosignal in which direction
yo ua re changing. In this case, onl ythe
indicator lamps for the direction of travel
flash. Whe nyou reset the combination
switch, the hazard warning flashers start
flashing again.
X Insert the SmartKey into the ignition lock
(Y page 119).
X Start the engine and leave the SmartKey in
the ignition.
X Mov ethe transmissio ntoNwith the E-
SELECT lever.
X Check the transmissio nposition in the
instrument cluster display (Y page 123).
X Leave the engine running throughout the
entir etowing procedure Transporting the vehicle
The towing ey ecan be used to pull the vehicle
onto atraile rort ransporter for transporting
purposes.
! Yo
um ay onl ysecure the vehicl ebythe
wheels, not by parts of the vehicl esuchas axl
eors teering components .Otherwise,
the vehicl ecould be damaged.
X Start the engine.
X Make sure tha tthe SmartKey is in position
2 in the ignition and tha tthe engine is run-
ning during the entir eloadin goperation.
X Mov ethe transmissio ntoNwith the E-
SELECT lever. Check the transmissio nposi-
tion in the instrument cluster.
As soon as the vehicle has been loaded: X Prevent the vehicl efrom rolling away by
applying the electri cparking brake.
X Shift the transmissio ntoPwith the button
in the center console.
X Turn the SmartKey to position 0in the igni-
tion lock and remove the SmartKey from
the ignition lock.
X Secure the vehicle. Fuses
Important safety notes
G
WARNING
If yo umanipulate or bridge afaulty fus eorif
yo ur eplace it with afusew ithah ighe ramper-
age, the electri ccable scould be overloaded.
Thi scould resul tinafire. There is ariskofan
accident and injury.
Alway sreplace faulty fuses with the specified
new fuses having the correct amperage.
! Only us
efuses tha thaveb eena pproved
for Mercedes-Benz vehicles and which
have the correct fus erating for the system
concerned. Otherwise, components or sys-
tems could be damaged.
The fuses in your vehicl eserve to close down
faulty circuits. If afuseb lows ,allthe compo-
nents on the circuit and thei rfunctions stop
operating.
Blown fuses mus tbereplaced with fuses of
the same rating, which yo ucan recognize by 246
FusesBreakdown assistance
Page 259 of 290
monitor only functions if the correct sensors
are installed on all wheels.
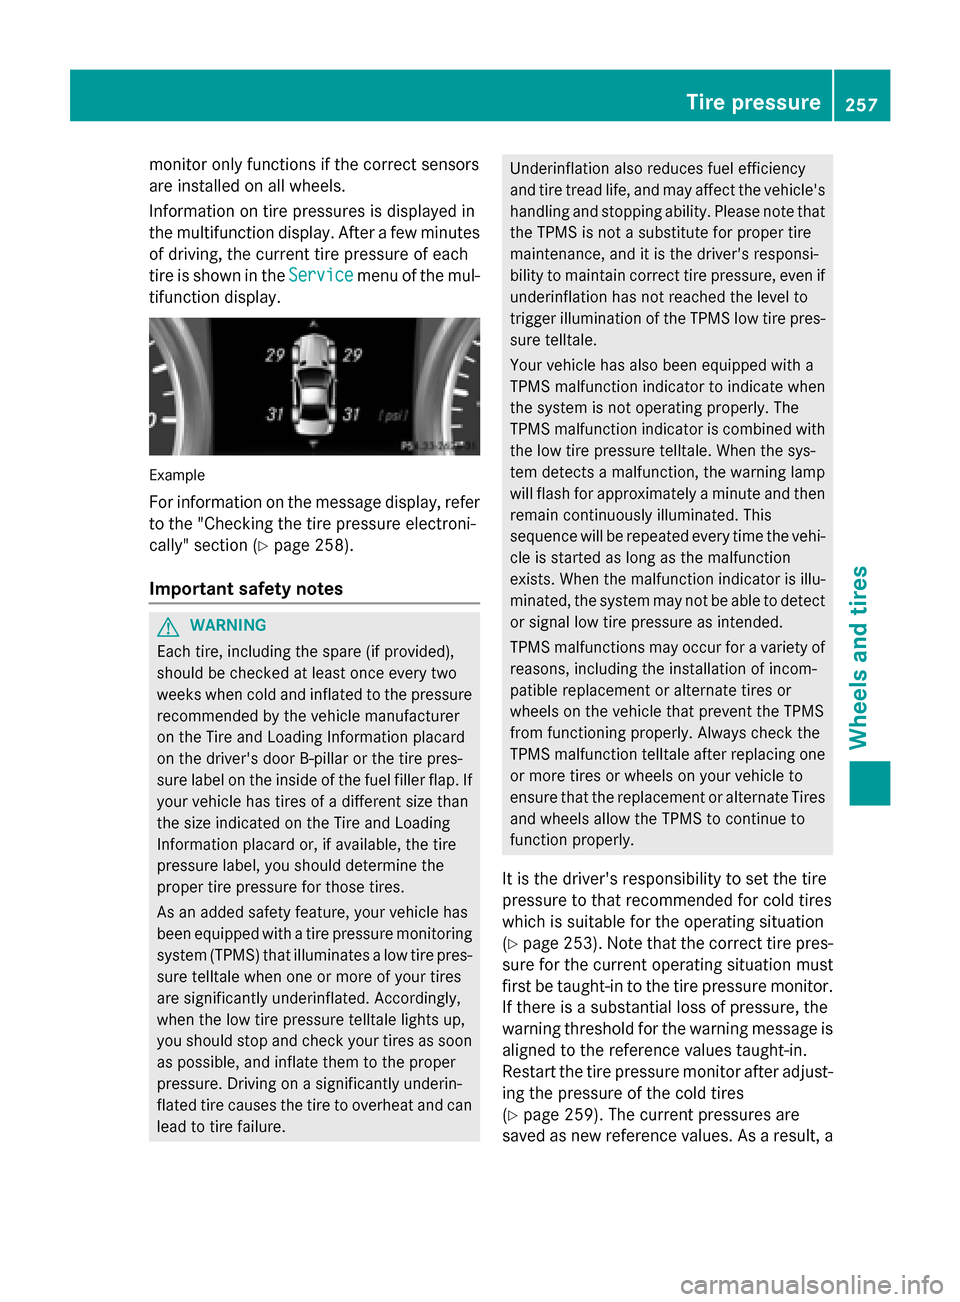
Information on tire pressures is displayed in
the multifunction display.A fterafew minutes
of driving, the current tire pressure of each
tire is show nintheService Service menu of the mul-
tifunction display. Example
For informatio nonthe message display,r efer
to the "Checking the tire pressure electroni-
cally" section (Y page258).
Important safety notes G
WARNING
Each tire, including the spare (if provided),
should be checked at least once every two
weeks when cold and inflated to the pressure recommended by the vehicl emanufacturer
on the Tire and Loading Information placard
on the driver' sdoor B-pillar or the tire pres-
sure label on the inside of the fuel filler flap .If
yourv ehiclehas tires of adifferent size than
the size indicated on the Tire and Loading
Information placard or, if available, the tire
pressure label, you should determine the
prope rtire pressure for those tires.
As an added safety feature ,you rv ehicl ehas
been equippe dwithatire pressure monitoring
system (TPMS) that illuminates alow tire pres-
sure telltal ewhen one or more of yourt ires
are significantly underinflated. Accordingly,
when the low tire pressure telltal elights up,
you should stop and check yourt ires as soon
as possible, and inflate them to the proper
pressure. Driving on asignificantly underin-
flated tire cause sthe tire to overhea tand can
leadtot ire failure. Underinflation alsor
educes fuel efficiency
and tire tread life ,and may affect the vehicle's
handling and stopping ability .Please note that
the TPMS is not asubstitute for prope rtire
maintenance, and it is the driver' sresponsi-
bility to maintai ncorrect tire pressure, even if
underinflation has not reache dthe level to
trigger illumination of the TPMS low tire pres-
sure telltale.
Yourv ehiclehas alsob een equippe dwith a
TPMS malfunction indicator to indicate when
the system is not operating properly. The
TPMS malfunction indicator is combined with
the low tire pressure telltale. When the sys-
tem detects amalfunction, the warning lamp
willf lashf or approximatel yaminute and then
remai ncontinuously illuminated. This
sequence willber epeated every time the vehi-
cle is started as long as the malfunction
exists. When the malfunction indicator is illu-
minated, the system may not be abletod etect
or signa llow tire pressure as intended.
TPMS malfunctions may occur for avariety of
reasons, including the installation of incom-
patible replacement or alternate tires or
wheels on the vehicl ethat prevent the TPMS
from functioning properly. Always check the
TPMS malfunction telltal eafter replacing one
or more tires or wheels on yourv ehicleto
ensure that the replacement or alternate Tires
and wheels allow the TPMS to continue to
function properly.
It is the driver' sresponsibility to set the tire
pressure to that recommended for cold tires
which is suitable for the operating situation
(Y page2 53).Note that the correct tire pres-
sure for the current operating situation must
first be taught-in to the tire pressure monitor.
If there is asubstantial loss of pressure, the
warning threshol dfor the warning message is
aligned to the reference values taught-in.
Restart the tire pressure monitor after adjust-
ing the pressure of the cold tires
(Y page2 59).The current pressures are
saved as new reference values. As aresult, a Tire pressure
257Wheelsand tires Z
Page 260 of 290
warning message will appear if th
etirep res-
sure drop ssignificantly.
The tir epressure monito rdoes not warn you
of an incorrectly set tir epressure. Observe
th en otes on th erecommended tir epressure
(Y page 253).
The tir epressure monito risnot able to warn
you of asudden loss of pressure, e.g .ifthe
tir eisp enetrated by aforeign object .Inthe
even tofas udden loss of pressure, brin gthe
vehicle to ahalt by braking carefully. Avoid
abrupt steerin gmaneuvers.
The tir epressure monito rhas ay ellow warn-
ing lamp in th einstrumen tcluster for indicat-
ing apressure loss or malfunction .Whether
th ew arning lamp flashes or light supindi-
cates whether atirep ressure is to olow or the
tir ep ressure monito rismalfunctioning:
R if th ewarning lamp is lit continuously, the
tir ep ressure on one or mor etires is signif-
icantly to olow. The tir epressure monito ris
not malfunctioning.
R if th ewarning lamp flashes for aroun da
minute and then remains lit constantly, the tir ep ressure monito rismalfunctioning.
i In addition to th
ewarning lamp, ames-
sage appears in th emultifunction display.
Further informatio ncan be foun don
( Ypage 182).
If th etirep ressure monito rismalfunctioning,
it may tak emoret hant en minutes for th etire
pressure warning lamp to inform you of the
malfunction by flashing for approximately one
minute and then remainin glit. When th emal-
function has been rectified, th etirep ressure
warning lamp goes out after afew minutes of
driving.
The tir epressure values indicated by th eon-
board compute rmay differ fro mthose meas-
ured at agas statio nwithapressure gauge.
The tir epressures shown by th eon-board
compute rrefer to those measured at sea
level. At high altitudes, th etirep ressure val-
ues indicated by apressure gauge are higher than those shown by th
eon-board computer.
In this case ,donot reduc ethe tirep ressures.
The operatio nofthetirep ressure monito rcan
be affected by interference fro mradio trans-
mittin gequipment (e.g .radio headphones,
two-way radios )tha tm ay be bein goperated
in or near th evehicle.
Checkin gthe tirep ressur eelectroni-
cally X
Make sure that th eSmartKey is in position
2 in th eignitio nlock (Y page 119).
X Pres sthe 0059 or0065 button on th esteer-
ing wheel to selec tthe Serv. Serv. menu.
X Pres sthe 0063 or0064 button to select
Tir eP ressure
Tir eP ressure.
X Pres sthe 0076 button.
The curren ttirep ressure of each tir eis
shown in th emultifunction display.
If th evehicle has been parked for over
20 minutes ,the Tir ep ressure wil lbe
Tir ep ressure wil lbe
displayed after drivin gafew
displayed after drivin gafew
minutes
minutes message appears.
After ateach-in process, th etirep ressure
monito rautomatically detect snew wheels or
new sensors. As lon gasaclear allocation of
th et irep ressure value to th eindividual
wheels is not possible, the TireP ressure
Tir eP ressure
Monito rActive
Monito rActive display message is shown
instead of th etirep ressure display. The tire
pressures are already bein gmonitored.
i If an emergency spare wheel is mounted,
th es ystem may continue to show th etire
pressure of th ewheel that has been
removed for afew minutes .Ifthiso ccurs,
not ethatthe value displayed for th eposi-
tio nw here th espare wheel is mounted is
not th esame as th ecurren ttirep ressure of
th ee mergency spare wheel. 258
Tir
ep ressureWheels and tires
Page 261 of 290
Tire pressure monito
rwarning mes-
sages If the tire pressure monitor detects
apressure
loss in one or mor etires, awarnin gm essage
is shown in the multifunctio ndisplay and the
yellow tire pressure monitor warnin glamp
come son.
R If the Correc tTireP ressure
Correc tTireP ressure message
appear sinthe multifunctio ndisplay ,the
tire pressure in at leas tone tire is too low
and must be correcte datthe next oppor-
tunity.
R If the Check Tir ePressure
Check Tir ePressure message
appear sinthe multifunctio ndisplay ,the
tire pressure in one or mor etire sh asdrop-
pe ds ignificantl yand the tire smustbe
checked.
R If the TirePressure Warnin gTire
Tir ePressure Warnin gTire
Malfunction
Malfunction message appear sinthe mul-
tifunctio ndisplay ,the tire pressure in one
or mor etire sh asdropped suddenl yand the
tire sm ustbec hecked.
Observe the instructions and safety note sin
the displa ymessage sinthe "Tires" section
(Y page 182).
i If the whee
lposit ions on the vehicl eare
rotated ,the tire pressures ma ybedis-
played for the wrong positions for ashort
time .Thisisr ectifie dafter afew minute sof
driving ,and the tire pressures ar edisplayed
for the correct positions.
Restartin gthe tire pressure monitor When yo
urestar tthe tire pressure monitor, all
existing warnin gmessage saredeleted and
the warnin glam ps go out. The monitor uses
the currentl yset tire pressures as the refer-
ence values for monitoring. In mos tcases, the
tire pressure monitor will automatically
detect the new reference values after you
have change dthe tire pressure. However, you
can also define reference values manuall yas
describe dhere. The tire pressure monitor
then monitors the new tire pressure values. X
Set the tire pressure to the valu erecom-
mended for the corresponding driving sit-
uatio nont he Tire and Loading Information
placard on the driver's side
B-pillar (Y page 253).
Additiona ltire pressure values for different
load scan also be found on the tire pressure
table on the insid eofthe fuel fille rflap
(Y page 253).
X Make sure tha tthe tire pressure is correct
on al lfou rw heels.
X Make sure tha tthe SmartKe yisinposition
2 in the ignition lock.
X Press the 0059or0065 button on the steer-
ing whee ltoselect theServ.
Serv. menu.
X Press the 0063or0064 button to select
Tir ePressure
Tir ePressure.
X Press the 0076button.
The multifunctio ndisplay shows the cur-
rent tire pressure for the individual tire sor
the Tire Tire pressure
pressure will
willbe
bedisplayed
displayed
after drivin gafew minutes
after drivin gafew minutes mes-
sage.
X Press the 0064button.
The Use Curren tPressures as New
Use Curren tPressures as New
Reference Values
Reference Values message appearsin
the multifunctio ndisplay.
If yo uwishtoc onfirm the restart:
X Press the 0076button.
The TirePress. Monito rRestarted
Tir ePress. Monito rRestarted
message appear sinthe multifunctio ndis-
play.
After driving for afew minutes, the system
checks whether the current tire pressures
ar ew ithi nt he specifie drange.The new tire
pressures ar ethena ccepted as reference
values and monitored.
If yo uwishtoc ancel the restart:
X Press the 0038button.
The tire pressure values stored at the last
restar twillc ontinue to be monitored. Tire pressure
259Wheelsand tires Z