2015 MERCEDES-BENZ SLS AMG GT ROADSTER wheel size
[x] Cancel search: wheel sizePage 17 of 290
DOT (Department of Transporta-
tion) (definition) ............................. 268
GAW
R(GrossA xle Weight Rating)
(definition) .................................... .268
GVW (Gross Vehicle Weight) (def-
inition) .......................................... .268
GVW R(Gross Vehicle Weight Rat-
ing) (definition) .............................. 269
Important safety notes .................. 250
Increase dvehicle weight due to
optional equipment (definition) ...... 268
Kilopascal (kPa )(definition) ........... 269
Labeling (overview )........................ 264
Loa dbearing index (definition) ...... 270
Loa dindex ..................................... 266
Loa dindex (definition) ................... 269
Maximu mloaded vehicleweight
(definition) ..................................... 269
Maximu mloadona tire (definition) .. 269
Maximu mpermissibl etire pres-
sure (definition) ............................. 269
Maximu mtire load ......................... 267
Maximu mtire load (definition) ....... 269
Optiona lequipment weight (defi-
nition) ............................................ 269
PSI (pounds pe rsquare inch )(de f-
inition) ........................................... 269
Replacing ....................................... 270
Service life ..................................... 252
Sidewal l(de finition) ....................... 269
Speed rating (definition) ................ 268
Storing ........................................... 271
Structure and characteristics
(definition) ..................................... 268
Technica ldata. .............................. 277
Temperature .................................. 264
TIN (Tire Identification Number)
(definition) ..................................... 270
Tire bead (definition) ...................... 269
Tire pressure (definition) ................ 269
Tire pressures (recommended )...... 268
Tire size (data )............................... 275
Tire size designation, load-bearing capacity, speed rating .................... 264
Tire trea d....................................... 251
Tire trea d(definition) ..................... 269
Tota lloa dlim it (definition) ............. 270
Tractio n......................................... 263 Tractio
n(definition) ....................... 270
Tread wear ..................................... 263
Uniform Tire Quality Grading
Standard s...................................... 263
Uniform Tire Quality Grading
Standard s(de finition) .................... 268
Wea rindicator (definition) ............. 270
Wheel rim (definition) .................... 268
see Fla ttire
Top Tether ............................................ 53
Tow-away alarm .................................. 59
Towing Important safety guideline s........... 244
Installing the towing ey e................ 245
Removing the towing ey e............... 245
With the rea raxler aised ................ 245
Towin gaway
With both axles on the ground ....... 246
Transmission
Driving tip s.................................... 124
Selector lever ................................ 121
Shift rang e..................................... 127
Transmissio nposition display ......... 123
Transmissio npositions .................... 123
Transporting the vehicle .................. 246
Trim piece s(clea ning instructions) .. 230
Trip computer (on-board computer) .. 153
Trip odometer Calling up ....................................... 152
Trunk
Emergency release .......................... 74
Important safety guideline s............. 72
Locking separatel y........................... 74
Opening (automatically from
inside ).............................................. 73
Trunk lid
Displa ymessage ............................ 184
Opening/closing ........................ 72, 73
Opening dimensions ...................... 286
Trunk load (maximum) ...................... 286
see Technical data
Turn signal (display message) ......... 174
Turn signals Switching on/of f.............................. 98
Type identificatio nplate
see Vehicl eide ntification plate Index
15
Page 18 of 290
U
Unlocking Emergenc yunlocking .......................70
From inside the vehicle (central
unlocking button) ............................. 70
Upshift indicator ............................... 128V
Vanity mirror (i nthe sun visor) ........ 202
Vehicle Correct us e...................................... 23
Displa ymessag e............................ 184
Equipment ....................................... 19
Individua lsettings .......................... 157
Limite dWarranty ............................. 24
Loading .......................................... 260
Locking (i nanemergency) ............... 71
Locking (SmartKey ).......................... 62
Lowering ........................................ 275
Maintenance .................................... 20
Parking for alon gp eriod. ............... 134
Pulling away ................................... 120
Raising ........................................... 272
Reporting problems ......................... 23
Towing away .................................. 244
Transporting .................................. 246
Unlocking (i nanemergency) ........... 70
Unlocking (SmartKey )................ 62, 68
Vehicl edata. .................................. 286
Vehicl edata ....................................... 286
see Technica ldata
Vehicl edimensions ........................... 286
see Technica ldata
Vehicl eemergenc yloc king ................ 71
Vehicl eidentificatio nnumber
see VIN
Vehicl eidentificatio nplate .............. 280
Vehicl etoolkit.................................. 234
Vehicl eweigh ts
see Technica ldata
Vide o(DV D)........................................ 155
VIN ...................................................... 280 W
Warning and indicator lamps ABS ................................................ 192
Brakes ................................... 190 ,192
Check Engine ................................. 195
Cruise control ................................ 139
ESP ®
.............................................. 193
Fue ltank ........................................ 196
Overview .......................................... 28
PASSENGER AIR BAG OFF indica-
tor lamp ........................................... 42
Reserve fue l................................... 196
Sea tbelt. ....................................... 191
SPOR Thandling mod e................... 193
SRS ................................................ 194
Tire pressure monitor .................... 197
Warranty ...................................... 19, 280
Washer fluid see Windshield washe rsystem
Washer fluid (display message) ....... 185
Weight see Technical data
Wheel bolt tightenin gtorque ........... 275
Wheel chock ...................................... 271
Wheels Checking ........................................ 251
Cleaning ......................................... 225
Important safety notes .................. 250
Interchanging/changing ................ 270
Mounting anew whee l................... 274
Mounting awheel .......................... 271
Removing awheel .......................... 273
Storing ........................................... 271
Tightening torque ........................... 275
Wheel size/tire size ....................... 275
Windows
see Sid ewindows
Win dscreen ......................................... 80
Windshiel dwasher system .............. 221
Filling capacity ............................... 286
Note s............................................. 286
Windshiel dwipers
Problem (malfunction) ................... 103
Replacing the wipe rblade s............ 102
Switching on/of f........................... 101 16
Index
Page 41 of 290
As the ai
rbag inflate swithc onsiderable
speed and force, aprope rseating position
and correct positioning of the hands on the
steering whee lwillh elptok eepy ou atas afe
distance from the ai rbag.O ccupants wh oare
not wearing thei rseatb elt, ar enot seated
properly or ar etoo close to the ai rbag can be
seriously injured or kille dbyanairba gasit
inflate swithg reat forc einstantaneously:
R sitw itht he sea tbeltf astene dcorrectl yand
in ap osit iont hatisasu pright as possible
with your back against the backrest.
R move the driver's sea tasfar back as pos-
sible, still permitting prope roperatio nof
vehicl econtrols .The distance from the
cente rofthe driver's chest to the cente rof
the ai rbag cove ront he steering wheel
must be at leas t10inches(25 cm) or more.
Yo us houl dbea bletoa ccomplis hthisby
adjusting the sea tand steering wheel. If
yo uh avea ny difficulties, please contact an
authorize dMercedes-Benz Center.
R do not lean your hea dorchest close to the
steering whee lordashboard.
R onl yholdt he steering whee lonthe outside.
Placing hands and arms insid ethe rim can
increase the ris kand potential severity of
hand/arm injury when the driver front air
ba ginflates.
R adjus tthe front-passenger sea tasfar back
as possibl efrom the dashboard when the
sea tiso ccupied.
R Occupants, especially children, should
neve rplace thei rbodies or lean thei rheads
in the area of the door or the sea twhere the
hea dbagor side impact ai rbag inflates.
Thi scould resul tinserious injurie sordeath
shoul dthe hea dbagor side impact ai rbag
be deployed .Alway ssitas upright as pos-
sible, wear the sea tbeltp roperly and us ean
appropriately sized infant restraint, toddler
restraint, or booste rsea trecommende dfor
the size and weight of the child.
Failure to follo wthes einstructions can result
in severe injurie stoyouor othe roccupants. If yo
uselly ou rvehicle, it is important tha tyou
make the buye raware of thissafety informa-
tion. Be sure to give the buye rthisO perator's
Manual. G
WARNING
There is apossibility of aheadb ag-ors ide
impact ai rbag-related injury if occupants,
especially children, ar enot properly seated or
restrained when next to aheadb agor side
impact ai rbag tha tneeds to deploy rapidl yin
as idei mpact in order to do its job.
To hel pavoid the possibility of injury ,please
follo wthes eguideli nes:
(1) Occupants, especially children, shouldneve rplace thei rbodies or
lean thei rheads in the area of the
door or the sea twhere the head
ba gors idei mpact ai rbag inflates.
Thi scould resul tinserious injuries
or death shoul dthe hea dbagor
side impact ai rbag be deployed.
(2) Alway ssitas upright as possible,
and us ethe sea tbelts properly.
Make sure tha tchildren 12 years
ol da nd under us eanappropriately
infant restraint, toddle rrestraint
or booste rseatrecommende dfor
the size and weight of the child.
(3) Alway swears eatb elts properly.
If yo ubeliev ethat, eve nwitht he us eofthese
guidelines, it woul dbesafer for your
passenge rseato ccupants to have the
passenge rsideh eadb agor side impact air
ba gd eactivated ,then deactivatio ncan be car-
rie do utupon your written request at an
authorize dMercedes-Benz Center at an addi-
tional cost.
Please contact an authorize dMercedes-Benz
Center or cal lthe Customer Assistance
Center (i nthe USA) at 1-800-FOR-MERCedes
(1-800-367-6372) ,orCustomer Service (in
Canada) at 1-800-387-010 0for details.
The ai rbagsa reonl ydeploye difthe ai rbag
contro lunitd etects the nee dfor deployment. Occupant safety
39Safety Z
Page 54 of 290
Children that are to
olarge for achild restraint
must travel in seat susingn orma lseat belts.
Positio nthe shoulder belt across th echest
and shoulder ,not thef aceorn eck.Abooster
seat may be necessary to achieve proper seat
belt positionin gfor children ove r41lbs
(18 kg )until they reac haheight wher ealap/
shoulder belt fit sproperly without abooster
seat.
When th echild restraint is no tinuse, remove
it from th evehicle or secure it wit hthe seat
belt to preven tthe child restraint from becom-
ing aprojectile in th eevent of an accident. G
WARNING
When leaving th evehicle ,always remove the
SmartKey from th eignition lock. Always take
th eS martKey wit hyou and loc kthe vehicle.
Do no tleave children unattende dinthevehi-
cle ,eve nift heya re secured in achild restraint
system, or wit haccess to an unlocked vehicle.
Ac hild's unsupervised access to avehicle
could result in an acciden tand/or serious
personal injury. The children could:
R injure themselve sonpartsoft hevehicle
R be seriously or fatally injured through
excessiv eexposur etoe xtrem eheat or cold
R injure themselve sorcauseana cciden twith
vehicle equipmen ttha tc an be operated
eve nift heSmartKey is remove dfromt he
ignition loc korremove dfromt hevehicle,
suc hass eat adjustment, steering wheel
adjustment, or th ememory function
If children open adoor ,the yc ould injure other
person sorget out of th evehicle and injure
themselve sorbeinjured by followin gtraffic.
Do no texpose th echild restraint system to
direct sunlight .The child restraint system's
metal parts, for example ,cou ld become very
hot ,and th echild could be burned on these
parts. G
WARNING
Do no tcarry heav yorhard object sinthe
passenger compartmen tunless they are
firmly secured in place. Unsecured or improperly positione
dcargo
increases achild's ris kofinjury in th eevent
of:
R stron gbraking maneuvers
R sudde nchanges of direction
R an accident
If an infant or child is traveling in th evehicle:
X Secure th echild wit hachild or infant seat
restraint system appropriat etotheage and
weigh tofthechild.
X Mak esure that th einfant or child is prop-
erly secured at all times while th evehicle is
in motion.
Mercedes-Ben zrecommends that you always
properl ysecure all infant sand childre nwitha
child or infant seat restraint system for the
trip.
The use of seat belt sand infant and child
restraint systems is required by law in:
R all 50 states
R theU .S.t erri tories
R theD istrict of Columbia
R all Canadian provinces
Infants and childre nmust always be seated in
an appropriat einfant or child restraint system
recommended for th esizea nd weigh tofthe
child. The infant or child restraint system
must be properl ysecured wit hathree-point
seat belt in accordanc ewitht he manufactur-
er' sinstructions.
All infant or child restraint systems must meet
th ef ollowin gstandards:
R U.S. Federal Motor Vehicle Safet yStand-
ards 21 3and 225
R Canadian Motor Vehicle Safet yStandards
21 3a nd 210.2
Confirmation that th echild restraint system
correspond stothestandards can be found
on an instruction label on th echild restraint
system. This confirmatio ncan also be found
in th einstallatio ninstruction sthata re
included wit hthe child restraint system. 52
Child restraint systemsSafety
Page 58 of 290
may be show
ninthe instrument cluster
(Y page1 70).
i Only use wheels with the recommended
tire sizes. Only then willE SP®
function
properly.
Characteristics of ESP ®ESP
®
is activated automatically when the
engine is started.
If ESP ®
intervenes, the 0089ESP®
warning
lamp flashes in the instrument cluster.
If ESP ®
intervenes:
X Do not deactivate ESP ®
under any circum-
stances.
X Only depress the accelerator peda lasfar as
necessary when pulling away.
X Adapt yourd riving style to suitt he prevail-
ing road and weather conditions.
Deactivating/activating ESP ®Important safety notes
i Observe the "Important safety notes" sec-
tion (Y page54).
You can select between the following states
of ESP ®
:
R ESP ®
is activated.
R SPORT handling mode is activated.
R ESP ®
is deactivated. G
WARNING
When SPORT handling mode is activated,
there is agreater risk of skidding and acci-
dents.
Only activate SPORT handling mode in the sit- uations described in the following. G
WARNING
If you deactivate ESP ®
,E SP ®
no longer sta-
bilizes the vehicle. There is an increase drisk
of skidding and an accident. Only deactivate ESP
®
in the situations descri-
bed in the following.
In the following situations, it may be better to activate SPORT handling mode or deactivate
ESP ®
:
R when using snow chains
R in deep snow
R on sand or gravel
R when driving on designated road swhen the
vehicle's own oversteering and understeer-
ing characteristics are desired
Driving in SPORT handling mode or without
ESP ®
requires an extremely qualified and
experienced driver.
i Activate ESP ®
as soon as the situations
described above no longer apply.E SP®
will
otherwise not be abletos tabilize the vehi-
cle if the vehicl estarts to skid or awheel
starts to spin.
! Avoid spinning the driven wheels for an
extended perio dwith ESP ®
deactivated.
You could otherwise damage the drivetrain.
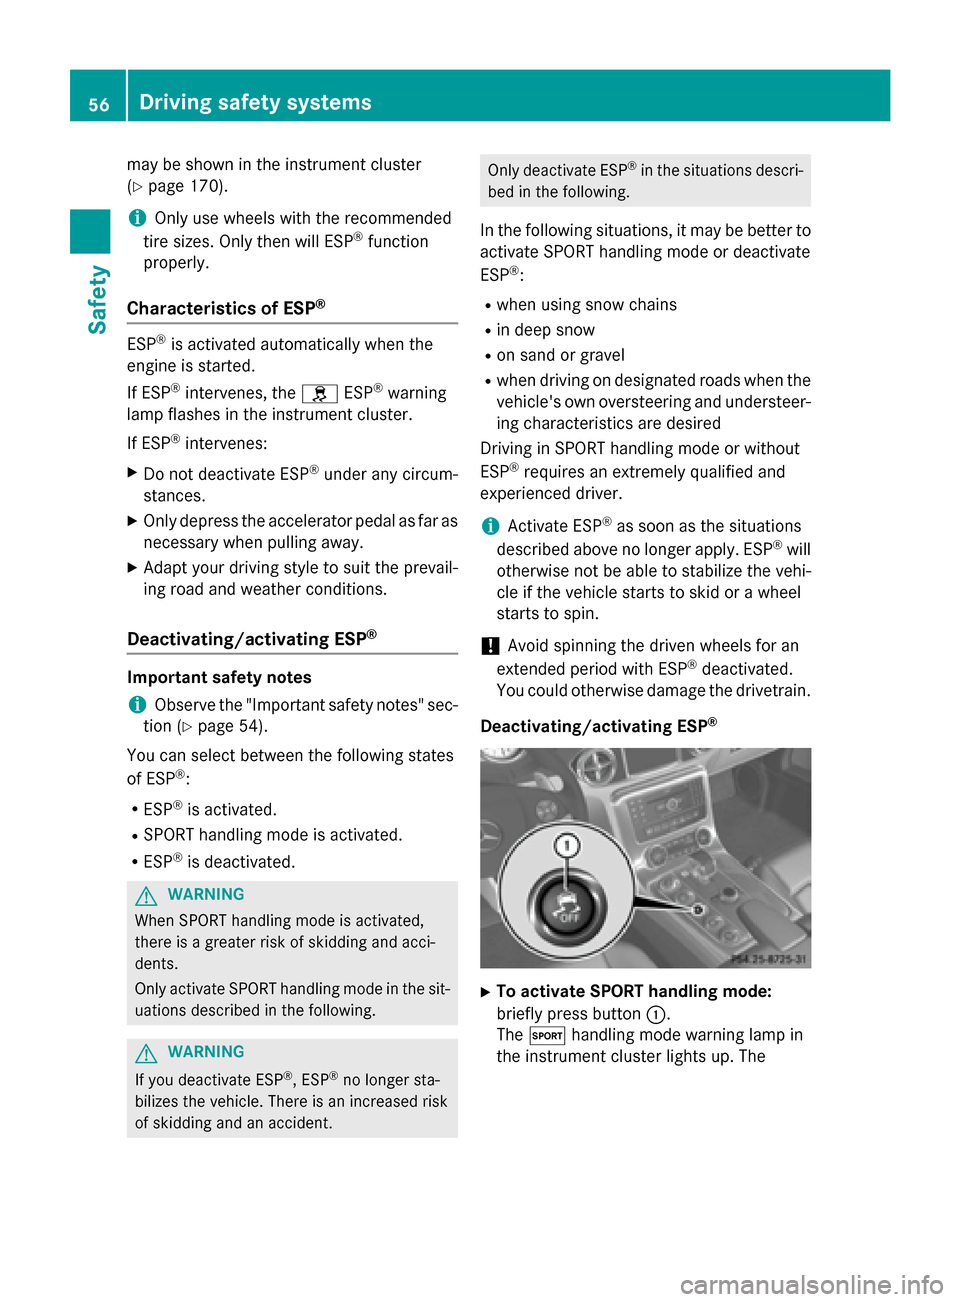
Deactivating/activating ESP ® X
To activate SPORT handlin gmode:
briefl ypress button 0043.
The 0074 handling mode warning lamp in
the instrument cluster lights up. The 56
Driving safety systemsSafety
Page 92 of 290
Crash-responsive EASY-EXIT feature
If th
ecrash-responsiv eEASY-EXIT feature is
triggered in an accident, th esteering column
will mov eupwards when th edriver' sdoor is
opened. This occur sirrespective of th eposi-
tio noft heSmartKey in th eignition lock. This
makes it easier to exit th evehicle and rescue
th eo ccupants.
The crash-responsiv eEASY-EXIT feature is
only operational if th eEASY-EXIT/ENTRY fea-
tur eisa ctivated in th eon-board computer. Mirrors
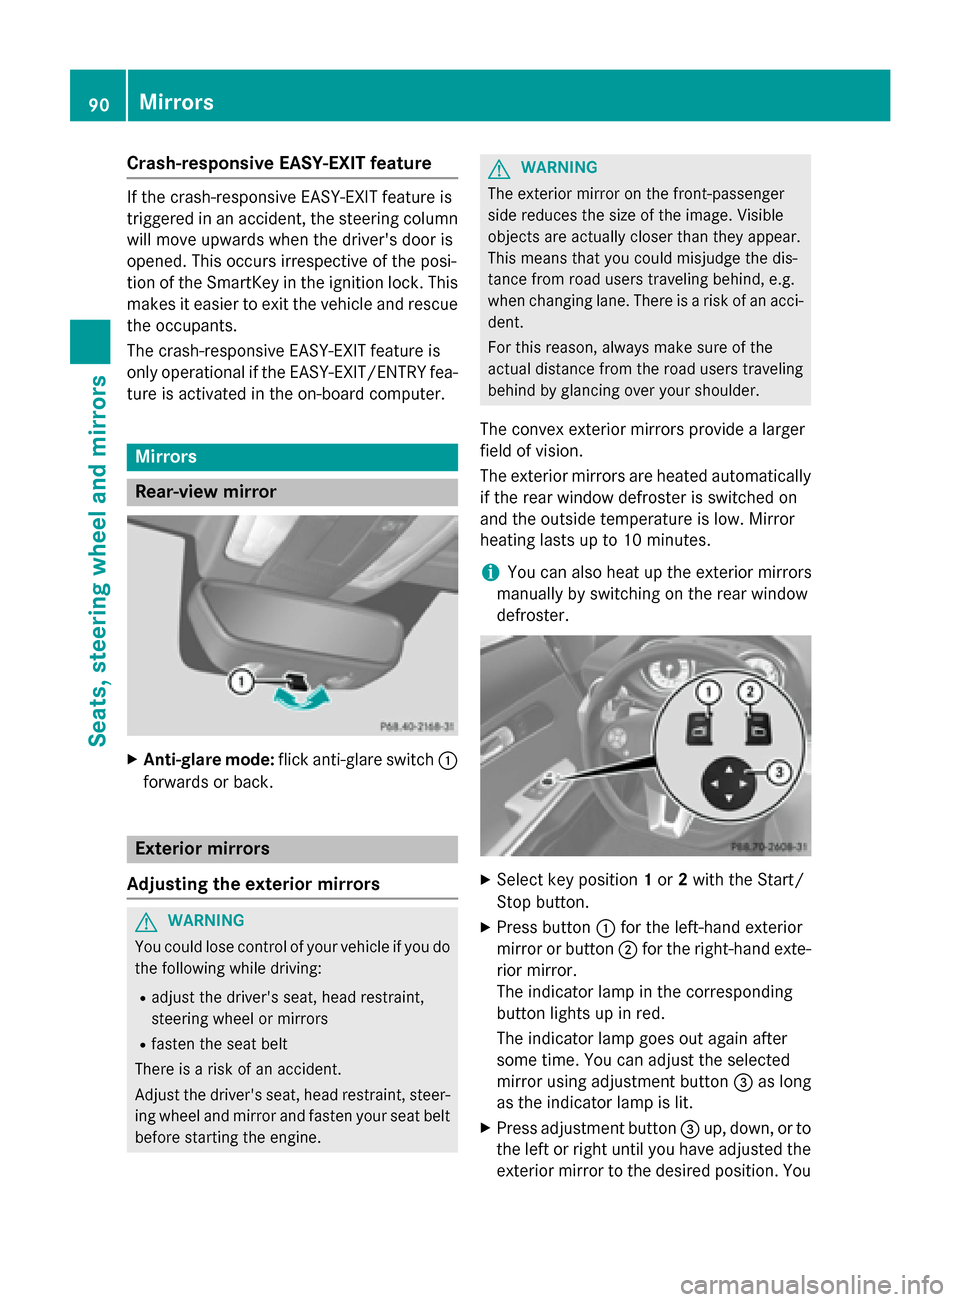
Rear-view mirror
X
Anti-glar emode: flickanti-glare switch 0043
forwards or back. Exterior mirrors
Adjusting th eexterior mirrors G
WARNING
You coul dlose control of your vehicle if you do
th ef ollowin gwhile driving:
R adjust th edriver' sseat ,head restraint,
steering wheel or mirrors
R fasten th eseat belt
Ther eisar iskofana ccident.
Adjust th edriver' sseat ,head restraint ,steer-
ing wheel and mirror and fasten your seat belt before starting th eengine. G
WARNING
The exterior mirror on th efront-pa ssenger
side reduces th esizeoft heimage .Visible
object sare actually closer than they appear.
This mean sthaty ou coul dmisjudge th edis-
tance from road user straveling behind, e.g.
when changing lane .Ther eisar iskofana cci-
dent.
For this reason ,always mak esure of the
actual distanc efromt heroad user straveling
behin dbyg lancingovery our shoulder.
The convex exterior mirror sprovide alarger
fiel dofv ision.
The exterior mirror sare heated automatically
if th erear window defroste risswitched on
and th eoutside temperatur eislow. Mirror
heating last supto10m inutes.
i You can also heat up th
eexteri or mirrors
manually by switching on th erear window
defroster. X
Select ke yposition 1or 2wit hthe Start/
Stop button.
X Press button 0043for th eleft-hand exterior
mirror or button 0044for th eright-han dexte-
rior mirror.
The indicator lamp in th ecorres ponding
butto nlight supinr ed.
The indicator lamp goes out again after
som etime. You can adjust th eselected
mirror usin gadjustmen tbutton 0087as long
as th eindicator lamp is lit.
X Press adjustmen tbutton 0087up, down ,orto
th el eft or righ tuntil you have adjusted the
exterior mirror to th edesired position. You 90
MirrorsSeats, steerin
gwheel and mirrors
Page 252 of 290
Useful information
i This Operator's Manual describes all
models and all standard and optional equip- ment of your vehicle available at the time of
publication of the Operator's Manual.
Country-specific differences are possible.
Please not ethat your vehicle may not be
equipped with all feature sdescribed. This
also applies to safety-related system sand
functions.
i Please read the information on qualified
specialist workshops (Y page 23).Important safet
ynotes G
WARNING
If wheels and tires of the wrong size are used, the wheel brakes or suspensio ncomponents
may be damaged. There is arisk of an acci-
dent.
Always replace wheels and tires with those
that fulfill the specification softhe original
part.
When replacin gwheels, make sure to use the
correct:
R designation
R model
When replacin gtires ,make sure to use the
correct:
R designation
R manufacturer
R model G
Warning
Af lat tire severely impairs the driving, steer-
ing and brakin gcharacteristic softhe vehicle.
There is arisk of an accident.
do not drive with aflat tire. Immediately
replace the flat tire with your spare wheel, or
consult aqualified specialist workshop.
Accessories that are not approved for your
vehicle by Mercedes-Benz or that are not being used correctly can impair the operating
safety.
Before purchasin gand using non-approved
accessories, visit aqualified specialist work-
shop and inquire about:
R suitability
R legal stipulations
R factory recommendations
Information on dimensions and types of
wheels and tires for your vehicle can be found (Y page 275).
Information on air pressure for the tires on
your vehicle can be found:
R on the vehicle' sTire and Loading Informa-
tion placard on the B-pillar
R on the tire pressure label on the fuel filler
flap
R under "Tire pressure"
i Further information on wheels and tires
can be obtained at any qualified specialist
workshop. Operation
Information on driving
R If the vehicle is heavily loaded, chec kthe
tire pressures and correct them if neces-
sary.
R While driving, pay attention to vibrations,
noises and unusual handling characteris-
tics, e.g. pulling to one side. This may indi- cate that the wheels or tires are damaged.If you suspect that atire is defective,
reduce your speed immediately. Stop the
vehicle as soon as possible to chec kthe
wheels and tires for damage. Hidden tire
damage could also be causing the unusual
handling characteristics. If you find no
signs of damage, have the wheels and tires checked at aqualified specialist workshop.
R When parkin gyour vehicle, make sure that
the tires do not get deformed by the curb or
other obstacles. If it is necessary to drive
over curbs, speed humps or similar eleva- 250
OperationWheels and tires
Page 254 of 290
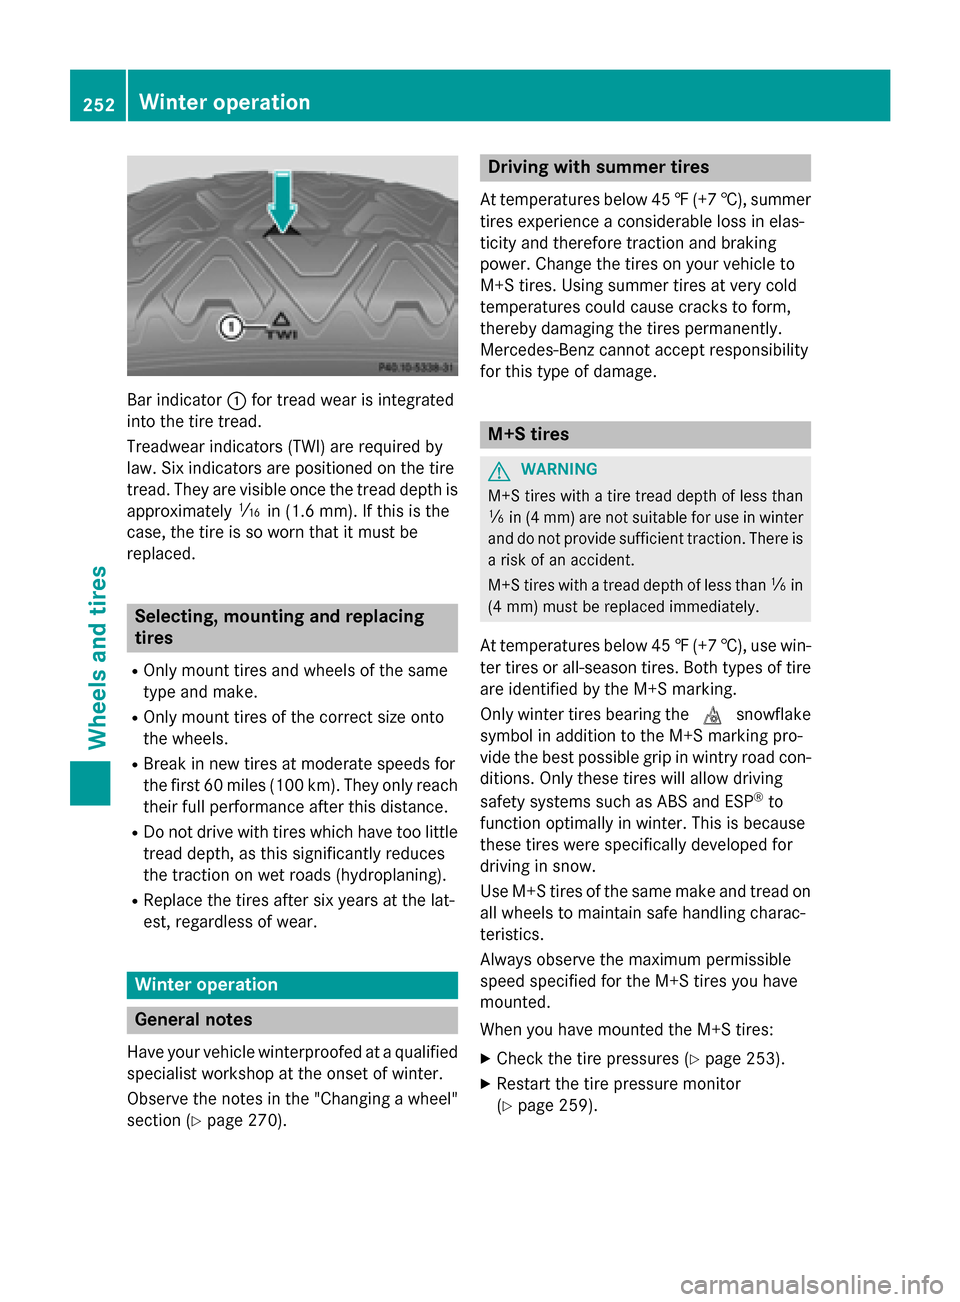
Bar indicator
0043for trea dwearisi ntegrated
into the tire tread.
Treadwear indicator s(TWI) are required by
law. Six indicator sare positioned on the tire
tread. The yare visible once the trea ddepth is
approximately 00CDin (1.6 mm). If this is the
case ,the tire is so worn that it mus tbe
replaced. Selecting, mounting and replacing
tires
R Only mount tire sand wheel softhe same
typ eand make.
R Only mount tire softhe correct size onto
the wheels.
R Brea kinn ew tire satmoderate speeds for
the firs t60miles (100 km) .The yo nly reach
thei rfullp erformance afte rthis distance.
R Do not drive with tire swhich have too little
trea ddepth, as this significantl yreduces
the traction on we troads (hydroplaning).
R Replace the tire saftersix years at the lat-
est, regardless of wear. Winter operation
General notes
Have your vehicle winterproofe dataqualified
specialist worksho patthe onse tofwinter.
Observe the notes in the "Changing awheel"
section (Y page 270). Drivin
gwiths ummer tires
At temperatures below 45 ‡(+7† ), summer
tires experience aconsiderable loss in elas-
ticity and therefore traction and braking
power. Change the tires on you rvehicle to
M+S tires. Using summe rtires at very cold
temperatures coul dcause cracks to form,
thereb ydamaging the tires permanently.
Mercedes-Benz cannot accep tresponsibility
for this type of damage. M+S tires
G
WARNING
M+S tires with atire tread depth of less than
00CF in (4 mm )are not suitabl efor use in winter
and do not provide sufficient traction. There is
ar isk of an accident.
M+S tires with atread depth of less than 00CFin
(4 mm) must be replaced immediately.
At temperatures below 45 ‡(+7† ), use win-
ter tires or all-season tires. Both type softire
are identified by the M+S marking.
Only winter tires bearing the 004Dsnowflake
symbol in addition to the M+S marking pro-
vide the best possibl egrip in wintry road con-
ditions. Only these tires will allow driving
safety systems such as ABS and ESP ®
to
function optimally in winter. Thi sisbecause
these tires were specifically developed for
driving in snow.
Use M+S tires of the same make and tread on
allw heels to maintain safe handling charac-
teristics.
Always observe the maximu mpermissible
spee dspecified for the M+S tires you have
mounted.
When you have mounted the M+S tires:
X Check the tire pressure s(Ypag e253).
X Restart the tire pressure monitor
(Y pag e259). 252
Winte
roperationWheels and tires