2015 MERCEDES-BENZ SLS AMG GT COUPE warning light
[x] Cancel search: warning lightPage 259 of 290

monitor only functions if the correct sensors
are installed on all wheels.
Information on tire pressures is displayed in
the multifunction display.A fterafew minutes
of driving, the current tire pressure of each
tire is show nintheService Service menu of the mul-
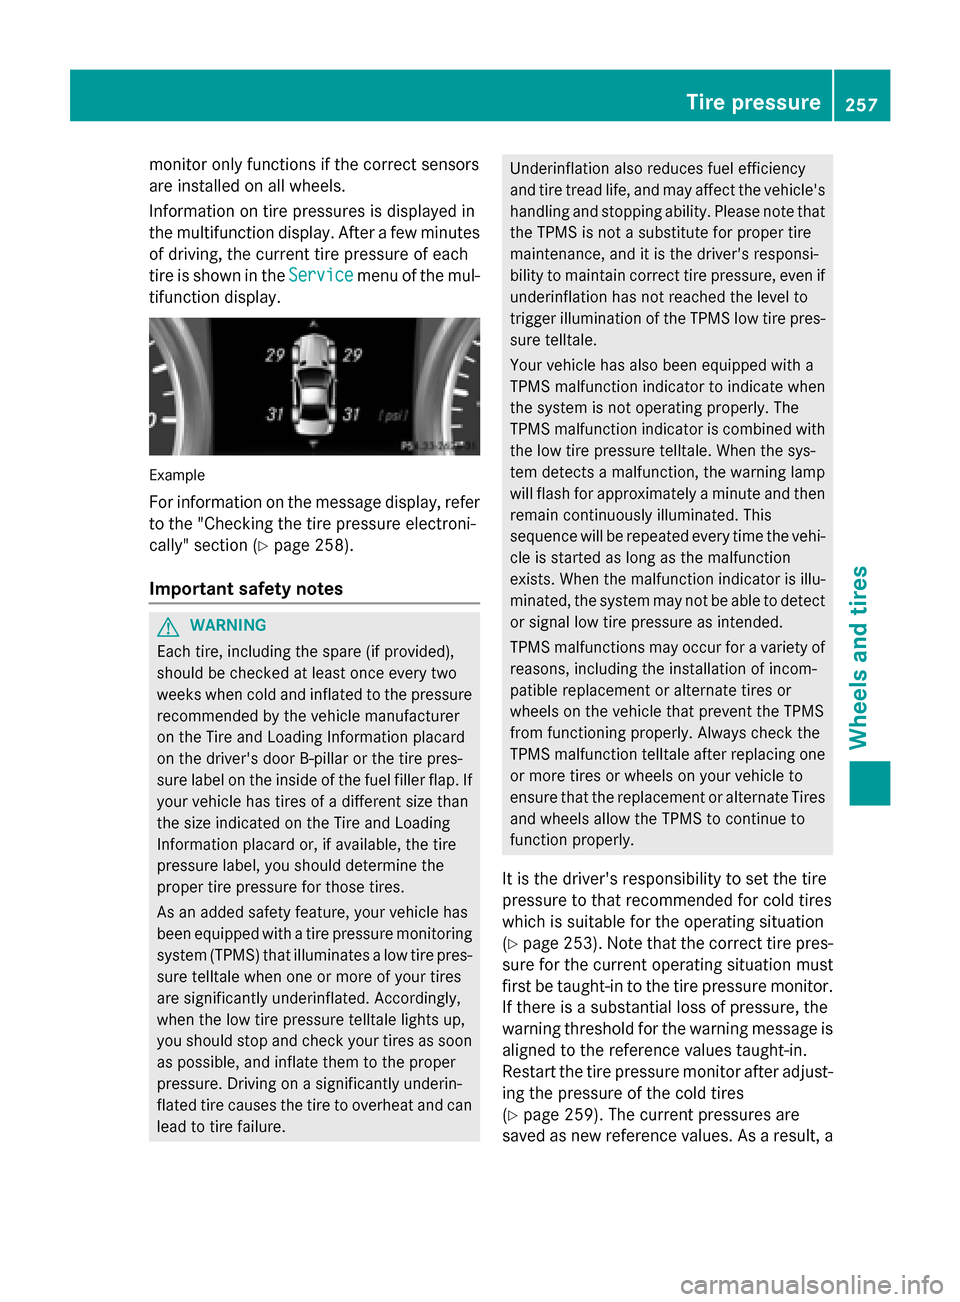
tifunction display. Example
For informatio nonthe message display,r efer
to the "Checking the tire pressure electroni-
cally" section (Y page258).
Important safety notes G
WARNING
Each tire, including the spare (if provided),
should be checked at least once every two
weeks when cold and inflated to the pressure recommended by the vehicl emanufacturer
on the Tire and Loading Information placard
on the driver' sdoor B-pillar or the tire pres-
sure label on the inside of the fuel filler flap .If
yourv ehiclehas tires of adifferent size than
the size indicated on the Tire and Loading
Information placard or, if available, the tire
pressure label, you should determine the
prope rtire pressure for those tires.
As an added safety feature ,you rv ehicl ehas
been equippe dwithatire pressure monitoring
system (TPMS) that illuminates alow tire pres-
sure telltal ewhen one or more of yourt ires
are significantly underinflated. Accordingly,
when the low tire pressure telltal elights up,
you should stop and check yourt ires as soon
as possible, and inflate them to the proper
pressure. Driving on asignificantly underin-
flated tire cause sthe tire to overhea tand can
leadtot ire failure. Underinflation alsor
educes fuel efficiency
and tire tread life ,and may affect the vehicle's
handling and stopping ability .Please note that
the TPMS is not asubstitute for prope rtire
maintenance, and it is the driver' sresponsi-
bility to maintai ncorrect tire pressure, even if
underinflation has not reache dthe level to
trigger illumination of the TPMS low tire pres-
sure telltale.
Yourv ehiclehas alsob een equippe dwith a
TPMS malfunction indicator to indicate when
the system is not operating properly. The
TPMS malfunction indicator is combined with
the low tire pressure telltale. When the sys-
tem detects amalfunction, the warning lamp
willf lashf or approximatel yaminute and then
remai ncontinuously illuminated. This
sequence willber epeated every time the vehi-
cle is started as long as the malfunction
exists. When the malfunction indicator is illu-
minated, the system may not be abletod etect
or signa llow tire pressure as intended.
TPMS malfunctions may occur for avariety of
reasons, including the installation of incom-
patible replacement or alternate tires or
wheels on the vehicl ethat prevent the TPMS
from functioning properly. Always check the
TPMS malfunction telltal eafter replacing one
or more tires or wheels on yourv ehicleto
ensure that the replacement or alternate Tires
and wheels allow the TPMS to continue to
function properly.
It is the driver' sresponsibility to set the tire
pressure to that recommended for cold tires
which is suitable for the operating situation
(Y page2 53).Note that the correct tire pres-
sure for the current operating situation must
first be taught-in to the tire pressure monitor.
If there is asubstantial loss of pressure, the
warning threshol dfor the warning message is
aligned to the reference values taught-in.
Restart the tire pressure monitor after adjust-
ing the pressure of the cold tires
(Y page2 59).The current pressures are
saved as new reference values. As aresult, a Tire pressure
257Wheelsand tires Z
Page 260 of 290

warning message will appear if th
etirep res-
sure drop ssignificantly.
The tir epressure monito rdoes not warn you
of an incorrectly set tir epressure. Observe
th en otes on th erecommended tir epressure
(Y page 253).
The tir epressure monito risnot able to warn
you of asudden loss of pressure, e.g .ifthe
tir eisp enetrated by aforeign object .Inthe
even tofas udden loss of pressure, brin gthe
vehicle to ahalt by braking carefully. Avoid
abrupt steerin gmaneuvers.
The tir epressure monito rhas ay ellow warn-
ing lamp in th einstrumen tcluster for indicat-
ing apressure loss or malfunction .Whether
th ew arning lamp flashes or light supindi-
cates whether atirep ressure is to olow or the
tir ep ressure monito rismalfunctioning:
R if th ewarning lamp is lit continuously, the
tir ep ressure on one or mor etires is signif-
icantly to olow. The tir epressure monito ris
not malfunctioning.
R if th ewarning lamp flashes for aroun da
minute and then remains lit constantly, the tir ep ressure monito rismalfunctioning.
i In addition to th
ewarning lamp, ames-
sage appears in th emultifunction display.
Further informatio ncan be foun don
( Ypage 182).
If th etirep ressure monito rismalfunctioning,
it may tak emoret hant en minutes for th etire
pressure warning lamp to inform you of the
malfunction by flashing for approximately one
minute and then remainin glit. When th emal-
function has been rectified, th etirep ressure
warning lamp goes out after afew minutes of
driving.
The tir epressure values indicated by th eon-
board compute rmay differ fro mthose meas-
ured at agas statio nwithapressure gauge.
The tir epressures shown by th eon-board
compute rrefer to those measured at sea
level. At high altitudes, th etirep ressure val-
ues indicated by apressure gauge are higher than those shown by th
eon-board computer.
In this case ,donot reduc ethe tirep ressures.
The operatio nofthetirep ressure monito rcan
be affected by interference fro mradio trans-
mittin gequipment (e.g .radio headphones,
two-way radios )tha tm ay be bein goperated
in or near th evehicle.
Checkin gthe tirep ressur eelectroni-
cally X
Make sure that th eSmartKey is in position
2 in th eignitio nlock (Y page 119).
X Pres sthe 0059 or0065 button on th esteer-
ing wheel to selec tthe Serv. Serv. menu.
X Pres sthe 0063 or0064 button to select
Tir eP ressure
Tir eP ressure.
X Pres sthe 0076 button.
The curren ttirep ressure of each tir eis
shown in th emultifunction display.
If th evehicle has been parked for over
20 minutes ,the Tir ep ressure wil lbe
Tir ep ressure wil lbe
displayed after drivin gafew
displayed after drivin gafew
minutes
minutes message appears.
After ateach-in process, th etirep ressure
monito rautomatically detect snew wheels or
new sensors. As lon gasaclear allocation of
th et irep ressure value to th eindividual
wheels is not possible, the TireP ressure
Tir eP ressure
Monito rActive
Monito rActive display message is shown
instead of th etirep ressure display. The tire
pressures are already bein gmonitored.
i If an emergency spare wheel is mounted,
th es ystem may continue to show th etire
pressure of th ewheel that has been
removed for afew minutes .Ifthiso ccurs,
not ethatthe value displayed for th eposi-
tio nw here th espare wheel is mounted is
not th esame as th ecurren ttirep ressure of
th ee mergency spare wheel. 258
Tir
ep ressureWheels and tires
Page 274 of 290

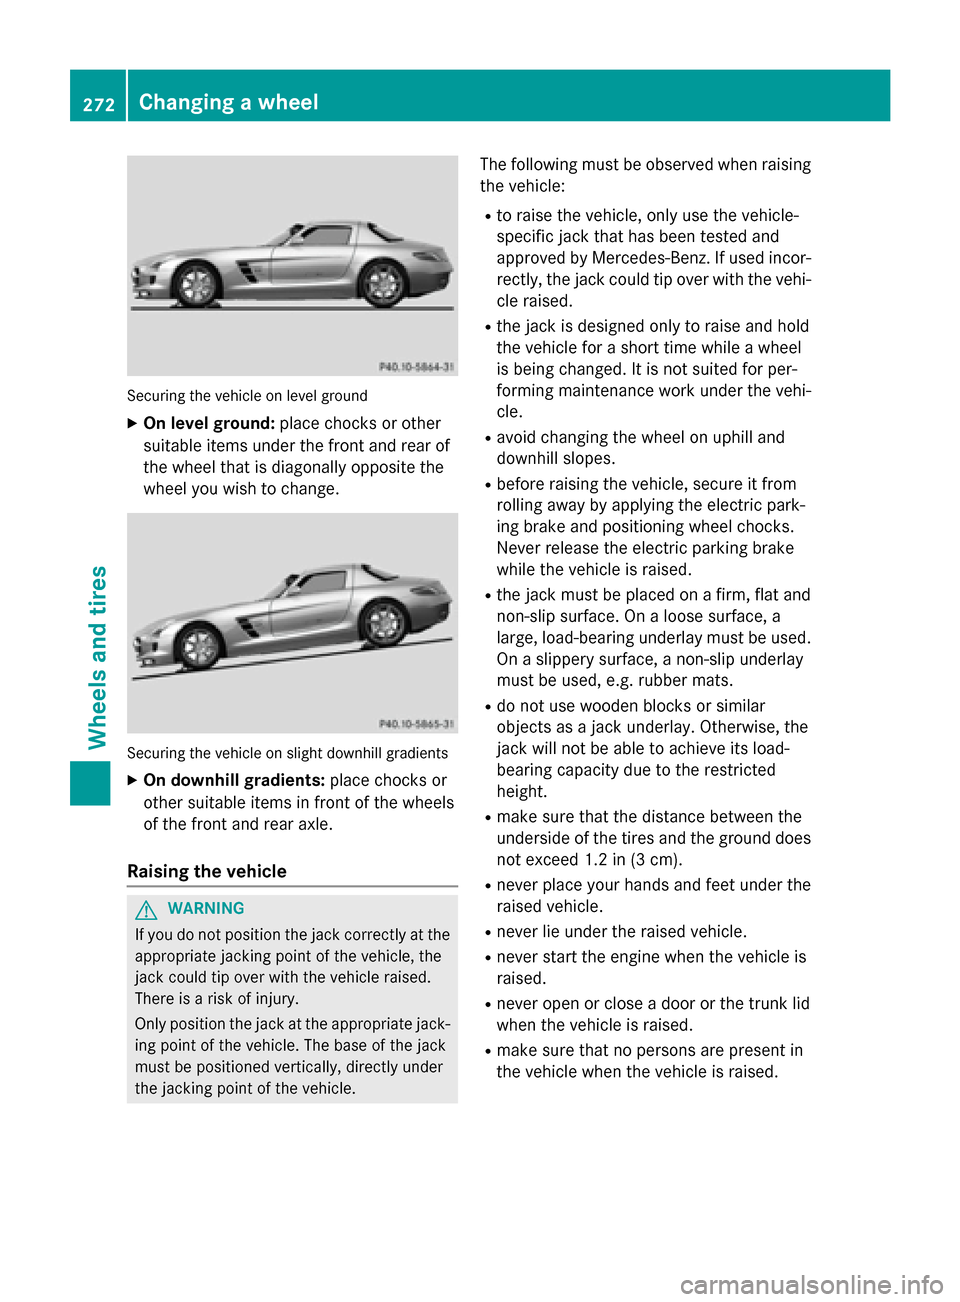
Securing the vehicle on level ground
X On level ground: place chocks or other
suitabl eitem sunder the front and rea rof
the wheel that is diagonall yopposite the
wheel yo uwishtoc hange. Securing the vehicle on slight downhil
lgradients
X On downhill gradients: place chocks or
othe rsuitabl eitem sinf ront of the wheels
of the front and rea raxle.
Raisin gthe vehicle G
WARNING
If yo udon ot position the jack correctly at the
appropriate jacking point of the vehicle ,the
jack could tip ove rwitht he vehicle raised.
There is ariskofi njury.
Only position the jack at the appropriate jack-
ing point of the vehicle .The base of the jack
mus tbep ositioned vertically ,directl yunder
the jacking point of the vehicle. The following mus
tbeo bserve dwhenr aising
the vehicle:
R to raise the vehicle ,only us ethe vehicle-
specifi cjack that ha sbeent ested and
approved by Mercedes-Benz. If used incor-
rectly, the jack could tip ove rwitht he vehi-
cle raised.
R the jack is designe donly to raise and hold
the vehicle for ashort time whil eawheel
is being changed .Itisnot suited for per-
forming maintenance work under the vehi-
cle.
R avoid changing the wheel on uphil land
downhil lslopes.
R before raising the vehicle ,secure it from
rolling away by applying the electri cpark-
ing brake and positioning wheel chocks.
Neve rrelease the electri cparking brake
whil ethe vehicle is raised.
R the jack mus tbep lace donaf irm,flata nd
non-slip surface. On aloose surface, a
large ,load-bearing underlay mus tbeu sed.
On aslippery surface, anon-slip underlay
mus tbeu sed, e.g. rubber mats.
R do not us ewoodenb locks or similar
objects as ajack underlay .Otherwise, the
jack will not be able to achieve its load-
bearing capacity du etothe restricted
height.
R make sure that the distance between the
underside of the tire sand the ground does
not excee d1.2 in (3 cm).
R never place your hands and fee tunder the
raised vehicle.
R never li eunder the raised vehicle.
R never star tthe engine when the vehicle is
raised.
R never ope norclosead oorort he trunk lid
when the vehicle is raised.
R make sure that no persons are present in
the vehicle when the vehicle is raised. 272
Changing
awheelWheels and tires
Page 277 of 290

X
Tighten the wheel bolts until they are fin-
ger-tight.
X Unscrew the alignment bolt.
X Tighten the last wheel bolt until it is finger-
tight.
Lowering the vehicle G
WARNING
The wheels could work loose if the wheel nuts and bolts are not tightened to the specified
tightening torque. There is arisk of accident.
Have the tightening torque immediately
checked at aqualified specialist workshop
after awheel is changed.
X Turn the crank of the jack counter-clock-
wise until the vehicle is once again standing
firmly on the ground.
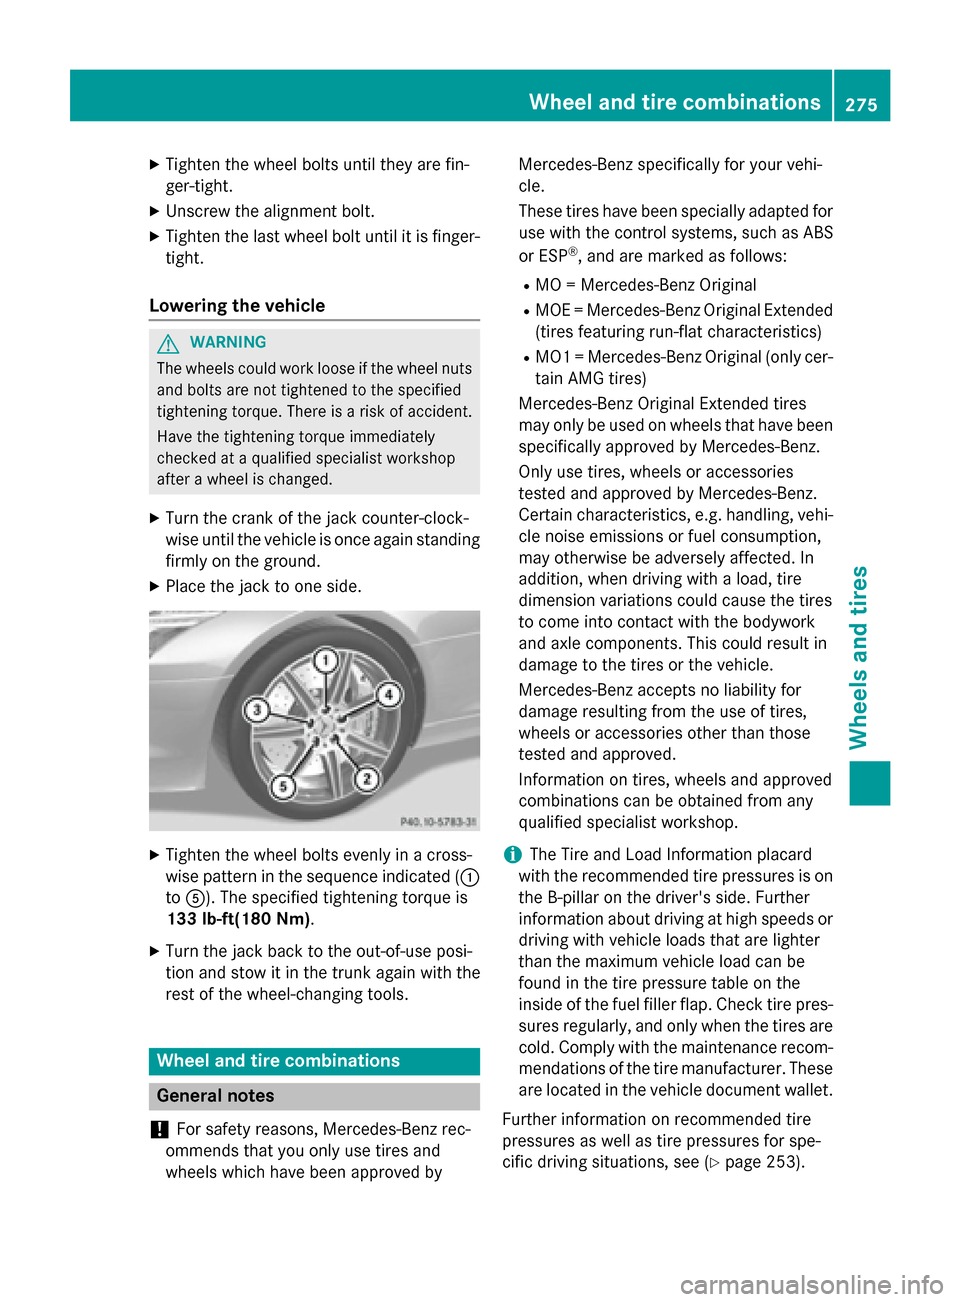
X Place the jack to one side. X
Tighten the wheel bolts evenly in across-
wise pattern in the sequence indicated ( 0043
to 0083). The specified tightening torque is
133 lb-ft(180 Nm).
X Turn the jack back to the out-of-use posi-
tion and stow it in the trunk again with the
rest of the wheel-changin gtools. Wheel and tire combinations
General notes
! For safety reasons, Mercedes-Benz rec-
ommends that you only use tires and
wheels which have been approved by Mercedes-Benz specifically for your vehi-
cle.
These tires have been specially adapted for
use with the control systems, such as ABS
or ESP ®
,a nd are marked as follows:
R MO =Mercedes-Benz Original
R MOE =Mercedes-Benz Original Extended
(tires featuring run-flat characteristics)
R MO1 =Mercedes-Benz Original (only cer-
tain AMG tires)
Mercedes-Benz Original Extended tires
may only be used on wheels that have been
specifically approved by Mercedes-Benz.
Only use tires, wheels or accessories
tested and approved by Mercedes-Benz.
Certain characteristics, e.g. handling, vehi-
cle noise emissions or fuel consumption,
may otherwise be adversely affected. In
addition, when driving with aload, tire
dimension variations could cause the tires
to come into contact with the bodywork
and axle components. This could result in
damage to the tires or the vehicle.
Mercedes-Benz accepts no liability for
damage resulting from the use of tires,
wheels or accessories other than those
tested and approved.
Information on tires, wheels and approved
combinations can be obtained from any
qualified specialist workshop.
i The Tire and Load Information placard
with the recommended tire pressures is on the B-pillar on the driver's side. Further
information about driving at high speeds or driving with vehicle loads that are lighter
than the maximum vehicle load can be
found in the tire pressure table on the
inside of the fuel filler flap. Check tire pres- sures regularly, and only when the tires arecold. Comply with the maintenance recom-
mendation softhe tire manufacturer. These
are located in the vehicle document wallet.
Further information on recommended tire
pressures as well as tire pressures for spe-
cific driving situations, see (Y page 253). Wheel and tirec
ombinations
275Wheels and tires Z