2015 MERCEDES-BENZ SLS AMG GT COUPE warning light
[x] Cancel search: warning lightPage 212 of 290
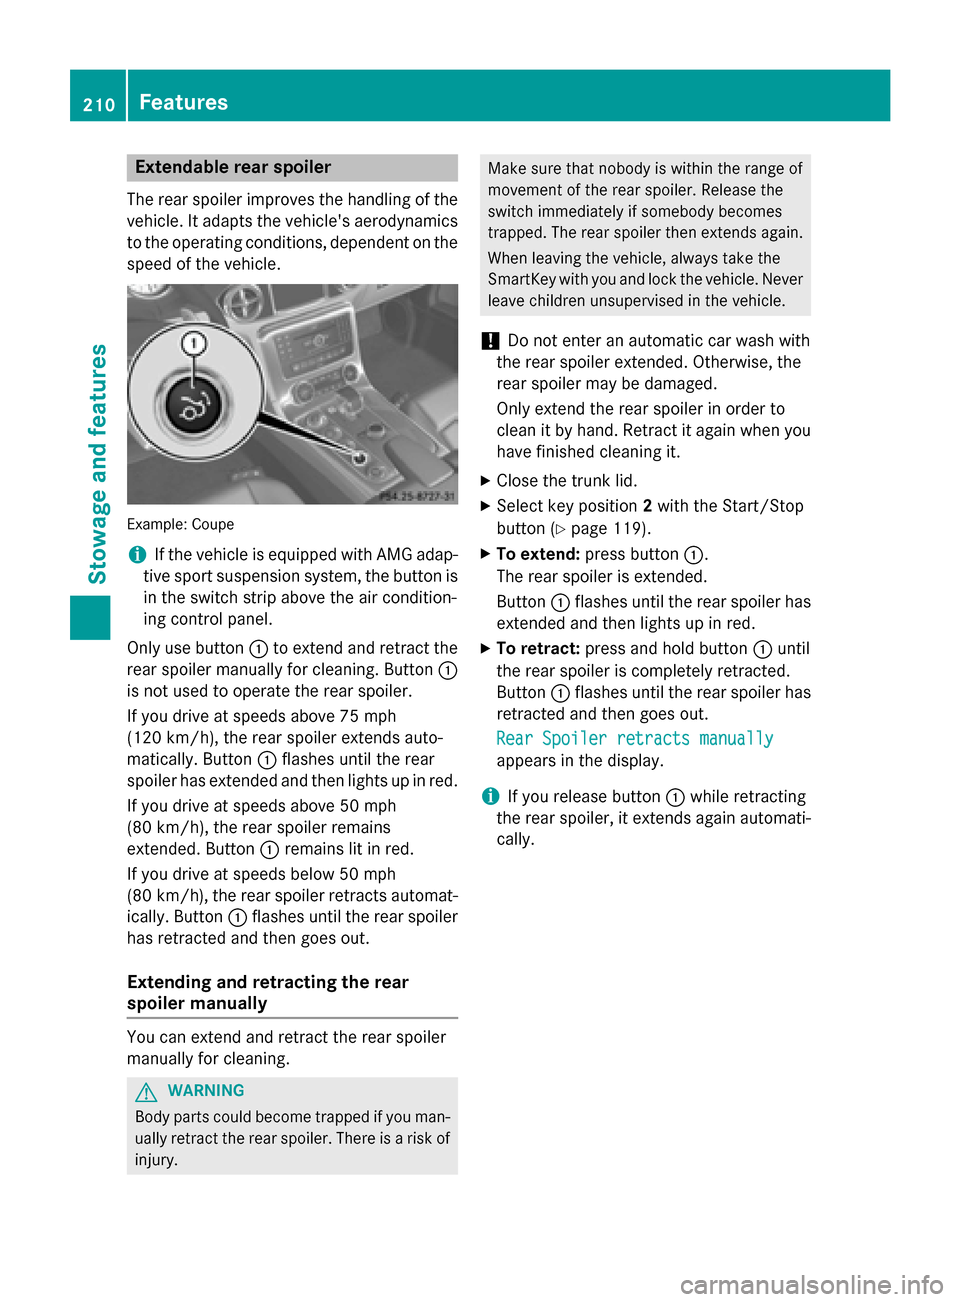
Extendable rea
rspoiler
The rear spoiler improve sthe handlin gofthe
vehicle .Itadapt sthe vehicle's aerodynamics
to th eoperatin gconditions, dependen tonthe
spee doft hevehicle. Example
:Coupe
i If th
evehicle is equippe dwith AM Gadap-
tiv es por tsuspension system, th ebutton is
in th eswitch strip above th eair condition-
ing control panel.
Only use button 0043to exten dand retrac tthe
rear spoiler manually for cleaning. Button 0043
is no tused to operate th erear spoiler.
If you driv eatspeeds above 75 mph
(12 0km/ h),t he rear spoiler extends auto-
matically. Button 0043flashes until the rear
spoiler has extended and then lights up in red.
If you drive at speeds above 50 mph
(8 0k m/ h),t he rear spoiler remains
extended. Button 0043remain slit in red.
If you drive at speeds below 50 mph
(8 0k m/ h),t he rear spoiler retract sautomat-
ically. Button 0043flashes until the rear spoiler
has retracted and then goes out.
Extending and retracting ther ear
spoiler manually You can extend and retract the rear spoiler
manually for cleaning. G
WARNING
Body parts could becom etrappe difyou man-
ually retract the rear spoiler. There is arisk of
injury. Make sure that nobody is within the range of
movement of the rear spoiler. Release the
switc himmediately if somebod ybecomes
trapped. The rear spoiler then extends again.
When leaving the vehicle, always tak ethe
SmartKe ywith you and lock the vehicle. Never
leave children unsupervised in the vehicle.
! Do not enter an automatic car wash with
the rear spoiler extended. Otherwise, the
rear spoiler may be damaged.
Only extend the rear spoiler in order to
clean it by hand. Retrac titagain when you
have finished cleanin git.
X Close the trunk lid.
X Selec tkey position 2with the Start/Stop
button (Y page 119).
X To extend: press button 0043.
The rear spoiler is extended.
Button 0043flashes until the rear spoiler has
extended and then lights up in red.
X To retract: press and hold button 0043until
the rear spoiler is completely retracted.
Button 0043flashes until the rear spoiler has
retracted and then goes out.
Rear Spoiler retracts manually Rear Spoiler retracts manually
appears in the display.
i If you release button
0043while retracting
the rear spoiler, it extends again automati-
cally. 210
FeaturesStowage and features
Page 216 of 290
also read th
eoperatin ginstruction sfor the
garag edoor system.
X Select ke yposition 2wit hthe Start/Stop
button.
X Press button 0044,0087or0085 whic hyou have
programed to operate th egarag edoor.
Garage door system wit hafixed code: indi-
cator lamp 0043light supg reen.
Garage door system wit harolling code:
indicator lamp 0043flashes green.
i The transmitte
rwill transmit asignal as
lon gast hebutto nisp ressed. The trans-
mission is halted after amaximum of ten
seconds and indicator lamp 0043light sup
yellow. Press button 0044,0087or0085 again if
necessary.
Clearing th ememory X
Select ke yposition 2wit hthe Start/Stop
button.
X Press buttons 0044and 0085.
The indicator lamp light supyellow.
X Press and hold buttons 0044and 0085until the
indicator lamp turns green.
i Mak
esure that you clear th ememory of
th ei ntegrate dgarag edoor opener before
sellin gthe vehicle. Charg
emaintenance socket
The battery may drain if th evehicle is left sta-
tionar yfor lon gperiods. In this case,
Mercedes-Ben zrecommends attaching the
trickle charge rtothecharge maintenance
socket.
The charge maintenance socke tisdesigned
solely for connecting atrickle charger. A
trickle charge rcan be obtaine dfroman
authorized Mercedes-Ben zCenter, for exam-
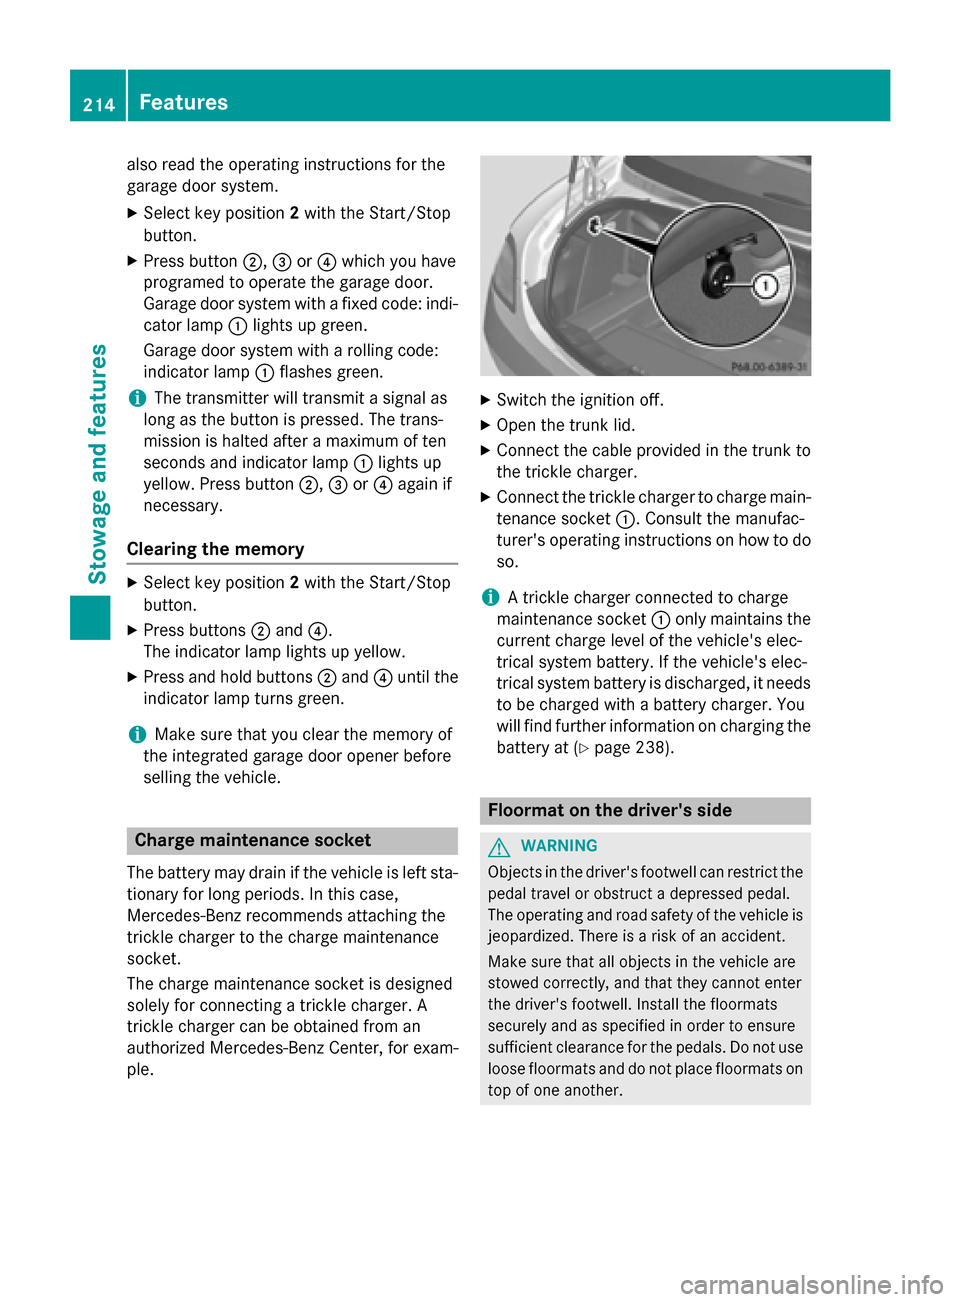
ple. X
Switch th eignition off.
X Open th etrunk lid.
X Connect th ecabl ep rovide dinthetrunk to
th et rickle charger.
X Connect th etrickle charge rtocharge main-
tenance socket 0043.Consult th emanufac-
turer' soperatin ginstruction sonhow to do
so.
i At
rickle charge rconnected to charge
maintenance socket 0043only maintain sthe
curren tcharge leve lofthevehicle's elec-
trical system battery. If th evehicle's elec-
trical system battery is discharged, it needs
to be charge dwithab attery charger. You
will fin dfurther informatio nonchargin gthe
battery at (Y page 238). Floorma
tonthedriver's side G
WARNING
Object sinthedriver' sfootwell can restrict the
pedal travel or obstruc tadepressed pedal.
The operatin gand road safety of th evehicle is
jeopardized. Ther eisariskofana ccident.
Mak esure that all object sinthevehicle are
stowed correctly, and that they canno tenter
th ed river' sfootwell. Install th efloormats
securely and as specifie dinorder to ensure
sufficient clearance for th epedals .Don otuse
loos efloormats and do no tplac efloormats on
to pofo neanother. 214
FeaturesStowage and features
Page 221 of 290
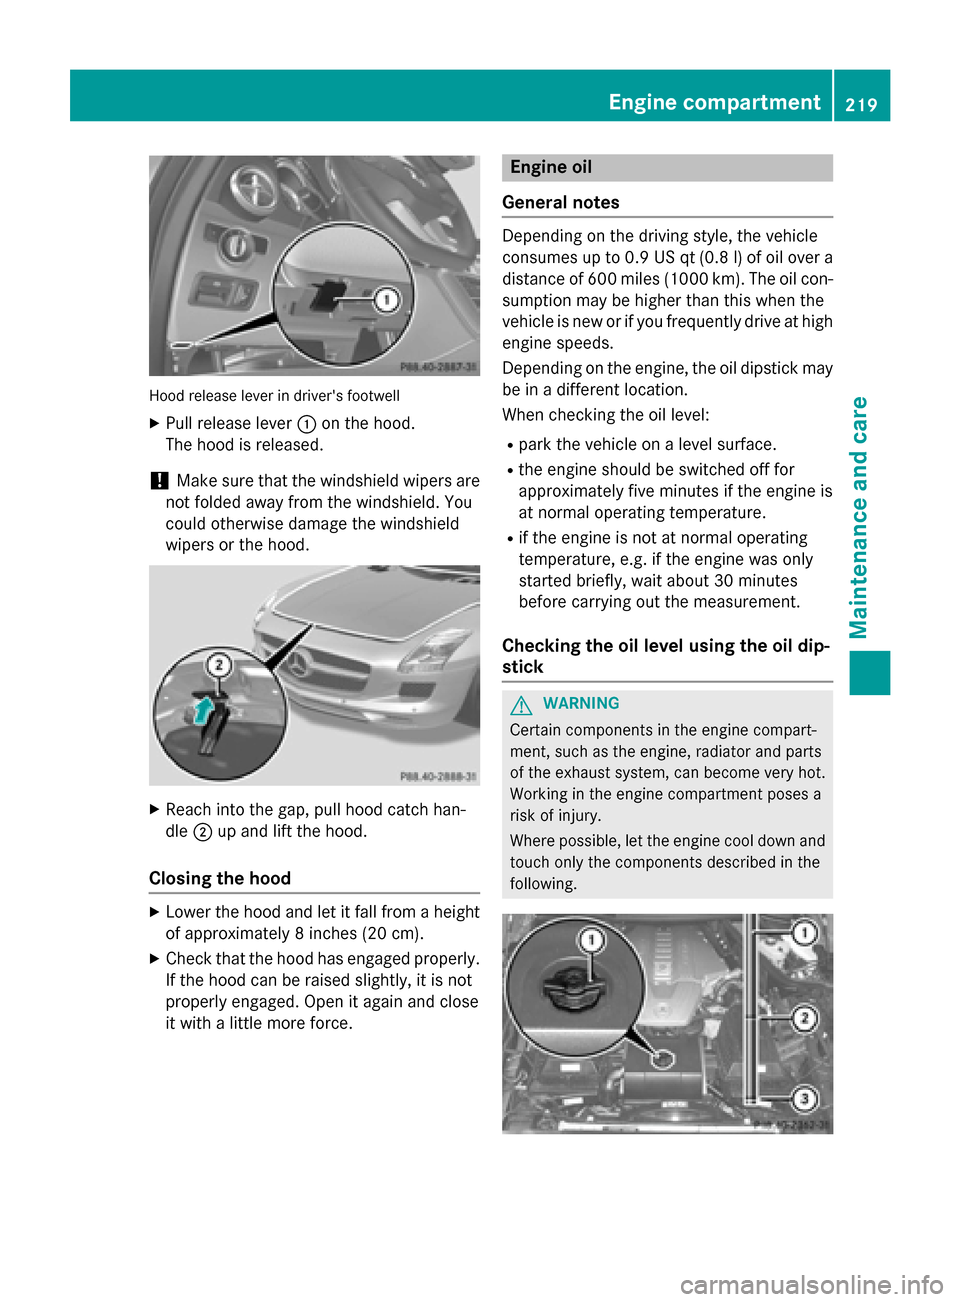
Hood release leve
rindriver's footwell
X Pull release lever 0043on the hood.
The hood is released.
! Make sure that the windshield wipers are
not folded away from the windshield .You
coul dotherwise damag ethe windshield
wipers or the hood. X
Reach into the gap ,pullh ood catch han-
dle 0044up and lift the hood.
Closing the hood X
Lower the hood and let it fal lfrom aheight
of approximatel y8inches (20 cm).
X Check that the hood has engaged properly.
If the hood can be raised slightly ,itisnot
properl yengaged .Openita gain and close
it with alittle more force. Engine oil
General notes Depending on the driving style, the vehicle
consumes up to 0.9 US qt (0.8 l) of oil over a
distance of 600 miles (1000 km). The oil con- sumptio nmay be higher than this whe nthe
vehicle is new or if yo ufrequently drive at high
engine speeds.
Depending on the engine, the oil dipstick may
be in adifferent location.
Whe nchecking the oil level:
R park the vehicle on aleve lsurface.
R the engine should be switched off for
approximatel yfive minutes if the engine is
at normal operating temperature.
R if the engine is not at normal operating
temperature, e.g. if the engine wa sonly
started briefly ,waita bout 30 minutes
before carrying out the measurement.
Checking the oill evel usin gthe oild ip-
stick G
WARNING
Certai ncomponents in the engine compart-
ment, such as the engine, radiator and parts
of the exhaust system, can become very hot.
Working in the engine compartment pose sa
risk of injury.
Where possible, let the engine cool dow nand
touch only the components describe dinthe
following. Engine compartment
219Maintenance and care Z
Page 227 of 290
and reduc
ewipin gnoises caused by residue
on th ewindshield.
Washin gbyhand In som
ecountries ,washin gbyh andiso nly
allowed at specially equippe dwashin gbays.
Observ ethe legal requirements in each coun-
try.
X Do no tuse hot wate rand do no twash the
vehicle in direct sunlight.
X Use asofts ponge to clean.
X Use amild cleanin gagent, suc hasacar
shampoo approved by Mercedes-Benz.
X Thoroughl yhosed own th evehicle wit ha
gentle je tofwater.
X Do no tpoin tthe wate rjet directly towards
th ea ir inlet.
X Use plenty of wate rand rinse out the
sponge frequently.
X Rins ethe vehicle wit hclean wate rand dry
thoroughly wit hachamois.
X Do no tlet th ecleanin gagen tdry on the
paintwork.
Carefully remove all deposits of road salt as
soon as possible when driving in winter.
Power washers G
WARNING
The wate rjet from acircular je tnozzle (dirt
blasters )can caus einvisible exterior damage
to th etires or chassis components. Compo-
nent sdamaged in this way may fail unexpect-
edly. Ther eisariskofana ccident.
Do no tuse power washers wit hcircular jet
nozzles to clean th evehicle .Haved amaged
tires or chassis component sreplace dimme-
diately.
! Always maintain
adistanc eofatl east
11.8 in (30 cm)between thev ehicle and the
power washe rnozzle .Inf ormation about
th ec orrec tdistanc eisavailabl efromt he
equipmen tmanufacturer. Mov
ethe power washe rnozzle around
when cleanin gyour vehicle.
Do no taim directly at any of th efollowing:
R tires
R door gaps, roo fgaps, joints, etc.
R electrical components
R battery
R connectors
R lights
R seals
R trim
R ventilatio nslots
Damaged seals or electrical components
can lead to leak sorfailures.
Cleaning th ewheels !
Do no
tuse acidic wheel cleanin gproducts
to remove brak edust .This could damage
wheel bolt sand brak ecom ponents.
! Do no
tpark th evehicle for an extended
period straigh tafter cleanin git, particularly
after havin gcleane dthe wheels wit hwheel
cleaner. Whee lcleaners could cause
increased corrosio nofthebrak ediscsa nd
brak epads/linings. For this reason ,you
should driv efor afew minute safter clean-
ing .Brakin gh eat sthe brak ediscsa nd the
brak epads/linings, thus dryin gthem. The
vehicle can then be parked.
Cleaning th epaintwork Scratches, corrosiv
edeposits ,areas affected
by corrosio nand damag ecaused by inade-
quat ecarec anno talways be completely
repaired. In suc hcases, visit aqualified spe-
cialist workshop, e.g .anauthorized
Mercedes-Ben zCenter.
X Remove impurities immediately, where
possible, whils tavoiding rubbing to ohard.
X Soak insect remains wit hinsect remover
and rinse off th etreated areas afterwards.
X Soak bird droppings wit hwaterand rinse
off th etreated areas afterwards. Care
225Maintenance and care Z
Page 229 of 290
Cleaning th
eRoadster soft top X
Light soiling: you can clean th esoftt op
while it is dry or rinse it wit hclear water.
X Norma ltoheavy soiling: clean thesoft
to pw ithab rushand clear water. Clean
stains and other dirt wit habrushand soft
to pc leanin gagents that have been recom-
mended and approved by Mercedes-Benz.
Always brus hfromf ront to back ,following
th eg rain of th efabric.
! Never use any of th
efollowin gtoclean the
sof ttop:
R gasoline
R thinner
R tar or stain remover
R other organic solvents
! Remov
ebird droppings immediately, as
they are corrosiv eand can therefor ecause
th es oft-to pfabric to leak .Donotwash the
vehicle wit hapower washe rorinacar
wash that uses power washers. Do no tuse
sharp-edged equipmen ttoremove ice and
snow.
Frequen tcleanin greduces th esoftt op 's
resistanc etodirt.
To restore this resistanc etodirt,c lean the
sof ttop usin gsoftt op cleanin gagents that
have been recommended and approved by
Mercedes-Benz.
Incorrect cleanin gand care, as well as aging,
can caus ethe soft-to pseam stol eak.Have
th es oft-to pseam ssealed at aqualified spe-
cialist workshop, e.g .atanauthorized
Mercedes-Ben zCenter.
i Cove
rthe softtop appropriately if you
plan to leave th evehicle outside for along
period of time.
Cleaning th ewindows G
WARNING
You coul dbecome trapped by th ewindshield
wiper siftheys tart moving while cleanin gthe windshield or wiper blades
.Ther eisar iskof
injury.
Always switch off th ewindshield wiper sand
th ei gnition before cleanin gthe windshield or
wiper blades.
! Only fold th
ewindshield wiper saway from
th ew indshield when vertical. Otherwise,
you will damag ethe hood.
X Clean th einside and outside of th ewin-
dows wit hadamp cloth and acleaning
product that is recommended and
approved by Mercedes-Benz.
! Do no
tuse dry cloths, abrasive products,
solvents or cleanin gagents containing sol-
vents to clean th einside of th ewindows. Do
no ttou ch th einsides of th ewindows with
hard objects, e.g .anice scraper or ring.
Ther eiso therwise ariskofd amaging the
windows.
! Clean th
ewaterdrainage channels of the
windshield and th erear window at regular
intervals. Deposits suc hasleaves, petals
and pollen may unde rcertain circumstan-
ces preven twate rfro md raining away. This
can lead to corrosio ndamag eand damage
to electronic components.
Cleaning wiper blades G
WARNING
You coul dbecome trapped by th ewindshield
wiper siftheys tart moving while cleanin gthe
windshield or wiper blades .Ther eisar iskof
injury.
Always switch off th ewindshield wiper sand
th ei gnition before cleanin gthe windshield or
wiper blades.
! Only fold th
ewindshield wiper saway from
th ew indshield when vertical. Otherwise,
you will damag ethe hood.
! Do no
tpull th ewiper blade. Otherwise,
th ew iper blade could be damaged. Care
227Maintenance and care Z
Page 232 of 290
Cleaning genuine wood and trim ele-
ments !
Do no
tuse solvent-based cleanin gagents
suc hast ar remover, wheel cleaners, pol-
ishe sorw axes. Ther eisotherwise ariskof
damaging th esurface.
! Do no
tuse chrom epolis hont rimp ieces.
The trim pieces have achrom elook but are
mostly made of anodized aluminum and
can lose their shin eifchrom epolis his
used. Use adamp, lint-free cloth instead
when cleanin gthe trim pieces.
If th echrome-plated trim pieces are very
dirty, you can use achrom epolish. If you
are unsure as to whether th etrimp ieces
are chrome-plated or not, consult an
authorized Mercedes-Ben zCenter.
X Wipe th ewoode ntrima nd trim pieces with
ad amp, lint-free cloth ,e.g.am icrofiber
cloth.
X Heavy soiling: use careand cleanin gprod-
uct srecommended and approved by
Mercedes-Benz.
Cleaning th eseat covers General notes
! Do no
tuse microfiber cloth stoclean gen-
uine leather ,artificial leather or DINAMICA
covers. If used often ,the se can damag ethe
cover.
i Not
ethatregular car eisessential to
ensure that th eappearanc eand comfort of
th ec oversisr etaine dovertime.
Genuine leather seat covers
Leather is anatural product.
It exhibit snatural surface characteristics, for
example:
R differences in th etexture
R sign sofs tretching and marking
R sligh tnuances of color
Thes eare characteristic sofleather and not
material defects. !
To retain th
enatural appearanc eofthe
leather ,observ ethe followin gcleaning
instructions:
R Clean genuine leather cover scarefully
wit had amp cloth and then wipe th ecov-
ers down wit hadry cloth.
R Mak esure that th eleather does not
become soaked. It may otherwise
become roug hand cracked.
R Only use leather car eagents that have
been tested and approved by Mercedes-
Benz. You can obtain these from aquali-
fied specialist workshop.
Seat cover sofother materials
! Observ
ethe followin gwhen cleaning:
R clean artificial leather cover swithac loth
moistene dwithas olution containing 1%
detergen t(e.g. dish washin gliquid).
R clean cloth cover switham icrofiber cloth
moistene dwithas olution containing 1%
detergen t(e.g. dish washin gliquid). Rub
carefully and always wipe entir eseat sec-
tions to avoid leavin gvisible lines. Leave
th es eat to dry afterwards. Cleaning
results depen donthetype of dirt and
how lon githas been there.
R clean DINAMICA cover swithad amp
cloth .Makes ure that you wipe entire
seat sections to avoid leavin gvisible
lines.
Cleaning th eseat belts G
WARNING
Seat belt scan become severely weakened if
bleached or dyed. This coul dcaus ethe seat
belt stot earorf ail, for instance, in th eevent of
an accident. This pose sanincreased ris kof
injury or fatal injury.
Never bleac hordye theseat belts.
! Do no
tclean th eseat belt susin gchemical
cleanin gagents .Don otdry th eseat belts
by heating at temperatures abov e176 ‡
(80 †) or in direct sunlight. 230
CareMaintenance and care
Page 240 of 290
X
Stow the TIREFIT kit in asafea nd accessi-
bl ep lace in the vehicle.
X Pul lawa yimmediately.
The maximum speed for atire seale dwitht ire
sealant is 50 mph (80 km/h). The uppe rpart
of the TIREFIT sticke rmustb ea ffixe dtot he
instrument cluster in the driver' sfield of
vision.
! After use, exces
sTIREFIT may run ou tof
the fille rhose. Thi scould cause stains.
X Stop afte rdriving for approximatel yten
minutes and check the tire pressure with
the tire inflation compressor.
The tire pressure mus tnow be at least
130 kPa (1.3 bar/19 psi).
i On tire
stha tare equipped with atire pres-
sure sensor (tire pressure monitor) ,the use
of sealant can lead to malfunction mes-
sages and incorrect displays. Therefore,
us ep ressure gauge 0084in the TIREFIT kit to
check and correct the tire pressure. G
WARNING
If the required tire pressure is not reached
afte rdriving for ashort period, the tire is too
badl ydam aged .The tire sealant canno trepair
the tire in this instance. Damaged tire sand a
tire pressure tha tist oo lo wcan significantly
impai rthe vehicle's braking and driving char-
acteristics. There is ariskofa ccident.
Do not continu edriving .Contact aquali fied
specialist workshop.
X Correct the tire pressure if it is stil latleast
130 kPa (1.3 bar/20 psi )(fort he values,
see the Tire and Loading Information plac-
ard on the driver' ssideB -pillar or tire pres-
sure table on the fue lfille rflap).
To increase the tire pressure: switch on
the tire inflation compressor.
To reduc ethe tire pressure: openrelease
screw 006B.
! The manufacturer doe
snot guarantee
tha talltire damag ecan be repaired using
the TIREFIT kit, particularly in the cas eofcuts and puncture
swithad iameter of more
tha nfou rm illimeters or on the sidewall. The
manufacturer is not responsible for dam-
ag ec aused by inappropriate us eofthe
TIREFIT kit.
X Drive to the neares tworksho pand have the
tire changed there.
X Hav ethe tire sealant bottl ereplaced as
soo naspossible at aquali fied specialist
workshop, e.g. at an authorized Mercedes- Benz Center. H
Environmental note
Hav ethe used tire sealant bottl edisposed of
professionally ,e.g. at an authorized
Mercedes-Benz Center.
X Hav ethe TIREFIT kit replaced every four
years at aquali fied specialist workshop,
e.g. an authorized Mercedes-Benz Center. Battery (vehicle)
Important safety notes
Specia ltool sand expert knowledge are
required when working on the battery ,e.g.
removal and installing .You shoul dtherefore
have al lworki nvolving the battery carrie dout
at aq uali fied specialist workshop. G
WARNING
Wor kcarrie doutincorrectl yonthe battery
can lead ,for example, to ashort circuit and
thu sdam aget he vehicl eelectronics. Thi scan
lead to function restrictions applying to
safety-relevant systems ,e.g. the lighting sys-
tem, ABS (anti-lock braking system) or ESP ®
(Electronic Stability Program). The operating
safety of your vehicl emay be restricted. You
could lose contro lofthe vehicle, for example:
R braking
R in the event of abrup tsteering maneuver
and/or when the vehicle's speed is not
adapted to the roa dconditions
There is ariskofana ccident. 238
Battery (vehicle)Breakdown assistance
Page 257 of 290
If the tire pressure is not set correctly, this
can leadtoane xcessive build up of heat and
as udden loss of pressure.
For more information, contact aqualified spe-
cialist workshop. Important notes on tire pressure
G
WARNING
If the tire pressure drops repeatedly,t he
wheel, valve or tire may be damaged. Tire
pressure that is too low may resultina tire
blow-out. There is arisk of an accident.
R Check the tire for foreign objects.
R Check whether the wheelisl osing air or the
valve is leaking.
If you are unabletor ectify the damage, con-
tact aqualifieds pecialist workshop. G
WARNING
If you fit unsuitable accessorie sonto tire
valves ,the tire valves may be overloaded and
malfunction, which can cause tire pressure
loss. Due to their design, retrofitted tire pres- sure monitors keep the tire valve open. This
can also resultint ire pressure loss. There is a
risk of an accident.
Only screw the standard valve cap or other
valve caps approved by Mercedes-Benz for
yourv ehicle onto the tire valve.
Use asuitable pressure gauge to check the
tire pressure. The outer appearance of atire
does not permit any reliable conclusion about the tire pressure. On vehicle sequippedw ith
the electronic tire pressure monitor, the tire
pressure can be checked in the on-board
computer.
The tire temperature and pressure increase
when the vehicle is in motion. This is depend-
ent on the driving speed and the load.
Therefore ,you shouldo nly correct tire pres-
sures when the tires are cold. The tires are cold:
R if the vehicle has been parked without
direct sunlight on the tires for at least three
hours and
R if the vehicle has not been driven further
than 1mile (1.6 km)
The tire temperature changes depending on
the outsid etemperature ,the vehicle speed
and the tire load. If the tire temperature
changes by 18 ‡(10 †), the tire pressure
changes by approximately 10 kPa (0.1 bar/
1.5 psi).T ake this into account when check-
ing the pressure of warm tires. Only correct
the tire pressure if it is too low for the current
operating conditions. If you check the tire
pressure when the tires are warm, the result- ing valuew illbeh igherthan if the tires were
cold. This is normal. Do not reduce the tire
pressure to the values pecified for cold tires.
The tire pressure would otherwis ebetoo low.
Observe the recommended tire pressures for
cold tires:
R on the Tire and Loading Information placard
on the B-pilla ronthe driver's side
R in the tire pressure table on the inside of the
fuel filler flap Underinflated or overinflated tires
Underinflated tires G
WARNING
Tires with pressure that is too low can over-
heat and burst as aconsequence. In addition,
they also suffer from excessive and/or irreg-
ularw ear, which can severel yimpair the brak-
ing propertie sand the driving characteristics.
There is arisk of an accident.
Avoid tire pressures that are too low in all the
tires, including the spare wheel.
Underinflated tires may:
R overheat, leading to tire defects
R adversely affect handling Tire pressure
255Wheelsand tires Z