2015 MERCEDES-BENZ SLS AMG GT COUPE warning light
[x] Cancel search: warning lightPage 115 of 290
Problems with the rear window defroster
Problem
Possible causes/consequences and
0050
0050Solutions The rear window
defroster has deacti-
vated prematurely or
cannot be activated. The on-board voltage is too low because too many electrical con-
sumers are switched on.
X Switch off any consumers that are not required, e.g. reading
lamps, interior lighting or the seat heating.
When the battery is sufficiently charged, the rear window
defroster can be activated again. Activating/deactivating air-recircula-
tion mode
General notes You can deactivate the flow of fresh air if
unpleasant odors are enteringt
he vehicle
from outside. The air already inside the vehi-
cle will then be recirculated.
If you switch on air-recirculation mode, the
windows can fog up more quickly, in particu-
lar at low temperatures. Only use air-recircu-
lation mode briefly to prevent the windows
from fogging up.
Activating/deactivating X
Select key position 2with the Start/Stop
button (Y page 119).
X To activate: press the0072button.
The indicator lamp in the 0072button lights
up.
i Air-recirculation mode is activated auto-
matically at high outside temperatures.
When air-recirculation mode is activated
automatically, the indicator lamp in the
0072 button is not lit.
Outside air is added after about 30
minutes.
X To deactivate: press the0072button.
The indicator lamp in the 0072button goes
out. i
Air-recirculation mode deactivates auto-
matically:
R after approximately five minutes at out-
side temperatures below approximately
41 ‡(5†)
R after approximately five minutes if cool-
ing with air dehumidification is deacti-
vated
R after approximately 30 minutes at out-
side temperatures above approximately
41 ‡(5†)ift he "Cooling with air dehu-
midification" function is activated Setting the air vents
Important safety notes
G
WARNING
Very hot or very cold air can flow from the air vents. This could result in burns or frostbitein the immediate vicinity of the air vents. There
is ar isk of injury.
Make sure that all vehicle occupants always
maintain asufficient distance to the air out-
lets. If necessary, redirect the airflow to
another area of the vehicle interior. Setting the air vents
113Climatecontrol Z
Page 130 of 290
!
In manual drive program
M,the transmis-
sion does not shift up automaticallye ven
when the engine limiting speed for the cur-
rent gear is reached. When the engine lim- iting speed is reached, the fuel supplyisc ut
to prevent the engine from overrevving.
Alwaysm ake sure that the engine speed
does not reach the red area of the tachom- eter and observe the upshift indicator.
There is otherwise arisk of engine damage.
X To activate the manual drive program:
turn the drive program selector switch until M appears in the instrument cluster's mul-
tifunction display.
M lights up in red on the drive program
selector switch.
X To deactivate the manual drive pro-
gram: turn the drive program selector
switch and select another drive program.
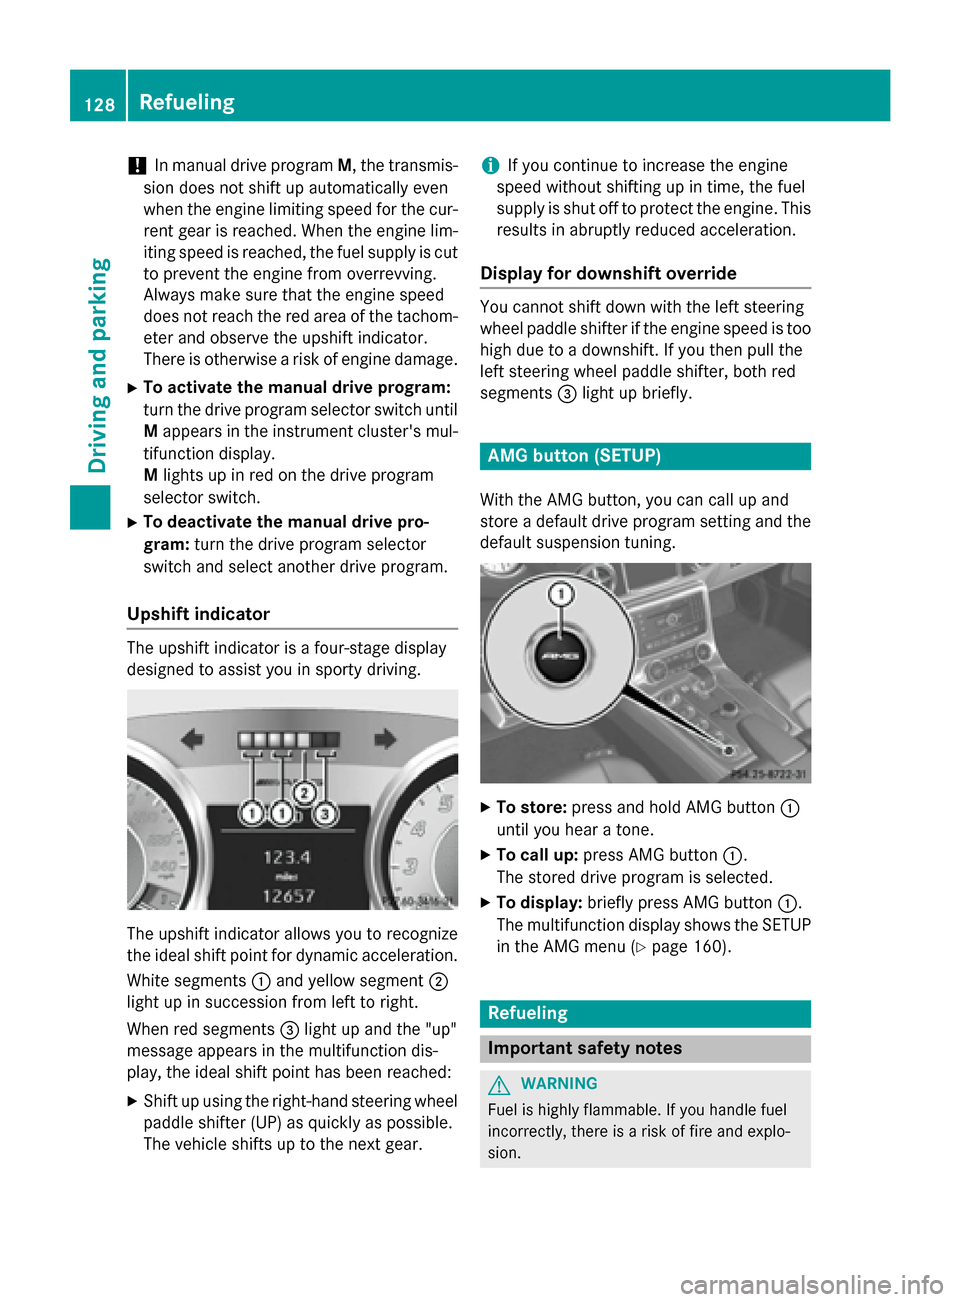
Upshift indicator The upshift indicator is
afour-stage display
designed to assist you in sporty driving. The upshift indicator allows you to recognize
the ideals hift point for dynamic acceleration.
White segments 0043and yellow segment 0044
light up in succession from left to right.
When red segments 0087light up and the "up"
message appears in the multifunction dis-
play,t he ideals hift point has been reached:
X Shift up using the right-hand steering wheel
paddles hifter (UP) as quickly as possible.
The vehicle shifts up to the next gear. i
If you continue to increase the engine
speed without shifting up in time, the fuel
supplyiss hut off to protect the engine. This
results in abruptly reduced acceleration.
Display for downshift override You cannot shift down with the left steering
wheel paddles hifter if the engine speed is too
high due to adownshift. If you then pull the
left steering wheel paddles hifter, both red
segments 0087light up briefly. AMG button (SETUP)
With the AMG button, you can call up and
store adefaultd rive program setting and the
defaults uspension tuning. X
To store: press and hold AMG button 0043
until you hear atone.
X To call up: press AMG button 0043.
The stored drive program is selected.
X To display: briefly press AMG button 0043.
The multifunction displays hows the SETUP
in the AMG menu (Y page 160). Refueling
Important safety notes
G
WARNING
Fuel is highly flammable. If you handle fuel
incorrectly, there is arisk of fire and explo-
sion. 128
RefuelingDriving and parking
Page 132 of 290
Opening
X
Switc hoff the engine.
i When the engin
eisrunning and the fuel
filler flap is open, the engin ediagnostics
warning lamp 00B9may light up.
Further information can be found in the
"Warning and indicator lamps in the instru-
ment cluster "chapter (Y page 195).
X Open the driver's door. This switches the
ignition to position 0,which corresponds to
having removed the SmartKey. The driver’s
door can be closed again.
X Press the fuel filler flap in the direction of
arrow 0043.
The fuel filler flap opens slightly.
X Open the fuel filler flap.
X Turn the fuel filler cap counter-clockwise
and remove it.
X Inser tthe fuel filler cap intot he holder
bracket on the inside of filler flap 0085.
X Completely insert the fuel pump nozzle into
the filler necka nd refuel.
X Only fill the tank until the pump nozzle
switches off.
! Overfilling the fuel tank could damage the
fuel system.
Closing X
Replace the fuel filler cap and turn it clock-
wise. The fuel filler cap audibly engages.
X Close the fuel filler flap. 130
RefuelingDriving and parking
Page 135 of 290
The transmission remains in
Nif:
R the SmartKey is in the ignition lock and
R you use the E ‑SELECT lever to shift the
transmission to Nbefore switchin gthe
engine off
This still applies if you open the driver's or
front-passenger door.
Further information on transmission posi-
tion Nwhen operating with aSmartKey is
available in the "Car wash" section
(Y page 223). Electric parking brake
General notes G
WARNING
If you leave children unsupervised in the vehi- cle, they could set it in motion by, for example:
R release the parking brake.
R shift the automatic transmission out of the
parking position P.
R start the engine.
In addition, they may operate vehicle equip-
ment and become trapped. There is arisk of
an accident and injury.
When leaving the vehicle, alway stake the
SmartKey with you and lock the vehicle. Never
leave children unsupervised in the vehicle.
The function of the electric parking brake is
dependent on the on-board voltage. If the on-
board voltage is low or there is amalfunction
in the system, it may not be possible to apply
the released parking brake.
X If this is the case, only park the vehicle on
level ground and secure it to prevent it roll- ing away.
X Shift the automatic transmission to posi-
tion P.
It may not be possible to release an applied
parking brake, if the on-board voltage is low
or there is amalfunction in the system. Con-
tact aqualified specialist workshop. Applying/releasing manually
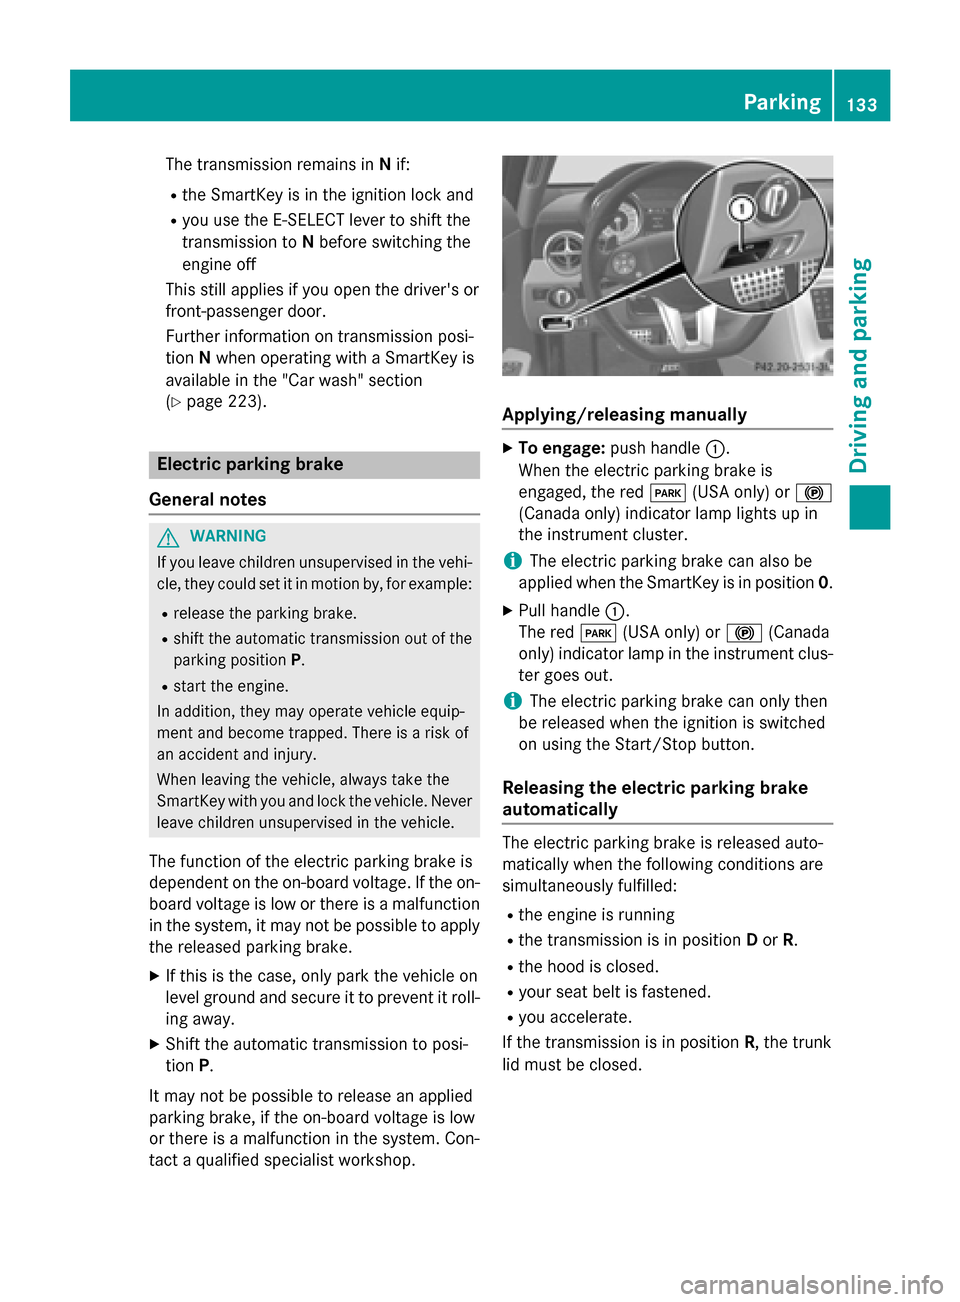
X
To engage: push handle 0043.
When the electric parking brake is
engaged, the red 0049(USA only) or 0024
(Canada only) indicator lamp lights up in
the instrument cluster.
i The electric parking brake can also be
applied when the SmartKey is in position 0.
X Pull handle 0043.
The red 0049(USA only) or 0024(Canada
only) indicator lamp in the instrument clus- ter goes out.
i The electric parking brake can only then
be released when the ignition is switched
on using the Start/Stop button.
Releasing the electric parking brake
automatically The electric parking brake is released auto-
matically when the following conditions are
simultaneously fulfilled:
R the engine is running
R the transmission is in position Dor R.
R the hood is closed.
R your seat belt is fastened.
R you accelerate.
If the transmission is in position R,the trunk
lid must be closed. Parking
133Driving and parking Z
Page 138 of 290
Wet roads
If you have drive
nfor along time in heavy rain
without braking, there may be adelayed reac-
tion from the brakes whe nbraking for the first
time. This may also occur after the vehicl ehas
been washed or drive nthroug hdeep water.
You have to depress the brake pedal more
firmly .Maintain agreater distance from the
vehicl einfront.
After driving on awet road or having the vehi-
cle washed ,brake firmly while paying atten-
tion to the traffic conditions. This wil lwarmup
the brake discs, thereby drying them more
quickly and protecting them against corro-
sion.
Limited braking performance on salt-
treated roads If you drive on salted roads,
alayer of salt
residue may form on the brake discs and
brake pads. This can result in asignificantly
longe rbraking distance.
R Brake occasionally to remove any possible
sal tresidue. Make sure that you do not
endange rother road users whe ndoing so.
R Carefully depress the brake pedal and the
beginning and end of ajourney.
R Maintain agreater distance to the vehicle
ahead.
Servicing the brakes !
If the red brake warning lamp lights up in
the instrument cluster and you hea rawarn-
ing tone while the engine is running, the
brake fluid leve lmay be too low .Observe
additiona lwarning messages in the multi-
function display.
The brake fluid leve lmay be too low due to
brake pad wea rorleaking brake lines.
Have the brake syste mchecked immedi-
ately. This work should be carrie dout at a
qualified specialist workshop. !
As the ESP ®
syste moperates automati-
cally, the engine and the ignition must be
switched off (the SmartKey must be in posi-
tion 0or 1in the ignition lock or the Start/
Stop button must be in position 0or 1)i f:
R the electric parking brake is tested using
ab rake dynamometer.
R the vehicl eistowed with one axle raised.
Braking triggered automatically by ESP ®
may seriousl ydamage the brake system.
All checks and maintenance work on the
brake syste mmust be carrie dout at aquali-
fied specialist workshop. Have this work car- ried out at an authorized Mercedes-Benz
Center.
Have the brake pad sreplaced and the brake
fluid renewe dataqualified specialist work-
shop, e.g. an authorized Mercedes-Benz
Center.
If the brake syste mhas only been subject to
moderate loads, you should test the function- ality of you rbrakes at regulari ntervals. At a
high speed, brake firmly while paying atten-
tion to the traffic conditions. This improves
the grip of the brake pads.
You can find adescription of Brake Assist
(BAS) on (Y page55).
Mercedes-Benz recommends that you only
have brake pads/linings installed on your
vehicl ewhich have been approved for
Mercedes-Benz vehicles or which correspond to an equivalent quality standard. Brake
pads/linings which have not been approved
for Mercedes-Benz vehicles or which are not
of an equivalent quality coul daffect you rvehi-
cle's operating safety.
Mercedes-Benz recommends that you only
use brake fluid that has been specially
approved for you rvehicl ebyM ercedes-Benz,
or which corresponds to an equivalent quality standard. Brake fluid which has not been
approved for Mercedes-Benz vehicles or
which is not of an equivalent quality could
affect you rvehicle's operating safety. 136
Driving tipsDriving and parking
Page 142 of 290
Making adjustments in
1mph incre-
ments X
Briefl ypress the cruis econtrol leve rtothe
pressure point, up 0043for ahigher spee dor
down 0044for alower speed.
The lasts peedstored is increased or
reduced.
Making adjustments in 10 mph incre-
ments X
Briefl ypress the cruis econtrol lever
beyond the pressure point, up 0043for a
higher spee dordown0044for alower speed.
The lasts peedstored is increased or
reduced.
Deactivatin gcruise control There are severa
lwaystod eactivate cruise
control:
X Briefl ypress the cruis econtrol leve rfor-
wards 0087.
or X Brake.
Cruise control is automatically deactivated if: R you press the electric parking brake han-
dle.
R you are driving below 20 mph (30 km/h).
R ESP ®
intervenes or you deactivate ESP ®
R you shift the transmission to Nwhile the
vehicl eisinm otion.
If cruis econtrol is deactivated, you willh eara
warning tone. The "Cruise Control Off Cruise Control Off"
message is displayed in the multifunction dis- playf or approximately five seconds.
i The lasts
peedstored is cleared when you
switch off the engine. AMG adaptive sport suspensions
ys-
tem
General notes The electronicall
ycontrolled damping system
works continuously.T his improves driving
safety and ride comfort.
The damping is tuned individually to each
whee land depends on:
R yourd riving style ,e.g. sporty
R the road surface condition, e.g. bumps
R youri ndividuals election of Sport, Sport +
or Comfort
If you select Comfort or Sport +mode and
restart the engine, the mode reverts to Sport.
i GT model:
you can only choose between
Sport and Sport +modes .Ifyou select
Sport +mode and restart the engine, the
mode reverts to Sport. Sport mode
The firmer suspension tuning in Sport mode
ensure
seven better contact with the road.
Select this mode when employing asporty
driving style ,e.g. on winding country roads.
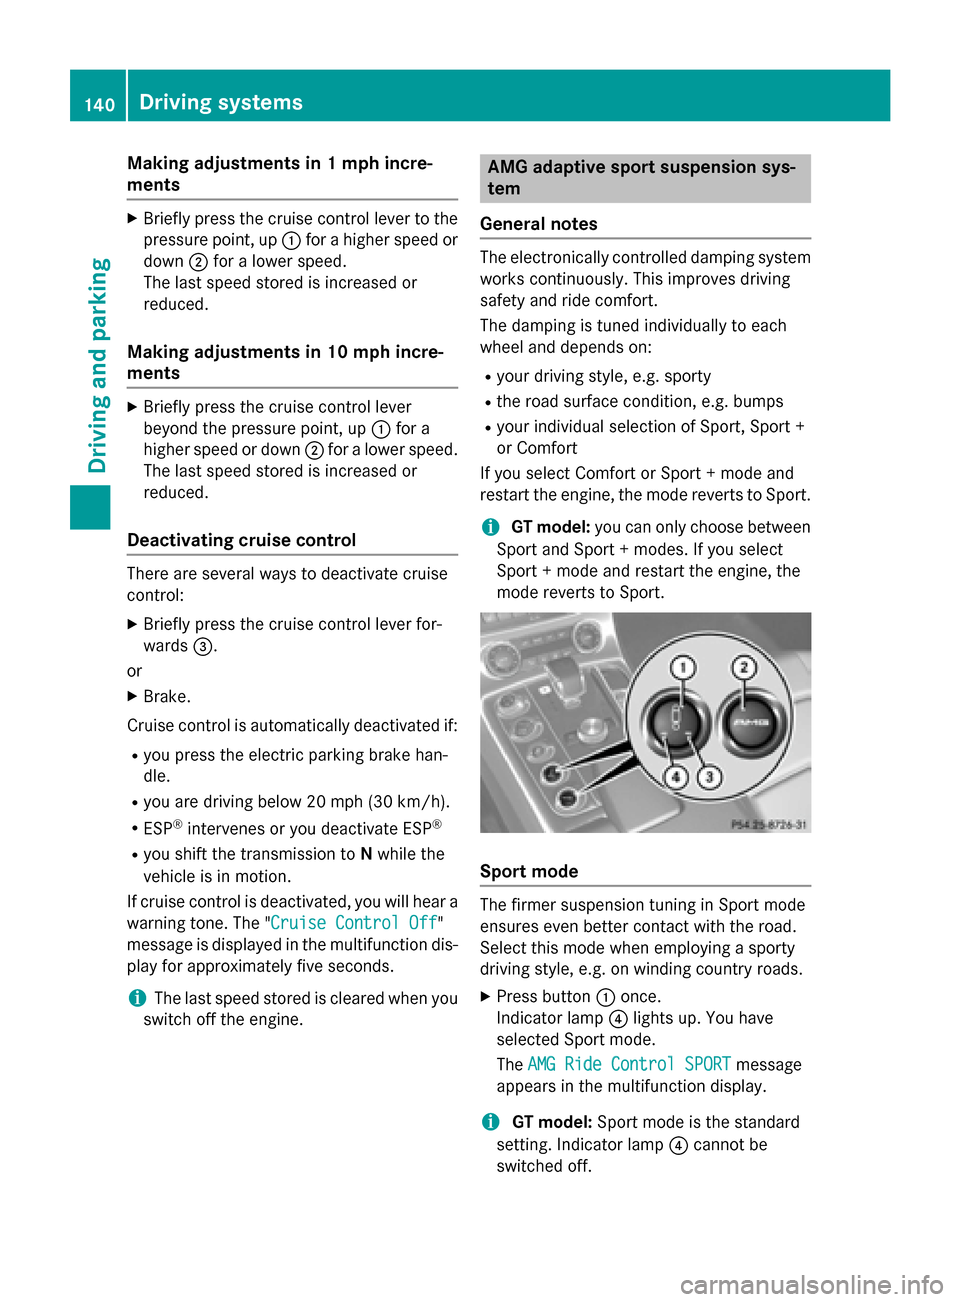
X Press button 0043once.
Indicator lamp 0085lights up. You have
selected Sport mode.
The AMG Ride Control SPORT AMG Ride Control SPORT message
appears in the multifunction display.
i GT model:
Sport mode is the standard
setting. Indicator lamp 0085cannot be
switched off. 140
Driving systemsDriving and parking
Page 144 of 290
0043
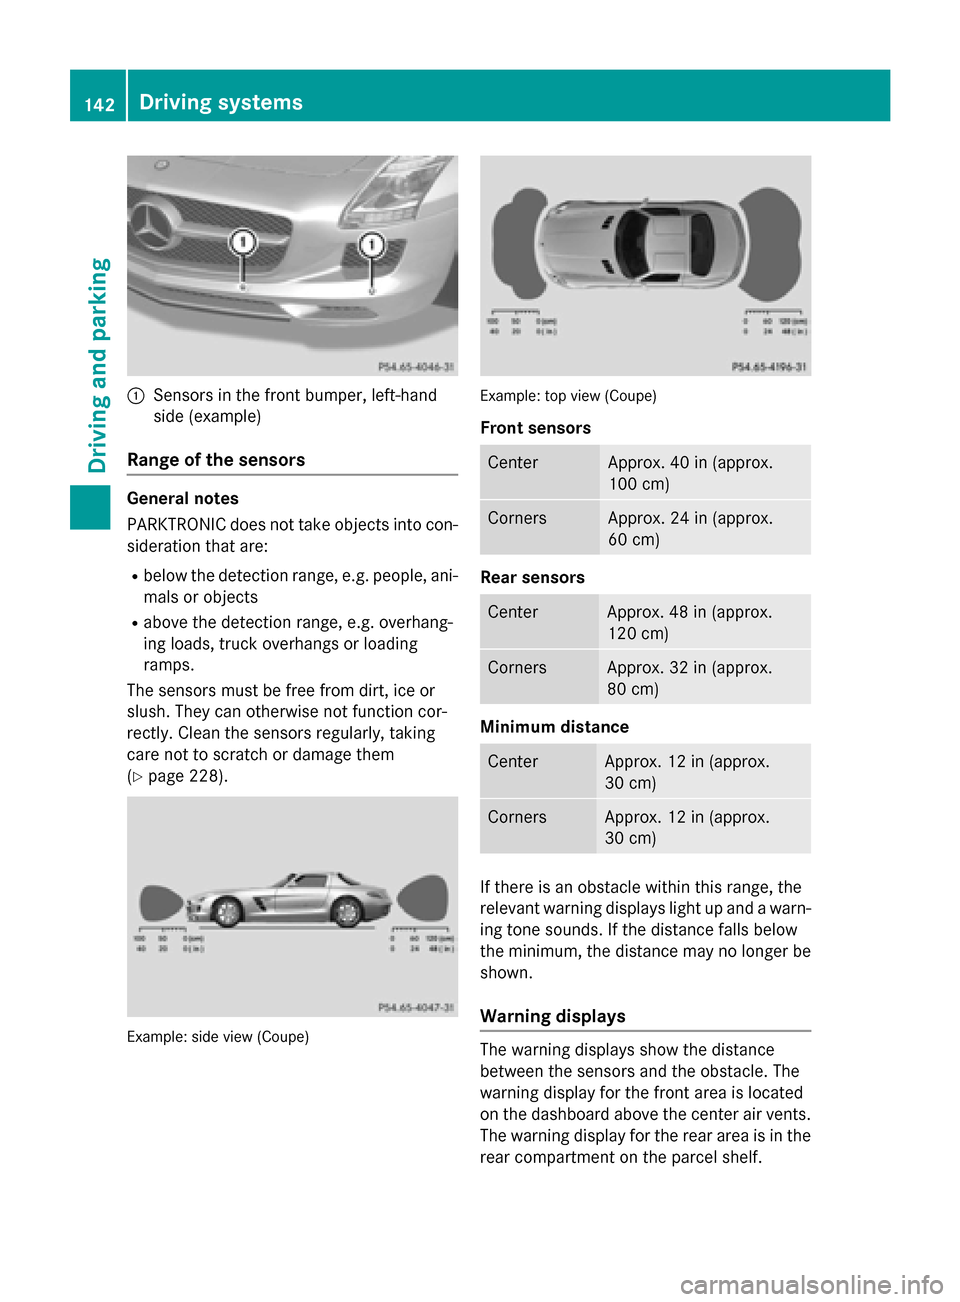
Sensors in the front bumper, left-hand
sid e(example)
Rang eoft he sensors General notes
PARKTRONIC doe
snot take objects into con-
sideration tha tare:
R belo wthe detectio nrange, e.g. people, ani-
mal soro bjects
R above the detectio nrange, e.g. overhang-
ing loads, truck overhangs or loading
ramps.
The sensors mus tbefree from dirt, ice or
slush. The ycan otherwise not function cor-
rectly. Clea nthe sensors regularly, taking
care not to scratch or damag ethem
(Y page 228). Example
:sidev iew( Coup e) Example
:top vie w(Coup e)
Front sensors Center Approx. 40 in (approx.
100 cm)
Corners Approx. 24 in (approx.
60 cm)
Rear sensors
Center Approx. 48 in (approx.
120 cm)
Corners Approx. 32 in (approx.
80 cm)
Minimum distance
Center Approx. 12 in (approx.
30 cm)
Corners Approx. 12 in (approx.
30 cm)
If there is an obstacl
ewithin this range, the
relevant warning display slight up and awarn-
ing tone sounds. If the distance falls below
the minimum ,the distance may no longer be
shown.
Warning displays The warning display
sshowt he distance
between the sensors and the obstacle. The
warning display for the front are aislocated
on the dashboard above the center ai rvents.
The warning display for the rea rareaisint he
rea rcompartment on the parcel shelf. 142
Driving systemsDriving and parking
Page 145 of 290
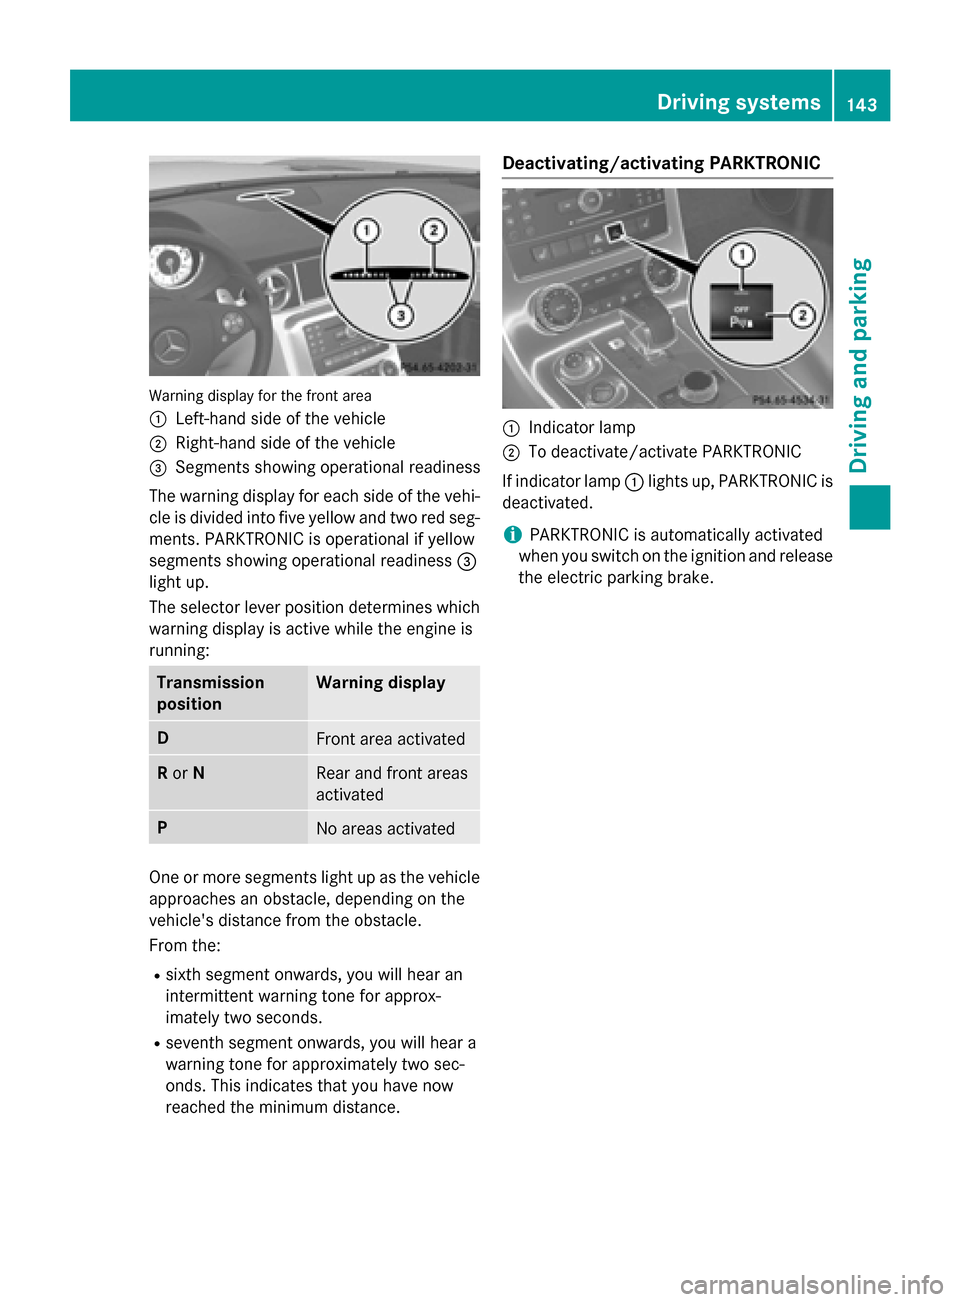
Warning display for the fron
tarea
0043 Left-hand side of the vehicle
0044 Right-han dside of the vehicle
0087 Segments showing operational readiness
The warning display for each side of the vehi- cle is divided into five yellow and two red seg-ments. PARKTRONIC is operational if yellow
segment sshowing operational readiness 0087
light up.
The selector lever position determines which
warning display is active while the engine is
running: Transmission
position Warning display
D
Fron
tarea activated R
or N Rear and fron
tareas
activated P
No areas activated
One or more segment
slight up as the vehicle
approaches an obstacle, depending on the
vehicle's distanc efrom the obstacle.
From the:
R sixt hsegment onwards, you will hear an
intermittent warning tonef or approx-
imately two seconds.
R sevent hsegment onwards, you will hear a
warning tonef or approximately two sec-
onds. This indicates that you have now
reached the minimum distance. Deactivating/activating PARKTRONIC
0043
Indicator lamp
0044 To deactivate/activate PARKTRONIC
If indicator lamp 0043lights up, PARKTRONIC is
deactivated.
i PARKTRONIC is automatically activated
when you switch on the ignition and release
the electric parking brake. Driving systems
143Driving and parking Z