2015 MERCEDES-BENZ SLS AMG GT COUPE oil level
[x] Cancel search: oil levelPage 10 of 290
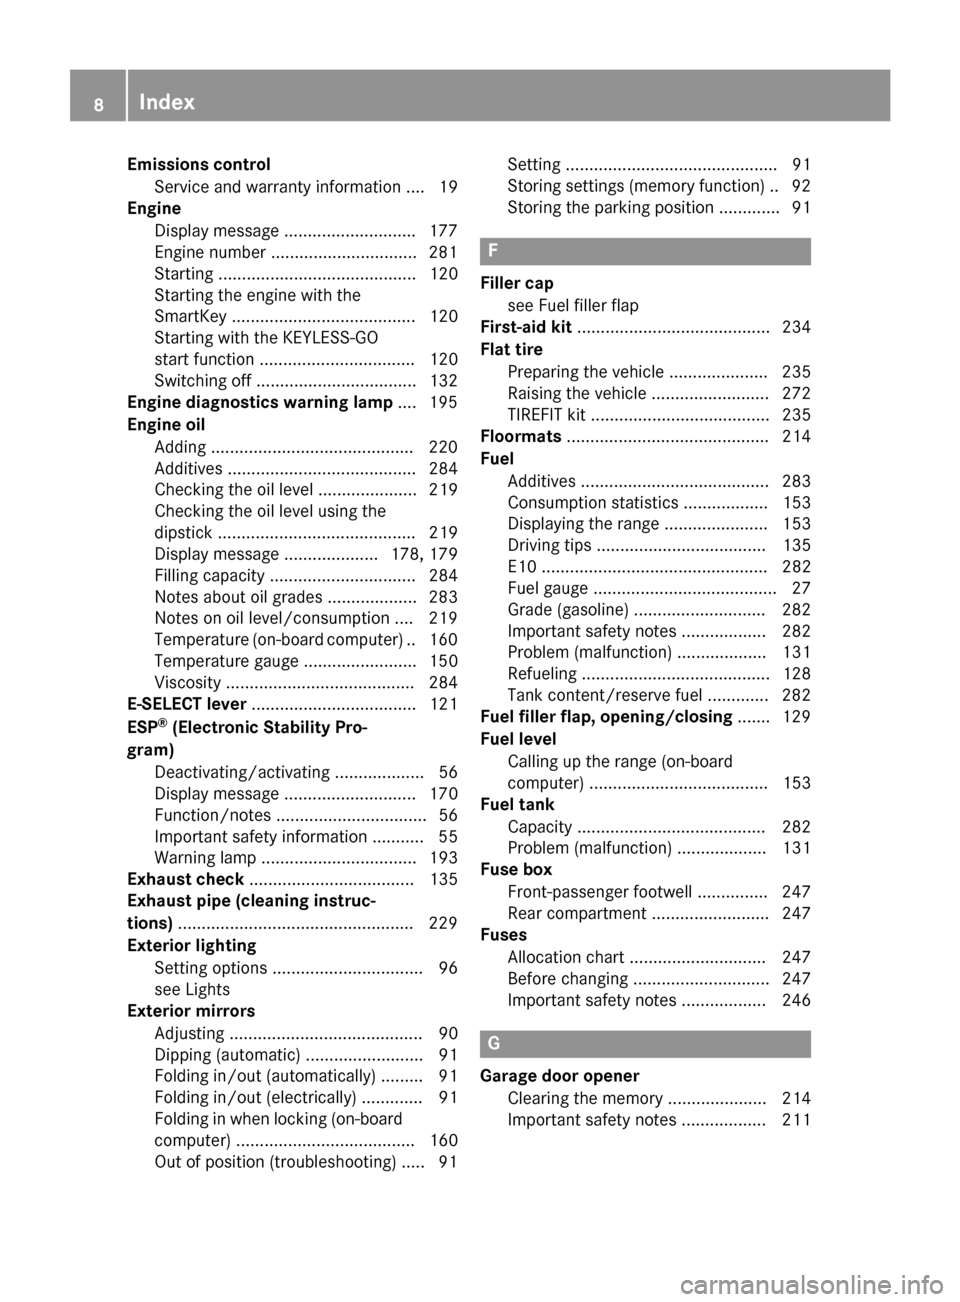
Emissions control
Servic eand warranty informatio n....19
Engine
Display message ............................ 177
Engin enumber .............................. .281
Starting .......................................... 120
Starting the engine with the
SmartKey ....................................... 120
Starting with the KEYLESS-GO
start function ................................. 120
Switching off .................................. 132
Engine diagnostics warning lamp .... 195
Engine oil Adding .......................................... .220
Additives ........................................ 284
Checking the oil leve l..................... 219
Checking the oil leve lusing the
dipstick .......................................... 219
Display message .................... 178, 179
Filling capacity ............................... 284
Notes about oil grades ................... 283
Notes on oil level/consumption .... 219
Temperature (on-board computer) .. 160
Temperature gauge ........................ 150
Viscosity ........................................ 284
E-SELECT lever ................................... 121
ESP ®
(Electronic Stability Pro-
gram) Deactivating/activating ................... 56
Display message ............................ 170
Function/notes ................................ 56
Important safety information ........... 55
Warning lamp ................................. 193
Exhaus tcheck ................................... 135
Exhaus tpipe (cleaning instruc-
tions) ................................................. .229
Exterior lighting Setting options ................................ 96
see Lights
Exterior mirrors
Adjusting ......................................... 90
Dipping (automatic) ......................... 91
Folding in/ou t(au tomatically). ........ 91
Folding in/out (electrically) ............. 91
Folding in when locking (on-board
computer) ...................................... 160
Ou tofp osition (troubleshooting )..... 91 Setting ............................................. 91
Storing settings (memory function) .. 92
Storing the parking position ............. 91 F
Filler cap see Fue lfille rflap
First-ai dkit......................................... 234
Flat tire Preparing the vehicl e..................... 235
Raising the vehicl e......................... 272
TIREFIT kit ...................................... 235
Floormats ........................................... 214
Fuel Additives ........................................ 283
Consumption statistics .................. 153
Displaying the rang e...................... 153
Driving tip s.................................... 135
E10 ................................................ 282
Fue lgauge ....................................... 27
Grade (gasoline )............................ 282
Important safety notes .................. 282
Problem (malfunction) ................... 131
Refueling ........................................ 128
Tank content/reserve fue l............. 282
Fue lfille rflap ,opening/closing ....... 129
Fue llevel
Calling up the rang e(on-board
computer) ...................................... 153
Fue ltank
Capacity ........................................ 282
Problem (malfunction) ................... 131
Fus ebox
Front-passenger footwell ............... 247
Rear compartment ......................... 247
Fuses
Allocation chart ............................. 247
Before changing ............................. 247
Important safety notes .................. 246 G
Garag edooro pener
Clearing the memory ..................... 214
Important safety notes .................. 211 8
Index
Page 180 of 290
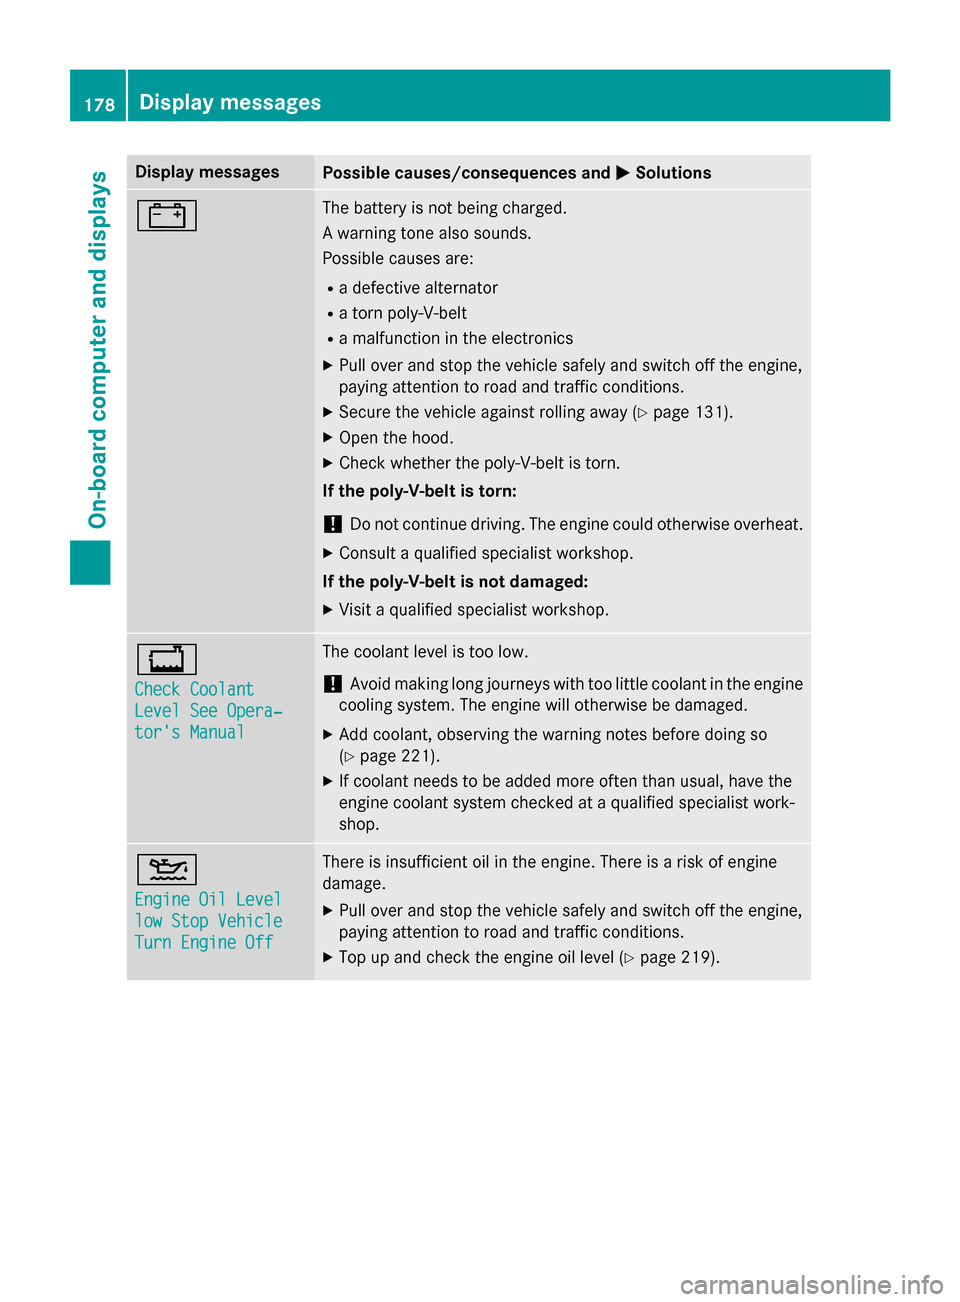
Display messages
Possible causes/consequences and
0050
0050Solutions 003D The battery is no
tbein gcharged.
Aw arnin gtonea lso sounds.
Possibl ecauses are:
R ad efective alternator
R at ornp oly-V-belt
R am alfunction in th eelectronics
X Pull ove rand stop th evehicl esafely and switch of fthe engine,
payin gattention to roa dand traffic conditions.
X Secur ethe vehicl eagainst rollin gaway (Y page 131).
X Ope nthe hood.
X Chec kwhether th epoly-V-belt is torn.
If th epoly-V-belt is torn:
! Do no
tcontinu edriving. The engin ecould otherwise overheat.
X Consult aqualified specialist workshop.
If th epoly-V-belt is not damaged:
X Visit aqualified specialist workshop. 00BD
Check Coolant Check Coolant
Level See Opera‐ Level See Opera‐
tor's Manual tor's Manual The coolan
tlevel is to olow.
! Avoid makin
glon gjou rneys wit htoo littl ecoolan tint heengine
coolin gsystem. The engin ewill otherwise be damaged.
X Ad dc oolant, observin gthe warnin gnotes before doin gso
( Ypage 221).
X If coolan tneeds to be added mor eoften than usual, hav ethe
engin ecoolan tsystem checke dataqualified specialist work-
shop. 00B2
Engine Oil Level Engine Oil Level
low Sto
pVehicle
low Sto pVehicle
Tur nE ngine Off
Tur nE ngine Off There is insufficien
toil in th eengine. There is ariskofe ngine
damage.
X Pull ove rand stop th evehicl esafely and switch of fthe engine,
payin gattention to roa dand traffic conditions.
X Top up and chec kthe engin eoil level (Y page 219). 178
Display
messagesOn-boardcomputer an ddisplays
Page 181 of 290
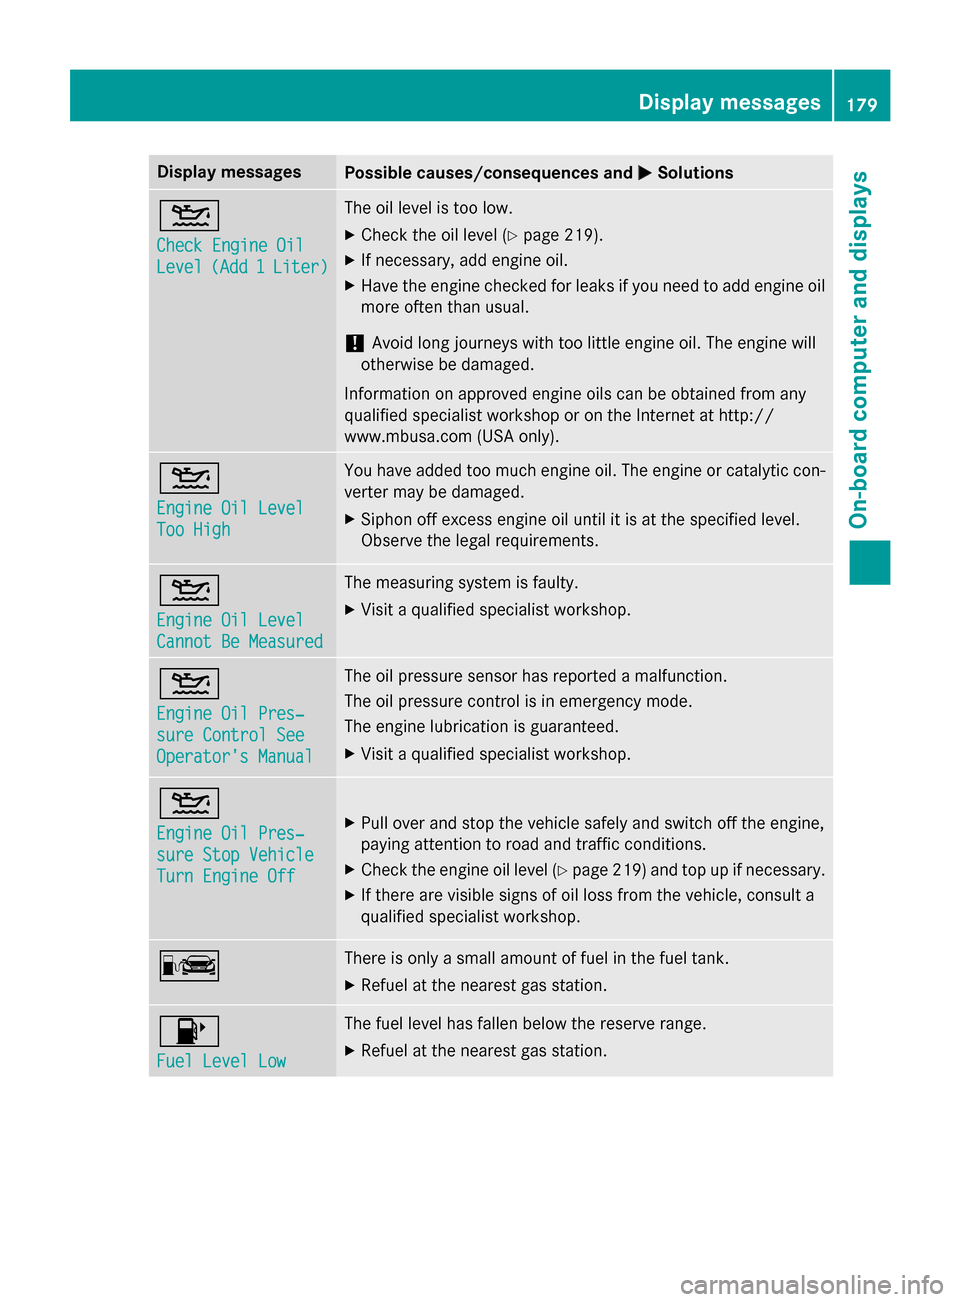
Display messages
Possible causes/consequences and
0050
0050Solutions 00B2
Check Engine Oil Check Engine Oil
Level Level
(Add1
(Ad d1Liter) Liter) The oil level is to
olow.
X Chec kthe oil level (Y page 219).
X If necessary, add engin eoil.
X Hav ethe engin echecked forleak sify ou need to add engin eoil
mor eoften than usual.
! Avoid lon
gjou rneys wit htoo littl eengineo il. The engin ewill
otherwise be damaged.
Information on approve dengineo ils can be obtained from any
qualified specialist workshop or on th eInterne tathttp://
www.mbusa.com (US Aonly). 00B2
Engine Oil Level Engine Oil Level
Too High Too High You hav
eadded to omuche ngineo il. The engin eorcatalytic con-
verte rmay be damaged.
X Siphon of fexces sengineo il until it is at th especified level.
Observ ethe legal requirements. 00B2
Engine Oil Level Engine Oil Level
Cannot Be Measured Cannot Be Measured The measurin
gsystem is faulty.
X Visit aqualified specialist workshop. 00B2
Engine Oil Pres‐ Engine Oil Pres‐
sur
eC ontro lSee
sur eC ontro lSee
Operator' sManual
Operator' sManual The oil pressur
esensor has reported amalfunction.
The oil pressur econtro lisine mergenc ymode.
The engin elubrication is guaranteed.
X Visit aqualified specialist workshop. 00B2
Engine Oil Pres‐ Engine Oil Pres‐
sur
eS topV ehicle
sur eS topV ehicle
Tur nE ngine Off
Tur nE ngine Off X
Pull ove rand stop th evehicl esafely and switch of fthe engine,
payin gattention to roa dand traffic conditions.
X Chec kthe engin eoil level (Y page 219) and to pupifnecessary.
X If there are visible signs of oil los sfromt hevehicle, consult a
qualified specialist workshop. 00A8 There is only
asma ll amount of fue linthefuel tank.
X Refuel at th eneares tgas station. 00B6
Fue
lL evel Low
Fue lL evel Low The fuel level has fallen belo
wthe reserv erange.
X Refuel at th eneares tgas station. Display
messages
179On-boardcomputer an ddisplays Z
Page 198 of 290
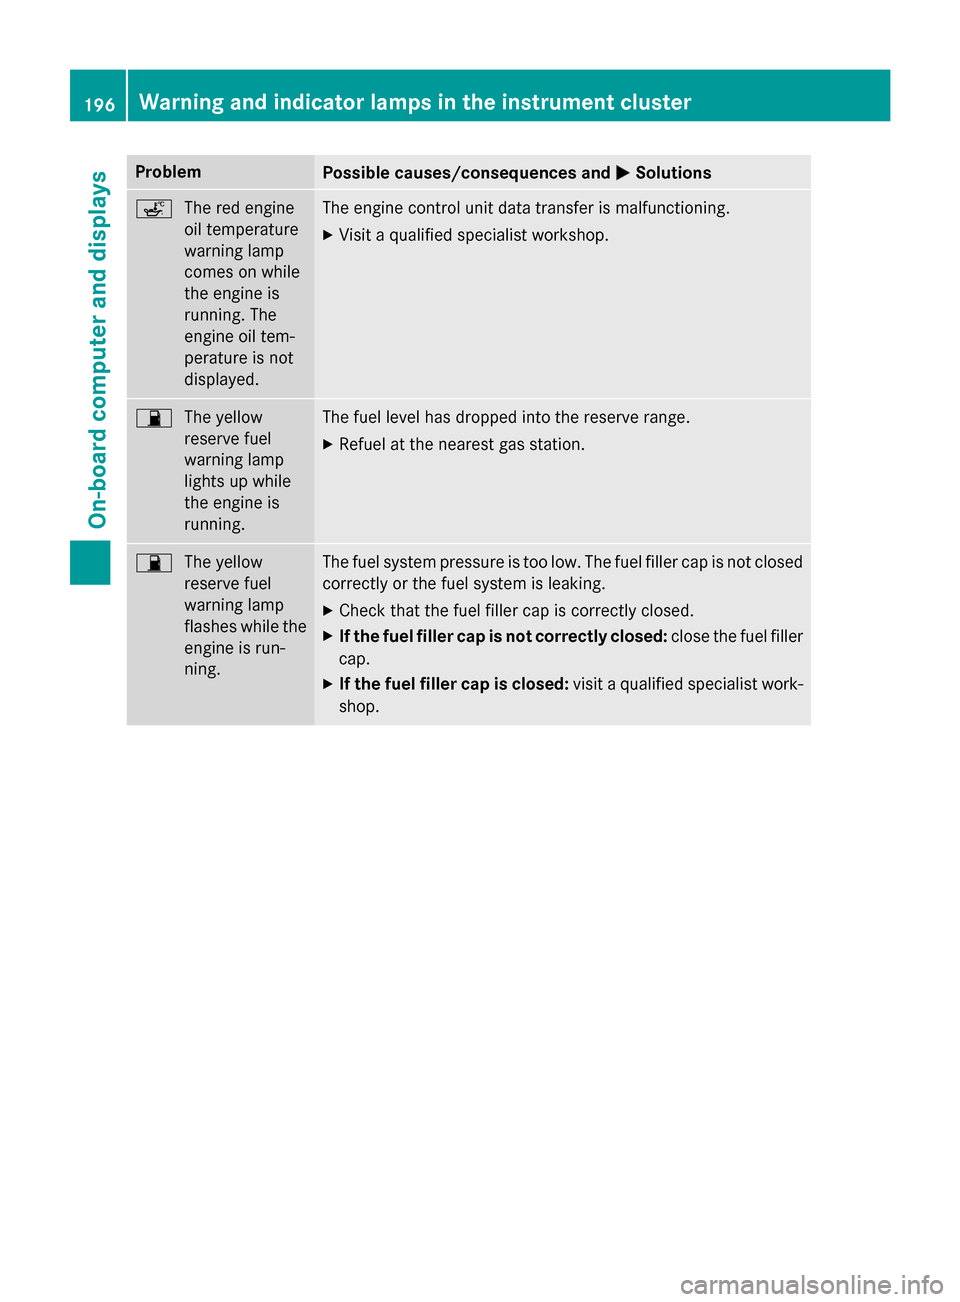
Problem
Possible causes/consequences and
0050
0050Solutions 00E4
The red engine
oil temperature
warning lamp
comes on while
the engine is
running. The
engine oil tem-
perature is not
displayed. The engine control unit data transfer is malfunctioning.
X Visit aqualified specialist workshop. 00B5
The yellow
reserve fuel
warning lamp
lights up while
the engine is
running. The fuel level has dropped into the reserve range.
X Refuel at the nearest gas station. 00B5
The yellow
reserve fuel
warning lamp
flashes while the
engine is run-
ning. The fuel system pressure is too low. The fuel filler cap is not closed
correctly or the fuel system is leaking.
X Check that the fuel filler cap is correctly closed.
X If the fuel filler cap is not correctly closed: close the fuel filler
cap.
X If the fuel filler cap is closed: visitaqualified specialist work-
shop. 196
Warning and indicator lampsint
he instrument clusterOn-board computer and displays
Page 221 of 290
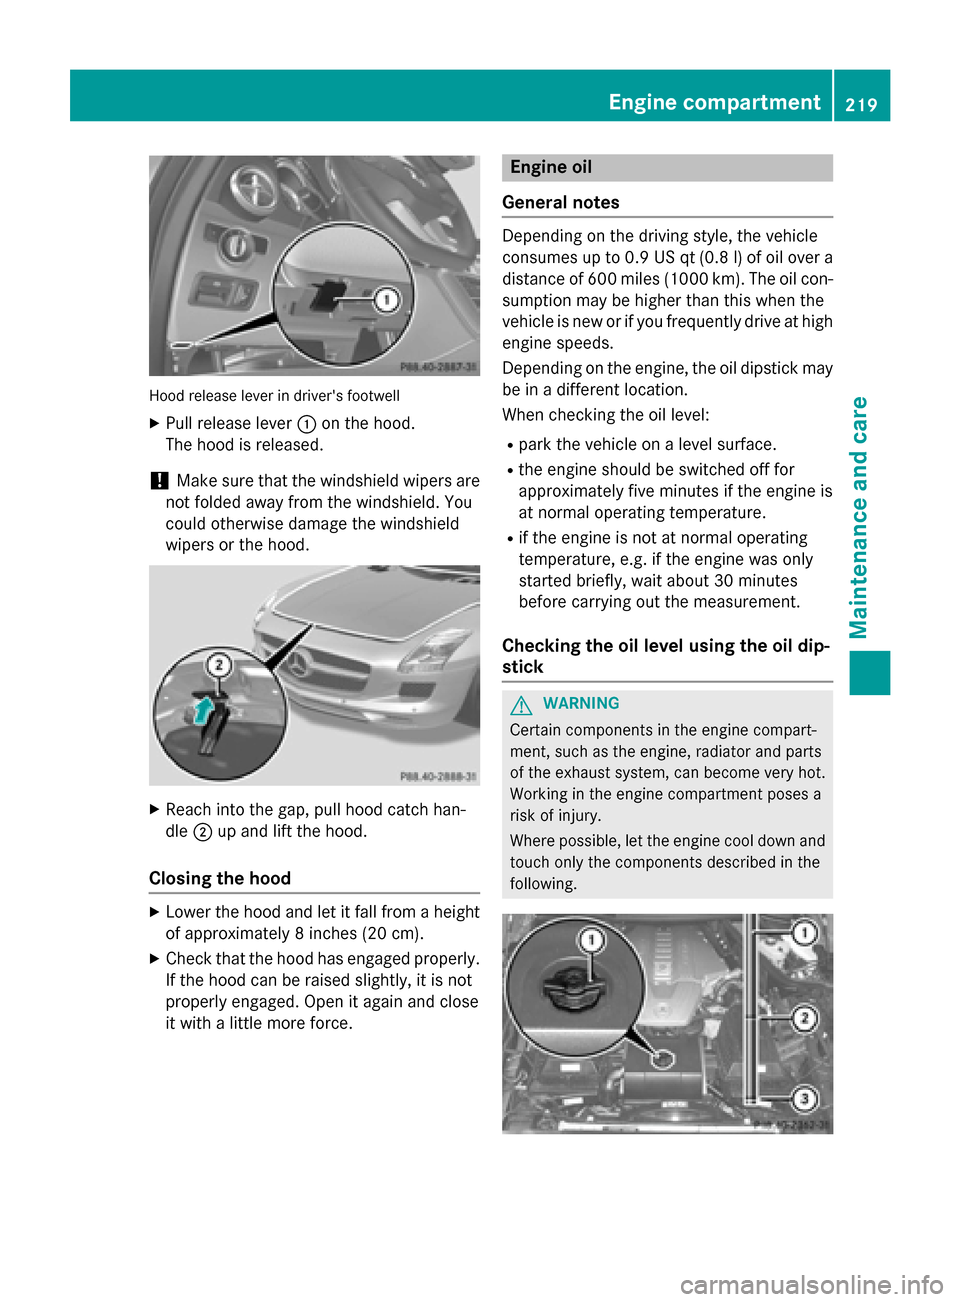
Hood release leve
rindriver's footwell
X Pull release lever 0043on the hood.
The hood is released.
! Make sure that the windshield wipers are
not folded away from the windshield .You
coul dotherwise damag ethe windshield
wipers or the hood. X
Reach into the gap ,pullh ood catch han-
dle 0044up and lift the hood.
Closing the hood X
Lower the hood and let it fal lfrom aheight
of approximatel y8inches (20 cm).
X Check that the hood has engaged properly.
If the hood can be raised slightly ,itisnot
properl yengaged .Openita gain and close
it with alittle more force. Engine oil
General notes Depending on the driving style, the vehicle
consumes up to 0.9 US qt (0.8 l) of oil over a
distance of 600 miles (1000 km). The oil con- sumptio nmay be higher than this whe nthe
vehicle is new or if yo ufrequently drive at high
engine speeds.
Depending on the engine, the oil dipstick may
be in adifferent location.
Whe nchecking the oil level:
R park the vehicle on aleve lsurface.
R the engine should be switched off for
approximatel yfive minutes if the engine is
at normal operating temperature.
R if the engine is not at normal operating
temperature, e.g. if the engine wa sonly
started briefly ,waita bout 30 minutes
before carrying out the measurement.
Checking the oill evel usin gthe oild ip-
stick G
WARNING
Certai ncomponents in the engine compart-
ment, such as the engine, radiator and parts
of the exhaust system, can become very hot.
Working in the engine compartment pose sa
risk of injury.
Where possible, let the engine cool dow nand
touch only the components describe dinthe
following. Engine compartment
219Maintenance and care Z
Page 222 of 290
X
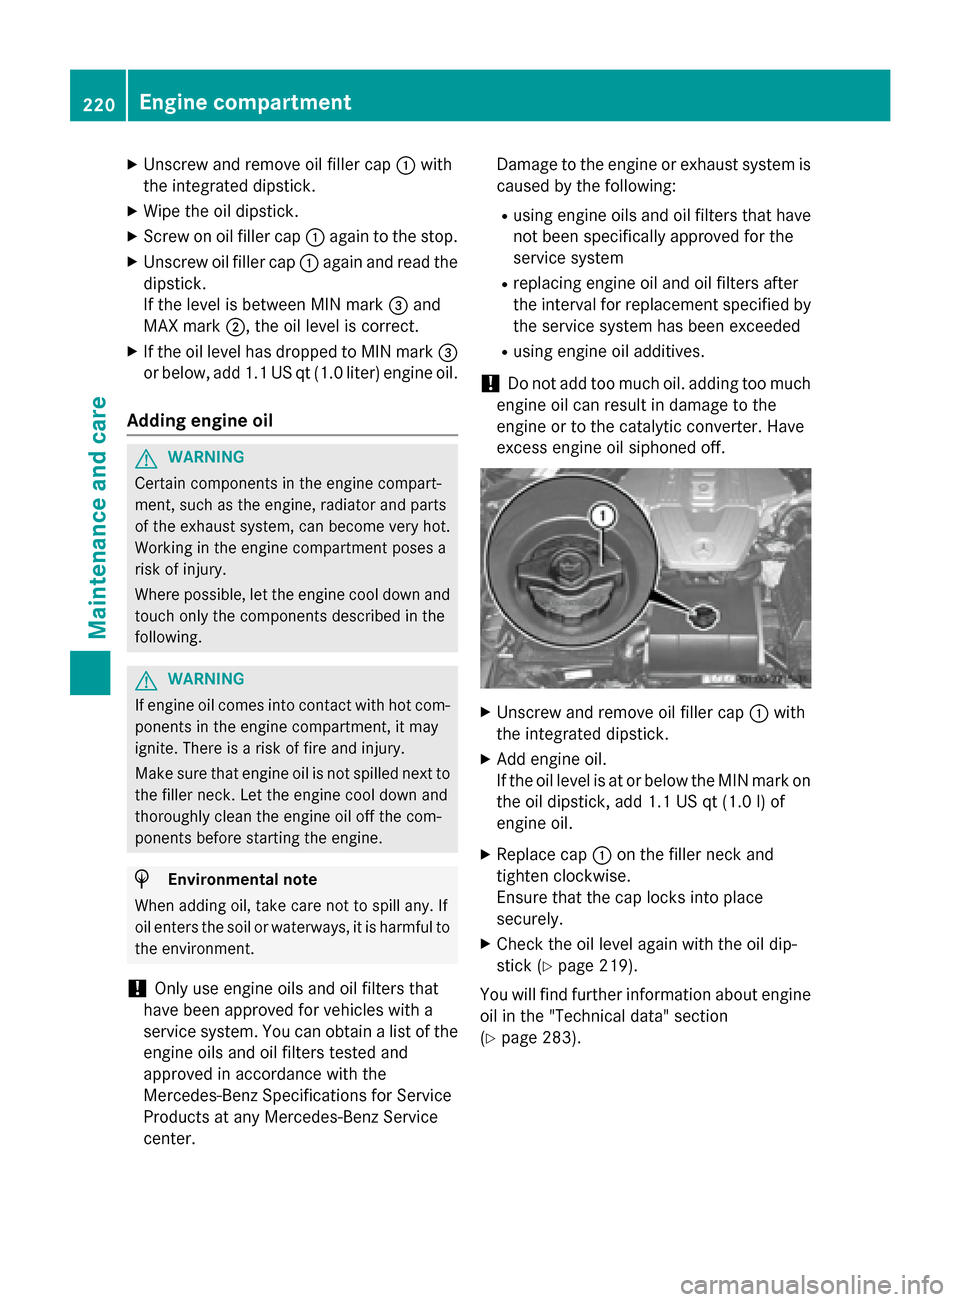
Unscrew and remove oil filler cap 0043with
the integrated dipstick.
X Wipe the oil dipstick.
X Screw on oil filler cap 0043againtot he stop.
X Unscrew oil filler cap 0043againa nd read the
dipstick.
If the level is between MIN mark 0087and
MAX mark 0044,the oil level is correct.
X If the oil level has dropped to MIN mark 0087
or below,a dd 1.1 US qt (1. 0liter )engine oil.
Adding engineo ilG
WARNING
Certain componentsint he engine compart-
ment, such as the engine, radiator and parts
of the exhaust system, can become very hot.
Working in the engine compartment poses a
risk of injury.
Where possible,l et the engine cool down and
touch only the componentsd escribed in the
following. G
WARNING
If engine oil comes into contact with hot com- ponents in the engine compartment,itm ay
ignite. There is arisk of fire and injury.
Make sure that engine oil is not spilledn ext to
the filler neck. Let the engine cool down and
thoroughly clean the engine oil off the com-
ponents before starting the engine. H
Environmental note
When adding oil, take care not to spill any. If
oil enters the soil or waterways, it is harmful to the environment.
! Only use engine oils and oil filters that
have been approved for vehicles with a
service system. You can obtain alist of the
engine oils and oil filters tested and
approved in accordance with the
Mercedes-Benz Specifications for Service
Products at any Mercedes-Benz Service
center. Damage to the engine or exhaust system is
caused by the following:
R using engine oils and oil filters that have
not been specificallya pproved for the
service system
R replacing engine oil and oil filters after
the interval for replacement specified by
the service system has been exceeded
R using engine oil additives.
! Do not add too much oil. adding too much
engine oil can result in damage to the
engine or to the catalytic converter. Have
excess engine oil siphoned off. X
Unscrew and remove oil filler cap 0043with
the integrated dipstick.
X Add engine oil.
If the oil level is at or below the MIN mark on
the oil dipstick, add 1.1 US qt (1.0 l)of
engine oil.
X Replace cap 0043on the filler neck and
tighten clockwise.
Ensure that the cap locks into place
securely.
X Check the oil level again with the oil dip-
stick (Y page 219).
You will find further information about engine
oil in the "Technical data" section
(Y page 283). 220
Engine compartmentMaintenance and care
Page 271 of 290
GVWR (Gross Vehicl
eWeight Rating)
The GVWR is the maximu mpermitted gross
weight of the fullyl oaded vehicle (weight of
the vehicle including all accessories, occu-
pants, fuel,l uggage and the drawbar nose-
weight if applicable).T he gross vehicle weight
rating is specified on the vehicle identification plate on the B-pilla ronthe driver's side.
Maximum loaded vehicle weight
The maximu mweight is the sum of the curb
weight of the vehicle ,the weight of the acces-
sories ,the total loadl imitand the weight of
the optional equipment installed at the fac-
tory.
Kilopascal (kPa)
Metric unit for tire pressure. 6.9 kPa is the
equivalent of 1psi.A nother unit for tire pres-
sure is bar. There are 100 kilopascals (kPa) to
1b ar.
Load index
In addition to the load-bearing index, the load index may alsobei mprinted on the sidewallof
the tire. This specifies the load-bearing capa-
city more precisely.
Curb weight
The weight of avehicle with standard equip-
ment including the maximu mcapacity of fuel,
oil and coolant. It alsoi ncludes the air-condi-
tioning system and optional equipment if
these are installed in the vehicle ,but does not
includ epassengers or luggage.
Maximum load rating
The maximu mloadr ating in kilograms or
pounds is the maximu mweight for which a
tire is approved.
Maximum permissible tire pressure
Maximu mpermissibl etire pressure for one
tire.
Maximum load on one tire
Maximu mloadono ne tire. This is calculated
by dividing the maximu maxle loadofo ne axle
by two. PSI (pounds per square inch)
As
tandard unit of measure for tire pressure.
Aspec tratio
Relationshi pbetwee ntire heigh tand tire
width in percent.
tire pressure
This is pressure inside the tire applying an
outward force to each square inch of the tire's surface. The tire pressure is specified in
pounds per square inch (psi), in kilopascal
(kPa) or in bar. The tire pressure shoul donly
be corrected when the tires are cold. For this,
the vehicle must have been stationary for at
least three hours or not have traveled more
than 1.6 km (1 mile)int his time.
Tire pressure of coldt ires
The tires are cold:
R if the vehicle has been parked without
direct sunlight on the tires for at least three
hours and
R if the vehicle has not been driven more than
1m ile (1.6 km)
Tread
The part of the tire that comes into contact
with the road.
Bead
The tire beade nsures that the tire sits
securel yonthe wheel. There are severa lsteel
wiresint he beadtop revent the tire from
coming loose from the wheelr im.
Sidewall
The part of the tire betwee nthe tread and the
bead.
Weight of optional extras
The combined weight of those optional extras
that weigh more than the replaced standard
part and more than 2.3 kilograms (5 lbs).
These optional extras, such as high-perform-
ance brakes, level control, aroof rack or a
high-performance battery, are not included in Alla
bout wheels and tires
269Wheelsand tires Z
Page 273 of 290
of hydroplaning. You will only gain these ben-
efits if the correc tdirection of rotation is
maintained.
An arrow on the sidewal lofthe tire indicates
its correc tdirection of rotation. Storing wheels
Storew heels that are not being used in acool,
dry and preferably dark place. Protec tthe
tires from oil, grease, gasoline and diesel. Cleaning the wheels
G
WARNING
The water jet from acircular jet nozzle (dirt
blasters) can cause invisible exterior damage to the tires or chassis components. Compo-
nentsd amaged in this way may fail unexpect-
edly. There is arisk of an accident.
Do not use power washers with circular jet
nozzles to clean the vehicle. Have damaged
tires or chassis components replaced imme-
diately. Mounting
awheel
Preparing the vehicle X
Stop the vehicle on solid, non-slippery and
level ground.
X Apply the electric parking brake manually.
X Bring the front wheels into the straight-
ahead position.
X Shift the transmission to position P.
X Switch off the engine.
X Open the driver's door.
The on-board electronics now have status
0.T his is the same as the SmartKey having
been removed.
X Remove Start/Stop button from ignition
lock (Y page 119). X
Take the following object sfrom the left-
hand stowage compartment and the left-
hand stowage space in the trunk:
R lug wrench
R folding wheel chock
R jack
R alignment bolt
X Secure the vehicle to prevent it from rolling
away.
Securing the vehicle to prevent it from
rolling away If your vehicle is equipped with
awheel chock,
it can be found in the vehicle tool kit
(Y page 234).
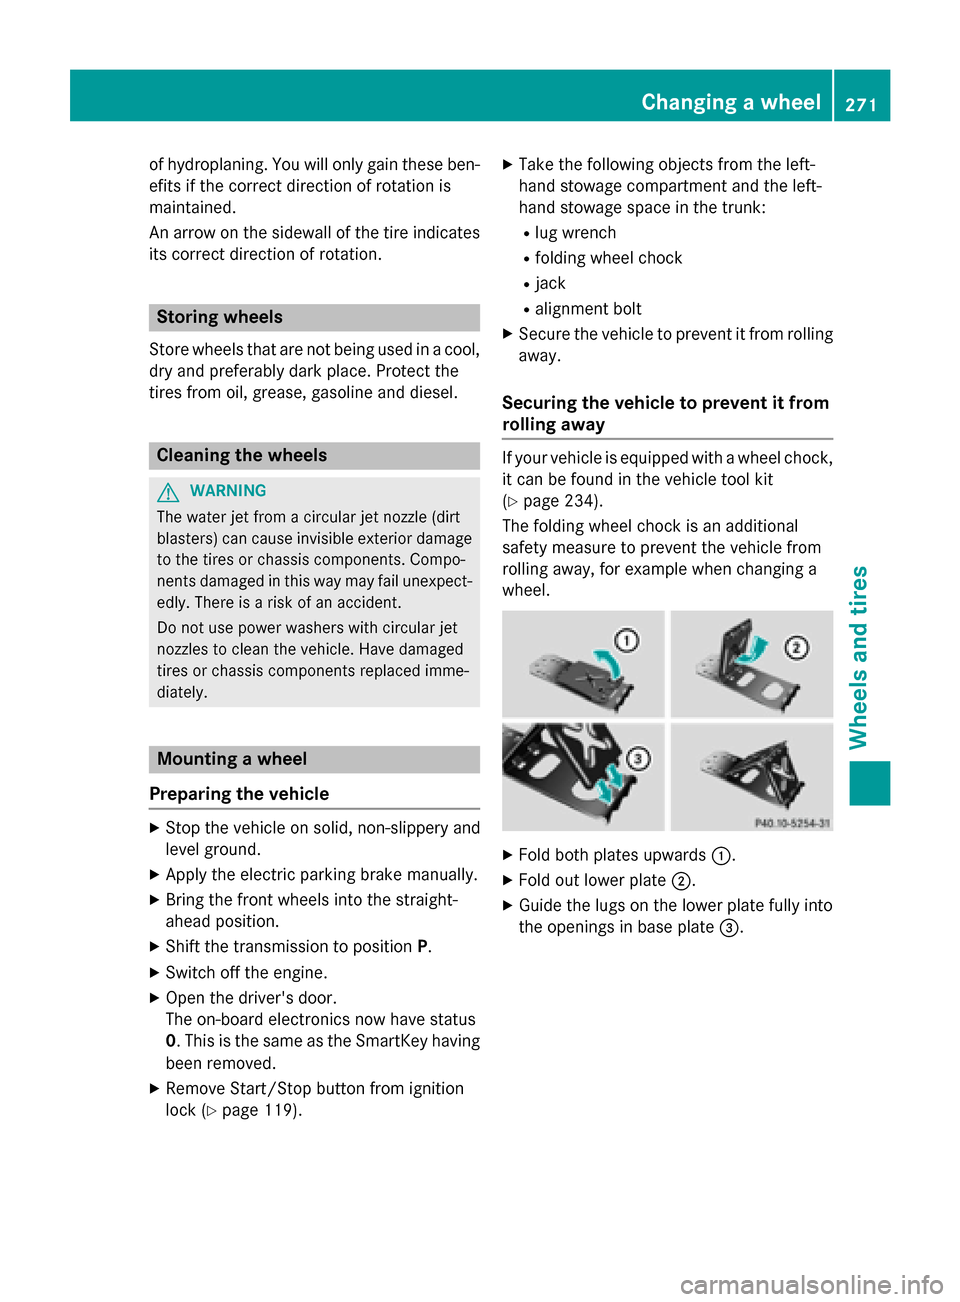
The folding wheel chock is an additional
safety measure to prevent the vehicle from
rolling away,f or example when changing a
wheel. X
Fold both plates upwards 0043.
X Fold out lower plate 0044.
X Guide the lugs on the lower plate fully into
the openings in base plate 0087. Changing
awheel
271Wheels and tires Z