2015 MERCEDES-BENZ SLS AMG GT COUPE light
[x] Cancel search: lightPage 92 of 290
Crash-responsive EASY-EXIT feature
If th
ecrash-responsiv eEASY-EXIT feature is
triggered in an accident, th esteering column
will mov eupwards when th edriver' sdoor is
opened. This occur sirrespective of th eposi-
tio noft heSmartKey in th eignition lock. This
makes it easier to exit th evehicle and rescue
th eo ccupants.
The crash-responsiv eEASY-EXIT feature is
only operational if th eEASY-EXIT/ENTRY fea-
tur eisa ctivated in th eon-board computer. Mirrors
Rear-view mirror
X
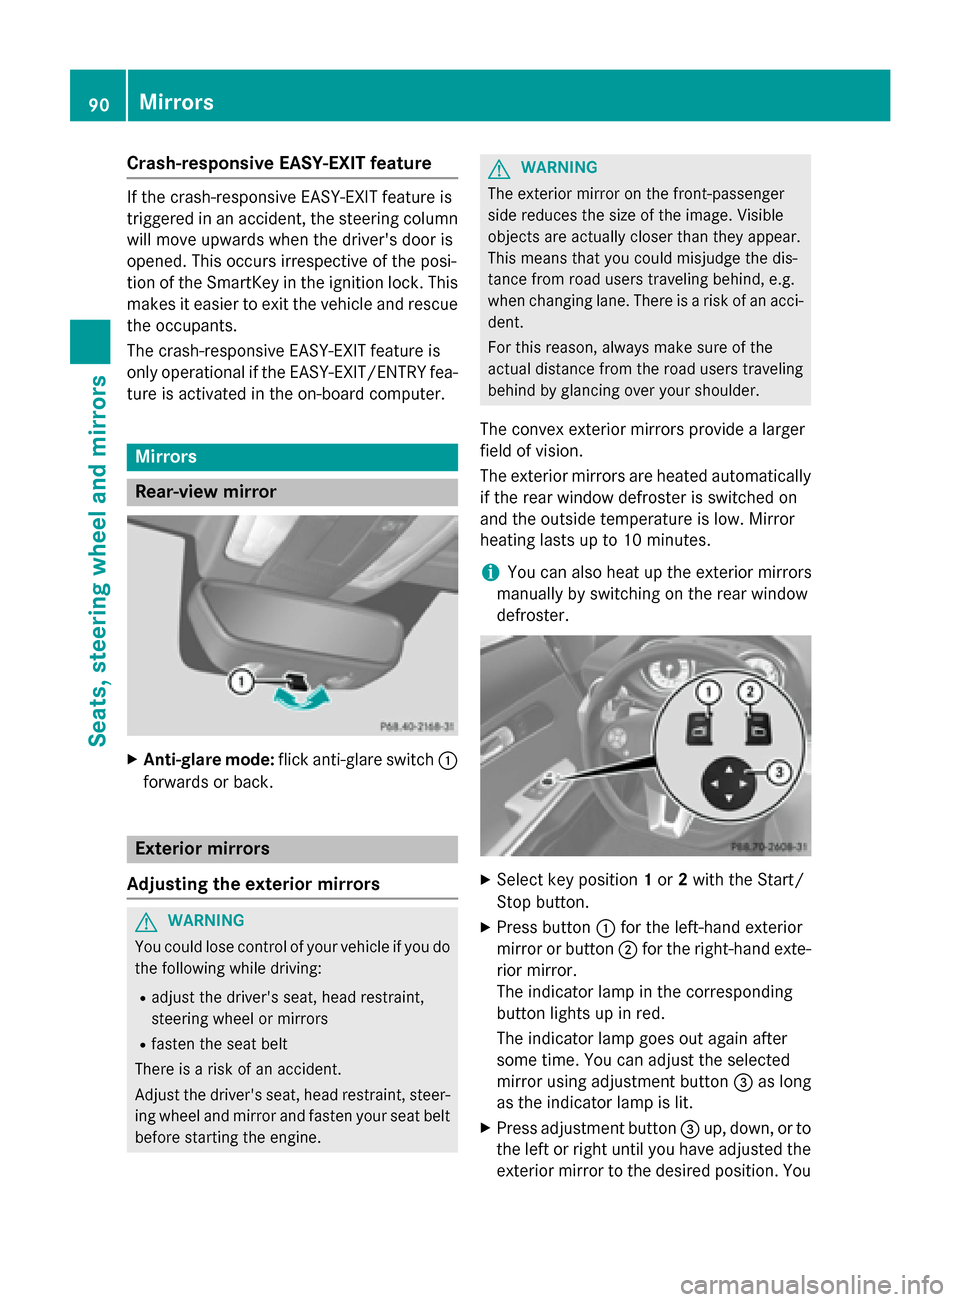
Anti-glar emode: flickanti-glare switch 0043
forwards or back. Exterior mirrors
Adjusting th eexterior mirrors G
WARNING
You coul dlose control of your vehicle if you do
th ef ollowin gwhile driving:
R adjust th edriver' sseat ,head restraint,
steering wheel or mirrors
R fasten th eseat belt
Ther eisar iskofana ccident.
Adjust th edriver' sseat ,head restraint ,steer-
ing wheel and mirror and fasten your seat belt before starting th eengine. G
WARNING
The exterior mirror on th efront-pa ssenger
side reduces th esizeoft heimage .Visible
object sare actually closer than they appear.
This mean sthaty ou coul dmisjudge th edis-
tance from road user straveling behind, e.g.
when changing lane .Ther eisar iskofana cci-
dent.
For this reason ,always mak esure of the
actual distanc efromt heroad user straveling
behin dbyg lancingovery our shoulder.
The convex exterior mirror sprovide alarger
fiel dofv ision.
The exterior mirror sare heated automatically
if th erear window defroste risswitched on
and th eoutside temperatur eislow. Mirror
heating last supto10m inutes.
i You can also heat up th
eexteri or mirrors
manually by switching on th erear window
defroster. X
Select ke yposition 1or 2wit hthe Start/
Stop button.
X Press button 0043for th eleft-hand exterior
mirror or button 0044for th eright-han dexte-
rior mirror.
The indicator lamp in th ecorres ponding
butto nlight supinr ed.
The indicator lamp goes out again after
som etime. You can adjust th eselected
mirror usin gadjustmen tbutton 0087as long
as th eindicator lamp is lit.
X Press adjustmen tbutton 0087up, down ,orto
th el eft or righ tuntil you have adjusted the
exterior mirror to th edesired position. You 90
MirrorsSeats, steerin
gwheel and mirrors
Page 93 of 290
should have
agood overview of traffic con-
ditions.
Folding the exterior mirrors in or out
electrically X
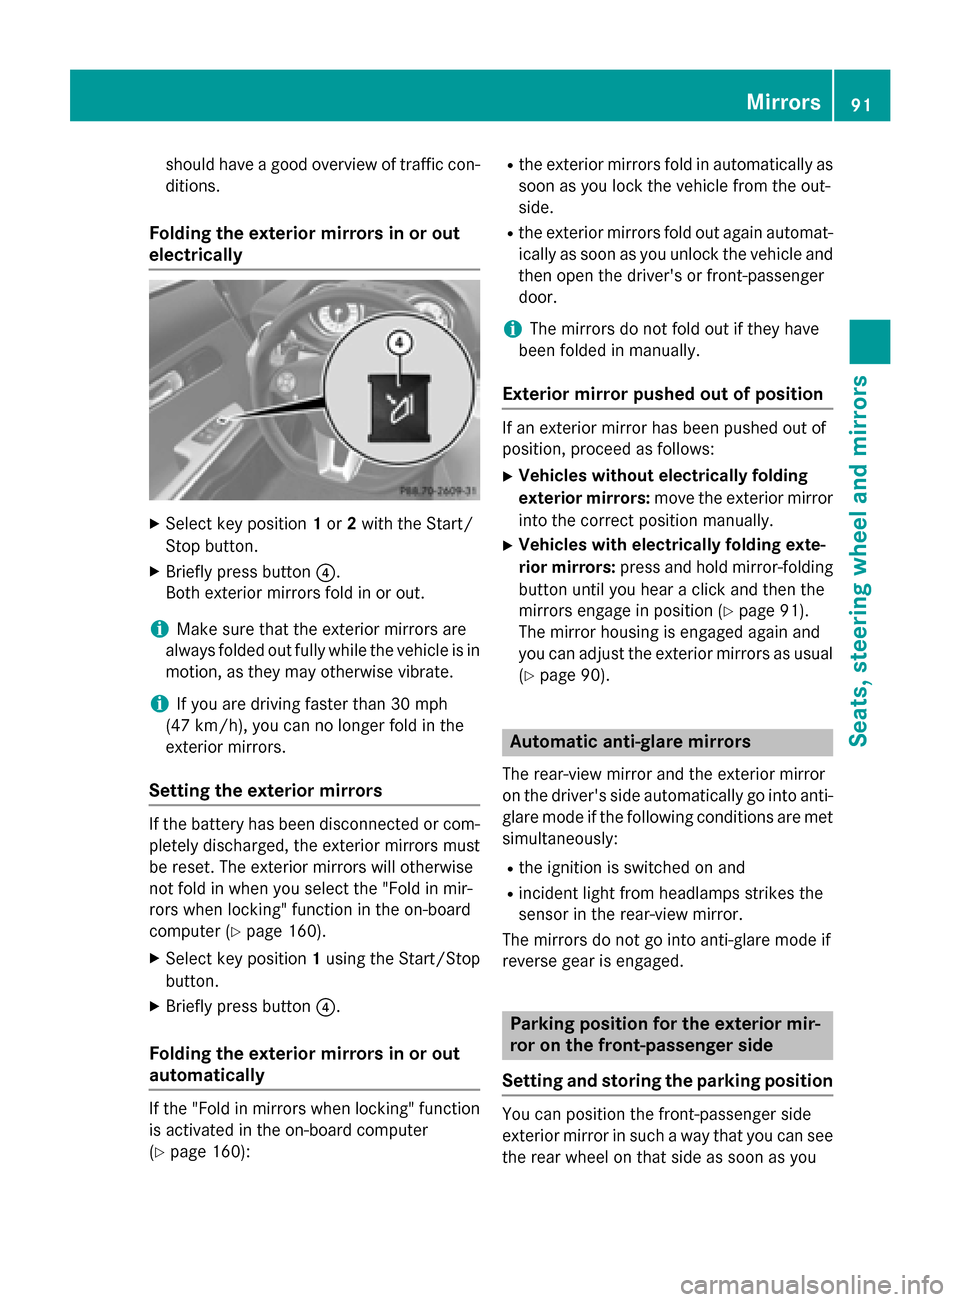
Select key position 1or 2with the Start/
Stop button.
X Briefly press button 0085.
Both exterior mirrors fold in or out.
i Make sure that the exterior mirrors are
always folded out fully while the vehicle is in motion, as they may otherwise vibrate.
i If you are driving faster than 30 mph
(47 km/h), you can no longer fold in the
exterior mirrors.
Setting the exterior mirrors If the battery has been disconnected or com-
pletely discharged, the exterior mirrors must
be reset. The exterior mirrors will otherwise
not fold in when you select the "Fold in mir-
rors when locking" function in the on-board
computer (Y page 160).
X Select key position 1using the Start/Stop
button.
X Briefly press button 0085.
Folding the exterior mirrors in or out
automatically If the "Fold in mirrors when locking" function
is activated in the on-board computer
(Y page 160): R
the exterior mirrors fold in automaticallyas
soon as you lock the vehicle from the out-
side.
R the exterior mirrors fold out againa utomat-
ically as soon as you unlock the vehicle and
then open the driver's or front-passenger
door.
i The mirrors do not fold out if they have
been folded in manually.
Exterior mirror pushed out of position If an exterior mirror has been pushed out of
position, proceed as follows:
X Vehicles without electrically folding
exterior mirrors: move the exterior mirror
into the correct position manually.
X Vehicles with electrically folding exte-
rior mirrors: press and hold mirror-folding
button until you hear aclick and then the
mirrors engage in position (Y page 91).
The mirror housing is engaged againa nd
you can adjust the exterior mirrors as usual
(Y page 90). Automatic anti-glare mirrors
The rear-view mirror and the exterior mirror
on the driver's side automaticallygoi nto anti-
glare mode if the following conditions are met simultaneously:
R the ignition is switched on and
R incident light from headlamps strikes the
sensor in the rear-view mirror.
The mirrors do not go into anti-glare mode if
reverse gear is engaged. Parking position for the exterior mir-
ror on the front-passengers
ide
Setting and storing the parking position You can position the front-passenger side
exterior mirror in such away that you can see
the rear wheel on that side as soon as you Mirrors
91Seats, steering wheela nd mirrors Z
Page 97 of 290
Useful information
..............................96
Exterior lighting .................................. 96
Interior lighting ................................... 99
Replacing bulbs ................................. 100
Windshield wipers ............................101 95Lights and windshield wipers
Page 98 of 290
Useful information
i This Operator's Manual describes all
models and all standard and optional equip- ment of your vehicle available at the time of
publication of the Operator's Manual.
Country-specific differences are possible.
Please not ethat your vehicle may not be
equipped with all feature sdescribed. This
also applies to safety-related system sand
functions.
i Please read the information on qualified
specialist workshops (Y page 23).Exterior lighting
Genera
lnotes
For reason sofsafety, Mercedes-Benz recom-
mends that you drive with the lights switched on even during the daytime. In some coun-
tries ,operation of the headlamps varies due
to legal requirements and self-imposed obli-
gations. Driving abroad
Converting to symmetrical low beam
when driving abroad: switchthe headlamps
to symmetrical low beam in countries in
which traffic drives on the opposite side of the
road to the country where the vehicle is reg-
istered. This prevents glare to oncoming traf- fic. Symmetrical lights do not illuminate as
large an area of the edge of the road.
Have the headlamps converted at aqualified
specialist workshop, e.g. an authorized
Mercedes-Benz Center, as close to the border
as possible before drivin ginthesecountries.
Converting to asymmetrical low beam
after returning: have the headlamps con-
verted back to asymmetrical low beam at a
qualified specialist workshop, e.g. an author-
ized Mercedes-Benz Center, as soon as pos-
sible after crossing the border again. Setting the exterior lighting
Setting options Exterior lightin
gcan be set using:
R the light switch
R the combination switc h(Ypage 98)
R the on-board computer (Y page 158)
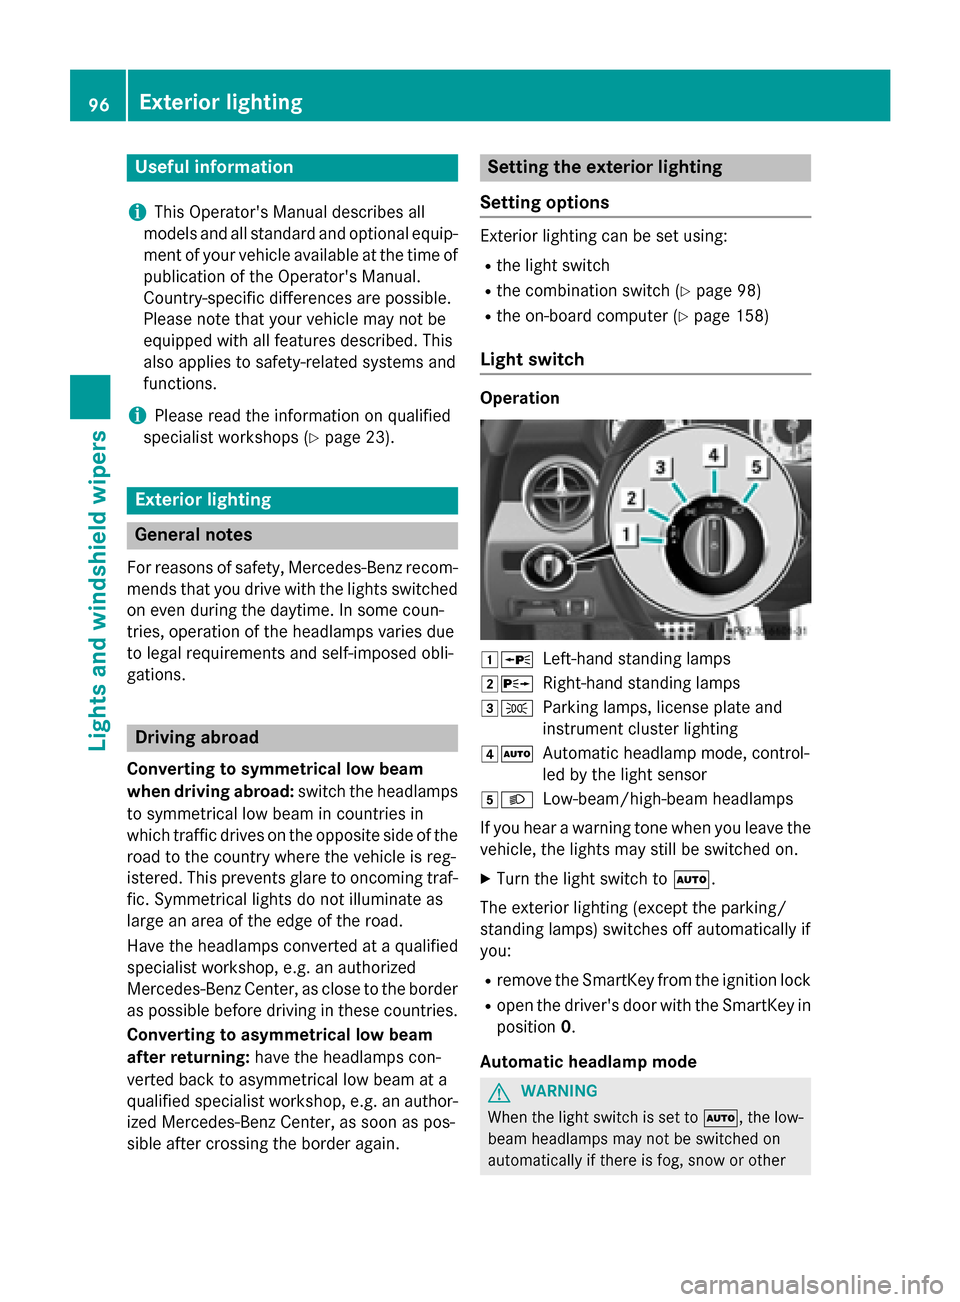
Light switch Operation
00470063
Left-handstanding lamps
00480064 Right-hand standing lamps
00490060 Parkinglamps, licens eplate and
instrumen tcluster lighting
004A0058 Automatic headlamp mode, control-
led by the light sensor
004B0058 Low-beam/high-beam headlamps
If you hear awarnin gton ew hen you leave the
vehicle, the lights may still be switched on.
X Turn the light switc hto0058.
The exterior lightin g(except the parking/
standing lamps) switches off automatically if
you:
R remov ethe SmartKey from the ignition lock
R open the driver' sdoor with the SmartKey in
position 0.
Automatic headlamp mode G
WARNING
When the light switc hisset to 0058,t he low-
beam headlamps may not be switched on
automatically if ther eisfog, snow or other 96
Exterior lightingLights and windshield wipers
Page 99 of 290
causes of poo
rvisibility du etothe weather
conditions such as spray. There is ariskofan
accident.
In such situations, turn the light switch to
0058.
The automatic headlamp feature is only an
aid. The driver is responsibl efor the vehicle's
lighting at al ltimes.
0058 is the favored light switch setting. The
light setting is automaticall yselected accord-
ing to the brightnes softhe ambient light
(exception: poo rvisibility du etoweathe rcon-
ditions such as fog, snow or spray):
R SmartKey in position 1in the ignition lock:
the parking lamps are switched on or off
automaticall ydepending on the brightness
of the ambient light.
R With the engine running: if yo uhavea cti-
vate dthe daytime running lamps function
via the on-board computer, the daytime
running lamps or the low-bea mheadlamps
and parking lamps are switched on or off
automaticall ydepending on the brightness
of the ambient light.
Onl yfor Canada:
The daytime running lamps improve the visi-
bility of your vehicle during the day. The day- time running lamps function is required by law
in Canada. It cannot therefore be deactivated.
Whe nthe engine is running and the vehicle is
stationary: if yo umove the selector lever from
ad rive position to P,the daytime running
lamps/low-bea mheadlamp sgooutafter
three minutes.
Whe nthe engine is running, the vehicle is
stationar yand in bright ambient light: if you
turn the light switch to 0060,the daytime
running lamps and parking lamps switch on.
If the engine is running and yo uturn the light
switch to 0058,the manual settings take
precedence over the daytime running lamps.
USA only:
The daytime running lamps improve the visi-
bility of your vehicle during the day. To do this,
the daytime running lamps function mus tbeswitched on using the on-board computer
(Y
page 158).
If the engine is running and yo uturn the light
switch to 0060or0058,t he manual settings
take precedence over the daytime running
lamps.
i In the USA, the daytime running lamps are
deactivated upon delivery from the factory.
X To switc honautomati cheadlamp
mode: turn the light switch to 0058.
Low-beam headlamps
Even if the light senso rdoesn ot detect that it
is dark, the parking lamps and low-beam
headlamp sswitch on whe nthe ignition is
switched on and the light switch is set to the 0058 position. Thi sisaparticularly useful
function in the event of rai nand fog.
X To switc honthe low-beam headlamps:
turn the SmartKey in the ignition lock to
position 2or star tthe engine.
X Turn the light switch to 0058.
The green 0058indicator lamp in the instru-
ment cluster lights up.
Parking lamps ! If the battery ha
sbeene xcessivel ydis-
charged ,the parking lamps or standing
lamps are automaticall yswitched off to
enabl ethe next engine start. Alway spark
your vehicle safel yand sufficiently lit
according to lega lstandards. Avoi dthe
continuou suseof the 0060parking lamps
for several hours. If possible ,switch on the
0064 right or the 0063left standing lamp.
X To switc hon:turn the light switch to 0060.
Standing lamps
Switching on the standing lamps ensures the corresponding sid eofthe vehicle is illumi-
nated. Exterio
rlighting
97Lights and windshieldw ipers Z
Page 100 of 290
X
To switc honthe standin glamps: the
SmartKe yisnot in the ignition lock or it is in
position 0.
X Turn the light switch to 0063(left-hand side
of the vehicle) or 0064(right-hand side of
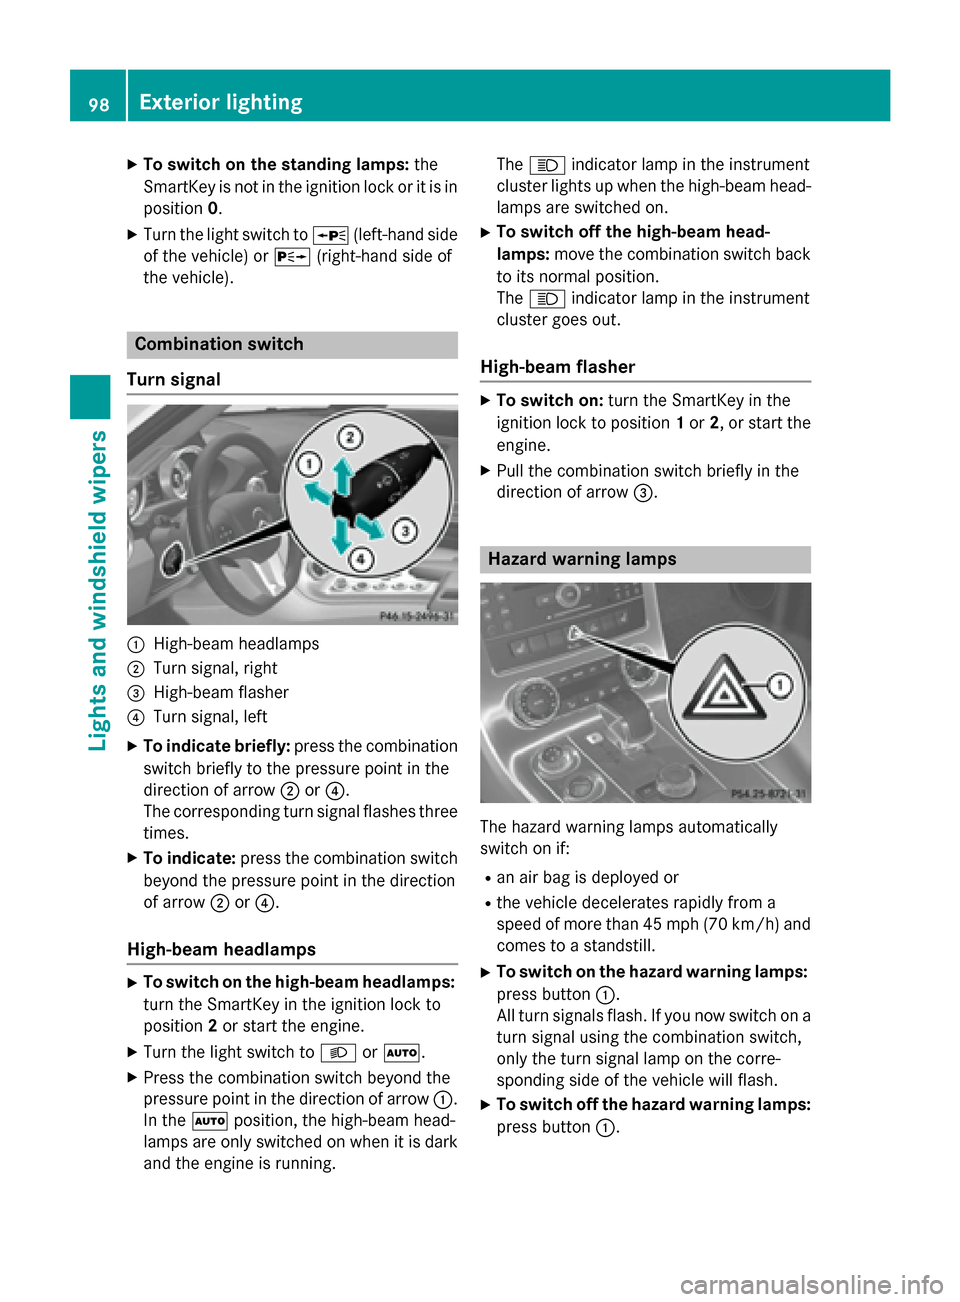
the vehicle). Combination switch
Turn signal 0043
High-bea mheadlamps
0044 Turn signal, right
0087 High-bea mflasher
0085 Turn signal, left
X To indicate briefly: press the combination
switch briefl ytothe pressure point in the
direction of arrow 0044or0085.
The corresponding tur nsigna lflashe sthree
times.
X To indicate: press the combinatio nswitch
beyond the pressure point in the direction
of arrow 0044or0085.
High-beam headlamps X
To switc honthe high-beam headlamps:
tur nthe SmartKe yinthe ignition lock to
position 2or start the engine.
X Turn the light switch to 0058or0058.
X Press the combinatio nswitch beyond the
pressure point in the direction of arrow 0043.
In the 0058position, the high-bea mhead-
lamps ar eonlys witched on when it is dark
and the engine is running. The
0057 indicator lamp in the instrument
cluster lights up when the high-bea mhead-
lamps ar eswitched on.
X To switc hoffthe high-beam head-
lamps: movethe combinatio nswitch back
to its normal position.
The 0057 indicator lamp in the instrument
cluster goe sout.
High-beam flasher X
To switc hon:tur nthe SmartKe yinthe
ignition lock to position 1or 2,ors tart the
engine.
X Pull the combinatio nswitch briefl yinthe
direction of arrow 0087. Hazard warning lamps
The hazar
dwarning lamps automatically
switch on if:
R an ai rbag is deployed or
R the vehicl edecelerates rapidl yfrom a
speed of mor ethan45m ph (70 km/h) and
come stoas tandstill.
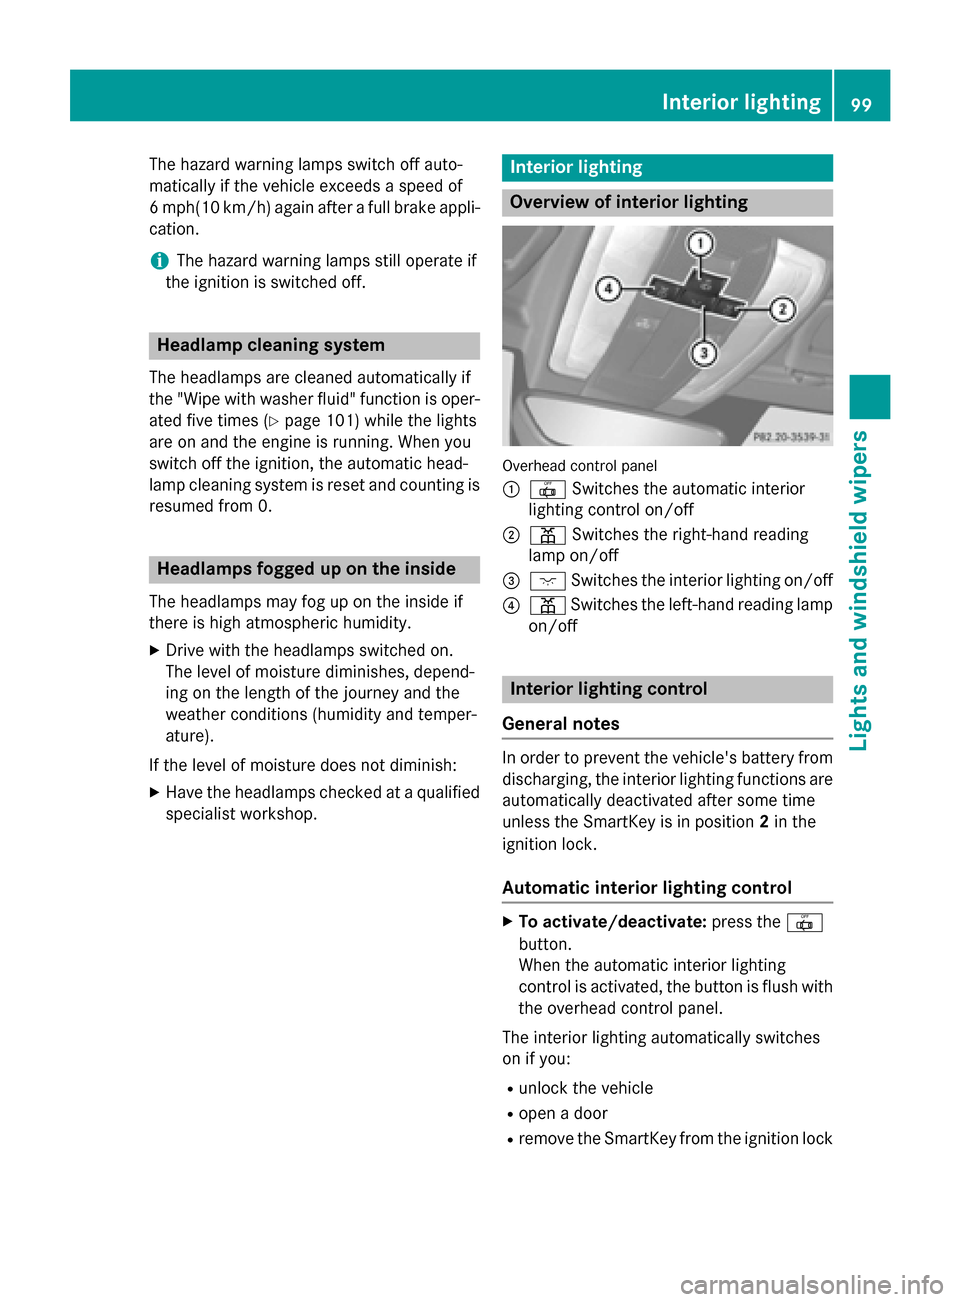
X To switc honthe hazard warning lamps:
press button 0043.
All tur nsignals flash. If yo unow switch on a
tur ns igna lusing the combinatio nswitch,
onl ythe tur nsigna llam pont he corre-
sponding side of the vehicl ewillf lash.
X To switc hoffthe hazard warning lamps:
press button 0043.98
Exterior lightingLights and
windshield wipers
Page 101 of 290
The hazard warning lamps switch off auto-
matically if the vehicle exceeds aspeed of
6m ph(10 km/h) again after afull brake appli-
cation.
i The hazard warning lamps still operate if
the ignition is switched off. Headlam
pcleaning system
The headlamps are cleaned automatically if
the "Wipe with washer fluid" function is oper-
ated five times (Y page 101) while the lights
are on and the engine is running. When you
switch off the ignition ,the automatic head-
lamp cleaning system is reset and counting is
resumed from 0. Headlamps fogged up on the inside
The headlamps may fog up on the inside if
there is high atmospheric humidity.
X Drive with the headlamps switched on.
The level of moisture diminishes, depend-
ing on the length of the journey and the
weather conditions (humidity and temper-
ature).
If the level of moisture does not diminish:
X Have the headlamps checked at aqualified
specialist workshop. Interior lighting
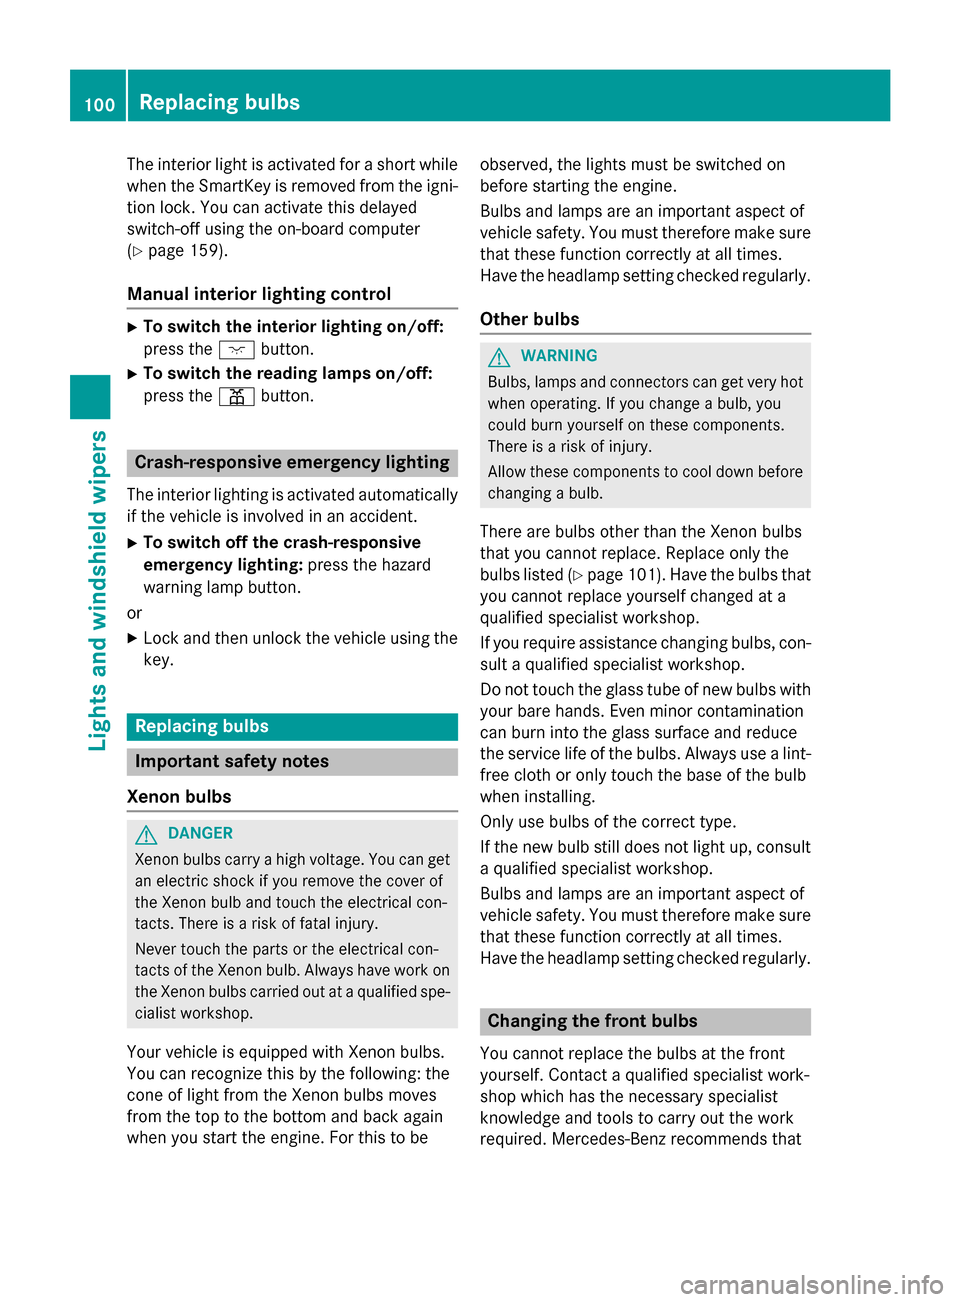
Overview of interior lighting
Overhead control panel
0043
0033 Switches the automatic interior
lighting control on/off
0044 003D Switches the right-hand reading
lamp on/off
0087 004A Switches the interior lighting on/off
0085 003D Switches the left-hand reading lamp
on/off Interior lighting control
General notes In order to prevent the vehicle's battery from
discharging, the interior lighting functions are
automatically deactivated after some time
unless the SmartKey is in position 2in the
ignition lock.
Automatic interior lighting control X
To activate/deactivate: press the0033
button.
When the automatic interior lighting
control is activated, the button is flush with
the overhead control panel.
The interior lighting automatically switches
on if you:
R unlock the vehicle
R open adoor
R remove the SmartKey from the ignition lock Interior lighting
99Lights and windshield wipers Z
Page 102 of 290
The interior light is activated for
ashort while
when the SmartKey is removed from the igni-
tion lock. You can activat ethis delayed
switch-off using the on-board computer
(Y page 159).
Manua linterior lighting control X
To switch the interior lighting on/off:
press the 004Abutton.
X To switch the reading lampso n/off:
press the 003Dbutton. Crash-responsive emergency lighting
The interior lighting is activated automatically
if the vehicle is involved in an accident.
X To switch off the crash-responsive
emergency lighting: press the hazard
warning lamp button.
or X Lock and then unlock the vehicle using the
key. Replacing bulbs
Important safety notes
Xenon bulbs G
DANGER
Xenon bulbs carry ahigh voltage. You can get
an electric shock if you remove the cover of
the Xenon bulb and touch the electrical con-
tacts. There is arisk of fatal injury.
Never touch the parts or the electrical con-
tactsoft he Xenon bulb. Always have work on
the Xenon bulbs carried out at aqualified spe-
cialist workshop.
Your vehicle is equipped with Xenon bulbs.
You can recognize this by the following: the
cone of light from the Xenon bulbs moves
from the top to the bottom and back again
when you start the engine. For this to be observed, the lights must be switched on
before starting the engine.
Bulbs and lamps are an importan
taspect of
vehicle safety. You must therefore make sure that these function correctly at all times.
Have the headlamp setting checked regularly.
Other bulbs G
WARNING
Bulbs, lamps and connector scan get very hot
when operating. If you change abulb, you
could burn yourself on these components.
There is arisk of injury.
Allow these components to cool down before changin gabulb.
There are bulbs other than the Xenon bulbs
that you cannot replace. Replace only the
bulbs listed (Y page 101). Have the bulbs that
you cannot replace yourself changed at a
qualified specialist workshop.
If you require assistance changin gbulbs, con-
sult aqualified specialist workshop.
Do not touch the glass tube of new bulbs with
your bare hands. Even minor contamination
can burn into the glass surface and reduce
the service life of the bulbs. Always use alint-
free cloth or only touch the base of the bulb
when installing.
Only use bulbs of the correc ttype.
If the new bulb still does not light up, consult
aq ualified specialist workshop.
Bulbs and lamps are an importan taspect of
vehicle safety. You must therefore make sure that these function correctly at all times.
Have the headlamp setting checked regularly. Changing the front bulbs
You cannot replace the bulbs at the front
yourself. Contact aqualified specialist work-
shop which has the necessary specialist
knowledge and tools to carry out the work
required. Mercedes-Benz recommends that 100
Replacing bulbsLights and windshield wipers