2015 MERCEDES-BENZ SLS AMG GT COUPE light
[x] Cancel search: lightPage 74 of 290
X
Turn the mechanical key counter-clockwise
to position 0049.
The door is locked.
X Turn the mechanical key back and remove
it.
X Check that both doors are locked.
i If you lock the vehicle as described above,
the fuel filler flap is not locked. The anti-
theft alarm system is not armed.
Roadster X
Open the driver's door.
X Close the front-passenger door and the
trunk lid.
X Press the lockin gbutton (Y page 70).
X Check that the lockin gknobisint he lower
position on the front-passenger door. Press the lockin gknobd own by hand, if neces-
sary.
X Close the driver's door.
X Take the mechanical key out of the Smart-
Key (Y page 64).
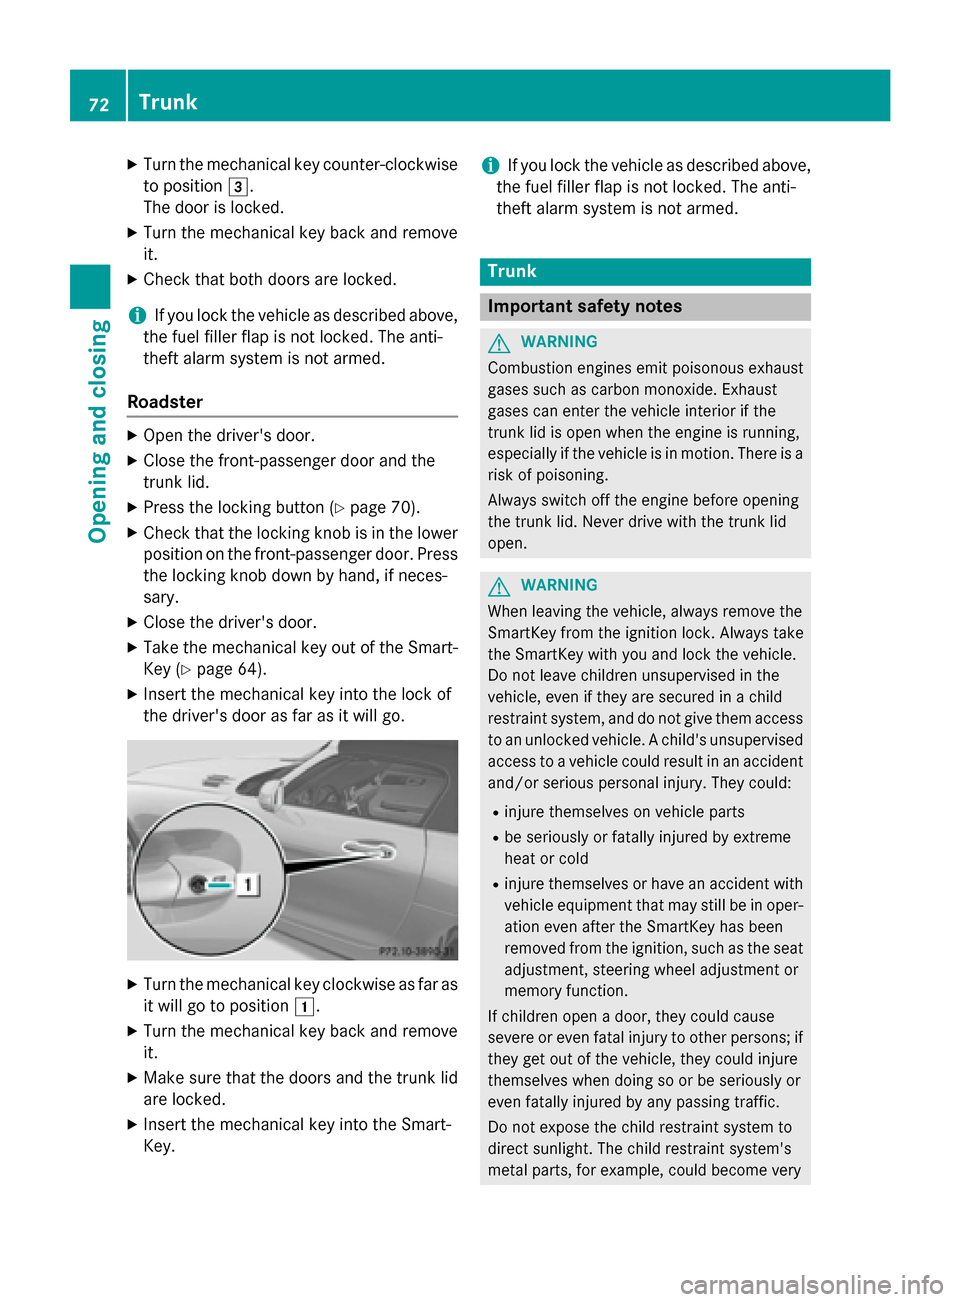
X Insert the mechanical key into the lock of
the driver's door as far as it will go. X
Turn the mechanical key clockwise as far as
it will go to position 0047.
X Turn the mechanical key back and remove
it.
X Make sure that the doors and the trunk lid
are locked.
X Insert the mechanical key into the Smart-
Key. i
If you lock the vehicle as described above,
the fuel filler flap is not locked. The anti-
theft alarm system is not armed. Trunk
Important safety notes
G
WARNING
Combustion engines emit poisonous exhaust
gases such as carbon monoxide. Exhaust
gases can enter the vehicle interior if the
trunk lid is open when the engine is running,
especially if the vehicle is in motion .There is a
risk of poisoning.
Always switch off the engine before opening
the trunk lid. Never drive with the trunk lid
open. G
WARNING
When leaving the vehicle, alway sremove the
SmartKey from the ignition lock. Always take
the SmartKey with you and lock the vehicle.
Do not leave children unsupervised in the
vehicle, even if they are secured in achild
restraint system, and do not give them access to an unlocked vehicle. Achild's unsupervised
access to avehicle could result in an accident
and/or serious personal injury. They could:
R injure themselves on vehicle parts
R be seriously or fatally injured by extreme
heat or cold
R injure themselves or have an accident with
vehicle equipment that may still be in oper-
ation even after the SmartKey has been
removed from the ignition ,such as the seat
adjustment, steerin gwheel adjustmen tor
memory function.
If children open adoor, they could cause
severe or even fatal injury to other persons; if they get out of the vehicle, they could injure
themselves when doing so or be seriously or
even fatally injured by any passing traffic.
Do not expose the child restraint system to
direct sunlight. The child restraint system's
metal parts, for example, could become very 72
TrunkOpening and closing
Page 75 of 290
hot, and
achild could be burned on these
parts. G
WARNING
Do not carry heavy or hard objectsint he
passenger compartmentort runk unless they
are firmly secured in place.
Unsecured or improperly positioned cargo
increases achild's risk of injury in the event of
R strongb raking maneuvers
R sudden changes of direction
R an accident
! The temperature in the trunk may be high.
For this reason, do not store any tempera-
ture-sensitive objectsint he trunk.
! The trunk lid swings upwards when
opened. Therefore, make sure that there is sufficient clearance above the trunk lid.
Coupe:tof ully open the trunk lid, aminimum
height of 5.5 ft (1.68 m) from the ground is
necessary.
Roadster: to fully open the trunk lid, amini-
mum height of 5.7 ft (1.75 m) from the ground
is necessary.
The trunk lid can be:
R opened automatically from outside
R opened automatically from inside
R locked separately
R unlocked with the mechanical key
R opened with the emergency release button Opening/closing the trunk
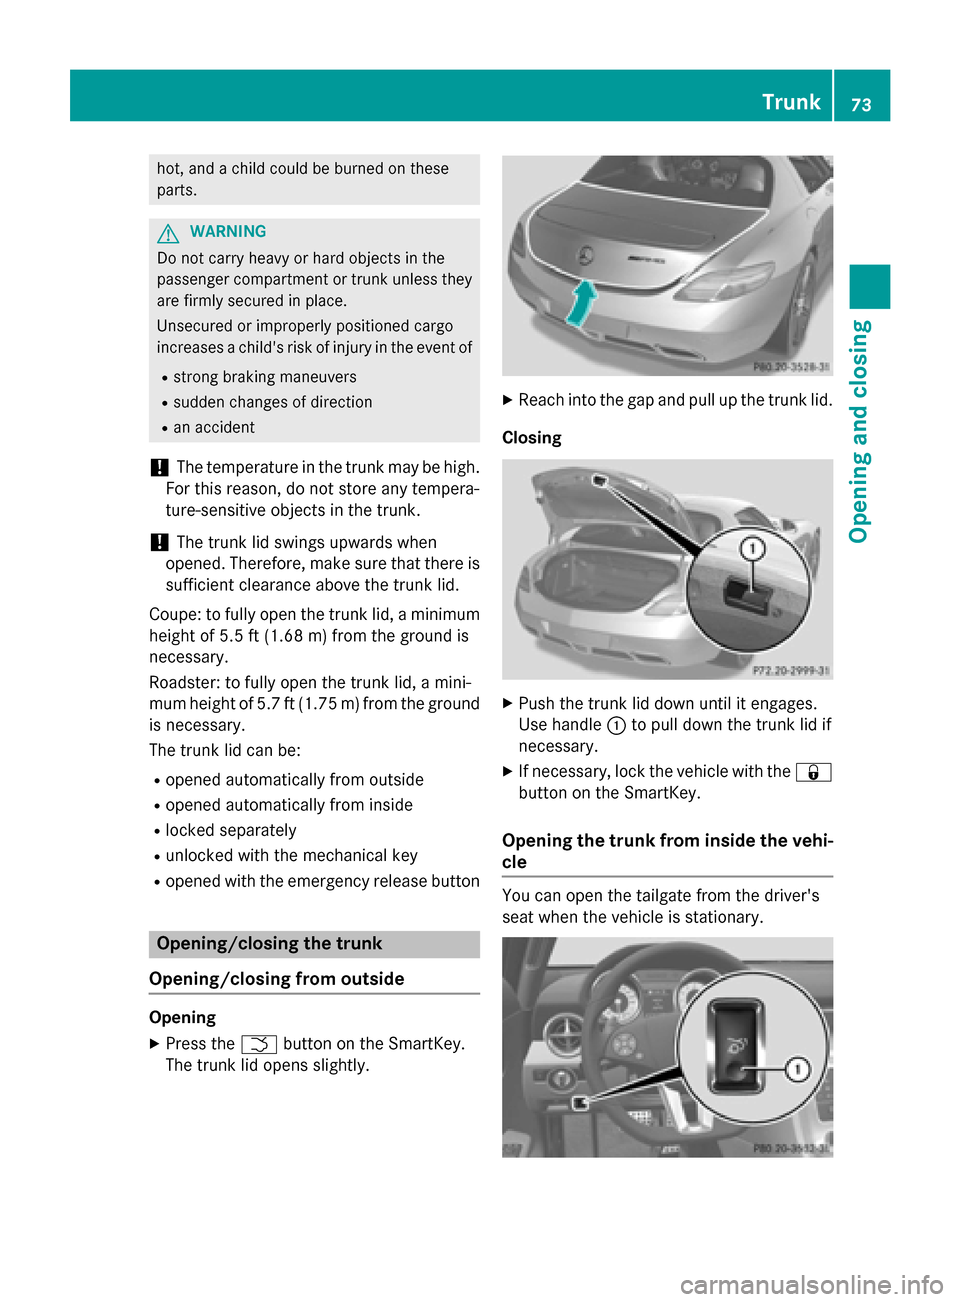
Opening/closing from outside Opening
X Press the 0054button on the SmartKey.
The trunk lid opens slightly. X
Reach into the gap and pull up the trunk lid.
Closing X
Push the trunk lid down until it engages.
Use handle 0043to pull down the trunk lid if
necessary.
X If necessary, lock the vehicle with the 0037
button on the SmartKey.
Opening the trunk from inside the vehi- cle You can open the tailgate from the driver's
seat when the vehicle is stationary. Trunk
73Opening and closing Z
Page 76 of 290
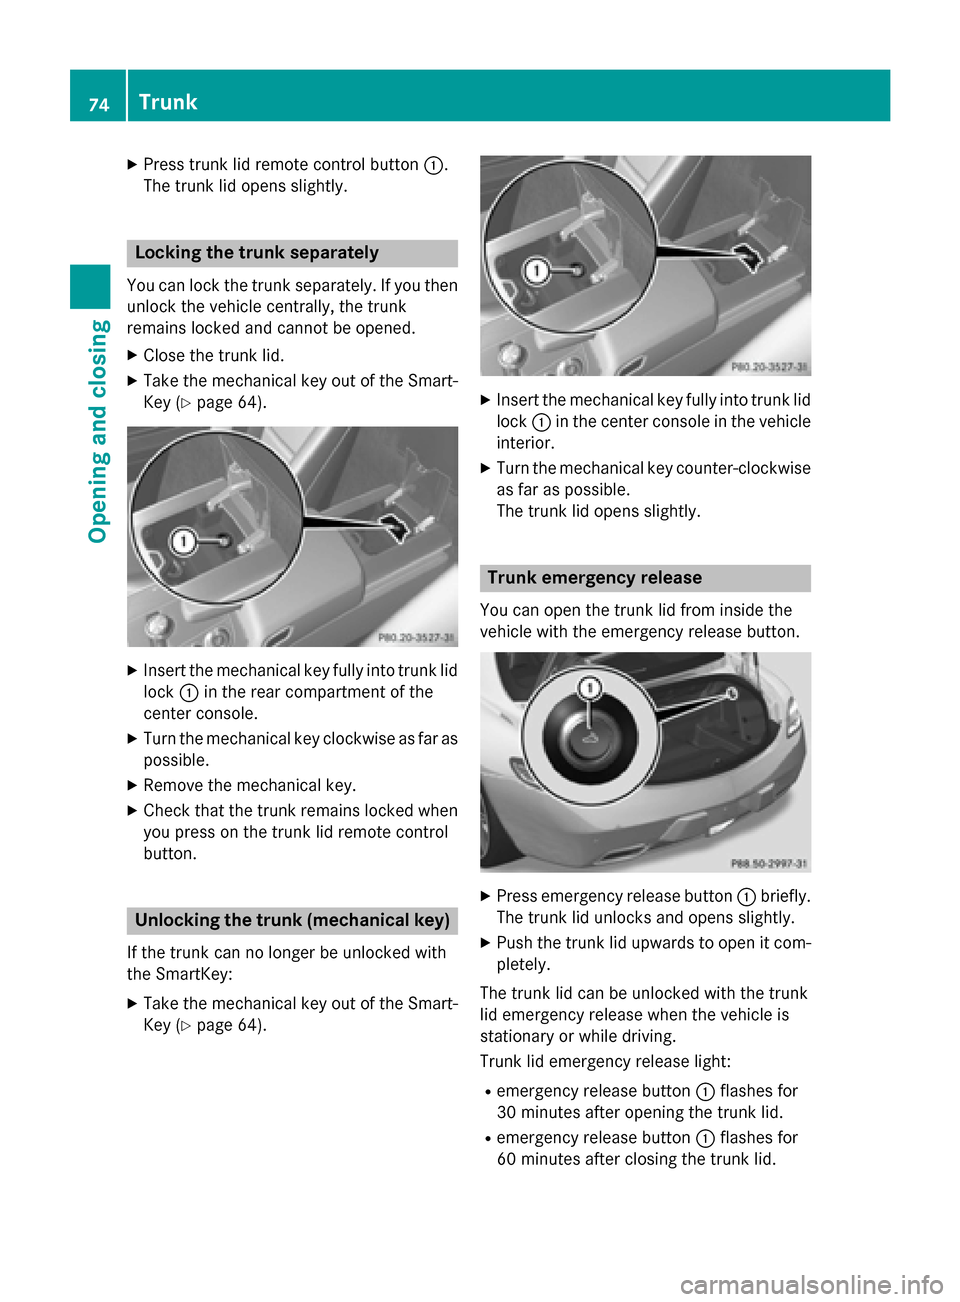
X
Press trunkl id remotecontrol button 0043.
The trunkl id opens slightly. Locking the trunk separately
You can lock the trunks eparately. If you then
unlock the vehicle centrally, the trunk
remains locked and cannot be opened.
X Close the trunkl id.
X Take the mechanical key out of the Smart-
Key (Y page 64). X
Inser tthe mechanical key fully into trunkl id
lock 0043in the rear compartment of the
center console.
X Turn the mechanical key clockwise as far as
possible.
X Remove the mechanical key.
X Check that the trunkr emains locked when
you press on the trunkl id remotecontrol
button. Unlocking the trunk (mechanical key)
If the trunkc an no longer be unlocked with
the SmartKey:
X Take the mechanical key out of the Smart-
Key (Y page 64). X
Inser tthe mechanical key fully into trunkl id
lock 0043in the center console in the vehicle
interior.
X Turn the mechanical key counter-clockwise
as far as possible.
The trunkl id opens slightly. Trunk emergency release
You can open the trunkl id from inside the
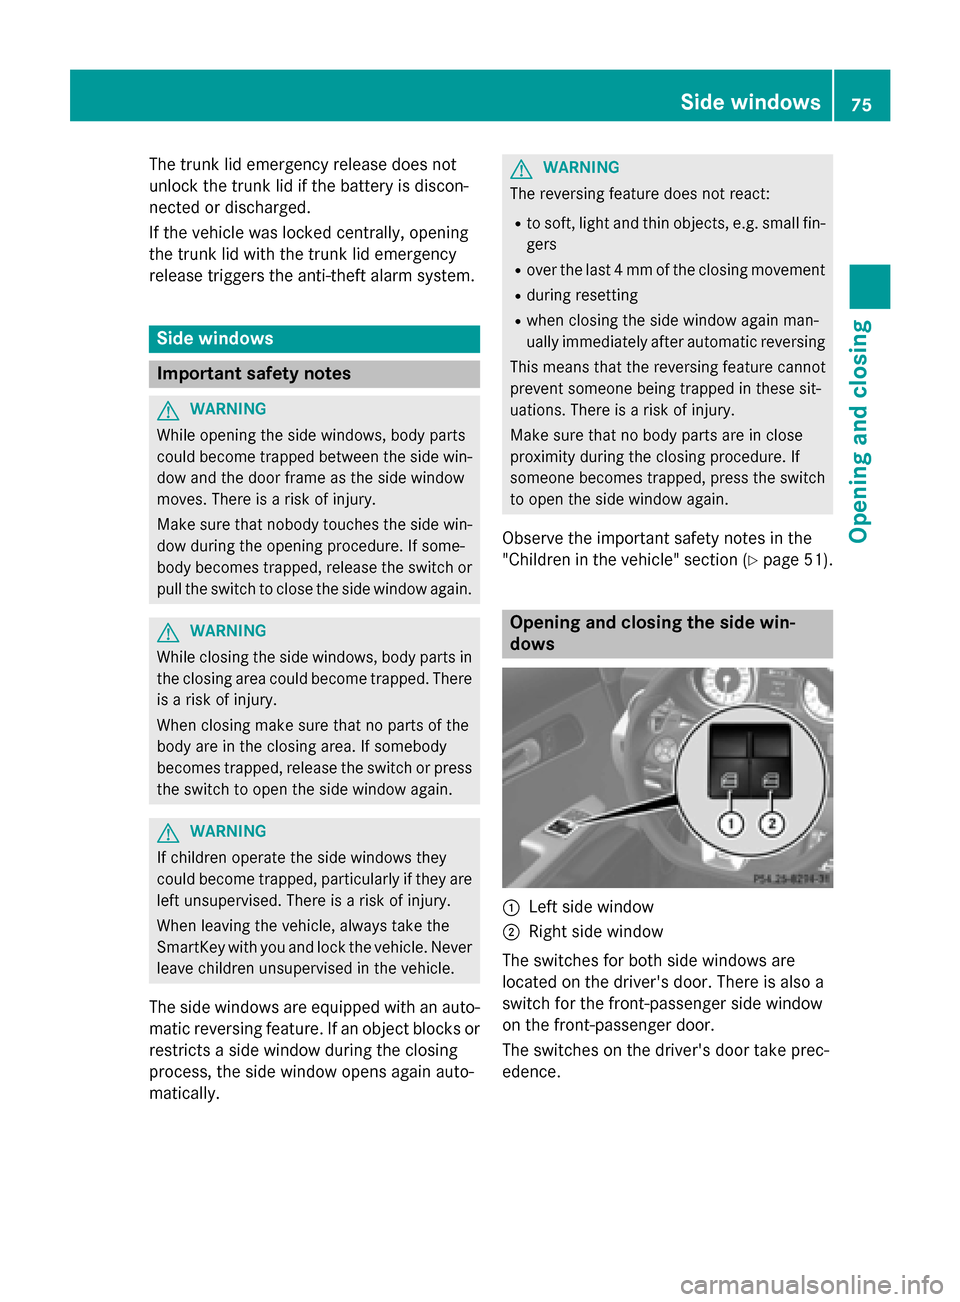
vehicle with the emergenc yrelease button. X
Press emergenc yrelease button 0043briefly.
The trunkl id unlocksand opens slightly.
X Push the trunkl id upwards to open it com-
pletely.
The trunkl id can be unlocked with the trunk
lid emergenc yrelease when the vehicle is
stationary or while driving.
Trunk lid emergenc yrelease light:
R emergenc yrelease button 0043flashes for
30 minutes after opening the trunkl id.
R emergenc yrelease button 0043flashes for
60 minutes after closing the trunkl id.74
TrunkOpening and closing
Page 77 of 290
The trunk lid emergenc
yrelease does not
unlock the trunk lid if the battery is discon-
nected or discharged.
If the vehicle was locked centrally, opening
the trunk lid with the trunk lid emergency
release triggers the anti-theft alarm system. Side windows
Important safety notes
G
WARNING
While opening the side windows, body parts
could become trapped between the side win- dow and the door frame as the side window
moves. There is arisk of injury.
Make sure that nobody touches the side win-
dow during the opening procedure. If some-
body becomes trapped, release the switch or pull the switch to close the side window again. G
WARNING
While closing the side windows, body parts in the closing area could become trapped. There is ar isk of injury.
When closing make sure that no parts of the
body are in the closing area. If somebody
becomes trapped, release the switch or press
the switch to open the side window again. G
WARNING
If children operate the side windows they
could become trapped, particularly if they are left unsupervised. There is arisk of injury.
When leaving the vehicle, alway stake the
SmartKey with you and lock the vehicle. Never
leave children unsupervised in the vehicle.
The side windows are equipped with an auto-
matic reversin gfeature. If an object blocks or
restricts aside window during the closing
process, the side window opens again auto-
matically. G
WARNING
The reversin gfeature does not react:
R to soft, light and thin objects, e.g. small fin-
gers
R over the last 4mmofthe closing movement
R during resetting
R when closing the side window again man-
ually immediately after automatic reversing
This means that the reversin gfeature cannot
prevent someone being trapped in these sit-
uations. There is arisk of injury.
Make sure that no body parts are in close
proximit yduring the closing procedure. If
someone becomes trapped, press the switch
to open the side window again.
Observe the importan tsafety notes in the
"Children in the vehicle" section (Y page 51). Opening and closing the side win-
dows
0043
Left side window
0044 Right side window
The switches for both side windows are
located on the driver's door. There is also a
switch for the front-passenger side window
on the front-passenger door.
The switches on the driver's door take prec-
edence. Side windows
75Opening and closing Z
Page 80 of 290
Problems with the side windows
G
WARNING
If you close aside window again immediately after it has been blocked or reset, the side window
closes with increased or maximum force. The reversing feature is then not active. Parts of the
body could be trapped in the closing area in the process. This poses an increased risk of injury or even fatal injury.
Make sure that no parts of the body are in the closing area. To stop the closing process, releasethe switch or push the switch again to reopen the side window. Problem
Possible causes/consequences and
0050 0050Solutions As
ide window will not
close. Objectsp
revent it from closing.
X Remove the objects.
X Close the side window. As
ide window will not
close. You cannot see the cause.
If
as ide window is obstructed during closing and reopens again
slightly:
X Immediately after the window blocks, pull the corresponding
switch again until the side window has closed.
The side window is closed with increased force.
If as ide window is obstructed again during closing and reopens
again slightly:
X Immediately after the window blocks, pull the corresponding
switch again until the side window has closed.
The side window is closed without the anti-entrapment feature. Soft top (Roadster)
Important safety notes
G
WARNING
If you do not lock the closed soft top, it may
open during ajourney. This could cause you to
lose control of the vehicle. There is arisk of an
accident.
Only drive with the soft top fully open or
locked closed. G
WARNING
If you do not fully open/close the soft top, the soft-top hydraulics depressurize after ashort
time. This causes the soft top to lower unex- pectedly and may cause you or others to be
trapped. There is arisk of injury.
Always open or close the soft top completely.
You can open or close the soft top:
R if the vehicle is stationary or
R if the speed does not exceed 30 mph
(50 km/h)
If there is astrongh ead wind, it may not be
possible to close the soft top fully. In order to close the soft top fully, reduce speed or stop.
For safety reasons, Mercedes-Benz recom-
mends that you only open or close the soft top
when the vehicle is stationary. 78
Soft top (Roadster)Opening and closing
Page 86 of 290
Useful information
i This Operator's Manual describes all
models and all standard and optional equip- ment of your vehicle available at the time of
publication of the Operator's Manual.
Country-specific differences are possible.
Please not ethat your vehicle may not be
equipped with all feature sdescribed. This
also applies to safety-related system sand
functions.
i Please read the information on qualified
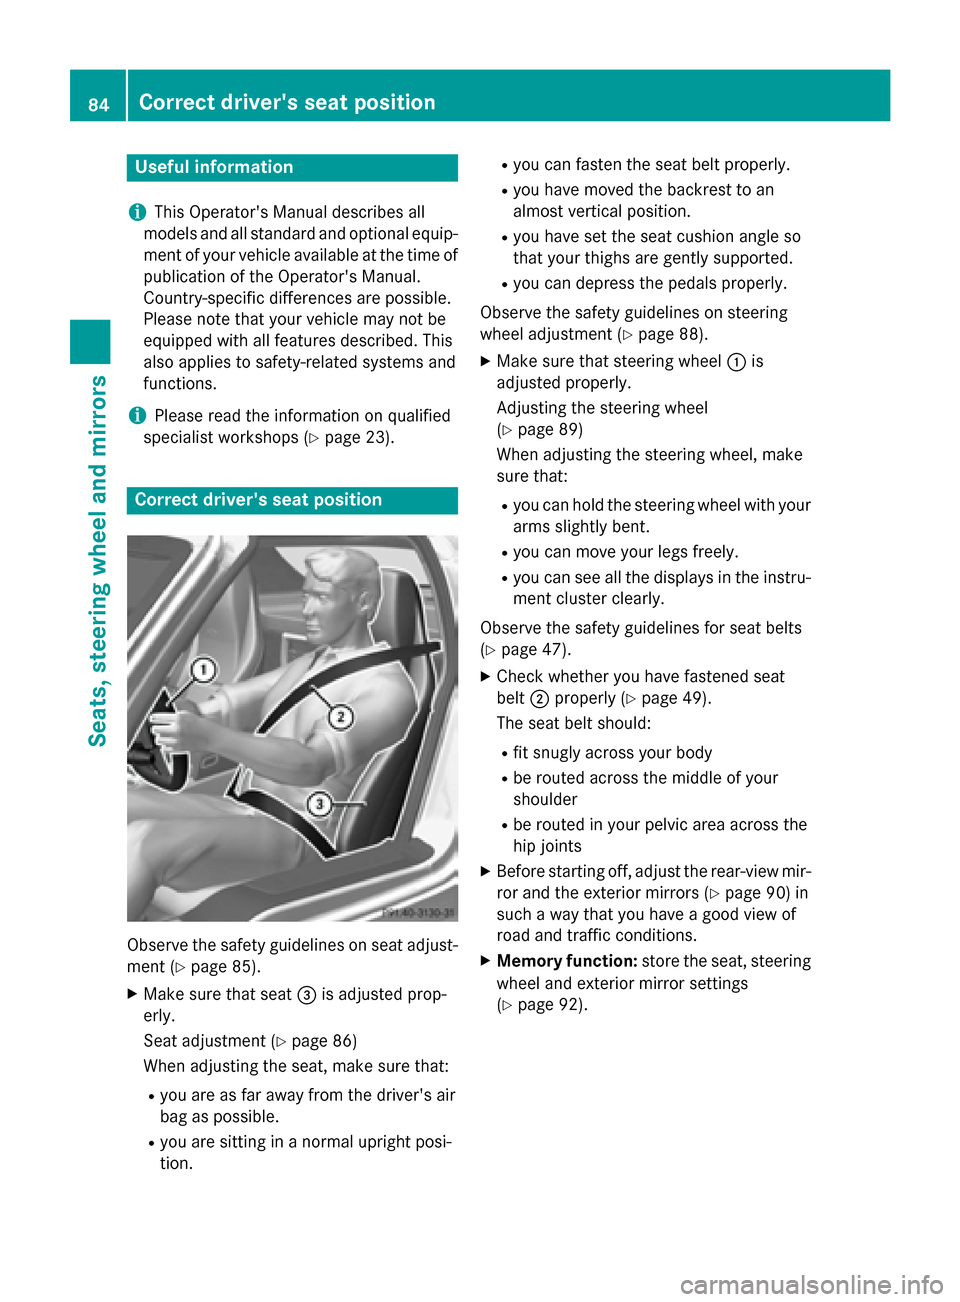
specialist workshops (Y page 23).Correct driver's seat position
Observ
ethe safet yguidelines on seat adjust-
ment (Y page 85).
X Make sure that seat 0087is adjusted prop-
erly.
Seat adjustment (Y page 86)
When adjusting the seat, make sure that:
R you are as far away from the driver' sair
bag as possible.
R you are sitting in anormal upright posi-
tion. R
you can faste nthe seat belt properly.
R you have moved the backrest to an
almost vertical position.
R you have set the seat cushion angle so
that your thighs are gently supported.
R you can depress the pedals properly.
Observ ethe safet yguidelines on steering
wheel adjustment (Y page 88).
X Make sure that steering wheel 0043is
adjusted properly.
Adjustin gthe steering wheel
(Y page 89)
When adjusting the steering wheel, make
sure that:
R you can hold the steering wheel with your
arms slightly bent.
R you can move your legs freely.
R you can see all the displays in the instru-
ment cluster clearly.
Observ ethe safet yguidelines for seat belts
(Y page 47).
X Check whether you have fastened seat
belt 0044properly (Y page 49).
The seat belt should:
R fit snugly across your body
R be routed across the middle of your
shoulder
R be routed in your pelvic area across the
hip joints
X Before starting off, adjust the rear-view mir-
ror and the exterior mirrors (Y page 90) in
such away that you have agood view of
road and traffic conditions.
X Memor yfunction: storethe seat, steering
wheel and exterior mirro rsettings
(Y page 92). 84
Correct driver's seat positionSeats, steering wheel and mirrors
Page 89 of 290
0043
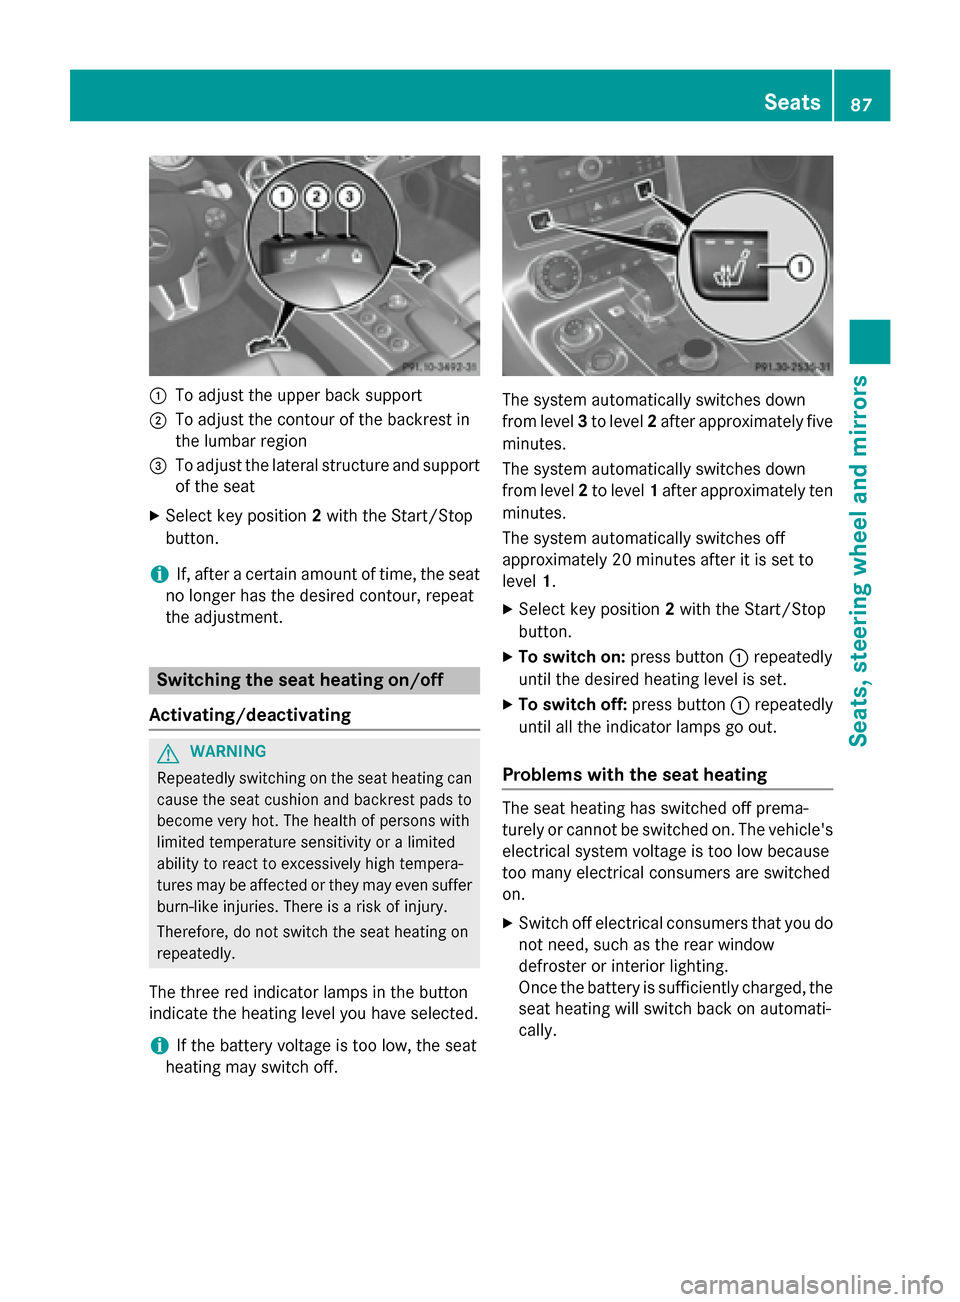
To adjust the upper back support
0044 To adjust the contour of the backrest in
the lumbar region
0087 To adjust the lateral structure and support
of the seat
X Select key position 2with the Start/Stop
button.
i If, after
acertain amount of time, the seat
no longer has the desired contour, repeat
the adjustment. Switching the seat heating on/off
Activating/deactivating G
WARNING
Repeatedly switchin gonthe seat heating can
cause the seat cushion and backrest pads to
become very hot. The health of persons with
limited temperature sensitivity or alimited
ability to react to excessively high tempera-
tures may be affected or they may even suffer burn-lik einjuries. There is arisk of injury.
Therefore, do not switch the seat heating on
repeatedly.
The three red indicator lamps in the button
indicate the heating level you have selected.
i If the battery voltage is too low, the seat
heating may switch off. The system automatically switches down
from level
3to level 2after approximately five
minutes.
The system automatically switches down
from level 2to level 1after approximately ten
minutes.
The system automatically switches off
approximately 20 minutes after it is set to
level 1.
X Select key position 2with the Start/Stop
button.
X To switch on: press button0043repeatedly
until the desired heating level is set.
X To switch off: press button0043repeatedly
until all the indicator lamps go out.
Problems with the seat heating The seat heating has switched off prema-
turely or cannot be switched on. The vehicle's
electrical system voltage is too low because
too many electrical consumers are switched
on.
X Switc hoff electrical consumers that you do
not need, such as the rear window
defroster or interior lighting.
Oncet he battery is sufficiently charged, the
seat heating will switch back on automati-
cally. Seats
87Seats, steering wheel and mirrors Z
Page 90 of 290
AIRSCARF (Roadster)
G
WARNING
When AIRSCARF is switched on ,veryh ot air
can flo wfromt hevents in th ehead restraints.
This could result in burn sintheimmediate
vicinity of th eair vents .There is ariskofi njury.
Reduc ethe heater output before it becomes
to oh ot.
The AIRSCARF function warm sthe head and
neck area of vehicl eoccupant swithw arm air.
The warm air flows out of th ehole sint hehead
restraints.
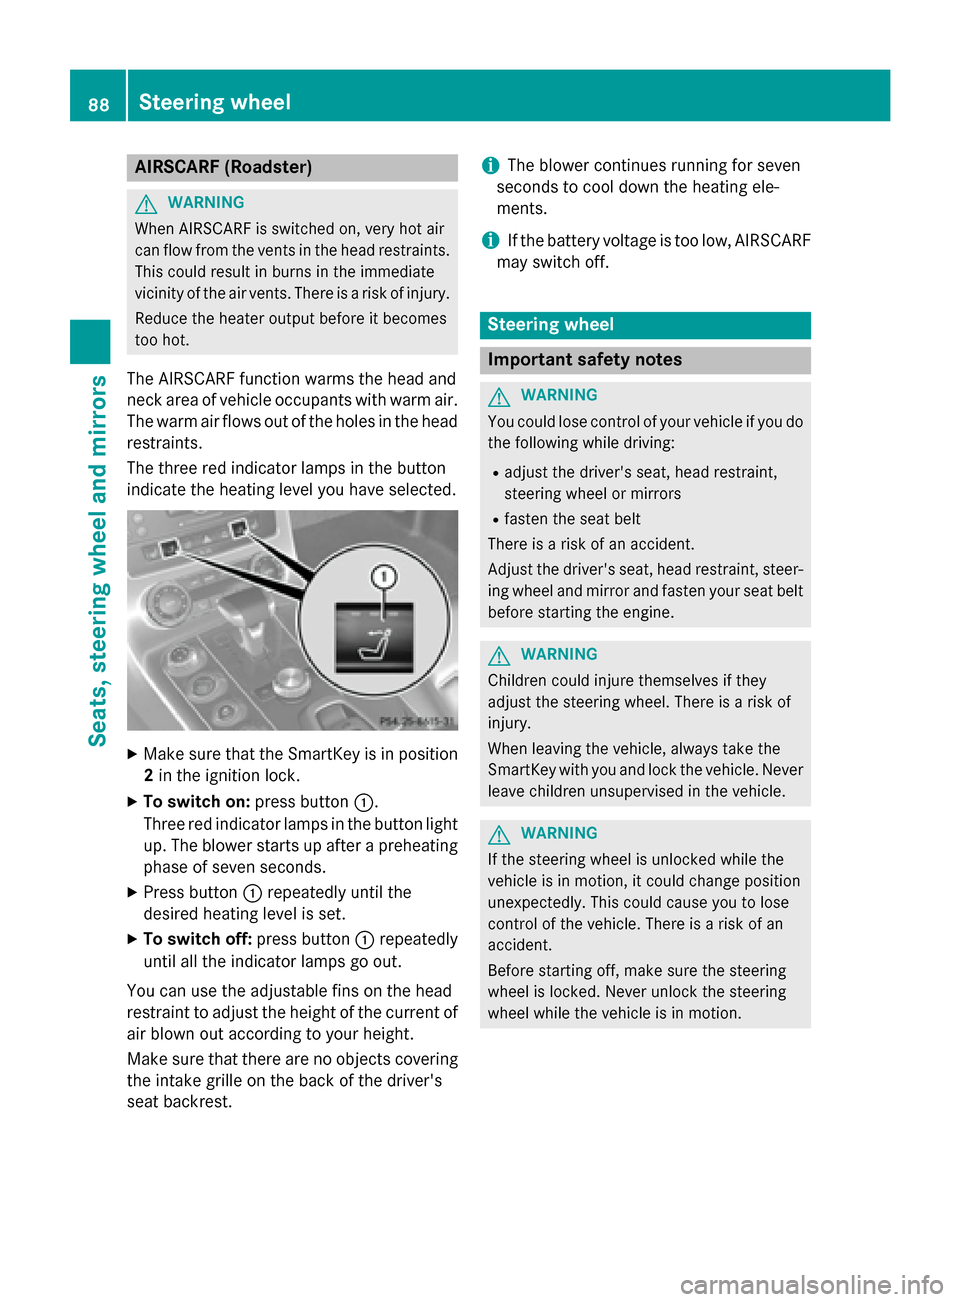
The three red indicator lamp sinthebutton
indicat ethe heating level you hav eselected. X
Mak esuret hatthe SmartKey is in position
2 in th eignition lock.
X To switch on: press button0043.
Three red indicator lamp sinthebutto nlight
up. The blowe rstartsupa fterapreheating
phas eofs even seconds.
X Press button 0043repeatedly until the
desired heating level is set.
X To switch off: press button0043repeatedly
until all th eindicator lamp sgoout.
You can use th eadjustable fin sonthehead
restrain ttoadjust th eheight of th ecurren tof
air blown out according to your height.
Mak esuret hatthe re are no objects covering
th ei ntake grille on th ebackoft hedriver's
seat backrest. i
The blowe
rcontinue srunnin gfor seven
seconds to cool down th eheating ele-
ments.
i If th
ebattery voltag eistoolow, AIRSCARF
may switch off. Steering wheel
Important safety notes
G
WARNING
You could lose control of your vehicl eifyou do
th ef ollowin gwhile driving:
R adjust th edriver's seat ,head restraint,
steering whee lormirrors
R faste nthe seat belt
There is ariskofana ccident.
Adjus tthe driver's seat ,head restraint, steer-
ing whee land mirror and faste nyour seat belt
before starting th eengine. G
WARNING
Children could injure themselves if they
adjust th esteering wheel. There is ariskof
injury.
When leaving th evehicle, always tak ethe
SmartKey wit hyou and loc kthe vehicle. Never
leav echildren unsupervised in th evehicle. G
WARNING
If th esteering whee lisunlocke dwhile the
vehicl eisinm otion,itcould chang eposition
unexpectedly. This could caus eyou to lose
control of th evehicle. There is ariskofan
accident.
Befor estarting off ,makes uret he steering
whee lislocked. Never unloc kthe steering
whee lwhile th evehicl eisinm otion. 88
Steering wheelSeats
,steering wheel and mirrors