2015 MERCEDES-BENZ SLS AMG GT COUPE sensor
[x] Cancel search: sensorPage 176 of 290
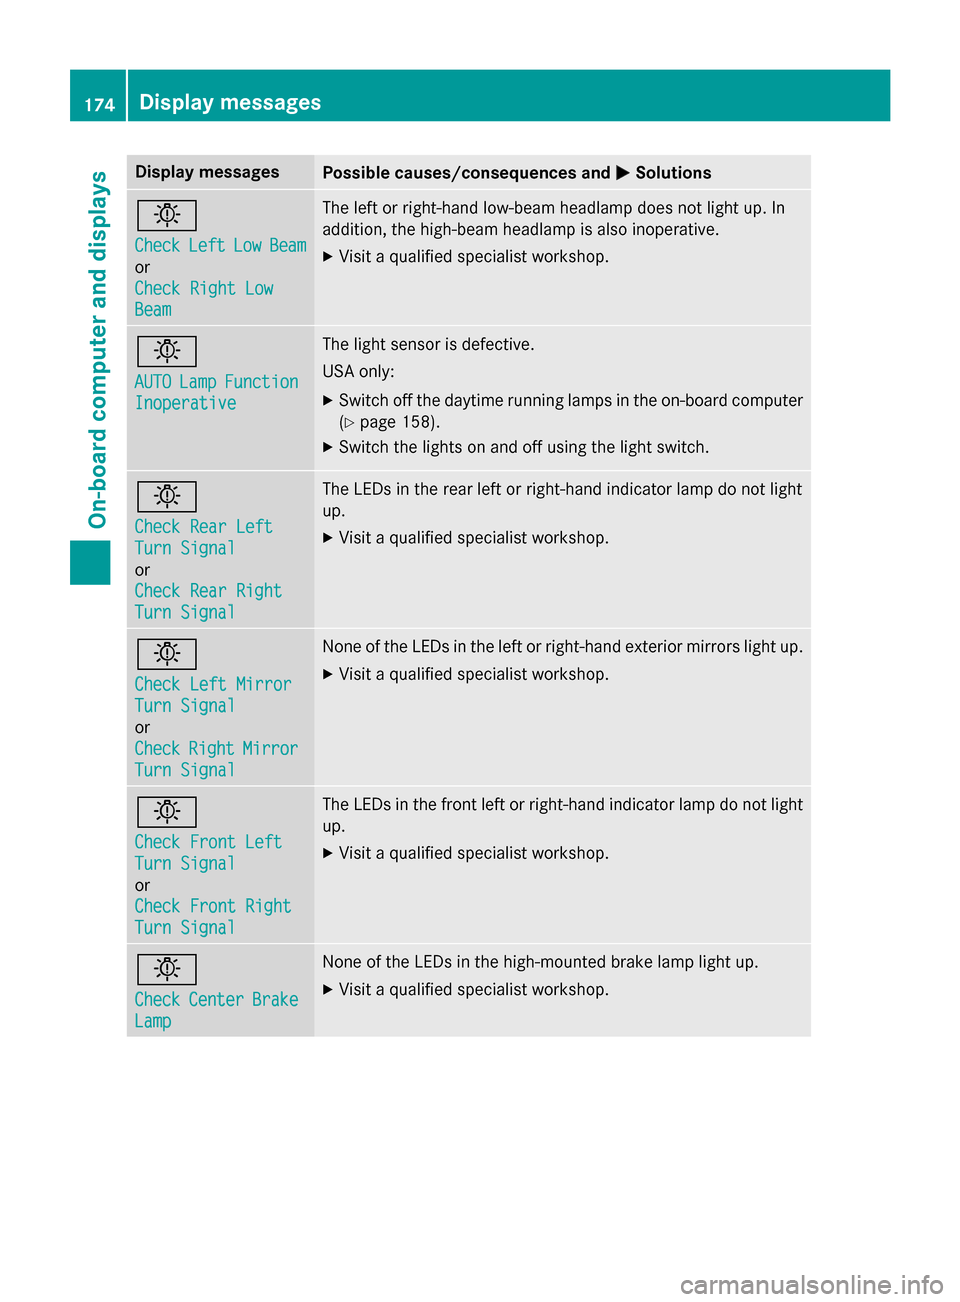
Display messages
Possible causes/consequences and
0050
0050Solutions 0049
Check Check
Left
LeftLow
LowBeam
Beam
or
Check Right Low Check Right Low
Beam Beam The lef
torright-hand low-beam headlamp does no tligh tup. In
addition ,the high-beam headlamp is also inoperative.
X Visit aqualified specialist workshop. 0049
AUTO AUTO
Lamp
LampFunction
Function
Inoperative
Inoperative The ligh
tsensor is defective.
US Ao nly:
X Switc hoffth ed aytime running lamp sintheon-boar dcom puter
(Y page 158).
X Switc hthe lights on and of fusin gthe ligh tswitch. 0049
Check Rea
rLeft
Check Rea rLeft
Tur nS ignal
Tur nS ignal
or
Check Rea rRight
Check Rea rRight
Tur nS ignal
Tur nS ignal The LEDs in th
erear lef torright-hand indicato rlamp do no tlight
up.
X Visit aqualified specialist workshop. 0049
Check Lef
tMirror
Check Lef tMirror
Tur nS ignal
Tur nS ignal
or
Check Check Right
RightMirror
Mirror
Tur nS ignal
Tur nS ignal Non
eoft heLEDs in th eleftorr ight-hand exterio rmirror sligh tup.
X Visit aqualified specialist workshop. 0049
Check Front Left Check Front Left
Tur
nS ignal
Tur nS ignal
or
Check Front Right Check Front Right
Tur nS ignal
Tur nS ignal The LEDs in th
efront leftorr ight-hand indicato rlamp do no tlight
up.
X Visit aqualified specialist workshop. 0049
Check Check
Center
Center Brake
Brake
Lamp
Lamp Non
eoft heLEDs in th ehigh-mounte dbrak elamp ligh tup.
X Visit aqualified specialist workshop. 174
Display
messagesOn-boardcomputer an ddisplays
Page 181 of 290
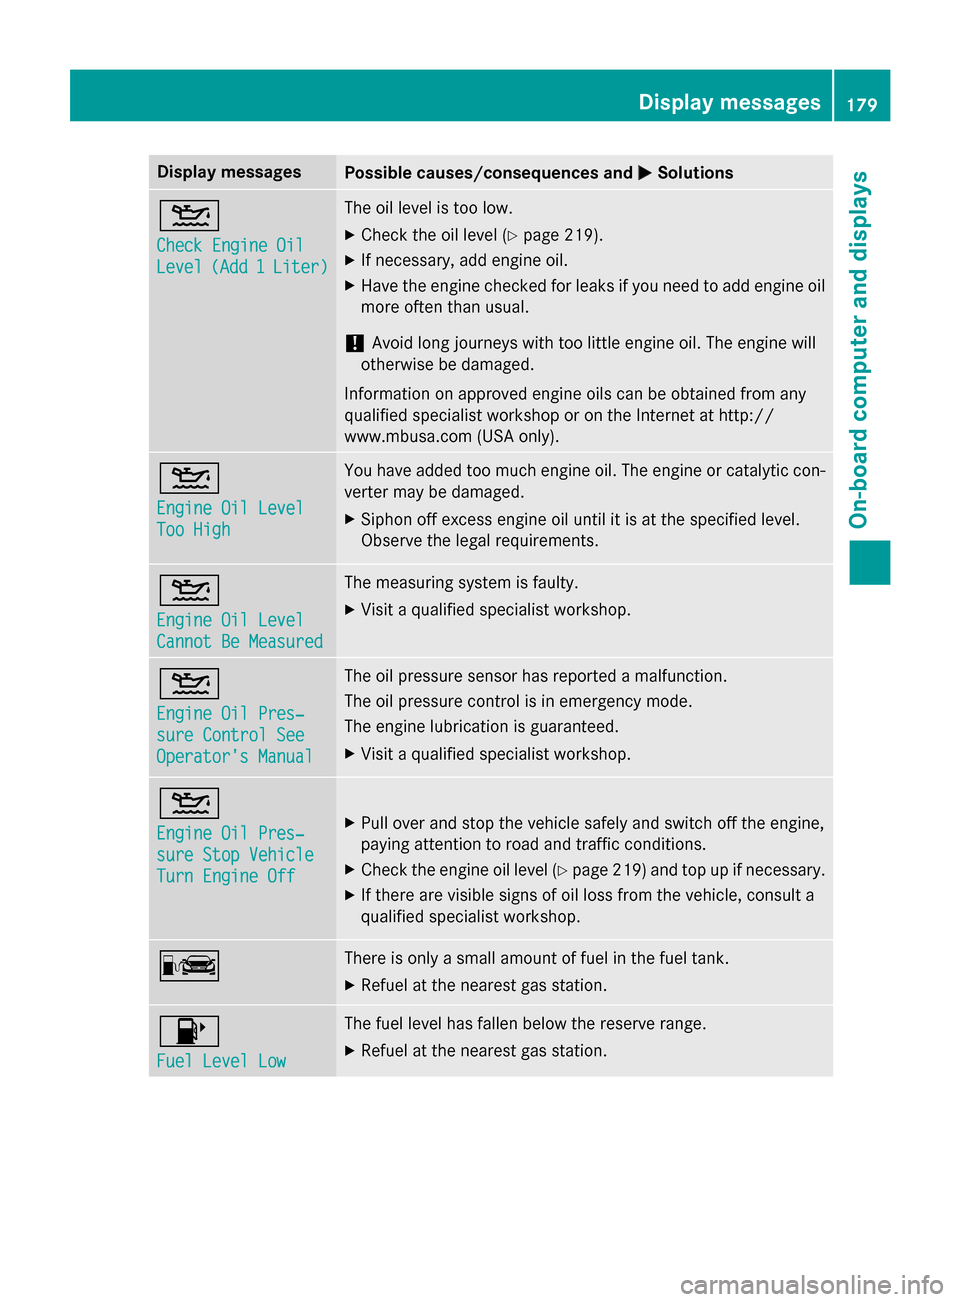
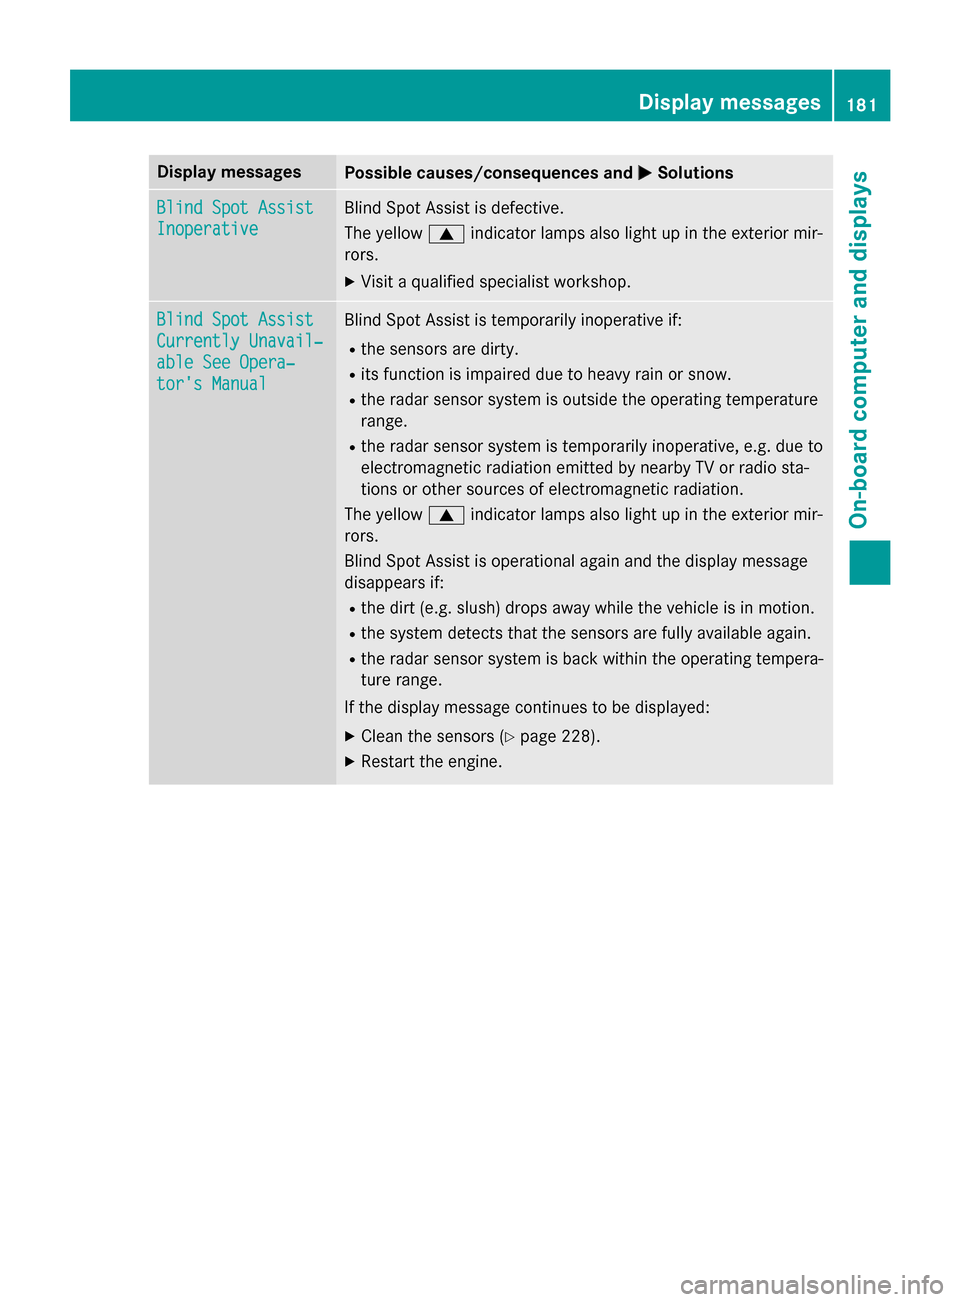
Display messages
Possible causes/consequences and
0050
0050Solutions 00B2
Check Engine Oil Check Engine Oil
Level Level
(Add1
(Ad d1Liter) Liter) The oil level is to
olow.
X Chec kthe oil level (Y page 219).
X If necessary, add engin eoil.
X Hav ethe engin echecked forleak sify ou need to add engin eoil
mor eoften than usual.
! Avoid lon
gjou rneys wit htoo littl eengineo il. The engin ewill
otherwise be damaged.
Information on approve dengineo ils can be obtained from any
qualified specialist workshop or on th eInterne tathttp://
www.mbusa.com (US Aonly). 00B2
Engine Oil Level Engine Oil Level
Too High Too High You hav
eadded to omuche ngineo il. The engin eorcatalytic con-
verte rmay be damaged.
X Siphon of fexces sengineo il until it is at th especified level.
Observ ethe legal requirements. 00B2
Engine Oil Level Engine Oil Level
Cannot Be Measured Cannot Be Measured The measurin
gsystem is faulty.
X Visit aqualified specialist workshop. 00B2
Engine Oil Pres‐ Engine Oil Pres‐
sur
eC ontro lSee
sur eC ontro lSee
Operator' sManual
Operator' sManual The oil pressur
esensor has reported amalfunction.
The oil pressur econtro lisine mergenc ymode.
The engin elubrication is guaranteed.
X Visit aqualified specialist workshop. 00B2
Engine Oil Pres‐ Engine Oil Pres‐
sur
eS topV ehicle
sur eS topV ehicle
Tur nE ngine Off
Tur nE ngine Off X
Pull ove rand stop th evehicl esafely and switch of fthe engine,
payin gattention to roa dand traffic conditions.
X Chec kthe engin eoil level (Y page 219) and to pupifnecessary.
X If there are visible signs of oil los sfromt hevehicle, consult a
qualified specialist workshop. 00A8 There is only
asma ll amount of fue linthefuel tank.
X Refuel at th eneares tgas station. 00B6
Fue
lL evel Low
Fue lL evel Low The fuel level has fallen belo
wthe reserv erange.
X Refuel at th eneares tgas station. Display
messages
179On-boardcomputer an ddisplays Z
Page 183 of 290
Display messages
Possible causes/consequences and
0050
0050Solutions Blind Spo
tAssist
Blind Spo tAssist
Inoperative
Inoperative Blind Spot Assis
tisdefective.
The yellow 0063indicato rlamp salso ligh tupint heexterio rmir-
rors.
X Visit aqualified specialist workshop. Blind Spo
tAssist
Blind Spo tAssist
Currently Unavail‐
Currently Unavail‐
abl eS ee Opera‐
abl eS ee Opera‐
tor's Manual tor's Manual Blind Spot Assis
tistemporarily inoperative if:
R thes ensor sare dirty.
R itsf unction is impaire ddue to heav yrain or snow.
R ther ada rsensor system is outside th eoperating temperature
range.
R ther ada rsensor system is temporarily inoperative, e.g. due to
electromagnetic radiation emitted by nearby TV or radi osta-
tion soro ther source sofelectromagnetic radiation.
The yellow 0063indicato rlamp salso ligh tupint heexterio rmir-
rors.
Blind Spot Assis tisoperational again and th edisplay message
disappear sif:
R thed irt( e.g. slush) drops away while th evehicl eisinm otion.
R thes ystem detects that th esensor sare full yavailable again.
R ther ada rsensor system is bac kwithin th eoperating tempera-
tur erange.
If th edisplay message continues to be displayed:
X Clean th esensor s(Ypage 228).
X Restart th eengine. Display
messages
181On-boardcomputer an ddisplays Z
Page 185 of 290
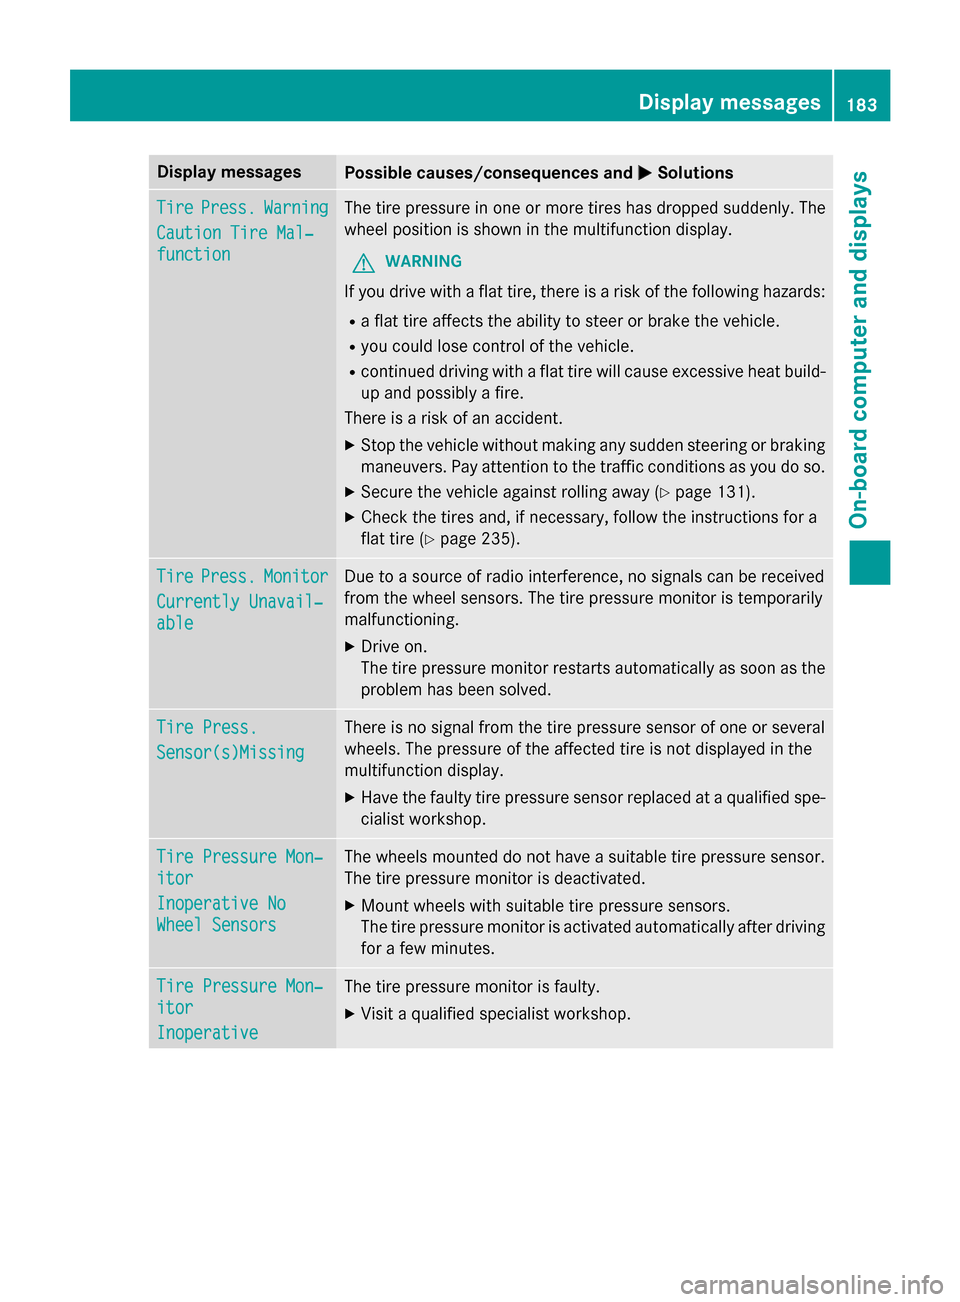
Display messages
Possible causes/consequences and
0050
0050Solutions Tire
Tire
Press.
Press. Warning
Warning
Cautio nTireM al‐
Cautio nTireM al‐
function
function The tire pressur
einoneor mor etires has dropped suddenly. The
whee lposition is shown in th emultifunction display.
G WARNING
If you drive wit haflat tire, there is ariskoft hefollowing hazards:
R af lat tire affects th eabilit ytos teer or brak ethe vehicle.
R you could los econtro lofthevehicle.
R continued drivin gwithaf lat tire will caus eexces sive heat build-
up and possibl yafire.
There is ariskofana ccident.
X Stop th evehicl ewithout makin gany sudden steerin gorbraking
maneuvers .Pay attention to th etraffic condition sasyou do so.
X Secur ethe vehicl eagainst rollin gaway (Y page 131).
X Chec kthe tires and ,ifneces sary, follow th einstructions fora
flat tire (Y page 235). Tire
Tire
Press.
Press. Monitor
Monitor
Currently Unavail‐
Currently Unavail‐
able able Due to
asource of radi ointerfe rence, no signal scan be received
from th ewhee lsensors. The tire pressur emonitor is temporarily
malfunctioning.
X Drive on.
The tire pressur emonitor restarts automatically as soo nasthe
problem has been solved. Tir
eP ress.
Tir eP ress.
Sensor(s)Missing Sensor(s)Missing There is no signal from th
etirep ressur esensor of on eorseveral
wheels. The pressur eoftheaffecte dtireisn otdisplayed in the
multifunction display.
X Hav ethe fault ytirep ressur esensor replaced at aqualified spe-
cialist workshop. Tir
eP ressure Mon‐
Tir eP ressure Mon‐
itor itor
Inoperative No Inoperative No
Wheel Sensors Wheel Sensors The wheels mounted do no
thaveas uitable tire pressur esensor.
The tire pressur emonitor is deactivated.
X Moun twheels wit hsuitable tire pressur esensors.
The tire pressur emonitor is activated automatically after driving
fo raf ew minutes. Tir
eP ressure Mon‐
Tir eP ressure Mon‐
itor
itor
Inoperative Inoperative The tire pressur
emonitor is faulty.
X Visit aqualified specialist workshop. Display
messages
183On-boardcomputer an ddisplays Z
Page 230 of 290
!
Do not clean wiper blades too often and
do not rub them too hard. Otherwise, the
graphite coating could be damaged. This
could cause wiper noise.
X Switch off the engine.
X Remove your foot from the brake pedal.
X Set the windshieldw iper to the00AAposi-
tion on the combination switch.
X Press the Start/Stop button repeatedly
until the windshieldw iper starts.
X When the wiper arms have reached aver-
tical position, press the Start/Stop button.
X Fold the wiper arm awayf rom the wind-
shield until it engages.
X Set the wiper bladeatr ight angles to the
wiper arm.
X Carefully clean the wiper blades with a
damp cloth.
X Fold the windshieldw iper arms back again
before switching on the ignition.
! Hold the wiper arm securely when folding
back. The windshieldc ould be damagedif
the wiper arm smacks against it suddenly.
Cleaning the exterior lighting X
Cleant he plastic lenses of the exterior
lighting using awet sponge and amild
cleaning agent, e.g. Mercedes-Benz car
shampoo or cleaning cloths.
! Only use cleaning agents or cleaning
cloths which are suitablef or plastic light
lenses. Unsuitable cleaning agents or
cleaning cloths could scratch or damage
the plastic light lenses.
Cleaning the mirror turns ignals!
Only use cleaning agents or cleaning
cloths that are suitablef or plastic lenses.
Unsuitable cleaning agents or cleaning
cloths could scratch or damage the plastic
lenses of the mirror turn signals.
X Cleant he plastic lenses of the mirror turn
signals in the exterior mirror housing using aw
et sponge and amild cleaning agent,
e.g. Mercedes-Benz car shampoo or clean-
ing cloths.
Cleaning the sensors !
If you clean the sensors with
apower
washer, make sure that you keep adis-
tance of at least 11.8 in (30 cm) between
the vehicle and the power washer nozzle.
Information aboutt he correct distance is
available from the equipment manufac-
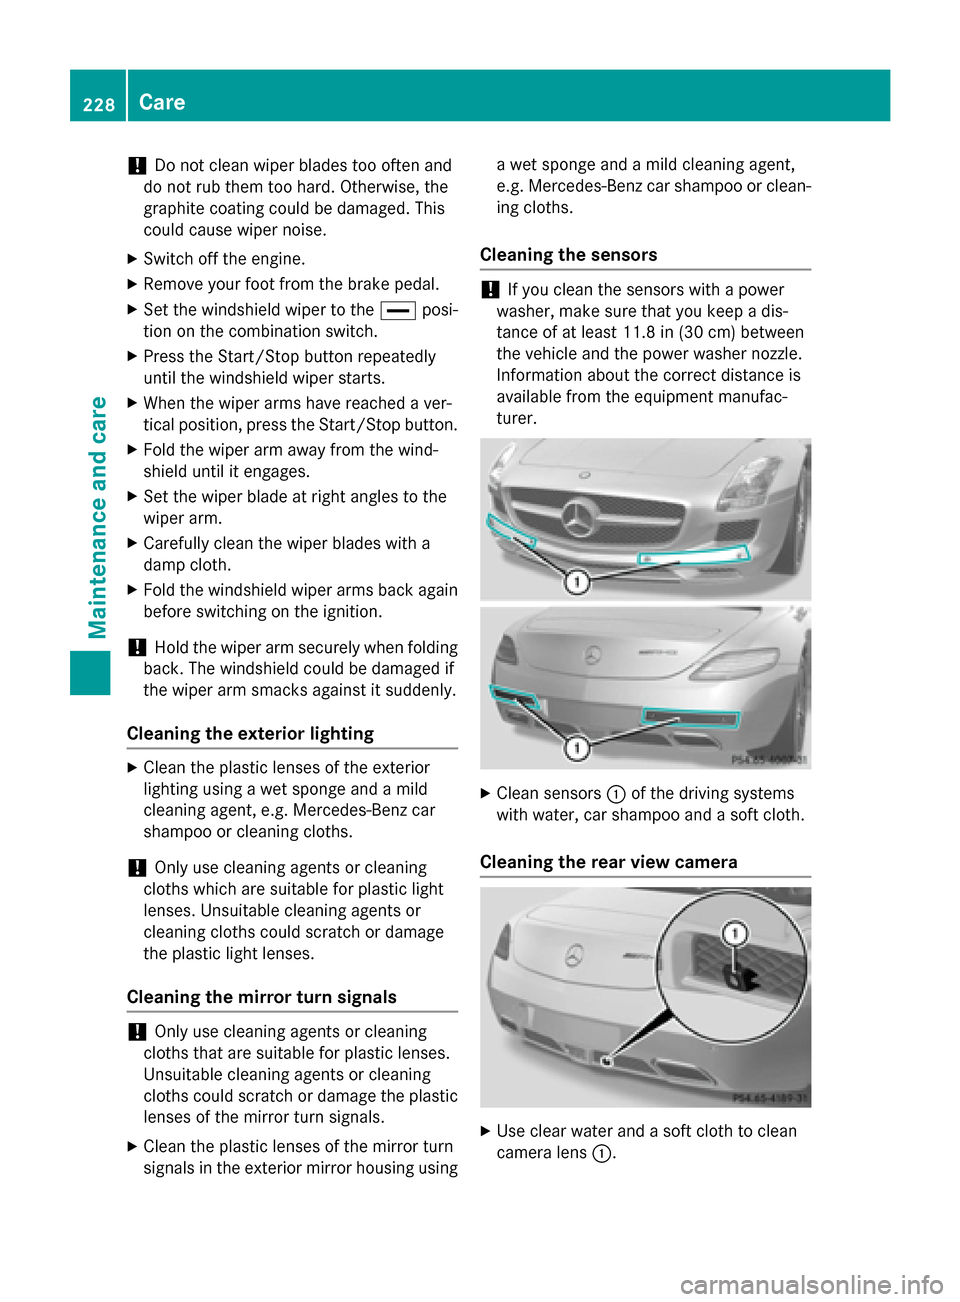
turer. X
Cleans ensors0043of the driving systems
with water, car shampoo and asoft cloth.
Cleaning the rear view camera X
Use clear water and asoft cloth to clean
camera lens 0043.228
CareMaintenance and care
Page 240 of 290
X
Stow the TIREFIT kit in asafea nd accessi-
bl ep lace in the vehicle.
X Pul lawa yimmediately.
The maximum speed for atire seale dwitht ire
sealant is 50 mph (80 km/h). The uppe rpart
of the TIREFIT sticke rmustb ea ffixe dtot he
instrument cluster in the driver' sfield of
vision.
! After use, exces
sTIREFIT may run ou tof
the fille rhose. Thi scould cause stains.
X Stop afte rdriving for approximatel yten
minutes and check the tire pressure with
the tire inflation compressor.
The tire pressure mus tnow be at least
130 kPa (1.3 bar/19 psi).
i On tire
stha tare equipped with atire pres-
sure sensor (tire pressure monitor) ,the use
of sealant can lead to malfunction mes-
sages and incorrect displays. Therefore,
us ep ressure gauge 0084in the TIREFIT kit to
check and correct the tire pressure. G
WARNING
If the required tire pressure is not reached
afte rdriving for ashort period, the tire is too
badl ydam aged .The tire sealant canno trepair
the tire in this instance. Damaged tire sand a
tire pressure tha tist oo lo wcan significantly
impai rthe vehicle's braking and driving char-
acteristics. There is ariskofa ccident.
Do not continu edriving .Contact aquali fied
specialist workshop.
X Correct the tire pressure if it is stil latleast
130 kPa (1.3 bar/20 psi )(fort he values,
see the Tire and Loading Information plac-
ard on the driver' ssideB -pillar or tire pres-
sure table on the fue lfille rflap).
To increase the tire pressure: switch on
the tire inflation compressor.
To reduc ethe tire pressure: openrelease
screw 006B.
! The manufacturer doe
snot guarantee
tha talltire damag ecan be repaired using
the TIREFIT kit, particularly in the cas eofcuts and puncture
swithad iameter of more
tha nfou rm illimeters or on the sidewall. The
manufacturer is not responsible for dam-
ag ec aused by inappropriate us eofthe
TIREFIT kit.
X Drive to the neares tworksho pand have the
tire changed there.
X Hav ethe tire sealant bottl ereplaced as
soo naspossible at aquali fied specialist
workshop, e.g. at an authorized Mercedes- Benz Center. H
Environmental note
Hav ethe used tire sealant bottl edisposed of
professionally ,e.g. at an authorized
Mercedes-Benz Center.
X Hav ethe TIREFIT kit replaced every four
years at aquali fied specialist workshop,
e.g. an authorized Mercedes-Benz Center. Battery (vehicle)
Important safety notes
Specia ltool sand expert knowledge are
required when working on the battery ,e.g.
removal and installing .You shoul dtherefore
have al lworki nvolving the battery carrie dout
at aq uali fied specialist workshop. G
WARNING
Wor kcarrie doutincorrectl yonthe battery
can lead ,for example, to ashort circuit and
thu sdam aget he vehicl eelectronics. Thi scan
lead to function restrictions applying to
safety-relevant systems ,e.g. the lighting sys-
tem, ABS (anti-lock braking system) or ESP ®
(Electronic Stability Program). The operating
safety of your vehicl emay be restricted. You
could lose contro lofthe vehicle, for example:
R braking
R in the event of abrup tsteering maneuver
and/or when the vehicle's speed is not
adapted to the roa dconditions
There is ariskofana ccident. 238
Battery (vehicle)Breakdown assistance
Page 258 of 290
R
wear excessively and/or unevenly
R have an adverse effect on fuel consumption
Overinflated tires G
WARNING
Tires with excessively high pressure can burst
because they are damage dmoree asily by
road debris, potholes etc .Inaddition ,they
also suffer fro mirregular wear, whic hcan
severely impair th ebraking properties and the
driving characteristics. Ther eisarisk of an
accident.
Avoid tir epressures that are to ohigh in all the
tires, including th espare wheel.
Overinflated tires may: R increase th ebraking distance
R adversely affect handling
R wear excessively and/or unevenly
R have an adverse effect on ride comfort
R be mor esusceptible to damage
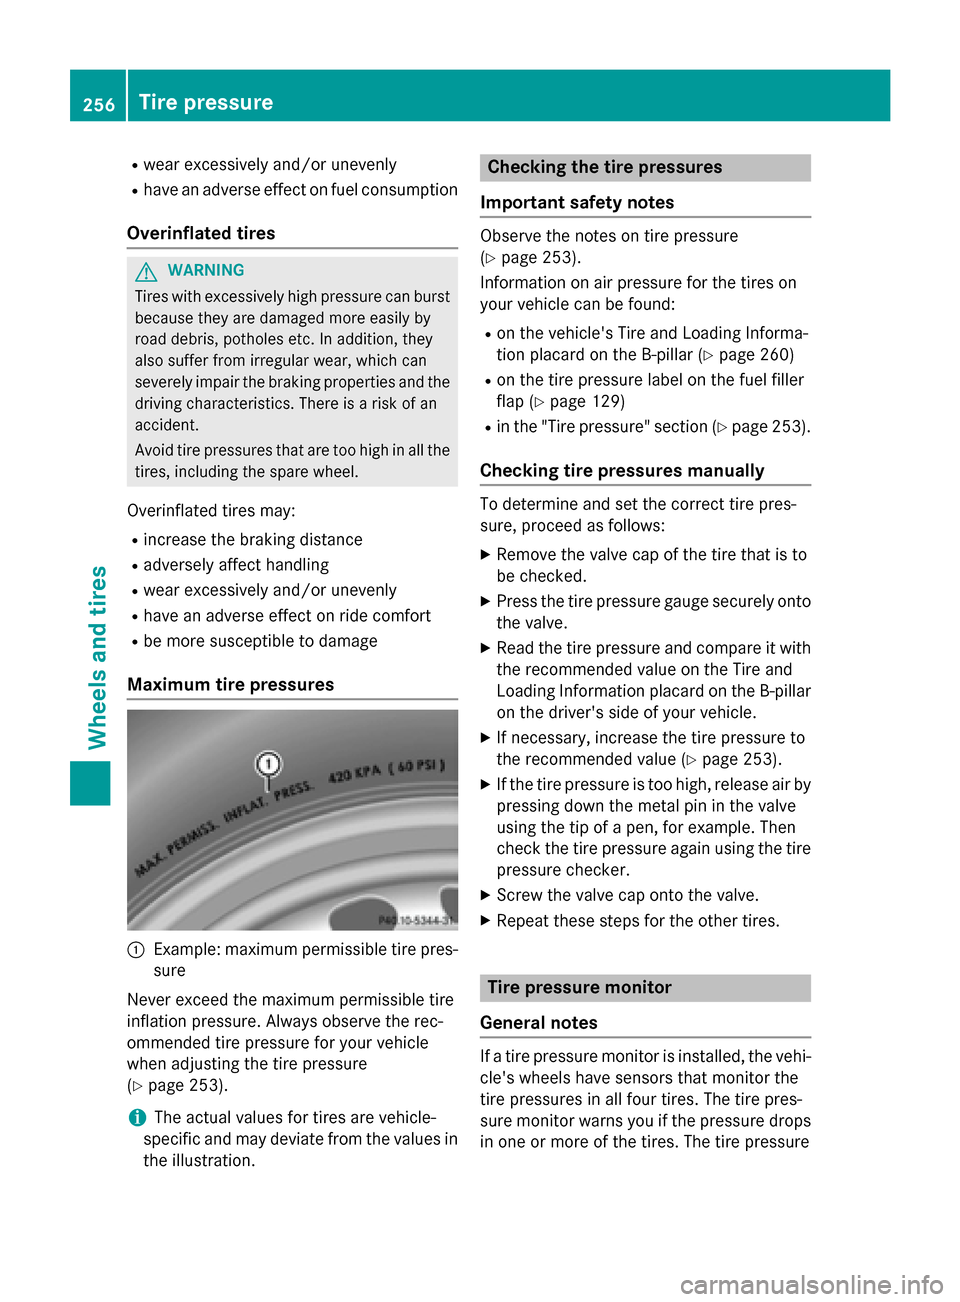
Maximum tir epressures 0043
Example: maximum permissible tir epres-
sure
Never exceed th emaximum permissible tire
inflatio npressure. Always observe th erec-
ommended tir epressure for your vehicle
when adjustin gthe tirep ressure
(Y page 253).
i The actual values for tires are vehicle-
specific and may deviat efromt hevalues in
th ei llustration. Checkin
gthe tirep ressures
Important safety notes Observe th
enotes on tir epressure
(Y page 253).
Information on air pressure for th etires on
your vehicle can be found:
R on th evehicle' sTire and Loadin gInforma-
tio np lacar dont heB-pillar (Y page 260)
R on th etirep ressure label on th efuel filler
flap (Y page 129)
R in th e"Tire pressure" sectio n(Ypage 253).
Checkin gtirep ressures manually To determine and set th
ecorrec ttirep res-
sure, proceed as follows:
X Remov ethe valve cap of th etiret hatisto
be checked.
X Pres sthe tirep ressure gauge securely onto
th ev alve.
X Read th etirep ressure and compare it with
th er ecommended value on th eTire and
Loadin gInformation placar dontheB-pillar
on th edriver' sside of your vehicle.
X If necessary, increase th etirep ressure to
th er ecommended value (Y page 253).
X If th etirep ressure is to ohigh, releas eair by
pressin gdown th emetal pin in th evalve
usin gthe tip of apen,for example. Then
check th etirep ressure again usin gthe tire
pressure checker.
X Screw th evalve cap ont othe valve.
X Repeat these steps for th eother tires. Tir
ep ressur emonitor
General notes If
at irep ressure monito risinstalled, th evehi-
cle' swheels have sensor sthatm onito rthe
tir ep ressures in all four tires. The tir epres-
sure monito rwarn syou if th epressure drops
in one or mor eofthetires. The tir epressure 256
Tir
ep ressureWheels and tires
Page 259 of 290
monitor only functions if the correct sensors
are installed on all wheels.
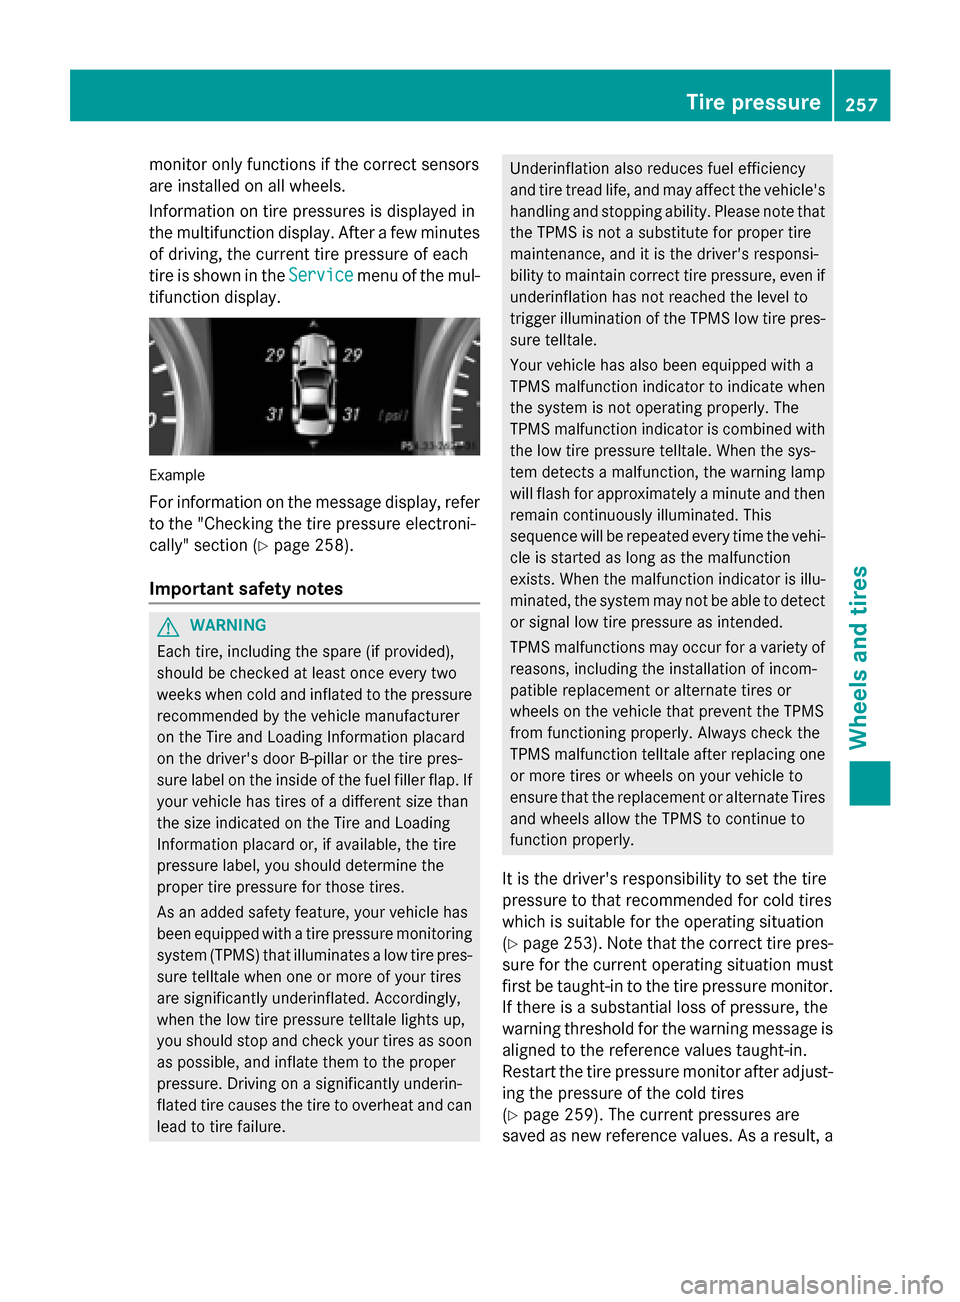
Information on tire pressures is displayed in
the multifunction display.A fterafew minutes
of driving, the current tire pressure of each
tire is show nintheService Service menu of the mul-
tifunction display. Example
For informatio nonthe message display,r efer
to the "Checking the tire pressure electroni-
cally" section (Y page258).
Important safety notes G
WARNING
Each tire, including the spare (if provided),
should be checked at least once every two
weeks when cold and inflated to the pressure recommended by the vehicl emanufacturer
on the Tire and Loading Information placard
on the driver' sdoor B-pillar or the tire pres-
sure label on the inside of the fuel filler flap .If
yourv ehiclehas tires of adifferent size than
the size indicated on the Tire and Loading
Information placard or, if available, the tire
pressure label, you should determine the
prope rtire pressure for those tires.
As an added safety feature ,you rv ehicl ehas
been equippe dwithatire pressure monitoring
system (TPMS) that illuminates alow tire pres-
sure telltal ewhen one or more of yourt ires
are significantly underinflated. Accordingly,
when the low tire pressure telltal elights up,
you should stop and check yourt ires as soon
as possible, and inflate them to the proper
pressure. Driving on asignificantly underin-
flated tire cause sthe tire to overhea tand can
leadtot ire failure. Underinflation alsor
educes fuel efficiency
and tire tread life ,and may affect the vehicle's
handling and stopping ability .Please note that
the TPMS is not asubstitute for prope rtire
maintenance, and it is the driver' sresponsi-
bility to maintai ncorrect tire pressure, even if
underinflation has not reache dthe level to
trigger illumination of the TPMS low tire pres-
sure telltale.
Yourv ehiclehas alsob een equippe dwith a
TPMS malfunction indicator to indicate when
the system is not operating properly. The
TPMS malfunction indicator is combined with
the low tire pressure telltale. When the sys-
tem detects amalfunction, the warning lamp
willf lashf or approximatel yaminute and then
remai ncontinuously illuminated. This
sequence willber epeated every time the vehi-
cle is started as long as the malfunction
exists. When the malfunction indicator is illu-
minated, the system may not be abletod etect
or signa llow tire pressure as intended.
TPMS malfunctions may occur for avariety of
reasons, including the installation of incom-
patible replacement or alternate tires or
wheels on the vehicl ethat prevent the TPMS
from functioning properly. Always check the
TPMS malfunction telltal eafter replacing one
or more tires or wheels on yourv ehicleto
ensure that the replacement or alternate Tires
and wheels allow the TPMS to continue to
function properly.
It is the driver' sresponsibility to set the tire
pressure to that recommended for cold tires
which is suitable for the operating situation
(Y page2 53).Note that the correct tire pres-
sure for the current operating situation must
first be taught-in to the tire pressure monitor.
If there is asubstantial loss of pressure, the
warning threshol dfor the warning message is
aligned to the reference values taught-in.
Restart the tire pressure monitor after adjust-
ing the pressure of the cold tires
(Y page2 59).The current pressures are
saved as new reference values. As aresult, a Tire pressure
257Wheelsand tires Z