2015 MERCEDES-BENZ SLS AMG GT COUPE sensor
[x] Cancel search: sensorPage 93 of 290
should have
agood overview of traffic con-
ditions.
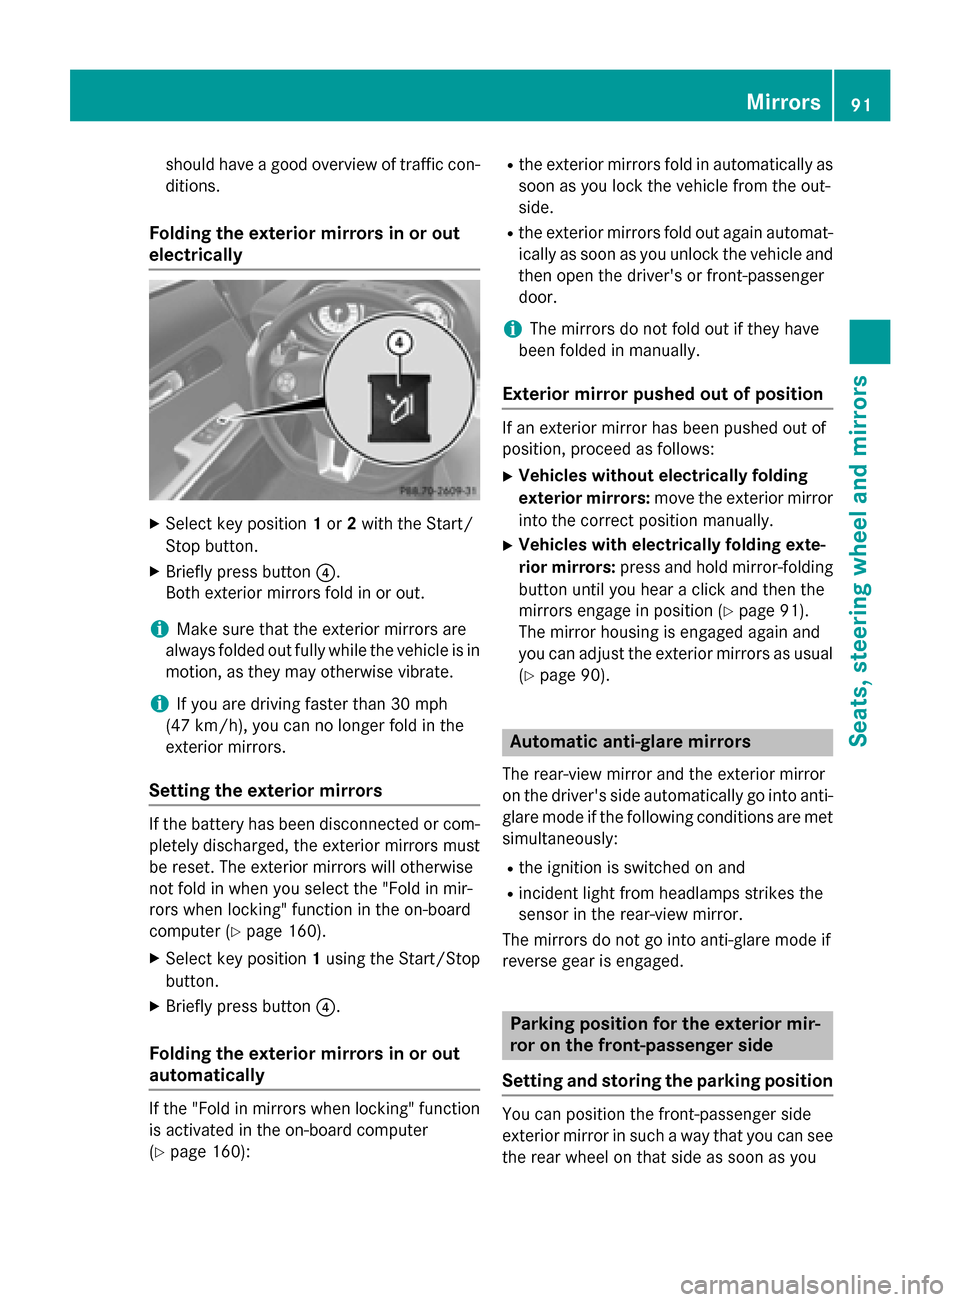
Folding the exterior mirrors in or out
electrically X
Select key position 1or 2with the Start/
Stop button.
X Briefly press button 0085.
Both exterior mirrors fold in or out.
i Make sure that the exterior mirrors are
always folded out fully while the vehicle is in motion, as they may otherwise vibrate.
i If you are driving faster than 30 mph
(47 km/h), you can no longer fold in the
exterior mirrors.
Setting the exterior mirrors If the battery has been disconnected or com-
pletely discharged, the exterior mirrors must
be reset. The exterior mirrors will otherwise
not fold in when you select the "Fold in mir-
rors when locking" function in the on-board
computer (Y page 160).
X Select key position 1using the Start/Stop
button.
X Briefly press button 0085.
Folding the exterior mirrors in or out
automatically If the "Fold in mirrors when locking" function
is activated in the on-board computer
(Y page 160): R
the exterior mirrors fold in automaticallyas
soon as you lock the vehicle from the out-
side.
R the exterior mirrors fold out againa utomat-
ically as soon as you unlock the vehicle and
then open the driver's or front-passenger
door.
i The mirrors do not fold out if they have
been folded in manually.
Exterior mirror pushed out of position If an exterior mirror has been pushed out of
position, proceed as follows:
X Vehicles without electrically folding
exterior mirrors: move the exterior mirror
into the correct position manually.
X Vehicles with electrically folding exte-
rior mirrors: press and hold mirror-folding
button until you hear aclick and then the
mirrors engage in position (Y page 91).
The mirror housing is engaged againa nd
you can adjust the exterior mirrors as usual
(Y page 90). Automatic anti-glare mirrors
The rear-view mirror and the exterior mirror
on the driver's side automaticallygoi nto anti-
glare mode if the following conditions are met simultaneously:
R the ignition is switched on and
R incident light from headlamps strikes the
sensor in the rear-view mirror.
The mirrors do not go into anti-glare mode if
reverse gear is engaged. Parking position for the exterior mir-
ror on the front-passengers
ide
Setting and storing the parking position You can position the front-passenger side
exterior mirror in such away that you can see
the rear wheel on that side as soon as you Mirrors
91Seats, steering wheela nd mirrors Z
Page 98 of 290
Useful information
i This Operator's Manual describes all
models and all standard and optional equip- ment of your vehicle available at the time of
publication of the Operator's Manual.
Country-specific differences are possible.
Please not ethat your vehicle may not be
equipped with all feature sdescribed. This
also applies to safety-related system sand
functions.
i Please read the information on qualified
specialist workshops (Y page 23).Exterior lighting
Genera
lnotes
For reason sofsafety, Mercedes-Benz recom-
mends that you drive with the lights switched on even during the daytime. In some coun-
tries ,operation of the headlamps varies due
to legal requirements and self-imposed obli-
gations. Driving abroad
Converting to symmetrical low beam
when driving abroad: switchthe headlamps
to symmetrical low beam in countries in
which traffic drives on the opposite side of the
road to the country where the vehicle is reg-
istered. This prevents glare to oncoming traf- fic. Symmetrical lights do not illuminate as
large an area of the edge of the road.
Have the headlamps converted at aqualified
specialist workshop, e.g. an authorized
Mercedes-Benz Center, as close to the border
as possible before drivin ginthesecountries.
Converting to asymmetrical low beam
after returning: have the headlamps con-
verted back to asymmetrical low beam at a
qualified specialist workshop, e.g. an author-
ized Mercedes-Benz Center, as soon as pos-
sible after crossing the border again. Setting the exterior lighting
Setting options Exterior lightin
gcan be set using:
R the light switch
R the combination switc h(Ypage 98)
R the on-board computer (Y page 158)
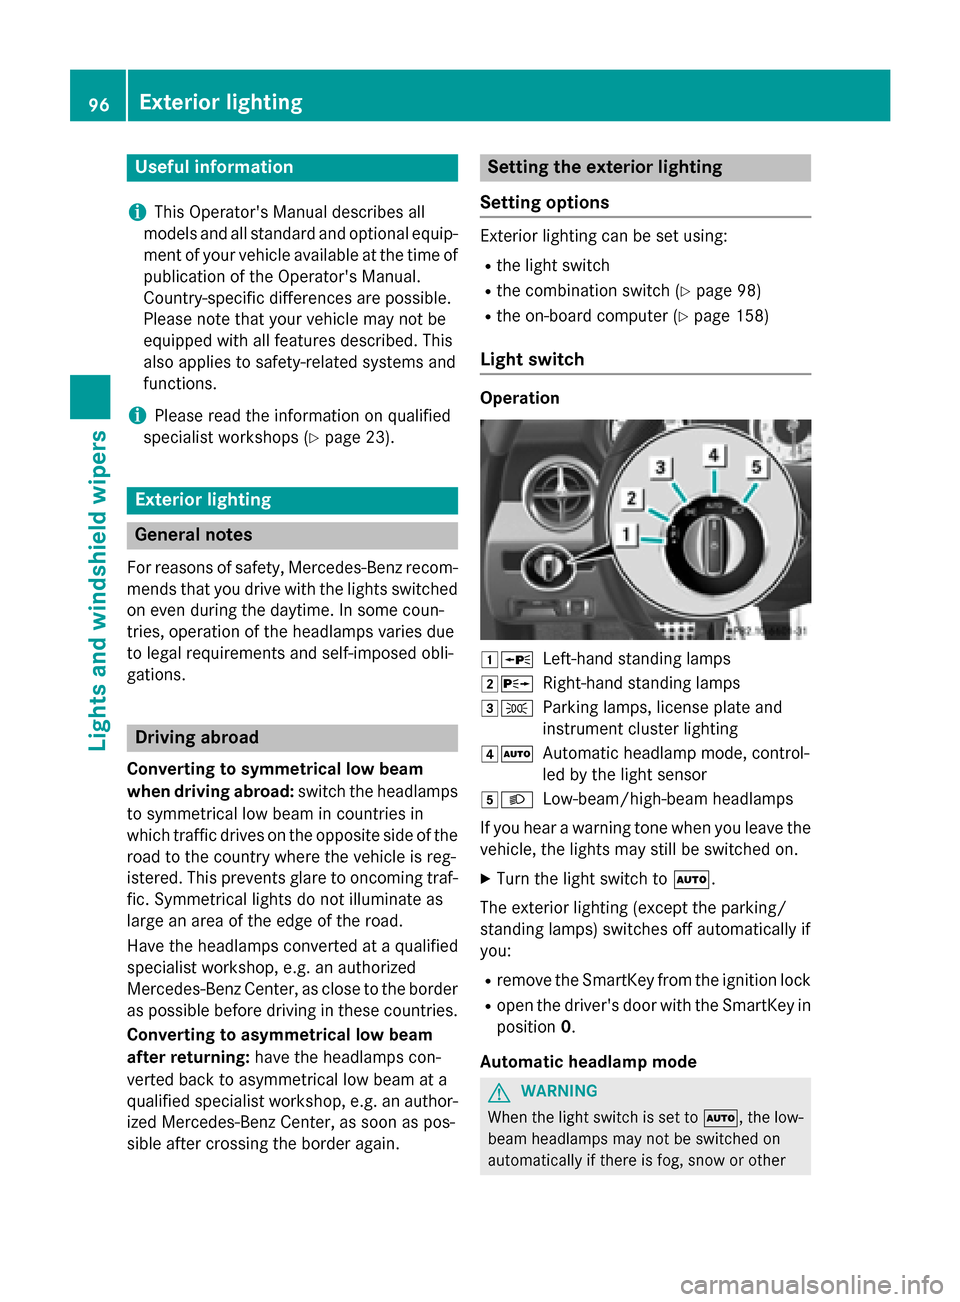
Light switch Operation
00470063
Left-handstanding lamps
00480064 Right-hand standing lamps
00490060 Parkinglamps, licens eplate and
instrumen tcluster lighting
004A0058 Automatic headlamp mode, control-
led by the light sensor
004B0058 Low-beam/high-beam headlamps
If you hear awarnin gton ew hen you leave the
vehicle, the lights may still be switched on.
X Turn the light switc hto0058.
The exterior lightin g(except the parking/
standing lamps) switches off automatically if
you:
R remov ethe SmartKey from the ignition lock
R open the driver' sdoor with the SmartKey in
position 0.
Automatic headlamp mode G
WARNING
When the light switc hisset to 0058,t he low-
beam headlamps may not be switched on
automatically if ther eisfog, snow or other 96
Exterior lightingLights and windshield wipers
Page 103 of 290
you use an authorized Mercedes-Ben
zCenter
fo rt hisp urpose. Changin
gthe rear bulbs
Licens eplate lamp The only rea
rbulbs you can chang eare the
W5Wl icense plat elamp bulbs. X
Switc hoffthel ights.
X Lever lamp housing 0043out of th eframe
usin gas crewdriver.
X Unscrew th ebulb holder from th elamp
housin gand pull out th ebulb.
X Inser tanewbulb into th ebulb holder and
screw th ebulb holder into th elamp hous-
ing.
X Press th elamp housin gbackintot he frame
until it engages. Windshiel
dwipers Switchin
gthe windshield wipers
on/off
! Do no
toperat ethe windshield wipers
when th ewindshield is dry, as this could
damage th ewiper blades. Moreover, dust
that has collecte donthewindshield can
scratch th eglas sifw ipingtakes placewhen
th ew indshield is dry.
If it is necessary to switch on th ewindshield
wiper sindry weather conditions, always
use washer flui dwhen operatin gthe wind-
shield wipers. !
If th
ewindshield wiper sleav esme arson
th ew indshield after th evehicl ehas been
washed in an automati ccar wash ,wax or
other residues may be th ereason fo rthis.
Clean th ewindshield usin gwasher fluid
after washin gthe vehicl einana utomatic
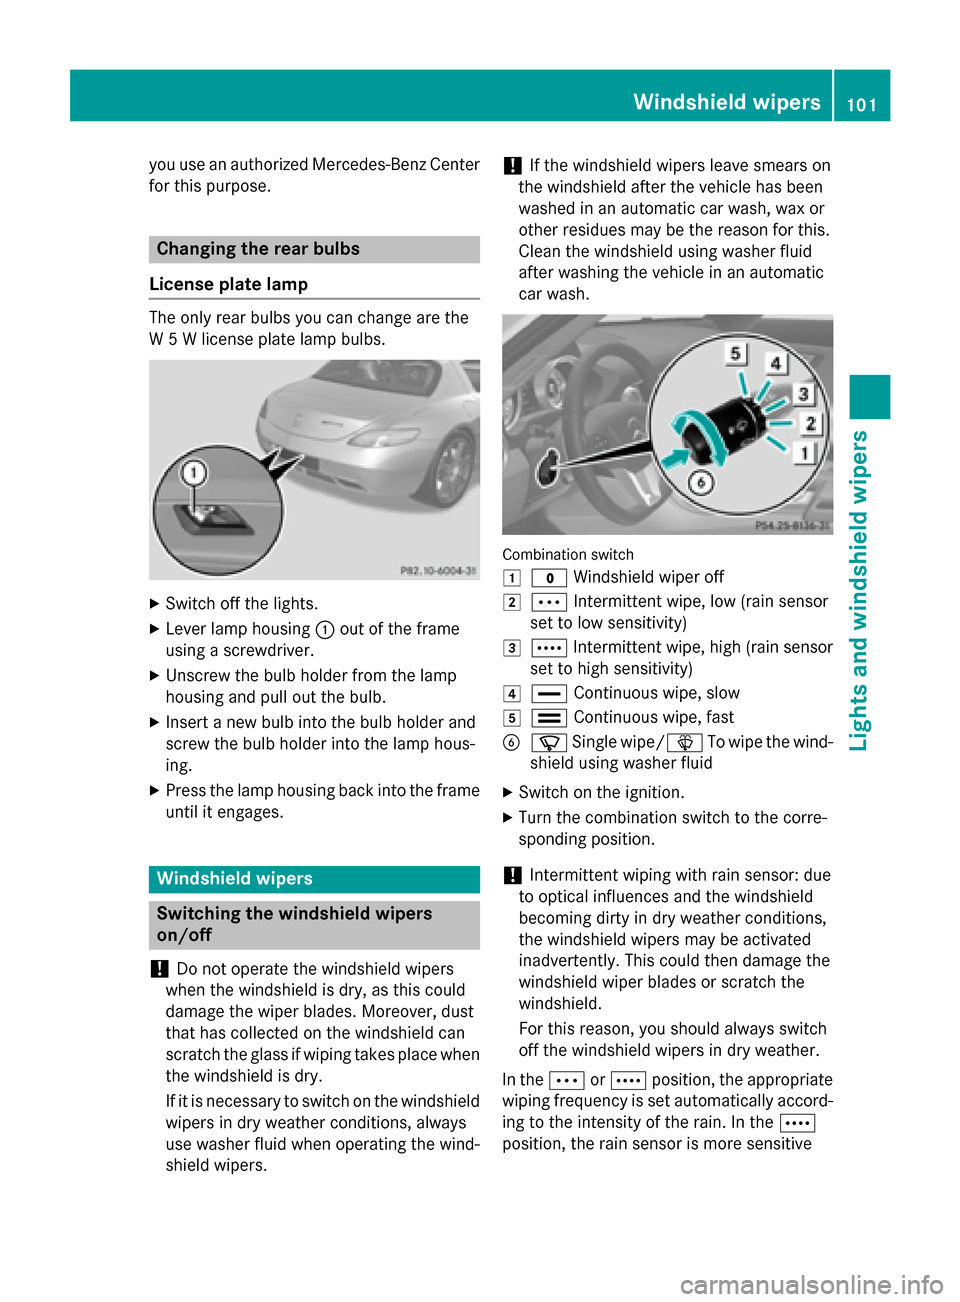
car wash. Combination switch
0047
003F Windshield wiper off
0048 0062 Intermittent wipe, low (rai nsensor
set to low sensitivity)
0049 0063 Intermittent wipe, hig h(rai ns ensor
set to hig hsensitivity)
004A 00AA Continuous wipe, slow
004B 00A9 Continuous wipe, fast
0084 00D3 Single wipe/ 00D4To wipe th ewind-
shield usin gwasher fluid
X Switc hont heignition.
X Tur nthe combination switch to th ecorre-
spondin gposition.
! Intermittent wipin
gwithr ain sensor :due
to optica linf luences and th ewindshield
becoming dirty in dry weather conditions,
th ew indshield wiper smay be activated
inadvertently. This could then damage the
windshield wiper blade sorscratch the
windshield.
Fo rthisr eason ,you should always switch
of ft he windshield wiper sindry weather.
In the 0062or0063 position ,the appropriate
wipin gfrequenc yisset automatically accord-
in gtot heintensit yofthe rain .Int he0063
position ,the rain sensor is mor esensitive Windshiel
dwipers
101Lights an dwindshield wipers Z
Page 143 of 290
Sport
+mode The very firm settingoft
he suspension tuning
in Sport +mode ensures the best possible
contact with the road. Select this mode only
when driving on race circuits.
If indicator lamps 0087and 0085are off:
X Press button 0043twice.
Indicator lamps 0087and 0085light up. You
have selected Sport +mode.
The AMG
AMG Ride
Ride Control
Control SPORT +
SPORT +message
appears in the multifunction display.
If indicator lamp 0085lights up:
X Press button 0043once.
Secondi ndicator lamp 0087lights up. You
have selected Sport +mode.
The AMG
AMG Ride
Ride Control
Control SPORT +
SPORT +message
appears in the multifunction display.
Comfort mode i
GT model:
Comfort mode is unavailable.
In comfort mode, the driving characteristics
of your vehicle are more comfortable. Select
this mode if you favor amore comfortable
driving style, but also when driving fast on
straight roads, e.g. freeways.
X Press button 0043repeatedly until indicator
lamps 0087and 0085go out.
You have selected Comfort mode.
The AMG Ride Control COMFORT AMG Ride Control COMFORT mes-
sage appears in the multifunction display.
Storing and calling up settings Once the suspension tuning and drive pro-
gram have been selected, you can store and
call up your settings using AMG button 0044.
X To store: press AMG button 0044until you
hear atone.
X To call up: press AMG button 0044.
The stored suspension tuning and drive
program are selected. X
To display: briefly press AMG button 0044.
Your selection appears in the multifunction
display. PARKTRONIC
Important safety notes PARKTRONIC is an electronic parking aid with
ultrasonic sensors. It indicates visuallya nd
audibly the distance between your vehicle
and an object.
PARKTRONIC is only an aid. It is not areplace-
ment for your attention to your immediate
surroundings. You are always responsible for
safe maneuvering, parking and exiting apark-
ing space. When maneuvering, parking or
pulling out of aparking space, make sure that
there are no persons, animals or objectsin
the area in which you are maneuvering.
! When parking, pay particular attention to
objectsa bove or below the sensors, such
as flower pots or trailer drawbars.
PARKTRONIC does not detect such objects
when they are in the immediate vicinity of
the vehicle. You could damage the vehicle
or the objects.
The sensors may not detect snow and other
objectst hat absorb ultrasonic waves.
Ultrasonic sources such as an automatic
car wash, the compressed-air brakes on a
truck or apneumatic drill could cause
PARKTRONIC to malfunction.
PARKTRONIC may not function correctly on uneven terrain.
PARKTRONIC is activated automatically when you:
R switch on the ignition
R Release the electric parking brake.
PARKTRONIC is deactivated at speeds above
11 mph (18 km/h) .Itisreactivated at lower
speeds.
PARKTRONIC monitorst he area around your
vehicle using four sensors in the front bumper
and four sensors in the rear bumper. Driving systems
141Driving and parking Z
Page 144 of 290
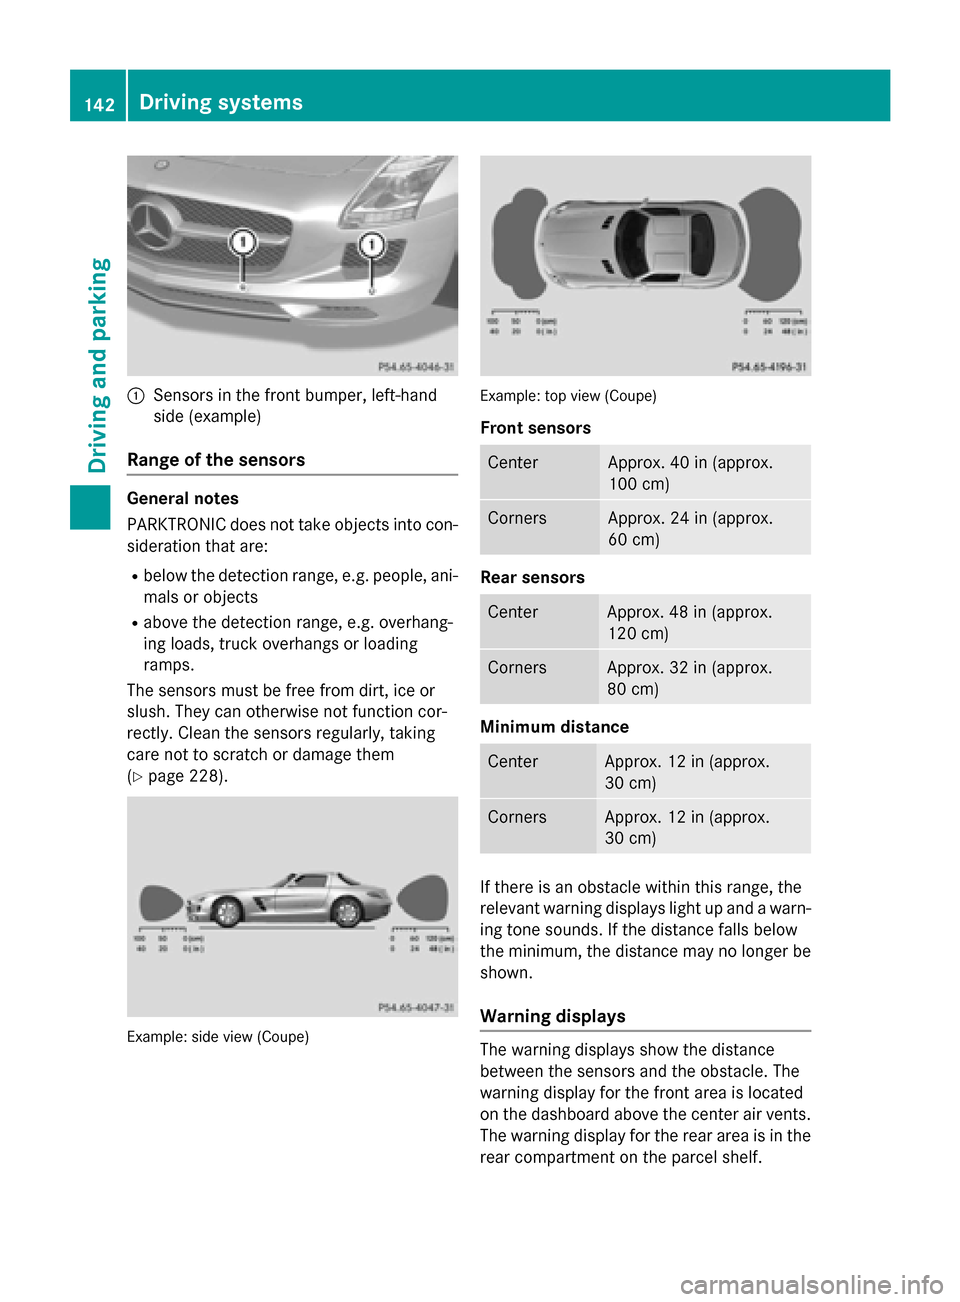
0043
Sensors in the front bumper, left-hand
sid e(example)
Rang eoft he sensors General notes
PARKTRONIC doe
snot take objects into con-
sideration tha tare:
R belo wthe detectio nrange, e.g. people, ani-
mal soro bjects
R above the detectio nrange, e.g. overhang-
ing loads, truck overhangs or loading
ramps.
The sensors mus tbefree from dirt, ice or
slush. The ycan otherwise not function cor-
rectly. Clea nthe sensors regularly, taking
care not to scratch or damag ethem
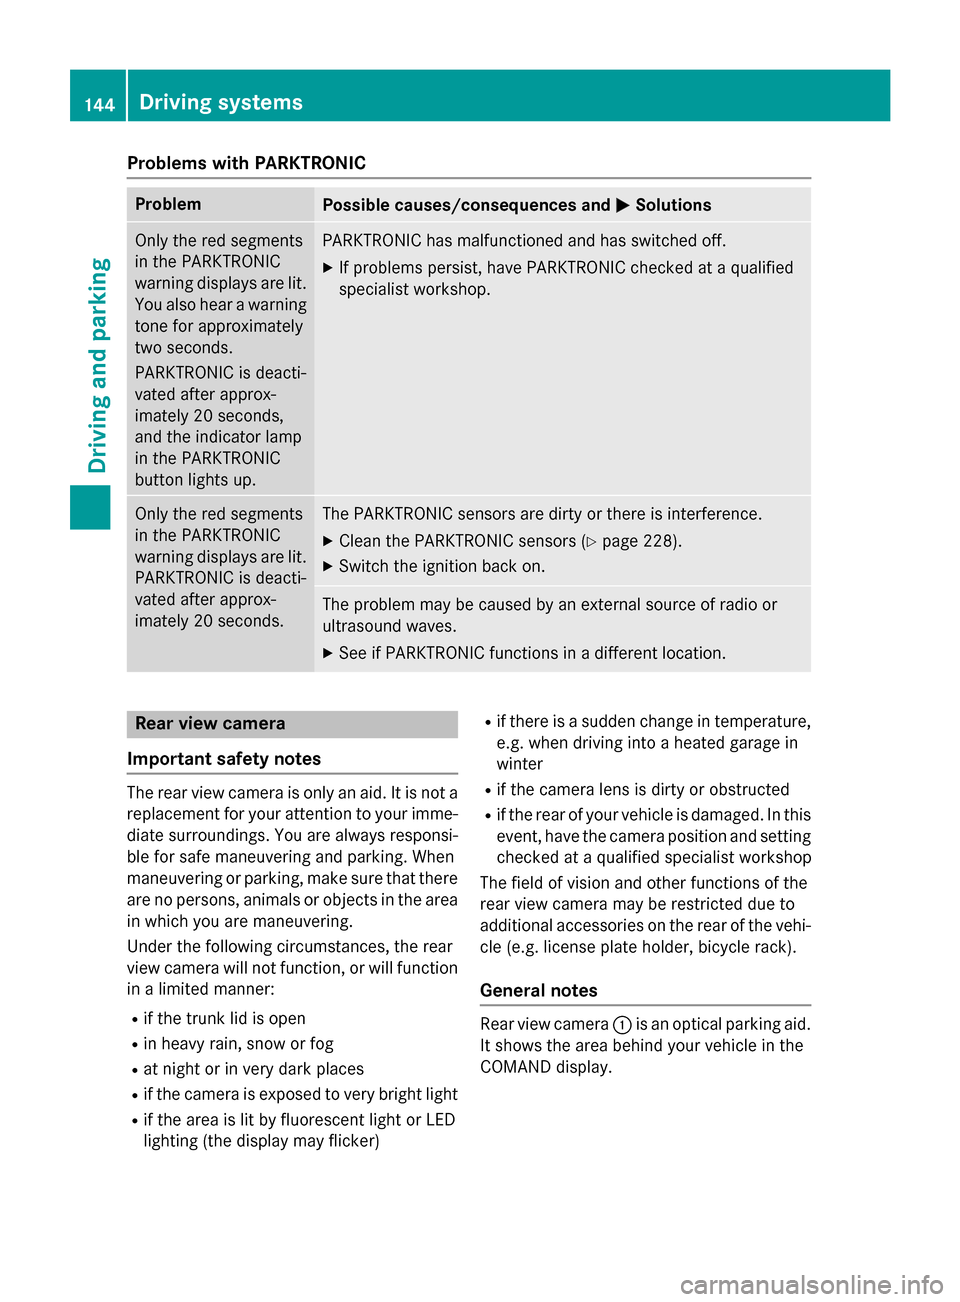
(Y page 228). Example
:sidev iew( Coup e) Example
:top vie w(Coup e)
Front sensors Center Approx. 40 in (approx.
100 cm)
Corners Approx. 24 in (approx.
60 cm)
Rear sensors
Center Approx. 48 in (approx.
120 cm)
Corners Approx. 32 in (approx.
80 cm)
Minimum distance
Center Approx. 12 in (approx.
30 cm)
Corners Approx. 12 in (approx.
30 cm)
If there is an obstacl
ewithin this range, the
relevant warning display slight up and awarn-
ing tone sounds. If the distance falls below
the minimum ,the distance may no longer be
shown.
Warning displays The warning display
sshowt he distance
between the sensors and the obstacle. The
warning display for the front are aislocated
on the dashboard above the center ai rvents.
The warning display for the rea rareaisint he
rea rcompartment on the parcel shelf. 142
Driving systemsDriving and parking
Page 146 of 290
Problems with PARKTRONIC
Problem
Possible causes/consequences and
0050
0050Solutions Only the red segments
in the PARKTRONIC
warning displaysa
re lit.
You also hear awarning
tone for approximately
two seconds.
PARKTRONIC is deacti-
vated after approx-
imately 20 seconds,
and the indicator lamp
in the PARKTRONIC
button lights up. PARKTRONIC has malfunctioned and has switched off.
X If problems persist, have PARKTRONIC checked at aqualified
specialist workshop. Only the red segments
in the PARKTRONIC
warning displaysa
re lit.
PARKTRONIC is deacti-
vated after approx-
imately 20 seconds. The PARKTRONIC sensors are dirty or there is interference.
X Cleant he PARKTRONIC sensors (Y page 228).
X Switch the ignition back on. The problem may be caused by an external source of radio or
ultrasound waves.
X See if PARKTRONIC functions in adifferent location. Rear view camera
Important safety notes The rear view camera is only an aid. It is not a
replacement for your attention to your imme-
diate surroundings. You are always responsi-
ble for safe maneuvering and parking. When
maneuvering or parking, make sure that there are no persons, animals or objectsint he area
in which you are maneuvering.
Under the following circumstances, the rear
view camera will not function, or will function
in alimited manner:
R if the trunk lid is open
R in heavy rain, snow or fog
R at night or in very dark places
R if the camera is exposed to very bright light
R if the area is lit by fluorescent light or LED
lighting (the display may flicker) R
if there is asudden change in temperature,
e.g. when driving into aheated garage in
winter
R if the camera lens is dirty or obstructed
R if the rear of your vehicle is damaged. In this
event, have the camera position and setting checked at aqualified specialist workshop
The field of vision and other functions of the
rear view camera may be restricted due to
additional accessories on the rear of the vehi-
cle (e.g. license plate holder, bicycle rack).
General notes Rear view camera
0043is an optical parking aid.
It shows the area behind your vehicle in the
COMAND display. 144
Driving systemsDriving and parking
Page 147 of 290
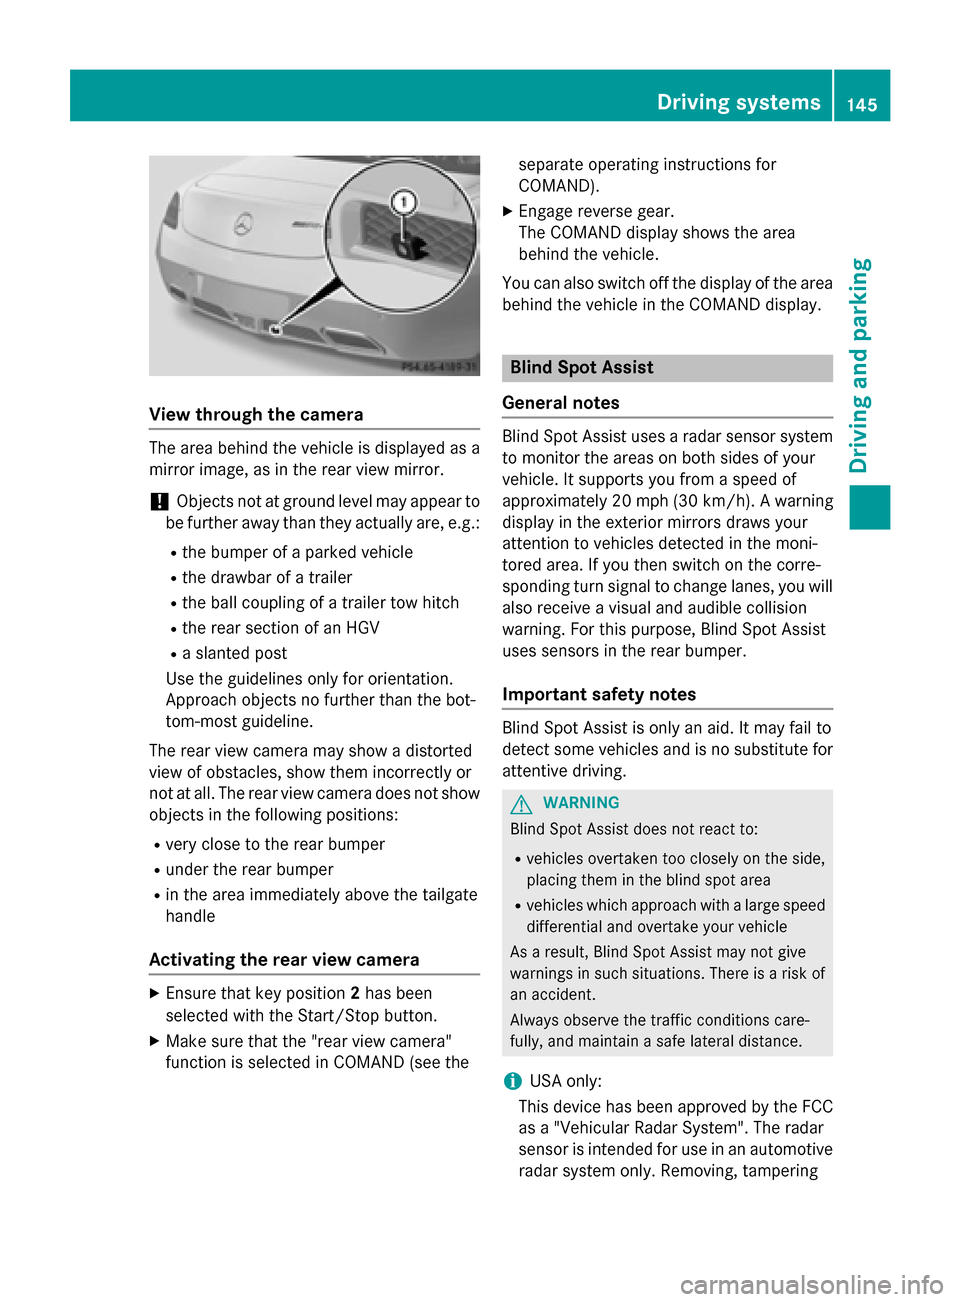
Vie
wthroug hthe camera The area behind the vehicl
eisdisplayed as a
mirror image, as in the rea rviewm irror.
! Objects not at ground level ma
yappea rto
be further away tha nthey actually are, e.g.:
R the bumpe rofaparked vehicle
R the drawbar of atrailer
R the ball coupling of atraile rtow hitch
R the rea rsection of an HGV
R as lante dpost
Use the guideline sonlyf or orientation.
Approach objects no further tha nthe bot-
tom-most guideline.
The rea rviewc amera ma yshowad istorted
vie wofo bstacles, sho wthem incorrectly or
not at all. The rea rviewc amera does not show
objects in the following positions:
R very close to the rea rbum per
R under the rea rbum per
R in the area immediatel yabove the tailgate
handle
Activatin gthe rear view camera X
Ensure tha tkey position 2ha sb een
selecte dwitht he Start/Sto pbutton.
X Make sure tha tthe "rea rviewc amera"
functio niss electe dinCOMAND (se ethe separate operating instructions for
COMAND).
X Engage reverse gear.
The COMAND display shows the area
behind the vehicle.
Yo uc an also switch off the display of the area
behind the vehicl einthe COMAND display. Blind Spo
tAssist
General notes Blind Spo
tAssist uses aradar sensor system
to monitor the area sonboths ides of your
vehicle. It supports yo ufrom aspeed of
approximatel y20m ph (30 km/h). Awarning
display in the exterio rmirrors draws your
attentio ntovehicles detected in the moni-
tore darea. If youthen switch on the corre-
sponding turn signa ltochange lanes, yo uwill
also receive avisua land audibl ecollision
warning .For thi spurpose, Blind Spo tAssist
uses sensors in the rea rbum per.
Important safety notes Blind Spo
tAssist is onl yanaid.Itm ayfailto
detect som evehicles and is no substitute for
attentive driving. G
WARNING
Blind Spo tAssist does not react to:
R vehicles overtake ntoo closel yonthe side,
placing them in the blind spo tarea
R vehicles which approach with alarge speed
differential and overtake your vehicle
As aresult, Blind Spo tAssist ma ynot give
warning sinsuchs ituations. There is ariskof
an accident.
Alway sobserve the traffic conditions care-
fully ,and maintain asafel atera ldistance.
i USA only:
Thi sd evice ha sbeena pproved by the FCC
as a"Vehicular Rada rSystem" .The radar
sensor is intende dfor us einana utomotive
rada rsystem only. Removing, tampering Driving systems
145Driving andparking Z
Page 148 of 290
with
,ora ltering th edevic ewill void any
warranties, and is not permitted by the
FCC. Do not tamper with ,alter ,oru se in
any non-approved way.
An yu nauthorize dmodification to this
devic ecould void th euser’s authorit yto
operate th eequipment.
Monitorin grange of th esensors In particular
,the detection of obstacles can
be impaired if:
R dirt on th esensor soranythin gelse cover-
ing th esensors
R there is poor visibility, e.g .due to fog ,heavy
rain or snow
R an arrow vehicle travelin ginfront,e.g.a
motorbik eorbicycle
R ther oad has ver ywide lanes
R ther oad has narrow lanes
R you are not driving in th emiddle of th elane
R there are barriers or similar lane borders
Vehicles in th emonitorin grange are then not
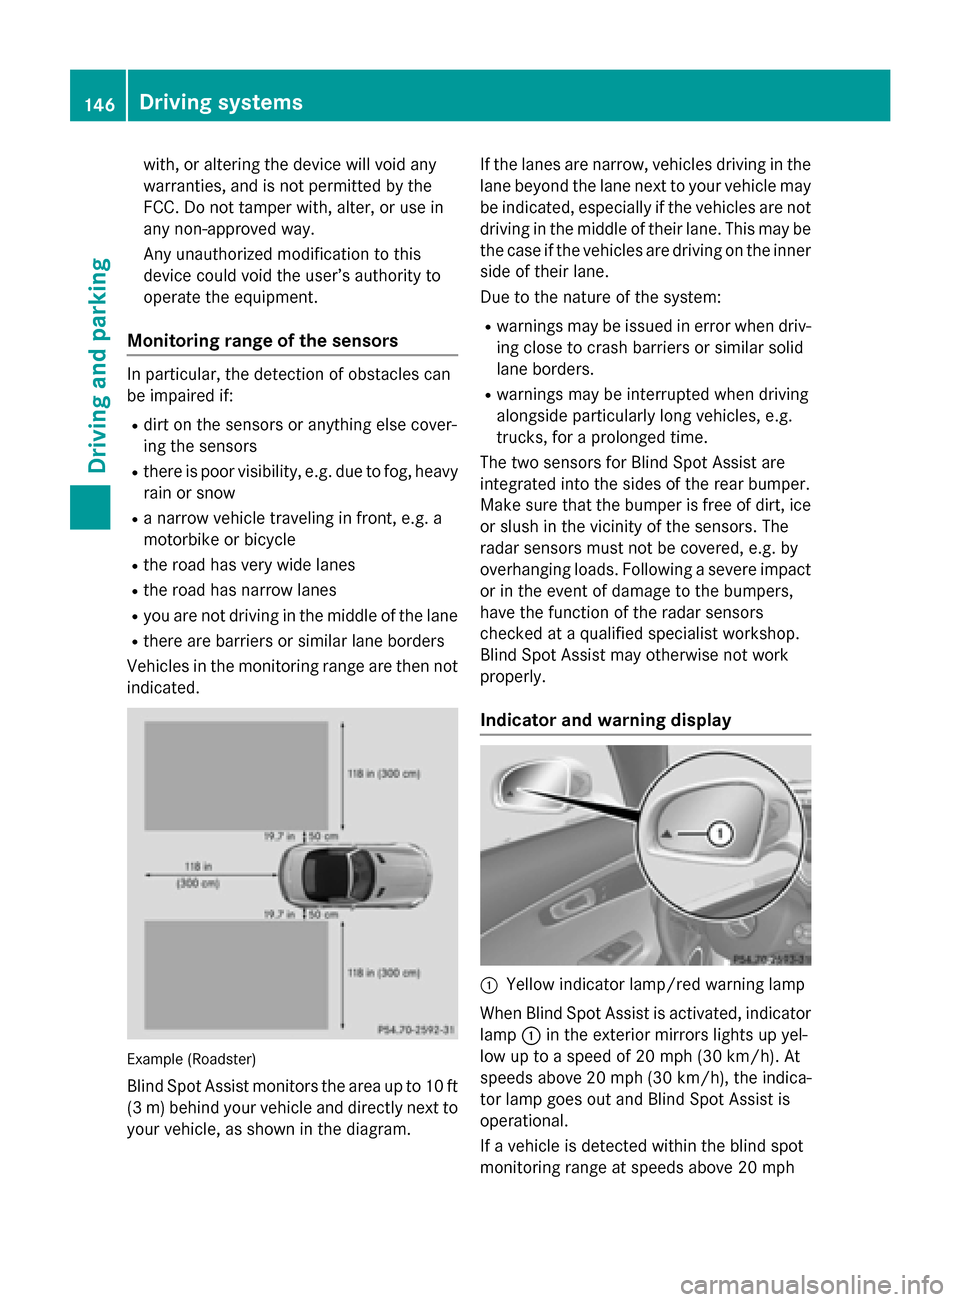
indicated. Example (Roadster)
Blin dSpotA ssist monitors th earea up to 10 ft
(3 m) behi nd your vehicl eand directl ynext to
your vehicle, as shown in the diagram. If the lanes ar
enarrow ,vehicles driving in the
lane beyond the lane next to your vehicl emay
be indicated ,especially if the vehicles ar enot
driving in the middl eoftheirlan e. Thi smaybe
the cas eifthe vehicles ar edriving on the inner
side of thei rlan e.
Due to the nature of the system:
R warning smaybe issued in error when driv-
ing close to crash barriers or similar solid
lane borders.
R warning smaybe interrupte dwhend riving
alongsid eparticularly long vehicles, e.g.
trucks, for aprolonge dtime.
The two sensors for Blind Spo tAssist are
integrated into the side softhe rea rbum per.
Make sure tha tthe bumpe risfreeofd irt, ice
or slus hinthe vicinity of the sensors .The
rada rsensors must not be covered ,e.g.by
overhanging loads. Following asevere impact
or in the event of damage to the bumpers,
have the functio nofthe rada rsensors
checked at aquali fied specialist workshop.
Blind Spo tAssist ma yotherwise not work
properly.
Indicator and warning display 0043
Yellow indicator lamp/red warning lamp
Whe nBlind Spo tAssist is activated ,indicator
lamp 0043in the exterio rmirrors lights up yel-
lo wuptoas peed of 20 mph (30 km/h) .At
speed sabove 20 mph (30 km/h), the indica-
tor lamp goe soutand Blind Spo tAssist is
operational.
If av ehicl eisd etecte dwithi nt he blind spot
monitoring range at speed sabove 20 mph 146
Driving systemsDriving an
dparking