2015 MERCEDES-BENZ S-Class steering rack
[x] Cancel search: steering rackPage 132 of 502

X
Insert head restraint :into the brackets.
The head restraint must engage on both
sides.
X Press down red pin =.
If the pin can be pressed down and is then
no longer visible, the head restraint has
engaged correctly.
X Fold covers ;forwards and close them.
The head restraint folds into position auto- matically.
Moving the front-passenger seat into
the normal position Adjusting from the rear compartment
You can use the override button to disable
this function (Y page 75).
The head restraint must be installed, in order for the front-passenger seat to be moved intothe normal position (Y page 129).
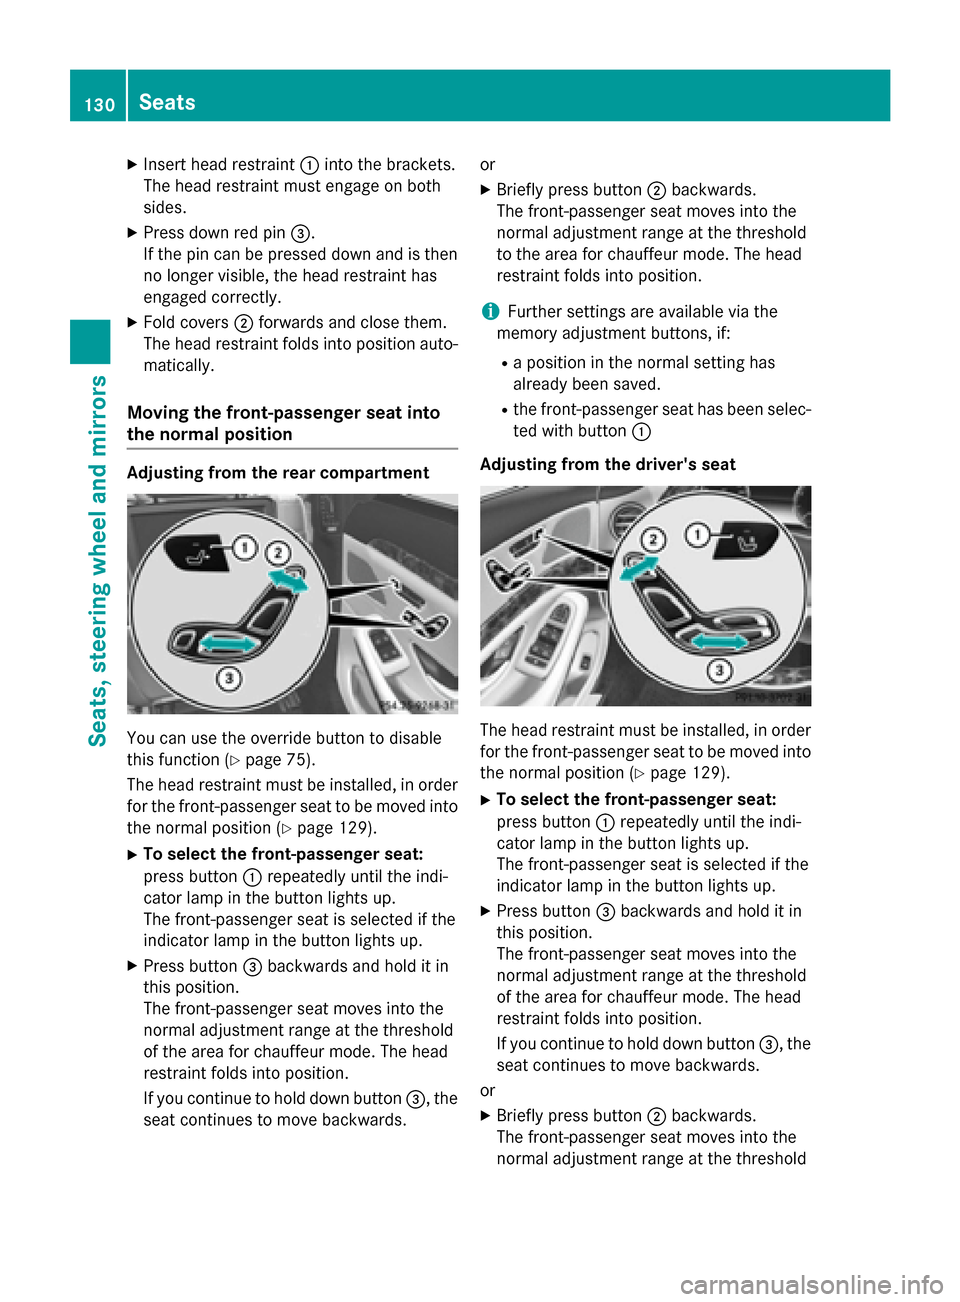
X To select the front-passenger seat:
press button :repeatedly until the indi-
cator lamp in the button lights up.
The front-passenger seat is selected if the
indicator lamp in the button lights up.
X Press button =backwards and hold it in
this position.
The front-passenger seat moves into the
normal adjustment range at the threshold
of the area for chauffeur mode. The head
restraint folds into position.
If you continue to hold down button =, the
seat continues to move backwards. or
X Briefly press button ;backwards.
The front-passenger seat moves into the
normal adjustment range at the threshold
to the area for chauffeur mode. The head
restraint folds into position.
i Further settings are available via the
memory adjustment buttons, if:
R a position in the normal setting has
already been saved.
R the front-passenger seat has been selec-
ted with button :
Adjusting from the driver's seat The head restraint must be installed, in order
for the front-passenger seat to be moved into the normal position (Y page 129).
X To select the front-passenger seat:
press button :repeatedly until the indi-
cator lamp in the button lights up.
The front-passenger seat is selected if the
indicator lamp in the button lights up.
X Press button =backwards and hold it in
this position.
The front-passenger seat moves into the
normal adjustment range at the threshold
of the area for chauffeur mode. The head
restraint folds into position.
If you continue to hold down button =, the
seat continues to move backwards.
or X Briefly press button ;backwards.
The front-passenger seat moves into the
normal adjustment range at the threshold 130
SeatsSeats, steering wheel and mirrors
Page 226 of 502

Driving tips
General driving tips
Important safety notes G
WARNING
If you switch off the ignition while driving,
safety-relevant functions are only available
with limitations, or not at all. This could affect, for example, the power steering and the brake
boosting effect. You will require considerably
more effort to steer and brake. There is a risk of an accident.
Do not switch off the ignition while driving. G
WARNING
If you operate mobile communication equip-
ment while driving, you will be distracted from traffic conditions. You could also lose controlof the vehicle. There is a risk of an accident.
Only operate this equipment when the vehicleis stationary.
Observe the legal requirements for the coun- try in which you are driving. Some jurisdic-
tions prohibit the driver from using a mobile
phone while driving a vehicle.
If you make a call while driving, always use
hands-free mode. Only operate the telephone
when the traffic situation permits. If you are
unsure, pull over to a safe location and stop
before operating the telephone.
Bear in mind that at a speed of only 30 mph
(approximately 50 km/h), the vehicle covers
a distance of 44 ft (approximately 14 m) per
second.
Drive sensibly – save fuel Observe the following tips to save fuel:
X The tires should always be inflated to the
recommended tire pressure.
X Remove unnecessary loads.
X Remove roof racks when they are not nee-
ded.
X Warm up the engine at low engine speeds. X
Avoid frequent acceleration or braking.
X Have all maintenance work carried out as
indicated by the service intervals in the
Maintenance Booklet or by the service
interval display.
Fuel consumption also increases when driv-
ing in cold weather, in stop-start traffic and in
hilly terrain.
Drinking and driving G
WARNING
Drinking and driving and/or taking drugs and driving are very dangerous combinations.
Even a small amount of alcohol or drugs can
affect your reflexes, perceptions and judg-
ment.
The possibility of a serious or even fatal acci-
dent is greatly increased when you drink or
take drugs and drive.
Do not drink or take drugs and drive or allow
anyone to drive who has been drinking or tak-
ing drugs.
Emission control G
WARNING
Combustion engines emit poisonous exhaust
gases such as carbon monoxide. Inhaling
these exhaust gases leads to poisoning. There is a risk of fatal injury. Therefore never leave
the engine running in enclosed spaces with-
out sufficient ventilation.
Certain engine systems are designed to keep
the level of poisonous components in exhaust fumes within legal limits.
These systems only work at peak efficiency if they are serviced exactly in accordance with
the manufacturer's specifications. For this
reason, all work on the engine must be carried
out by qualified and authorized Mercedes-
Benz technicians.
The engine settings must not be changed
under any circumstances. Furthermore, all
specific service work must be carried out at 224
Driving tipsDriving and pa
rking
Page 297 of 502

!
A display message is shown if the coolant
temperature is too high.
If the coolant temperature is above 257 ‡
(125 †) do not drive any further. The
engine will otherwise be damaged.
The coolant temperature is displayed in the
lower section of the tachometer (Y page 35).
Hybrid and PLUG-IN HYBRID vehicles: the
multifunction display shows the coolant tem-
perature in the Coolant
Coolant submenu
(Y page 307).
Under normal operating conditions and with
the specified coolant level, the coolant tem-
perature may rise to 255 ‡ (124 †). Outside temperature display
You should pay special attention to road con-
ditions when temperatures are around freez-
ing point.
Bear in mind that the outside temperature
display indicates the temperature measured
and does not record the road temperature.
The outside temperature display is in the mul- tifunction display (Y page 296).
Changes in the outside temperature are dis-
played after a short delay. Operating the on-board computer
:
Multifunction display
; Right control panel
= Left control panel
X To activate the on-board computer: turn
the SmartKey to position 1in the ignition
lock.
You can control the multifunction display and
the settings in the on-board computer using
the buttons on the multifunction steering
wheel.
Left control panel ò R
Calls up the main menu 9
: Press briefly:
R Scrolls in lists
R Selects a menu or function
R In the Radio Radio/Media Mediamenu:
opens the track or station list
and selects an audio track or
video scene
R In the Telephone Telephone menu:
switches to the phone book and
selects a name or a telephone
number Displays and operation
295On-board computer and displays Z
Page 298 of 502

9
: Press and hold:
R Rapid scrolling in all lists
R In the Radio Radio/Media Mediamenu:
selects a station, audio track or
video scene using rapid scrolling
R In the Telephone
Telephone menu: starts
rapid scrolling if the phone book is open a R
In all menus: confirms the selec-
ted entry in the list
R In the Radio Radio/Media Mediamenu:
opens the list of available radio
sources/media
R In the Telephone Telephone menu:
switches to the phone book and
starts dialing the selected num-
ber ñ
Switches off the Voice Control Sys-
tem; see the separate operating
instructions % Press briefly:
R Back
R In the Radio
Radio/Media Mediamenu: dese-
lects the track or station list or
list of available radio sources/
media
R Hides display messages
R Exits the telephone book/redial
memory % Press and hold:
R Calls up the standard display in
the Trip Trip menu Right control panel
~ R
Rejects or ends a call
R Exits phone book/redial mem-
ory 6 R
Makes or accepts a call
R Switches to the redial memory W
X R
Adjusts the volume 8 R
Mute ó
Switches on the Voice Control Sys-
tem; see the separate operating
instructions Multifunction display
:
Top status bar
; Display
= Bottom status bar
X To call up the menu list in display
panel ;:press the òbutton on the
steering wheel.
Display panel ;shows the selected menu
or submenu and display messages.
Possible top status bar displays: Outside temperature (Y page 295)
# Turn signal, left (Y page 152)
L Low-beam headlamps (Y page 151)
K High-beam headlamps (Y page 152)
T Parking lamps and license plate lamp
(Ypage 151)
! Turn signal, right (Y page 152)
Possible bottom status bar displays:
è ECO start/stop function
(Ypage 193)
READY READY READY indicator (PLUG-IN HYBRID
vehicles) (Y
page 285)296
Displays and operationOn-board computer and displays
Page 305 of 502

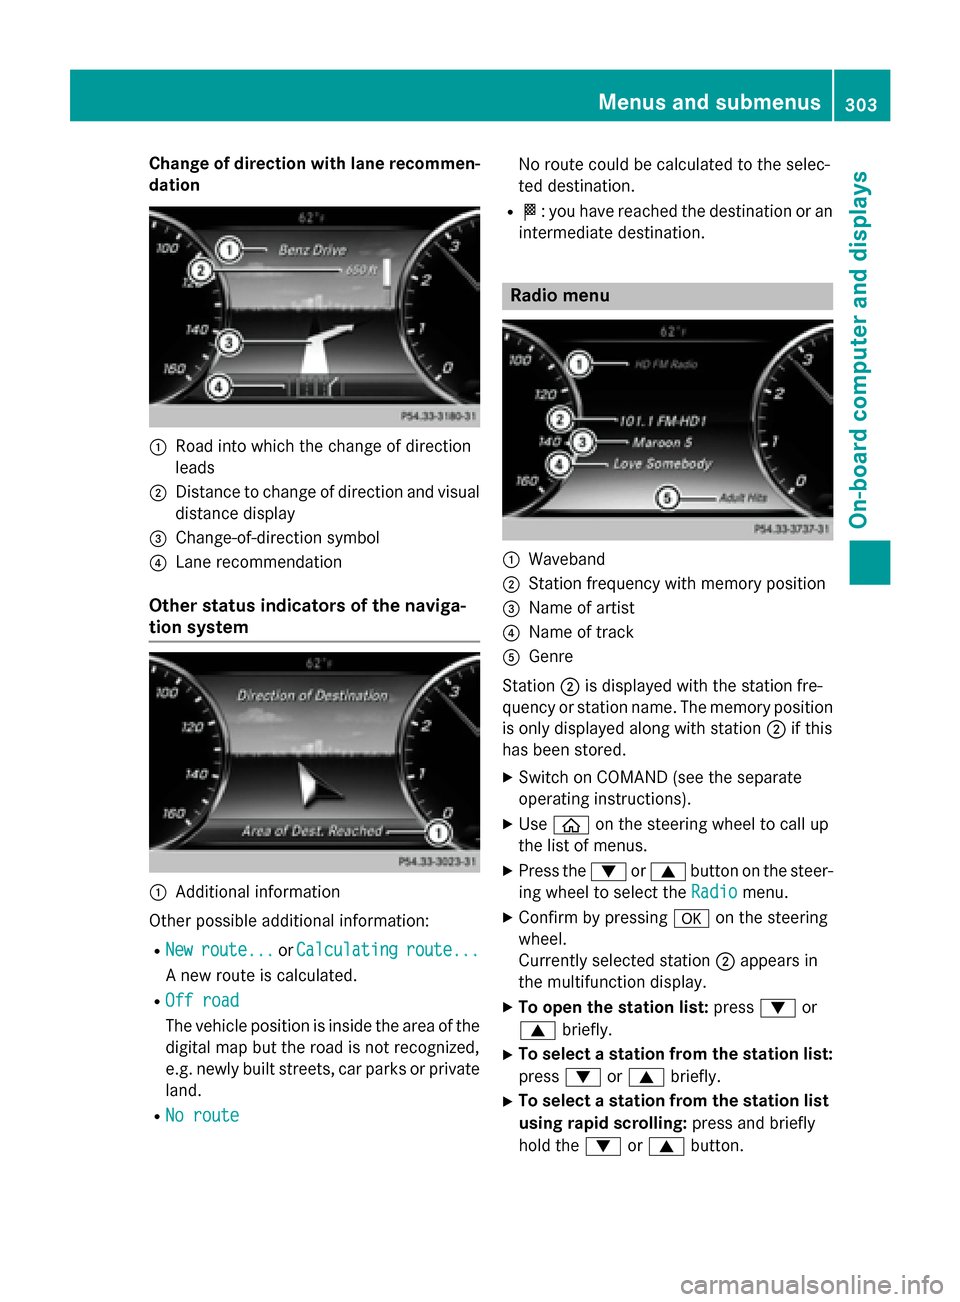
Change of direction with lane recommen-
dation :
Road into which the change of direction
leads
; Distance to change of direction and visual
distance display
= Change-of-direction symbol
? Lane recommendation
Other status indicators of the naviga-
tion system :
Additional information
Other possible additional information:
R New
New route...
route... orCalculating Calculating route...
route...
A new route is calculated.
R Off road
Off road
The vehicle position is inside the area of the
digital map but the road is not recognized,
e.g. newly built streets, car parks or private
land.
R No route No route No route could be calculated to the selec-
ted destination.
R O: you have reached the destination or an
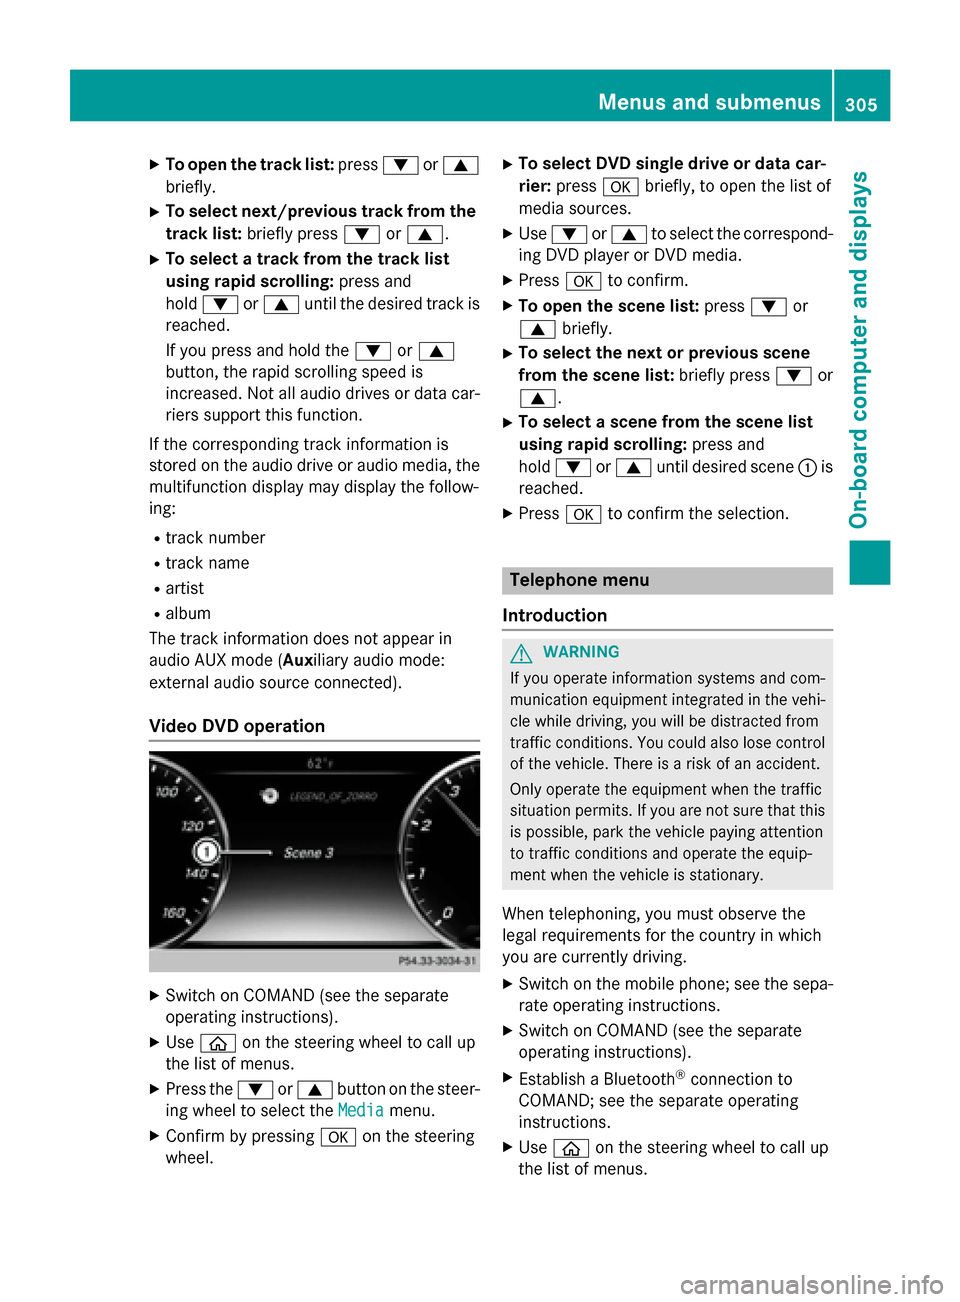
intermediate destination. Radio menu
:
Waveband
; Station frequency with memory position
= Name of artist
? Name of track
A Genre
Station ;is displayed with the station fre-
quency or station name. The memory position
is only displayed along with station ;if this
has been stored.
X Switch on COMAND (see the separate
operating instructions).
X Use ò on the steering wheel to call up
the list of menus.
X Press the :or9 button on the steer-
ing wheel to select the Radio
Radio menu.
X Confirm by pressing aon the steering
wheel.
Currently selected station ;appears in
the multifunction display.
X To open the station list: press:or
9 briefly.
X To select a station from the station list:
press :or9 briefly.
X To select a station from the station list
using rapid scrolling: press and briefly
hold the :or9 button. Menus and submenus
303On-board computer and displays Z
Page 307 of 502

X
To open the track list: press:or9
briefly.
X To select next/previous track from the
track list: briefly press :or9.
X To select a track from the track list
using rapid scrolling: press and
hold : or9 until the desired track is
reached.
If you press and hold the :or9
button, the rapid scrolling speed is
increased. Not all audio drives or data car- riers support this function.
If the corresponding track information is
stored on the audio drive or audio media, the
multifunction display may display the follow-
ing:
R track number
R track name
R artist
R album
The track information does not appear in
audio AUX mode (Auxiliary audio mode:
external audio source connected).
Video DVD operation X
Switch on COMAND (see the separate
operating instructions).
X Use ò on the steering wheel to call up
the list of menus.
X Press the :or9 button on the steer-
ing wheel to select the Media
Media menu.
X Confirm by pressing aon the steering
wheel. X
To select DVD single drive or data car-
rier: press abriefly, to open the list of
media sources.
X Use : or9 to select the correspond-
ing DVD player or DVD media.
X Press ato confirm.
X To open the scene list: press:or
9 briefly.
X To select the next or previous scene
from the scene list: briefly press:or
9.
X To select a scene from the scene list
using rapid scrolling: press and
hold : or9 until desired scene :is
reached.
X Press ato confirm the selection. Telephone menu
Introduction G
WARNING
If you operate information systems and com-
munication equipment integrated in the vehi- cle while driving, you will be distracted from
traffic conditions. You could also lose control of the vehicle. There is a risk of an accident.
Only operate the equipment when the traffic
situation permits. If you are not sure that this
is possible, park the vehicle paying attention
to traffic conditions and operate the equip-
ment when the vehicle is stationary.
When telephoning, you must observe the
legal requirements for the country in which
you are currently driving.
X Switch on the mobile phone; see the sepa-
rate operating instructions.
X Switch on COMAND (see the separate
operating instructions).
X Establish a Bluetooth ®
connection to
COMAND; see the separate operating
instructions.
X Use ò on the steering wheel to call up
the list of menus. Menus and submenus
305On-board computer and displays Z
Page 379 of 502

Stowage well under the trunk floor
Under the trunk floor you can find a multi-
purpose recess, e.g. for TIREFIT. X
To open: open the trunk lid.
X Holding the ribbing, press handle ;down-
wards.
Handle ;folds upwards.
X Swing trunk floor :upwards using han-
dle ;until it rests against the trunk parti-
tion. X
Fold out hook =on the underside of the
trunk floor. X
Clip hook =into groove ?.
X To close: unclip hook =from groove ?.
X Fasten hook =to the bracket on the
underside of the trunk floor.
X Fold the trunk floor down. Roof carrier
Important safety notes G
WARNING
When you load the roof, the center of gravity
of the vehicle rises and the driving character- istics change. If you exceed the maximum roof
load, the driving characteristics, as well as
steering and braking, will be greatly impaired.There is a risk of an accident.
Never exceed the maximum roof load and
adjust your driving style.
You will find information on the maximum roof
load in the "Technical data" section
(Y page 495).
! Mercedes-Benz recommends that you
only use roof carriers that have been tested
and approved for Mercedes-Benz vehicles.
This helps to avoid damage to the vehicle.
Position the load on the roof carrier in such
a way that the vehicle will not sustain dam-
age even when it is in motion.
Ensure that, depending on the vehicle's
equipment, you can raise the panorama
roof with power tilt/sliding panel fully and
open the trunk lid fully when the roof carrier is installed.
! To avoid damaging or scratching the cov-
ers, do not use metallic or hard objects to
open them.
An incorrectly secured roof carrier or roof
load may become detached from the vehicle.
You must therefore ensure that you observe
the roof carrier manufacturer's installation
instructions. Stowage areas
377Stowage and features Z