2015 MERCEDES-BENZ S-Class operating temperature
[x] Cancel search: operating temperaturePage 17 of 502

Operation ......................................... 60
System self-test ...............................62
Odometer ...........................................2 99
Oil
see Engine oil
On-board computer
AMG menu ..................................... 314
Assistance graphic menu .............. .307
Assistance menu ........................... 308
Display messages .......................... 316
Displaying a service message ....... .410
DISTRONIC PLUS ........................... 237
Factory settings ............................ .314
Head-up displa y............................. 297
Important safety notes .................. 294
Instrument cluster menu ............... 312
Lights menu ................................... 312
Media menu ................................... 304
Menu overview .............................. 299
Message memory .......................... 316
Navigation menu ............................ 301
Operation ....................................... 295
Radio menu ................................... 303
Service menu ................................. 307
Settings menu ............................... 308
Standard display ............................ 299
Telephone menu ............................ 305
Trip menu ...................................... 299
Video DVD operation ..................... 305
Online access .................................... 219
Operating safety
Declaration of conformity ................ 28
Important safety notes .................... 27
Operating system
see On-board computer
Operator's Manual
Overview .......................................... 25
Vehicle equipment ........................... 25
Outside temperature display ........... 295
Overhead control panel ...................... 41
Override feature
Rear side window s........................... 75 P
Paint code number ............................ 488
Paintwork (cleaning instructions) ... 413
Panic alarm .......................................... 49 Panorama roof with power tilt/
sliding panel
Important safety notes .................. 110
Opening/closing ............................ 111
Problem (malfunction) ................... 117
Resetting ....................................... 115
Parcel net hooks ............................... 376
Parking
Important safety notes .................. 220
Parking brake ................................ 222
Position of exterior mirror, front-
passenger side ............................... 142
Rear view camera .......................... 256
see PARKTRONIC
Parking aid
Active Parking Assist ..................... 251
see Exterior mirrors
see PARKTRONIC
Parking assistance
see PARKTRONIC
Parking brake
Display message ............................ 320
Electric parking brake .................... 222
Warning lamp ................................. 362
Parking lamps
Switching on/of f........................... 151
PARKTRONIC
Deactivating/activating ................. 250
Driving system ............................... 248
Function/note s............................. 248
Important safety notes .................. 248
Problem (malfunction) ................... 251
Range of the sensors ..................... 249
Warning display ............................. 250
PASSENGER AIR BAG
Indicator lamps ................................ 50
PASSENGER AIR BAG indicator
lamp
Problem (malfunction) ................... 332
Perfume atomizer
Operating ....................................... 178
Perfume vial ................................... 178
Problem (malfunction) ................... 180
Pets in the vehicle ............................... 76
Plastic trim (cleaning instruc-
tions) .................................................. 418 Index
15
Page 19 of 502

RBS (Recuperative Brake System)
Warning lamp ................................. 366
Reading lamp ..................................... 155
Rear compartment
Activating/deactivating climate
control ........................................... 169
Setting the air distribution ............. 174
Setting the air vents ...................... 185
Setting the airflow ......................... 174
Setting the temperature ................ 173
Stowage compartment .................. 374
Rear lamps
see Lights
Rear seats
Adjusting ....................................... 123
Adjusting a rear reclining seat ....... 123
Overview .......................................... 43
Setting the reclined position .......... 123
Rear view camera
Cleaning instructions ..................... 416
Function/notes ............................ .256
Switching on/off ........................... 257
Rear window blind ............................ 381
Rear window defroster
Problem (malfunction) ................... 177
Switching on/off ........................... 176
Rear-view mirror
Anti-glare (manual) ........................ 140
Dipping (automatic) ....................... 142
Recuperation display ........................ 299
Recuperative Brake System
Driving safety systems ..................... 48
Important safety notes .................... 48
Refrigerant (air-conditioning sys-
tem)
Important safety notes .................. 494
Refueling
Fuel gauge ....................................... 35
Important safety notes .................. 205
Refueling process .......................... 206
see Fuel
Remote control
Garage door opene r....................... 397
Programming (garage door
opener) .......................................... 398
Replacing bulbs
General notes ................................ 157
Reporting safety defects .................... 30Rescue card
......................................... 30
Reserve (fuel tank)
see Fuel
Reserve fuel
Display message ............................ 339
Warning lamp ................................. 363
Residual heat (climate control) ........ 177
Restraint system
Display message ............................ 328
Introduction ..................................... 49
Warning lamp ................................. 362
Warning lamp (function) ................... 50
Reversing feature
Panorama sliding sunroo f.............. 111
Roller sunblind s............................. 112
Side windows ................................. 106
Trunk lid ......................................... 100
Reversing lamps (display mes-
sage) ................................................... 335
ROAD SURFACE SCAN ....................... 245
Roadside Assistance (breakdown) .... 26
Roller sunblind
Panorama roof with power tilt/
sliding panel .................................. 112
Rear side window s......................... 381
Rear window .................................. 381
Roller sunblind of the panorama
roof with power tilt/sliding panel
Operating (front roller sunblind) .... 113
Operating (rear roller sunblind )...... 113
Roof carrier ........................................ 377
Roof lining and carpets (cleaning
guidelines) ......................................... 419
Roof load (maximum) ........................ 495 S
Safety Occupant Classification System
(OCS) ............................................... 59
see Operating safety
Safety notes
Hybrid vehicles ................................ 46
Safety system
see Driving safety systems
Seat
Multicontour seat in the rear com-partment ........................................ 134 Index
17
Page 117 of 502

X
Turn the SmartKey to position 1or 2in the
ignition lock (Y page 189).
MAGIC SKY CONTROL switches to the sta-
tus it was set to before the engine was
switched off.
X To change the degree of transparency:
press button :.
If the rear MAGIC SKY CONTROL element is in
a different state than the front element, the
degree of transparency will change only in the
front element. Both elements will then be in
the same state and any further changes will
again occur synchronously.
i At sub-zero temperatures, the change is
slower and uneven. The entire process may
take some time.
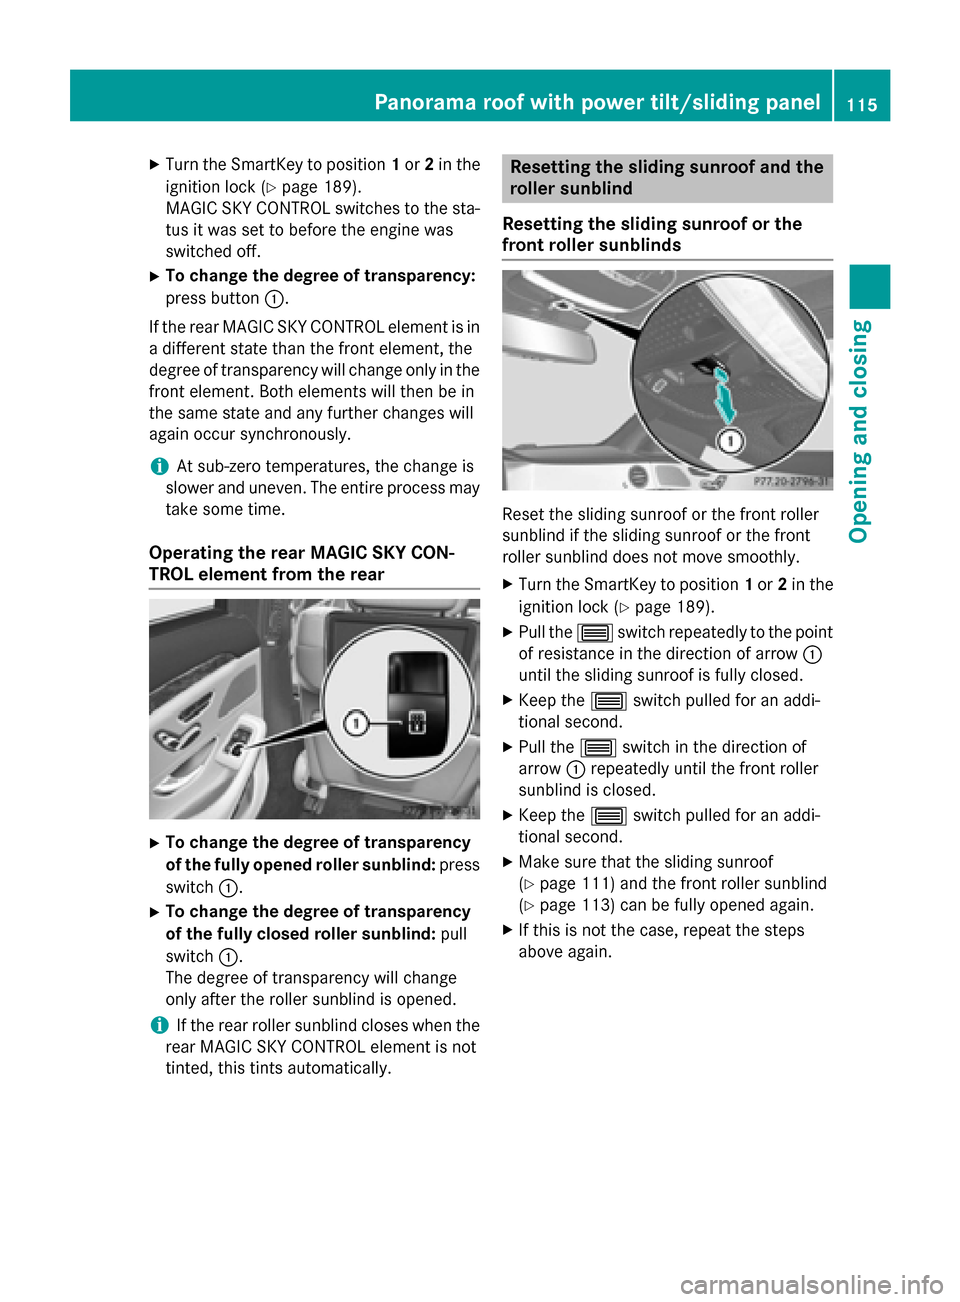
Operating the rear MAGIC SKY CON-
TROL element from the rear X
To change the degree of transparency
of the fully opened roller sunblind: press
switch :.
X To change the degree of transparency
of the fully closed roller sunblind: pull
switch :.
The degree of transparency will change
only after the roller sunblind is opened.
i If the rear roller sunblind closes when the
rear MAGIC SKY CONTROL element is not
tinted, this tints automatically. Resetting the sliding sunroof and the
roller sunblind
Resetting the sliding sunroof or the
front roller sunblinds Reset the sliding sunroof or the front roller
sunblind if the sliding sunroof or the front
roller sunblind does not move smoothly.
X Turn the SmartKey to position 1or 2in the
ignition lock (Y page 189).
X Pull the 3switch repeatedly to the point
of resistance in the direction of arrow :
until the sliding sunroof is fully closed.
X Keep the 3switch pulled for an addi-
tional second.
X Pull the 3switch in the direction of
arrow :repeatedly until the front roller
sunblind is closed.
X Keep the 3switch pulled for an addi-
tional second.
X Make sure that the sliding sunroof
(Y page 111) and the front roller sunblind
(Y page 113) can be fully opened again.
X If this is not the case, repeat the steps
above again. Panorama roof with power tilt/sliding panel
115Opening and closing Z
Page 136 of 502

The supplementary cushion is attached to the
head restraint by three press studs.
Installing the supplementary cushion:
X Position the head restraint as far forwards
as possible (Y page 123).
X Hold supplementary cushion ;against
the head restraint and push press studs :
into the counterpieces.
Removing the supplementary cushion: X Position the head restraint as far forwards
as possible (Y page 123).
X Release press studs :and remove sup-
plementary cushion ;.
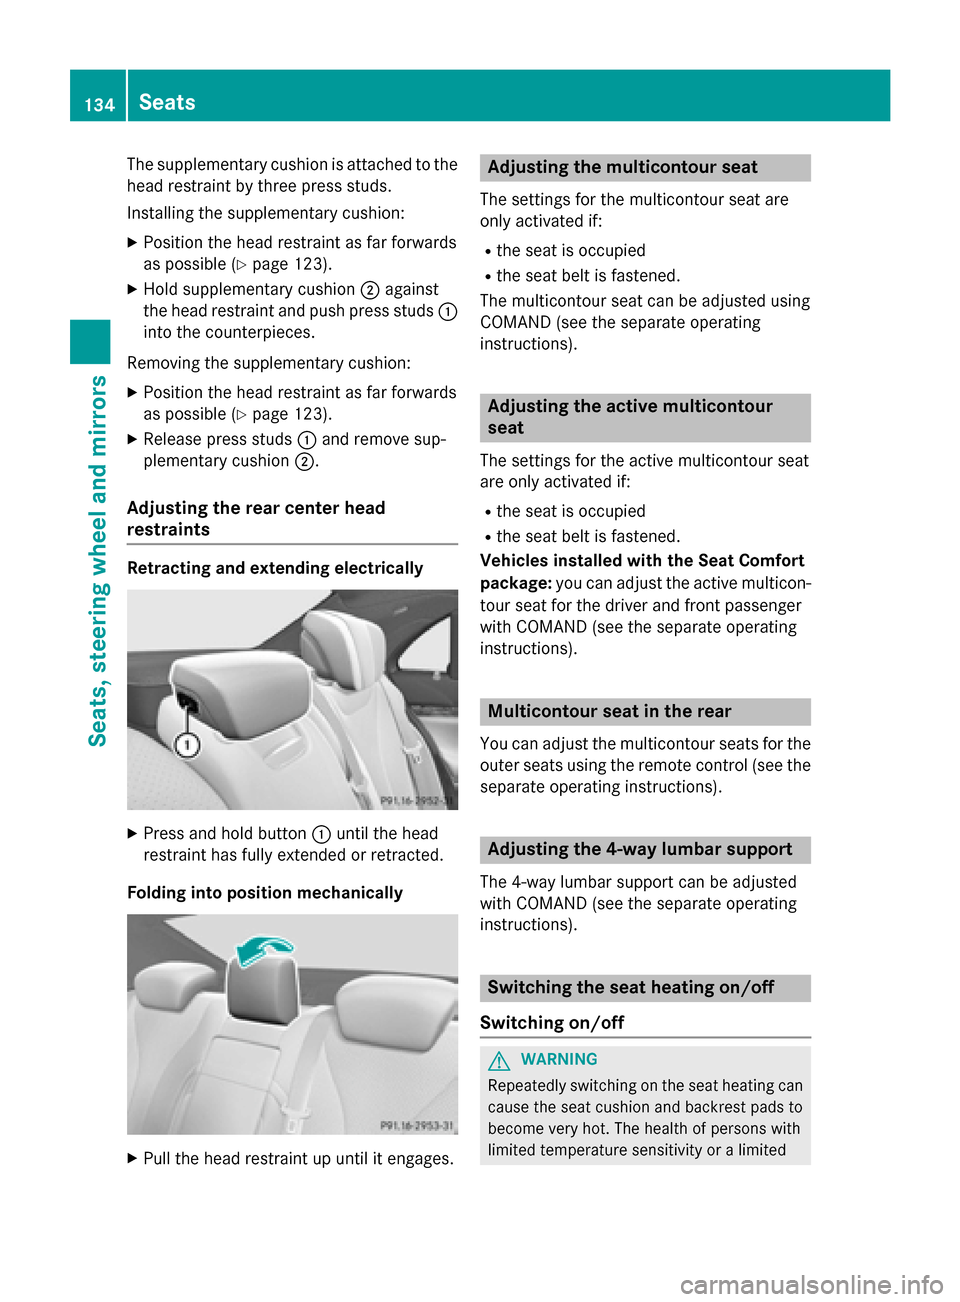
Adjusting the rear center head
restraints Retracting and extending electrically
X
Press and hold button :until the head
restraint has fully extended or retracted.
Folding into position mechanically X
Pull the head restraint up until it engages. Adjusting the multicontour seat
The settings for the multicontour seat are
only activated if:
R the seat is occupied
R the seat belt is fastened.
The multicontour seat can be adjusted using
COMAND (see the separate operating
instructions). Adjusting the active multicontour
seat
The settings for the active multicontour seat
are only activated if:
R the seat is occupied
R the seat belt is fastened.
Vehicles installed with the Seat Comfort
package: you can adjust the active multicon-
tour seat for the driver and front passenger
with COMAND (see the separate operating
instructions). Multicontour seat in the rear
You can adjust the multicontour seats for the
outer seats using the remote control (see the separate operating instructions). Adjusting the 4-way lumbar support
The 4-way lumbar support can be adjusted
with COMAND (see the separate operating
instructions). Switching the seat heating on/off
Switching on/off G
WARNING
Repeatedly switching on the seat heating can
cause the seat cushion and backrest pads to
become very hot. The health of persons with
limited temperature sensitivity or a limited 134
SeatsSeats, steering wheel and mirrors
Page 143 of 502

Adjusting the exterior mirrors
X
Turn the SmartKey to position 1or 2in the
ignition lock (Y page 189).
X Press button ;for the right-hand exterior
mirror or button =for the left-hand exte-
rior mirror.
The indicator lamp lights up in the button
that has been pressed.
The indicator lamp goes out again after
some time. You can adjust the selected
mirror using adjustment button :as long
as the indicator lamp is lit.
X Press adjustment button :up, down, or to
the left or right until you have adjusted the
exterior mirror to the correct position. You
should have a good overview of traffic con- ditions.
The convex exterior mirrors provide a larger
field of vision.
After the engine has been started, the exte-
rior mirrors are automatically heated if the
rear window defroster is switched on and the
outside temperature is low. Folding the exterior mirrors in or out
electrically X
Turn the SmartKey to position 1or 2in the
ignition lock (Y page 189).
X Briefly press button :.
Both exterior mirrors fold in or out.
i Make sure that the exterior mirrors are
always folded out fully while driving. They
could otherwise vibrate.
i If you are driving faster than 30 mph
(47 km/ h), you can no longer fold in the
exterior mirrors.
Setting the exterior mirrors If the battery has been disconnected or com-
pletely discharged, the exterior mirrors must
be reset. The exterior mirrors will otherwise
not fold in when you select the "Fold in mir-
rors when locking" function in the on-board
computer.
X Turn the SmartKey to position 1or 2in the
ignition lock (Y page 189).
X Briefly press button :.
Folding the exterior mirrors in or out
automatically This function is only available in vehicles for
Canada.
When the
Automatic Automatic Mirror MirrorFolding
Folding func-
tion is activated in COMAND (see the sepa-
rate operating instructions): Mirrors
141Seats, steering wheel and mirrors Z
Page 171 of 502

Notes on using automatic climate
control
Climate control system Below, you can find a number of notes and
recommendations to help you use climate
control optimally.
R Activate climate control using the Ã
rocker switch. The indicator lamp in the
à rocker switch lights up.
R Set the temperature to 72 ‡ (22 †).
R Only use the "Windshield defrosting" func-
tion briefly until the windshield is clear
again.
R Only use air-recirculation mode briefly, e.g.
if there are unpleasant outside odors or
when in a tunnel. The windows could oth-
erwise fog up, since no fresh air is drawn
into the vehicle in air-recirculation mode.
R Use the residual heat function if you want to
heat or ventilate the vehicle interior when
the ignition is switched off. The residual
heat function can only be activated or deac- tivated with the ignition switched off. The
residual heat function is switched off whenthe ignition is switched on.
If you are controlling the rear climate control using the front control panel, note the follow-
ing:
R If you set rear-compartment climate con-
trol using the front control panel, the Y
symbol appears in the rear-compartment
control panel display.
R If the rear-compartment climate control is
set using the front control panel, it cannot
be set at the same time using the rear con- trol panel. If controlling the rear climate
control from the front control panel is
locked, wait five seconds. You will then be
able to control the rear climate control
using the rear control panel.
R After selecting the rear compartment set-
tings, the front climate control can be con-
trolled automatically again via COMAND
after five seconds. Alternatively, you can select "Cancel rear
compartment" in the COMAND air-condi-
tioning function bar.
ECO start/stop function During automatic engine switch-off, the cli-
mate control system only operates at a
reduced capacity. If you require the full cli-
mate control output, you can switch off the
ECO start/stop function by pressing the ECO
button (Y page 194). Operating the climate control sys-
tems Switching climate control on/off
General notes When the climate control is switched off, the
air supply and air circulation are also
switched off. The windows could fog up.
Therefore, switch off climate control only
briefly
Switch on climate control primarily using the
à rocker switch (Y page 171).
Switching the front climate control on
and off using the control panel X
Turn the SmartKey to position 2in the igni-
tion lock (Y page 189).
X To activate: press thetrocker switch
up or down.
The COMAND climate control menu opens.
X Activate climate control via the air-condi-
tioning setting bar in COMAND (see the
separate operating instructions).
X To deactivate: press thetrocker
switch up or down.
The COMAND climate control menu opens.
X Deactivate climate control via the air-con-
ditioning setting bar in COMAND (see the
separate operating instructions). Operating the climate control systems
169Climate control
Page 172 of 502

Switching the rear-compartment cli-
mate control on/off using the front con- trol panel Observe the notes on controlling the rear-
compartment climate control using the front
control panel (Y page 169).
X Turn the SmartKey to position 2in the igni-
tion lock (Y page 189).
X To activate: press thetrocker switch
up or down.
The COMAND climate control menu opens.
X Select "Rear adjustment" in the air-condi-
tioning setting bar (see the separate
COMAND operating instructions).
You can control the rear-compartment cli-
mate control using the front control panel
or COMAND.
X Activate rear-compartment climate control
via the air-conditioning setting bar.
X To deactivate: press thetrocker
switch up or down.
The COMAND climate control menu opens.
X Select "Rear adjustment" in the air-condi-
tioning setting bar (see the separate
COMAND operating instructions).
X Deactivate rear-compartment climate con-
trol via the air-conditioning setting bar.
Switching rear-compartment climate
control on/off using the rear control
panel X
Turn the SmartKey to position 2in the igni-
tion lock (Y page 189).
X To activate: press rocker switch Lup or
down (Y page 165).
The indicator lamp in rocker switch Lgoes
out. All settings are displayed in full in the
rear-compartment display.
X To deactivate: press rocker switch Lup
or down (Y page 165).
The indicator lamp in rocker switch L
lights up. OFF
OFF is displayed in the rear-com-
partment display. Activating/deactivating cooling with
air dehumidification
General notes If you deactivate the "Cooling with air-dehu-
midification" function, the air inside the vehi-
cle will not be cooled. The air inside the vehi-
cle will also not be dehumidified. The win-
dows can fog up more quickly. Therefore,
deactivate the cooling with air-dehumidifica-
tion function only briefly.
The "Cooling with air dehumidification" func-
tion is only available when the engine is run-
ning. The air inside the vehicle is cooled and
dehumidified according to the temperature
selected.
Condensation may drip from the underside of the vehicle when it is in cooling mode. This isnormal and not a sign that there is a malfunc-
tion.
Activating/deactivating cooling with
air dehumidification X
To activate: press theÁrocker switch
up or down.
The indicator lamp above the rocker switch lights up.
or
X Activate the "Cooling with air dehumidifi-
cation" function via COMAND (see the sep-
arate operating instructions).
X To deactivate: press theÁrocker
switch up or down.
The indicator lamp above the rocker switch
goes out.
or X Deactivate the "Cooling with air dehumidi-
fication" function via COMAND (see the
separate operating instructions). 170
Operating the climate control systemsClimate control
Page 173 of 502

Problems with the "Cooling with air dehumidification" function
Problem
Possible causes/consequences and
M
MSolutions The indicator lamp in
the
Á button
flashes three times or
remains off. Cooling
with air dehumidifica-
tion can also no longer
be switched on using
COMAND (see the sep-
arate operating instruc- tions). Cooling with air dehumidification has been deactivated due to a
malfunction.
X Visit a qualified specialist workshop. Setting climate control to automatic
General notes In automatic mode, the set temperature is
maintained automatically at a constant level. The system automatically regulates the tem-
perature of the dispensed air, the airflow and
the air distribution.
The automatic mode functions optimally
when the "Cooling with air dehumidification"
function is activated. If necessary, cooling
with air dehumidification can be deactivated.
If you deactivate the "Cooling with air-dehu-
midification" function, the air inside the vehi-
cle will not be cooled. The air inside the vehi- cle will also not be dehumidified. The win-
dows can fog up more quickly. Therefore,
deactivate the cooling with air-dehumidifica-
tion function only briefly. Controlling front climate control auto-
matically using the front control panel X
Turn the SmartKey to position 2in the igni-
tion lock (Y page 189).
X Set the desired temperature using the
w rocker switch on the front control
unit.
or
X Set the desired temperature using
COMAND (see the separate operating
instructions).
X To activate: press rocker switch Ãup
or down.
The indicator lamp in the Ãrocker
switch lights up.
X To switch to manual operation: press the
K rocker switch up or down.
or
X Set the airflow using COMAND (see the
separate operating instructions).
or
X Set the air distribution using COMAND (see
the separate operating instructions).
The indicator lamp in the Ãrocker
switch goes out.
In automatic mode, if you adjust the airflow or air distribution manually, the indicator lamp
on the Ãrocker switch goes out. The func-
tion which has not been changed manually, Operating the climate control systems
171Climate control