2015 MERCEDES-BENZ S-Class top tether
[x] Cancel search: top tetherPage 9 of 502

Charging the high-voltage battery
(important safety notes) ...................209
Chauffeur mode
Display message ............................ 352
Fully reclined position .................... 131
General notes ................................ 127
Installing the head restraint ........... 129
Moving front-passenger seat into
the chauffeur position .................... 128
Moving the front-passenger seat
into the normal position ................. 130
Removing the head restraint .......... 129
Child
Restraint system .............................. 70
Child seat
Forward-facing restraint system ...... 74
LATCH-type (ISOFIX) child seat
anchors ............................................ 71
On the front-passenger sea t............ 74
Rearward-facing restraint system .... 74
Top Tether ....................................... 73
Child-proof locks
Important safety notes .................... 74
Rear doors ....................................... 75
Children
In the vehicle ................................... 69
Special seat belt retractor ............... 69
Cigarette lighter ................................ 383
Cleaning
Mirror turn signal ........................... 415
Climate control
Automatic climate control ............. 165
Controlling automaticall y............... 171
Cooling with air dehumidification .. 170
Defrosting the windows ................. 176
Defrosting the windshield .............. 175
ECO start/stop function ................ 169
General notes ................................ 164
Immediate pre-entry climate con-
trol ................................................. 183
Indicator lamp ................................ 171
Ionization ....................................... 180
Notes on using the automatic cli-
mate control .................................. 169
Overview of systems ...................... 164
Perfume atomizer .......................... 178 Pre-entry climate control at
departure time (REMOTE CLI-
MATE CONTROL) ........................... 182
Pre-entry climate control via key ... 180
Problem with the rear window
defroster ........................................ 177
Problems with cooling with air
dehumidification ............................ 171
Rear control panel ......................... 165
Refrigerant ..................................... 494
Refrigerant filling capacity ............. 495
Setting the air distribution ............. 174
Setting the air vents ...................... 184
Setting the airflow ......................... 174
Setting the climate mod e............... 173
Setting the temperature ................ 173
Switching air-recirculation mode
on/of f............................................ 177
Switching on/of f........................... 169
Switching residual heat on/off ...... 177
Switching the rear window
defroster on/of f............................ 176
Switching the synchronization
function on and off ........................ 175
Climate control system
Climate control .............................. 169
Cockpit
Overview .......................................... 34
COLLISION PREVENTION ASSIST
PLUS
Activating/deactivating ................. 309
Display message ............................ 325
Operation/note s.............................. 79
COMAND display
Cleaning ......................................... 417
Combination switch .......................... 152
Consumption statistics (on-board
computer) .......................................... 300
Convenience closing feature ............ 108
Convenience opening feature .......... 107
Coolant (engine)
Checking the level ......................... 408
Display message ............................ 336
Displaying the temperature (on-
board computer) ............................ 307
Filling capacity ............................... 493
Important safety notes .................. 493
Temperature gaug e........................ 294 Index
7
Page 23 of 502

Structure and characteristics
(definition) ..................................... 463
Summer tires in winter .................. 444
Temperature .................................. 459
TIN (Tire Identification Number)
(definition) ..................................... 465
Tire bead (definition) ...................... 465
Tire pressure (definition) ................ 464
Tire pressures (recommended) ...... 463
Tire size (data )............................... 471
Tire size designation, load-bearing capacity, speed rating .................... 459
Tire tread ....................................... 443
Tire tread (definition) ..................... 465
Total load limit (definition) ............. 465
Traction ......................................... 458
Traction (definition) ....................... 465
Tread wear ..................................... 458
Uniform Tire Quality Grading
Standards ...................................... 458
Uniform Tire Quality Grading
Standards (definition) .................... 463
Wear indicator (definition) ............. 465
Wheel and tire combination ........... 473
Wheel rim (definition) .................... 463
see Flat tire
Top Tether ............................................ 73
Tow-starting
Emergency engine starting ............ 438
Important safety notes .................. 435
Towing away
Important safety guidelines ........... 435
Installing the towing eye ................ 436
Notes for 4MATIC vehicles ............ 438
Removing the towing eye ............... 436
With both axles on the ground ....... 436
With the rear axle raised ................ 437
Towing eye ......................................... 422
Transfer case ..................................... 205
Transmission
see Automatic transmission
Transporting the vehicle .................. 437
Trim pieces (cleaning instruc-
tions) .................................................. 418
Trip computer (on-board com-
puter) .................................................. 300 Trip odometer
Calling up ....................................... 299
Resetting (on-board computer) ...... 301
Trunk
Emergency release ........................ 105
Important safety notes .................. 100
Locking separately ......................... 104
Opening/closing (automatically
from inside) ................................... 104
Opening/closing (automatically
from outside) ................................. 101
Opening/closing (from outside,
HANDS-FREE ACCESS) .................. 102
Opening/closing (manually from
outside) ......................................... 101
Power closing .................................. 98
Trunk lid
Display message ............................ 352
Obstacle recognition ...................... 100
Opening dimensions ...................... 495
Opening/closing ............................ 100
Trunk load (maximum) ...................... 495
Turn signals
Display message ............................ 333
Switching on/of f........................... 152
Two-way radio
Windshield (infrared reflective) ...... 401
Type identification plate
see Vehicle identification plate U
Unlocking Emergency unlocking ....................... 98
From inside the vehicle (central
unlocking button) ............................. 97 V
Vanity mirror (in the sun visor) ........ 381
Vehicle
Correct use ...................................... 29
Data acquisition ............................... 30
Display message ............................ 351
Equipment ....................................... 25
Individual settings .......................... 308
Limited Warranty ............................. 30
Loading .......................................... 453
Locking (in an emergency) ............... 99 Index
21
Page 73 of 502

G
WARNING
Child restraint systems or their securing sys-
tems which have been damaged or subjected to a load in an accident can no longer protect
as intended. The child cannot then be
restrained in the event of an accident, heavy
braking or sudden changes of direction. There is an increased risk of injury, possibly even
fatal.
Replace child restraint systems which have
been damaged or subjected to a load in an
accident as soon as possible. Have the secur-
ing systems on the child restraint system
checked at a qualified specialist workshop,
before you install a child restraint system
again.
The securing systems of child restraint sys-
tems are:
R the seat belt system
R the LATCH-type (ISOFIX) securing rings
R the Top Tether anchorages
If it is absolutely necessary to carry a child on the front-passenger seat, be sure to observe
the information on the "Occupant Classifica-
tion System (OCS)" (Y page 59). There you
will also find information on deactivating the
front-passenger front air bag.
All child restraint systems must meet the fol- lowing standards:
R U.S. Federal Motor Vehicle Safety Stand-
ards 213 and 225
R Canadian Motor Vehicle Safety Standards
213 and 210.2
Confirmation that the child restraint system
corresponds to the standards can be found
on an instruction label on the child restraint
system. This confirmation can also be found
in the installation instructions that are inclu-
ded with the child restraint system.
Observe the warning labels in the vehicle inte-
rior and on the child restraint system. Vehicles with seat belt extenders:
when
securing a child in a child restraint system on
a rear seat, observe the following instruc-
tions:
R make sure that the seat belt on the child
restraint system is fastened according to
the manufacturer's installation instruc-
tions for the child restraint system.
R for child restraint systems with a belt
clamp: engage the belt tongue in the buckle
before you tighten the seat belt using the
belt clamp.
Vehicles with a rear reclining seat: when
installing a child restraint system, move the
rear reclining seat backrest to an almost ver-
tical position. The rear reclining seat backrest
must rest against the child restraint system.
Observe the notes on the cushion air bag
(Y page 59).
Vehicles with belt bags: only use a child
restraint system which has been approved by
Mercedes-Benz. Always observe the instruc-
tions and safety notes on belt bags for the
outer seat belts in the rear (Y page 53). LATCH-type (ISOFIX) child seat secur-
ing system G
WARNING
LATCH-type (ISOFIX) child restraint systems
do not offer sufficient protective effect for
children whose weight is greater than 48 lbs
(22 kg) who are secured using the safety belt integrated in the child restraint system. In the
event of an accident, a child might not be
restrained correctly. This poses an increased
risk of injury or even fatal injury.
If the child weighs more than 48 lbs (22 kg),
only use LATCH-type (ISOFIX) child restraint
systems with which the child is also secured
with the vehicle seat belt. Also secure the
child restraint system with the Top Tether
belt, if available. Children in the vehicle
71Safety Z
Page 75 of 502

Top Tether
Introduction Top Tether provides an additional connection
between the child restraint system secured
with a LATCH-type (ISOFIX) child seat mount
and the vehicle. This helps reduce the risk of
injury even further. If the child restraint sys-
tem is equipped with a Top Tether belt, this
should always be used.
Important safety notes G
WARNING
If the rear seat backrests are not locked, they
could fold forwards in the event of an acci-
dent, heavy braking or sudden changes of
direction. As a result, child restraint systems
cannot perform their intended protective
function. Rear seat backrests that are not
locked can also cause additional injuries, e.g. in the event of an accident. This poses an
increased risk of injury or even fatal injury.
Always lock rear seat backrests after instal-
ling a Top Tether belt. Observe the lock veri-
fication indicator. Adjust the rear seat backr-
ests so that they are in an upright position. G
WARNING
Vehicles with electrically adjustable rear
bench seats:
If you adjust the seat after installing a child
restraint system:
R the seat belt could slacken or become too
tight
R the child restraint system could become
loose, incorrectly positioned or damaged
As a result, the child restraint system may not
be able to provide the intended level of pro-
tection. This poses an increased risk of injury or even fatal injury.
Never adjust the seat after installing the child
restraint system.
If the rear seat backrest is not engaged and
locked, this will be shown in the multifunction display in the instrument cluster. A warning
tone also sounds.
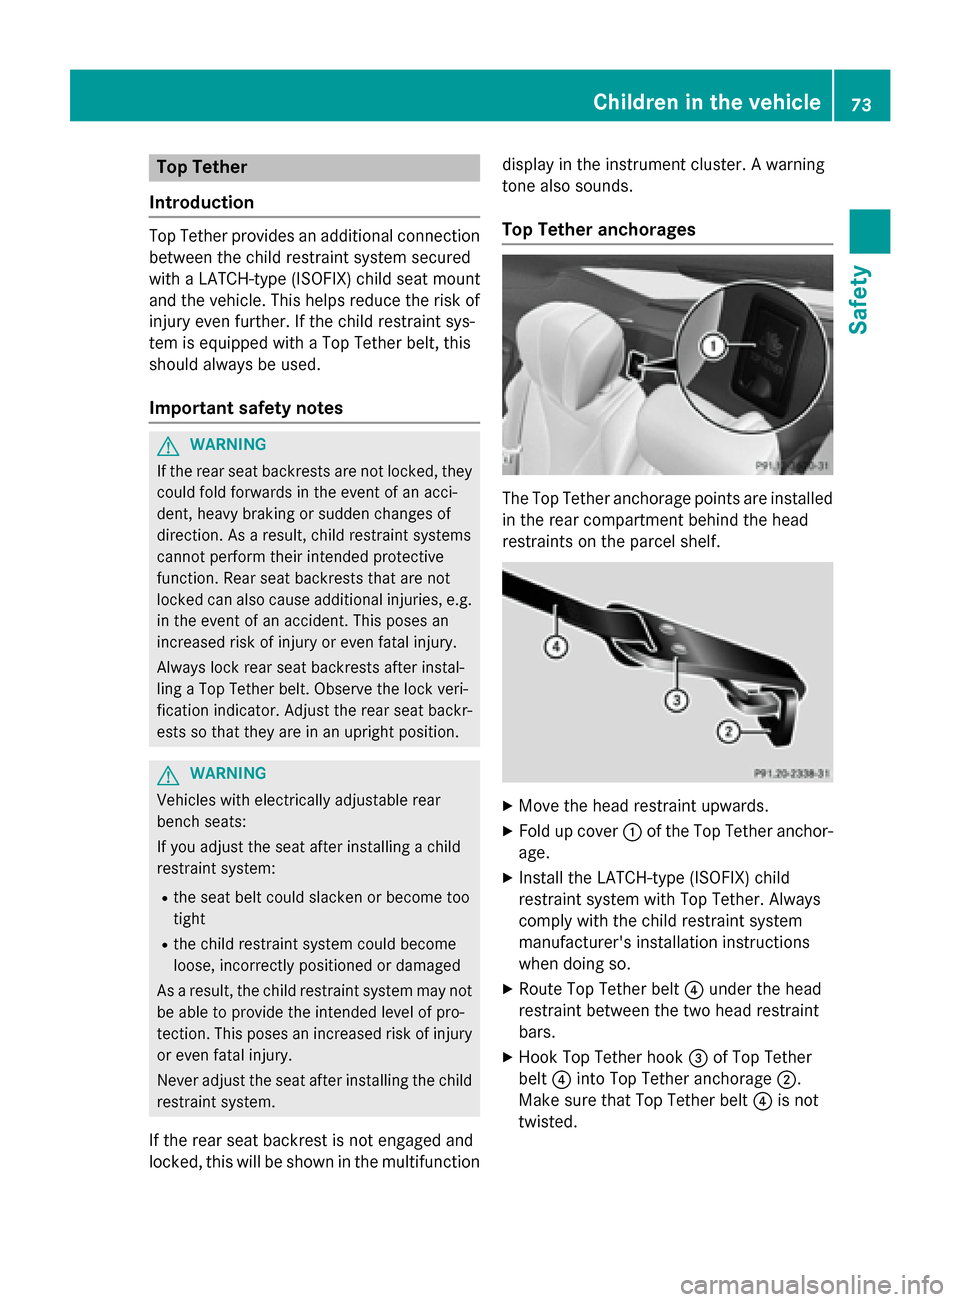
Top Tether anchorages The Top Tether anchorage points are installed
in the rear compartment behind the head
restraints on the parcel shelf. X
Move the head restraint upwards.
X Fold up cover :of the Top Tether anchor-
age.
X Install the LATCH-type (ISOFIX) child
restraint system with Top Tether. Always
comply with the child restraint system
manufacturer's installation instructions
when doing so.
X Route Top Tether belt ?under the head
restraint between the two head restraint
bars.
X Hook Top Tether hook =of Top Tether
belt ?into Top Tether anchorage ;.
Make sure that Top Tether belt ?is not
twisted. Children in the vehicle
73Safety Z
Page 76 of 502

X
Tension Top Tether belt ?. Always comply
with the child restraint system manufactur- er's installation instructions when doing so.
X Fold down cover :of the Top Tether
anchorage.
X If necessary, move the head restraint back
down again slightly (Y page 133). Make
sure that you do not interfere with the cor-
rect routing of Top Tether belt ?.Child restraint system on the front-
passenger seat
General notes Accident statistics show that children
secured in the rear seats are safer than chil-
dren secured in the front-passenger seat. For
this reason, Mercedes-Benz strongly advises
that you install the child restraint system on a
rear seat.
If it is absolutely necessary to install a child
restraint system on the front-passenger seat,
be sure to observe the instructions and safety
notes on the "Occupant Classification System (OCS)" (Y page 59).
You can thus avoid the risks that could arise
as a result of:
R an incorrectly categorized person in the
front-passenger seat
R the unintentional deactivation of the front-
passenger front air bag
R the unsuitable positioning of the child
restraint system, e.g. too close to the dash- board
Rearward-facing child restraint system If it is absolutely necessary to install a rear-
ward-facing child restraint system on the
front-passenger seat, always make sure that
the front-passenger front air bag is deactiva-
ted. Only if the PASSENGER AIR BAG OFF
indicator lamp is permanently lit (Y page 50)
is the front-passenger front air bag deactiva-
ted. Always observe the child restraint system
manufacturer's installation and operating
instructions.
Forward-facing child restraint system If it is absolutely necessary to install a
forward-facing child restraint system on the
front-passenger seat, always move the front-
passenger seat as far back as possible. Fully
retract the seat cushion length. The entire
base of the child restraint system must
always rest on the seat cushion of the front-
passenger seat. The backrest of the child
restraint system must lie as flat as possible
against the backrest of the front-passenger
seat. The child restraint system must not
touch the roof or be subjected to a load by the
head restraint. Adjust the angle of the seat
backrest and the head restraint position
accordingly. Always make sure that the shoul- der belt strap is correctly routed from the
vehicle belt outlet to the shoulder belt guide
on the child restraint system. The shoulder
belt strap must be routed forwards and down-
wards from the vehicle belt outlet. If neces-
sary, adjust the vehicle belt outlet and the
front-passenger seat accordingly.
Always observe the child restraint system
manufacturer's installation and operating
instructions. Child-proof locks
Important safety notes G
WARNING
If children are traveling in the vehicle, they
could:
R open doors, thus endangering other people
or road users
R exit the vehicle and be caught by oncoming
traffic
R operate vehicle equipment and become
trapped
There is a risk of an accident and injury. 74
Children in the vehicleSafety