2015 MERCEDES-BENZ S-Class remove seats
[x] Cancel search: remove seatsPage 141 of 502

Problems with the steering wheel heating
Problem
Possible causes/consequences and
M
MSolutions The steering wheel
heating has switched
off prematurely or can-
not be switched on. The on-board voltage is too low because too many electrical con-
sumers are switched on.
X Switch off electrical consumers that you do not need, such as
the rear window defroster or interior lighting. EASY-ENTRY/EXIT feature
Important safety notes G
WARNING
When the EASY-ENTRY/EXIT feature adjusts
the steering wheel and the driver's seat, you
and other vehicle occupants – particularly
children – could become trapped. There is a
risk of injury.
While the EASY-ENTRY/EXIT feature is mak-
ing adjustments, make sure that no one has
any body parts in the sweep of the seat and
the steering wheel.
If there is a risk of becoming trapped by
R the steering wheel: move the steering
wheel adjustment lever.
R the seat: press the switch for seat adjust-
ment.
The adjustment process is stopped.
Press one of the memory function position
switches. The adjustment process is stopped.
This function is only available on vehicles with
memory function. G
WARNING
If children activate the EASY-ENTRY/EXIT fea- ture, they can become trapped, particularly
when unattended. There is a risk of injury.
When leaving the vehicle, always take the
SmartKey with you and lock the vehicle. Never leave children unsupervised in the vehicle. G
WARNING
If you drive off while the EASY-ENTRY/EXIT
feature is making adjustments, you could lose control of the vehicle. There is a risk of an
accident.
Always wait until the adjustment process is
complete before driving off.
The EASY-ENTRY/EXIT feature makes getting in and out of your vehicle easier.
You can activate and deactivate the EASY-
ENTRY/EXIT feature using COMAND (see theseparate operating instructions).
Position of the steering wheel and the
driver's seat when the EASY-ENTRY/
EXIT feature is active The steering wheel tilts upwards and the driv-
er's seat moves backwards if you:
R remove the SmartKey from the ignition lock
R with KEYLESS-GO: open the driver's door;
KEYLESS-GO must be in position 1
R with the SmartKey: open the driver's
door; the SmartKey must be in position 0or
1 in the ignition lock (Y page 189)
R open the driver's door when the ignition is
switched off
i The steering wheel only tilts upwards and
the driver's seat only moves backwards if
the driving position is stored after seat or
steering wheel adjustment (Y page 144).
The last position of the steering wheel or seat is stored if:
R the ignition is switched off
R the setting is stored with the memory func-
tion (Y page 144). Steering wheel
139Seats, steering wheel and mirrors Z
Page 142 of 502

i
The steering wheel only moves upwards if
it has not already reached the upper stop.
The driver's seat only moves backwards if it is not already in the rearmost position.
Position of the steering wheel and the
driver's seat for driving The steering wheel and the driver's seat are
moved to the previously set position if:
R the driver's door is closed and you insert
the SmartKey into the ignition lock
R you close the driver's door when the igni-
tion is switched on
R you press the Start/Stop button once on
vehicles with KEYLESS-GO
i The steering wheel and the driver's seat
only return to the last set position when the
driving position is stored after seat or steer-
ing wheel adjustment (Y page 144).
The last position of the steering wheel or seat is stored if:
R the ignition is switched off
R the setting is stored with the memory func-
tion (Y page 144).
Crash-responsive EASY-EXIT feature If the crash-responsive EASY-EXIT feature is
triggered in an accident, the steering column
will move upwards when the driver's door is
opened or the SmartKey is removed from the ignition lock. This makes it easier to exit the
vehicle and rescue the occupants.
The crash-responsive EASY-EXIT feature is
only operational if the EASY-EXIT/ENTRY fea-
ture is activated in COMAND (see the sepa-
rate operating instructions). Mirrors
Rear-view mirror
X
Anti-glare mode: flick anti-glare lever :
forwards or back. Exterior mirrors
Important safety notes G
WARNING
You could lose control of your vehicle if you do the following while driving:
R adjust the driver's seat, head restraint,
steering wheel or mirrors
R fasten the seat belt
There is a risk of an accident.
Adjust the driver's seat, head restraint, steer-
ing wheel and mirror and fasten your seat belt before starting the engine. G
WARNING
The exterior mirror on the front-passenger
side reduces the size of the image. Visible
objects are actually closer than they appear.
This means that you could misjudge the dis-
tance from road users traveling behind, e.g.
when changing lane. There is a risk of an acci-
dent.
For this reason, always make sure of the
actual distance from the road users traveling
behind by glancing over your shoulder. 140
MirrorsSeats, steering wheel and mirrors
Page 381 of 502

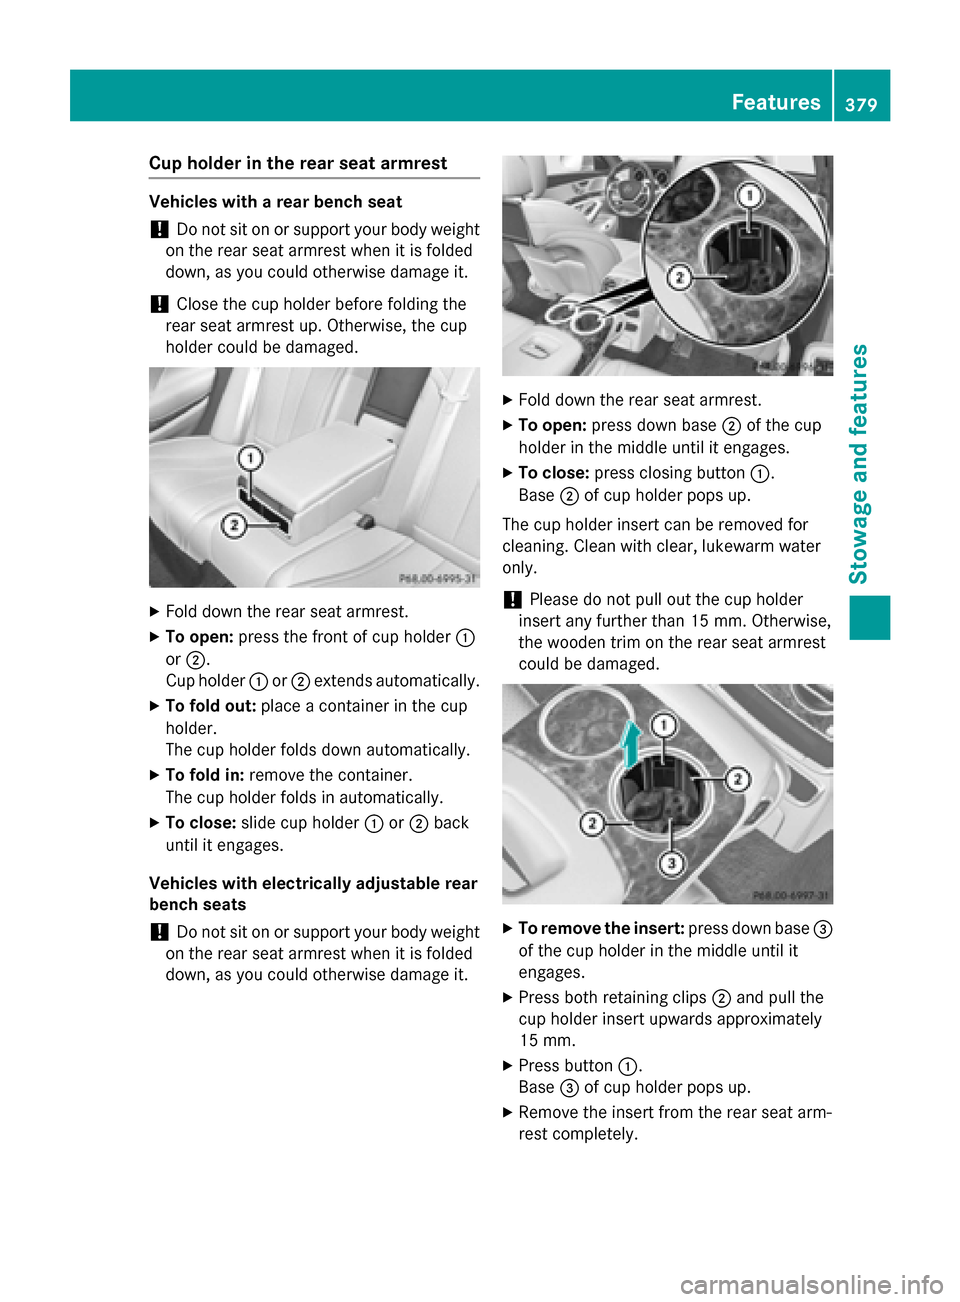
Cup holder in the rear seat armrest
Vehicles with a rear bench seat
! Do not sit on or support your body weight
on the rear seat armrest when it is folded
down, as you could otherwise damage it.
! Close the cup holder before folding the
rear seat armrest up. Otherwise, the cup
holder could be damaged. X
Fold down the rear seat armrest.
X To open: press the front of cup holder :
or ;.
Cup holder :or; extends automatically.
X To fold out: place a container in the cup
holder.
The cup holder folds down automatically.
X To fold in: remove the container.
The cup holder folds in automatically.
X To close: slide cup holder :or; back
until it engages.
Vehicles with electrically adjustable rear
bench seats
! Do not sit on or support your body weight
on the rear seat armrest when it is folded
down, as you could otherwise damage it. X
Fold down the rear seat armrest.
X To open: press down base ;of the cup
holder in the middle until it engages.
X To close: press closing button :.
Base ;of cup holder pops up.
The cup holder insert can be removed for
cleaning. Clean with clear, lukewarm water
only.
! Please do not pull out the cup holder
insert any further than 15 mm. Otherwise,
the wooden trim on the rear seat armrest
could be damaged. X
To remove the insert: press down base=
of the cup holder in the middle until it
engages.
X Press both retaining clips ;and pull the
cup holder insert upwards approximately
15 mm.
X Press button :.
Base =of cup holder pops up.
X Remove the insert from the rear seat arm-
rest completely. Features
379Stowage and features Z
Page 385 of 502

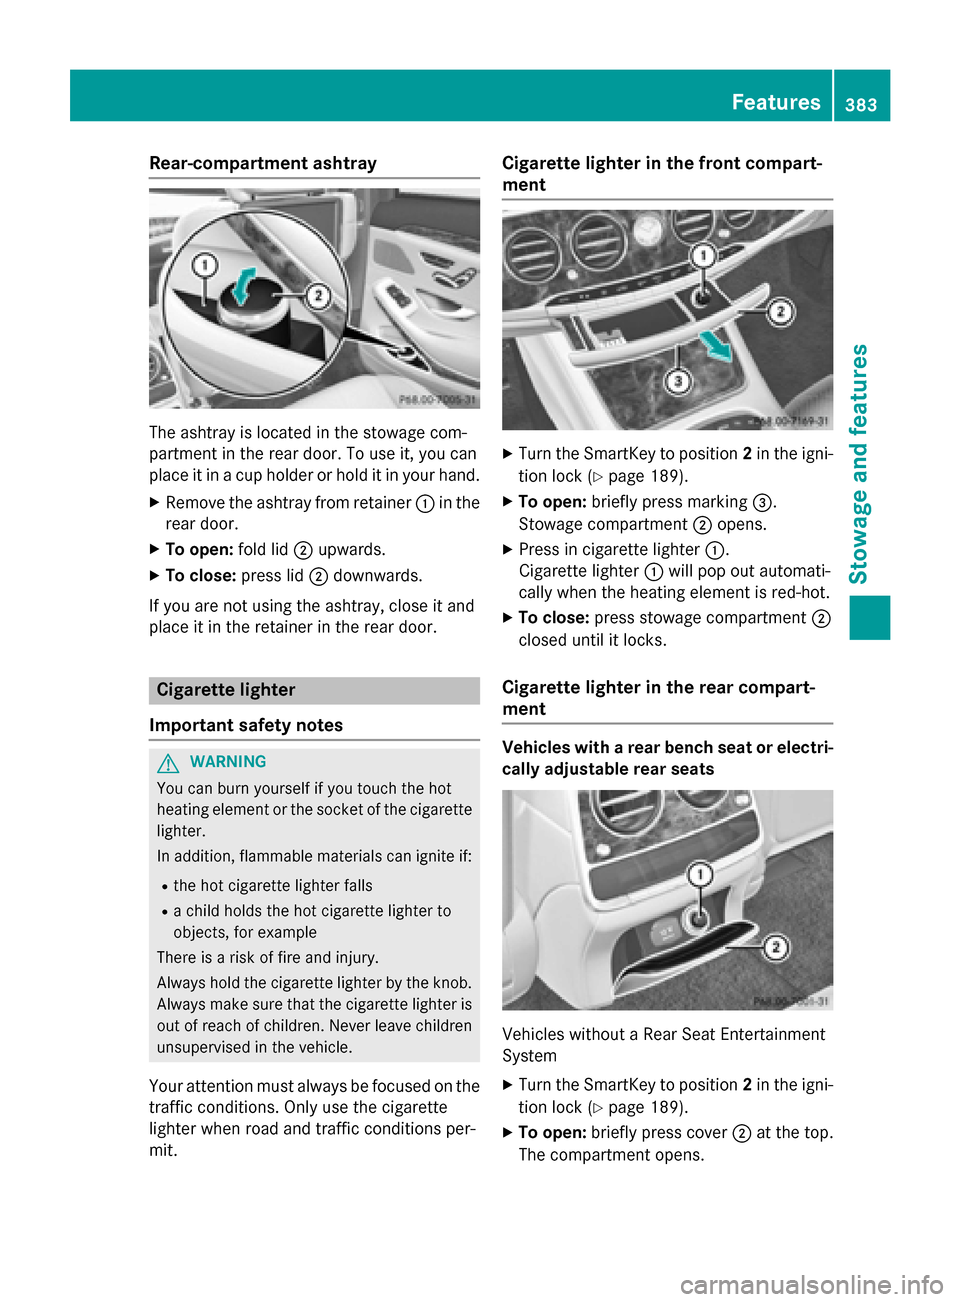
Rear-compartment ashtray
The ashtray is located in the stowage com-
partment in the rear door. To use it, you can
place it in a cup holder or hold it in your hand.
X Remove the ashtray from retainer :in the
rear door.
X To open: fold lid;upwards.
X To close: press lid;downwards.
If you are not using the ashtray, close it and
place it in the retainer in the rear door. Cigarette lighter
Important safety notes G
WARNING
You can burn yourself if you touch the hot
heating element or the socket of the cigarette lighter.
In addition, flammable materials can ignite if:
R the hot cigarette lighter falls
R a child holds the hot cigarette lighter to
objects, for example
There is a risk of fire and injury.
Always hold the cigarette lighter by the knob.
Always make sure that the cigarette lighter is
out of reach of children. Never leave children unsupervised in the vehicle.
Your attention must always be focused on the traffic conditions. Only use the cigarette
lighter when road and traffic conditions per-
mit. Cigarette lighter in the front compart-
ment
X
Turn the SmartKey to position 2in the igni-
tion lock (Y page 189).
X To open: briefly press marking =.
Stowage compartment ;opens.
X Press in cigarette lighter :.
Cigarette lighter :will pop out automati-
cally when the heating element is red-hot.
X To close: press stowage compartment ;
closed until it locks.
Cigarette lighter in the rear compart-
ment Vehicles with a rear bench seat or electri-
cally adjustable rear seats Vehicles without a Rear Seat Entertainment
System
X Turn the SmartKey to position 2in the igni-
tion lock (Y page 189).
X To open: briefly press cover ;at the top.
The compartment opens. Features
383Stowage and features Z
Page 388 of 502

R
Use only connector cables that are dry and
free of damage.
R When the ignition is off, make sure that the
115 V power socket is dry.
R Have the 115 V power socket checked or
replaced immediately at a qualified speci-
alized workshop if it is damaged or has been
pulled out of the trim.
R Never plug the connector cable into a 115 V
power socket that is damaged or has been
pulled out of the trim. G
DANGER
If you reach into the power socket or plug
inappropriate devices into the power socket,
you could receive an electric shock. There is a risk of fatal injury.
Only connect appropriate devices to the
power socket.
! Note that work and repairs on the 115 V
power socket should only be carried out by
qualified specialist personnel.
General notes The 115 V power socket provides an alter-
nating voltage of 115 V so that small elec-
tronic devices can be connected. These devi- ces, such as games consoles, chargers and
laptops, must not consume more than a max-imum of 150 watts altogether.
Requirements for operation of these devices:
R the electronic device that you connect has
a suitable connector and conforms to
standards specific to the country you are in.
R the plug of the electronic device is plugged
correctly into 115 V power socket.
R the maximum wattage of the device to be
connected must not exceed 150 watts.
R the on-board power supply is within a per-
missible voltage range.
R the 12 V sockets in the center console in
the front compartment (Y page 384) and in
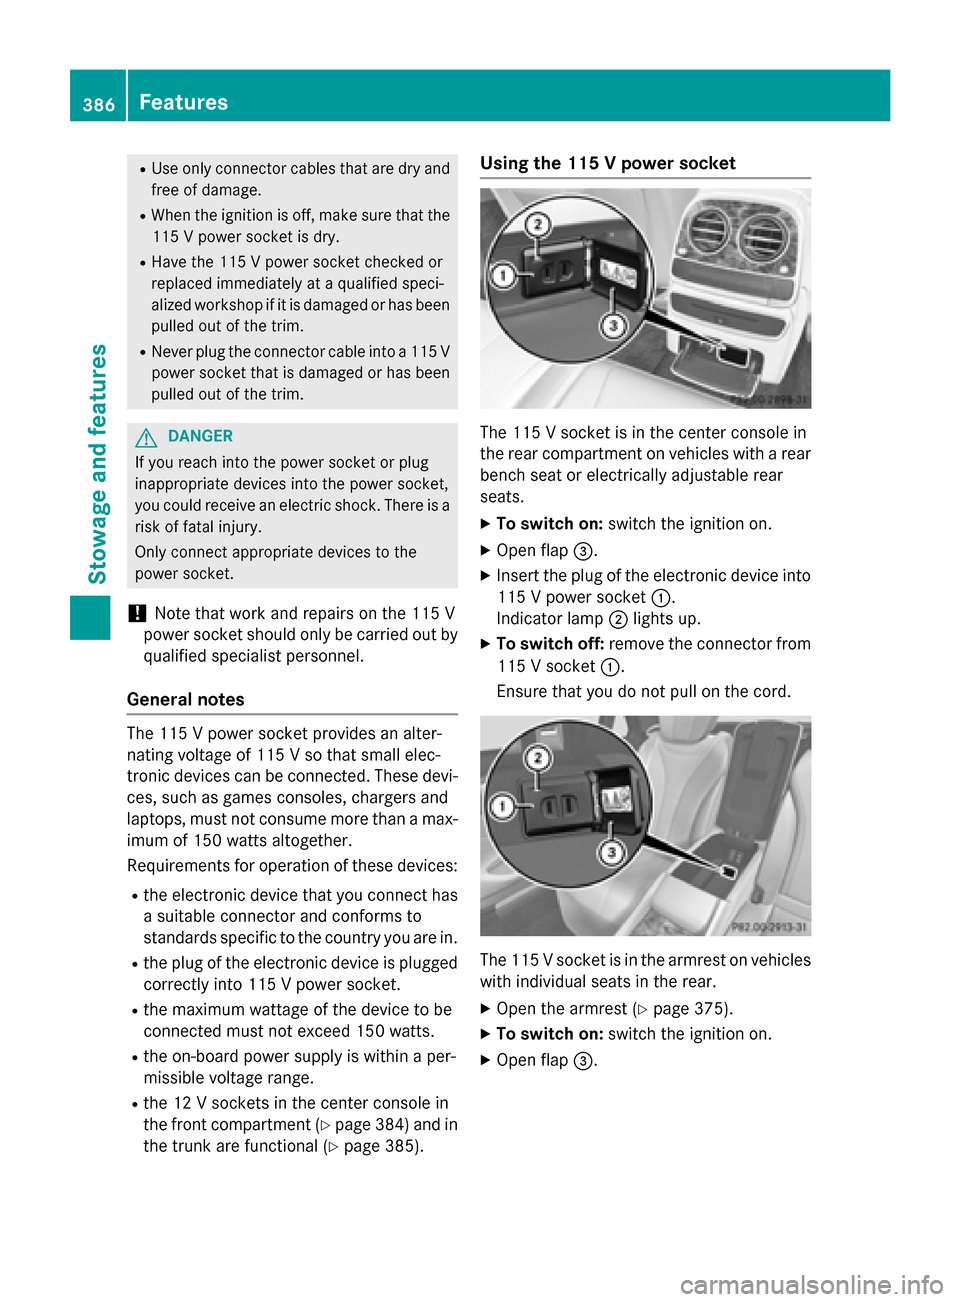
the trunk are functional (Y page 385).Using the 115 V power socket
The 115 V socket is in the center console in
the rear compartment on vehicles with a rear
bench seat or electrically adjustable rear
seats.
X To switch on: switch the ignition on.
X Open flap =.
X Insert the plug of the electronic device into
115 V power socket :.
Indicator lamp ;lights up.
X To switch off: remove the connector from
115 V socket :.
Ensure that you do not pull on the cord. The 115 V socket is in the armrest on vehicles
with individual seats in the rear.
X Open the armrest (Y page 375).
X To switch on: switch the ignition on.
X Open flap =. 386
FeaturesStowage and features
Page 403 of 502

Clearing the memory
Make sure that you clear the memory of the
integrated garage door opener before selling
the vehicle.
X Turn the SmartKey to position 2in the igni-
tion lock (Y page 189).
X Press and hold buttons ;and ?.
The indicator lamp initially lights up yellow
and then green.
X Release buttons ;and ?.
The memory of the integrated garage door
opener in the rear-view mirror is cleared. Floormats
G
WARNING
Objects in the driver's footwell can restrict the pedal travel or obstruct a depressed pedal.
The operating and road safety of the vehicle is
jeopardized. There is a risk of an accident.
Make sure that all objects in the vehicle are
stowed correctly, and that they cannot enter
the driver's footwell. Install the floormats
securely and as specified in order to ensure
sufficient clearance for the pedals. Do not use loose floormats and do not place floormats on
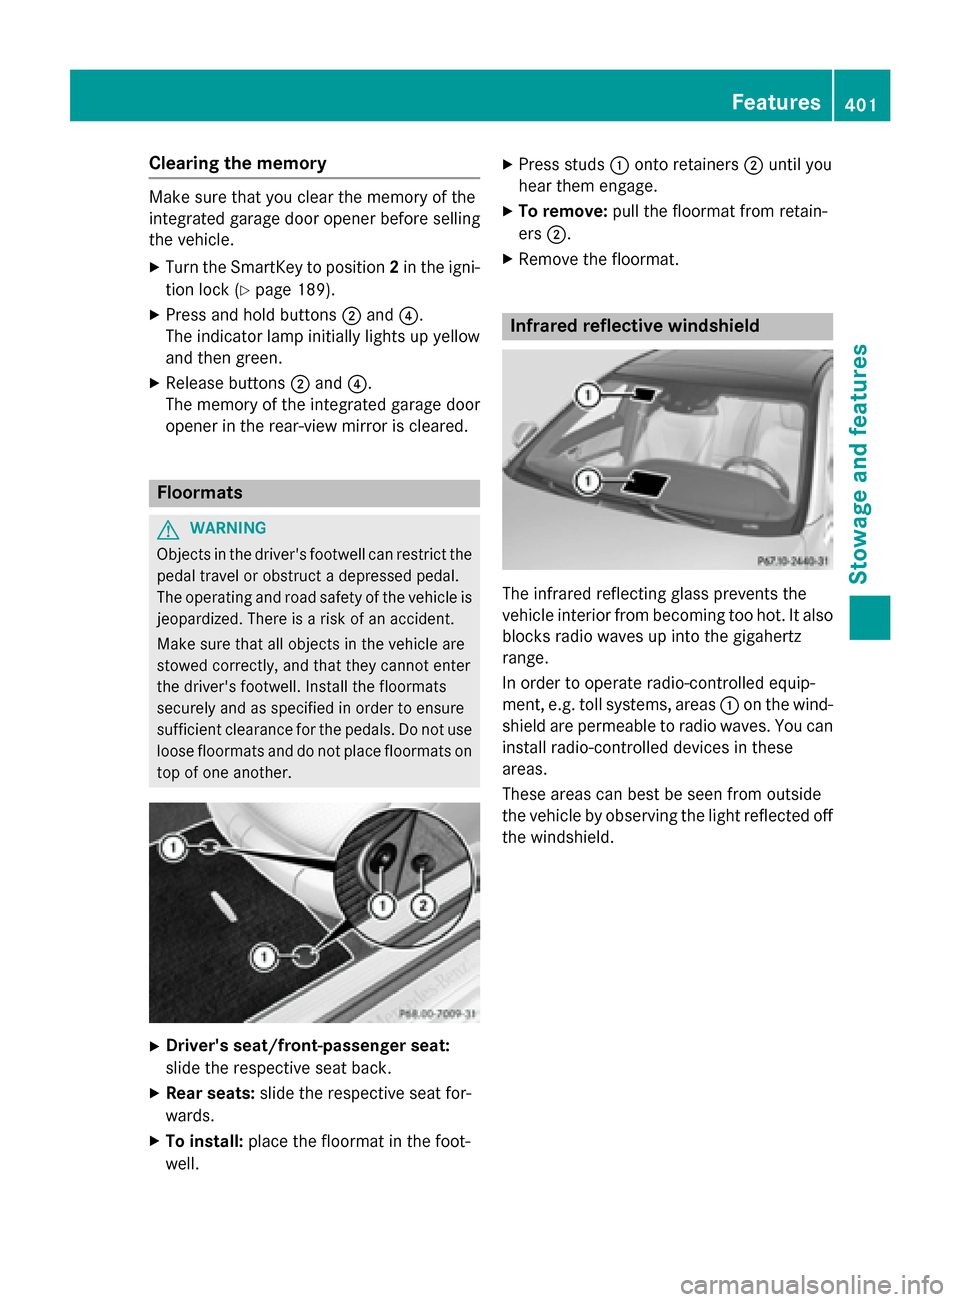
top of one another. X
Driver's seat/front-passenger seat:
slide the respective seat back.
X Rear seats: slide the respective seat for-
wards.
X To install: place the floormat in the foot-
well. X
Press studs :onto retainers ;until you
hear them engage.
X To remove: pull the floormat from retain-
ers ;.
X Remove the floormat. Infrared reflective windshield
The infrared reflecting glass prevents the
vehicle interior from becoming too hot. It also
blocks radio waves up into the gigahertz
range.
In order to operate radio-controlled equip-
ment, e.g. toll systems, areas :on the wind-
shield are permeable to radio waves. You can install radio-controlled devices in these
areas.
These areas can best be seen from outside
the vehicle by observing the light reflected off the windshield. Features
401Stowage and features Z
Page 430 of 502

G
WARNING
Electrostatic build-up can lead to the creation of sparks, which could ignite the highly explo-
sive gases of a battery. There is a risk of an
explosion.
Before handling the battery, touch the vehicle body to remove any existing electrostatic
build-up.
The highly flammable gas mixture forms when
charging the battery as well as when jump-
starting.
Always make sure that neither you nor the
battery is electrostatically charged. A build-
up of electrostatic charge can be caused, for
example:
R by wearing clothing made from synthetic
fibers
R due to friction between clothing and seats
R if you push or pull the battery across the
carpet or other synthetic materials
R if you wipe the battery with a cloth G
WARNING
During the charging process, a battery produ- ces hydrogen gas. If a short circuit occurs or
sparks are created, the hydrogen gas can
ignite. There is a risk of an explosion.
R Make sure that the positive terminal of a
connected battery does not come into con-
tact with vehicle parts.
R Never place metal objects or tools on a bat-
tery.
R It is important that you observe the descri-
bed order of the battery terminals when
connecting and disconnecting a battery.
R When jump-starting, make sure that the
battery poles with identical polarity are
connected.
R It is particularly important to observe the
described order when connecting and dis-
connecting the jumper cables.
R Never connect or disconnect the battery
terminals while the engine is running. G
WARNING
Battery acid is caustic. There is a risk of injury. Avoid contact with skin, eyes or clothing. Do
not inhale any battery gases. Do not lean over
the battery. Keep children away from batter-
ies. Wash away battery acid immediately with
plenty of clean water and seek medical atten- tion.
All vehicles: H
Environmental note Batteries contain dangerous
substances. It is against the
law to dispose of them with
the household rubbish. They
must be collected separately
and recycled to protect the
environment. Dispose of batteries in an
environmentally friendly
manner. Take discharged
batteries to a qualified spe-
cialist workshop or a special
collection point for used bat-
teries.
! Have the battery checked regularly at a
qualified specialist workshop.
Observe the service intervals in the Main-
tenance Booklet or contact a qualified spe-
cialist workshop for more information.
! Always have work on the batteries carried
out at a qualified specialist workshop.
Should it, in exceptional circumstances, be absolutely necessary to disconnect the 12-
volt battery yourself, please observe the
following:
R secure the vehicle to prevent it from roll-
ing away.
R you switch off the engine and remove the
SmartKey. Make sure the ignition is
switched off. Check that all the indicator lamps in the instrument cluster are off.
Otherwise, electronic components, such
as the alternator, may be damaged. 428
Battery (vehicle)Roadside Assistance