2015 MERCEDES-BENZ S-Class remove seats
[x] Cancel search: remove seatsPage 26 of 502

Protection of the environment
General notes
H
Environmental note
Daimler's declared policy is one of compre-
hensive environmental protection.
The objectives are for the natural resources
that form the basis of our existence on this
planet to be used sparingly and in a manner
that takes the requirements of both nature
and humanity into account.
You too can help to protect the environment
by operating your vehicle in an environmen-
tally responsible manner.
Fuel consumption and the rate of engine,
transmission, brake and tire wear are affected by these factors:
R operating conditions of your vehicle
R your personal driving style
You can influence both factors. You should
bear the following in mind:
Operating conditions:
R avoid short trips as these increase fuel con-
sumption.
R always make sure that the tire pressures
are correct.
R do not carry any unnecessary weight.
R remove roof racks once you no longer need
them.
R a regularly serviced vehicle will contribute
to environmental protection. You should
therefore adhere to the service intervals.
R always have service work carried out at a
qualified specialist workshop.
Personal driving style:
R do not depress the accelerator pedal when
starting the engine.
R do not warm up the engine when the vehicle
is stationary.
R drive carefully and maintain a safe distance
from the vehicle in front.
R avoid frequent, sudden acceleration and
braking. R
change gear in good time and use each gear
only up to Ôof its maximum engine speed.
R switch off the engine in stationary traffic.
R keep an eye on the vehicle's fuel consump-
tion. H
Environmental note
Have a defective high-voltage battery dis-
posed of in an environmentally-responsible
manner. Contact a qualified specialist work-
shop which has the necessary specialist
knowledge and tools to carry out the work
required. Mercedes-Benz recommends that
you use an authorized Mercedes-Benz Center
for this purpose. Environmental concerns and recom-
mendations
Wherever the operating instructions require
you to dispose of materials, first try to regen-
erate or re-use them. Observe the relevant
environmental rules and regulations when
disposing of materials. In this way you will
help to protect the environment. Genuine Mercedes-Benz parts
H
Environmental note
Daimler AG also supplies reconditioned major
assemblies and parts which are of the same
quality as new parts. They are covered by the same Limited Warranty entitlements as new
parts.
! Air bags and Emergency Tensioning Devi-
ces, as well as control units and sensors for
these restraint systems, may be installed in the following areas of your vehicle:
R doors
R door pillars
R door sills
R seats
R cockpit 24
Introduction
Page 74 of 502
Always comply with the manufacturer's
installation and operating instructions for the child restraint system used.
Before every trip, make sure that the LATCH-
type (ISOFIX) child restraint system is
engaged correctly in both LATCH-type (ISO-
FIX) securing rings
! When installing the child restraint system,
make sure that the seat belt for the middle seat does not get trapped. The seat belt
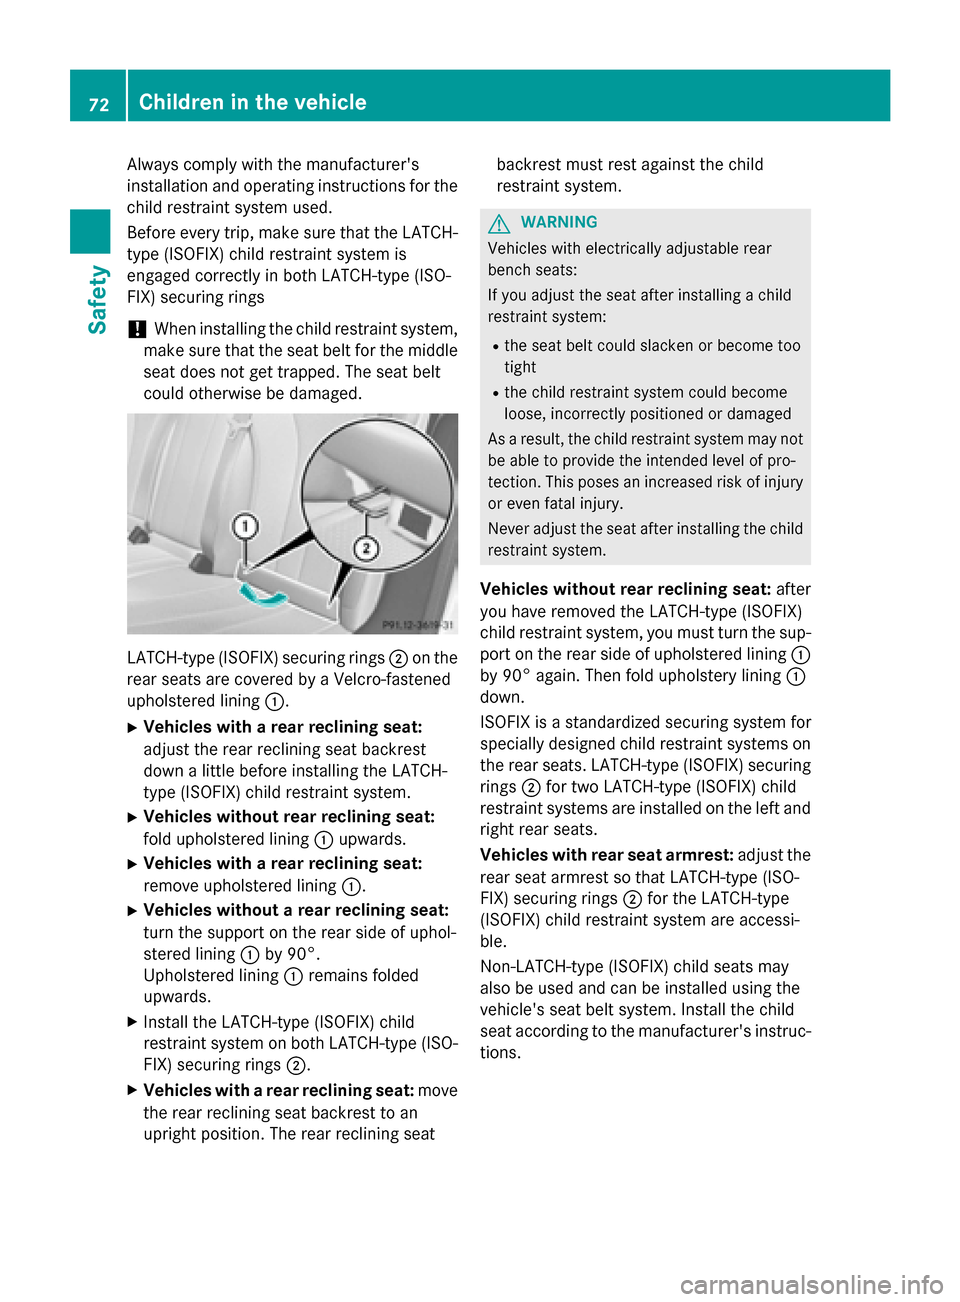
could otherwise be damaged. LATCH-type (ISOFIX) securing rings
;on the
rear seats are covered by a Velcro-fastened
upholstered lining :.
X Vehicles with a rear reclining seat:
adjust the rear reclining seat backrest
down a little before installing the LATCH-
type (ISOFIX) child restraint system.
X Vehicles without rear reclining seat:
fold upholstered lining :upwards.
X Vehicles with a rear reclining seat:
remove upholstered lining :.
X Vehicles without a rear reclining seat:
turn the support on the rear side of uphol-
stered lining :by 90°.
Upholstered lining :remains folded
upwards.
X Install the LATCH-type (ISOFIX) child
restraint system on both LATCH-type (ISO-
FIX) securing rings ;.
X Vehicles with a rear reclining seat: move
the rear reclining seat backrest to an
upright position. The rear reclining seat backrest must rest against the child
restraint system. G
WARNING
Vehicles with electrically adjustable rear
bench seats:
If you adjust the seat after installing a child
restraint system:
R the seat belt could slacken or become too
tight
R the child restraint system could become
loose, incorrectly positioned or damaged
As a result, the child restraint system may not
be able to provide the intended level of pro-
tection. This poses an increased risk of injury or even fatal injury.
Never adjust the seat after installing the child
restraint system.
Vehicles without rear reclining seat: after
you have removed the LATCH-type (ISOFIX)
child restraint system, you must turn the sup-
port on the rear side of upholstered lining :
by 90° again. Then fold upholstery lining :
down.
ISOFIX is a standardized securing system for
specially designed child restraint systems on
the rear seats. LATCH-type (ISOFIX) securing rings ;for two LATCH-type (ISOFIX) child
restraint systems are installed on the left and
right rear seats.
Vehicles with rear seat armrest: adjust the
rear seat armrest so that LATCH-type (ISO-
FIX) securing rings ;for the LATCH-type
(ISOFIX) child restraint system are accessi-
ble.
Non-LATCH-type (ISOFIX) child seats may
also be used and can be installed using the
vehicle's seat belt system. Install the child
seat according to the manufacturer's instruc- tions. 72
Children in the vehicleSafety
Page 129 of 502
Adjusting the front-passenger seat
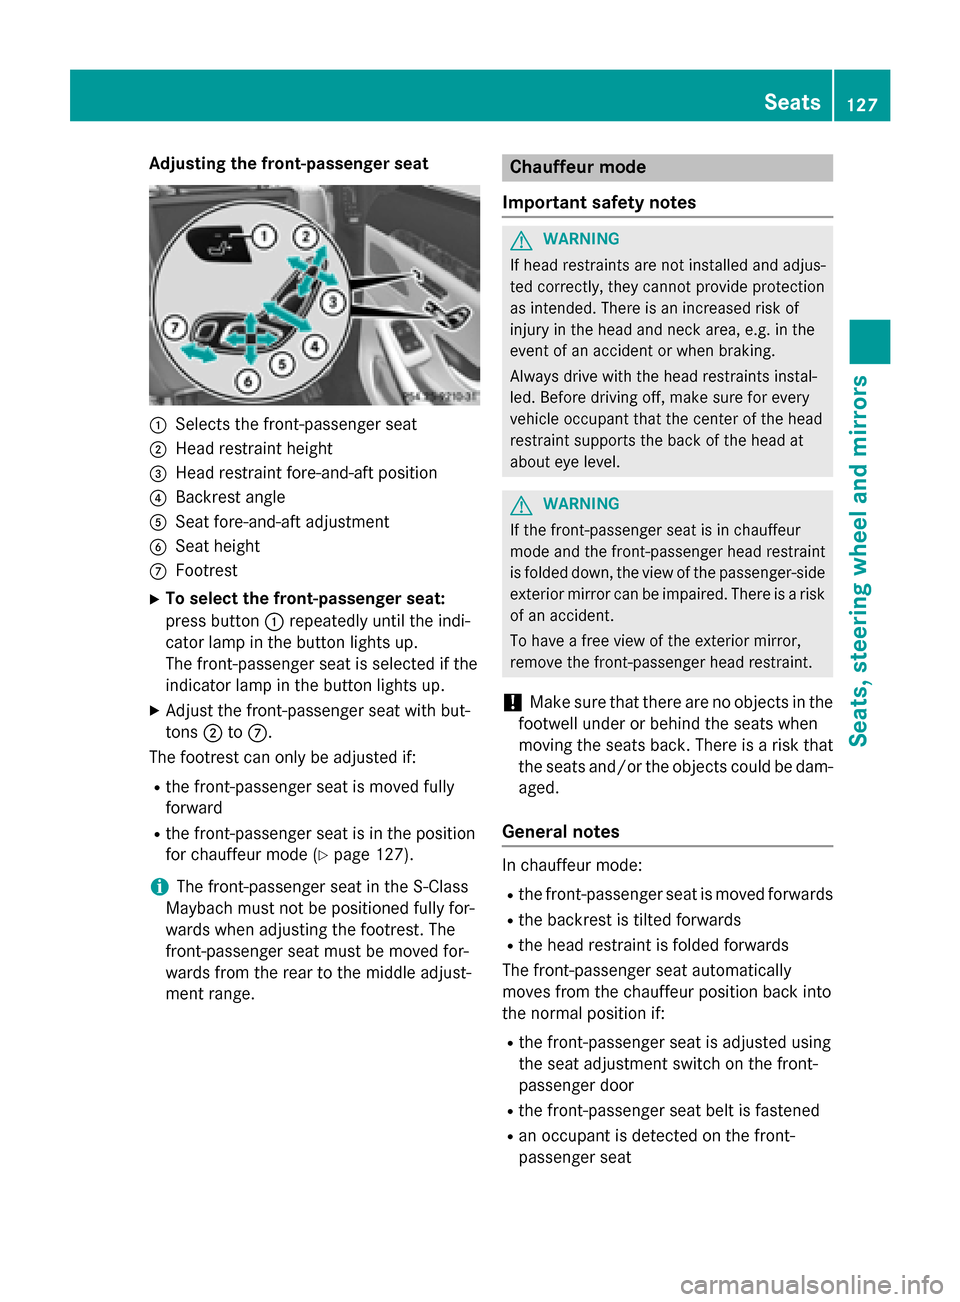
:
Selects the front-passenger seat
; Head restraint height
= Head restraint fore-and-aft position
? Backrest angle
A Seat fore-and-aft adjustment
B Seat height
C Footrest
X To select the front-passenger seat:
press button :repeatedly until the indi-
cator lamp in the button lights up.
The front-passenger seat is selected if the
indicator lamp in the button lights up.
X Adjust the front-passenger seat with but-
tons ;toC.
The footrest can only be adjusted if:
R the front-passenger seat is moved fully
forward
R the front-passenger seat is in the position
for chauffeur mode (Y page 127).
i The front-passenger seat in the S-Class
Maybach must not be positioned fully for-
wards when adjusting the footrest. The
front-passenger seat must be moved for-
wards from the rear to the middle adjust-
ment range. Chauffeur mode
Important safety notes G
WARNING
If head restraints are not installed and adjus-
ted correctly, they cannot provide protection
as intended. There is an increased risk of
injury in the head and neck area, e.g. in the
event of an accident or when braking.
Always drive with the head restraints instal-
led. Before driving off, make sure for every
vehicle occupant that the center of the head
restraint supports the back of the head at
about eye level. G
WARNING
If the front-passenger seat is in chauffeur
mode and the front-passenger head restraint
is folded down, the view of the passenger-side
exterior mirror can be impaired. There is a risk of an accident.
To have a free view of the exterior mirror,
remove the front-passenger head restraint.
! Make sure that there are no objects in the
footwell under or behind the seats when
moving the seats back. There is a risk that
the seats and/or the objects could be dam-
aged.
General notes In chauffeur mode:
R the front-passenger seat is moved forwards
R the backrest is tilted forwards
R the head restraint is folded forwards
The front-passenger seat automatically
moves from the chauffeur position back into
the normal position if:
R the front-passenger seat is adjusted using
the seat adjustment switch on the front-
passenger door
R the front-passenger seat belt is fastened
R an occupant is detected on the front-
passenger seat Seats
127Seats, steering wheel and mirrors Z
Page 130 of 502

R
the front-passenger seat head restraint is
inserted and the ignition is switched on
R the front-passenger seat backrest is moved
backwards or the seat is moved in a longi-
tudinal direction out of the chauffeur area
(Y page 130).
Positioning the front-passenger seat for
chauffeur mode General notes
Pay attention to the important safety notes
(Y
page 127). Adjust the seat for chauffeur
mode before the journey (Y page 128). Do not
remove the front-passenger seat head
restraint during the journey.
Adjusting from the rear compartment You can use the override button to disable
this function (Y page 75).
In order for the front-passenger seat to be
positioned in chauffeur mode:
R the SmartKey must be in the ignition lock
and in position 1or 2(Y page 189)
R the front-passenger seat may not be occu-
pied
R the front-passenger seat belt must not be
inserted into the buckle X
To select the front-passenger seat:
press button :repeatedly until the indi-
cator lamp in the button lights up.
The front-passenger seat is selected if the
indicator lamp in the button lights up.
X Press button ;forwards and hold it in this
position.
The seat moves forward.
The seat stops at the threshold of the area for chauffeur mode.
X Release button ;.
X Press and hold button ;again until the
front-passenger seat is in position for
chauffeur mode.
The head restraint on the front-passenger
seat folds forwards. The seat moves
forward.
The To
To view view the
theext.
ext. mirror,
mirror, adjust
adjust
front-passenger
front-passenger seat
seator
orremove
remove the
the
head
head restraint.
restraint. message appears in the
multifunction display (Y page 352).
i If the front-passenger seat is already at
the threshold to the area for the chauffeur
mode, the position for the chauffeur mode
is set immediately.
i The position for chauffeur mode can be
saved or set using the memory function of
the rear seat (Y page 145). For this the
indicator lamp on button :must be lit.
Adjusting from the driver's seat 128
SeatsSeats, steering
wheel and mirrors
Page 131 of 502
In order for the front-passenger seat to be
positioned in chauffeur mode:
R the SmartKey must be in the ignition lock
and in position 1or 2(Y page 189)
R the front-passenger seat may not be occu-
pied
R the front-passenger seat belt must not be
inserted into the buckle
X To select the front-passenger seat:
press button :repeatedly until the indi-
cator lamp in the button lights up.
The front-passenger seat is selected if the
indicator lamp in the button lights up.
X Press button ;forward and hold it.
The seat moves forward.
The seat stops at the threshold of the area for chauffeur mode.
X Release button ;.
X Press and hold button ;again until the
front-passenger seat is in position for
chauffeur mode.
The head restraint on the front-passenger
seat folds forwards. The seat moves
forward.
The To Toview
view the
theext.
ext. mirror,
mirror, adjust
adjust
front-passenger
front-passenger seat
seator
orremove
remove the
the
head
head restraint.
restraint. message appears in the
multifunction display (Y page 352).
i If the front-passenger seat is already at
the threshold to the area for the chauffeur
mode, the position for the chauffeur mode
is set immediately.
i The position for chauffeur mode cannot
be stored or set with the driver's seat mem-
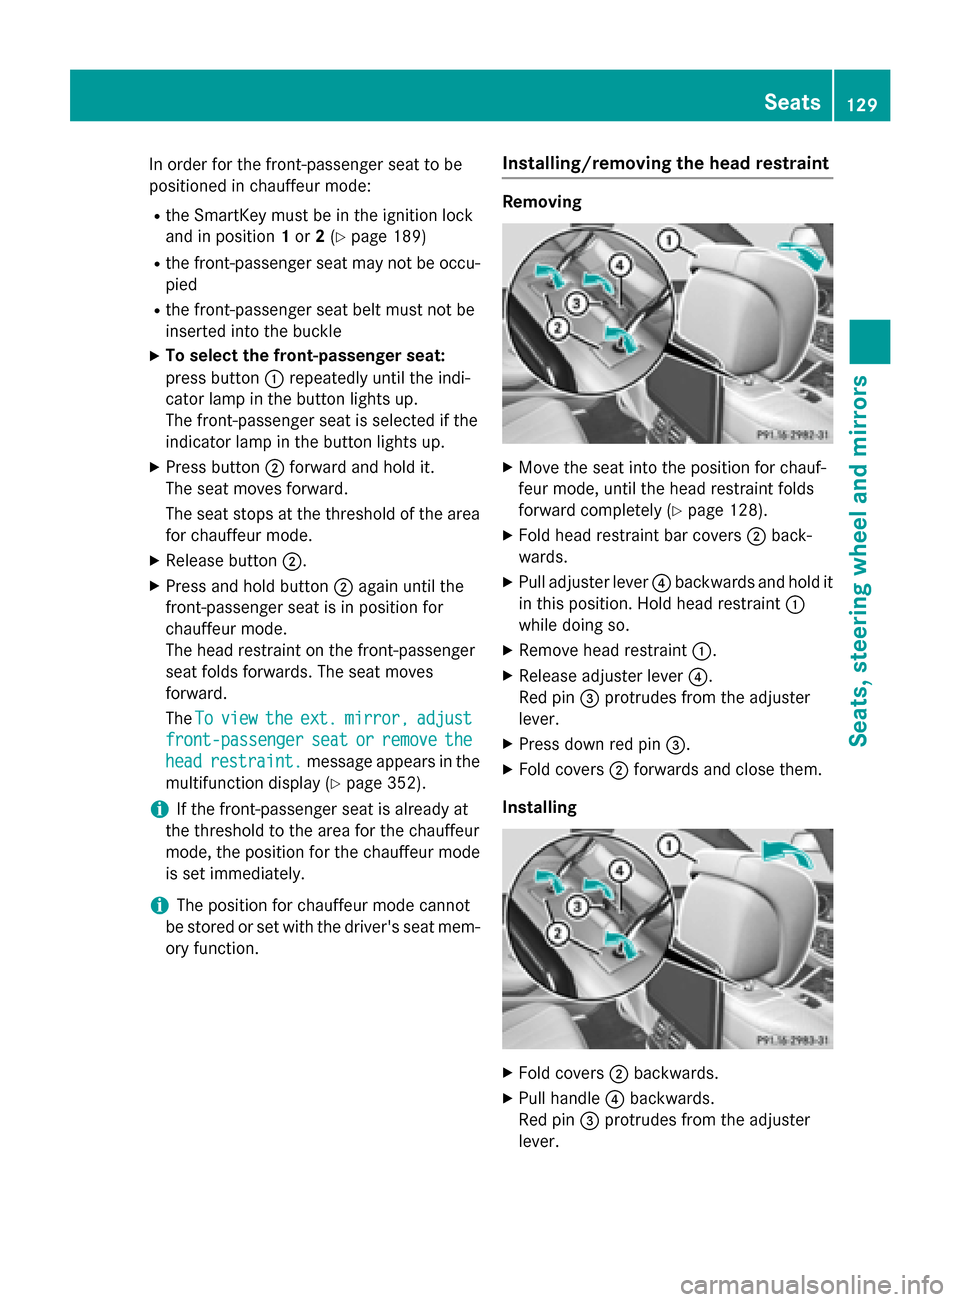
ory function. Installing/removing the head restraint Removing
X
Move the seat into the position for chauf-
feur mode, until the head restraint folds
forward completely (Y page 128).
X Fold head restraint bar covers ;back-
wards.
X Pull adjuster lever ?backwards and hold it
in this position. Hold head restraint :
while doing so.
X Remove head restraint :.
X Release adjuster lever ?.
Red pin =protrudes from the adjuster
lever.
X Press down red pin =.
X Fold covers ;forwards and close them.
Installing X
Fold covers ;backwards.
X Pull handle ?backwards.
Red pin =protrudes from the adjuster
lever. Seats
129Seats, steering wheel and mirrors Z
Page 133 of 502
to the area for chauffeur mode. The head
restraint folds into position.
i Further settings are available via the
memory adjustment buttons if the front-
passenger seat has been selected with but- ton :.
Adjusting from the front-passenger seat X Press any seat adjustment button.
The front-passenger seat moves into the
normal adjustment range at the threshold
of the area for chauffeur mode. The head
restraint folds into position.
Fully reclined position of the front-
passenger seat Adjusting
This function is only available on vehicles with
electrically adjustable rear seats.
You can move the front-passenger seat into a fully reclined position. The rear seat and front-
passenger seat then provide a continuous
surface.
To do so:
R move the seat cushion of the rear seat as
far back as possible in a longitudinal direc-
tion (Y page 123)
R move the front-passenger seat into posi-
tion for chauffeur mode (Y page 128)
R remove the front-passenger seat head
restraint (Y page 129)
R move the front-passenger seat so that the
backrest is in a fully reclined position
(Y page 122)
Exiting
To exit the fully reclined position:
R fold the backrest upright to a suitable posi-
tion
R install the head restraint (Y page 129) Adjusting the head restraints
Adjusting the front head restraints Important safety notes
G
WARNING
You could lose control of your vehicle if you do the following while driving:
R adjust the driver's seat, head restraint,
steering wheel or mirrors
R fasten the seat belt
There is a risk of an accident.
Adjust the driver's seat, head restraint, steer-
ing wheel and mirror and fasten your seat belt before starting the engine. G
WARNING
If head restraints are not installed and adjus-
ted correctly, they cannot provide protection
as intended. There is an increased risk of
injury in the head and neck area, e.g. in the
event of an accident or when braking.
Always drive with the head restraints instal-
led. Before driving off, make sure for every
vehicle occupant that the center of the head
restraint supports the back of the head at
about eye level.
General notes
Pay attention to the important safety notes
(Y page 121).
Do not rotate the head restraints of the front
and rear seats. Otherwise, you cannot adjust
the height and angle of the head restraints to
the correct position. Seats
131Seats, steering wheel and mirrors Z
Page 136 of 502
The supplementary cushion is attached to the
head restraint by three press studs.
Installing the supplementary cushion:
X Position the head restraint as far forwards
as possible (Y page 123).
X Hold supplementary cushion ;against
the head restraint and push press studs :
into the counterpieces.
Removing the supplementary cushion: X Position the head restraint as far forwards
as possible (Y page 123).
X Release press studs :and remove sup-
plementary cushion ;.
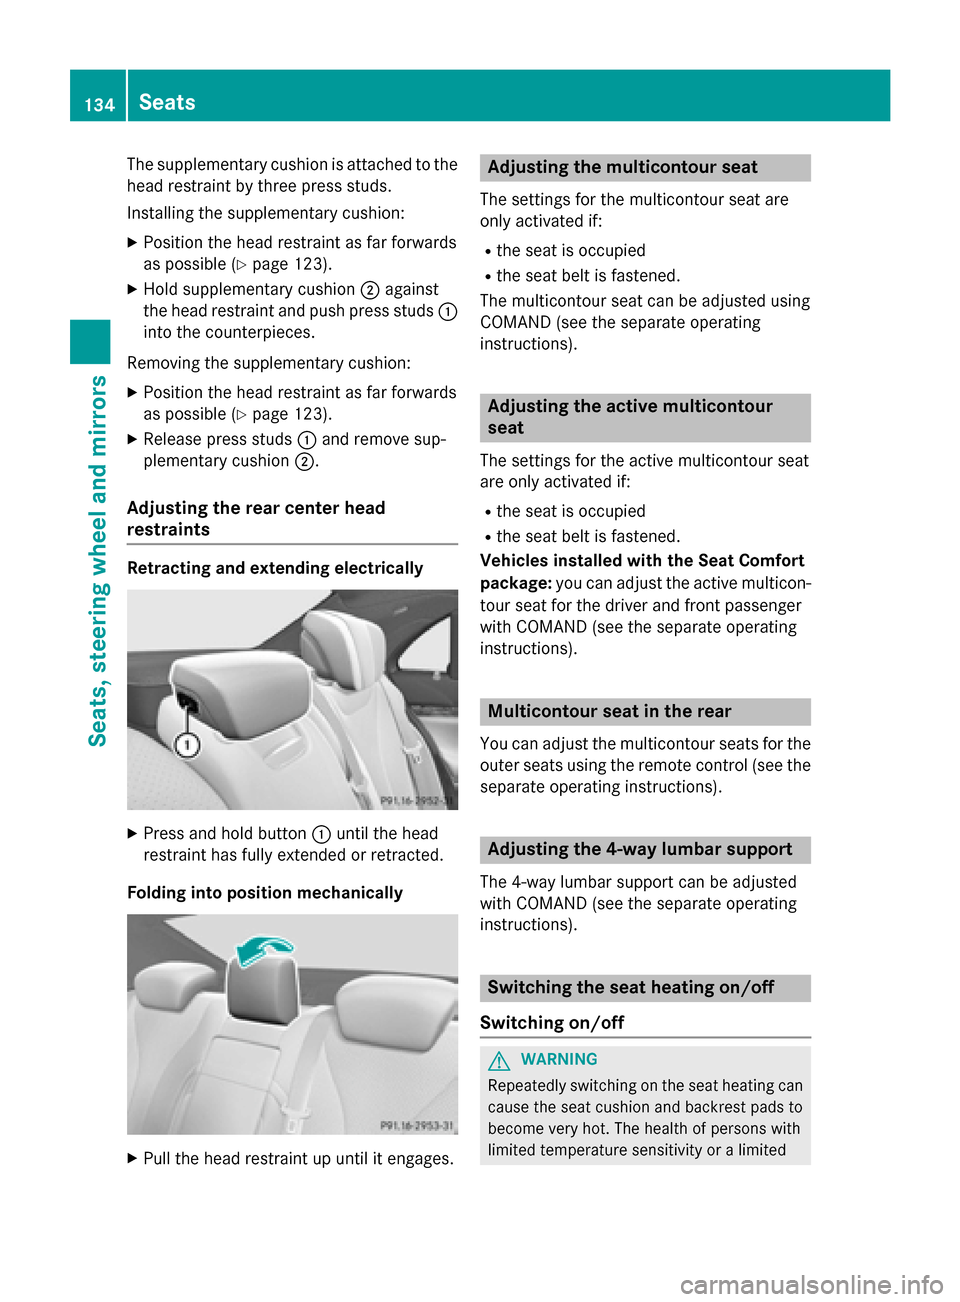
Adjusting the rear center head
restraints Retracting and extending electrically
X
Press and hold button :until the head
restraint has fully extended or retracted.
Folding into position mechanically X
Pull the head restraint up until it engages. Adjusting the multicontour seat
The settings for the multicontour seat are
only activated if:
R the seat is occupied
R the seat belt is fastened.
The multicontour seat can be adjusted using
COMAND (see the separate operating
instructions). Adjusting the active multicontour
seat
The settings for the active multicontour seat
are only activated if:
R the seat is occupied
R the seat belt is fastened.
Vehicles installed with the Seat Comfort
package: you can adjust the active multicon-
tour seat for the driver and front passenger
with COMAND (see the separate operating
instructions). Multicontour seat in the rear
You can adjust the multicontour seats for the
outer seats using the remote control (see the separate operating instructions). Adjusting the 4-way lumbar support
The 4-way lumbar support can be adjusted
with COMAND (see the separate operating
instructions). Switching the seat heating on/off
Switching on/off G
WARNING
Repeatedly switching on the seat heating can
cause the seat cushion and backrest pads to
become very hot. The health of persons with
limited temperature sensitivity or a limited 134
SeatsSeats, steering wheel and mirrors
Page 140 of 502
Steering wheel heating
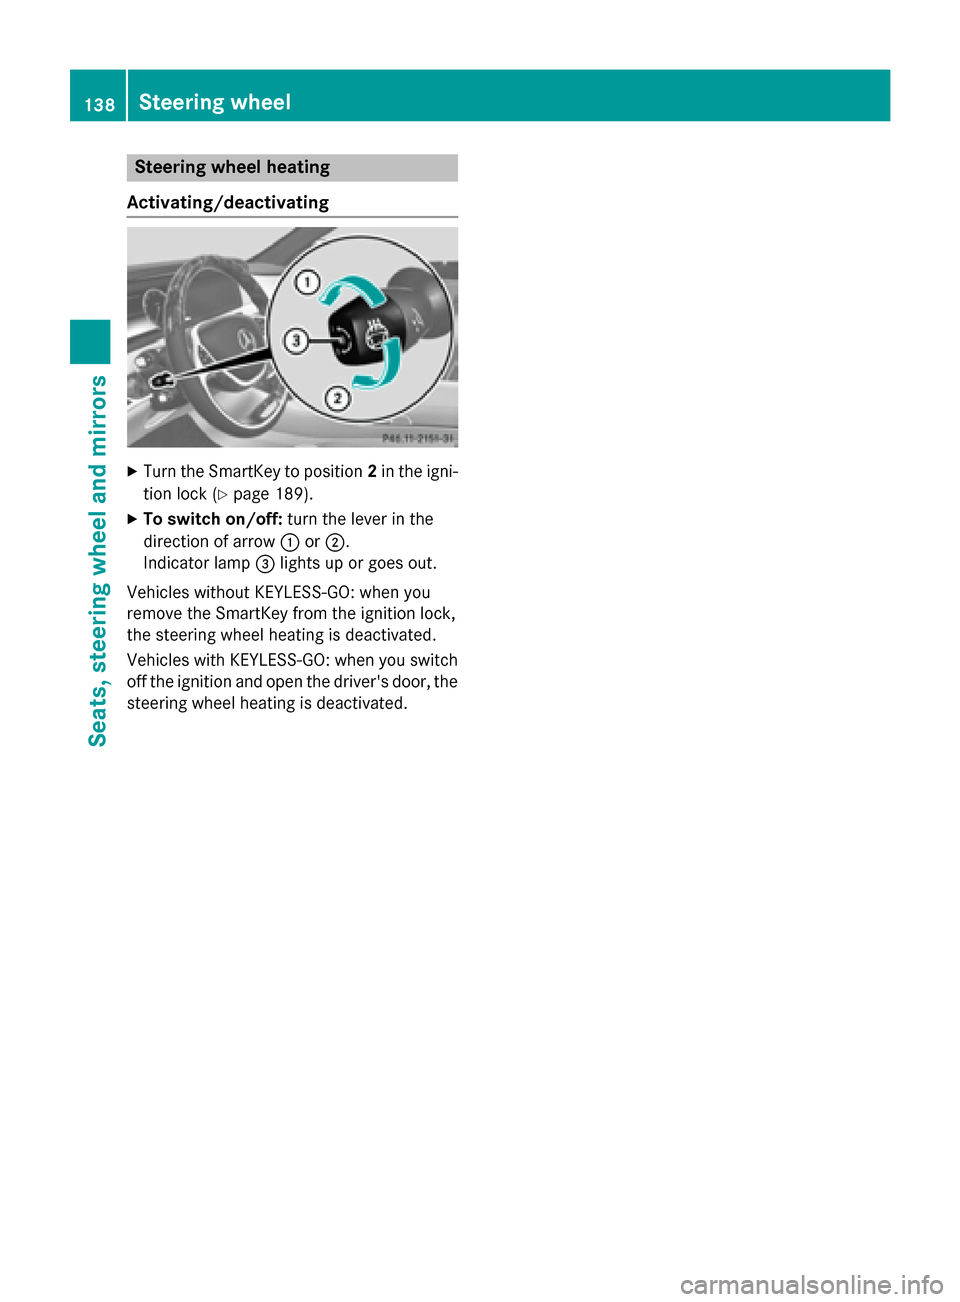
Activating/deactivating X
Turn the SmartKey to position 2in the igni-
tion lock (Y page 189).
X To switch on/off: turn the lever in the
direction of arrow :or;.
Indicator lamp =lights up or goes out.
Vehicles without KEYLESS-GO: when you
remove the SmartKey from the ignition lock,
the steering wheel heating is deactivated.
Vehicles with KEYLESS-GO: when you switch
off the ignition and open the driver's door, the steering wheel heating is deactivated. 138
Steering wheelSeats, steering wheel and mirrors