2015 MERCEDES-BENZ S-CLASS COUPE ESP
[x] Cancel search: ESPPage 134 of 417

Important safety notes
G
WARNING
Adaptive Highbeam Assist Plus does not rec-
ognise road users:
R who have no lights, e.g. pedestrians
R who have poor lighting, e.g. cyclists
R whose lighting is blocked, e.g. by a barrier
In very rare cases, Adaptive Highbeam Assist
Plus may not recognise road users who do
have lights, or may recognise them too late. In this, or in similar situations, the automatic
main-beam headlamps will not be deactivated
or will be activated despite the presence of
other road users. There is a risk of an acci-
dent.
Always carefully observe the traffic conditions and switch off the main-beam headlamps in
good time.
Adaptive Highbeam Assist PLUS cannot take
into account road, weather or traffic condi-
tions. Adaptive Highbeam Assist Plus is only
an aid. You are responsible for adjusting the
vehicle's lighting to the prevailing light, visi-
bility and traffic conditions.
In particular, the detection of obstacles can
be restricted if there is:
R poor visibility, e.g. due to fog, heavy rain or
snow
R dirt on the sensors or if the sensors are
obscured Switching Adaptive Highbeam Assist
PLUS on/off :
Main-beam headlamps
; Turn signal, right
= Headlamp flasher
? Turn signal, left
X To switch on: turn the light switch to Ã.
X Press the combination switch beyond the
pressure point in the direction of arrow :.
The _ indicator lamp in the multifunc-
tion display lights up when it is dark and the light sensor switches on the dipped-beam
headlamps.
If you are driving at speeds above approx-
imately 25 km/h:
The headlamp range is set automatically
depending on the distance between the
vehicle and other road users.
If you are driving at speeds above approx-
imately 30 km/h and no other road users
have been detected:
The main-beam headlamps are switched on
automatically. The Kindicator lamp in
the instrument cluster also lights up.
If you are driving at speeds above approx-
imately 45 km/h and other road users have
been detected:
Partial main-beam is selected automati-
cally. The Kindicator lamp in the instru-
ment cluster also lights up.
If you are driving at speeds below approx-
imately 40 km/h:
The partial main-beam headlamps are
switched off automatically. If no other road Exterior lighting
131Lights and windscreen wipers Z
Page 136 of 417
X
To switch on/off: press the|button.
When the automatic interior lighting con-
trol is activated, the button is flush with the overhead control panel.
The interior lighting automatically switches
on if you:
R unlock the vehicle
R open a door
R remove the key from the ignition lock
The interior lighting is activated for a short
time when the key is removed from the igni-
tion lock. This delayed switch-off can be
adjusted using COMAND Online (see the sep- arate COMAND Online operating instruc-
tions).
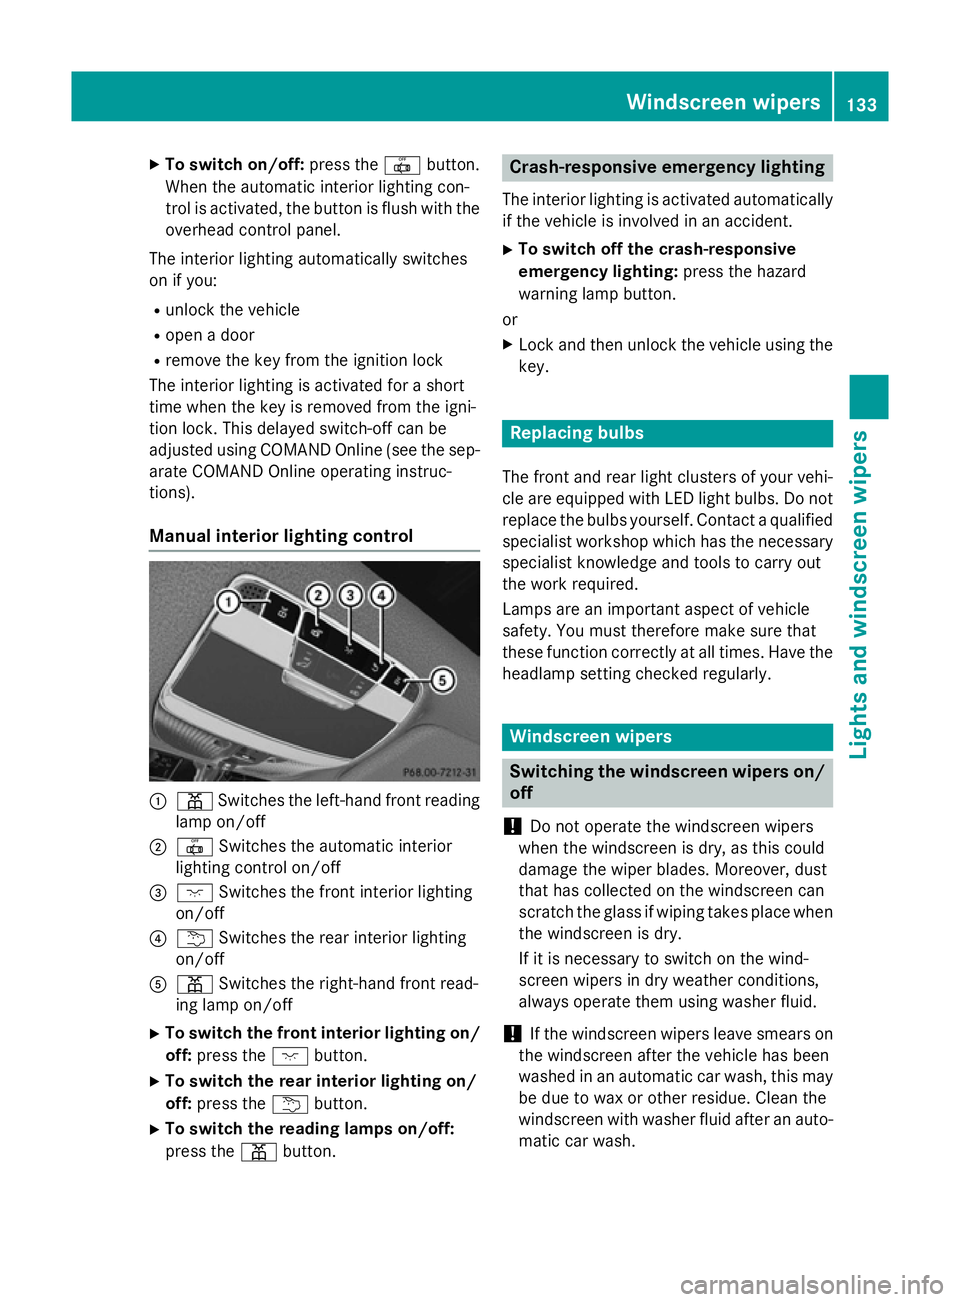
Manual interior lighting control :
p Switches the left-hand front reading
lamp on/off
; | Switches the automatic interior
lighting control on/off
= c Switches the front interior lighting
on/off
? u Switches the rear interior lighting
on/off
A p Switches the right-hand front read-
ing lamp on/off
X To switch the front interior lighting on/
off: press the cbutton.
X To switch the rear interior lighting on/
off: press the ubutton.
X To switch the reading lamps on/off:
press the pbutton. Crash-responsive emergency lighting
The interior lighting is activated automatically
if the vehicle is involved in an accident.
X To switch off the crash-responsive
emergency lighting: press the hazard
warning lamp button.
or X Lock and then unlock the vehicle using the
key. Replacing bulbs
The front and rear light clusters of your vehi-
cle are equipped with LED light bulbs. Do not replace the bulbs yourself. Contact a qualifiedspecialist workshop which has the necessaryspecialist knowledge and tools to carry out
the work required.
Lamps are an important aspect of vehicle
safety. You must therefore make sure that
these function correctly at all times. Have the
headlamp setting checked regularly. Windscreen wipers
Switching the windscreen wipers on/
off
! Do not operate the windscreen wipers
when the windscreen is dry, as this could
damage the wiper blades. Moreover, dust
that has collected on the windscreen can
scratch the glass if wiping takes place when the windscreen is dry.
If it is necessary to switch on the wind-
screen wipers in dry weather conditions,
always operate them using washer fluid.
! If the windscreen wipers leave smears on
the windscreen after the vehicle has been
washed in an automatic car wash, this may
be due to wax or other residue. Clean the
windscreen with washer fluid after an auto-
matic car wash. Windscreen wipers
133Lights andwindscreen wipers Z
Page 151 of 417
tally responsible recycling
system. Dispose of full perfume vials
in an environmentally
responsible manner and
take them to a special waste
collection point. :
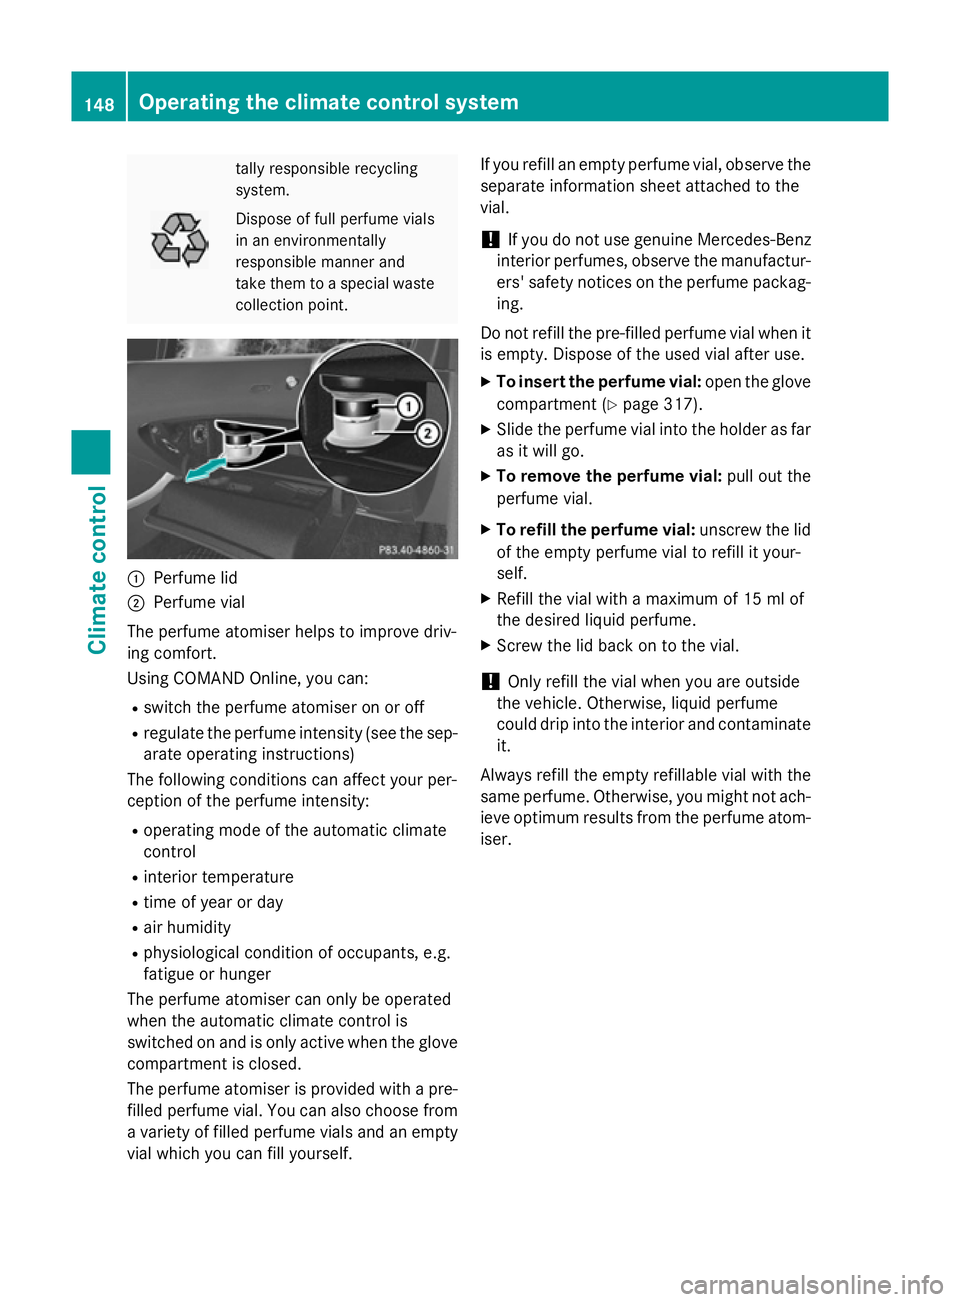
Perfume lid
; Perfume vial
The perfume atomiser helps to improve driv-
ing comfort.
Using COMAND Online, you can:
R switch the perfume atomiser on or off
R regulate the perfume intensity (see the sep-
arate operating instructions)
The following conditions can affect your per-
ception of the perfume intensity:
R operating mode of the automatic climate
control
R interior temperature
R time of year or day
R air humidity
R physiological condition of occupants, e.g.
fatigue or hunger
The perfume atomiser can only be operated
when the automatic climate control is
switched on and is only active when the glove compartment is closed.
The perfume atomiser is provided with a pre- filled perfume vial. You can also choose froma variety of filled perfume vials and an empty
vial which you can fill yourself. If you refill an empty perfume vial, observe the
separate information sheet attached to the
vial.
! If you do not use genuine Mercedes-Benz
interior perfumes, observe the manufactur-
ers' safety notices on the perfume packag-
ing.
Do not refill the pre-filled perfume vial when it is empty. Dispose of the used vial after use.
X To insert the perfume vial: open the glove
compartment (Y page 317).
X Slide the perfume vial into the holder as far
as it will go.
X To remove the perfume vial: pull out the
perfume vial.
X To refill the perfume vial: unscrew the lid
of the empty perfume vial to refill it your-
self.
X Refill the vial with a maximum of 15 ml of
the desired liquid perfume.
X Screw the lid back on to the vial.
! Only refill the vial when you are outside
the vehicle. Otherwise, liquid perfume
could drip into the interior and contaminate it.
Always refill the empty refillable vial with the
same perfume. Otherwise, you might not ach-
ieve optimum results from the perfume atom-
iser. 148
Operating the climate control systemClimate control
Page 152 of 417
Problems with the perfume atomiser
Problem
Possible causes/consequences and
M
MSolutions The vehicle interior is
not perfumed although
the perfume atomiser
has been activated. The perfume vial has not been pushed into the holder as far as it
will go.
X Slide the perfume vial into the holder as far as it will go. The perfume vial is not filled sufficiently.
X Pre-filled vials: dispose of the empty vial.
X Use a new pre-filled vial.
X Refillable vials: refill the vial with a maximum of 15 ml of the
same perfume. The perfume atomiser is faulty.
X Have the perfume atomiser checked at a qualified specialist
workshop. Ionisation
You can use the ionisation function to purify
the air in the vehicle interior and attain an
improved interior climate.
The ionisation of the interior air is odourless
and cannot, directly, be perceived in the vehi-
cle interior.
You can switch ionisation on or off using
COMAND Online (see the separate operating instructions).
Ionisation can only be switched on if the front
automatic climate control is activated. The
side air vent on the driver's side must be
open. Auxiliary heating
Important safety notes G
DANGER
If the exhaust pipe is blocked or sufficient
ventilation is not possible, toxic exhaust
fumes can enter the vehicle, especially car-
bon monoxide. This is the case, e.g. in
enclosed spaces, or if the vehicle is stuck in
snow. There is a risk of fatal injuries. You should switch off the auxiliary heating in
enclosed spaces which do not have an extrac-
tion system, e.g. a garage. If the vehicle is
stuck in snow and you must leave the auxiliary
heating running, keep the exhaust pipe and
the area around the vehicle clear of snow. To guarantee a sufficient supply of fresh air, open
a window on the side of the vehicle away from the wind. G
WARNING
When the auxiliary heating is switched on,
parts of the vehicle can become very hot.
Flammable materials such as leaves, grass or twigs may ignite if they come into contact
with:
R hot parts of the exhaust system
R the exhaust gas itself
There is a risk of fire. Operating the climate control system
149Climate control
Z
Page 157 of 417
environmentally responsible
recycling system. Dispose of batteries in an
environmentally responsible
manner. Take discharged
batteries to a qualified spe-
cialist workshop or to a col-
lection point for used batter-
ies.
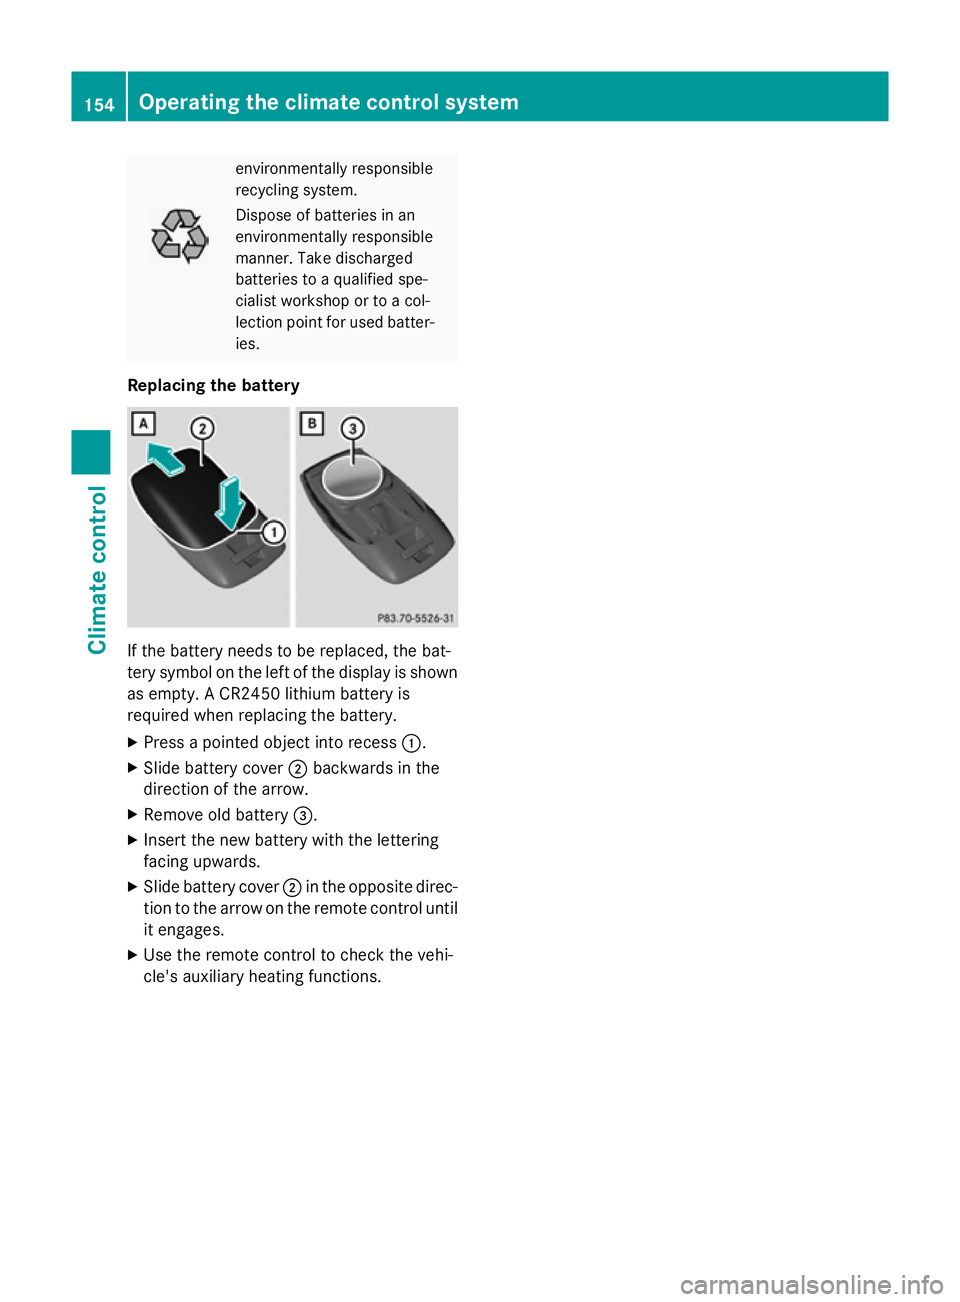
Replacing the battery If the battery needs to be replaced, the bat-
tery symbol on the left of the display is shown as empty. A CR2450 lithium battery is
required when replacing the battery.
X Press a pointed object into recess :.
X Slide battery cover ;backwards in the
direction of the arrow.
X Remove old battery =.
X Insert the new battery with the lettering
facing upwards.
X Slide battery cover ;in the opposite direc-
tion to the arrow on the remote control until
it engages.
X Use the remote control to check the vehi-
cle's auxiliary heating functions. 154
Operating the climate control systemClimate control
Page 164 of 417
G
WARNING
Unsuitable footwear can hinder correct usage of the pedals, e.g.:
R shoes with thick soles
R shoes with high heels
R slippers
There is a risk of an accident.
Wear suitable footwear to ensure correct
usage of the pedals. G
WARNING
If you switch off the ignition while driving,
safety-relevant functions are only available
with limitations, or not at all. This could affect, for example, the power steering and the brake
boosting effect. You will require considerably
more effort to steer and brake. There is a risk of an accident.
Do not switch off the ignition while driving. G
WARNING
If the parking brake has not been fully
released when driving, the parking brake can:
R overheat and cause a fire
R lose its hold function.
There is a risk of fire and an accident. Release
the parking brake fully before driving off.
! Do not warm up the engine when the vehi-
cle is stationary. Drive off immediately.
Avoid high engine speeds and driving at full throttle until the engine has reached its
operating temperature.
Only shift the automatic transmission to
the desired drive position when the vehicle is stationary.
Where possible, avoid spinning the drive
wheels when pulling away on slippery
roads. You could otherwise damage the
drive train.
! Mercedes-AMG vehicles:
at low engine
oil temperatures (below +20 †), the maxi-
mum engine speed is restricted in order to
protect the engine. To protect the engine and maintain smooth engine operation,
avoid driving at full throttle when the
engine is cold. Key positions
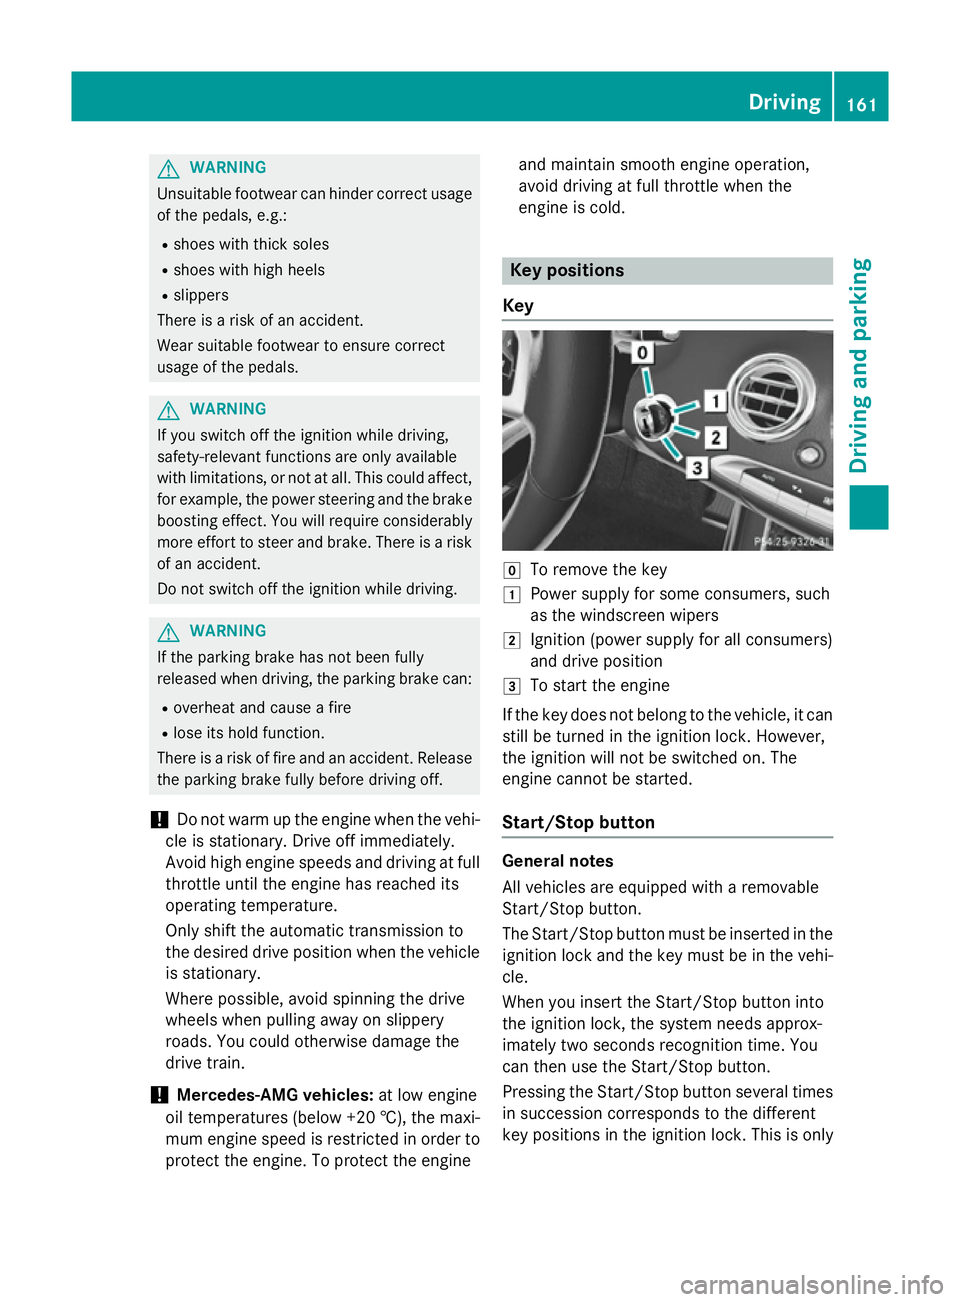
Key g
To remove the key
1 Power supply for some consumers, such
as the windscreen wipers
2 Ignition (power supply for all consumers)
and drive position
3 To start the engine
If the key does not belong to the vehicle, it can still be turned in the ignition lock. However,
the ignition will not be switched on. The
engine cannot be started.
Start/Stop button General notes
All vehicles are equipped with a removable
Start/Stop button.
The Start/Stop button must be inserted in the
ignition lock and the key must be in the vehi-
cle.
When you insert the Start/Stop button into
the ignition lock, the system needs approx-
imately two seconds recognition time. You
can then use the Start/Stop button.
Pressing the Start/Stop button several times
in succession corresponds to the different
key positions in the ignition lock. This is only Driving
161Driving and parking Z
Page 165 of 417
the case if you are not depressing the brake
pedal.
If you depress the brake pedal and press the
Start/Stop button, the engine starts immedi-
ately.
A check which periodically establishes a radio
connection between the vehicle and the key
determines whether a valid key is in the vehi- cle. This occurs, for example, when starting
the engine.
To start the vehicle without actively using the
key:
R the Start/Stop button must be inserted in
the ignition lock
R the key must be in the vehicle
R the vehicle must not be locked with the key
or KEYLESS-GO (Y page 85)
Do not keep the key:
R with electronic devices, e.g. a mobile
phone or another key
R with metallic objects, e.g. coins or metal
film
R inside metallic objects, e.g. a metal case
This can affect the key's functionality.
If you lock the vehicle with the key's remote
control or with KEYLESS-GO, after a short
time:
R you will not be able to switch on the ignition
with the Start/Stop button
R you will not be able to start the engine with
the Start/Stop button until the vehicle is
unlocked again
If you lock the vehicle centrally using the but- ton on the front door (Y page 91), you can
continue to start the engine with the Start/
Stop button.
The engine can be switched off while the vehi-
cle is in motion by pressing and holding the
Start/Stop button for three seconds. This
function operates independently of the ECO
start/stop automatic engine switch-off func-
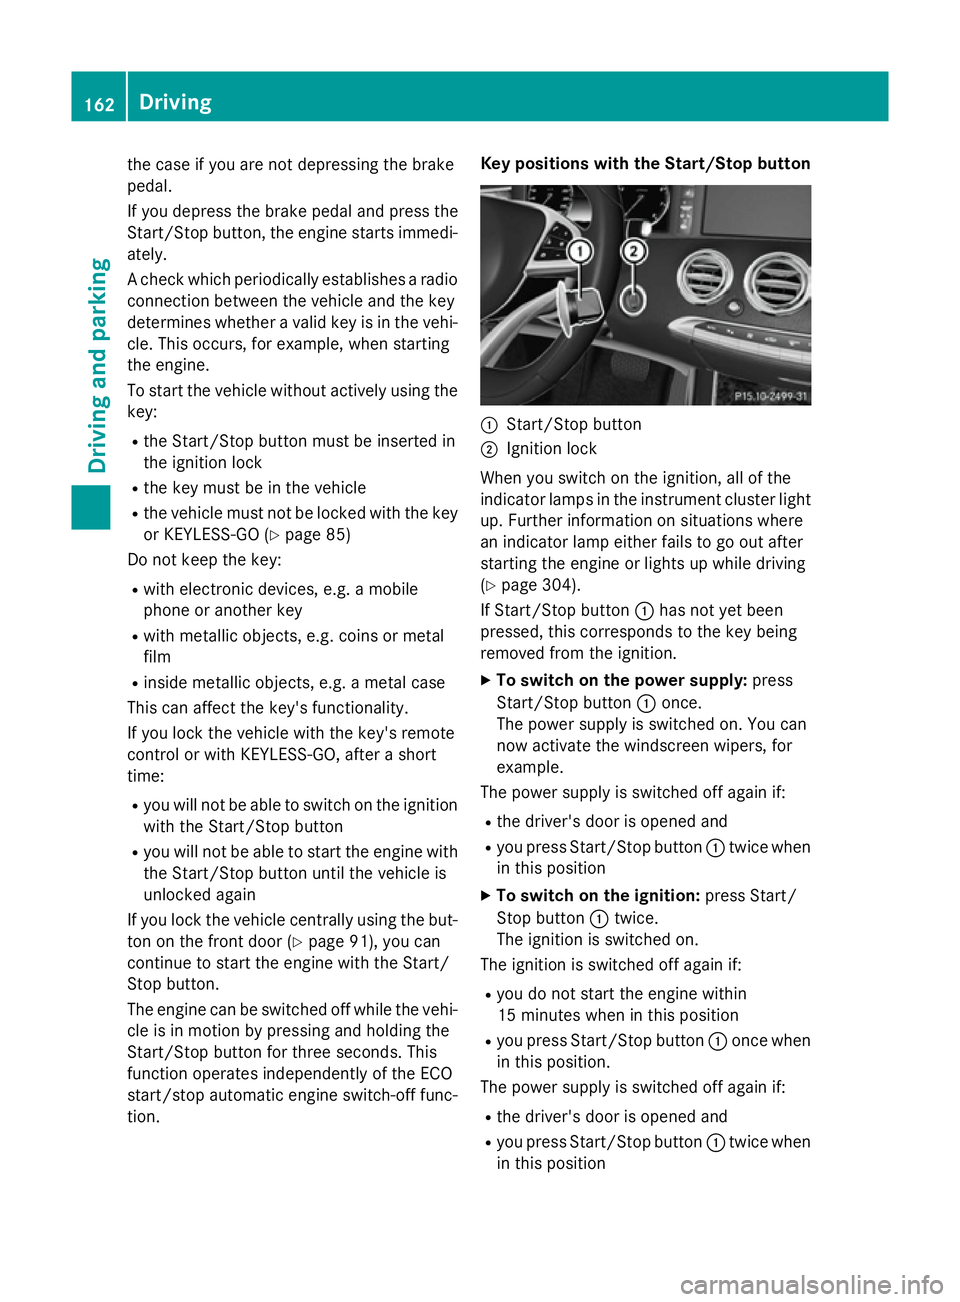
tion. Key positions with the Start/Stop button
:
Start/Stop button
; Ignition lock
When you switch on the ignition, all of the
indicator lamps in the instrument cluster light up. Further information on situations where
an indicator lamp either fails to go out after
starting the engine or lights up while driving
(Y page 304).
If Start/Stop button :has not yet been
pressed, this corresponds to the key being
removed from the ignition.
X To switch on the power supply: press
Start/Stop button :once.
The power supply is switched on. You can
now activate the windscreen wipers, for
example.
The power supply is switched off again if:
R the driver's door is opened and
R you press Start/Stop button :twice when
in this position
X To switch on the ignition: press Start/
Stop button :twice.
The ignition is switched on.
The ignition is switched off again if:
R you do not start the engine within
15 minute s when inthis position
R you press Start/Stop button :once when
in this position.
The power supply is switched off again if:
R the driver's door is opened and
R you press Start/Stop button :twice when
in this position 162
DrivingDriving an
d parking
Page 167 of 417
X
Turn the key to position 3in the ignition
lock and release it as soon as the engine is running (Y page 161).
Starting procedure using the Start/
Stop button The Start/Stop button can be used to start
the vehicle manually without inserting the key
into the ignition lock. The key must be in the
vehicle and the Start/Stop button must be
inserted in the ignition lock. This mode for
starting the engine operates independently of the ECO start/stop automatic engine start
function.
You can start the engine if a valid key is in the vehicle. Always take the key with you when
leaving the vehicle, even if you only leave it for
a short time. Pay attention to the important
safety notes.
X Depress the brake pedal and keep it
depressed.
X Press the Start/Stop button once
(Y page 161).
The engine starts. Pulling away
General notes G
WARNING
If the engine speed is above the idling speed
and you engage transmission position Dor R,
the vehicle could pull away suddenly. There is a risk of an accident.
When engaging transmission position Dor R,
always firmly depress the brake pedal and do not simultaneously accelerate.
Depress the accelerator carefully when pull-
ing away.
The vehicle locks centrally once you have
pulled away. The locking knobs in the doors
drop down.
You can open the doors from the inside at any
time. You can also deactivate the automatic locking
feature (Y page 92).
It is only possible to shift the transmission
from position Pto the desired position if you
depress the brake pedal. Only then is the
parking lock released.
If you do not depress the brake pedal, the
DIRECT SELECT lever can still be moved but
the parking lock remains engaged.
i Upshifts take place at higher engine
speeds after a cold start. This helps the
catalytic converter to reach its operating
temperature more quickly.
Information on automatically releasing the
electrical parking brake (Y page 183).
Hill start assist Hill start assist helps you when pulling away
forwards or in reverse on an uphill gradient. It
holds the vehicle for a short time after you
have removed your foot from the brake pedal. This gives you enough time to move your footfrom the brake pedal to the accelerator pedal
and depress it before the vehicle begins to
roll. G
WARNING
After a while, hill start assist no longer holds
the vehicle and it may roll away. There is a risk of an accident and injury.
Therefore, quickly move your foot from the
brake pedal to the accelerator pedal. Never
leave the vehicle when it is held by hill start
assist.
Hill start assist is not active if:
R you are pulling away on a level road or a
downhill gradient
R the transmission is in position N
R the electric parking brake is applied
R ESP ®
is malfunctioning 164
DrivingDriving and parking