2015 MERCEDES-BENZ S-CLASS COUPE change wheel
[x] Cancel search: change wheelPage 243 of 417

In such cases, Active Lane Keeping Assist
can:
R give an unnecessary warning and then
make a course-correcting brake application
to the vehicle
R neither give a warning nor intervene
There is a risk of an accident.
Always pay particular attention to the traffic
situation and keep within the lane, especially
if Active Lane Keeping Assist alerts you. Ter-
minate the intervention in a non-critical driv-
ing situation.
The system may be impaired or may not func-
tion if:
R there is poor visibility, e.g. due to insuffi-
cient illumination of the road, or due to
snow, rain, fog or spray
R there is glare, e.g. from oncoming traffic,
the sun or reflection from other vehicles
(e.g. if the road surface is wet)
R the windscreen is dirty, misted up, dam-
aged or covered, for instance by a sticker,
in the vicinity of the camera
R the radar sensors in the front or rear bump-
ers or the radiator trim are dirty, e.g.
obscured by snow
R no or several, unclear lane markings are
present for one lane, e.g. in a construction
area
R the lane markings are worn away, dark or
covered up, e.g. by dirt or snow
R the distance to the vehicle in front is too
small and the lane markings thus cannot be
detected
R the lane markings change quickly, e.g.
lanes branch off, cross one another or
merge
R the road is narrow and winding
R there are highly variable shade conditions
on the road
If no vehicle is detected in the adjacent lane
and broken lane markings are detected, no
lane-correcting brake application is made. Warning vibration through the steering
wheel
A warning may be given if a front wheel
passes over a lane marking. It will warn you by
means of intermittent vibration in the steer-
ing wheel for up to 1.5 seconds.
In order that you are warned only when nec-
essary and in good time if you cross the lane marking, the system detects certain condi-
tions and warns you accordingly.
The warning vibration occurs earlier if:
R you approach the outer lane marking on a
bend
R the road has very wide lanes, e.g. a motor-
way
R the system detects solid lane markings
The warning vibration occurs later if:
R the road has narrow lanes
R you cut the corner on a bend
Lane-correcting brake application
If you leave your lane under certain circum-
stances, the vehicle will brake briefly on one
side. This is intended to help you return the
vehicle to the original lane. G
WARNING
A lane-correcting brake application cannot
always bring the vehicle back into the original lane. There is a risk of an accident.
Always steer, brake or accelerate yourself,
especially if Active Lane Keeping Assist warns
you or makes a lane-correcting brake appli-
cation. G
WARNING
Active Lane Keeping Assist does not detect
traffic conditions or road users. In very rare
cases, the system may make an inappropriate brake application, e.g. after intentionally driv-
ing over a solid lane marking. There is a risk of an accident.
An inappropriate brake application may be
interrupted at any time if you steer slightly in
the opposite direction. Always make sure that 240
Driving systemsDriving and parking
Page 248 of 417
The red band in the rev counter indicates the
engine's overrevving range.
The fuel supply is interrupted to protect the
engine when the red band is reached. Outside temperature display
You should pay special attention to road con-
ditions when temperatures are around freez-
ing point.
Bear in mind that the outside temperature
display indicates the measured air tempera-
ture and not the road surface temperature.
The outside temperature display is in the mul- tifunction display (Y page 246).
There is a short delay before a change in out- side temperature is shown in the multifunc-
tion display. Coolant temperature gauge
G
WARNING
If you open the bonnet while the engine is
overheating or while there is a fire in the
engine compartment, you could come into
contact with hot gases or other leaking ser-
vice products. There is a danger of injury.
Allow an overheating engine to cool down
before opening the bonnet. If there is a fire in the engine compartment, leave the bonnet
closed and notify the fire brigade.
The multifunction display shows the coolant
temperature gauge in the lower section of the rev counter (Y page 32).
At high outside temperatures and when driv-
ing uphill, the coolant temperature may rise.
Under normal operating conditions and with
the specified coolant level, the coolant tem-
perature may rise to 124 †. Operating the on-board computer
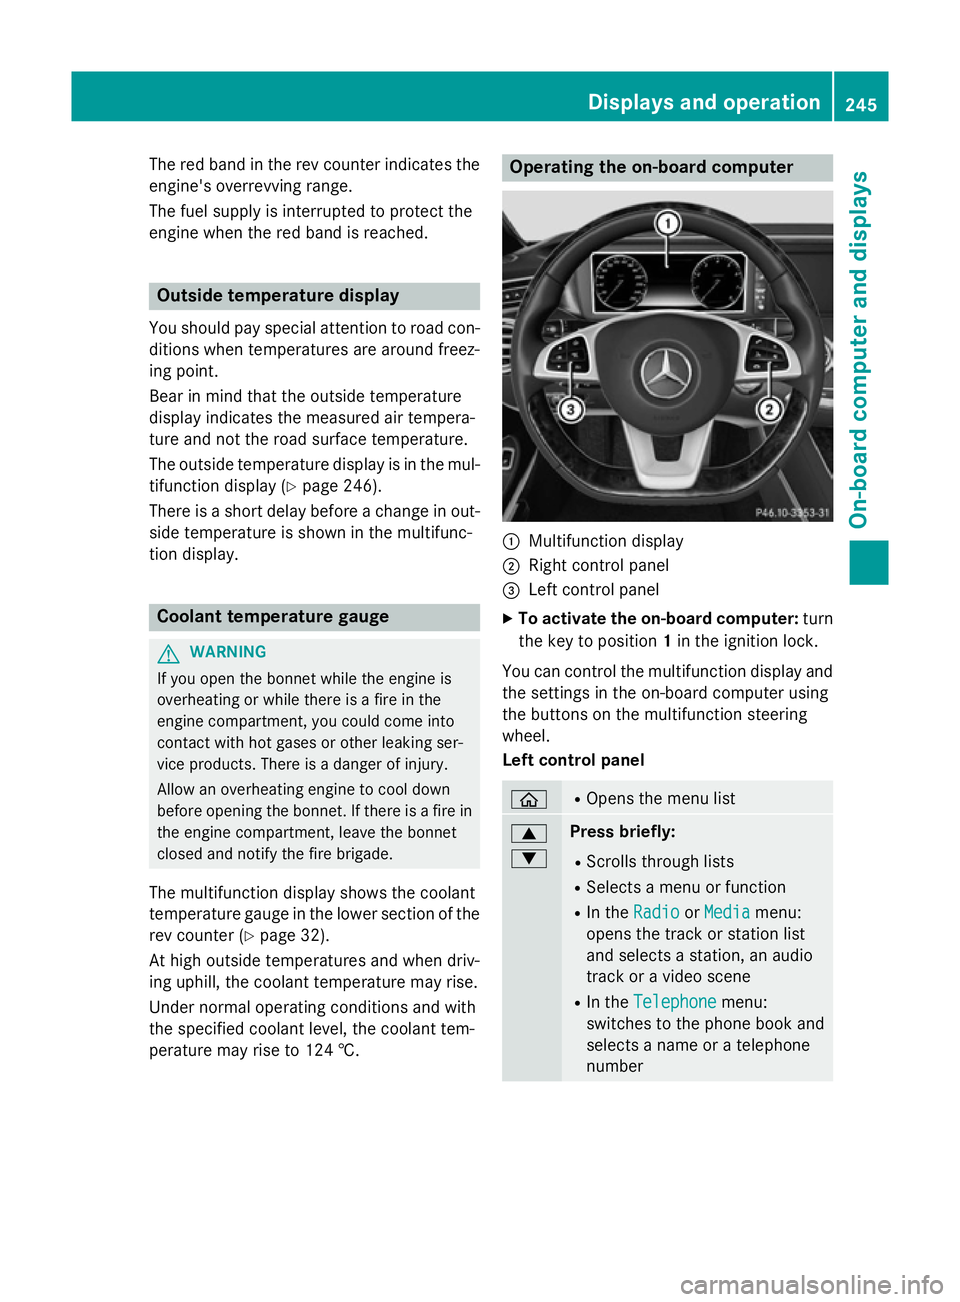
:
Multifunction display
; Right control panel
= Left control panel
X To activate the on-board computer: turn
the key to position 1in the ignition lock.
You can control the multifunction display and
the settings in the on-board computer using
the buttons on the multifunction steering
wheel.
Left control panel ò R
Opens the menu list 9
: Press briefly:
R Scrolls through lists
R Selects a menu or function
R In the Radio Radio orMedia
Media menu:
opens the track or station list
and selects a station, an audio
track or a video scene
R In the Telephone
Telephone menu:
switches to the phone book and
selects a name or a telephone
number Displays and operation
245On-board computer and displays Z
Page 256 of 417
Change of direction with lane recommen-
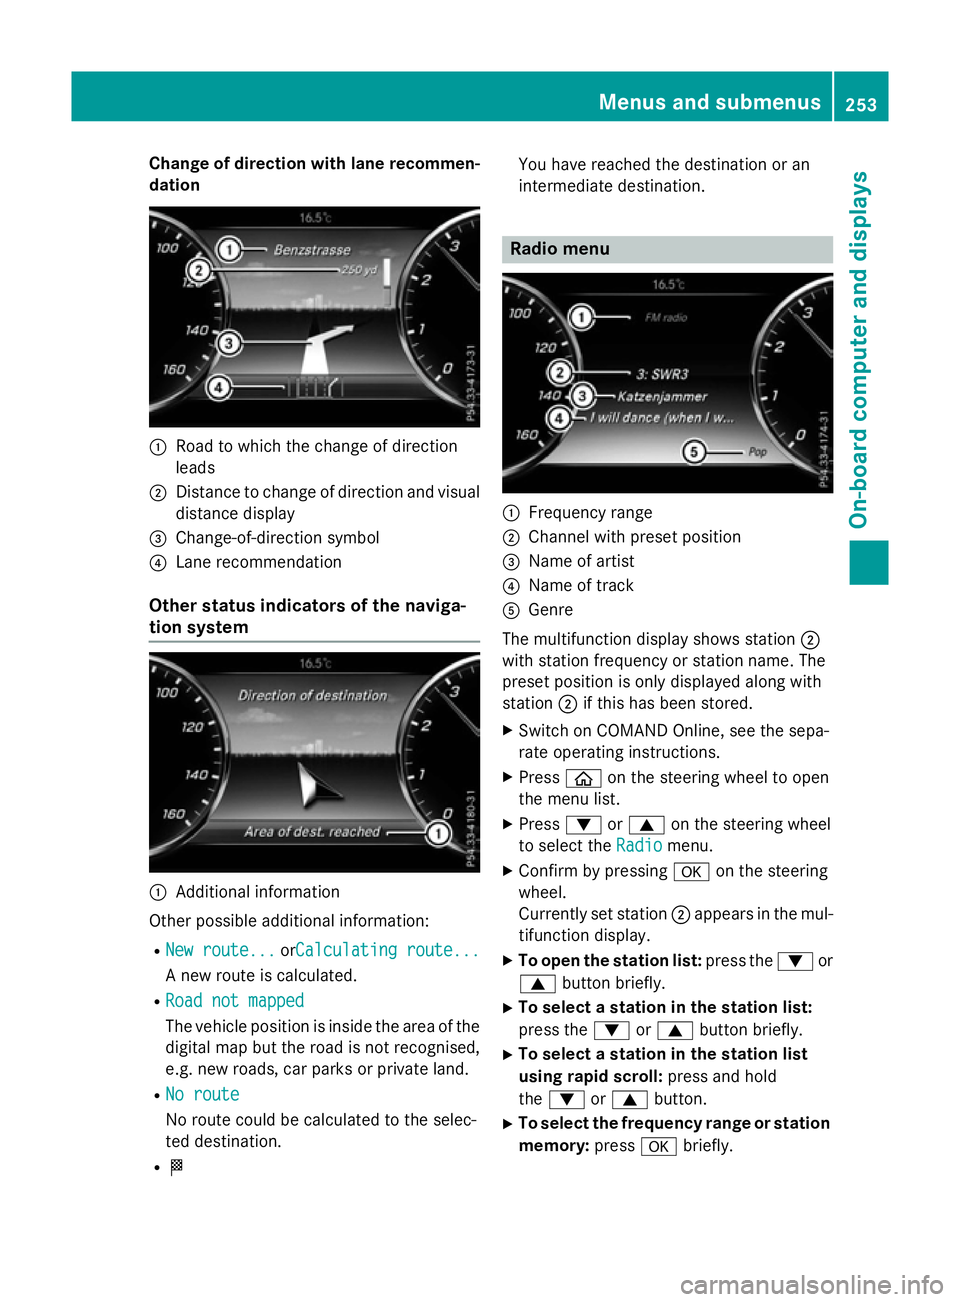
dation :
Road to which the change of direction
leads
; Distance to change of direction and visual
distance display
= Change-of-direction symbol
? Lane recommendation
Other status indicators of the naviga-
tion system :
Additional information
Other possible additional information:
R New route...
New route... orCalculating route...Calculating route...
A new route is calculated.
R Road not mapped
Road not mapped
The vehicle position is inside the area of the
digital map but the road is not recognised,
e.g. new roads, car parks or private land.
R No route
No route
No route could be calculated to the selec-
ted destination.
R O You have reached the destination or an
intermediate destination. Radio menu
:
Frequency range
; Channel with preset position
= Name of artist
? Name of track
A Genre
The multifunction display shows station ;
with station frequency or station name. The
preset position is only displayed along with
station ;if this has been stored.
X Switch on COMAND Online, see the sepa-
rate operating instructions.
X Press òon the steering wheel to open
the menu list.
X Press :or9 on the steering wheel
to select the Radio
Radio menu.
X Confirm by pressing aon the steering
wheel.
Currently set station ;appears in the mul-
tifunction display.
X To open the station list: press the:or
9 button briefly.
X To select a station in the station list:
press the :or9 button briefly.
X To select a station in the station list
using rapid scroll: press and hold
the : or9 button.
X To select the frequency range or station
memory: pressabriefly. Menus and submenus
253On-board computer and displays Z
Page 257 of 417
X
Press :or9 to select the frequency
range or station memory.
X Press ato confirm the selection.
i Store the station in COMAND Online (see
the separate operating instructions).
i DAB radio mode (Digital
AudioBroadcast-
ing) is an optimised digital transmission
standard designed for the mobile reception of radio transmissions. Media menu
Changing the media source You can change the media source and play-
back mode (audio, video or TV) at any time in
the Media
Media menu.
X Switch on COMAND Online; see the sepa-
rate operating instructions.
X Press òon the steering wheel to open
the menu list.
X Press :or9 on the steering wheel
to select the Media
Mediamenu.
X Confirm by pressing aon the steering
wheel.
X To open/close the media sources list:
press abriefly.
The list shows the following media sources,
for example:
R Disc (CD/DVD)
R SD memory card
R Media register R
USB storage device
R Bluetooth ®
capable audio device
Please observe further information on media
support and media operation on COMAND
Online (see the separate operating instruc-
tions).
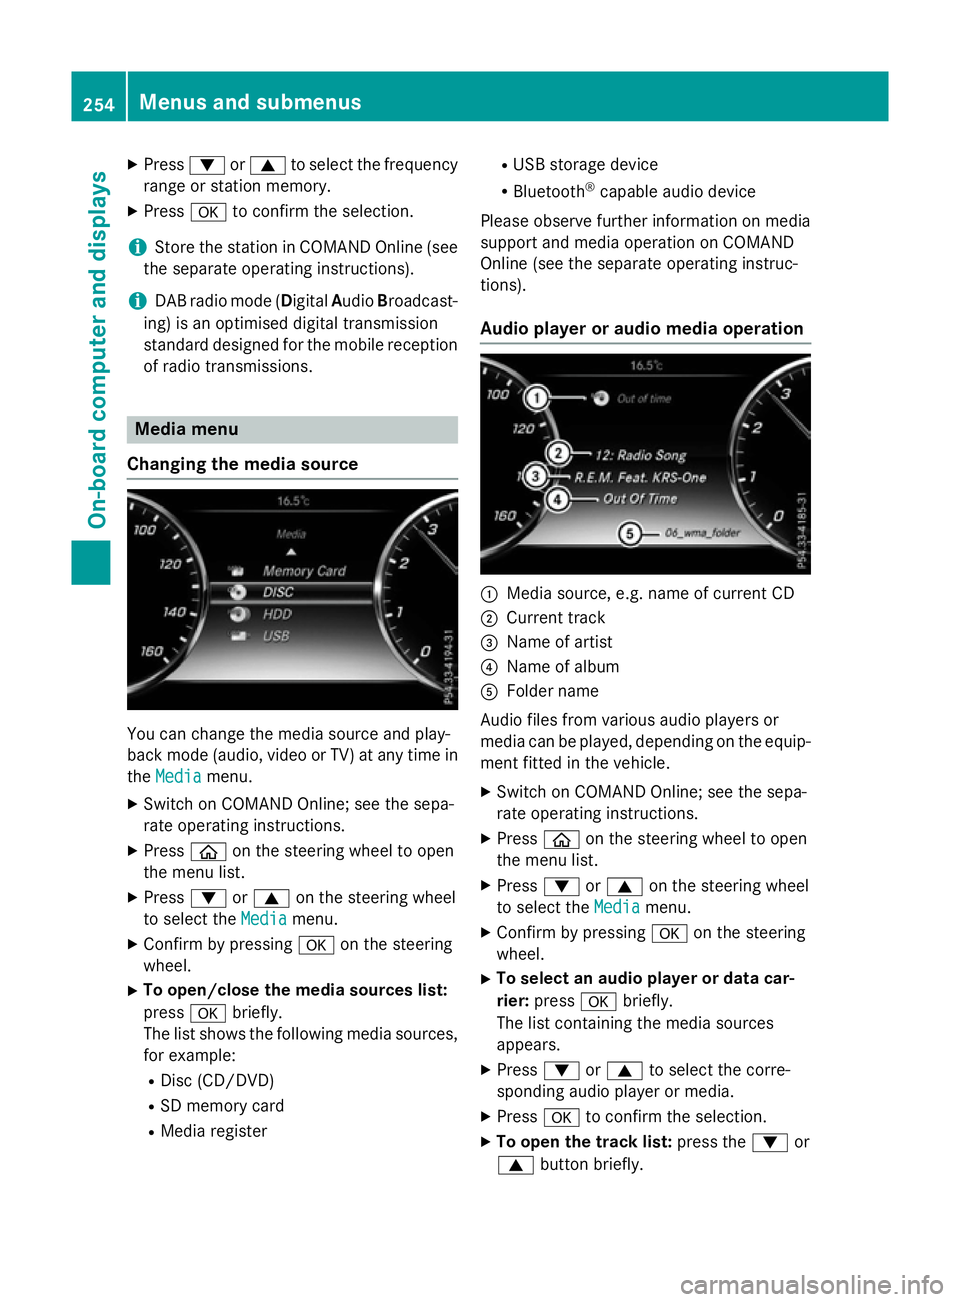
Audio player or audio media operation :
Media source, e.g. name of current CD
; Current track
= Name of artist
? Name of album
A Folder name
Audio files from various audio players or
media can be played, depending on the equip-
ment fitted in the vehicle.
X Switch on COMAND Online; see the sepa-
rate operating instructions.
X Press òon the steering wheel to open
the menu list.
X Press :or9 on the steering wheel
to select the Media Mediamenu.
X Confirm by pressing aon the steering
wheel.
X To select an audio player or data car-
rier: press abriefly.
The list containing the media sources
appears.
X Press :or9 to select the corre-
sponding audio player or media.
X Press ato confirm the selection.
X To open the track list: press the:or
9 button briefly. 254
Menus and submenusOn-board computer and displays
Page 264 of 417
Setting ATTENTION ASSIST
X Press òon the steering wheel to open
the menu list.
X Press :or9 on the steering wheel
to select the Settings
Settings menu.
X Confirm by pressing aon the steering
wheel.
X Use : or9 to select the Assis‐
Assis‐
tance
tance submenu.
X Press ato confirm your selection.
X Press :or9 to select ATTENTION
ATTENTION
ASSIST
ASSIST.
X Press ato confirm your selection.
X Press the :or9 button to select
Deactivated
Deactivated Standard
StandardorSensitive
Sensitive.
X Press ato confirm the selection.
When ATTENTION ASSIST is deactivated, the é symbol appears in the Assistance
Assistance
graphic
graphic menu in the multifunction display.
For further information about ATTENTION
ASSIST, see (Y page 228).
Activating/deactivating Active Lane
Keeping Assist X Press òon the steering wheel to open
the menu list.
X Press :or9 on the steering wheel
to select the Settings Settingsmenu.
X Confirm by pressing aon the steering
wheel.
X Press :or9 to select the Assis‐
Assis‐
tance
tance submenu.
X Press ato confirm your selection.
X Press the :or9 button to select
Lane Keeping Assist
Lane Keeping Assist.
X Press ato confirm.
The current selection, Standard
StandardorAdap‐
Adap‐
tive
tive, appears.
X To change the setting: pressaagain.
Further information about Active Lane Keep-
ing Assist (Y page 239). Head-up display submenu Selecting other displays
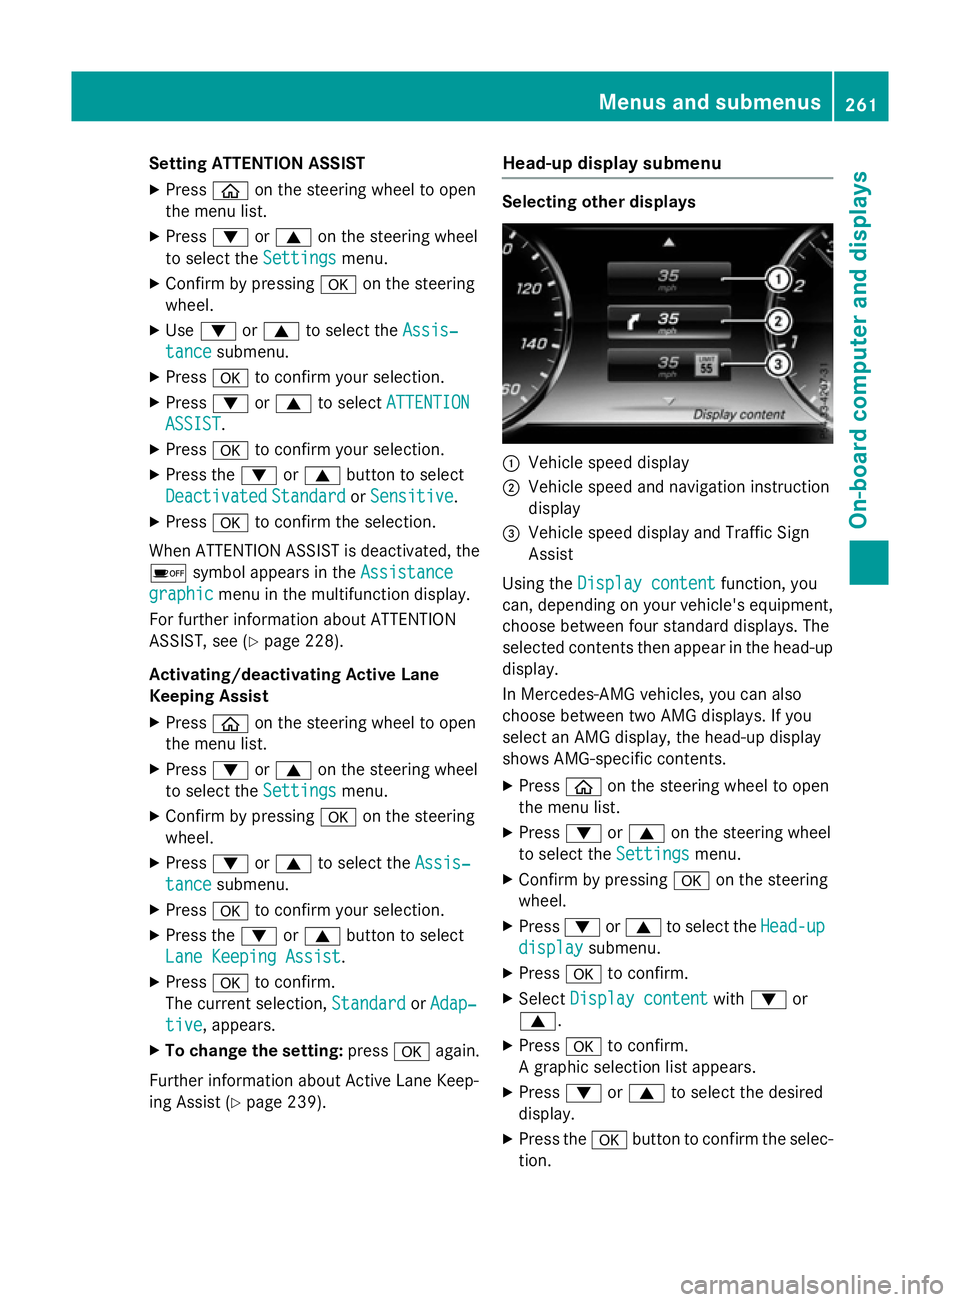
:
Vehicle speed display
; Vehicle speed and navigation instruction
display
= Vehicle speed display and Traffic Sign
Assist
Using the Display content
Display content function, you
can, depending on your vehicle's equipment,
choose between four standard displays. The
selected contents then appear in the head-up
display.
In Mercedes-AMG vehicles, you can also
choose between two AMG displays. If you
select an AMG display, the head-up display
shows AMG-specific contents.
X Press òon the steering wheel to open
the menu list.
X Press :or9 on the steering wheel
to select the Settings
Settings menu.
X Confirm by pressing aon the steering
wheel.
X Press :or9 to select the Head-up Head-up
display
display submenu.
X Press ato confirm.
X Select Display content
Display content with: or
9.
X Press ato confirm.
A graphic selection list appears.
X Press :or9 to select the desired
display.
X Press the abutton to confirm the selec-
tion. Menus and submenus
261On-board computer and displays Z
Page 265 of 417
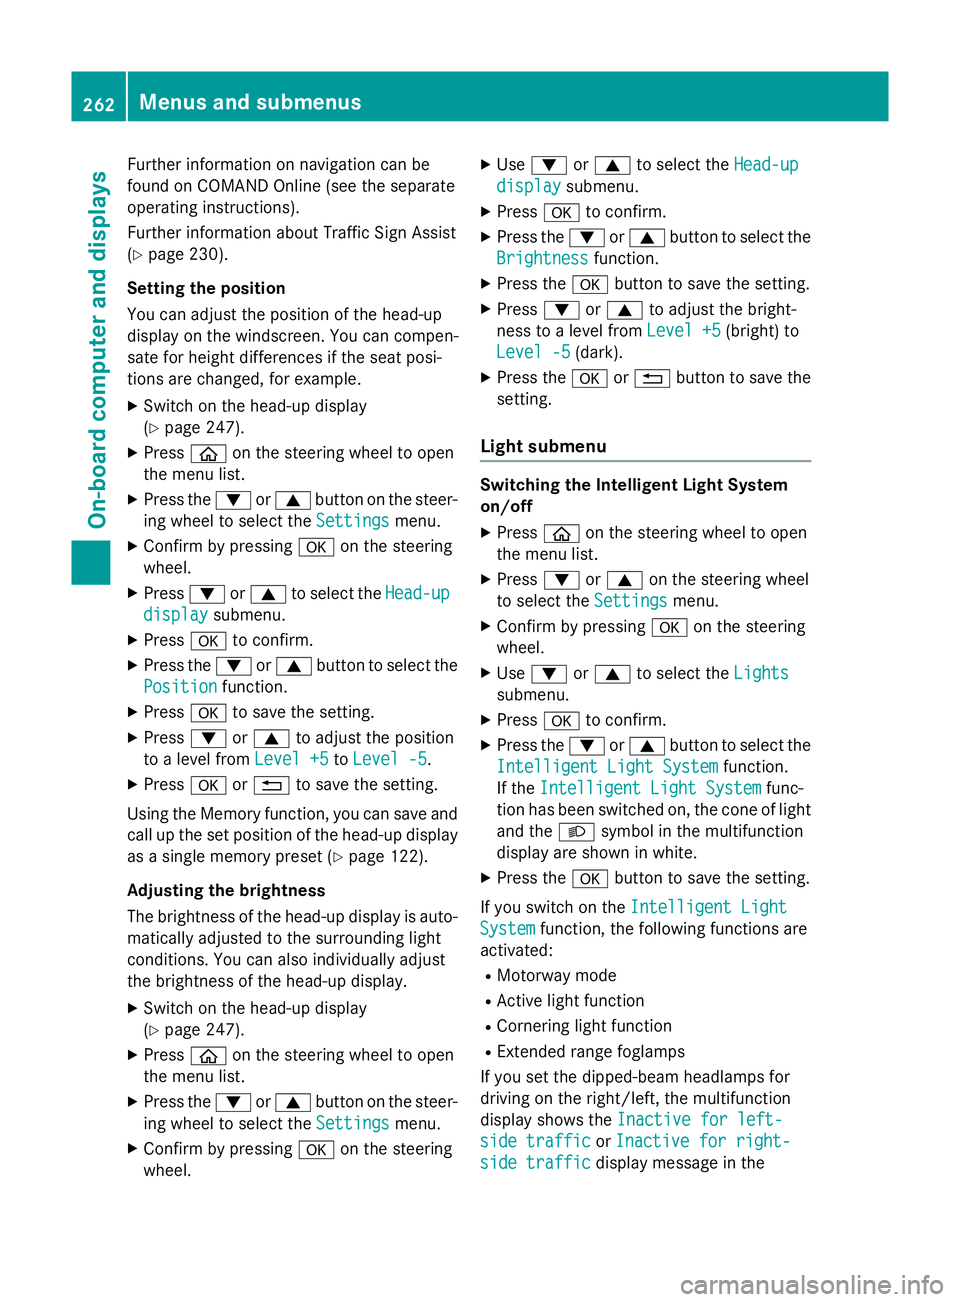
Further information on navigation can be
found on COMAND Online (see the separate
operating instructions).
Further information about Traffic Sign Assist
(Y page 230).
Setting the position
You can adjust the position of the head-up
display on the windscreen. You can compen-
sate for height differences if the seat posi-
tions are changed, for example.
X Switch on the head-up display
(Y page 247).
X Press òon the steering wheel to open
the menu list.
X Press the :or9 button on the steer-
ing wheel to select the Settings
Settings menu.
X Confirm by pressing aon the steering
wheel.
X Press :or9 to select the Head-up Head-up
display
display submenu.
X Press ato confirm.
X Press the :or9 button to select the
Position
Position function.
X Press ato save the setting.
X Press :or9 to adjust the position
to a level from Level +5
Level +5 toLevel -5
Level -5.
X Press aor% to save the setting.
Using the Memory function, you can save and
call up the set position of the head-up display as a single memory preset (Y page 122).
Adjusting the brightness
The brightness of the head-up display is auto-
matically adjusted to the surrounding light
conditions. You can also individually adjust
the brightness of the head-up display.
X Switch on the head-up display
(Y page 247).
X Press òon the steering wheel to open
the menu list.
X Press the :or9 button on the steer-
ing wheel to select the Settings
Settings menu.
X Confirm by pressing aon the steering
wheel. X
Use : or9 to select the Head-up
Head-up
display display submenu.
X Press ato confirm.
X Press the :or9 button to select the
Brightness
Brightness function.
X Press the abutton to save the setting.
X Press :or9 to adjust the bright-
ness to a level from Level +5
Level +5 (bright) to
Level -5
Level -5 (dark).
X Press the aor% button to save the
setting.
Light submenu Switching the Intelligent Light System
on/off
X Press òon the steering wheel to open
the menu list.
X Press :or9 on the steering wheel
to select the Settings Settingsmenu.
X Confirm by pressing aon the steering
wheel.
X Use : or9 to select the Lights
Lights
submenu.
X Press ato confirm.
X Press the :or9 button to select the
Intelligent Light System
Intelligent Light System function.
If the Intelligent Light System
Intelligent Light System func-
tion has been switched on, the cone of light and the Lsymbol in the multifunction
display are shown in white.
X Press the abutton to save the setting.
If you switch on the Intelligent Light
Intelligent Light
System
System function, the following functions are
activated:
R Motorway mode
R Active light function
R Cornering light function
R Extended range foglamps
If you set the dipped-beam headlamps for
driving on the right/left, the multifunction
display shows the Inactive for left-
Inactive for left-
side traffic side traffic orInactive for right-
Inactive for right-
side traffic
side traffic display message in the262
Menus and submenusOn-board computer and displays
Page 266 of 417
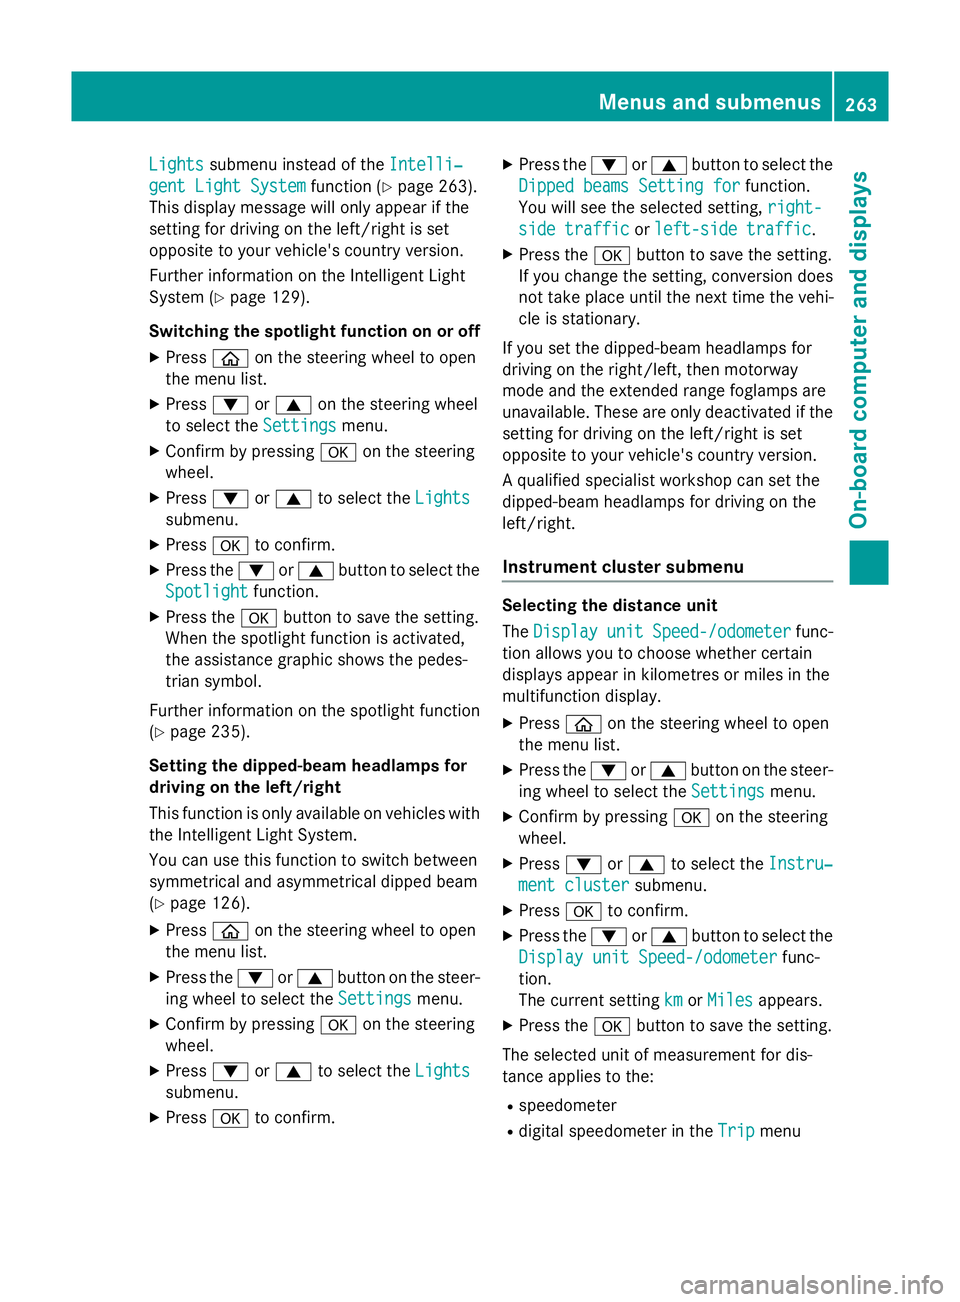
Lights
Lights
submenu instead of the Intelli‐
Intelli‐
gent Light System
gent Light System function (Ypage 263).
This display message will only appear if the
setting for driving on the left/right is set
opposite to your vehicle's country version.
Further information on the Intelligent Light
System (Y page 129).
Switching the spotlight function on or off
X Press òon the steering wheel to open
the menu list.
X Press :or9 on the steering wheel
to select the Settings
Settings menu.
X Confirm by pressing aon the steering
wheel.
X Press :or9 to select the Lights Lights
submenu.
X Press ato confirm.
X Press the :or9 button to select the
Spotlight
Spotlight function.
X Press the abutton to save the setting.
When the spotlight function is activated,
the assistance graphic shows the pedes-
trian symbol.
Further information on the spotlight function
(Y page 235).
Setting the dipped-beam headlamps for
driving on the left/right
This function is only available on vehicles with
the Intelligent Light System.
You can use this function to switch between
symmetrical and asymmetrical dipped beam
(Y page 126).
X Press òon the steering wheel to open
the menu list.
X Press the :or9 button on the steer-
ing wheel to select the Settings
Settings menu.
X Confirm by pressing aon the steering
wheel.
X Press :or9 to select the Lights Lights
submenu.
X Press ato confirm. X
Press the :or9 button to select the
Dipped beams Setting for
Dipped beams Setting for function.
You will see the selected setting, right-
right-
side traffic
side traffic orleft-side traffic
left-side traffic.
X Press the abutton to save the setting.
If you change the setting, conversion does
not take place until the next time the vehi-
cle is stationary.
If you set the dipped-beam headlamps for
driving on the right/left, then motorway
mode and the extended range foglamps are
unavailable. These are only deactivated if the
setting for driving on the left/right is set
opposite to your vehicle's country version.
A qualified specialist workshop can set the
dipped-beam headlamps for driving on the
left/right.
Instrument cluster submenu Selecting the distance unit
The
Display Display unit
unitSpeed-/odometer
Speed-/odometer func-
tion allows you to choose whether certain
displays appear in kilometres or miles in the
multifunction display.
X Press òon the steering wheel to open
the menu list.
X Press the :or9 button on the steer-
ing wheel to select the Settings Settingsmenu.
X Confirm by pressing aon the steering
wheel.
X Press :or9 to select the Instru‐
Instru‐
ment cluster
ment cluster submenu.
X Press ato confirm.
X Press the :or9 button to select the
Display unit Speed-/odometer
Display unit Speed-/odometer func-
tion.
The current setting km kmorMiles
Miles appears.
X Press the abutton to save the setting.
The selected unit of measurement for dis-
tance applies to the:
R speedometer
R digital speedometer in the Trip
Tripmenu Menus and submenus
263On-board computer and displays Z
Page 298 of 417
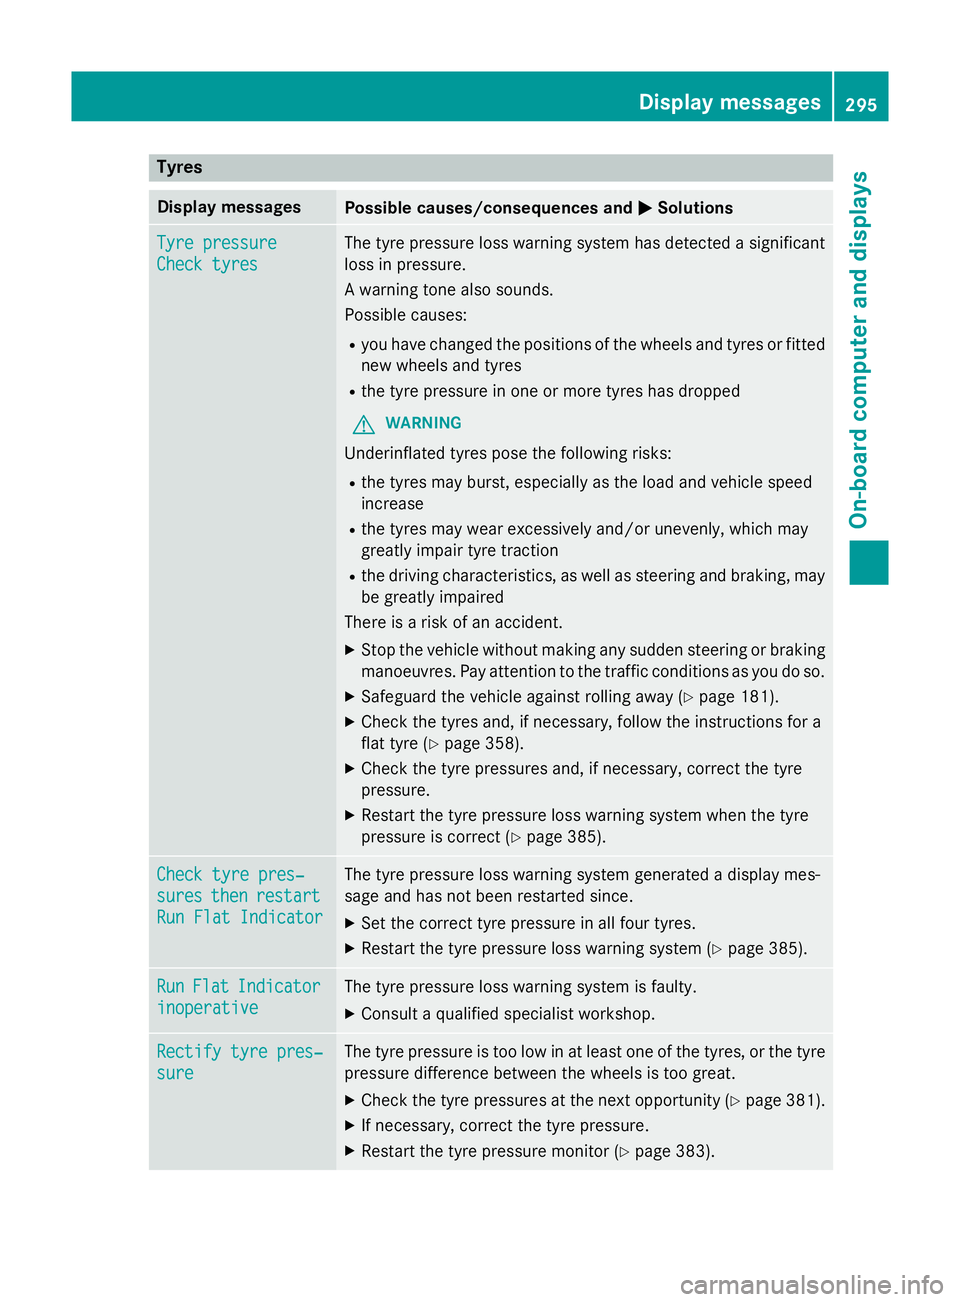
Tyres
Display messages
Possible causes/consequences and
M
MSolutions Tyre pressure
Tyre pressure
Check tyres Check tyres The tyre pressure loss warning system has detected a significant
loss in pressure.
A warning tone also sounds.
Possible causes:
R you have changed the positions of the wheels and tyres or fitted
new wheels and tyres
R the tyre pressure in one or more tyres has dropped
G WARNING
Underinflated tyres pose the following risks:
R the tyres may burst, especially as the load and vehicle speed
increase
R the tyres may wear excessively and/or unevenly, which may
greatly impair tyre traction
R the driving characteristics, as well as steering and braking, may
be greatly impaired
There is a risk of an accident.
X Stop the vehicle without making any sudden steering or braking
manoeuvres. Pay attention to the traffic conditions as you do so.
X Safeguard the vehicle against rolling away (Y page 181).
X Check the tyres and, if necessary, follow the instructions for a
flat tyre (Y page 358).
X Check the tyre pressures and, if necessary, correct the tyre
pressure.
X Restart the tyre pressure loss warning system when the tyre
pressure is correct (Y page 385).Check tyre pres‐ Check tyre pres‐
sures sures
then
thenrestart
restart
Run Flat Indicator
Run Flat Indicator The tyre pressure loss warning system generated a display mes-
sage and has not been restarted since.
X Set the correct tyre pressure in all four tyres.
X Restart the tyre pressure loss warning system (Y page 385).Run Run
Flat
Flat Indicator
Indicator
inoperative
inoperative The tyre pressure loss warning system is faulty.
X Consult a qualified specialist workshop. Rectify tyre pres‐
Rectify tyre pres‐
sure sure The tyre pressure is too low in at least one of the tyres, or the tyre
pressure difference between the wheels is too great.
X Check the tyre pressures at the next opportunity (Y page 381).
X If necessary, correct the tyre pressure.
X Restart the tyre pressure monitor (Y page 383). Display
messages
295On-board computer and displays Z