2015 MERCEDES-BENZ S-CLASS COUPE change time
[x] Cancel search: change timePage 163 of 417

Useful information
i This Owner's Manual describes all mod-
els, series and optional equipment for your
vehicle that were available at the time of
going to press. National variations are pos- sible. Note that your vehicle may not be
equipped with all of the functions descri-
bed. This is also the case for systems and
functions relevant to safety.
i Read the information on qualified special-
ist workshops: (Y page 26). Running-in notes
Important safety notes
In certain driving and driving safety systems,
the sensors adjust automatically while a cer-
tain distance is being driven after the vehicle has been delivered or after repairs. Full sys-
tem effectiveness is not reached until the end
of this teach-in process.
Brake pads/linings and discs that are either
new or have been replaced only achieve opti- mum braking effect after several hundred kil-
ometres of driving. Compensate for the
reduced braking effect by applying greater
force to the brake pedal. The first 1,500 km
If you treat the engine with sufficient care
from the very start, you will be rewarded with excellent performance for the remainder of
the engine's life.
R Drive at varying road speeds and engine
speeds for the first 1,500 km.
R Avoid overstraining the vehicle during this
period, e.g. driving at full throttle.
R When changing gears manually, change up
in good time, before the rev counter needle reaches
Ôof the way to the red area of the
rev counter.
R Do not shift down a gear manually in order
to brake.
R Try to avoid depressing the accelerator
pedal beyond the point of resistance (kick- down).
R All vehicles (except Mercedes-AMG
vehicles): drive the vehicle mainly in drive
program Efor the first 1500 km.
Additional notes on running in Mercedes-
AMG vehicles:
R Do not drive at speeds above 140 km/ hfor
the first 1,500 km.
R Only allow the engine to reach a maximum
engine speed of 4,500 rpm briefly.
R Drive the vehicle mainly in drive program C
for the first 1,500 km.
After 1,500 km, you may gradually accelerate the vehicle to full road and engine speeds.
You should also observe these notes on run-
ning-in if the engine or parts of the drive train
on your vehicle have been replaced.
Always observe the maximum permissible
speed. Driving
Important safety notes
G
WARNING
Objects in the driver's footwell may restrict
the clearance around the pedals or block a
depressed pedal. This jeopardises the oper-
ating and road safety of the vehicle. There is a risk of an accident.
Stow all objects securely in the vehicle so that
they do not get into the driver's footwell.
Always fit the floormats securely and as pre-
scribed in order to ensure that there is always sufficient room for the pedals. Do not use
loose floormats and do not place several floor-mats on top of one another. 160
DrivingDriving and parking
Page 178 of 417
driven at lower engine speeds and the
wheels being less likely to spin.
Automatic drive program S Drive program
Sis characterised by the fol-
lowing:
R sporty engine settings
R the vehicle pulling away in first gear.
R the automatic transmission shifting up
later.
R as a result of the later automatic transmis-
sion shift points, the fuel consumption pos-sibly being higher.
Manual drive program M General notes
In this drive program, you can briefly change
gear yourself by using the steering wheel
gearshift paddles. The transmission must be
in position
D.
You can activate manual drive program Min
the E(C in Mercedes-AMG vehicles) and S
automatic drive programs.
Mercedes-AMG vehicles: as well as tempo-
rary drive program M, you can also activate
permanent drive program M. Further infor-
mation about permanent drive program M
(Y page 176).
Activating
X Shift the transmission to position D.
X Pull the left or right steering wheel gearshift
paddle (Y page 174).
Manual drive program Mis temporarily acti-
vated.
All vehicles (except Mercedes-AMG
vehicles:) M and the selected gear appear
in the multifunction display.
Shifting gears
If you pull on the left or right-hand steering
wheel gearshift paddle, the automatic trans-
mission switches to manual drive program M
for a limited amount of time. Depending on which gearshift paddle is pulled, the auto-
matic transmission immediately shifts into
the next gear up or down, if permitted.
X To shift up: pull the right-hand steering
wheel gearshift paddle (Y page 174).
The automatic transmission shifts up to the
next gear.
If the maximum engine speed on the cur-
rently engaged gear is reached and you
continue to accelerate, the automatic
transmission automatically shifts up in
order to prevent engine damage.
Mercedes-AMG vehicles: the automatic
transmission will not shift up to the next
gear when the engine speed is very low.
X To shift down: pull on the left-hand steer-
ing wheel gearshift paddle (Y page 174).
The automatic transmission shifts down to
the next gear.
If the engine exceeds the maximum engine speed when shifting down, the automatic
transmission protects against engine dam- age by not shifting down.
Automatic downshifting occurs when
coasting.
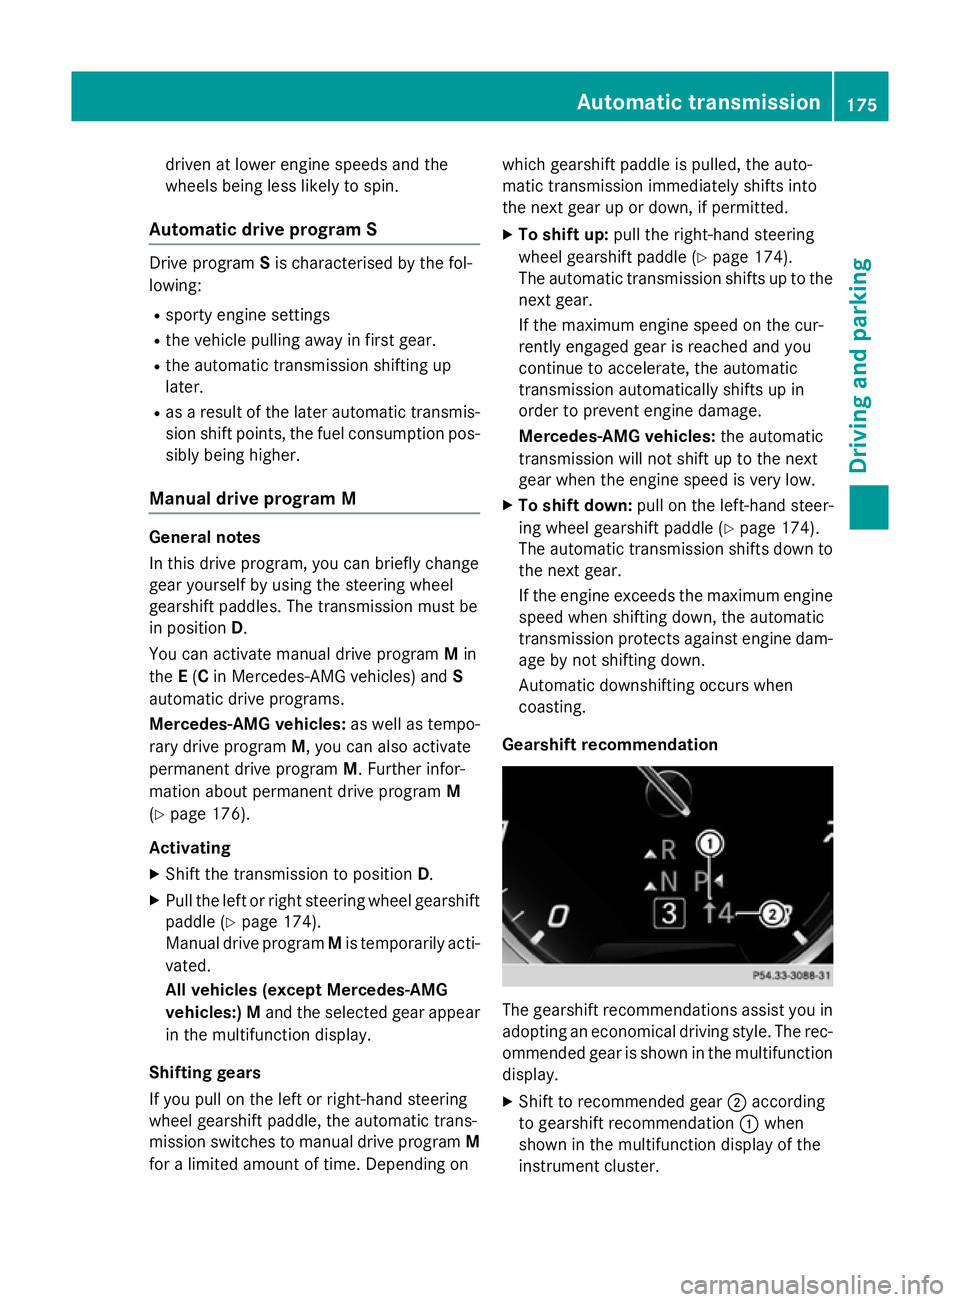
Gearshift recommendation The gearshift recommendations assist you in
adopting an economical driving style. The rec- ommended gear is shown in the multifunction
display.
X Shift to recommended gear ;according
to gearshift recommendation :when
shown in the multifunction display of the
instrument cluster. Automatic transmission
175Driving and parking Z
Page 179 of 417
Deactivating
If you have activated manual drive program
M, it will remain active for a certain amount of
time. Under certain conditions the minimum
amount of time is extended, e.g. in the case of lateral acceleration, during an overrun phase or when driving on steep terrain.
When manual drive program Mis deactivated,
the automatic transmission shifts into the
automatic drive program that was last selec-
ted.
You can also deactivate manual drive pro-
gram Myourself:
X Pull on the right-hand steering wheel gear-
shift paddle and hold it in place
(Y page 174).
or
X Use the DIRECT SELECT lever to shift the
transmission position.
or
X Use the program selector button to change
the drive program (Y page 173).
Manual drive program Mis deactivated.
The automatic transmission switches to
the previously activated drive program E
(drive program Con Mercedes-AMG vehi-
cles) or S. Manual drive program (Mercedes-
AMG vehicles)
General notes In this drive program, you can permanently
change gear yourself by using the steering
wheel gearshift paddles. The transmission
must be in position
D.
Manual drive program Mdiffers from drive
program Swith regard to spontaneity,
responsiveness and the smoothness of the
gear changes.
As well as this permanent drive program M,
you can also activate temporary drive pro-
gram M(Y page 175). Activating the manual drive program In manual drive program
M, you can change
gear yourself using the steering wheel gear-
shift paddles if the transmission is in position
D. The current drive program and the engaged
gear are shown in the multifunction display.
X Press the program selector button
(Y page 173) repeatedly until Mappears in
the multifunction display.
Upshifting !
In manual gearshift program
M, the auto-
matic transmission does not shift up auto-
matically even when the engine limiting
speed for the current gear is reached.
When the engine limiting speed is reached, the fuel supply is cut to prevent the engine
from overrevving. You must make sure that the engine speed does not reach the red
area of the rev counter. Otherwise, there is
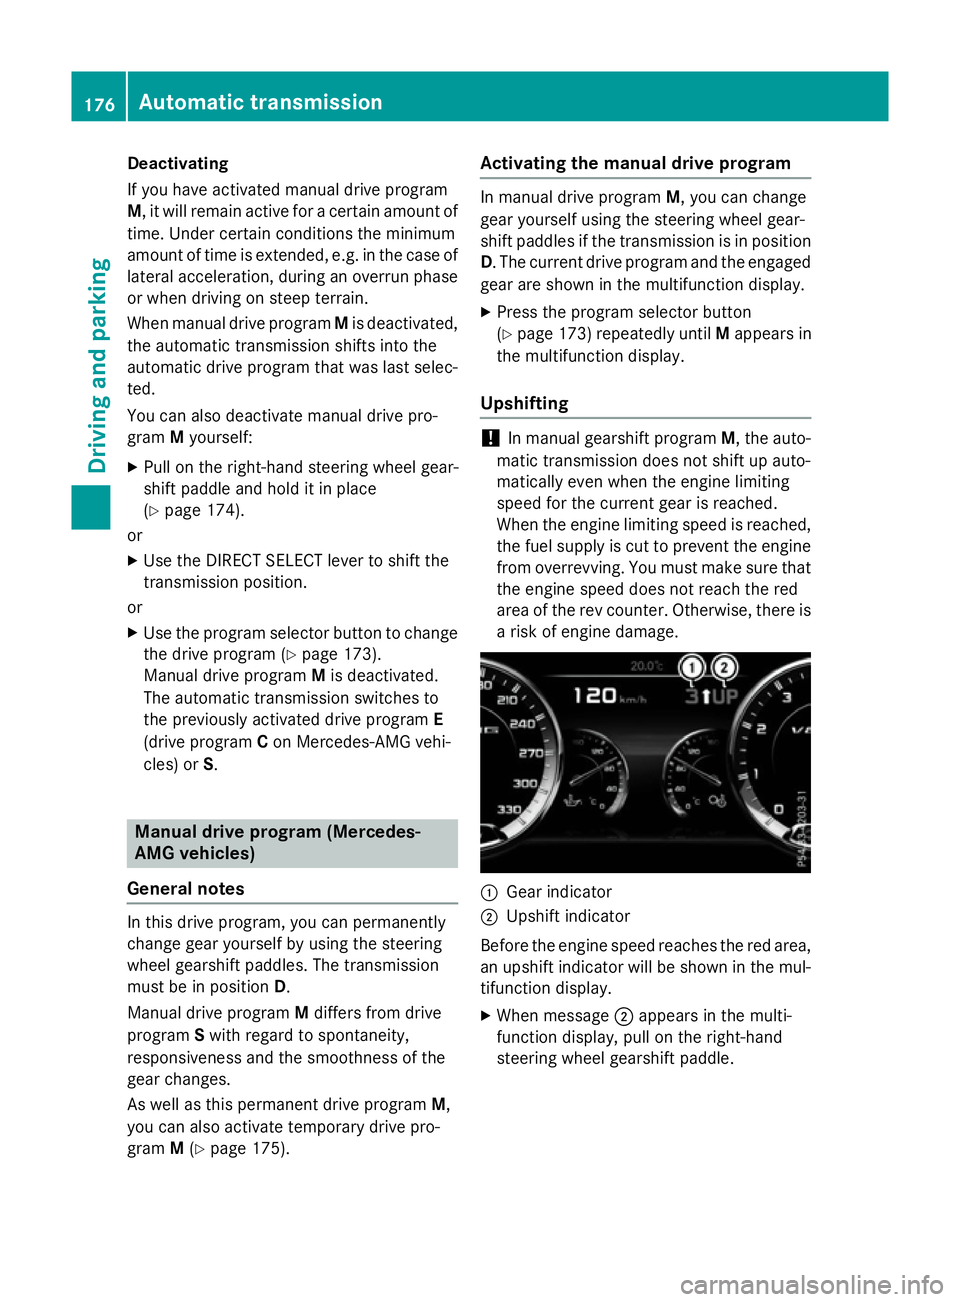
a risk of engine damage. :
Gear indicator
; Upshift indicator
Before the engine speed reaches the red area, an upshift indicator will be shown in the mul-
tifunction display.
X When message ;appears in the multi-
function display, pull on the right-hand
steering wheel gearshift paddle. 176
Automatic transmissionDriving and pa
rking
Page 188 of 417
more effort to steer and brake. There is a risk
of an accident.
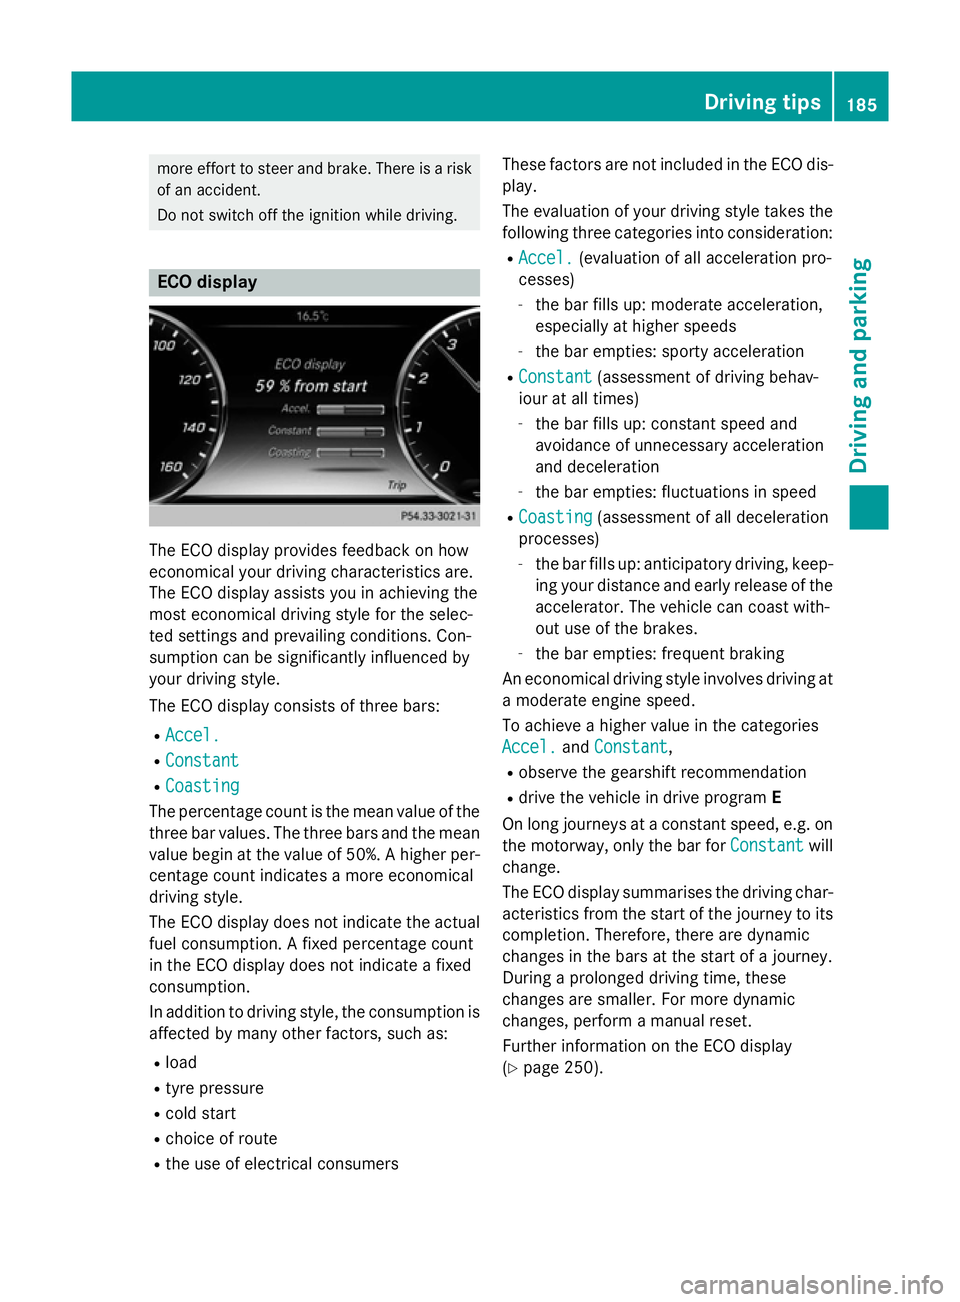
Do not switch off the ignition while driving. ECO display
The ECO display provides feedback on how
economical your driving characteristics are.
The ECO display assists you in achieving the
most economical driving style for the selec-
ted settings and prevailing conditions. Con-
sumption can be significantly influenced by
your driving style.
The ECO display consists of three bars:
R Accel.
Accel.
R Constant Constant
R Coasting
Coasting
The percentage count is the mean value of the three bar values. The three bars and the mean
value begin at the value of 50%. A higher per-
centage count indicates a more economical
driving style.
The ECO display does not indicate the actual fuel consumption. A fixed percentage count
in the ECO display does not indicate a fixed
consumption.
In addition to driving style, the consumption is
affected by many other factors, such as:
R load
R tyre pressure
R cold start
R choice of route
R the use of electrical consumers These factors are not included in the ECO dis-
play.
The evaluation of your driving style takes the following three categories into consideration:
R Accel.
Accel. (evaluation of all acceleration pro-
cesses)
- the bar fills up: moderate acceleration,
especially at higher speeds
- the bar empties: sporty acceleration
R Constant Constant (assessment of driving behav-
iour at all times)
- the bar fills up: constant speed and
avoidance of unnecessary acceleration
and deceleration
- the bar empties: fluctuations in speed
R Coasting Coasting (assessment of all deceleration
processes)
- the bar fills up: anticipatory driving, keep-
ing your distance and early release of the
accelerator. The vehicle can coast with-
out use of the brakes.
- the bar empties: frequent braking
An economical driving style involves driving at a moderate engine speed.
To achieve a higher value in the categories
Accel. Accel. andConstant
Constant,
R observe the gearshift recommendation
R drive the vehicle in drive program E
On long journeys at a constant speed, e.g. on the motorway, only the bar for Constant
Constantwill
change.
The ECO display summarises the driving char-
acteristics from the start of the journey to its completion. Therefore, there are dynamic
changes in the bars at the start of a journey.
During a prolonged driving time, these
changes are smaller. For more dynamic
changes, perform a manual reset.
Further information on the ECO display
(Y page 250). Driving tips
185Driving and parking Z
Page 189 of 417
Brakes
Important safety notes G
WARNING
If you shift down on a slippery road surface in an attempt to increase the engine's braking
effect, the drive wheels could lose their grip.
This increases the risk of skidding and having
an accident.
Do not shift down for additional engine brak-
ing on a slippery road surface.
Downhill gradients Change into a lower gear in good time on long
and steep downhill gradients. Take particular note of this when driving a laden vehicle.
This also applies if you have activated cruise
control, SPEEDTRONIC or DISTRONIC PLUS.
This will use the braking effect of the engine,
so less braking will be required to maintain
vehicle speed. This relieves the load on the
brake system and prevents the brakes from
overheating and wearing too quickly.
Heavy and light loads G
WARNING
The braking system can overheat if you leave your foot on the brake pedal while driving.
This increases the braking distance and could
even cause the braking system to fail. There is
a risk of an accident.
Never use the brake pedal as a footrest. Do
not simultaneously depress both the brake
pedal and the accelerator pedal while driving.
! Depressing the brake pedal constantly
results in excessive and premature wear to
the brake pads.
If heavy demands are made on the brakes, do not park the vehicle immediately. Drive on for
a short while. This allows the airflow to cool
the brakes more quickly.
If the brakes have been used only moderately,
you should occasionally test their effective- ness. To do this, brake more firmly from a
higher speed while paying attention to the
traffic conditions. This improves the grip of
the brakes.
Wet road surfaces If you have driven for a long time in heavy rain
without braking, there may be a delayed reac-
tion from the brakes when braking for the first time. This may also occur after a car wash orafter driving through deep water.
You will have to depress the brake pedal more
firmly. Maintain a greater distance to the vehi-
cle in front.
After driving on a wet road or having the vehi- cle washed, brake firmly while paying atten-
tion to the traffic conditions. This will warm upthe brake discs, thereby drying them more
quickly and protecting them against corro-
sion.
Limited braking performance on salt-
treated roads If you drive on salt-treated roads, a layer of
salt may form on the brake discs and pads.
This can increase the braking distance con-
siderably.
R In order to prevent any salt build-up, apply
the brakes occasionally while paying atten-
tion to the traffic conditions.
R Carefully depress the brake pedal at the
end of the journey and when starting the
next journey.
R Maintain a much greater distance to the
vehicle in front.
New brake discs and brake pads/
linings Brake pads/linings and discs that are either
new or have been replaced only achieve opti- mum braking effect after several hundred kil-
ometres of driving. Compensate for the
reduced braking effect by applying greater
force to the brake pedal. 186
Driving tipsDriving an
d parking
Page 192 of 417
Cruise control
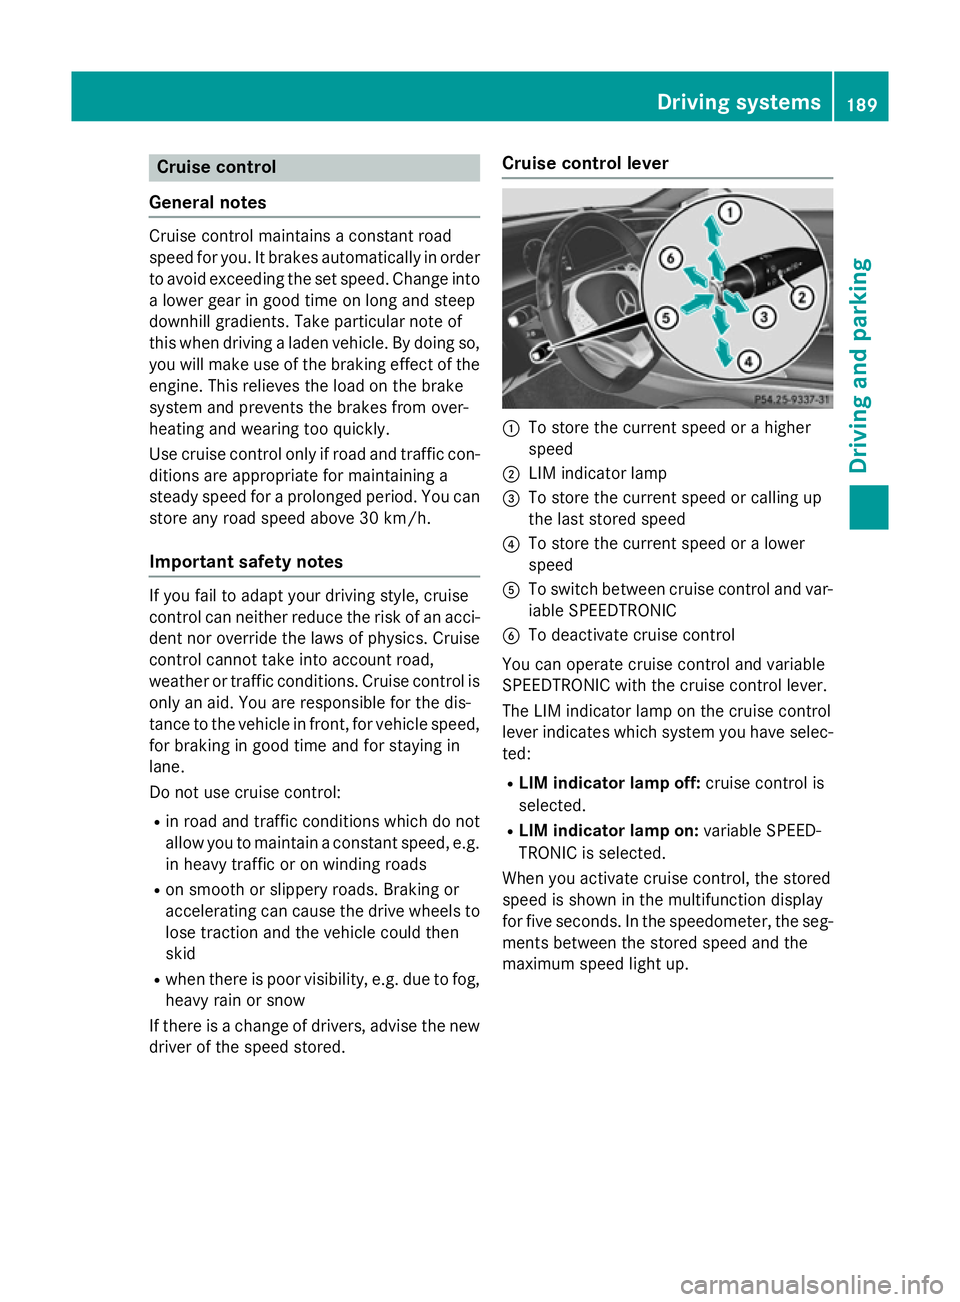
General notes Cruise control maintains a constant road
speed for you. It brakes automatically in order
to avoid exceeding the set speed. Change into
a lower gear in good time on long and steep
downhill gradients. Take particular note of
this when driving a laden vehicle. By doing so, you will make use of the braking effect of the engine. This relieves the load on the brake
system and prevents the brakes from over-
heating and wearing too quickly.
Use cruise control only if road and traffic con-
ditions are appropriate for maintaining a
steady speed for a prolonged period. You can store any road speed above 30 km/h.
Important safety notes If you fail to adapt your driving style, cruise
control can neither reduce the risk of an acci-
dent nor override the laws of physics. Cruise
control cannot take into account road,
weather or traffic conditions. Cruise control is
only an aid. You are responsible for the dis-
tance to the vehicle in front, for vehicle speed, for braking in good time and for staying in
lane.
Do not use cruise control:
R in road and traffic conditions which do not
allow you to maintain a constant speed, e.g.
in heavy traffic or on winding roads
R on smooth or slippery roads. Braking or
accelerating can cause the drive wheels to lose traction and the vehicle could then
skid
R when there is poor visibility, e.g. due to fog,
heavy rain or snow
If there is a change of drivers, advise the new driver of the speed stored. Cruise control lever
:
To store the current speed or a higher
speed
; LIM indicator lamp
= To store the current speed or calling up
the last stored speed
? To store the current speed or a lower
speed
A To switch between cruise control and var-
iable SPEEDTRONIC
B To deactivate cruise control
You can operate cruise control and variable
SPEEDTRONIC with the cruise control lever.
The LIM indicator lamp on the cruise control
lever indicates which system you have selec- ted:
R LIM indicator lamp off: cruise control is
selected.
R LIM indicator lamp on: variable SPEED-
TRONIC is selected.
When you activate cruise control, the stored
speed is shown in the multifunction display
for five seconds. In the speedometer, the seg- ments between the stored speed and the
maximum speed light up. Driving systems
189Driving and parking Z
Page 194 of 417
Setting a speed
Bear in mind that it may take a brief moment
until the vehicle has accelerated or braked tothe set speed.
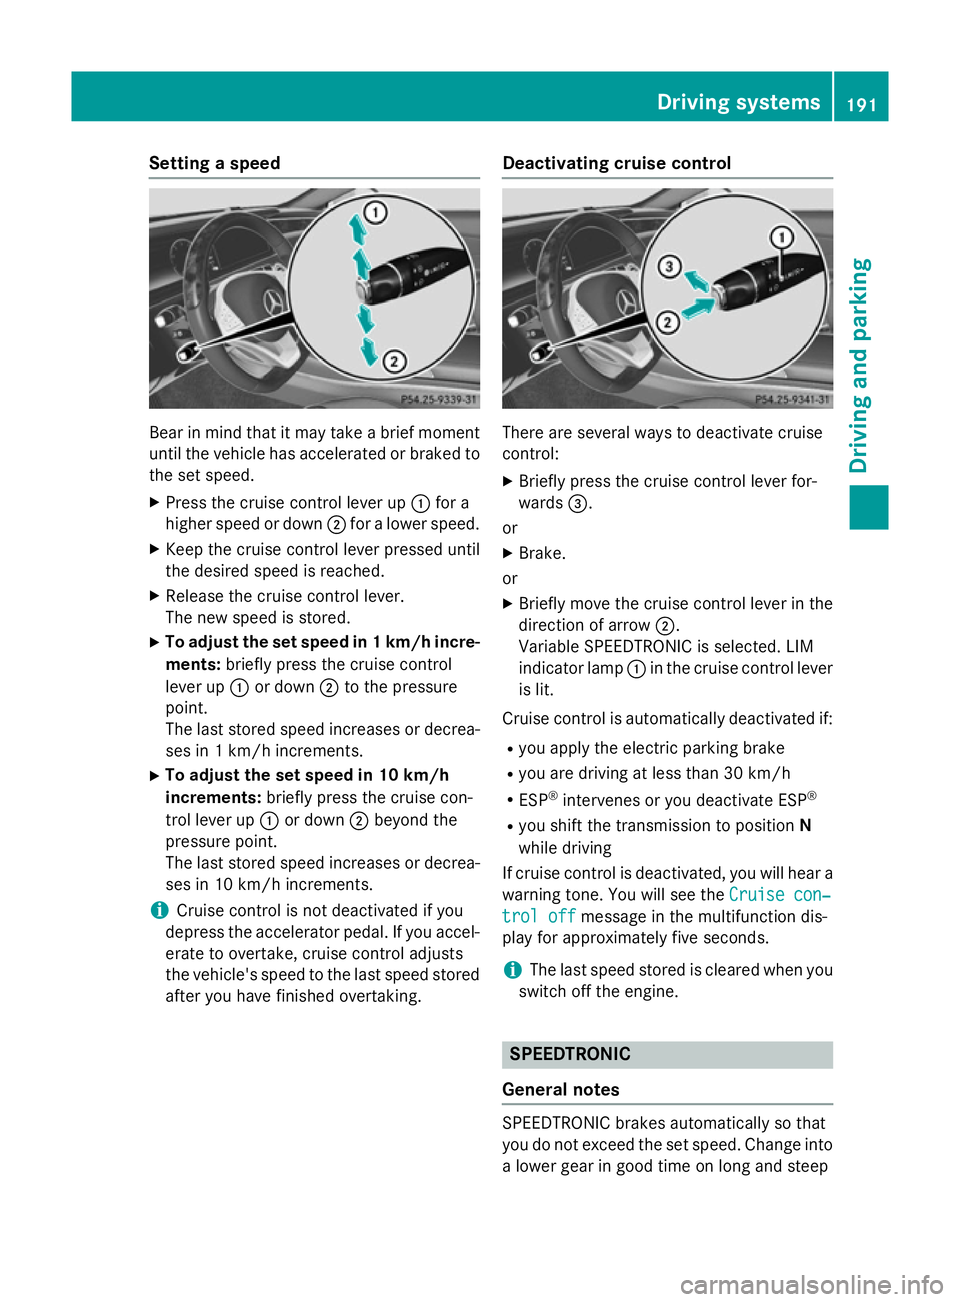
X Press the cruise control lever up :for a
higher speed or down ;for a lower speed.
X Keep the cruise control lever pressed until
the desired speed is reached.
X Release the cruise control lever.
The new speed is stored.
X To adjust the set speed in 1 km/h incre-
ments: briefly press the cruise control
lever up :or down ;to the pressure
point.
The last stored speed increases or decrea- ses in 1 km/h increments.
X To adjust the set speed in 10 km/h
increments: briefly press the cruise con-
trol lever up :or down ;beyond the
pressure point.
The last stored speed increases or decrea- ses in 10 km/h increments.
i Cruise control is not deactivated if you
depress the accelerator pedal. If you accel- erate to overtake, cruise control adjusts
the vehicle's speed to the last speed stored
after you have finished overtaking. Deactivating cruise control There are several ways to deactivate cruise
control:
X Briefly press the cruise control lever for-
wards =.
or X Brake.
or
X Briefly move the cruise control lever in the
direction of arrow ;.
Variable SPEEDTRONIC is selected. LIM
indicator lamp :in the cruise control lever
is lit.
Cruise control is automatically deactivated if:
R you apply the electric parking brake
R you are driving at less than 30 km/h
R ESP ®
intervenes or you deactivate ESP ®
R you shift the transmission to position N
while driving
If cruise control is deactivated, you will hear a
warning tone. You will see the Cruise con‐ Cruise con‐
trol off
trol off message in the multifunction dis-
play for approximately five seconds.
i The last speed stored is cleared when you
switch off the engine. SPEEDTRONIC
General notes SPEEDTRONIC brakes automatically so that
you do not exceed the set speed. Change into
a lower gear in good time on long and steep Driving systems
191Driving and parking Z
Page 195 of 417
downhill gradients. Take particular note of
this when driving a laden vehicle. By doing so, you will make use of the braking effect of the engine. This relieves the load on the brake
system and prevents the brakes from over-
heating and wearing too quickly.
Important safety notes If you fail to adapt your driving style, SPEED-
TRONIC can neither reduce the risk of an
accident nor override the laws of physics.
SPEEDTRONIC cannot take into account
road, weather or traffic conditions. SPEED-
TRONIC is only an aid. You are responsible for
the distance to the vehicle in front, for vehicle speed, for braking in good time and for stay-
ing in lane.
If there is a change of drivers, advise the new
driver of the speed stored.
Variable SPEEDTRONIC General notes
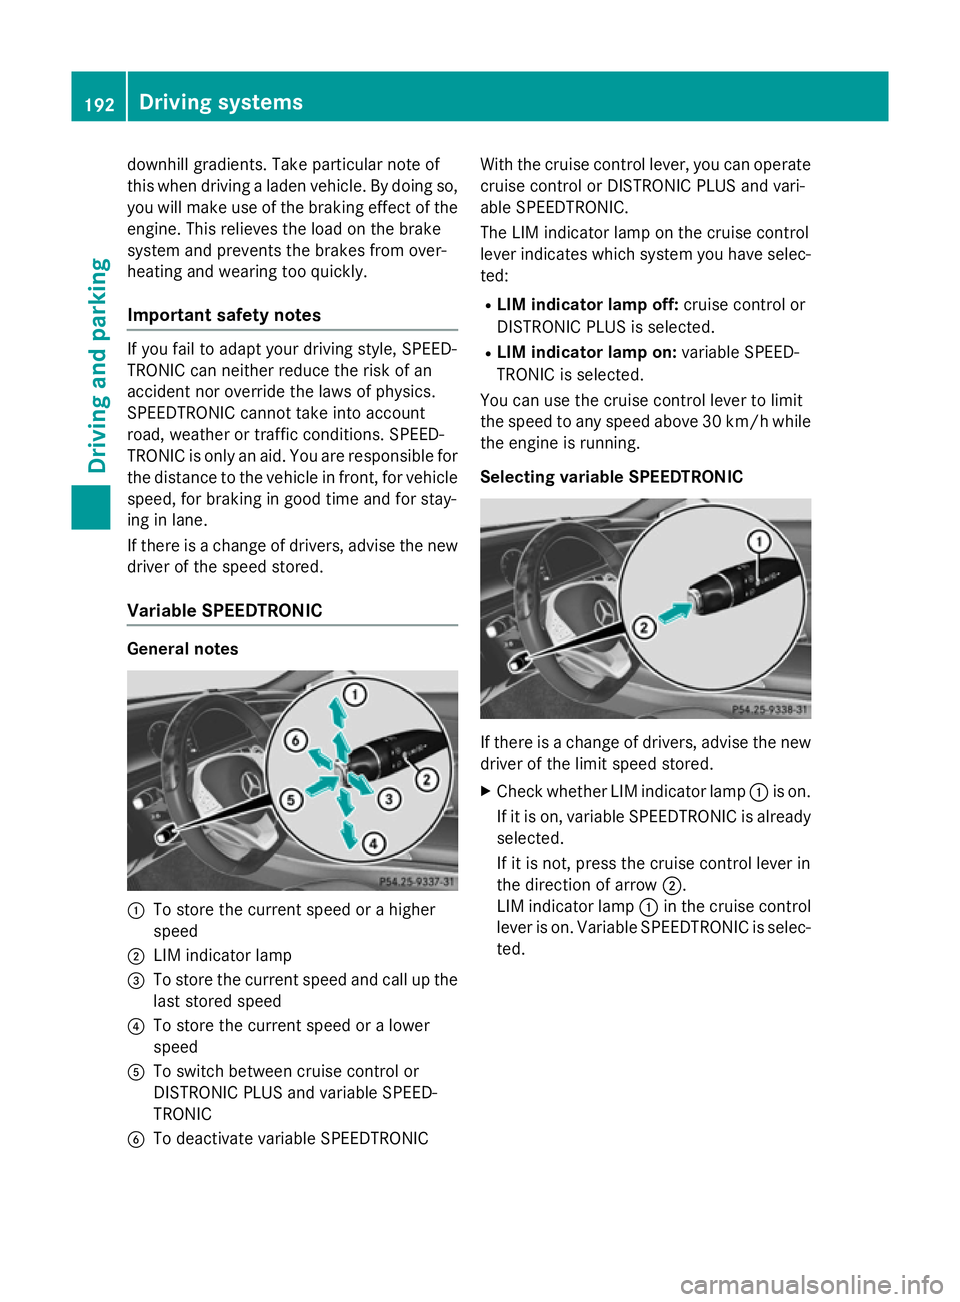
:
To store the current speed or a higher
speed
; LIM indicator lamp
= To store the current speed and call up the
last stored speed
? To store the current speed or a lower
speed
A To switch between cruise control or
DISTRONIC PLUS and variable SPEED-
TRONIC
B To deactivate variable SPEEDTRONIC With the cruise control lever, you can operate
cruise control or DISTRONIC PLUS and vari-
able SPEEDTRONIC.
The LIM indicator lamp on the cruise control
lever indicates which system you have selec-
ted:
R LIM indicator lamp off: cruise control or
DISTRONIC PLUS is selected.
R LIM indicator lamp on: variable SPEED-
TRONIC is selected.
You can use the cruise control lever to limit
the speed to any speed above 30 km/ hwhile
the engine is running.
Selecting variable SPEEDTRONIC If there is a change of drivers, advise the new
driver of the limit speed stored.
X Check whether LIM indicator lamp :is on.
If it is on, variable SPEEDTRONIC is already
selected.
If it is not, press the cruise control lever in
the direction of arrow ;.
LIM indicator lamp :in the cruise control
lever is on. Variable SPEEDTRONIC is selec-
ted. 192
Driving systemsDriving and parking