2015 MERCEDES-BENZ GLK-CLASS SUV clock
[x] Cancel search: clockPage 88 of 386
Automatic locking feature
The vehicle is locked automatically when the
ignition is switched on and the vehicle's
wheels are turning at a speed in excess of
9 mph (15 km/h).
You could therefore be locked out if:R the vehicle is being pushed.
R the vehicle is being towed.
R the vehicle is on a roller dynamometer.
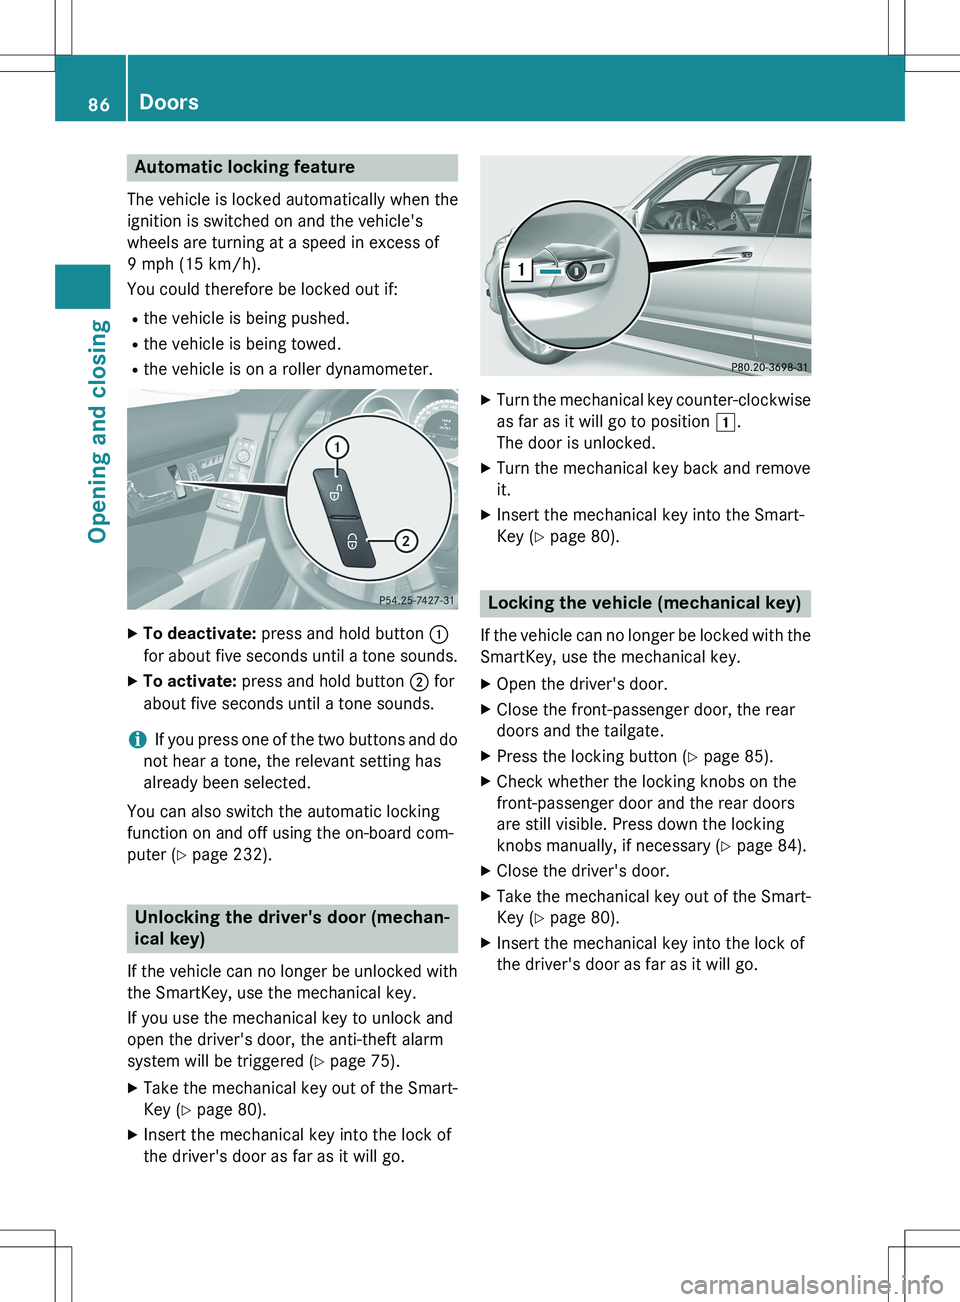
XTo deactivate: press and hold button :
for about five seconds until a tone sounds.
X To activate: press and hold button ; for
about five seconds until a tone sounds.
iIf you press one of the two buttons and do
not hear a tone, the relevant setting has
already been selected.
You can also switch the automatic locking
function on and off using the on-board com-
puter ( Y page 232).
Unlocking the driver's door (mechan-
ical key)
If the vehicle can no longer be unlocked with
the SmartKey, use the mechanical key.
If you use the mechanical key to unlock and
open the driver's door, the anti-theft alarm
system will be triggered ( Y page 75).
X Take the mechanical key out of the Smart-
Key ( Y page 80).
X Insert the mechanical key into the lock of
the driver's door as far as it will go.
XTurn the mechanical key counter-clockwise
as far as it will go to position 1.
The door is unlocked.
X Turn the mechanical key back and remove
it.
X Insert the mechanical key into the Smart-
Key ( Y page 80).
Locking the vehicle (mechanical key)
If the vehicle can no longer be locked with the
SmartKey, use the mechanical key.
X Open the driver's door.
X Close the front-passenger door, the rear
doors and the tailgate.
X Press the locking button ( Y page 85).
X Check whether the locking knobs on the
front-passenger door and the rear doors
are still visible. Press down the locking
knobs manually, if necessary ( Y page 84).
X Close the driver's door.
X Take the mechanical key out of the Smart-
Key ( Y page 80).
X Insert the mechanical key into the lock of
the driver's door as far as it will go.
86Doors
Opening and closing
Page 89 of 386

XTurn the mechanical key clockwise as far as
it will go to position 1.
X Turn the mechanical key back and remove
it.
X Make sure that the doors and the tailgate
are locked.
X Insert the mechanical key into the Smart-
Key ( Y page 80).
iIf you lock the vehicle as described above,
the fuel filler flap is not locked. The anti-
theft alarm system is not armed.
Cargo compartment
Important safety notes
GWARNING
If persons, particularly children are subjected to prolonged exposure to extreme heat or
cold, there is a risk of injury, possibly even
fatal. Never leave children unattended in the
vehicle.
GWARNING
Combustion engines emit poisonous exhaust
gases such as carbon monoxide. If the tailgateis open when the engine is running, particu-
larly if the vehicle is moving, exhaust fumes
could enter the passenger compartment.
There is a risk of poisoning.
Turn off the engine before opening the tail-
gate. Never drive with the tailgate open.
! The tailgate swings upwards and to the
rear when opened. Therefore, make sure that there is sufficient clearance above and
behind the tailgate.
iTailgate opening dimensions
( Y page 380).
You should preferably place luggage or loads
in the cargo compartment. Observe the load-
ing guidelines ( Y page 274).
Do not leave the SmartKey in the cargo com- partment. You could otherwise lock yourself
out.
Vehicles without the EASY-PACK tailgate:
the tailgate can be:
R opened and closed manually from outside
R unlocked from inside with the mechanical
key
For vehicles with the EASY-PACK tailgate you can:
R open and close the tailgate manually from
outside
R open and close the tailgate automatically
from outside
R open and close the tailgate automatically
from inside
R limit the opening angle of the tailgate
R unlock the tailgate from inside with the
mechanical key
Tailgate reversing feature
The tailgate is equipped with an automatic
reversing feature. It reacts if a solid object
obstructs or restricts the tailgate during the
closing procedure. The tailgate opens again
automatically. The automatic reversing fea-
ture is however only an aid and is not a sub-
stitute for your attentiveness when closing
the cargo compartment.
GWARNING
The reversing feature does not react:
R to soft, light and thin objects, e.g. small fin-
gers
R over the last 1/3 in (8 mm) of the closing
movement
Cargo compartment87
Opening and closing
Z
Page 93 of 386
(Y page 88) in the tailgate or pull the handle
on the outside of the tailgate again.
X To store the position: press and hold the
closing button in the tailgate until you hear a short tone.
The opening angle limiter is activated. The
tailgate will now stop in the stored positionwhen opening.
iTo open the tailgate fully, pull the handle
on the outside of the tailgate again after it
has stopped automatically. This does not
delete the stored position.
Deactivating
X Press and hold the closing button
(Y page 88) in the tailgate until you hear
two short tones.
Tailgate emergency release
Important safety notes
! The tailgate swings upwards and to the
rear when opened. Therefore, make sure
that there is sufficient clearance above and behind the tailgate.
If the tailgate can no longer be opened from
outside the vehicle, use the emergency
release on the inside of the tailgate.
iTailgate opening dimensions
( Y page 380).
Opening
X
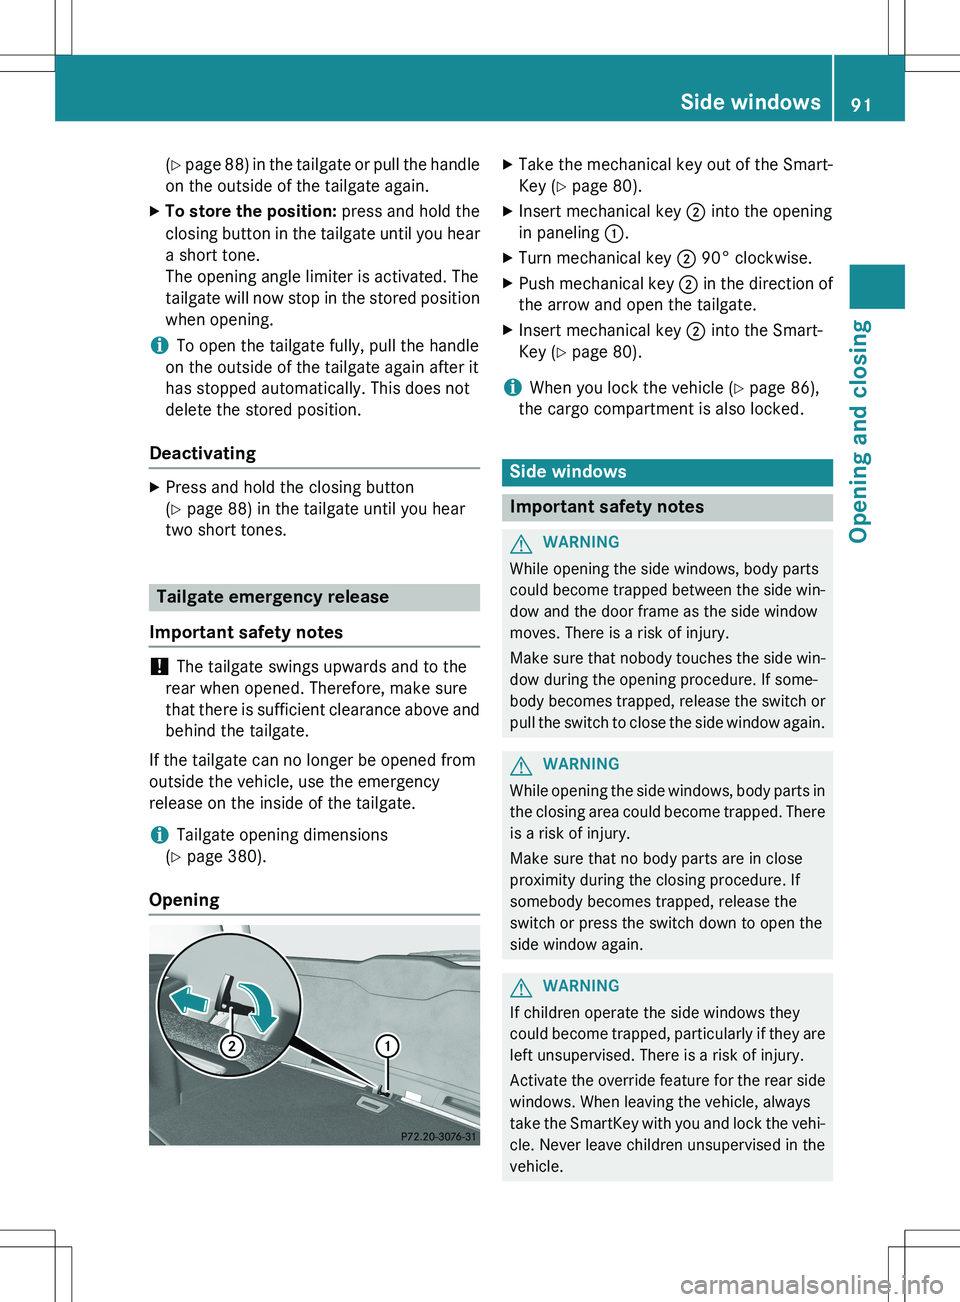
Take the mechanical key out of the Smart-
Key ( Y page 80).
X Insert mechanical key ; into the opening
in paneling :.
X Turn mechanical key ; 90° clockwise.
X Push mechanical key ; in the direction of
the arrow and open the tailgate.
X Insert mechanical key ; into the Smart-
Key ( Y page 80).
iWhen you lock the vehicle ( Y page 86),
the cargo compartment is also locked.
Side windows
Important safety notes
GWARNING
While opening the side windows, body parts
could become trapped between the side win- dow and the door frame as the side window
moves. There is a risk of injury.
Make sure that nobody touches the side win-
dow during the opening procedure. If some-
body becomes trapped, release the switch or pull the switch to close the side window again.
GWARNING
While opening the side windows, body parts in
the closing area could become trapped. There is a risk of injury.
Make sure that no body parts are in close
proximity during the closing procedure. If
somebody becomes trapped, release the
switch or press the switch down to open the
side window again.
GWARNING
If children operate the side windows they
could become trapped, particularly if they are left unsupervised. There is a risk of injury.
Activate the override feature for the rear side
windows. When leaving the vehicle, always
take the SmartKey with you and lock the vehi-
cle. Never leave children unsupervised in the
vehicle.
Side windows91
Opening and closing
Z
Page 126 of 386
Changing the front bulbs
Low-beam headlamps (halogen head-
lamps)
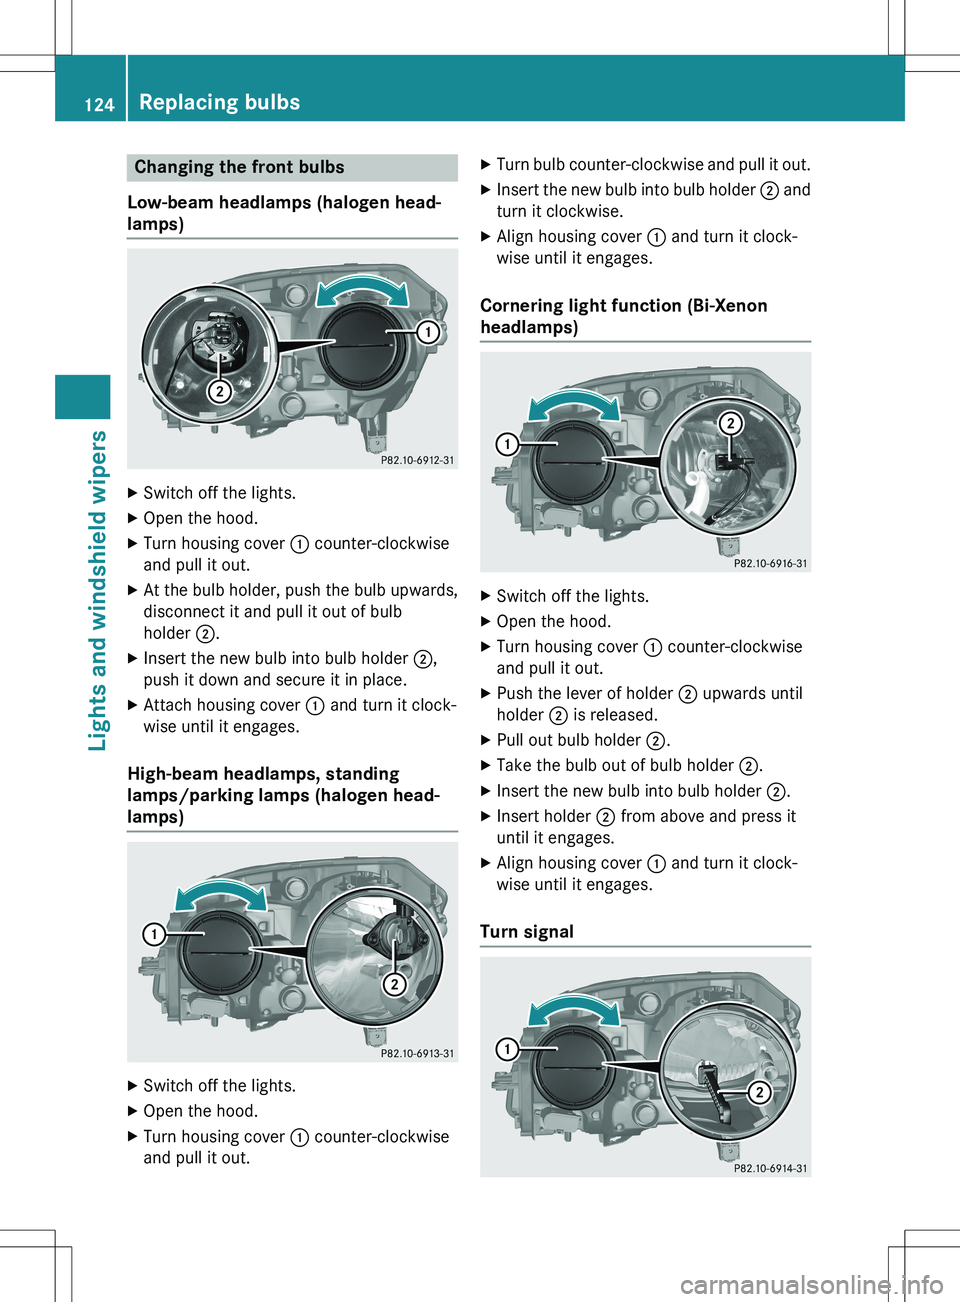
X Switch off the lights.
X Open the hood.
X Turn housing cover : counter-clockwise
and pull it out.
X At the bulb holder, push the bulb upwards,
disconnect it and pull it out of bulb
holder ;.
X Insert the new bulb into bulb holder ;,
push it down and secure it in place.
X Attach housing cover : and turn it clock-
wise until it engages.
High-beam headlamps, standing
lamps/parking lamps (halogen head-
lamps)
X Switch off the lights.
X Open the hood.
X Turn housing cover : counter-clockwise
and pull it out. X
Turn bulb counter-clockwise and pull it out.
X Insert the new bulb into bulb holder ; and
turn it clockwise.
X Align housing cover : and turn it clock-
wise until it engages.
Cornering light function (Bi-Xenon
headlamps)
X Switch off the lights.
X Open the hood.
X Turn housing cover : counter-clockwise
and pull it out.
X Push the lever of holder ; upwards until
holder ; is released.
X Pull out bulb holder ;.
X Take the bulb out of bulb holder ;.
X Insert the new bulb into bulb holder ;.
X Insert holder ; from above and press it
until it engages.
X Align housing cover : and turn it clock-
wise until it engages.
Turn signal
124Replacing bulbs
Lights and windshield wipers
Page 127 of 386
XSwitch off the lights.
X Open the hood.
X Turn housing cover : counter-clockwise
and pull it out.
X Grip the back of lever extension ; and pull
it out in a straight line.
X Take the bulb out of lever extension ;.
X Insert the new bulb into lever extension ;.
X
Re-insert lever extension ; downwards
(swelling) with guide rail =.
Changing the rear bulbs
Opening and closing the side trim pan-
els
You must open the side trim panel in the
cargo compartment before you can change
the bulbs in the tail lamps.
Left-hand side trim panel
Right-hand side trim panel
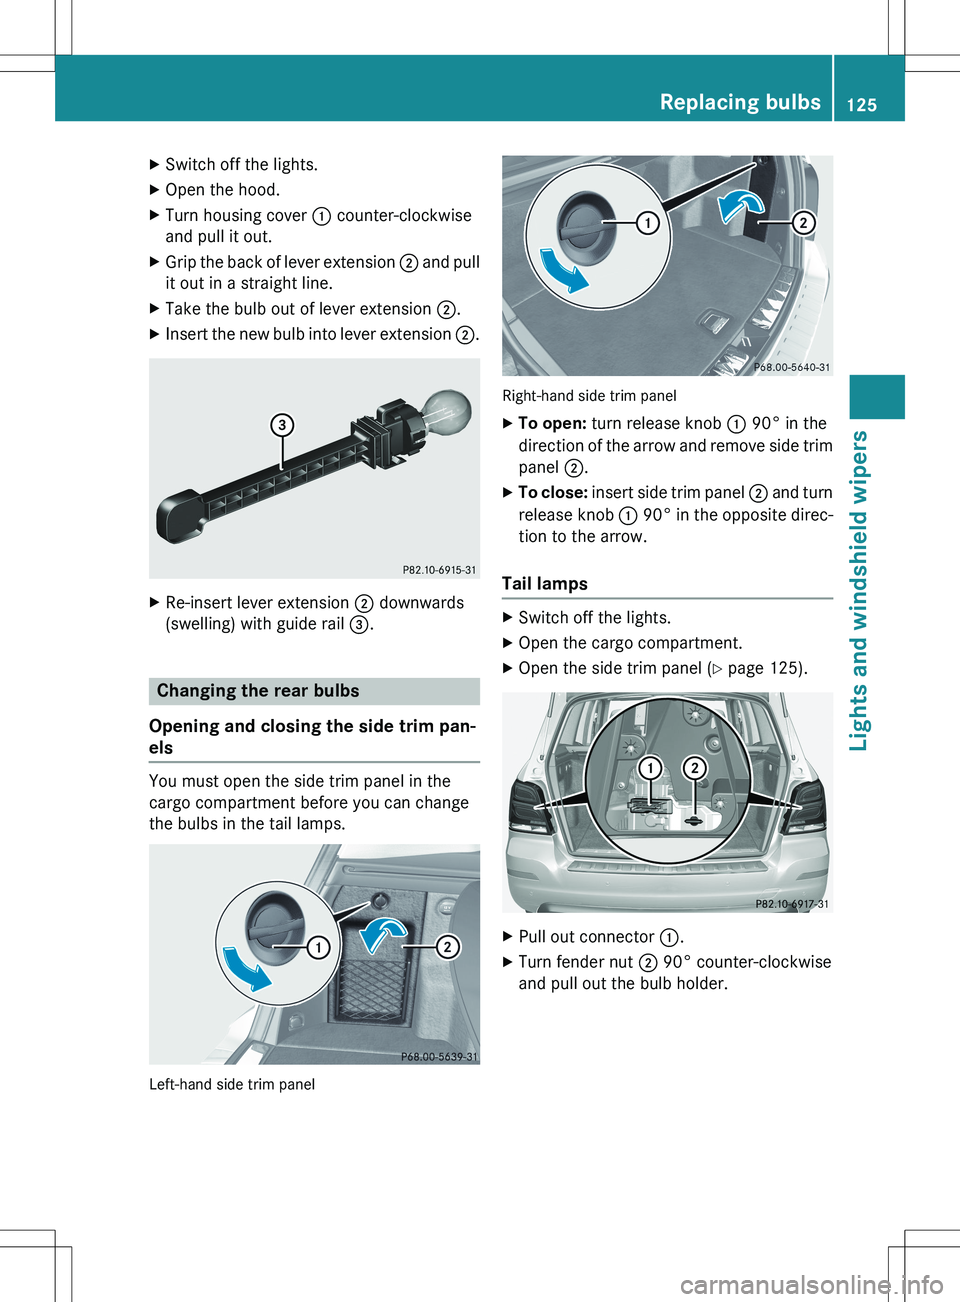
X To open: turn release knob : 90° in the
direction of the arrow and remove side trim panel ;.
X To close: insert side trim panel ; and turn
release knob : 90° in the opposite direc-
tion to the arrow.
Tail lamps
X Switch off the lights.
X Open the cargo compartment.
X Open the side trim panel ( Y page 125).
X
Pull out connector :.
X Turn fender nut ; 90° counter-clockwise
and pull out the bulb holder.
Replacing bulbs125
Lights and windshield wipers
Z
Page 128 of 386

XBackup lamp :: remove the bulb from
bulb holder.
X Insert the new bulb into the bulb holder.
X Re-install bulb holder.
X Turn fender nut 90° clockwise.
X Insert the connector.
X Close the side trim panel ( Y page 125).
Windshield wipers
Switching the windshield wipers
on/off
!
Do not operate the windshield wipers
when the windshield is dry, as this could
damage the wiper blades. Moreover, dust
that has collected on the windshield can
scratch the glass if wiping takes place when the windshield is dry.
If it is necessary to switch on the windshield wipers in dry weather conditions, always
use washer fluid when operating the wind-
shield wipers.
! If the windshield wipers leave smears on
the windshield after the vehicle has been
washed in an automatic car wash, wax or
other residues may be the reason for this.
Clean the windshield using washer fluid
after washing the vehicle in an automatic
car wash.
Combination switch 1
$ Windshield wiper off
2Ä Intermittent wipe, low (rain sensor
set to low sensitivity)
3Å Intermittent wipe, high (rain sensor
set to high sensitivity)
4° Continuous wipe, slow
5¯ Continuous wipe, fast
Bí Single wipe/ î Wipes the wind-
shield using washer fluid
X Switch on the ignition.
X Turn the combination switch to the corre-
sponding position.
! Vehicles with a rain sensor: if the wind-
shield becomes dirty in dry weather condi-
tions, the windshield wipers may be activa-
ted inadvertently. This could then damage
the windshield wiper blades or scratch the
windshield.
For this reason, you should always switch
off the windshield wipers in dry weather.
If the wiper blades are worn, the windshield
will no longer be wiped properly. This could
prevent you from observing the traffic condi-
tions.
126Windshield wipers
Lights and windshield wipers
Page 144 of 386
XPress the à button.
The indicator lamp in the ¬ button goes
out. Airflow and air distribution are set to
automatic mode.
or X Turn temperature control : or B counter-
clockwise or clockwise ( Y page 133),
( Y page 136).
or
X Press the K or I button.
MAX COOL maximum cooling
The MAX COOL function is only available in
vehicles for the USA.
MAX COOL is only operational when the
engine is running.
When you activate MAX COOL, climate con-
trol switches to the following functions:
R maximum cooling
R maximum airflow
R air-recirculation mode on
X To activate: press the Ù button.
The indicator lamp in the Ù button lights
up.
X To deactivate: press the Ù button.
The indicator lamp in the Ù button goes
out. The previously selected settings are
restored.
Defrosting the windows
Windows fogged up on the inside
X Activate the ¿ cooling with air dehu-
midification function.
X Activate automatic mode Ã.
X Adjust the side air vents so that the warmed
air is directed to the side windows.
X If the windows continue to fog up, activate
the ¬ "Windshield defrosting" function.
iYou should only select this setting until
the windshield is clear again.
Windows fogged up on the outside
X Activate the windshield wipers.
X Press the _ button repeatedly until the
O or P symbol appears in the dis-
play.
X Adjust the side air vents so that no air is
directed to the side windows.
Rear window defroster
General notes
The rear window defroster has a high current draw. You should therefore switch it off as
soon as the rear window is clear. Otherwise,
the rear window defroster switches off auto-
matically after several minutes.
If the battery voltage is too low, the rear win-
dow defroster may switch off.
Switching on/off
X Turn the SmartKey to position 2 in the igni-
tion lock ( Y page 149).
X Press the ¤ button.
The indicator lamp in the ¤ button lights
up or goes out.
142Operating the climate control systems
Climate control
Page 166 of 386
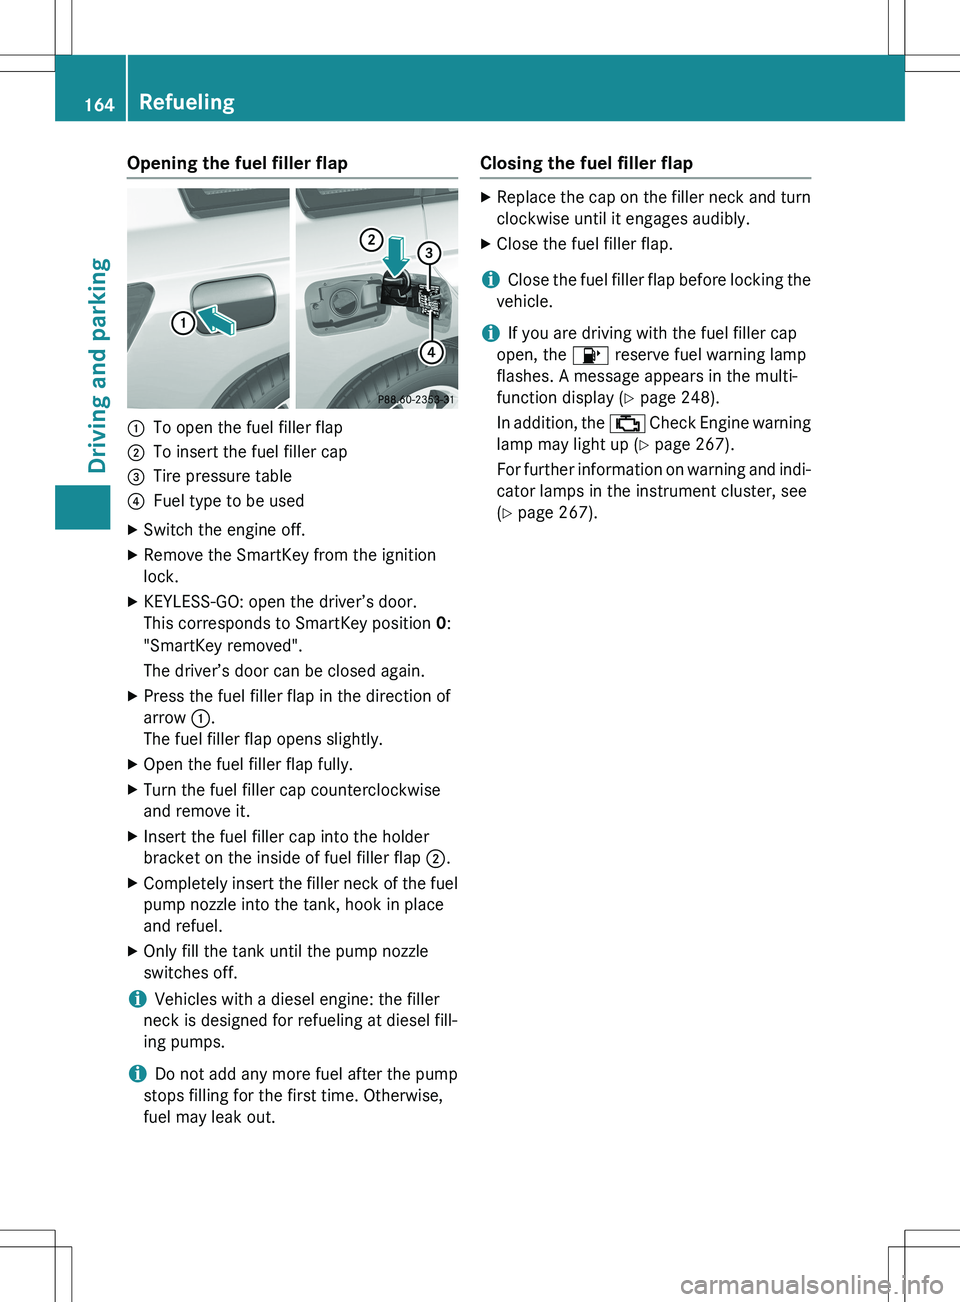
Opening the fuel filler flap
:To open the fuel filler flap
;To insert the fuel filler cap
=Tire pressure table
?Fuel type to be used
X Switch the engine off.
X Remove the SmartKey from the ignition
lock.
X KEYLESS-GO: open the driver’s door.
This corresponds to SmartKey position 0:
"SmartKey removed".
The driver’s door can be closed again.
X Press the fuel filler flap in the direction of
arrow :.
The fuel filler flap opens slightly.
X Open the fuel filler flap fully.
X Turn the fuel filler cap counterclockwise
and remove it.
X Insert the fuel filler cap into the holder
bracket on the inside of fuel filler flap ;.
X Completely insert the filler neck of the fuel
pump nozzle into the tank, hook in place
and refuel.
X Only fill the tank until the pump nozzle
switches off.
iVehicles with a diesel engine: the filler
neck is designed for refueling at diesel fill-
ing pumps.
iDo not add any more fuel after the pump
stops filling for the first time. Otherwise,
fuel may leak out.
Closing the fuel filler flap
X Replace the cap on the filler neck and turn
clockwise until it engages audibly.
X Close the fuel filler flap.
iClose the fuel filler flap before locking the
vehicle.
iIf you are driving with the fuel filler cap
open, the 8 reserve fuel warning lamp
flashes. A message appears in the multi-
function display ( Y page 248).
In addition, the ; Check Engine warning
lamp may light up ( Y page 267).
For further information on warning and indi- cator lamps in the instrument cluster, see
( Y page 267).
164Refueling
Driving and parking