2015 MERCEDES-BENZ GLK-CLASS SUV oil level
[x] Cancel search: oil levelPage 12 of 386

Engine jump startingsee Jump starting (engine)
Engine oil
Adding ........................................... 30 2
Additives ........................................ 377
Checking the oil level ..................... 301
Checking the oil level using the
dipstick .......................................... 30 1
Display message ............................ 248
Filling capacity ............................... 377
Notes about oil grades ................... 377
Notes on oil level/consumption .... 301
Viscosity ........................................ 377
ESP ®
(Electronic Stability Pro-
gram)
Deactivating/activating ................... 71
Display message ............................ 236
ETS/4ETS ........................................ 70
Function/notes ................................ 70
General notes .................................. 70
Important safety information ........... 71
Trailer stabilization ........................... 72
Warning lamp ................................. 264
ETS/4ETS (Electronic Traction Sys-
tem) ................................................... ... 70
Exhaust check ................................... 170
Exhaust tail pipe (cleaning instruc-
tions) .................................................. 3 09
Exterior lighting
Setting options .............................. 116
see Lights
Exterior mirrors
Adjusting ....................................... 109
Dipping (automatic) ....................... 110
Folding in when locking (on-boardcomputer) ...................................... 233
Folding in/out (automatically) ....... 110
Folding in/out (electrically) ........... 110
Out of position (troubleshooting) ... 110
Setting ........................................... 1 10
Storing settings (memory func-
tion) .............................................. . 112
Storing the parking position .......... 111
F
Filler cap
see Fuel filler flap Flat tire
MOExtended tires .......................... 315
Preparing the vehicle ..................... 314
TIREFIT kit ...................................... 316
see Emergency spare wheel
Floormats ........................................... 298
Fog lamps
Switching on/off ........................... 117
Folding the rear bench seat for-
wards/back ....................................... 276
Fording
On flooded roads ........................... 174
Front fog lamps
Switching on/off ........................... 117
Fuel
Additives ........................................ 375
Consumption statistics .................. 223
Displaying the current consump-
tion ............................................... . 224
Displaying the range ...................... 224
Driving tips .................................... 170
Fuel gauge ....................................... 33
Grade (gasoline) ............................ 374
Important safety notes .................. 373
Premium-grade unleaded gaso-
line ............................................... .. 374
Problem (malfunction) ................... 165
Quality (diesel) ............................... 375
Refueling ........................................ 16 2
Tank content/reserve fuel ............. 374
Fuel filler flap
Opening ......................................... 164
Fuel filter (display message) ............ 249
Fuel level
Calling up the range (on-board
computer) ...................................... 224
Fuel tank
Capacity ........................................ 374
Problem (malfunction) ................... 165
Fuse allocation chart (vehicle tool
kit) ................................................... ... 314
Fuses
Allocation chart ............................. 328
Before changing ............................. 328
Dashboard fuse box ....................... 328
Fuse box in the cargo compart-
ment .............................................. 3 29
10Index
Page 250 of 386
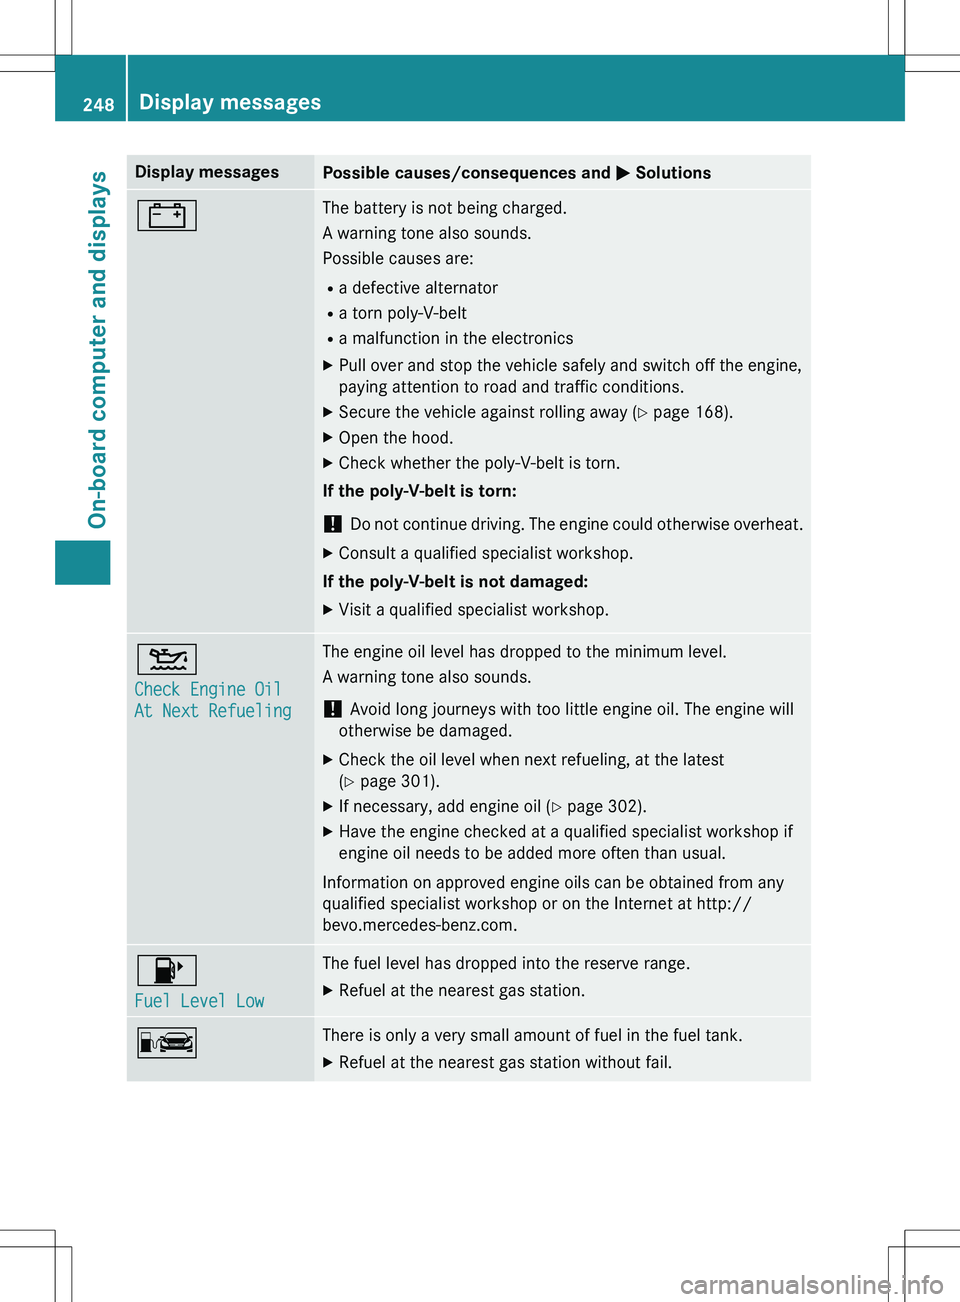
Display messagesPossible causes/consequences and M Solutions
#The battery is not being charged.
A warning tone also sounds.
Possible causes are: R
a defective alternator
R a torn poly-V-belt
R a malfunction in the electronics
X Pull over and stop the vehicle safely and switch off the engine,
paying attention to road and traffic conditions.
X Secure the vehicle against rolling away ( Y page 168).
X Open the hood.
X Check whether the poly-V-belt is torn.
If the poly-V-belt is torn:
! Do not continue driving. The engine could otherwise ov erheat.
X Consult a qualified specialist workshop.
If the poly-V-belt is not damaged: X Visit a qualified specialist workshop.
4
Check Engine Oil
At Next Refueling
The engine oil level has dropped to the minimum level.
A warning tone also sounds.
! Avoid long journeys with too little engine oil. The engine will
otherwise be damaged.
X Check the oil level when next refueling, at the latest
(Y page 301).
X If necessary, add engine oil ( Y page 302).
X Have the engine checked at a qualified specialist workshop if
engine oil needs to be added more often than usual.
Information on approved engine oils can be obtained from any
qualified specialist workshop or on the Internet at http://
bevo.mercedes-benz.com.
8
Fuel Level Low
The fuel level has dropped into the reserve range. X Refuel at the nearest gas station.
CThere is only a very small amount of fuel in the fuel tank.
X Refuel at the nearest gas station without fail.
248Display messages
On-board computer and displays
Page 303 of 386
! Make sure that the windshield wipers are
not folded away from the windshield. You
could otherwise damage the windshield
wipers or the hood.
X Make sure that the windshield wipers are
turned off.
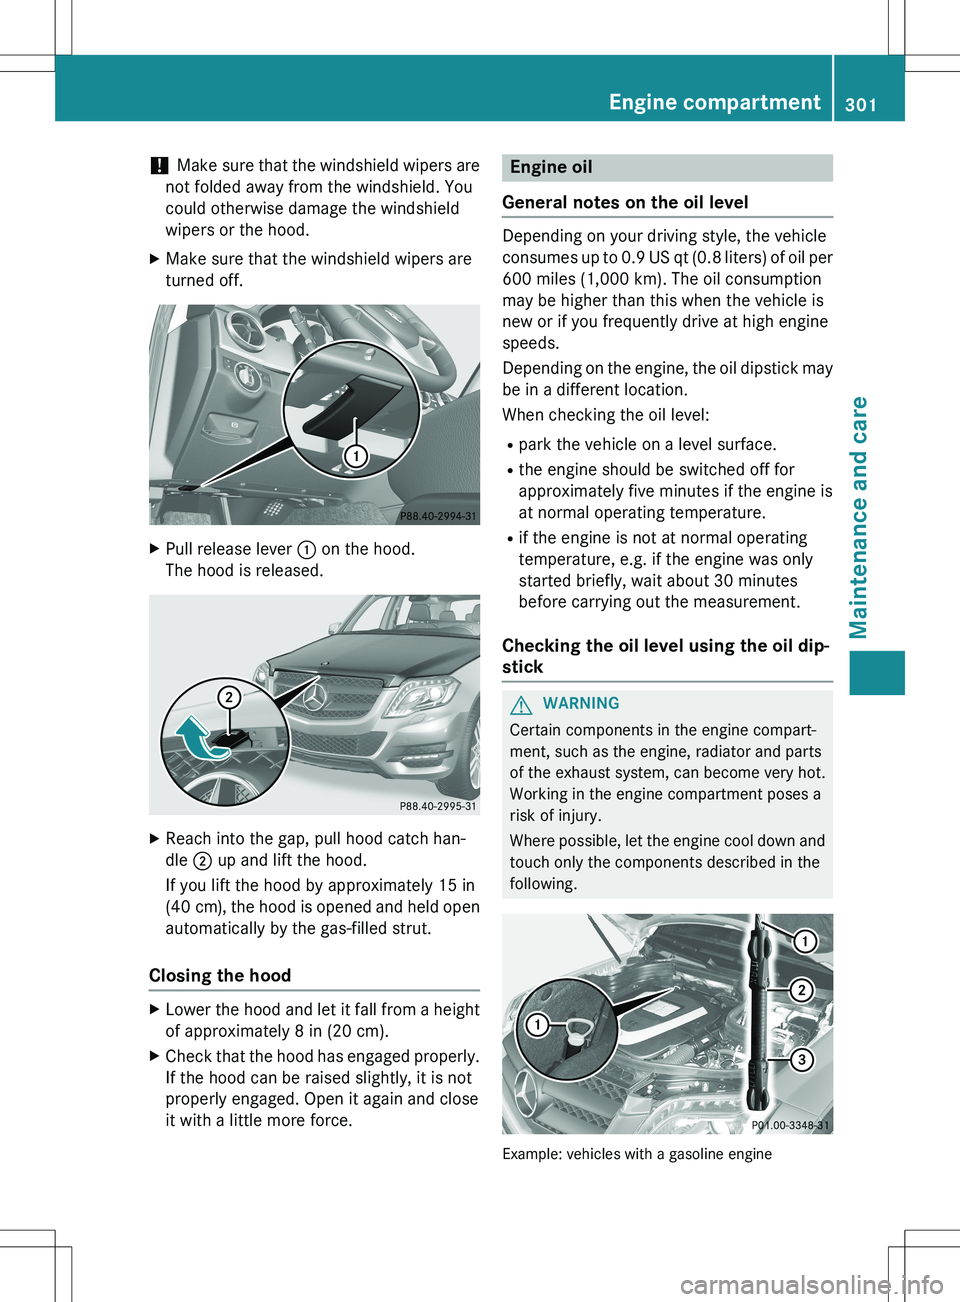
XPull release lever : on the hood.
The hood is released.
X Reach into the gap, pull hood catch han-
dle ; up and lift the hood.
If you lift the hood by approximately 15 in
(40 cm), the hood is opened and held open automatically by the gas-filled strut.
Closing the hood
X Lower the hood and let it fall from a height
of approximately 8 in (20 cm).
X Check that the hood has engaged properly.
If the hood can be raised slightly, it is not
properly engaged. Open it again and close
it with a little more force.
Engine oil
General notes on the oil level
Depending on your driving style, the vehicle
consumes up to 0.9 US qt (0.8 liters) of oil per
600 miles (1,000 km). The oil consumption
may be higher than this when the vehicle is
new or if you frequently drive at high engine
speeds.
Depending on the engine, the oil dipstick may be in a different location.
When checking the oil level:
R park the vehicle on a level surface.
R the engine should be switched off for
approximately five minutes if the engine is
at normal operating temperature.
R if the engine is not at normal operating
temperature, e.g. if the engine was only
started briefly, wait about 30 minutes
before carrying out the measurement.
Checking the oil level using the oil dip-
stick
GWARNING
Certain components in the engine compart-
ment, such as the engine, radiator and parts
of the exhaust system, can become very hot.
Working in the engine compartment poses a
risk of injury.
Where possible, let the engine cool down and
touch only the components described in the
following.
Example: vehicles with a gasoline engine
Engine compartment301
Maintenance and care
Z
Page 304 of 386

Example: vehicles with a diesel engine
XPark the vehicle on a level surface.
To check the oil level with the engine at
operating temperature, switch the engine
off and wait for approximately five minutes.
X Pull oil dipstick : out of the dipstick guide
tube.
X Wipe off oil dipstick :.
X Slowly slide oil dipstick : into the guide
tube to the stop, and take it out again.
If the level is between MIN mark = and
MAX mark ;, the oil level is correct.
X If the oil level has dropped to MIN mark =
or below, add 1.1 US qt (1.0 liter) engine oil.
Adding engine oil
GWARNING
Certain components in the engine compart-
ment, such as the engine, radiator and parts
of the exhaust system, can become very hot.
Working in the engine compartment poses a
risk of injury.
Where possible, let the engine cool down and touch only the components described in the
following.
GWARNING
If engine oil comes into contact with hot com- ponents in the engine compartment, it may
ignite. There is a risk of fire and injury.
Make sure that engine oil is not spilled next to
the filler neck. Let the engine cool down and
thoroughly clean the engine oil off the com-
ponents before starting the engine.
HEnvironmental note
When adding oil, take care not to spill any. If
oil enters the soil or waterways, it is harmful to the environment.
! Only use engine oils and oil filters that
have been approved for vehicles with a ser-
vice system. You can obtain a list of the
engine oils and oil filters tested and
approved in accordance with the
Mercedes-Benz Specifications for Service
Products at any Mercedes-Benz Service
center.
Damage to the engine or exhaust system is caused by the following:
R using engine oils and oil filters that have
not been specifically approved for the
service system
R replacing engine oil and oil filters after
the interval for replacement specified by
the service system has been exceeded
R using engine oil additives.
! Do not add too much oil. If the oil level is
above the "max" mark on the dipstick, too
much oil has been added. This can lead to
damage to the engine or the catalytic con-
verter. Have excess oil siphoned off.
Example: engine oil cap
X Turn cap : counter-clockwise and remove
it.
X Add engine oil.
If the oil level is at or below the MIN mark on
the oil dipstick, add 1.1 US qt (1.0 l) of
engine oil.
302Engine compartment
Maintenance and care
Page 305 of 386
XReplace cap : on the filler neck and turn
clockwise.
Ensure that the cap locks into place
securely.
X Check the oil level again with the oil dip-
stick ( Y page 301).
Further information on engine oil
( Y page 377).
Checking and adding other service
products
Checking coolant level
GWARNING
Certain components in the engine compart-
ment, such as the engine, radiator and parts
of the exhaust system, can become very hot.
Working in the engine compartment poses a
risk of injury.
Where possible, let the engine cool down and touch only the components described in the
following.
GWARNING
The engine cooling system is pressurized, par-ticularly when the engine is warm. When
opening the cap, you could be scalded by hotcoolant spraying out. There is a risk of injury.
Let the engine cool down before opening the
cap. Wear eye and hand protection when
opening the cap. Open the cap slowly half a
turn to allow pressure to escape.
Only check the coolant level when the vehicle
is on a level surface and the engine has cooled down.
X Turn the SmartKey to position 2 in the igni-
tion lock ( Y page 149).
On vehicles with KEYLESS-GO, press the
Start/Stop button twice ( Y page 149).
X Check the coolant temperature display in
the instrument cluster.
The coolant temperature must be below
158 ‡ (70 †).
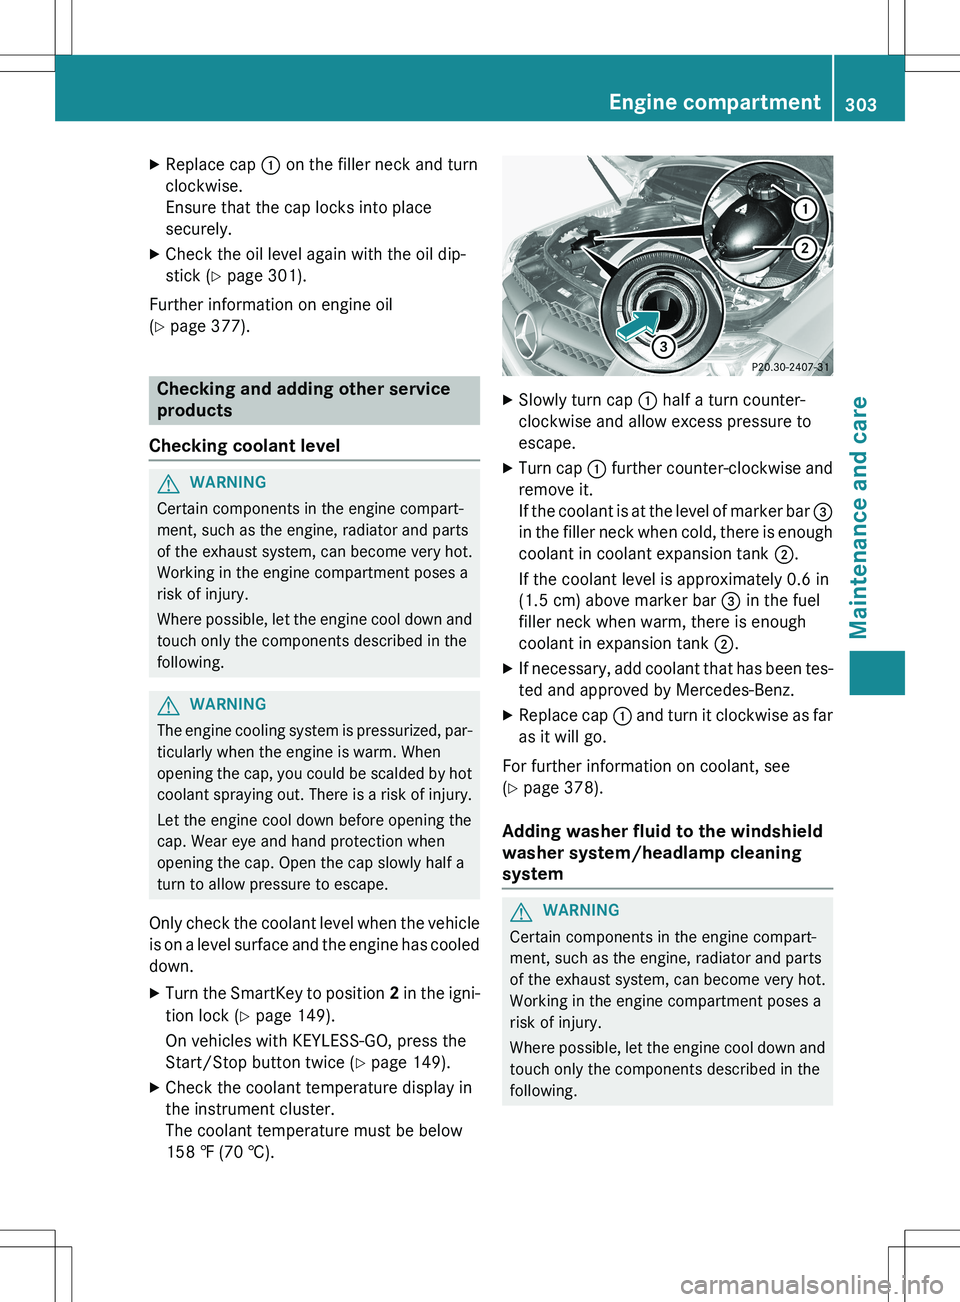
XSlowly turn cap : half a turn counter-
clockwise and allow excess pressure to
escape.
X Turn cap : further counter-clockwise and
remove it.
If the coolant is at the level of marker bar =
in the filler neck when cold, there is enough coolant in coolant expansion tank ;.
If the coolant level is approximately 0.6 in
(1.5 cm) above marker bar = in the fuel
filler neck when warm, there is enough
coolant in expansion tank ;.
X If necessary, add coolant that has been tes-
ted and approved by Mercedes-Benz.
X Replace cap : and turn it clockwise as far
as it will go.
For further information on coolant, see
( Y page 378).
Adding washer fluid to the windshield
washer system/headlamp cleaning
system
GWARNING
Certain components in the engine compart-
ment, such as the engine, radiator and parts
of the exhaust system, can become very hot.
Working in the engine compartment poses a
risk of injury.
Where possible, let the engine cool down and
touch only the components described in the
following.
Engine compartment303
Maintenance and care
Z
Page 306 of 386
GWARNING
Windshield washer concentrate could ignite ifit comes into contact with hot engine compo-
nents or the exhaust system. There is a risk of
fire and injury.
Make sure that no windshield washer con-
centrate is spilled next to the filler neck.
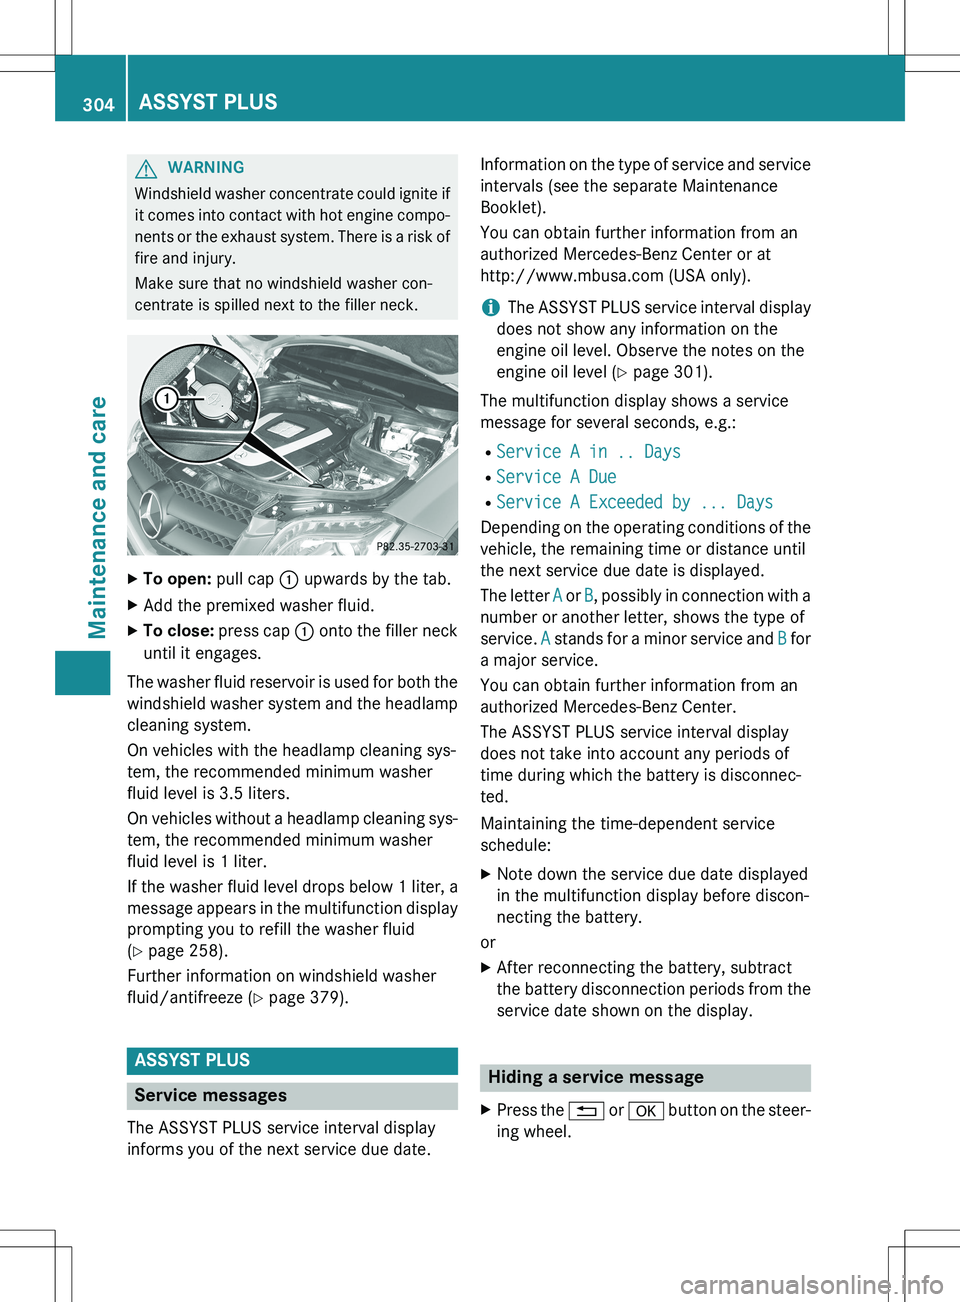
X To open: pull cap : upwards by the tab.
X Add the premixed washer fluid.
X To close: press cap : onto the filler neck
until it engages.
The washer fluid reservoir is used for both the
windshield washer system and the headlamp
cleaning system.
On vehicles with the headlamp cleaning sys-
tem, the recommended minimum washer
fluid level is 3.5 liters.
On vehicles without a headlamp cleaning sys- tem, the recommended minimum washer
fluid level is 1 liter.
If the washer fluid level drops below 1 liter, amessage appears in the multifunction display
prompting you to refill the washer fluid
( Y page 258).
Further information on windshield washer
fluid/antifreeze ( Y page 379).
ASSYST PLUS
Service messages
The ASSYST PLUS service interval display
informs you of the next service due date. Information on the type of service and service
intervals (see the separate Maintenance
Booklet).
You can obtain further information from an
authorized Mercedes-Benz Center or at
http://www.mbusa.com (USA only).
iThe ASSYST PLUS service interval display
does not show any information on the
engine oil level. Observe the notes on the
engine oil level ( Y page 301).
The multifunction display shows a service
message for several seconds, e.g.:
R
Service A in .. Days
RService A Due
RService A Exceeded by ... Days
Depending on the operating conditions of the vehicle, the remaining time or distance until
the next service due date is displayed.
The letter
A or B, possibly in connection with a
number or another letter, shows the type of
service.
A stands for a minor service and B for
a major service.
You can obtain further information from an
authorized Mercedes-Benz Center.
The ASSYST PLUS service interval display
does not take into account any periods of
time during which the battery is disconnec-
ted.
Maintaining the time-dependent service
schedule:
X Note down the service due date displayed
in the multifunction display before discon-
necting the battery.
or
X After reconnecting the battery, subtract
the battery disconnection periods from the
service date shown on the display.
Hiding a service message
X Press the % or a button on the steer-
ing wheel.
304ASSYST PLUS
Maintenance and care
Page 357 of 386
Treadwear indicators
Narrow bars (tread wear bars) that are dis-
tributed over the tire tread. If the tire tread islevel with the bars, the wear limit of á in
(1.6 mm) has been reached.
Occupant distribution
The distribution of occupants in a vehicle at
their designated seating positions.
Total load limit
Nominal load and luggage load plus 68 kg
(150 lbs) multiplied by the number of seats in the vehicle.
Changing a wheel
Flat tire
You can find information on what to do in theevent of a flat tire in the "Flat tire" section
( Y page 314).
Information on driving with MOExtended tires
in the event of a flat tire can be found under
"MOExtended tires (tires with run-flat char-
acteristics" ( Y page 315).
Rotating the wheels
GWARNING
Interchanging the front and rear wheels may
severely impair the driving characteristics if
the wheels or tires have different dimensions.
The wheel brakes or suspension components
may also be damaged. There is a risk of acci-
dent.
Rotate front and rear wheels only if the wheels and tires are of the same dimensions.
! On vehicles equipped with a tire pressure
monitor, electronic components are loca-
ted in the wheel. Tire-mounting tools should not be used
near the valve. This could damage the elec-
tronic components.
Only have tires changed at a qualified spe-cialist workshop.
Always observe the instructions and safety
notes in the "Mounting a wheel" section
( Y page 356).
The wear patterns on the front and rear tires
differ, depending on the operating conditions.
Rotate the wheels before a clear wear pattern has formed on the tires. Front tires typically
wear more on the shoulders and the rear tires in the center.
If your vehicle's tire configuration allows, you can rotate the wheels according to the inter-
vals in the tire manufacturer's warranty book
in your vehicle documents. If no warranty
book is available, the tires should be rotated
every 3,000 to 6,000 miles (5,000 to
10,000 km), or earlier if tire wear requires. Do
not change the direction of wheel rotation.
Clean the contact surfaces of the wheel and
the brake disc thoroughly every time a wheel
is rotated. Check the tire pressure and reac-
tivate the tire pressure monitor if necessary.
Information on changing tires and mounting
the spare wheel ( Y page 355).
Direction of rotation
Tires with a specified direction of rotation
have additional benefits, e.g. if there is a risk
of hydroplaning. These advantages can only
be gained if the tires are installed correspond- ing to the direction of rotation.
An arrow on the sidewall of the tire indicates
its correct direction of rotation.
Storing wheels
Store wheels that are not being used in a cool,
dry and preferably dark place. Protect the
tires from oil, grease, gasoline and diesel.
Changing a wheel355
Wheels and tires
Z
Page 375 of 386

XSlide the right-hand front seat to its rear-
most position.
X Fold floor covering : upwards.
You will see VIN ;.
The VIN can also be found in the following
locations: R on the lower edge of the windshield
(Y page 373)
R on the vehicle identification plate
(Y page 372)
Engine number
:Emission control information plate,
including the certification of both federal
and Californian emissions standards
;Engine number (stamped into the crank-
case)
=VIN (on the lower edge of the windshield)
Service products and filling capaci-
ties
Important safety notes
GWARNING
Service products may be poisonous and haz-
ardous to health. There is a risk of injury.
Comply with instructions on the use, storage
and disposal of service products on the labels
of the respective original containers. Always
store service products sealed in their original containers. Always keep service products out
of the reach of children.
HEnvironmental note
Dispose of service products in an environ-
mentally responsible manner.
Service products include the following: R Fuels (e.g. gasoline, diesel)
R Exhaust gas aftertreatment additives, e.g.
DEF
R Lubricants (e.g. engine oil, transmission oil)
R Coolant
R Brake fluid
R Windshield washer fluid
R Climate control system refrigerant
Comply with all valid regulations with respect to handling, storing, and disposing of service
fluids.
Components and service products must be
matched. You should therefore only use prod- ucts that have been tested and approved by
Mercedes-Benz.
Information about tested and approved prod- ucts can be obtained from an authorized
Mercedes-Benz Center or on the Internet at
http://bevo.mercedes-benz.com.
You can recognize service products approved
by Mercedes-Benz by the following inscrip-
tion on the containers:
R MB-Freigabe (e.g. MB-Freigabe 229.51)
R MB Approval (e.g. MB Approval 229.51)
Other designations or recommendations indi- cate a level of quality or a specification in
accordance with an MB Sheet Number (e.g.
MB 229.5). They have not necessarily been
approved by Mercedes-Benz.
Fuel
Important safety notes
GWARNING
Fuel is highly flammable. If you handle fuel
incorrectly, there is a risk of fire and explo-
sion.
Service products and filling capacities373
Technical data
Z