2015 MERCEDES-BENZ GLK-CLASS SUV winter tires
[x] Cancel search: winter tiresPage 22 of 386

Emergency locking ........................... 86
Emergency unlocking ....................... 86
Equipment ....................................... 23
Individual settings .......................... 230
Limited Warranty ............................. 28
Loading .......................................... 343
Locking (in an emergency) ............... 86
Locking (SmartKey) .......................... 78
Lowering ........................................ 359
Maintenance .................................... 24
Parking for a long period ................ 169
Pulling away ................................... 152
Raising ........................................... 35 7
Reporting problems ......................... 27
Securing from rolling away ............ 356
Towing away .................................. 325
Transporting .................................. 327
Unlocking (in an emergency) ........... 86
Unlocking (SmartKey) ...................... 78
Vehicle data ................................... 380
Vehicle data ....................................... 380
Vehicle dimensions ........................... 380
Vehicle emergency locking ................ 86
Vehicle identification number
see VIN
Vehicle identification plate .............. 372
Vehicle maintenance
see ASSYST PLUS
Vehicle tool kit .................................. 314
Video (DVD) ........................................ 227
VIN ................................................... ... 372
W
Warning and indicator lamps
ABS ................................................ 262
Brakes ........................................... 26 2
Check Engine ................................. 267
Coolant .......................................... 26 8
Distance warning ........................... 270
DISTRONIC PLUS ........................... 270
ESP ®
.............................................. 264
ESP ®
OFF ....................................... 265
Fuel tank ........................................ 267
Overview .......................................... 34
PASSENGER AIRBAG OFF ................ 49
Reserve fuel ................................... 267
Seat belt ........................................ 260 SRS ................................................
266
Tire pressure monitor .................... 271
Warranty .............................................. 23
Washer fluid
Display message ............................ 258
Wheel and tire combination
see Tires
Wheel bolt tightening torque ........... 359
Wheel chock ...................................... 356
Wheels
Changing a wheel .......................... 355
Checking ........................................ 333
Cleaning ......................................... 30 7
Emergency spare wheel ................. 366
General notes ................................ 360
Important safety notes .................. 332
Information on driving .................... 332
Interchanging/changing ................ 355
Mounting a new wheel ................... 358
Mounting a wheel .......................... 356
Removing a wheel .......................... 358
Storing ........................................... 3 55
Tightening torque ........................... 359
Wheel size/tire size ....................... 360
Window curtain air bag
Display message ............................ 240
Operation ......................................... 49
Windows
see Side windows
Windshield
Defrosting ...................................... 141
Windshield washer fluid
see Windshield washer system
Windshield washer system .............. 303
Notes ............................................. 37 9
Windshield wipers
Problem (malfunction) ................... 129
Rear window wiper ........................ 127
Replacing the wiper blades ............ 127
Switching on/off ........................... 126
Winter driving
Important safety notes .................. 334
Slippery road surfaces ................... 174
Snow chains .................................. 335
Winter tires
M+S tires ....................................... 335
Wiper blades
Cleaning ......................................... 30 8
20Index
Page 70 of 386
Driving safety systems
Overview of driving safety systems
In this section, you will find information aboutthe following driving safety systems:
R ABS ( Anti-lock Braking System)
( Y page 68)
R BAS ( Brake Assist System) ( Y page 69)
R BAS PLUS ( Brake Assist System Plus)
( Y page 69)
R ESP ®
(E lectronic Stability Program)
( Y page 70)
R EBD ( Electronic Brake force Distribution)
( Y page 73)
R PRE-SAFE ®
Brake ( Y page 73)
Important safety notes
If you fail to adapt your driving style or if you
are inattentive, the driving safety systems can
neither reduce the risk of an accident nor
override the laws of physics. Driving safety
systems are merely aids designed to assist
driving. You are responsible for the distance
to the vehicle in front, for vehicle speed and
for braking in good time. Always adapt your
driving style to suit the prevailing road,
weather and traffic conditions and maintain a
safe distance from the vehicle in front. Drive
carefully.
The driving safety systems described only
work as effectively as possible when there is
adequate contact between the tires and the
road surface. Please pay special attention to
the notes on tires, recommended minimum
tire tread depths, etc. ( Y page 332).
In wintry driving conditions, always use winter
tires (M+S tires) and if necessary, snow
chains. Only in this way will the driving safety
systems described in this section work as
effectively as possible.
ABS (Anti-lock Braking System)
General information
ABS regulates brake pressure in such a way
that the wheels do not lock when you brake.
This allows you to continue steering the vehi- cle when braking.
The yellow ! ABS warning lamp in the
instrument cluster lights up when the ignition is switched on. It goes out when the engine is
running.
Important safety notes
iObserve the "Important safety notes" sec-
tion ( Y page 68).
GWARNING
If ABS is faulty, the wheels could lock when
braking. The steerability and braking charac-
teristics may be severely impaired. Addition-
ally, further driving safety systems are deac-
tivated. There is an increased danger of skid-
ding and accidents.
Drive on carefully. Have ABS checked imme-
diately at a qualified specialist workshop.
When ABS is malfunctioning, other systems,
including driving safety systems, will also
become inoperative. Observe the information on the ABS warning lamp ( Y page 262) and
display messages which may be shown in the
instrument cluster ( Y page 236).
ABS works from a speed of about 5 mph
(8 km/h), regardless of road-surface condi-
tions. ABS works on slippery surfaces, even if
you only brake gently.
Brakes
X If ABS intervenes: continue to depress the
brake pedal vigorously until the braking sit-
uation is over.
X To make a full brake application:
depress the brake pedal with full force.
If ABS intervenes when braking, you will feel a pulsing in the brake pedal.
68Driving safety systems
Safety
Page 176 of 386
Ravoid sudden steering movements.
R brake carefully.
Driving on flooded roads
! Do not drive through flooded areas.
Check the depth of any water before driving through it. Drive slowly through standing
water. Otherwise, water may enter the
vehicle interior or the engine compartment.
This can damage the electronic compo-
nents in the engine or the automatic trans- mission. Water can also be drawn in by the
engine's air suction nozzles and this can
cause engine damage.
Prevent water from entering the vehicle inte-
rior or the engine compartment. If you must
drive through standing water, bear in mind
that:
R in the case of standing water, the water
level may be no higher than the lower edge
of the vehicle body
R you should drive no faster than at a walking
pace
Winter driving
GWARNING
If you shift down on a slippery road surface in an attempt to increase the engine's braking
effect, the drive wheels could lose their grip.
There is an increased danger of skidding and
accidents.
Do not shift down for additional engine brak-
ing on a slippery road surface.
GDANGER
If the exhaust pipe is blocked or adequate
ventilation is not possible, poisonous gases
such as carbon monoxide (CO) may enter thevehicle. This is the case, e.g. if the vehicle
becomes trapped in snow. There is a risk of
fatal injury.
If you leave the engine or the auxiliary heating
running, make sure the exhaust pipe and area
around the vehicle are clear of snow. To
ensure an adequate supply of fresh air, open a window on the side of the vehicle that is not
facing into the wind.
Have your vehicle winter-proofed at a quali-
fied specialist workshop at the onset of win-
ter.
Drive particularly carefully on slippery road
surfaces. Avoid sudden acceleration, steering and braking maneuvers. Do not use the cruise
control or DISTRONIC PLUS.
If the vehicle threatens to skid or cannot be
stopped when moving at low speed:
X Shift the transmission to position N.
The outside temperature indicator is not
designed to serve as an ice-warning device
and is therefore unsuitable for that purpose.
Changes in the outside temperature are dis-
played after a short delay.
Indicated temperatures just above the freez-
ing point do not guarantee that the road sur-
face is free of ice. The road may still be icy,
especially in wooded areas or on bridges. The vehicle could skid if you fail to adapt your
driving style. Always adapt your driving style
and drive at a speed to suit the prevailing
weather conditions.
You should pay special attention to road con-
ditions when temperatures are around freez-
ing point.
For more information on driving with snow
chains, see ( Y page 335).
For more information on driving with summer tires, see ( Y page 334).
Observe the notes in the "Winter operation"
section ( Y page 334).
174Driving tips
Driving and parking
Page 188 of 386

iIn wintry driving conditions, the maximum
effect of 4MATIC can only be achieved if
you use winter tires (M+S tires), with snow
chains if necessary.
! When testing the parking brake, operate
the vehicle only briefly (for a maximum of
ten seconds) on a brake test dynamometer. When doing this, turn the SmartKey to posi-
tion 0 or 1 in the ignition. Failure to do this
can cause damage to the drive train or the brake system.
! A function or performance test should
only be carried out on a two-axle dyna-
mometer. Before you operate the vehicle
on such a dynamometer, please consult a
qualified workshop. You could otherwise
damage the drive train or the brake system.
PARKTRONIC
Important safety notes
PARKTRONIC is an electronic parking aid with ultrasonic sensors. It monitors the area
around your vehicle using six sensors in the
front bumper and four sensors in the rear
bumper. PARKTRONIC indicates visually and
audibly the distance between your vehicle
and an object.
PARKTRONIC is only an aid. It is not a replace-
ment for your attention to your immediate
surroundings. You are always responsible for
safe maneuvering, parking and exiting a park-
ing space. When maneuvering, parking or
pulling out of a parking space, make sure that there are no persons, animals or objects in
the area in which you are maneuvering.
! When parking, pay particular attention to
objects above or below the sensors, such
as flower pots or trailer drawbars.
PARKTRONIC does not detect such objects
when they are in the immediate vicinity of
the vehicle. You could damage the vehicle
or the objects.
The sensors may not detect snow and other
objects that absorb ultrasonic waves. Ultrasonic sources such as an automatic
car wash, the compressed-air brakes on a
truck or a pneumatic drill could cause
PARKTRONIC to malfunction.
PARKTRONIC may not function correctly on
uneven terrain.
PARKTRONIC is activated automatically when you:
R switch on the ignition
R shift the transmission to position D, R or N
R release the parking brake
PARKTRONIC is deactivated at speeds above
11 mph (18 km/h). It is reactivated at lower
speeds.
:Sensors in the front bumper, left-hand
side (example)
Range of the sensors
General notes
PARKTRONIC does not take objects into con-
sideration that are:
R below the detection range, e.g. people, ani-
mals or objects
R above the detection range, e.g. overhang-
ing loads, truck overhangs or loading ramps
The sensors must be free from dirt, ice or
slush. They can otherwise not function cor-
rectly. Clean the sensors regularly, taking
care not to scratch or damage them
( Y page 309).
186Driving systems
Driving and parking
Page 196 of 386
Rif the area is lit by fluorescent bulbs or LED
lighting (the display may flicker)
R if there is a sudden change in temperature,
e.g. when driving into a heated garage in
winter
R if the camera lens is dirty or obstructed
R if the rear of your vehicle is damaged. In this
event, have the camera position and setting checked at a qualified specialist workshop
The field of vision and other functions of the
rear view camera may be restricted due to
additional accessories on the rear of the vehi-
cle (e.g. license plate holder, bicycle rack).
Activating/deactivating the rear view
camera
X To activate: make sure that the SmartKey
is in position 2 in the ignition lock.
X Make sure that the "Activation by R gear"
setting is active in COMAND, see the sep-
arate COMAND operating instructions.
X Engage reverse gear.
The area behind the vehicle is shown in the
COMAND display with guide lines.
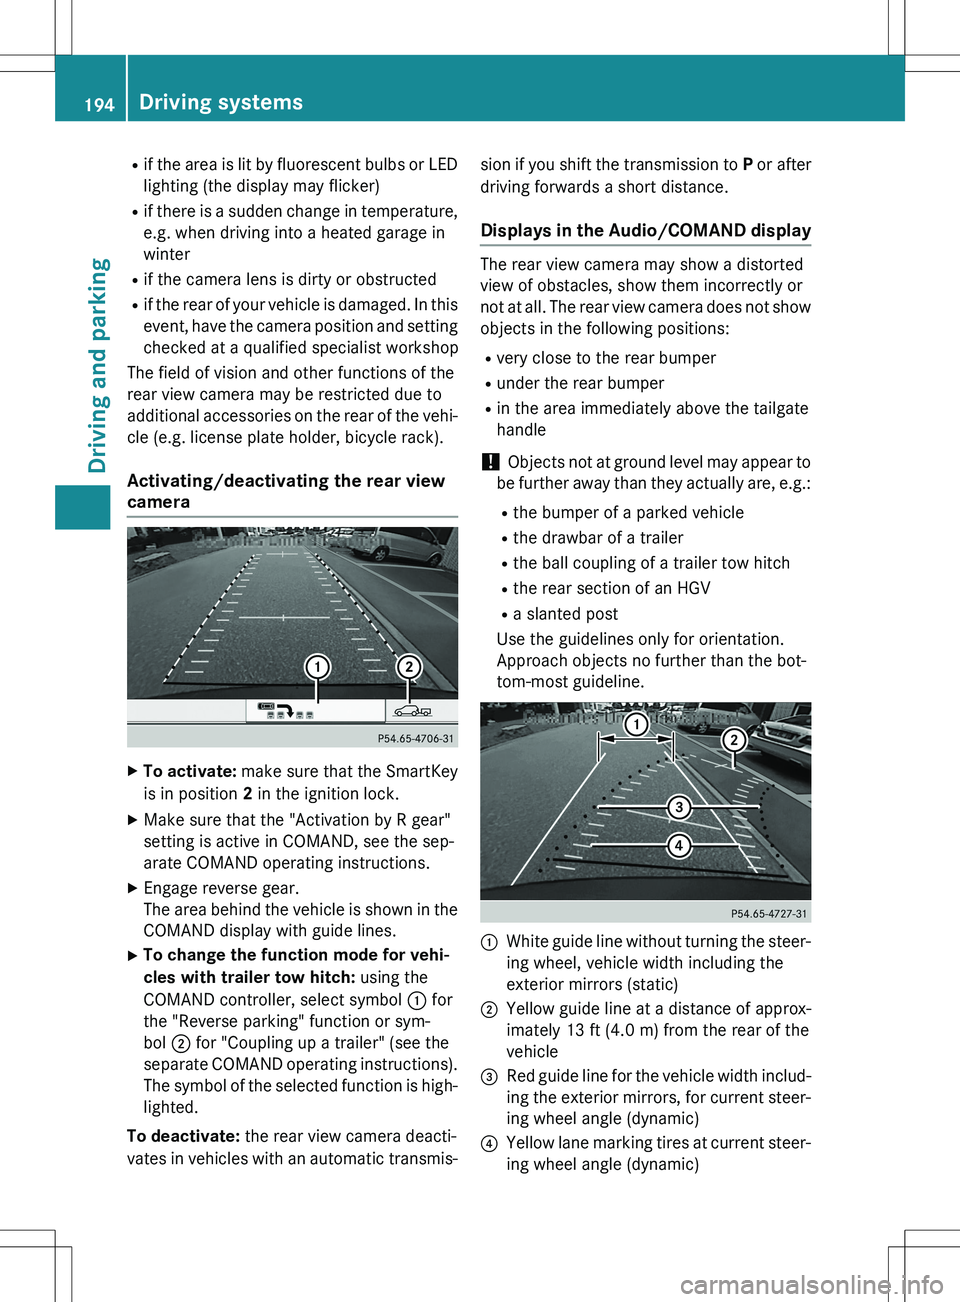
X To change the function mode for vehi-
cles with trailer tow hitch: using the
COMAND controller, select symbol : for
the "Reverse parking" function or sym-
bol ; for "Coupling up a trailer" (see the
separate COMAND operating instructions).
The symbol of the selected function is high- lighted.
To deactivate: the rear view camera deacti-
vates in vehicles with an automatic transmis- sion if you shift the transmission to
P or after
driving forwards a short distance.
Displays in the Audio/COMAND display
The rear view camera may show a distorted
view of obstacles, show them incorrectly or
not at all. The rear view camera does not show
objects in the following positions:
R very close to the rear bumper
R under the rear bumper
R in the area immediately above the tailgate
handle
! Objects not at ground level may appear to
be further away than they actually are, e.g.: R the bumper of a parked vehicle
R the drawbar of a trailer
R the ball coupling of a trailer tow hitch
R the rear section of an HGV
R a slanted post
Use the guidelines only for orientation.
Approach objects no further than the bot-
tom-most guideline.
:White guide line without turning the steer-
ing wheel, vehicle width including the
exterior mirrors (static)
;Yellow guide line at a distance of approx-
imately 13 ft (4.0 m) from the rear of the
vehicle
=Red guide line for the vehicle width includ-
ing the exterior mirrors, for current steer-
ing wheel angle (dynamic)
?Yellow lane marking tires at current steer-
ing wheel angle (dynamic)
194Driving systems
Driving and parking
Page 308 of 386
should drive for a few minutes after clean-
ing. Braking heats the brake discs and the
brake pads/linings, thus drying them. The
vehicle can then be parked.
Regular care of your vehicle is a condition for
retaining the quality in the long term.
Use care products and cleaning agents rec-
ommended and approved by Mercedes-Benz.
Exterior care
Automatic car wash
GWARNING
Braking efficiency is reduced after washing
the vehicle. There is a risk of an accident.
After the vehicle has been washed, brake
carefully while paying attention to the traffic
conditions until full braking power is restored.
! If DISTRONIC PLUS or the HOLD function
is activated, the vehicle brakes automati-
cally in certain situations. To prevent dam-
age to the vehicle, deactivate DISTRONIC
PLUS and the HOLD function in the follow-
ing or other similar situations:
R when towing the vehicle
R in the car wash
! Never clean your vehicle in a Touchless
Automatic Car Wash as these use special
cleaning agents. These cleaning agents can
damage the paintwork or plastic parts.
! Make sure that the automatic transmis-
sion is in position N when washing your
vehicle in a tow-through car wash. The vehi-
cle could be damaged if the transmission is
in another position.
! Make sure that:
R the side windows and the sliding sunroof
are fully closed.
R the ventilation/heating is switched off
(the OFF button has been pressed).
R the windshield wiper switch is in position
0 . Otherwise, the vehicle might be damaged.
You can wash the vehicle in an automatic car wash from the very start.
If the vehicle is very dirty, pre-wash it before
cleaning it in an automatic car wash.
After using an automatic car wash, wipe off
wax from the windshield and the wiper
blades. This will prevent smears and reduce
wiping noises caused by residue on the wind-shield.
Washing by hand
In some countries, washing by hand is only
allowed at specially equipped washing bays.
Observe the legal requirements in all coun-
tries concerned.
X Do not use hot water and do not wash the
vehicle in direct sunlight.
X Use a soft sponge to clean.
X Use a mild cleaning agent, such as a car
shampoo approved by Mercedes-Benz.
X Thoroughly hose down the vehicle with a
gentle jet of water.
X Do not point the water jet directly towards
the air inlet.
X Use plenty of water and rinse out the
sponge frequently.
X Rinse the vehicle with clean water and dry
thoroughly with a chamois.
X Do not let the cleaning agent dry on the
paintwork.
When using the vehicle in winter, remove all
traces of road salt deposits carefully and as
soon as possible.
Power washers
GWARNING
The water jet from a circular jet nozzle (dirt
blasters) can cause invisible exterior damage to the tires or chassis components. Compo-
nents damaged in this way may fail unexpect- edly. There is a risk of an accident.
306Care
Maintenance and care
Page 317 of 386
XVehicles without KEYLESS-GO: remove
the SmartKey from the ignition lock.
X Vehicles with KEYLESS-GO: open the
driver's door.
The on-board electronics have status 0,
which is the same as the SmartKey having
been removed.
X Vehicles with KEYLESS-GO: remove the
Start/Stop button from the ignition lock
( Y page 149).
X All occupants must get out of the vehicle.
Make sure that they are not endangered as
they do so.
X Make sure that no one is near the danger
area while a wheel is being changed. Any-
one who is not directly assisting in the
wheel change should, for example, stand
behind the barrier.
X Get out of the vehicle. Pay attention to traf-
fic conditions when doing so.
X Close the driver's door.
iVehicles equipped with MOExtended tires
are not equipped with a TIREFIT kit at the
factory. It is therefore recommended that
you additionally equip your vehicle with a
TIREFIT kit if you mount tires that do not
feature run-flat properties, e.g. winter tires.
A TIREFIT kit may be obtained from a quali-
fied specialist workshop.
MOExtended tires (tires with run-flat
properties)
General notes
With MOExtended tires (tires with run flat
characteristics), you can continue to drive
your vehicle even if there is a total loss of
pressure in one or more tires. The affected
tire must not show any clearly visible damage.
You can recognize MOExtended tires by the
MOExtended marking which appears on the
sidewall of the tire. You will find this marking next to the tire size designation, the load-
bearing capacity and the speed index
( Y page 349). MOExtended tires may only be used in con-
junction with an active tire pressure monitor.
If a pressure loss warning message
appears in the multifunction display:
R observe the instructions in the display mes-
sages ( Y page 255).
R check the tire for damage.
R if driving on, observe the following notes.
The driving distance possible in run-flat mode is approximately 50 miles (80 km) when the
vehicle is partially laden and approximately
18 miles (30 km) when the vehicle is fully
laden.
In addition to the vehicle load, the driving dis-tance possible depends upon:
R vehicle speed
R road condition
R outside temperature
The driving distance possible in run-flat mode may be reduced by extreme driving condi-
tions/maneuvers, or it can be increased
through a moderate style of driving.
The driving distance possible in run-flat modeis counted from the moment the tire pressure
loss warning appears in the multifunction dis-
play.
You must not exceed a maximum speed of
50 mph (80 km/h).
iWhen replacing one or all tires, please
observe the following specifications for
your vehicle's tires:
R size
R type and
R the "MOExtended" mark
If a tire has gone flat and cannot be
replaced with a MOExtended tire, a stand-
ard tire may be used as a temporary meas- ure. Make sure that you use the proper size
and type (summer or winter tire).
iVehicles equipped with MOExtended tires
are not equipped with a TIREFIT kit at the
factory. It is therefore recommended that
you additionally equip your vehicle with a
Flat tire315
Roadside Assistance
Page 318 of 386
TIREFIT kit if you mount tires that do not
feature run-flat properties, e.g. winter tires.A TIREFIT kit may be obtained from a quali- fied specialist workshop.
Important safety notes
GWARNING
When driving in emergency mode, the drivingcharacteristics deteriorate, e.g. when corner-
ing, accelerating quickly and when braking.
There is a risk of an accident.
Do not exceed the stated maximum speed.
Avoid abrupt steering and driving maneuvers,
and driving over obstacles (curbs, potholes,
off-road). This applies in particular to a laden
vehicle.
Stop driving in emergency mode if:
R you hear banging noises.
R the vehicle starts to shake.
R you see smoke and smell rubber.
R ESP ®
is intervening constantly.
R there are tears in the sidewalls of the tire.
After driving in emergency mode, have the
wheel rims checked at a qualified specialist
workshop with regard to their further use. The defective tire must be replaced in every case.
TIREFIT kit
Important safety notes
TIREFIT is a tire sealant.
You can use TIREFIT to seal punctures of up to 0.16 in (4 mm), particularly those in the tire
tread. You can use TIREFIT at outside tem-
peratures down to Ò4 ‡ ( Ò20 †).
GWARNING
In the following situations, the tire sealant is
unable to provide sufficient breakdown assis-
tance, as it is unable to seal the tire properly:
R there are cuts or punctures in the tire larger
than those mentioned above.
R the wheel rim is damaged.
R you have driven at very low tire pressures or
on a flat tire.
There is a risk of an accident.
Do not drive the vehicle. Contact a qualified
specialist workshop.
GWARNING
The tire sealant is harmful and causes irrita-
tion. It must not come into contact with your
skin, eyes or clothing or be swallowed. Do not inhale TIREFIT fumes. Keep tire sealant away
from children. There is a risk of injury.
If you come into contact with the tire sealant,
observe the following:
R Rinse off the tire sealant from your skin
immediately with water.
R If the tire sealant comes into contact with
your eyes, immediately rinse them thor-
oughly with clean water.
R If tire sealant is swallowed, immediately
rinse your mouth out thoroughly and drink
plenty of water. Do not induce vomiting,
and seek medical attention immediately.
R Immediately change out of clothing which
has come into contact with tire sealant.
R If an allergic reaction occurs, seek medical
attention immediately.
! Do not operate the tire inflation compres-
sor for longer than eight minutes at a time
without a break. It may otherwise overheat.
The tire inflation compressor can be oper-
ated again once it has cooled down.
Comply with the manufacturer’s safety
instructions on the sticker on the tire inflation
compressor.
316Flat tire
Roadside Assistance