2015 MERCEDES-BENZ GLK-CLASS SUV change wheel
[x] Cancel search: change wheelPage 8 of 386

Brake fluidDisplay message ............................ 238
Notes ............................................. 37 7
Brake lamps
Display message ............................ 244
Brakes
ABS ................................................ .. 68
BAS ................................................ .. 69
BAS PLUS ........................................ 69
Brake fluid (notes) ......................... 377
Display message ............................ 236
Important safety notes .................. 172
Maintenance .................................. 172
Parking brake ........................ 169, 173
Riding tips ...................................... 172
Warning lamp ................................. 262
Breakdown
see Flat tire
see Towing away/tow-starting
Brightness control knob (instru-
ment cluster lighting, multifunc-
tion steering wheel with 12 but-
tons) ................................................... .. 33
Bulbs
see Replacing bulbs
C
CaliforniaImportant notice for retail cus-
tomers and lessees .......................... 24
Calling up a malfunction
see Display messages
Car
see Vehicle
Care
Car wash ........................................ 306
Carpets .......................................... 312
Display ........................................... 31 0
Exterior lights ................................ 309
Gear or selector lever .................... 311
Interior ........................................... 310
Matte finish ................................... 308
Notes ............................................. 3 05
Paint .............................................. 307
Plastic trim .................................... 310
Power washer ................................ 306
Rear view camera .......................... 309 Roof lining ...................................... 312
Seat belt ........................................ 312
Seat cover ..................................... 311
Sensors ......................................... 309
Steering wheel ............................... 311
Tail pipes ....................................... 309
Trim pieces .................................... 311
Washing by hand ........................... 306
Wheels ........................................... 307
Windows ........................................ 308
Wiper blades .................................. 308
Wooden trim .................................. 311
Cargo compartment cover
Important safety notes .................. 278
Cargo compartment enlarge-
ment ................................................... 276
Cargo compartment floor
Opening/closing ............................ 281
Stowage well (under) ..................... 281
Cargo net
Attaching ....................................... 280
Important safety information ......... 279
Cargo tie down rings ......................... 277
CD player/CD changer (on-board
computer) .......................................... 226
Center console
Lower section .................................. 37
Upper section .................................. 36
Central locking
Automatic locking (on-board com-puter) ............................................. 232
Locking/unlocking (SmartKey) ........ 78
Changing bulbs
Cornering light function ................. 124
High-beam headlamps ................... 124
Low-beam headlamps .................... 124
Parking lamps ................................ 124
Reversing lamps ............................ 125
Standing lamps (front) ................... 124
Turn signals (front) ......................... 124
Child seat
LATCH-type (ISOFIX) child seat
anchors ............................................ 64
Top Tether ....................................... 65
Child-proof locks
Important safety notes .................... 66
Rear doors ....................................... 67
6Index
Page 28 of 386

worked components. In particular, systems
relevant to safety could also be affected. As aresult, these may no longer function as inten-
ded and/or jeopardize the operating safety of
the vehicle. There is an increased risk of an
accident and injury.
Never tamper with the wiring as well as elec-
tronic components or their software. You
should have all work to electrical and elec-
tronic equipment carried out at a qualified
specialist workshop.
If you make any changes to the vehicle elec-
tronics, the general operating permit is ren-
dered invalid.
! There is a risk of damage to the vehicle if:
R the vehicle becomes stuck, e.g. on a high
curb or an unpaved road
R you drive too fast over an obstacle, e.g. a
curb or a hole in the road
R a heavy object strikes the undercarriage
or parts of the chassis
In situations like this, the body, the under-
carriage, chassis parts, wheels or tires
could be damaged without the damage
being visible. Components damaged in this
way can unexpectedly fail or, in the case of
an accident, no longer withstand the strain
they are designed to.
If the underbody paneling is damaged,
combustible materials such as leaves,
grass or twigs can gather between the
underbody and the underbody paneling. If
these materials come in contact with hot
parts of the exhaust system, they can catch fire.
In such situations, have the vehicle
checked and repaired immediately at a
qualified specialist workshop. If on con-
tinuing your journey you notice that driving
safety is impaired, pull over and stop the
vehicle immediately, paying attention to
road and traffic conditions. In such cases,
consult a qualified specialist workshop.
Declarations of conformity
Vehicle components which receive
and/or transmit radio waves
USA: "The wireless devices of this vehicle
comply with Part 15 of the FCC Rules. Oper-
ation is subject to the following two condi-
tions: 1) These devices may not cause harm-
ful interference, and 2) These devices must
accept any interference received, including
interference that may cause undesired oper-
ation. Changes or modifications not expressly approved by the party responsible for com-
pliance could void the user’s authority to
operate the equipment."
Canada: "The wireless devices of this vehicle
comply with Industry Canada license-exempt RSS standard(s). Operation is subject to the
following two conditions: (1) These devices
may not cause interference, and (2) These
devices must accept any interference, includ-
ing interference that may cause undesired
operation of the device."
Diagnostics connection
The diagnostics connection is only intended
for the connection of diagnostic equipment at a qualified specialist workshop.
GWARNING
If you connect equipment to the diagnostics
connection in the vehicle, it may affect the
operation of the vehicle systems. As a result, the operating safety of the vehicle could be
affected. There is a risk of an accident.
Do not connect any equipment to a diagnos-
tics connection in the vehicle.
GWARNING
Objects in the driver's footwell can restrict the pedal travel or obstruct a depressed pedal.
The operating and road safety of the vehicle is
jeopardized. There is a risk of an accident.
Make sure that all objects in the vehicle are
stowed correctly, and that they cannot enter
26Introduction
Page 45 of 386

SRS (Supplemental Restraint System)
Introduction
Supplemental Restraint System (SRS) with:
R The 6 SRS warning lamp
R Air bags
R Air bag control unit (with crash sensors)
R Emergency Tensioning Device (ETD) for
seat belts
R Seat belt force limiters
SRS reduces the risk of vehicle occupants
coming into contact with parts of the vehi-
cle's interior in the event of an accident. It can also reduce the forces to which vehicle occu-
pants are subjected during an accident.
SRS warning lamp
GWARNING
If SRS is malfunctioning, restraint system
components may be triggered unintentionally
or might not be triggered at all in the event of
an accident with a high rate of vehicle decel-
eration. There is an increased risk of injury,
possibly even fatal.
Have SRS checked and repaired immediately
at a qualified specialist workshop.
SRS functions are checked regularly when
you switch on the ignition and when the
engine is running. Therefore, malfunctions
can be detected in good time.
The 6 SRS warning lamp in the instrument
cluster lights up when the ignition is switched
on. It goes out no later than a few seconds
after the engine is started.
The SRS components are in operational read-
iness when the 6 SRS warning lamp goes
out while the engine is running. There is a malfunction if: R
the 6 SRS warning lamp does not light
up when the ignition is switched on
R the engine is running and the 6 SRS
warning lamp does not go out after a few
seconds
R the engine is running and the 6 SRS
warning lamp lights up again
Safety guidelines for seat belts, Emer-
gency Tensioning Devices (ETDs) and
air bags
GWARNING
R Damaged seat belts or seat belts that have
been subjected to stress in an accident
must be replaced. Their anchoring points
must also be checked. Only use seat belts
installed or supplied by an authorized
Mercedes-Benz Center.
R Air bags and pyrotechnic Emergency Ten-
sioning Devices (ETDs) contain perchlorate
material, which may require special han-
dling and regard for the environment.
Check your national disposal guidelines.
California residents, see
www.dtsc.ca.gov/HazardousWaste/
Perchlorate/index.cfm .
R Air bags and ETDs are designed to function
on a one-time-only basis. An air bag or ETDthat has deployed must be replaced.
R Do not pass seat belts over sharp edges.
They could tear.
R Do not make any modification that could
change the effectiveness of the seat belts.
R Do not bleach or dye seat belts as this may
severely weaken them. In a crash they may
not be able to provide adequate protection.
R No modifications of any kind may be made
to any components or wiring of the SRS.
R Do not change or remove any component or
part of the SRS.
R Do not install additional trim material, seat
covers, badges, etc. over the steering
wheel hub, front-passenger front air bag
Occupant safety43
Safety
Z
Page 108 of 386

Problems with the seat heating
ProblemPossible causes/consequences and M Solutions
The seat heating has
switched off prema-
turely or cannot be
switched on.The on-board voltage is too low because too many elect rical con-
sumers are switched on.
X Switch off electrical consumers that you do not need, such as
the rear window defroster or interior lighting.
Steering wheel
Important safety notes
GWARNING
You could lose control of your vehicle if you do
the following while driving:
R adjust the driver's seat, head restraint,
steering wheel or mirrors
R fasten the seat belt
There is a risk of an accident.
Adjust the driver's seat, head restraint, steer-
ing wheel and mirror and fasten your seat belt before starting the engine.
GWARNING
If the steering wheel is unlocked while the
vehicle is in motion, it could change position
unexpectedly. This could cause you to lose
control of the vehicle. There is a risk of an
accident.
Before starting off, make sure the steering
wheel is locked. Never unlock the steering
wheel while the vehicle is in motion.
GWARNING
Children could injure themselves if they
adjust the steering wheel. There is a risk of
injury.
When leaving the vehicle, always take the
SmartKey with you and lock the vehicle. Neverleave children unsupervised in the vehicle.
The electrically adjustable steering wheel can
still be adjusted when there is no SmartKey in
the ignition lock.
Adjusting the steering wheel man-
ually
GWARNING
If the steering wheel is unlocked while the
vehicle is in motion, it could change position
unexpectedly. This could cause you to lose
control of the vehicle. There is a risk of an
accident.
Before starting off, make sure the steering
wheel is locked. Never unlock the steering
wheel while the vehicle is in motion.
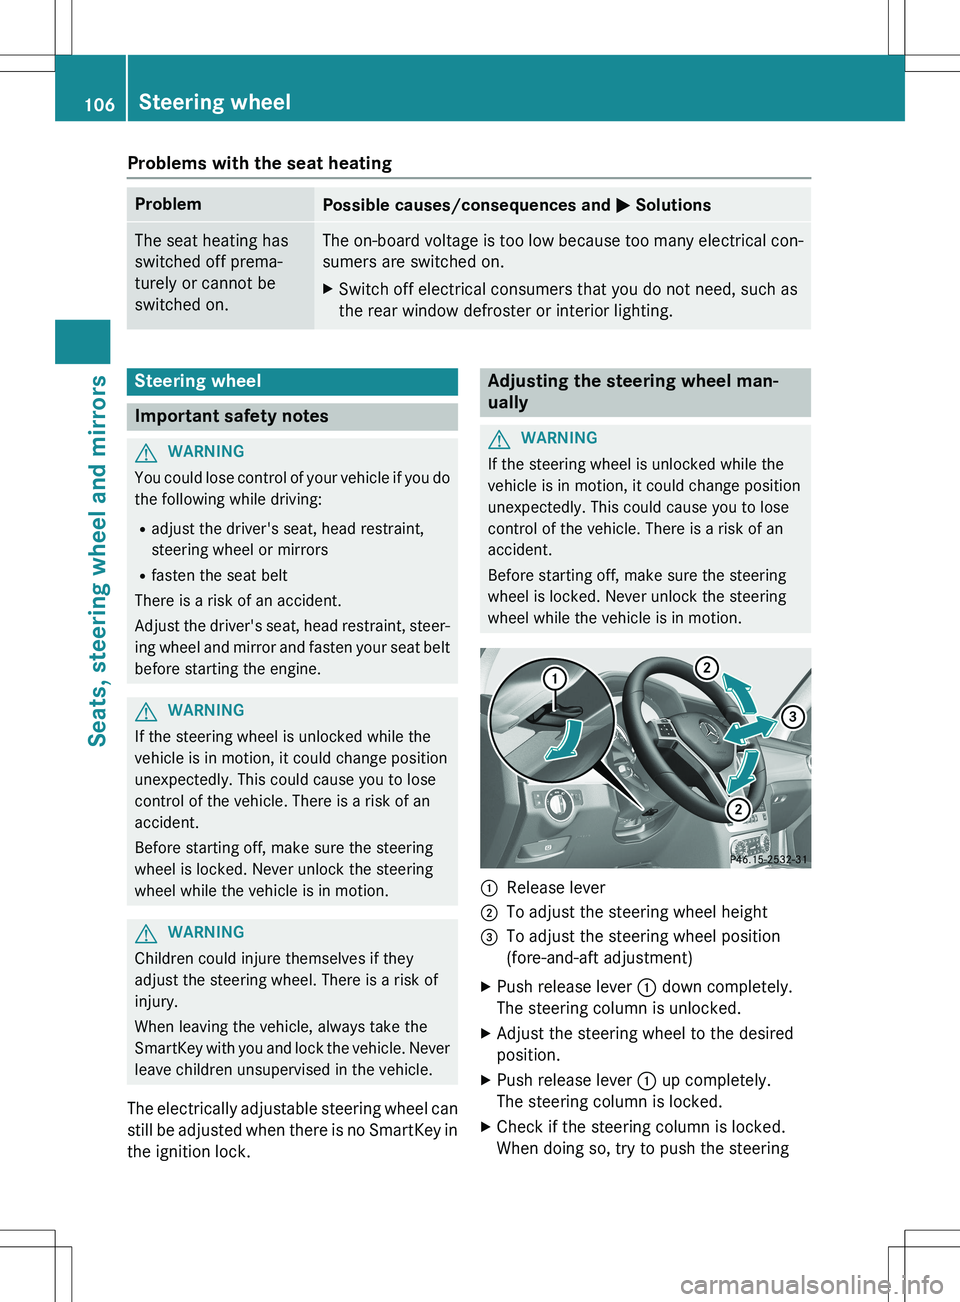
:Release lever
;To adjust the steering wheel height
=To adjust the steering wheel position
(fore-and-aft adjustment)
X Push release lever : down completely.
The steering column is unlocked.
X Adjust the steering wheel to the desired
position.
X Push release lever : up completely.
The steering column is locked.
X Check if the steering column is locked.
When doing so, try to push the steering
106Steering wheel
Seats, steering wheel and mirrors
Page 113 of 386

If you come into contact with the electrolyte,
observe the following:R Rinse off the electrolyte from your skin
immediately with water.
R Immediately rinse the electrolyte out of
your eyes thoroughly with clean water.
R If the electrolyte is swallowed, immediately
rinse your mouth out thoroughly. Do not
induce vomiting.
R If electrolyte comes into contact with your
skin or hair or is swallowed, seek medical
attention immediately.
R Immediately change out of clothing which
has come into contact with electrolyte.
R If an allergic reaction occurs, seek medical
attention immediately.
The rear-view mirror and the exterior mirror
on the driver's side automatically go into anti-
glare mode if the following conditions are met simultaneously: R the ignition is switched on and
R incident light from headlamps strikes the
sensor in the rear-view mirror.
The mirrors do not go into anti-glare mode if
reverse gear is engaged or if the interior light-
ing is switched on.
Parking position for the exterior mir-
ror on the front-passenger side
Setting and storing the parking position
Using reverse gear
You can position the front-passenger side
exterior mirror in such a way that you can see
the rear wheel on that side as soon as you
engage reverse gear. You can store this posi-
tion.
X Make sure that the vehicle is stationary and
that the SmartKey is in position 2 in the
ignition lock ( Y page 149).
X Press button ; for the exterior mirror on
the front-passenger side.
X Engage reverse gear.
The exterior mirror on the front-passenger
side moves to the preset parking position.
X Use adjustment button = to adjust the
exterior mirror to a position that allows you to see the rear wheel and the curb.
The parking position is stored.
iIf you shift the transmission to another
position, the exterior mirror on the front-
passenger side returns to the driving posi-
tion.
Using the memory button
You can position the front-passenger side
exterior mirror in such a way that you can see
the rear wheel on that side as soon as you
engage reverse gear. This setting can be
stored using memory button M ? .
X Make sure that the SmartKey is in position
2 in the ignition lock ( Y page 149).
X With the exterior mirror on the front-
passenger side activated, use adjustment
button = to adjust the exterior mirror. In
the exterior mirror, the rear wheel and the
curb should be visible.
Mirrors111
Seats, steering wheel and mirrors
Z
Page 122 of 386

Cornering light function
The cornering light function improves the illu-
mination of the road over a wide angle in the direction you are turning, enabling better vis-
ibility in tight bends, for example. The corner- ing light function can only be activated when
the low-beam headlamps are switched on.
Active: R if you are driving at speeds below 25 mph
(40 km/h) and switch on the turn signal or
turn the steering wheel
R if you are driving at speeds between
25 mph (40 km/h) and 45 mph (70 km/h)
and turn the steering wheel
The cornering lamp may remain lit for a short
time, but is automatically switched off after
no more than three minutes.
Adaptive Highbeam Assist
General notes
You can use this function to set the head-
lamps to change between low beam and high beam automatically. The system recognizes
vehicles with their lights on, either approach-
ing from the opposite direction or traveling in front of your vehicle, and consequently
switches the headlamps from high beam to
low beam.
The system automatically adapts the low-
beam headlamp range depending on the dis-
tance to the other vehicle. Once the system
no longer detects any other vehicles, it reac-
tivates the high-beam headlamps. The system's optical sensor is located behind
the windshield near the overhead control
panel.
Important safety notes
GWARNING
Adaptive Highbeam Assist does not recognize road users:
R who have no lights, e.g. pedestrians
R who have poor lighting, e.g. cyclists
R whose lighting is blocked, e.g. by a barrier
In very rare cases, Adaptive Highbeam Assist
may fail to recognize other road users that
have lights, or may recognize them too late. In this or similar situations, the automatic high-
beam headlamps will not be deactivated or
activated regardless. There is a risk of an acci-
dent.
Always carefully observe the traffic conditions and switch off the high-beam headlamps in
good time.
Adaptive Highbeam Assist cannot take into
account road, weather or traffic conditions.
Adaptive Highbeam Assist is only an aid. You are responsible for adjusting the vehicle's
lighting to the prevailing light, visibility and
traffic conditions.
120Exterior lighting
Lights and windshield wipers
Page 142 of 386

Setting the temperature
Dual-zone automatic climate control
Different temperatures can be set for the
driver's and front-passenger sides.
X Turn the SmartKey to position 2 in the igni-
tion lock ( Y page 149).
X To increase/reduce: turn thumbwheel :
or B to the left or right ( Y page 133).
Only change the temperature setting in
small increments. Start at 72 ‡ (22 †).
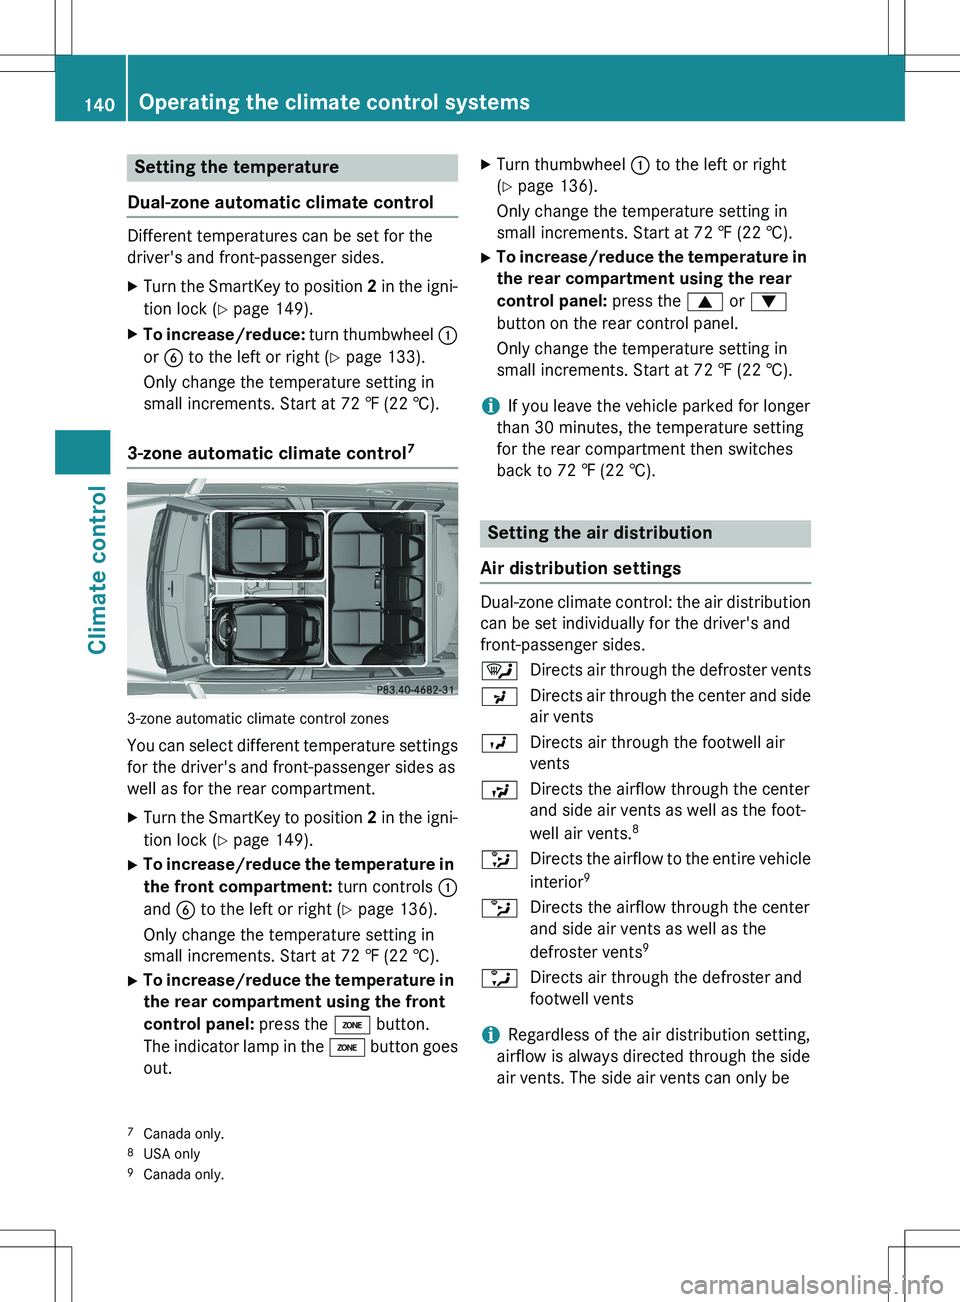
3-zone automatic climate control7
3-zone automatic climate control zones
You can select different temperature settings for the driver's and front-passenger sides as
well as for the rear compartment. X Turn the SmartKey to position 2 in the igni-
tion lock ( Y page 149).
X To increase/reduce the temperature in
the front compartment: turn controls :
and B to the left or right ( Y page 136).
Only change the temperature setting in
small increments. Start at 72 ‡ (22 †).
X To increase/reduce the temperature in
the rear compartment using the front
control panel: press the á button.
The indicator lamp in the á button goes
out. X
Turn thumbwheel : to the left or right
( Y page 136).
Only change the temperature setting in
small increments. Start at 72 ‡ (22 †).
X To increase/reduce the temperature in
the rear compartment using the rear
control panel: press the 9 or :
button on the rear control panel.
Only change the temperature setting in
small increments. Start at 72 ‡ (22 †).
iIf you leave the vehicle parked for longer
than 30 minutes, the temperature setting
for the rear compartment then switches
back to 72 ‡ (22 †).
Setting the air distribution
Air distribution settings
Dual-zone climate control: the air distribution can be set individually for the driver's and
front-passenger sides. ¯ Directs air through the defroster vents
P Directs air through the center and side
air vents
O Directs air through the footwell air
vents
S Directs the airflow through the center
and side air vents as well as the foot-
well air vents. 8
_ Directs the airflow to the entire vehicle
interior 9
b Directs the airflow through the center
and side air vents as well as the
defroster vents 9
a Directs air through the defroster and
footwell vents
iRegardless of the air distribution setting,
airflow is always directed through the side
air vents. The side air vents can only be
7 Canada only.
8 USA only
9 Canada only.
140Operating the climate control systems
Climate control
Page 161 of 386

ANeutral
Do not shift the transmission to N
while driving. Otherwise, the auto-
matic transmission could be dam-
aged.
No power is transmitted from the
engine to the drive wheels.
Releasing the brakes will allow you
to move the vehicle freely, e.g. to
push it or tow it.
If ESP ®
is deactivated or faulty:
shift the transmission to position N
if the vehicle is in danger of skid-
ding, e.g. on icy roads.
If you switch the engine off with the transmission in position R or D, the
automatic transmission shifts to N
automatically.
! Rolling in neutral N can damage
the drive train.
7Drive
The automatic transmission
changes gear automatically. All
forward gears are available.
Driving tips
Changing gear
The automatic transmission shifts to the indi- vidual gears automatically when it is in trans-
mission position D. This automatic gearshift-
ing behavior is determined by:
R the selected drive program ( Y page 159)
R the position of the accelerator pedal
(Y page 159)
R the road speed
Accelerator pedal position
Your style of driving influences how the auto-
matic transmission shifts gear:
R little throttle: early upshifts
R more throttle: late upshifts
Kickdown
Use kickdown for maximum acceleration.
X Depress the accelerator pedal beyond the
pressure point.
The automatic transmission shifts to a
lower gear depending on the engine speed.
X Ease off the accelerator pedal once the
desired speed is reached.
The automatic transmission shifts back up.
Towing a trailer
XWhen traveling downhill, switch to a lower
gear if the automatic transmission con-
stantly switches between two gears.
X Engaging a lower gear and reducing the
speed reduces the risk of the engine over-
heating.
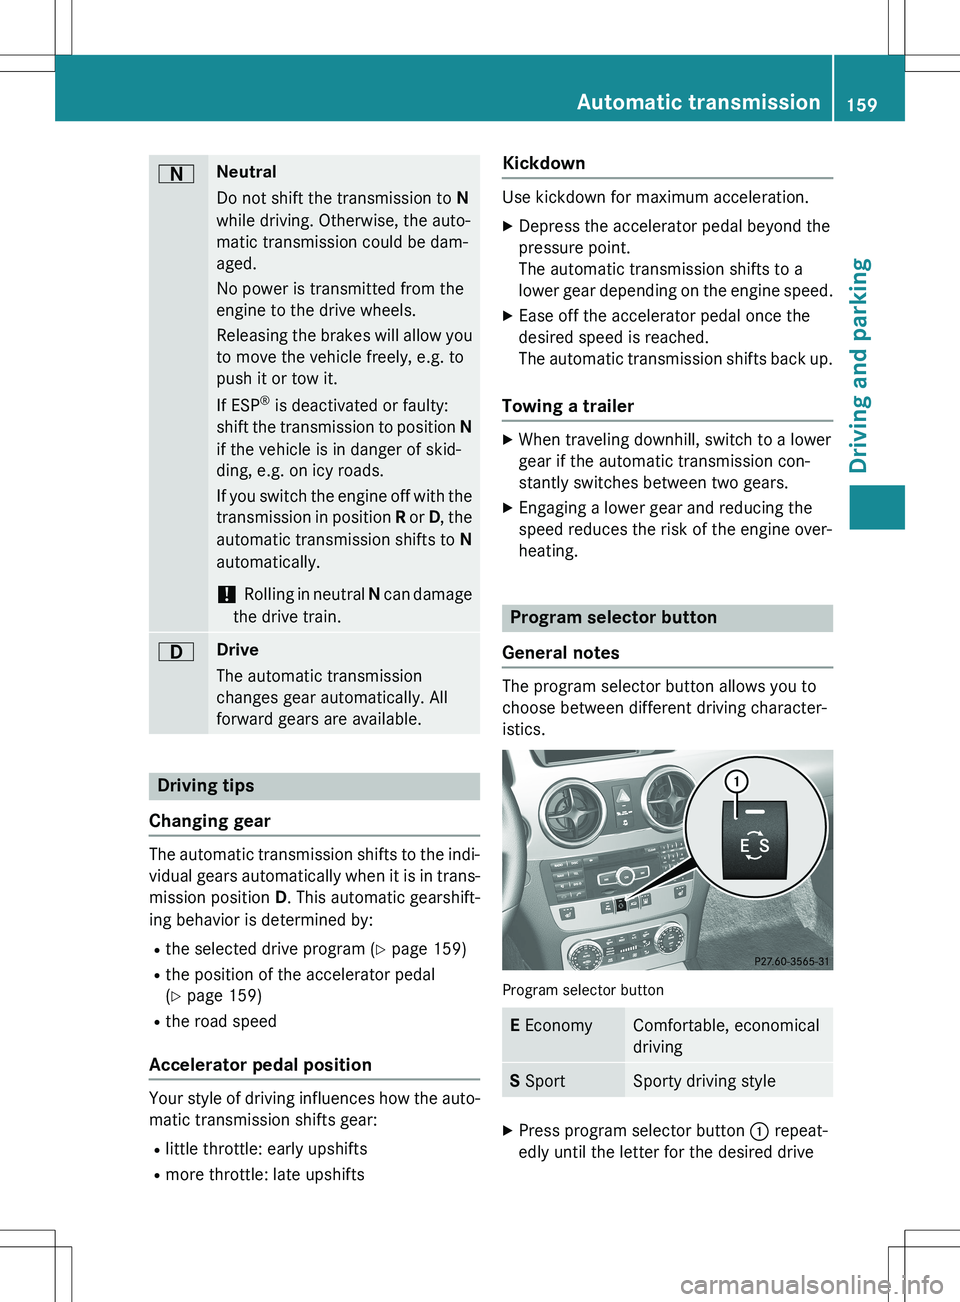
Program selector button
General notes
The program selector button allows you to
choose between different driving character-
istics.
Program selector button
E EconomyComfortable, economical
driving
S SportSporty driving style
X
Press program selector button : repeat-
edly until the letter for the desired drive
Automatic transmission159
Driving and parking
Z