2015 MERCEDES-BENZ GLK-CLASS SUV hood release
[x] Cancel search: hood releasePage 34 of 386
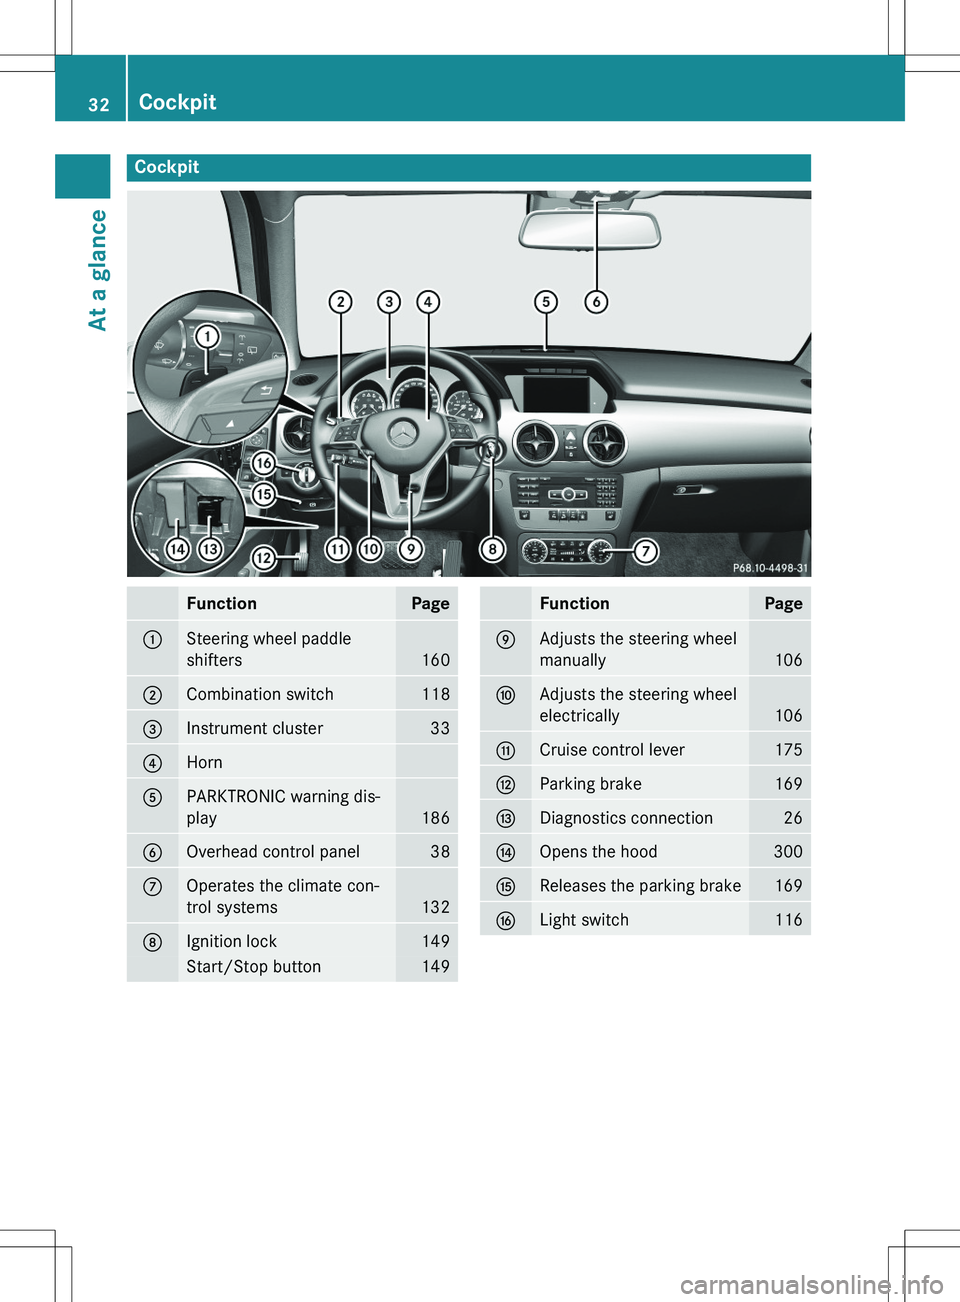
Cockpit
FunctionPage
:Steering wheel paddle
shifters
160
;Combination switch118
=Instrument cluster33
?Horn
APARKTRONIC warning dis-
play
186
BOverhead control panel38
COperates the climate con-
trol systems
132
DIgnition lock149
Start/Stop button149
FunctionPage
EAdjusts the steering wheel
manually
106
FAdjusts the steering wheel
electrically
106
GCruise control lever175
HParking brake169
IDiagnostics connection26
JOpens the hood300
KReleases the parking brake169
LLight switch116
32Cockpit
At a glance
Page 126 of 386
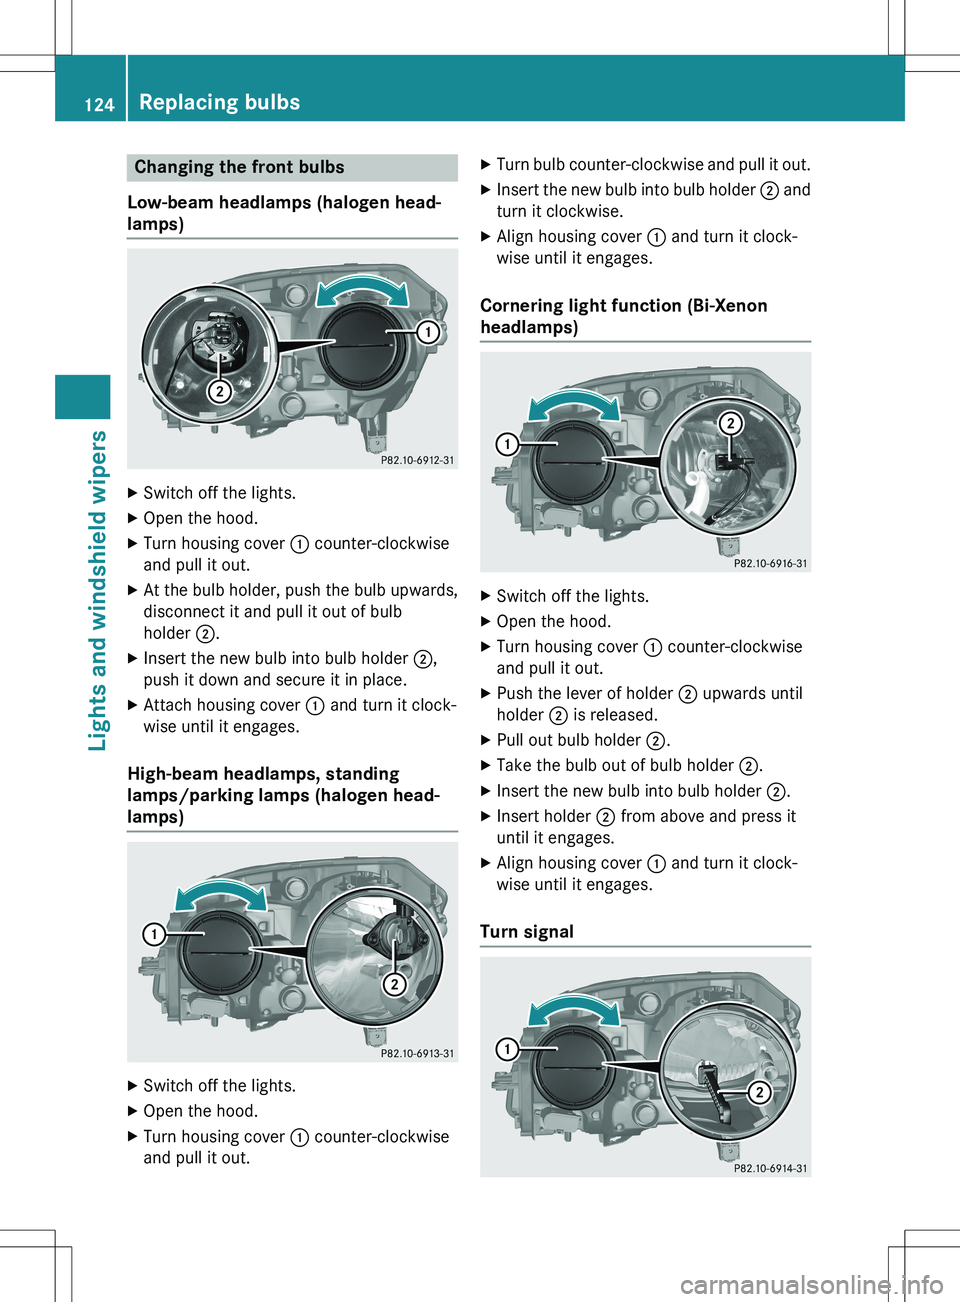
Changing the front bulbs
Low-beam headlamps (halogen head-
lamps)
X Switch off the lights.
X Open the hood.
X Turn housing cover : counter-clockwise
and pull it out.
X At the bulb holder, push the bulb upwards,
disconnect it and pull it out of bulb
holder ;.
X Insert the new bulb into bulb holder ;,
push it down and secure it in place.
X Attach housing cover : and turn it clock-
wise until it engages.
High-beam headlamps, standing
lamps/parking lamps (halogen head-
lamps)
X Switch off the lights.
X Open the hood.
X Turn housing cover : counter-clockwise
and pull it out. X
Turn bulb counter-clockwise and pull it out.
X Insert the new bulb into bulb holder ; and
turn it clockwise.
X Align housing cover : and turn it clock-
wise until it engages.
Cornering light function (Bi-Xenon
headlamps)
X Switch off the lights.
X Open the hood.
X Turn housing cover : counter-clockwise
and pull it out.
X Push the lever of holder ; upwards until
holder ; is released.
X Pull out bulb holder ;.
X Take the bulb out of bulb holder ;.
X Insert the new bulb into bulb holder ;.
X Insert holder ; from above and press it
until it engages.
X Align housing cover : and turn it clock-
wise until it engages.
Turn signal
124Replacing bulbs
Lights and windshield wipers
Page 127 of 386
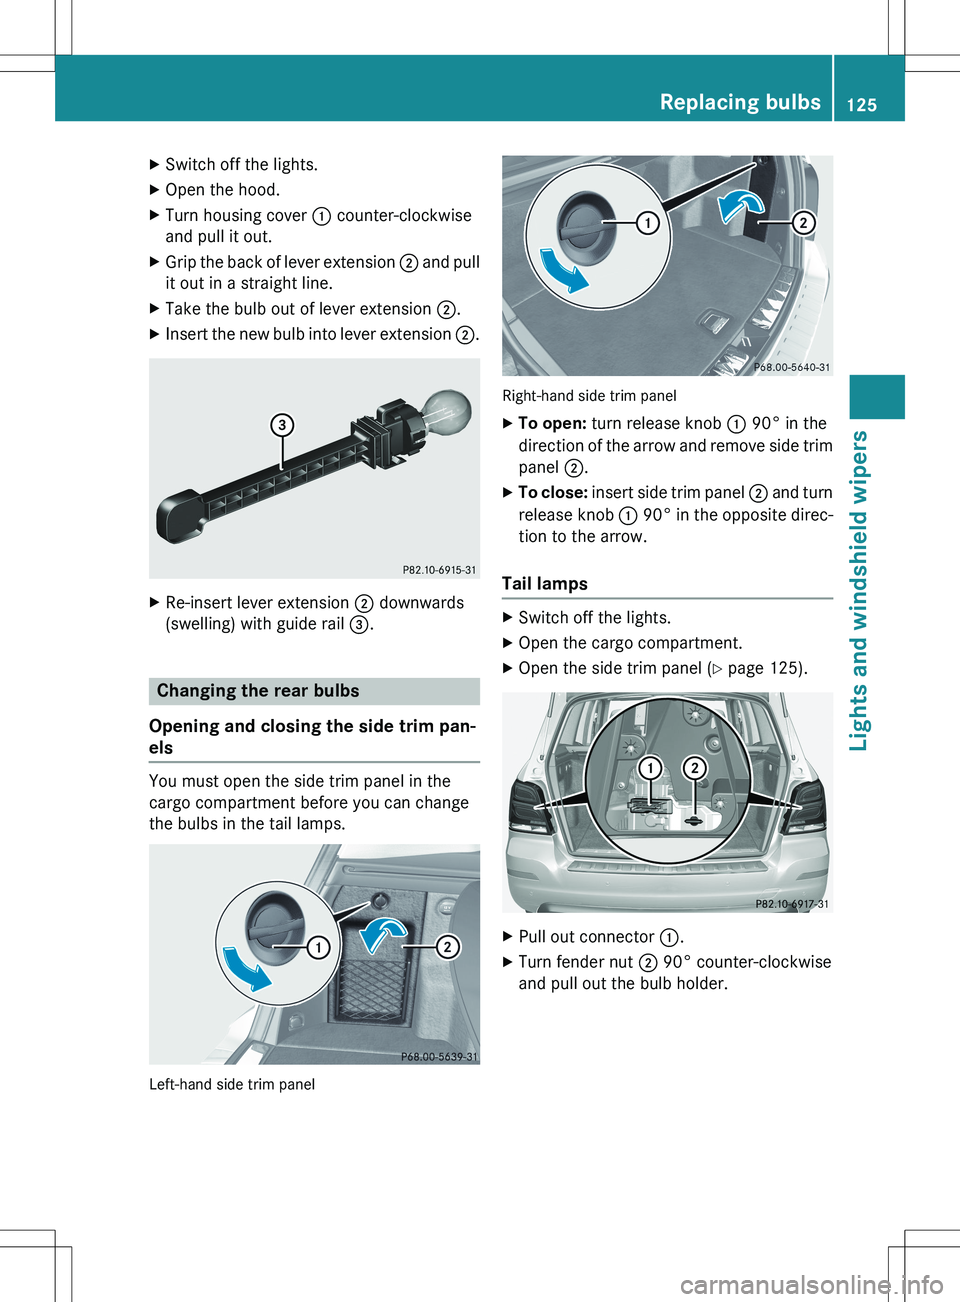
XSwitch off the lights.
X Open the hood.
X Turn housing cover : counter-clockwise
and pull it out.
X Grip the back of lever extension ; and pull
it out in a straight line.
X Take the bulb out of lever extension ;.
X Insert the new bulb into lever extension ;.
X
Re-insert lever extension ; downwards
(swelling) with guide rail =.
Changing the rear bulbs
Opening and closing the side trim pan-
els
You must open the side trim panel in the
cargo compartment before you can change
the bulbs in the tail lamps.
Left-hand side trim panel
Right-hand side trim panel
X To open: turn release knob : 90° in the
direction of the arrow and remove side trim panel ;.
X To close: insert side trim panel ; and turn
release knob : 90° in the opposite direc-
tion to the arrow.
Tail lamps
X Switch off the lights.
X Open the cargo compartment.
X Open the side trim panel ( Y page 125).
X
Pull out connector :.
X Turn fender nut ; 90° counter-clockwise
and pull out the bulb holder.
Replacing bulbs125
Lights and windshield wipers
Z
Page 129 of 386
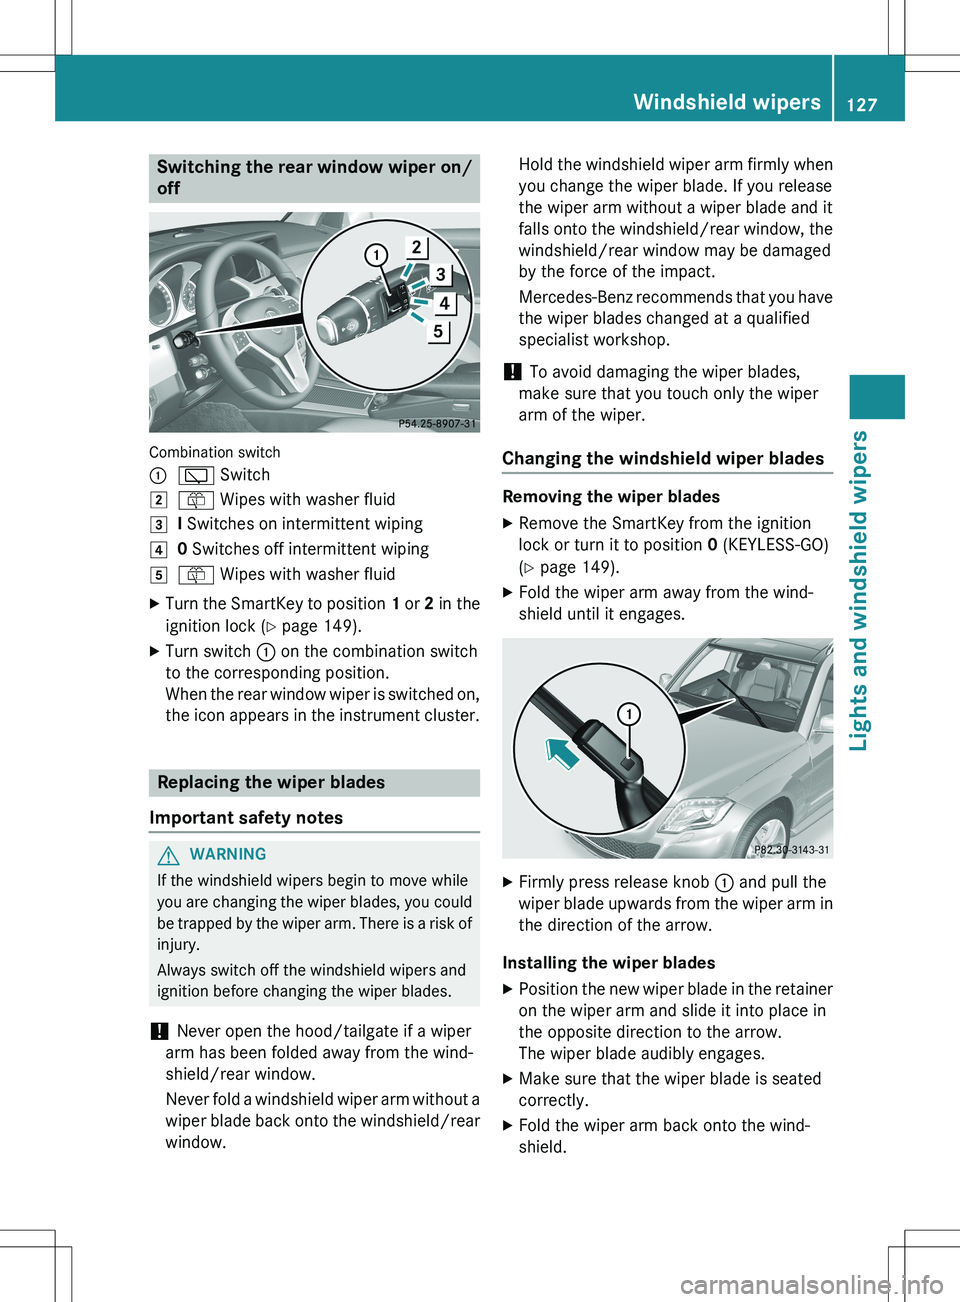
Switching the rear window wiper on/
off
Combination switch :
è Switch
2ô Wipes with washer fluid
3I Switches on intermittent wiping
40 Switches off intermittent wiping
5ô Wipes with washer fluid
X Turn the SmartKey to position 1 or 2 in the
ignition lock ( Y page 149).
X Turn switch : on the combination switch
to the corresponding position.
When the rear window wiper is switched on,
the icon appears in the instrument cluster.
Replacing the wiper blades
Important safety notes
GWARNING
If the windshield wipers begin to move while
you are changing the wiper blades, you could be trapped by the wiper arm. There is a risk of
injury.
Always switch off the windshield wipers and
ignition before changing the wiper blades.
! Never open the hood/tailgate if a wiper
arm has been folded away from the wind-
shield/rear window.
Never fold a windshield wiper arm without a
wiper blade back onto the windshield/rear window. Hold the windshield wiper arm firmly when
you change the wiper blade. If you release
the wiper arm without a wiper blade and it
falls onto the windshield/rear window, the
windshield/rear window may be damaged
by the force of the impact.
Mercedes-Benz recommends that you have the wiper blades changed at a qualified
specialist workshop.
! To avoid damaging the wiper blades,
make sure that you touch only the wiper
arm of the wiper.
Changing the windshield wiper blades
Removing the wiper blades
X Remove the SmartKey from the ignition
lock or turn it to position 0 (KEYLESS-GO)
( Y page 149).
X Fold the wiper arm away from the wind-
shield until it engages.
XFirmly press release knob : and pull the
wiper blade upwards from the wiper arm in the direction of the arrow.
Installing the wiper blades
X Position the new wiper blade in the retainer
on the wiper arm and slide it into place in
the opposite direction to the arrow.
The wiper blade audibly engages.
X Make sure that the wiper blade is seated
correctly.
X Fold the wiper arm back onto the wind-
shield.
Windshield wipers127
Lights and windshield wipers
Z
Page 155 of 386
The engine starts automatically when the
driver wants to pull away again. The ECO
start/stop function thereby helps you to
reduce the fuel consumption and emissions
of your vehicle.
Important safety notes
GWARNING
If the engine is switched off automatically andyou exit the vehicle, the engine is restarted
automatically. The vehicle may begin moving. There is a risk of accident and injury.
If you wish to exit the vehicle, always turn off
the ignition and secure the vehicle against
rolling away.
General notes
If the engine has been switched off automat-
ically by the ECO start/stop function, the ¤ symbol is shown in the multifunction
display.
Every time you switch on the engine using the SmartKey or the Start/Stop button, the ECO
start/stop function is activated.
Automatic engine switch-off
If the vehicle is braked to a standstill in D or N,
the ECO start/stop function switches off the engine automatically.
The ECO start/stop function is operational
when:
R the indicator lamp in the ECO button is lit
green.
R the outside temperature is within the range
that is suitable for the system.
R the engine is at normal operating temper-
ature.
R the set temperature for the vehicle interior
has been reached.
R the battery is sufficiently charged.
R the system detects that the windshield is
not fogged up when the air-conditioning
system is switched on. R
the hood is closed.
R the driver's door is closed and the driver's
seat belt is fastened.
iAll of the vehicle's systems remain active
when the engine is stopped automatically.
iThe HOLD function can also be activated
if the engine has been switched off auto-
matically. It is then not necessary to con-
tinue applying the brakes during the auto-
matic stop phase. When you depress the
accelerator pedal, the engine starts auto-
matically and the braking effect of the
HOLD function is deactivated.
iThe engine can be switched off automat-
ically a maximum of four times (first stop
and three subsequent stops) in succession.
Automatic engine start
The engine starts automatically if:
R you switch off the ECO start/stop function
by pressing the ECO button.
R in transmission position D or N the brake
pedal is released and the HOLD function is not active.
R you depress the accelerator pedal.
R you engage reverse gear R.
R you move the transmission out of position
P.
R you unfasten your seat belt or open the
driver's door.
R the vehicle starts to roll.
R the brake system requires this.
R the temperature in the vehicle interior devi-
ates from the set range.
R the system detects moisture on the wind-
shield when the air-conditioning system is
switched on.
R the battery's condition of charge is too low.
iShifting the transmission to position P
does not start the engine.
Driving153
Driving and parking
Z
Page 181 of 386
Rthe transmission must be in position D.
R the hood must be closed.
R the driver's door must be closed when you
shift from P to D or your seat belt must be
fastened.
R the front-passenger door and rear doors
must be closed.
R the vehicle must not skid.
Activating while driving
When driving at speeds below 20 mph
(30 km/h), you can only activate DISTRONIC
PLUS if the vehicle in front has been detected
and is shown in the multifunction display. If
the vehicle in front is no longer detected and displayed, DISTRONIC PLUS switches off anda tone sounds.
X Briefly pull the cruise control lever towards
you ?, or press it up : or down ;.
DISTRONIC PLUS is selected.
X Press the cruise control lever repeatedly
up : or down ; until the desired speed is
set.
X Remove your foot from the accelerator
pedal.
Your vehicle adapts its speed to that of the
vehicle in front, but only up to the desired
stored speed.
iIf you do not fully release the accelerator
pedal, the
DISTRONIC PLUS Override
message appears in the multifunction dis-
play. The set distance to a slower-moving
vehicle in front will then not be maintained. You will be driving at the speed you deter-
mine by the position of the accelerator
pedal.
Pulling away X If the vehicle in front pulls away: remove
your foot from the brake pedal. X
Briefly pull the cruise control lever towards
you ?.
or X Accelerate briefly.
Your vehicle pulls away and adapts its
speed to that of the vehicle in front.
Driving
If there is no vehicle in front, DISTRONIC
PLUS operates in the same way as cruise
control.
If DISTRONIC PLUS detects that the vehicle in front has slowed down, it brakes your vehicle.
In this way, the distance you have selected is maintained.
If DISTRONIC PLUS detects that the vehicle infront is driving faster, it accelerates your vehi-
cle, but only up to the speed you have stored.
Changing lanes
If you change to the passing lane, DISTRONIC
PLUS supports you when: R you are driving faster than 40 mph
(60 km/h)
R DISTRONIC PLUS is maintaining the dis-
tance to a vehicle in front
R you switch on the appropriate turn signal
R DISTRONIC PLUS does not detect a danger
of collision
If these conditions are fulfilled, your vehicle is
accelerated. Acceleration will be interrupted
if changing lanes takes too long or if the dis-
tance between your vehicle and the vehicle in front becomes too small.
iWhen changing lanes, DISTRONIC PLUS
monitors the left lane on left-hand drive
vehicles and the right lane on right-hand
drive vehicles.
Driving systems179
Driving and parking
Z
Page 186 of 386
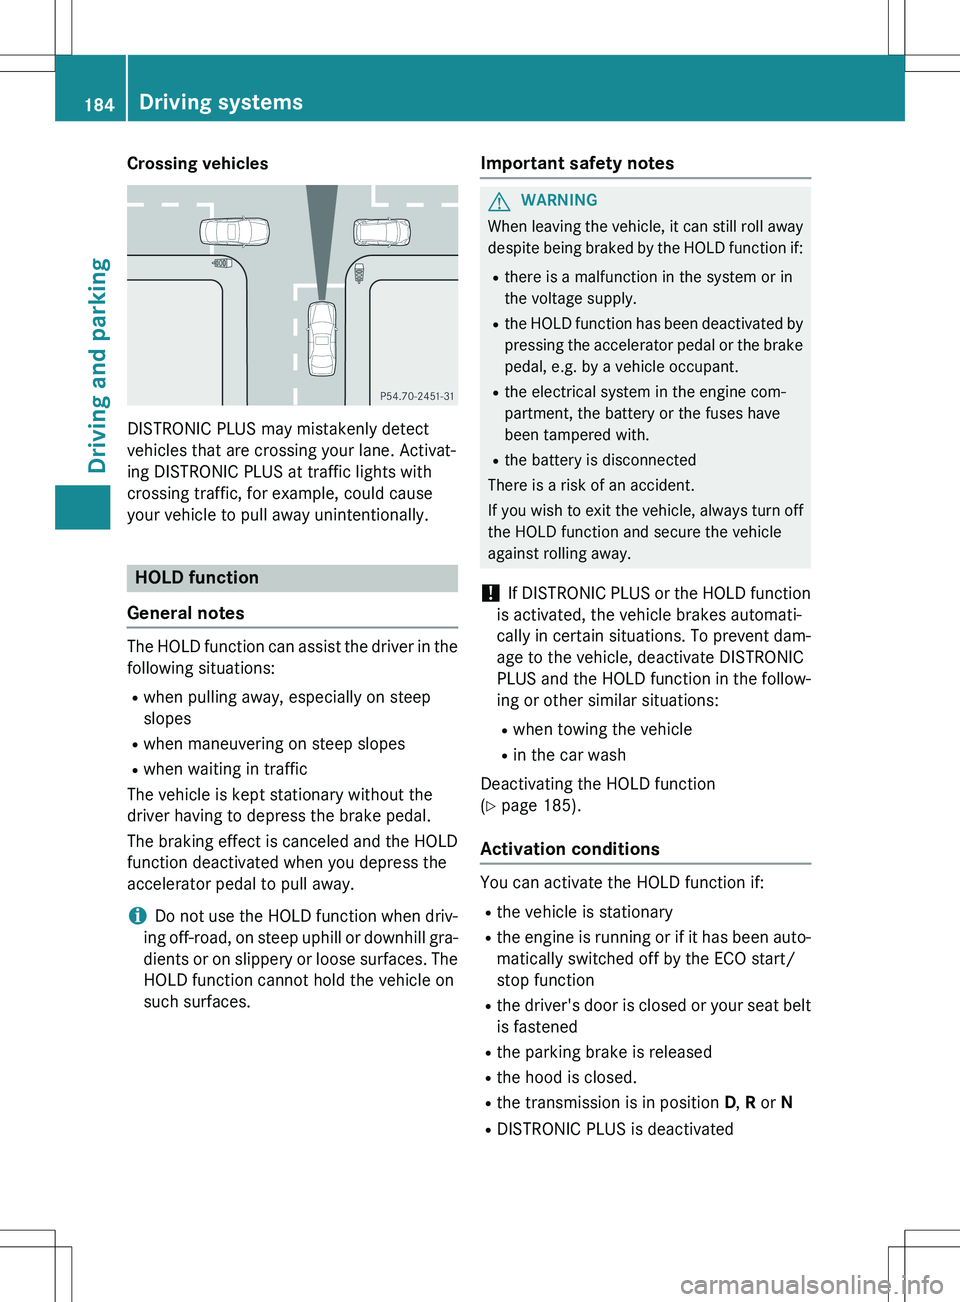
Crossing vehicles
DISTRONIC PLUS may mistakenly detect
vehicles that are crossing your lane. Activat-
ing DISTRONIC PLUS at traffic lights with
crossing traffic, for example, could cause
your vehicle to pull away unintentionally.
HOLD function
General notes
The HOLD function can assist the driver in the
following situations: R when pulling away, especially on steep
slopes
R when maneuvering on steep slopes
R when waiting in traffic
The vehicle is kept stationary without the
driver having to depress the brake pedal.
The braking effect is canceled and the HOLD
function deactivated when you depress the
accelerator pedal to pull away.
iDo not use the HOLD function when driv-
ing off-road, on steep uphill or downhill gra-
dients or on slippery or loose surfaces. The HOLD function cannot hold the vehicle on
such surfaces.
Important safety notes
GWARNING
When leaving the vehicle, it can still roll away despite being braked by the HOLD function if:
R there is a malfunction in the system or in
the voltage supply.
R the HOLD function has been deactivated by
pressing the accelerator pedal or the brake
pedal, e.g. by a vehicle occupant.
R the electrical system in the engine com-
partment, the battery or the fuses have
been tampered with.
R the battery is disconnected
There is a risk of an accident.
If you wish to exit the vehicle, always turn off the HOLD function and secure the vehicle
against rolling away.
! If DISTRONIC PLUS or the HOLD function
is activated, the vehicle brakes automati-
cally in certain situations. To prevent dam-
age to the vehicle, deactivate DISTRONIC
PLUS and the HOLD function in the follow-
ing or other similar situations:
R when towing the vehicle
R in the car wash
Deactivating the HOLD function
( Y page 185).
Activation conditions
You can activate the HOLD function if:
R the vehicle is stationary
R the engine is running or if it has been auto-
matically switched off by the ECO start/
stop function
R the driver's door is closed or your seat belt
is fastened
R the parking brake is released
R the hood is closed.
R the transmission is in position D, R or N
R DISTRONIC PLUS is deactivated
184Driving systems
Driving and parking
Page 187 of 386
Activating the HOLD function
XMake sure that the activation conditions
are met.
X Depress the brake pedal.
X Quickly depress the brake pedal further
until ë appears in the multifunction dis-
play.
The HOLD function is activated. You can
release the brake pedal.
iIf depressing the brake pedal the first
time does not activate the HOLD function,
wait briefly and then try again.
Deactivating the HOLD function
The HOLD function is deactivated automati-
cally if: R you accelerate and the transmission is in
position D or R.
R the transmission is in position P.
R you depress the brake pedal again with a
certain amount of pressure until ë dis-
appears from the multifunction display.
R you activate DISTRONIC PLUS.
When the HOLD function is activated in vehi-
cles with an automatic transmission, the
transmission is shifted automatically to posi- tion P if:
R the driver's door is open and the driver's
seat belt is unfastened.
R the engine is switched off, unless it is auto-
matically switched off by the ECO start/
stop function.
R the hood is opened.
R a system malfunction occurs.
R the power supply is not sufficient.
The horn will also sound at regular intervals if
the HOLD function is activated and you:
R switch the engine off, open the driver's
door and remove your seat belt.
R open the hood.
The sounding of the horn alerts you to the fact that the vehicle has been parked while the HOLD function is still activated. If you attempt
to lock the vehicle, the tone becomes louder.
The vehicle is not locked until the HOLD func- tion is deactivated.
iIf the engine has been switched off, it
cannot be started again until the HOLD
function has been deactivated.
If there is a malfunction in the system or
power supply while the HOLD function is acti- vated, the
Brake Immediately message is
shown in the multifunction display. Immedi-
ately depress the brake firmly until the warn-
ing message in the multifunction display goes
out.
You can also shift the transmission to position
P . This deactivates the HOLD function.
4MATIC (permanent four-wheel drive)
4MATIC ensures that all four wheels are per-
manently driven. Together with ESP ®
and
ETS, it improves the traction of your vehicle
whenever a drive wheel spins due to insuffi-
cient grip.
If you fail to adapt your driving style, 4MATIC
can neither reduce the risk of accident nor
override the laws of physics. 4MATIC cannot
take account of road, weather and traffic con- ditions. 4MATIC is only an aid. You are
responsible for the distance to the vehicle in
front, for vehicle speed, for braking in good
time and for staying in your lane.
If a drive wheel spins due to insufficient grip:
R Only depress the accelerator pedal as far as
necessary when pulling away.
R Accelerate less when driving.
! Never tow the vehicle with one axle
raised. This may damage the transfer case.
Damage of this sort is not covered by the
Mercedes-Benz Limited Warranty. All
wheels must remain either on the ground or be fully raised. Observe the instructions for
towing the vehicle with all wheels in full
contact with the ground.
Driving systems185
Driving and parking
Z