2015 MERCEDES-BENZ GLE SUV door lock
[x] Cancel search: door lockPage 196 of 453
engine is switched off. Noises that occur are
normal.
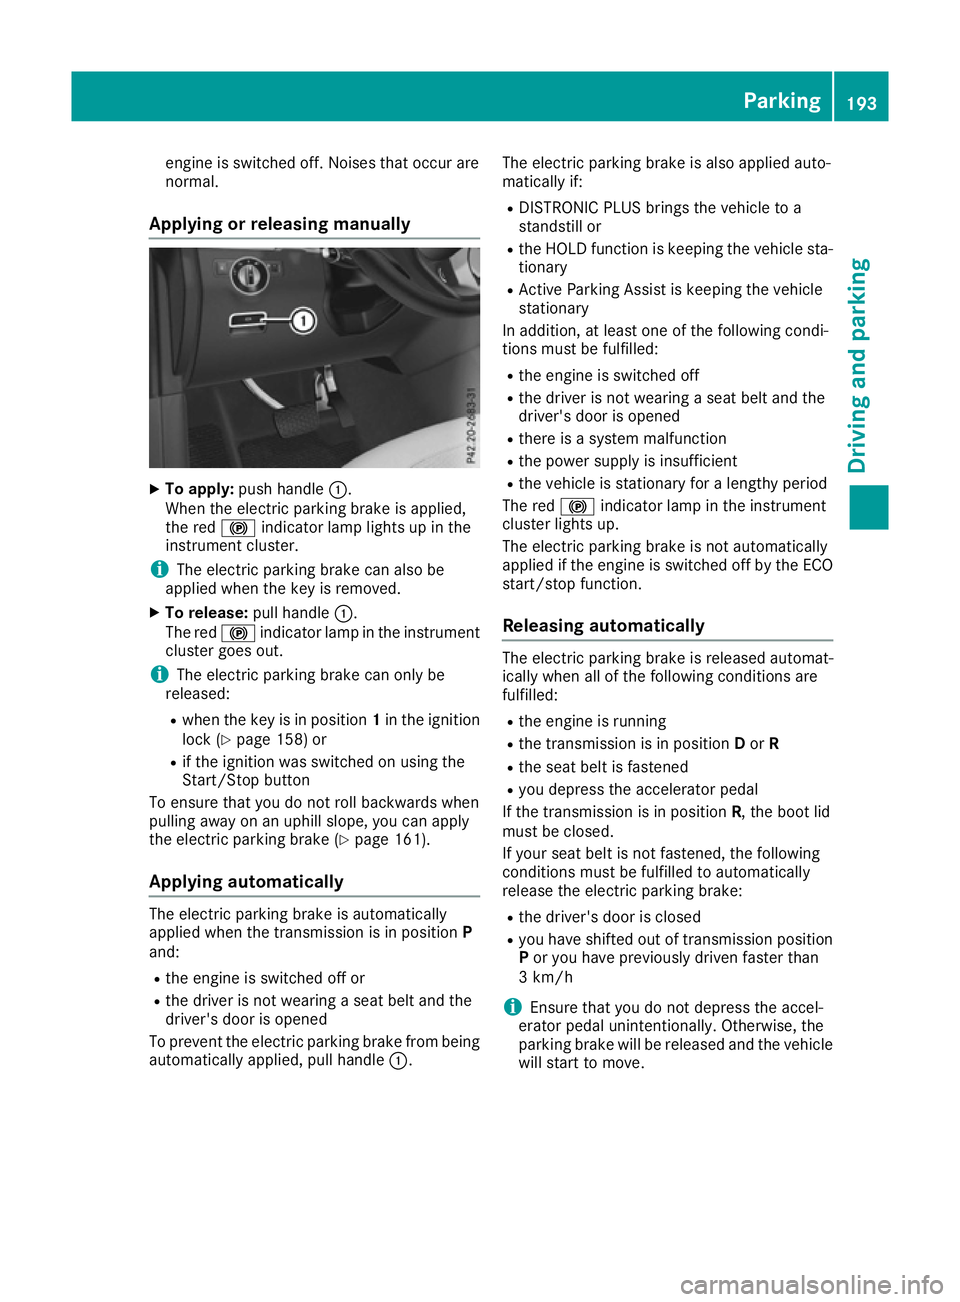
Applying or releasing manually X
To apply: push handle :.
When the electric parking brake is applied,
the red !indicator lamp lights up in the
instrument cluster.
i The electric parking brake can also be
applied when the key is removed.
X To release: pull handle:.
The red !indicator lamp in the instrument
cluster goes out.
i The electric parking brake can only be
released:
R when the key is in position 1in the ignition
lock (Y page 158) or
R if the ignition was switched on using the
Start/Stop button
To ensure that you do not roll backwards when
pulling away on an uphill slope, you can apply
the electric parking brake (Y page 161).
Applying automatically The electric parking brake is automatically
applied when the transmission is in position
P
and:
R the engine is switched off or
R the driver is not wearing a seat belt and the
driver's door is opened
To prevent the electric parking brake from being
automatically applied, pull handle :.The electric parking brake is also applied auto-
matically if:
R
DISTRONIC PLUS brings the vehicle to a
standstill or
R the HOLD function is keeping the vehicle sta-
tionary
R Active Parking Assist is keeping the vehicle
stationary
In addition, at least one of the following condi-
tions must be fulfilled:
R the engine is switched off
R the driver is not wearing a seat belt and the
driver's door is opened
R there is a system malfunction
R the power supply is insufficient
R the vehicle is stationary for a lengthy period
The red !indicator lamp in the instrument
cluster lights up.
The electric parking brake is not automatically
applied if the engine is switched off by the ECO
start/stop function.
Releasing automatically The electric parking brake is released automat-
ically when all of the following conditions are
fulfilled:
R
the engine is running
R the transmission is in position Dor R
R the seat belt is fastened
R you depress the accelerator pedal
If the transmission is in position R, the boot lid
must be closed.
If your seat belt is not fastened, the following
conditions must be fulfilled to automatically
release the electric parking brake:
R the driver's door is closed
R you have shifted out of transmission position
P or you have previously driven faster than
3 km/h
i Ensure that you do not depress the accel-
erator pedal unintentionally. Otherwise, the
parking brake will be released and the vehicle will start to move. Parking
193Driving and parking Z
Page 201 of 453
Off-road fording
!
Under no circumstances should you accel-
erate before entering the water. The bow
wave could cause water to enter and damage
the engine and neighbouring assemblies.
! Do not open any of the vehicle's doors while
fording. Otherwise, water could get into the
vehicle interior and damage the vehicle's
electronics and interior equipment.
R Establish how deep the water is and the char-
acteristics of the body of water before ford-
ing.
R Select the highest possible vehicle level.
R Shift to a lower gear using the left-hand steer-
ing wheel gearshift paddle.
R Avoid high engine speeds.
R Enter and exit the water at a flat place and at
a steady walking pace.
R Drive slowly and at a constant speed through
the water.
R Ensure that a bow wave does not form as you
drive.
R Do not stop and do not switch off the engine.
Water offers a high degree of resistance, the
ground is slippery and, in some cases, unsta- ble. Therefore, it is difficult and dangerous to
pull away in the water.
R Clean any mud from the tyre tread after ford-
ing.
R Apply the brakes to dry them after fording.
Always observe the fording depth values
(Y page 444). Winter driving
G
WARNING
If you shift down on a slippery road surface in an attempt to increase the engine's braking
effect, the drive wheels could lose their grip.
This increases the risk of skidding and having
an accident.
Do not shift down for additional engine brak-
ing on a slippery road surface. G
DANGER
If the exhaust pipe is blocked or adequate
ventilation is not possible, poisonous gases such as carbon monoxide (CO) may enter the
vehicle. This is the case, e.g. if the vehicle
becomes trapped in snow. There is a risk of
fatal injury.
If you leave the engine or the auxiliary heating
running, make sure the exhaust pipe and area
around the vehicle are clear of snow. To
ensure an adequate supply of fresh air, open a window on the side of the vehicle that is not
facing into the wind.
! Take care not to damage the sealing strip
and the moulding on the side of the rear win- dow when scraping ice off the rear window.
Have your vehicle winterproofed at a qualified
specialist workshop at the onset of winter.
You should drive particularly carefully on slip-
pery road surfaces. Avoid sudden acceleration,
steering and braking manoeuvres. Do not use
cruise control or DISTRONIC PLUS.
If the vehicle threatens to skid or cannot be
stopped when moving at low speed:
X Shift the transmission to position N.
X Try to bring the vehicle under control by using
corrective steering.
When driving in snow with or without snow
chains, select driving program Slippery
(Y page 166).
The outside temperature indicator is not
designed to serve as an ice-warning device and
is therefore unsuitable for that purpose.
Changes in the outside temperature are dis-
played after a short delay.
Indicated temperatures just above the freezing
point do not guarantee that the road surface is
free of ice. The road may still be icy, especially in wooded areas or on bridges. You should pay
special attention to road conditions when tem-
peratures are around freezing point.
Further information on driving with snow chains
(Y page 408).
Further information on driving with summer
tyres (Y page 407).
Observe the notes in the "Winter operation" sec-
tion (Y page 407). 198
Driving tipsDriving and parking
Page 203 of 453
The following driving systems are specially
adapted to off-road driving:
R the Offroad drive program (vehicles without
Off-Road Engineering package)
(Y page 254)
R Offroad andOffroad Plus drive programs
(vehicles with Off-Road Engineering pack-
age) . (Y page 254)
R LOW RANGE offroad gear (vehicles with the
Off-Road Engineering package)
(Y page 255)
R Differential lock (vehicles with the Off-Road
Engineering package) (Y page 255)
R Off-road ABS (Y page 71)
R Offroad 4ETS (Y page 76)
R Offroad ESP ®
(Y page 77)
R AIRMATIC package (vehicle level)
(Y page 220)
R DSR (Downhill Speed Regulation)
(Y page 252)
Observe the following notes:
R Stop the vehicle before driving off-road. If
necessary, select the offroad program
(Y page 254) or shift to the LOW RANGE off-
road gear (Y page 255).
R Select a vehicle level suitable for the off-road
terrain. To avoid damaging the vehicle, make sure there is always sufficient ground clear-
ance.
R Make sure that items of luggage and loads are
stowed safely and are well secured
(Y page 355).
R Always keep the engine running and in gear
when driving on a downhill gradient. Activate
DSR (Y page 252).
R Drive slowly and evenly, if necessary at walk-
ing pace.
R Ensure that the wheels are in contact with the
ground at all times.
R Drive with extreme care on unknown off-road
routes where visibility is poor. For safety rea-
sons, get out of the vehicle first and survey
the off-road route.
R Look out for obstacles such as rocks, holes,
tree stumps and furrows.
R Take care when turning on an uphill or down-
hill slope or when driving across a slope. The
vehicle could otherwise tip over. R
Always keep the doors, the tailgate and the
sliding sunroof closed while the vehicle is in
motion.
R Do not stray from marked routes or paths.
R Observe the notes on off-road fording
(Y page 198).
i Information about retrofitting special all-ter-
rain tyres is available from any qualified spe-
cialist workshop.
i Do not use the HOLD function when driving
off-road, on steep uphill or downhill gradients or on slippery or loose surfaces. The HOLD
function cannot hold the vehicle on such sur-faces.
Checklist before driving off-road X
Engine oil level: check the engine oil and top
it up if necessary.
When driving on steep gradients, the oil level must be sufficiently high to ensure a correct
oil supply in the vehicle.
X AdBlue ®
tank (BlueTEC vehicles): check
the level and top up if necessary
(Y page 180).
X Tyre-change tool kit: check that the jack is
working and make sure you have the wheel
wrench, a robust tow cable and a folding
spade in the vehicle.
X Wheels and tyres: check the tyre tread
depth and tyre pressure.
X Check for damage and remove any foreign
objects, e.g. small stones, from the wheels/
tyres.
X Replace any missing valve caps.
X Replace dented or damaged wheels.
X Wheels: dented or bent wheels can lead to a
loss of tyre pressure and damage to the tyre
bead. Before driving off-road, check the
wheels and replace them if necessary.
Checklist after driving off-road !
If you detect damage to the vehicle after
driving off-road, have the vehicle checked
immediately at a qualified specialist work-
shop.
Driving over rough terrain places greater
demands on your vehicle than driving on normal
roads. After driving off-road, check the vehicle.
This allows you to detect damage promptly and 200
Driving tipsDriving and parking
Page 219 of 453
Activating Steering Assist and Stop&Go
Pilot
X Activate the DISTRONIC PLUS with Steering
Assist and Stop&Go Pilot function using the
on-board computer (Y page 290).
The DTR+: steering assistant On
DTR+: steering assistant On mes-
sage appears in the multifunction display.
Steering Assist and Stop&Go Pilot are active.
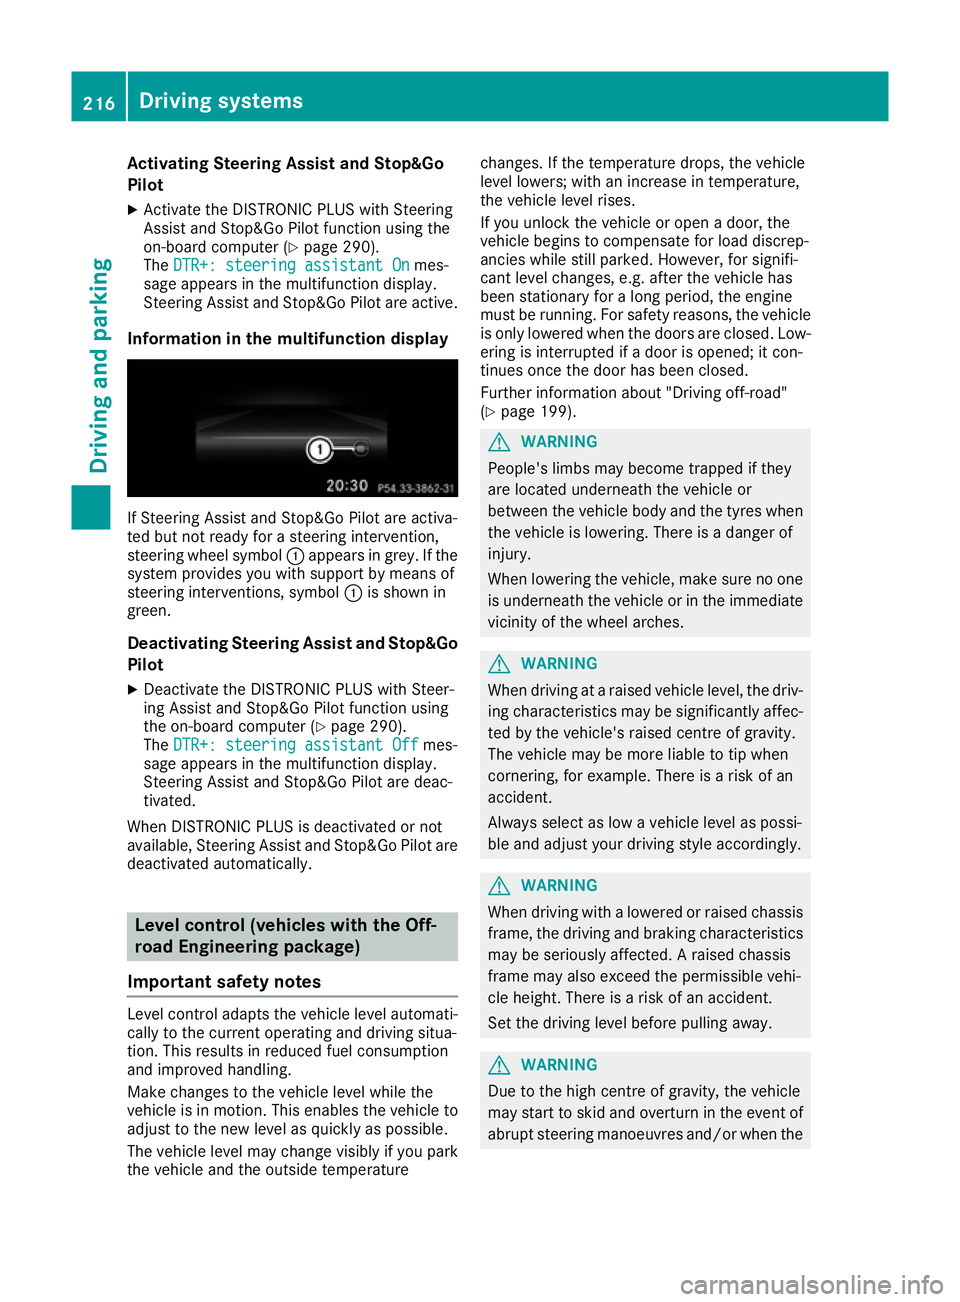
Information in the multifunction display If Steering Assist and Stop&Go Pilot are activa-
ted but not ready for a steering intervention,
steering wheel symbol :appears in grey. If the
system provides you with support by means of
steering interventions, symbol :is shown in
green.
Deactivating Steering Assist and Stop&Go
Pilot
X Deactivate the DISTRONIC PLUS with Steer-
ing Assist and Stop&Go Pilot function using
the on-board computer (Y page 290).
The DTR+: steering assistant Off
DTR+: steering assistant Off mes-
sage appears in the multifunction display.
Steering Assist and Stop&Go Pilot are deac-
tivated.
When DISTRONIC PLUS is deactivated or not
available, Steering Assist and Stop&Go Pilot are deactivated automatically. Level control (vehicles with the Off-
road Engineering package)
Important safety notes Level control adapts the vehicle level automati-
cally to the current operating and driving situa-
tion. This results in reduced fuel consumption
and improved handling.
Make changes to the vehicle level while the
vehicle is in motion. This enables the vehicle to adjust to the new level as quickly as possible.
The vehicle level may change visibly if you park
the vehicle and the outside temperature changes. If the temperature drops, the vehicle
level lowers; with an increase in temperature,
the vehicle level rises.
If you unlock the vehicle or open a door, the
vehicle begins to compensate for load discrep-
ancies while still parked. However, for signifi-
cant level changes, e.g. after the vehicle has
been stationary for a long period, the engine
must be running. For safety reasons, the vehicle
is only lowered when the doors are closed. Low-
ering is interrupted if a door is opened; it con-
tinues once the door has been closed.
Further information about "Driving off-road"
(Y page 199). G
WARNING
People's limbs may become trapped if they
are located underneath the vehicle or
between the vehicle body and the tyres when the vehicle is lowering. There is a danger of
injury.
When lowering the vehicle, make sure no one
is underneath the vehicle or in the immediate vicinity of the wheel arches. G
WARNING
When driving at a raised vehicle level, the driv- ing characteristics may be significantly affec-ted by the vehicle's raised centre of gravity.
The vehicle may be more liable to tip when
cornering, for example. There is a risk of an
accident.
Always select as low a vehicle level as possi-
ble and adjust your driving style accordingly. G
WARNING
When driving with a lowered or raised chassis frame, the driving and braking characteristics
may be seriously affected. A raised chassis
frame may also exceed the permissible vehi-
cle height. There is a risk of an accident.
Set the driving level before pulling away. G
WARNING
Due to the high centre of gravity, the vehicle
may start to skid and overturn in the event of abrupt steering manoeuvres and/or when the 216
Driving systemsDriving and pa
rking
Page 224 of 453
When lowering the vehicle, make sure no one
is underneath the vehicle or in the immediate
vicinity of the wheel arches.
If you unlock the vehicle or open a door, the
vehicle begins to compensate for load discrep-
ancies while still parked. However, for signifi-
cant level changes, e.g. after the vehicle has
been stationary for a long period, the engine
must be running. For safety reasons, the vehicle
is only lowered when the doors are closed. Low-
ering is interrupted if a door is opened; it con-
tinues once the door has been closed.
ADS and ADS PLUS (Adaptive Damping
System) General notes
The Adaptive Damping System automatically
controls the calibration of the dampers. The
damping characteristics adapt to the current
operating and driving situation.
The damping is tuned individually to each wheel
and depends on:
R your driving style, e.g. sporty
R the road surface conditions
R the drive program selected
R the vehicle level setting
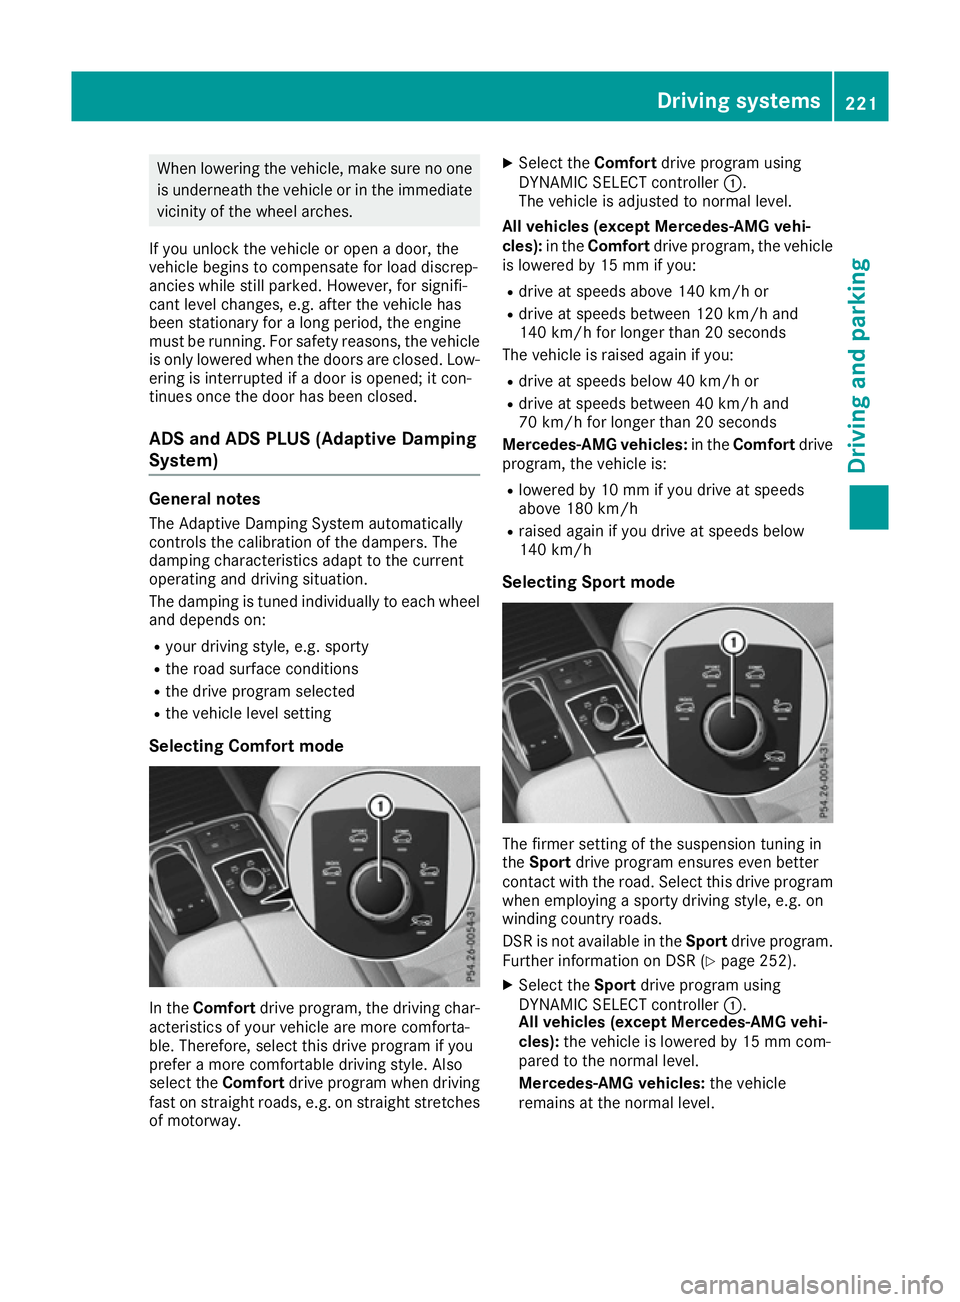
Selecting Comfort mode In the
Comfort drive program, the driving char-
acteristics of your vehicle are more comforta-
ble. Therefore, select this drive program if you
prefer a more comfortable driving style. Also
select the Comfortdrive program when driving
fast on straight roads, e.g. on straight stretches
of motorway. X
Select the Comfortdrive program using
DYNAMIC SELECT controller :.
The vehicle is adjusted to normal level.
All vehicles (except Mercedes-AMG vehi-
cles): in theComfort drive program, the vehicle
is lowered by 15 mm if you:
R drive at speeds above 140 km/h or
R drive at speeds between 120 km/h and
140 km/h for longer than 20 seconds
The vehicle is raised again if you:
R drive at speeds below 40 km/h or
R drive at speeds between 40 km/h and
70 km/h for longer than 20 seconds
Mercedes-AMG vehicles: in theComfort drive
program, the vehicle is:
R lowered by 10 mm if you drive at speeds
above 180 km/h
R raised again if you drive at speeds below
140 km/h
Selecting Sport mode The firmer setting of the suspension tuning in
the
Sport drive program ensures even better
contact with the road. Select this drive program when employing a sporty driving style, e.g. on
winding country roads.
DSR is not available in the Sportdrive program.
Further information on DSR (Y page 252).
X Select the Sportdrive program using
DYNAMIC SELECT controller :.
All vehicles (except Mercedes-AMG vehi-
cles): the vehicle is lowered by 15 mm com-
pared to the normal level.
Mercedes-AMG vehicles: the vehicle
remains at the normal level. Driving systems
221Driving and parking Z
Page 226 of 453
If this vehicle is not driven in a safe manner, it
can lead to an accident, to the vehicle over-
turning as well as serious or even fatal inju-
ries.
R In the event of an accident with the vehicle
overturning, passengers who are not wearing
their seat belt are considerably more likely to die than passengers wearing their seat belt.
You and all vehicle occupants should always
wear your seat belts.
General notes
Only select raised level if this is appropriate for
the road conditions. Otherwise, fuel consump-
tion may increase and handling may be affected.
Make changes to the vehicle level while the
vehicle is in motion. This enables the vehicle to
adjust to the new level as quickly as possible.
The vehicle level may change visibly if you park
the vehicle and the outside temperature
changes. If the temperature drops, the vehicle
level lowers; with an increase in temperature,
the vehicle level rises.
If you unlock the vehicle or open a door, the
vehicle begins to compensate for load discrep-
ancies while still parked. However, for signifi-
cant level changes, e.g. after the vehicle has
been stationary for a long period, the engine
must be running. For safety reasons, the vehicle is only lowered when the doors are closed. Low-
ering is interrupted if a door is opened; it con-
tinues once the door has been closed.
Vehicles without a trailer coupled: below a
speed of 65 km/h, you can select between the
normal and raised vehicle level. Select the nor-
mal vehicle level for normal road conditions and
the raised vehicle level when using snow chains or if the road conditions are very poor. Your
selection remains stored even if you remove the
key from the ignition lock. If you try to select
raised level at a speed above 65 km/h, the
Please
Please reduce reducespeed
speedmessage appears in the
multifunction display.
Vehicles with a trailer coupled: below a speed
of 30 km/h, you can select between the normal
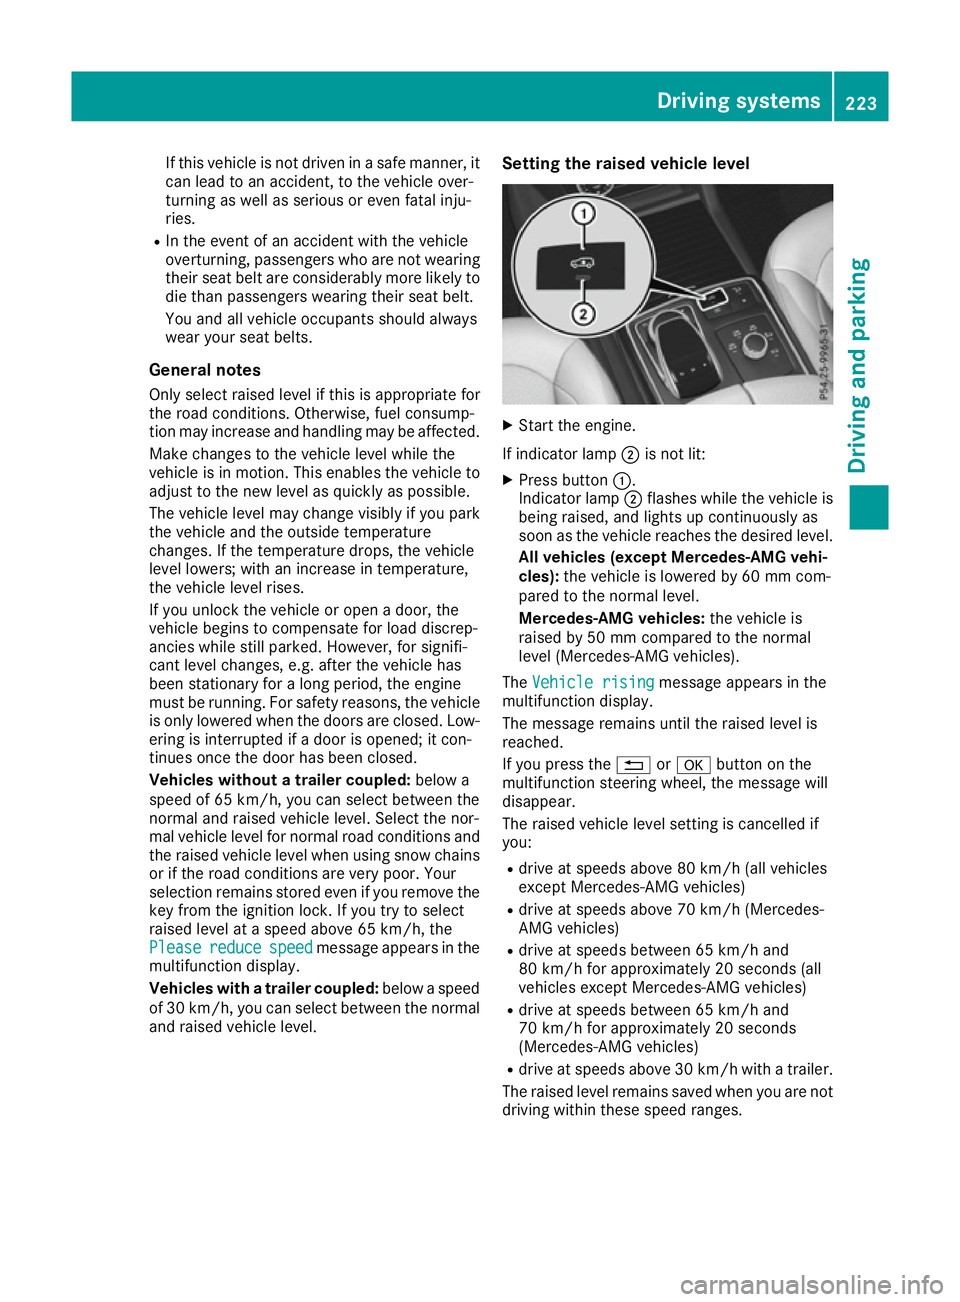
and raised vehicle level. Setting the raised vehicle level X
Start the engine.
If indicator lamp ;is not lit:
X Press button :.
Indicator lamp ;flashes while the vehicle is
being raised, and lights up continuously as
soon as the vehicle reaches the desired level.
All vehicles (except Mercedes-AMG vehi-
cles): the vehicle is lowered by 60 mm com-
pared to the normal level.
Mercedes-AMG vehicles: the vehicle is
raised by 50 mm compared to the normal
level (Mercedes-AMG vehicles).
The Vehicle rising Vehicle rising message appears in the
multifunction display.
The message remains until the raised level is
reached.
If you press the %ora button on the
multifunction steering wheel, the message will
disappear.
The raised vehicle level setting is cancelled if
you:
R drive at speeds above 80 km/h (all vehicles
except Mercedes-AMG vehicles)
R drive at speeds above 70 km/h (Mercedes-
AMG vehicles)
R drive at speeds between 65 km/h and
80 km/h for approximately 20 seconds (all
vehicles except Mercedes-AMG vehicles)
R drive at speeds between 65 km/h and
70 km/h for approximately 20 seconds
(Mercedes-AMG vehicles)
R drive at speeds above 30 km/h with a trailer.
The raised level remains saved when you are not driving within these speed ranges. Driving systems
223Driving and parking Z
Page 275 of 453
Hybrid drive system
Problem
Possible causes/consequences and
M
MSolutions The hybrid drive system
has been switched off
automatically. You have been in an accident.
The hybrid drive system remains switched off if:
R the internal combustion engine cannot be restarted after a few
seconds.
R the red 6restraint system warning lamp in the instrument clus-
ter is lit.
X Consult a qualified specialist workshop. The hybrid drive system
has been switched off
automatically. The multi-
function display also
shows a display mes-
sage. An electrical short circuit has occurred in the hybrid drive system or an
electrical connection has been disconnected.
X Observe the additional display messages in the multifunction dis-
play (Y page 300).
X Consult a qualified specialist workshop. Towing a trailer
Important safety notes
G
WARNING
Vehicles with level control:
The vehicle level may be changed uninten-
tionally, e.g. by other persons. If this happens while you are coupling or decoupling a trailer,
you could become trapped. In addition, other
people could become trapped if their limbs
are between the vehicle body and the wheels or underneath the vehicle. There is a risk of
injury.
When coupling or decoupling a trailer, make
sure that no one:
R opens or closes the doors or the tailgate
R initiates a level change or turns the
DYNAMIC SELECT Controller
R locks or unlocks the vehicle G
WARNING
You could lose control of the vehicle/trailer
combination if it begins to swerve. The vehi-
cle/trailer combination could even overturn.
There is a risk of an accident.
On no account should you attempt to
straighten out the vehicle/trailer combina- tion by increasing speed. Decrease your
speed and do not countersteer. Brake if nec-
essary. G
WARNING
If the maximum permissible load for a carrier system is exceeded, the carrier could come
loose from the vehicle and endanger other
road users. There is a risk of an accident and injury.
Never exceed the maximum permissible load
when using a carrier.
Exceeding the maximum permissible nose-
weight of the trailer drawbar on the ball coupling
may cause damage to the following:
R your vehicle
R the trailer
R the ball coupling
R trailer tow hitch
The vehicle/trailer combination could become
unstable.
If the noseweight used is lower than the mini-
mum permissible noseweight, the vehicle/
trailer combination could also become unstable. 272
Towing a trailerDriving and parking
Page 277 of 453
When towing a trailer, your vehicle's handling
characteristics will be different in comparison to
when driving without a trailer and it will con-
sume more fuel.
Use the left-hand gearshift paddle to shift to a
lower gear on long and steep downhill gradients.
This also applies if you have activated cruise
control, SPEEDTRONIC or DISTRONIC PLUS.
This will use the braking effect of the engine, so
less braking will be required to maintain vehicle
speed. This relieves the load on the brake sys-
tem and prevents the brakes from overheating
and wearing too quickly. If you need additional
braking, depress the brake pedal repeatedly
rather than continuously.
Driving tips If the trailer swings from side to side:
X Do not accelerate.
X Do not countersteer.
X Brake if necessary.
R Maintain a greater distance to the vehicle in
front than when driving without a trailer.
R Avoid braking abruptly. If possible, brake gen-
tly at first to allow the trailer to run on. Then,
increase the braking force rapidly.
R The values given for gradient-climbing capa-
bilities from a standstill refer to sea level.
When driving in mountainous areas, note that
the power output of the engine, and conse-
quently the vehicle's gradient-climbing capa-
bility, decrease with increasing altitude. Swinging out the ball coupling
G
WARNING
If the ball coupling is not engaged, the trailer
may come loose. There is a risk of an accident.
Make sure that the ball coupling is securely
engaged and locked in position.
! Do not attempt to speed the up the swing-
out procedure by applying additional pressure
with your foot. The system could otherwise be
mechanically damaged. To fold out the ball coupling, you have two
options:
R use the switch in the driver's door (all vehicles
except PLUG-IN HYBRID vehicles)
R use the switch in the tailgate
The trailer power socket is integrated into the
ball coupling and swivels out with it.
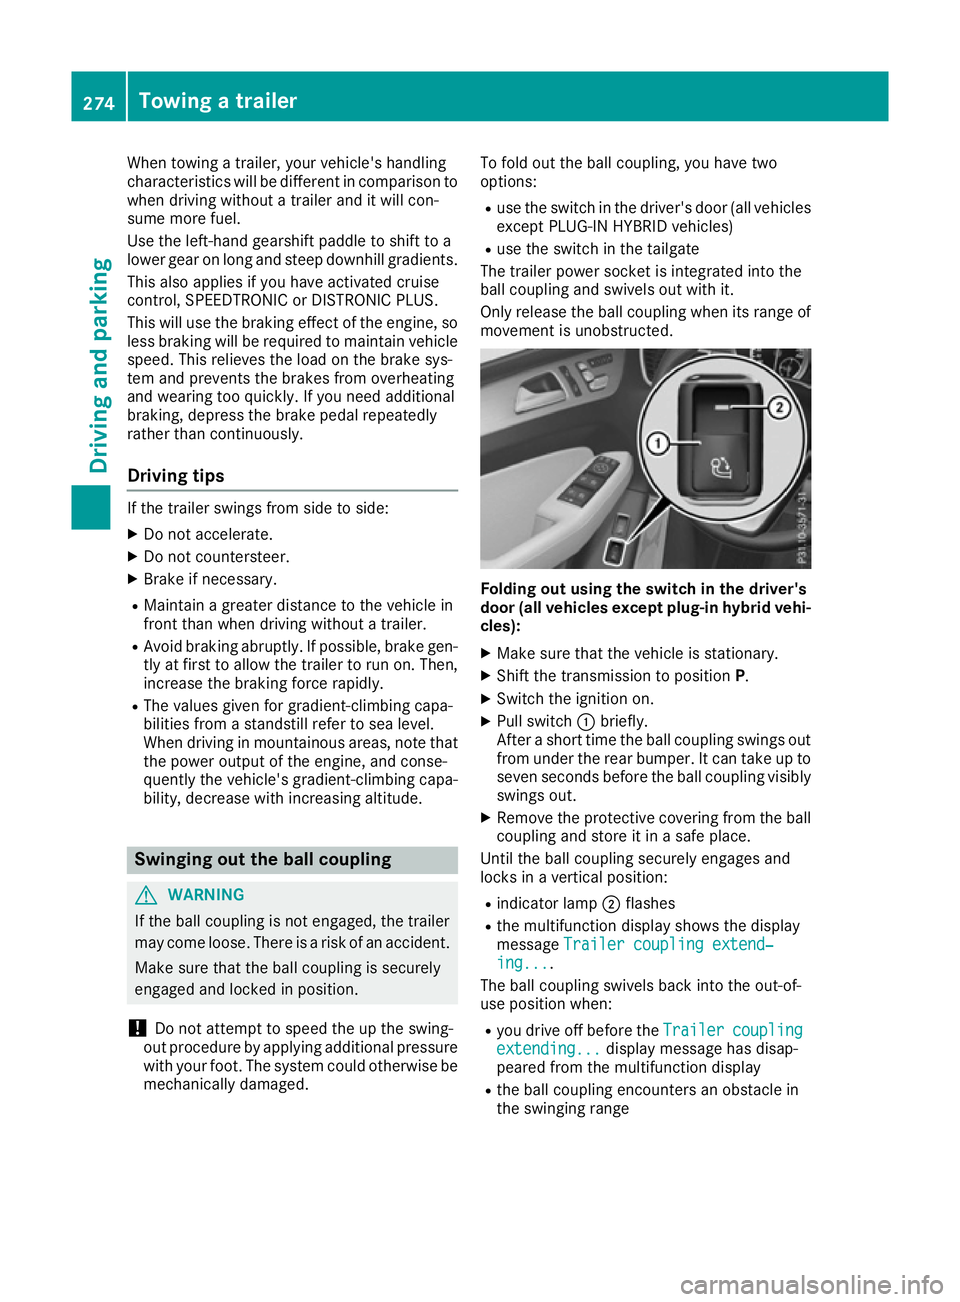
Only release the ball coupling when its range of movement is unobstructed. Folding out using the switch in the driver's
door (all vehicles except plug-in hybrid vehi-
cles):
X Make sure that the vehicle is stationary.
X Shift the transmission to position P.
X Switch the ignition on.
X Pull switch :briefly.
After a short time the ball coupling swings out from under the rear bumper. It can take up to
seven seconds before the ball coupling visibly
swings out.
X Remove the protective covering from the ball
coupling and store it in a safe place.
Until the ball coupling securely engages and
locks in a vertical position:
R indicator lamp ;flashes
R the multifunction display shows the display
message Trailer coupling extend‐ Trailer coupling extend‐
ing...
ing....
The ball coupling swivels back into the out-of-
use position when:
R you drive off before the Trailer
Trailercoupling
coupling
extending...
extending... display message has disap-
peared from the multifunction display
R the ball coupling encounters an obstacle in
the swinging range 274
Towing a trailerDriving and parking