2015 MERCEDES-BENZ GLE SUV display
[x] Cancel search: displayPage 76 of 453
BAS PLUS provides braking assistance in haz-
ardous situations with vehicles in front within a
speed range between 7 km/h and 250 km/h.
At speeds of up to approximately 70 km/h, BAS
PLUS can react to:
R stationary objects in the path of your vehicle,
e.g. stopped or parked vehicles
R pedestrians in the path of your vehicle
R obstacles crossing your path, which move in
the detection range of the sensors and are
recognised by them
i If BAS PLUS demands particularly high brak-
ing force, preventative passenger protection
measures (PRE-SAFE ®
) are activated simulta-
neously (Y page 57).
X Keep the brake pedal depressed until the
emergency braking situation is over.
ABS prevents the wheels from locking.
BAS PLUS is deactivated and the brakes func-
tion as usual again if:
R you release the brake pedal
R there is no longer a risk of collision
R no obstacle is detected in front of your vehicle
R you depress the accelerator pedal
R you activate kickdown COLLISION PREVENTION ASSIST
PLUS
General notes i
Observe the "Important safety notes" sec-
tion (Y page 70).
COLLISION PREVENTION ASSIST PLUS consists of a distance warning function with an autono-
mous braking function and Adaptive Brake
Assist.
COLLISION PREVENTION ASSIST PLUS can help
you to minimise the risk of a collision with the
vehicle in front or reduce the effects of such a
collision.
If COLLISION PREVENTION ASSIST PLUS
detects that there is a risk of a collision, you will
be warned visually and acoustically. If you do not react to the visual and audible collision warning,autonomous braking can be initiated in critical
situations. If you apply the brake yourself in a
critical situation, the COLLISION PREVENTION
ASSIST PLUS Adaptive Brake Assist assists you. Important safety notes In particular, the detection of obstacles can be
impaired in the case of:
R dirt on the sensors or obscured sensors
R snow or heavy rain
R interference by other radar sources
R strong radar reflections, for example, in multi-
storey car parks
R a narrow vehicle travelling in front, e.g. a
motorcycle
R a vehicle travelling in front on a different line
R new vehicles or after a service on the COLLI-
SION PREVENTION ASSIST PLUS system
Please observe the information in the section on running-in the vehicle (Y page 157).
Following damage to the front end of the vehicle, have the configuration and operation of the
radar sensor checked at a qualified specialist
workshop. This also applies to collisions at slow speeds where there is no visible damage to thefront of the vehicle.
Activating/deactivating The COLLISION PREVENTION ASSIST PLUS is
automatically active after switching on the igni-
tion.
You can activate or deactivate COLLISION PRE-
VENTION ASSIST PLUS in the on-board com-
puter (Y page 291). When deactivated, the dis-
tance warning function and the autonomous
braking function are also deactivated.
If COLLISION PREVENTION ASSIST PLUS is
deactivated, the æsymbol appears in the
assistance graphics display.
Distance warning function General notes
The distance warning function can help you to
minimise the risk of a collision with the vehicle in
front or reduce the effects of such a collision. If the distance warning function detects that there
is a risk of a collision, you will be warned visually
and acoustically.
Important safety notes
i Observe the "Important safety notes" sec-
tion for driving safety systems (Y page 70). Driving safety systems
73Safety Z
Page 77 of 453
G
WARNING
The distance warning function does not react:
R to people or animals
R to oncoming vehicles
R to crossing traffic
R when cornering
Thus, the distance warning function cannot
provide a warning in all critical situations.
There is a risk of an accident.
Always pay careful attention to the traffic sit-
uation and be ready to brake. G
WARNING
The distance warning function cannot always
clearly identify objects and complex traffic
situations.
In such cases, the distance warning function
may:
R give an unnecessary warning
R not give a warning
There is a risk of an accident.
Always pay careful attention to the traffic sit-
uation; do not rely on the distance warning
function alone.
Function The distance warning function issues a warning at speeds:
R of approximately 30 km/h or more, if, over
several seconds, the distance maintained to
the vehicle travelling in front is insufficient.
The · distance warning lamp then lights
up in the instrument cluster.
R of approximately 7 km/h or more, if you rap-
idly approach a vehicle in front. An intermit-
tent warning tone will then sound and the
· distance warning lamp will light up in the
instrument cluster.
X Brake immediately in order to increase the
distance from the vehicle in front.
or
X Take evasive action provided it is safe to do
so.
Due to the nature of the system, particularly
complicated but non-critical driving conditions
may also cause the system to display a warning. With the help of the radar sensor system, the
distance warning function can detect obstacles
that are in the path of your vehicle for an exten-
ded period of time.
Up to a speed of approximately 70 km/h, the
distance warning function can also react to sta-
tionary obstacles, such as stopped or parked
vehicles.
Autonomous braking function If the driver does not react to the distance warn-
ing signal in a critical situation, COLLISION PRE- VENTION ASSIST PLUS can assist with the
autonomous braking function.
The autonomous braking function:
R gives the driver more time to react to critical
driving situations
R can help the driver to avoid an accident or
R reduces the effects of an accident
Vehicles without DISTRONIC PLUS: the
autonomous braking function is available in the
following speed ranges:
R 7 - 105 km/h for moving objects
R 7 - 50 km/h for stationary objects
Vehicles with DISTRONIC PLUS: the autono-
mous braking function is available in the follow-
ing speed ranges:
R 7 - 200 km/h for moving objects
R 7 - 50 km/h for stationary objects
Due to the nature of the system, complicated
but non-critical driving situations may also
cause the autonomous braking function to inter- vene.
If the autonomous braking function demands
particularly high braking force, preventative
passenger protection measures (PRE-SAFE ®
)
are activated simultaneously (Y page 57).
Adaptive Brake Assist General notes
i Observe the "Important safety notes" sec-
tion (Y page 70).
With the help of Adaptive Brake Assist, the dis-
tance warning signal can detect obstacles that
are in the path of your vehicle for an extended
period of time.
If Adaptive Brake Assist detects a risk of a col-
lision with the vehicle in front, it calculates the 74
Driving safety systemsSafety
Page 79 of 453
ESP
®
monitors driving stability and traction, i.e.
power transmission between the tyres and the
road surface.
If ESP ®
detects that the vehicle is deviating from
the direction desired by the driver, one or more
wheels are braked to stabilise the vehicle. The
engine output is also modified to keep the vehi- cle on the desired course within physical limits.
ESP ®
assists the driver when pulling away on
wet or slippery roads. ESP ®
can also stabilise
the vehicle during braking.
ETS/4ETS (Electronic Traction System) ETS traction control is part of ESP
®
. On vehicles
with 4MATIC, 4ETS is a component of ESP ®
.
Traction control brakes the drive wheels indi-
vidually if they spin. This enables you to pull
away and accelerate on slippery surfaces, for
example if the road surface is slippery on one
side. In addition, more drive torque is transfer-
red to the wheel or wheels with traction.
Traction control remains active if you deactivate
ESP ®
.
In appropriate driving situations, activate the
off-road programs:
X Vehicles without the Off-Road Engineering
package (Y page 254)
X Vehicles with the Off-Road Engineering pack-
age (Y page 254)
Off-road 4ETS (Electronic Traction Sys-
tem) An ETS system specifically suited to off-road
terrain is activated automatically once an off-
road program is activated:
R Vehicles without the Off-Road Engineering
package (Y page 254)
R Vehicles with the Off-Road Engineering pack-
age (Y page 254)
Important safety notes G
WARNING
If ESP ®
is malfunctioning, ESP ®
is unable to
stabilise the vehicle. In addition, other driving
safety systems are switched off. This increa-
ses the risk of skidding and an accident. Drive on carefully. Have ESP
®
checked at a
qualified specialist workshop.
! Only operate the vehicle for a maximum of
ten seconds on a brake dynamometer. Switch
off the ignition.
Application of the brakes by ESP ®
may oth-
erwise destroy the brake system.
! A function or performance test should only
be carried out on a twin-axle dynamometer.
Before you operate the vehicle on such a
dynamometer, please consult a qualified
workshop. You could otherwise damage the
drive train or the brake system.
When ESP ®
is deactivated, the åESP®
OFF
warning lamp lights up continuously.
If the ÷ warning lamp and the åwarning
lamp are lit continuously, ESP ®
is not available
due to a malfunction.
Observe the information on warning lamps
(Y page 343) and display messages which may
be shown in the instrument cluster
(Y page 301).
i Only use wheels with the recommended tyre
sizes. Only then will ESP ®
function properly.
Characteristics of ESP ® General notes
If the ÷ ESP warning lamp goes out before
beginning the journey, ESP ®
is automatically
active.
If ESP ®
intervenes, the ÷ESP®
warning lamp
flashes in the instrument cluster.
If ESP ®
intervenes:
X Do not deactivate ESP ®
under any circum-
stances.
X When pulling away, only depress the acceler-
ator pedal as far as is necessary.
X Adapt your driving style to suit the prevailing
road and weather conditions.
ECO start/stop function
The ECO start/stop function switches the
engine off automatically if the vehicle stops
moving. When pulling away again, the engine
starts automatically. ESP ®
remains in its previ-
ously selected status. Example:if ESP®
was
deactivated before the engine was switched off, 76
Driving safety systemsSafety
Page 81 of 453
slows the vehicle down by braking and limiting
the engine output until the vehicle/trailer com- bination has stabilised.
Important safety notes G
WARNING
If road and weather conditions are poor,
trailer stabilisation will not be able to prevent the vehicle/trailer combination from swerv-
ing. Trailers with a high centre of gravity can
tip over before ESP ®
can detect this. There is
a risk of an accident.
Always adapt your driving style to the prevail-
ing road and weather conditions.
If your vehicle/trailer combination begins to
lurch, you can only stabilise the vehicle/trailer
combination by depressing the brake firmly.
Trailer stabilisation is active above speeds of
about 60 km/h.
ESP ®
trailer stabilisation does not work if ESP ®
is deactivated or disabled because of a malfunc- tion.
Crosswind Assist General notes
Strong crosswind gusts can impair the road-
holding of your vehicle when driving straight
ahead. The crosswind driving assistance func-
tion integrated in ESP ®
noticeably reduces
these impairments.
Depending on the direction and intensity of the
side wind, ESP ®
is activated automatically.
ESP ®
intervenes with stabilising braking to
assist you in keeping the vehicle in the lane.
Crosswind Assist is active at vehicle speeds
above 80 km/h when driving straight ahead or
cornering gently.
Important safety notes Crosswind Assist does not work if ESP ®
is deac-
tivated or disabled because of a malfunction. EBD (electronic brake force distribu-
tion)
General notes EBD monitors and controls the brake pressure
on the rear wheels to improve driving stability
while braking.
Important safety notes i
Observe the "Important safety notes" sec-
tion for driving safety systems (Y page 70). G
WARNING
If EBD is malfunctioning, the rear wheels can
lock, e.g. under full braking. This increases the risk of skidding and an accident.
You should therefore adapt your driving style
to the different handling characteristics. Have the brake system checked at a qualified spe-
cialist workshop.
Observe information regarding indicator and
warning lamps (Y page 341) as well as display
messages (Y page 303). ADAPTIVE BRAKE
ADAPTIVE BRAKE enhances braking safety and
offers increased braking comfort. In addition to
the braking function, ADAPTIVE BRAKE also has the HOLD function (Y page 219) and hill start
assist (Y page 161). PRE-SAFE
®
Brake
General notes PRE-SAFE
®
Brake can help you to minimise the
risk of a collision with a vehicle ahead or a
pedestrian, and reduce the effects of such a
collision. If PRE-SAFE ®
Brake has detected a risk
of a collision, you will be warned visually and
acoustically as well as by automatic braking.
i Pay attention to the important safety notes
in the "Driving safety systems" section
(Y page 70).
PRE‑SAFE ®
Brake is only available in vehicles
with the Driving Assistance Plus package. 78
Driving safety systemsSafety
Page 110 of 453
Useful information
i This Owner's Manual describes all models,
series and optional equipment for your vehi-
cle that were available at the time of going to
press. National variations are possible. Note
that your vehicle may not be equipped with all
of the functions described. This is also the
case for systems and functions relevant to
safety.
i Read the information on qualified specialist
workshops: (Y page 28). Correct driver's seat position
G
WARNING
You could lose control of the vehicle while
driving if you:
R adjust the driver's seat, steering wheel or
mirrors
R fasten the seat belt
There is a risk of an accident.
Adjust the driver's seat, head restraint, steer-
ing wheel and mirrors and fasten your seat
belt before starting the engine. X
Observe the safety guidelines on seat adjust-
ment (Y page 108).
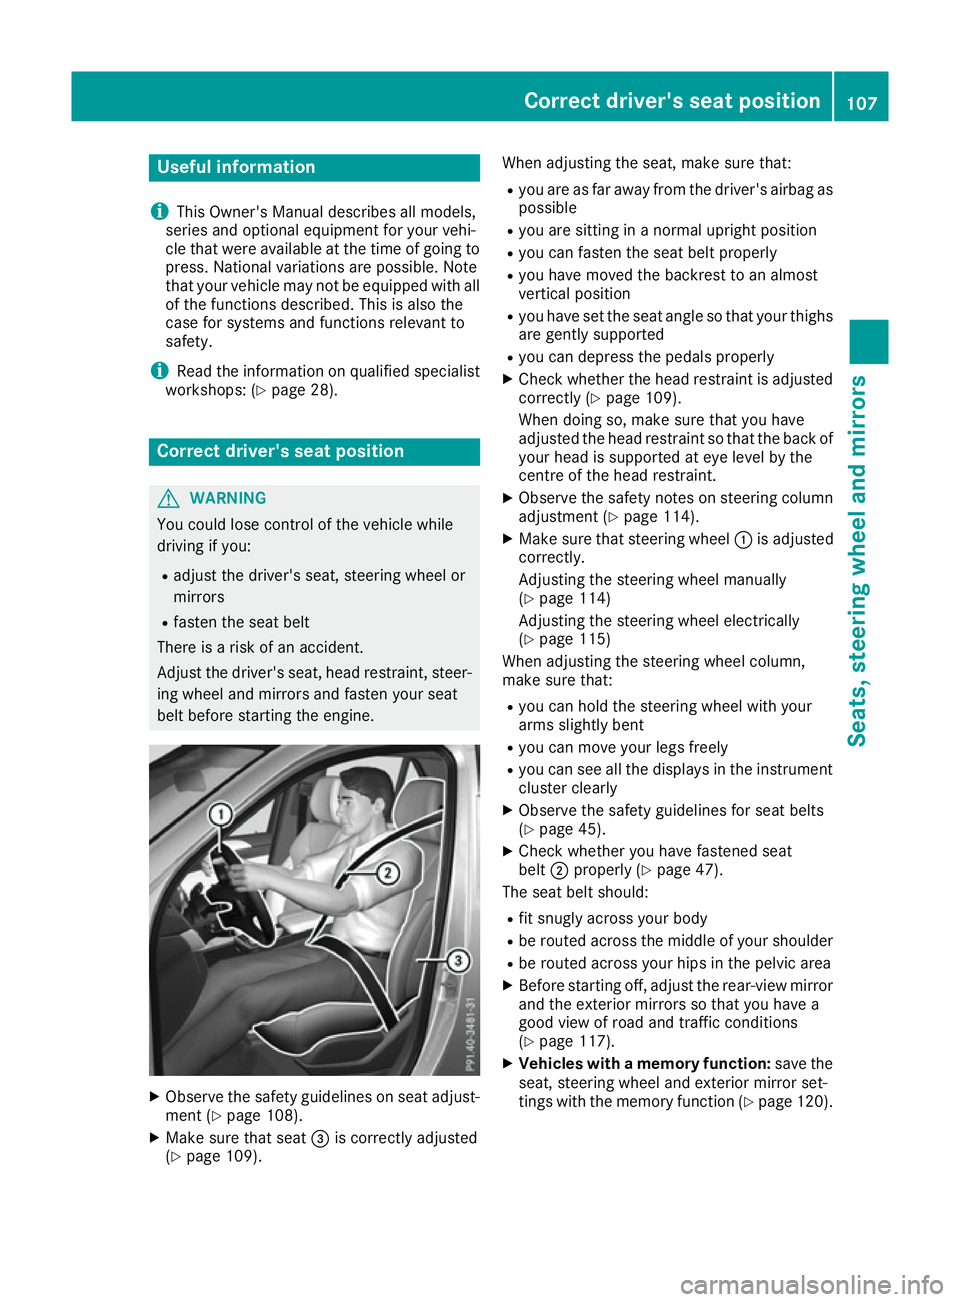
X Make sure that seat =is correctly adjusted
(Y page 109). When adjusting the seat, make sure that:
R you are as far away from the driver's airbag as
possible
R you are sitting in a normal upright position
R you can fasten the seat belt properly
R you have moved the backrest to an almost
vertical position
R you have set the seat angle so that your thighs
are gently supported
R you can depress the pedals properly
X Check whether the head restraint is adjusted
correctly (Y page 109).
When doing so, make sure that you have
adjusted the head restraint so that the back of
your head is supported at eye level by the
centre of the head restraint.
X Observe the safety notes on steering column
adjustment (Y page 114).
X Make sure that steering wheel :is adjusted
correctly.
Adjusting the steering wheel manually
(Y page 114)
Adjusting the steering wheel electrically
(Y page 115)
When adjusting the steering wheel column,
make sure that:
R you can hold the steering wheel with your
arms slightly bent
R you can move your legs freely
R you can see all the displays in the instrument
cluster clearly
X Observe the safety guidelines for seat belts
(Y page 45).
X Check whether you have fastened seat
belt ;properly (Y page 47).
The seat belt should:
R fit snugly across your body
R be routed across the middle of your shoulder
R be routed across your hips in the pelvic area
X Before starting off, adjust the rear-view mirror
and the exterior mirrors so that you have a
good view of road and traffic conditions
(Y page 117).
X Vehicles with a memory function: save the
seat, steering wheel and exterior mirror set-
tings with the memory function (Y page 120). Correct driver's seat position
107Seats, steering wheel and mirrors Z
Page 129 of 453
Adaptive Highbeam Assist Plus
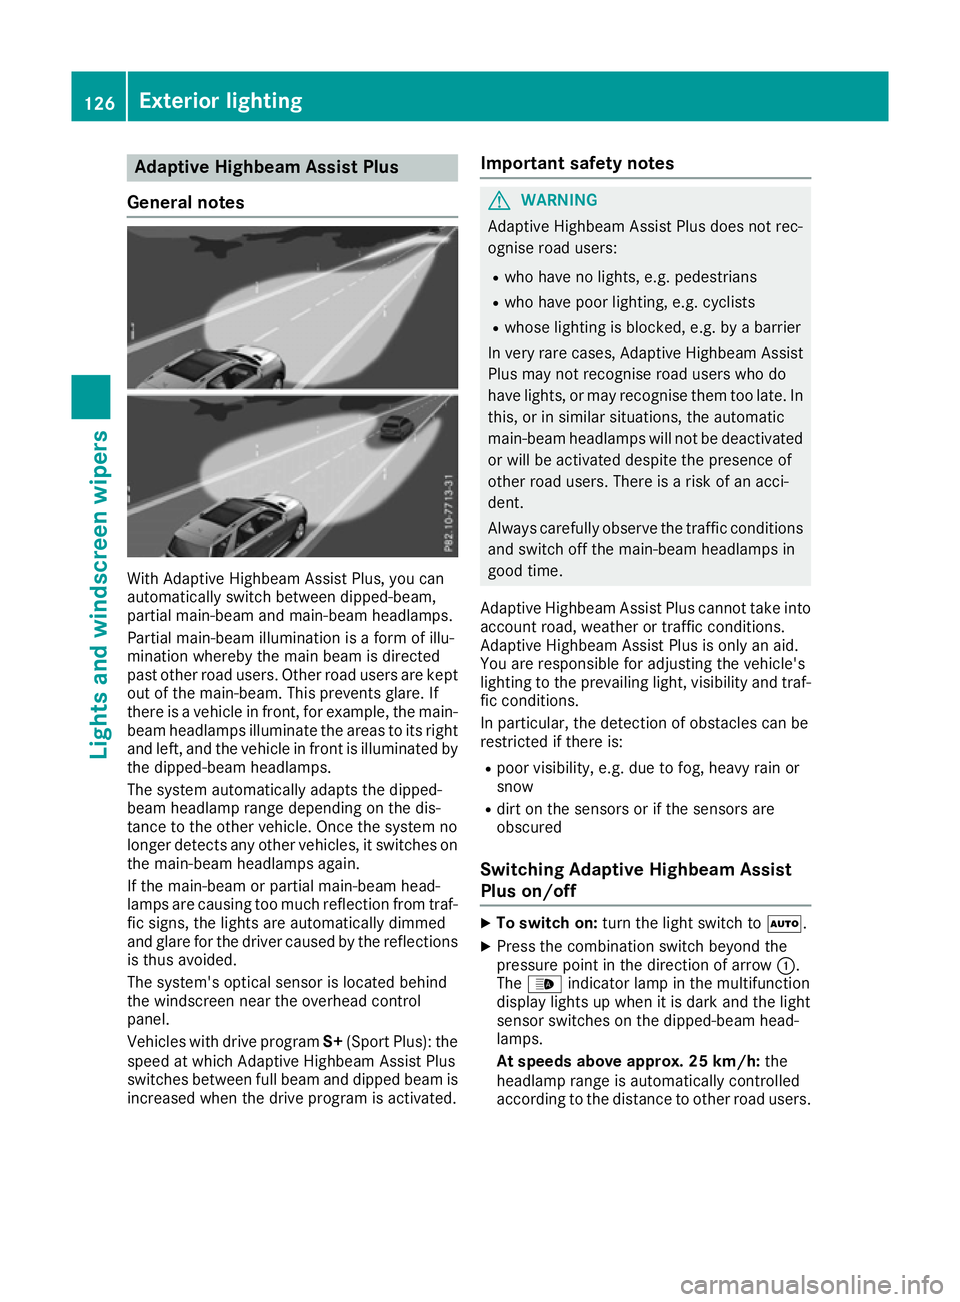
General notes With Adaptive Highbeam Assist Plus, you can
automatically switch between dipped-beam,
partial main-beam and main-beam headlamps.
Partial main-beam illumination is a form of illu-
mination whereby the main beam is directed
past other road users. Other road users are kept
out of the main-beam. This prevents glare. If
there is a vehicle in front, for example, the main- beam headlamps illuminate the areas to its right
and left, and the vehicle in front is illuminated by
the dipped-beam headlamps.
The system automatically adapts the dipped-
beam headlamp range depending on the dis-
tance to the other vehicle. Once the system no
longer detects any other vehicles, it switches on the main-beam headlamps again.
If the main-beam or partial main-beam head-
lamps are causing too much reflection from traf-fic signs, the lights are automatically dimmed
and glare for the driver caused by the reflections
is thus avoided.
The system's optical sensor is located behind
the windscreen near the overhead control
panel.
Vehicles with drive program S+(Sport Plus): the
speed at which Adaptive Highbeam Assist Plus
switches between full beam and dipped beam is
increased when the drive program is activated. Important safety notes G
WARNING
Adaptive Highbeam Assist Plus does not rec-
ognise road users:
R who have no lights, e.g. pedestrians
R who have poor lighting, e.g. cyclists
R whose lighting is blocked, e.g. by a barrier
In very rare cases, Adaptive Highbeam Assist
Plus may not recognise road users who do
have lights, or may recognise them too late. In this, or in similar situations, the automatic
main-beam headlamps will not be deactivated
or will be activated despite the presence of
other road users. There is a risk of an acci-
dent.
Always carefully observe the traffic conditions and switch off the main-beam headlamps in
good time.
Adaptive Highbeam Assist Plus cannot take into
account road, weather or traffic conditions.
Adaptive Highbeam Assist Plus is only an aid.
You are responsible for adjusting the vehicle's
lighting to the prevailing light, visibility and traf-
fic conditions.
In particular, the detection of obstacles can be
restricted if there is:
R poor visibility, e.g. due to fog, heavy rain or
snow
R dirt on the sensors or if the sensors are
obscured
Switching Adaptive Highbeam Assist
Plus on/off X
To switch on: turn the light switch to Ã.
X Press the combination switch beyond the
pressure point in the direction of arrow :.
The _ indicator lamp in the multifunction
display lights up when it is dark and the light
sensor switches on the dipped-beam head-
lamps.
At speeds above approx. 25 km/h: the
headlamp range is automatically controlled
according to the distance to other road users. 126
Exterior lightingLights and windscreen wipers
Page 130 of 453
At speeds above approx. 30 km/h:
R If no other road users are detected, the
main-beam headlamps are automatically
switched on.
R If other road users are detected, the partial
main-beam headlamps are automatically
switched on.
The K indicator lamp in the instrument
cluster also lights up.
At speeds below approx. 25 km/h or
when there is sufficient street lighting:
R The partial main-beam headlamps are
switched off automatically.
R The main-beam headlamps are switched off
automatically.
The K indicator lamp in the instrument
cluster goes out. The _indicator lamp in
the multifunction display remains lit.
X To switch off: move the combination switch
back to its normal position or move the light
switch to another position.
The _ indicator lamp in the multifunction
display goes out. Headlamps misted up on the inside
Under certain climatic and physical conditions,
moisture may form in the headlamp. This mois-
ture will not impair the function of the headlamp. Interior lighting
Overview of interior lighting
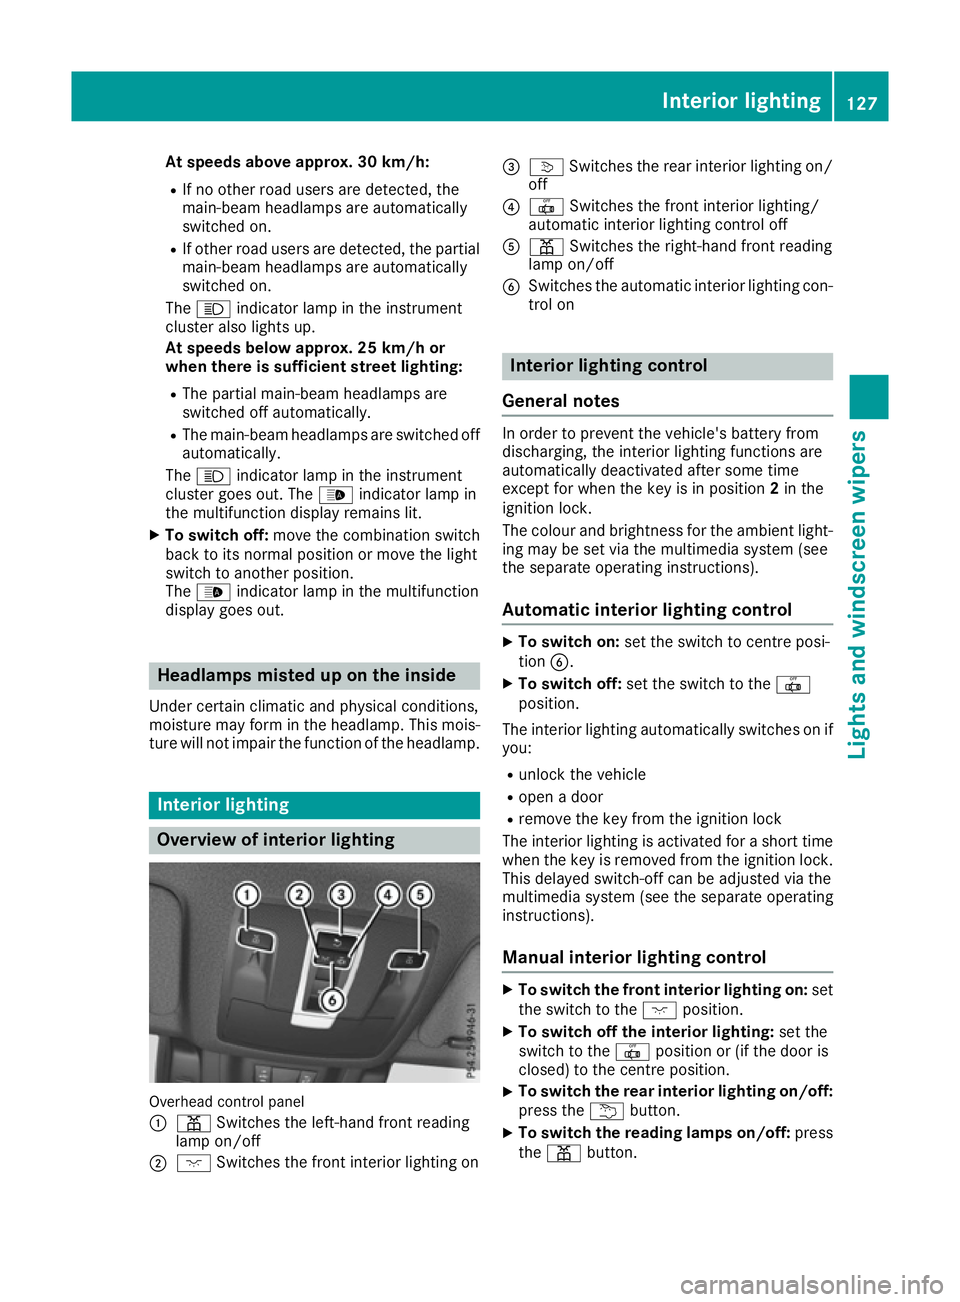
Overhead control panel
: p Switches the left-hand front reading
lamp on/off
; c Switches the front interior lighting on =
v Switches the rear interior lighting on/
off
? | Switches the front interior lighting/
automatic interior lighting control off
A p Switches the right-hand front reading
lamp on/off
B Switches the automatic interior lighting con-
trol on Interior lighting control
General notes In order to prevent the vehicle's battery from
discharging, the interior lighting functions are
automatically deactivated after some time
except for when the key is in position
2in the
ignition lock.
The colour and brightness for the ambient light-
ing may be set via the multimedia system (see
the separate operating instructions).
Automatic interior lighting control X
To switch on: set the switch to centre posi-
tion B.
X To switch off: set the switch to the |
position.
The interior lighting automatically switches on if you:
R unlock the vehicle
R open a door
R remove the key from the ignition lock
The interior lighting is activated for a short time
when the key is removed from the ignition lock.
This delayed switch-off can be adjusted via the
multimedia system (see the separate operating
instructions).
Manual interior lighting control X
To switch the front interior lighting on: set
the switch to the cposition.
X To switch off the interior lighting: set the
switch to the |position or (if the door is
closed) to the centre position.
X To switch the rear interior lighting on/off:
press the ubutton.
X To switch the reading lamps on/off: press
the p button. Interior lighting
127Lights and windscreen wipers Z
Page 140 of 453

A
To direct the airflow through the footwell vents
B To switch the seat heating on the left-hand side on/off Information on using THERMATIC
automatic climate control
The following contains notes and recommenda-
tions on optimum use of THERMATIC automatic climate control.
R Activate climate control using the Ãand
Á buttons. The indicator lamps in the
à andÁ buttons light up.
R Set the temperature to 22 †.
R Only use the "Windscreen demisting" function
briefly until the windscreen is clear again.
R Only use air-recirculation mode briefly, e.g. if
there are unpleasant outside odours or when
in a tunnel. The windows could otherwise mist
up as no fresh air is drawn into the vehicle in air-recirculation mode.
R Use the ZONE function to adopt the temper-
ature settings on the driver's side for the
front-passenger side as well. The indicator
lamp above the ábutton goes out.
R If you change the settings of the climate con-
trol system, the climate status display
appears for approximately three seconds at
the bottom of the screen in the multimedia
system display. You will see the current set-
tings of the various climate control functions.
During automatic engine switch-off, the climate
control only operates at a reduced capacity. If
you require the full climate control output, you
can switch off the ECO start/stop function by
pressing the ECO button (Y page 163). Overview of climate control systems
137Climate control