2015 MERCEDES-BENZ GLE SUV tow
[x] Cancel search: towPage 85 of 453
Tow-away protection
Function An audible and visual alarm is triggered if your
vehicle's angle of inclination is altered while
tow-away protection is primed. This can occur if
the vehicle is jacked up on one side, for exam-
ple.
Priming X
Make sure that:
R the doors are closed
R the tailgate is closed
Only then is tow-away protection primed.
X Lock the vehicle with the key or KEYLESS-GO.
Tow-away protection is primed after approx-
imately 60 second s.
Switching off X
Unlo ck the vehicle with the key or KEYLESS-
GO.
or X Insert the key into the ignition lock.
Tow-away protection is switched off automat-
ically.
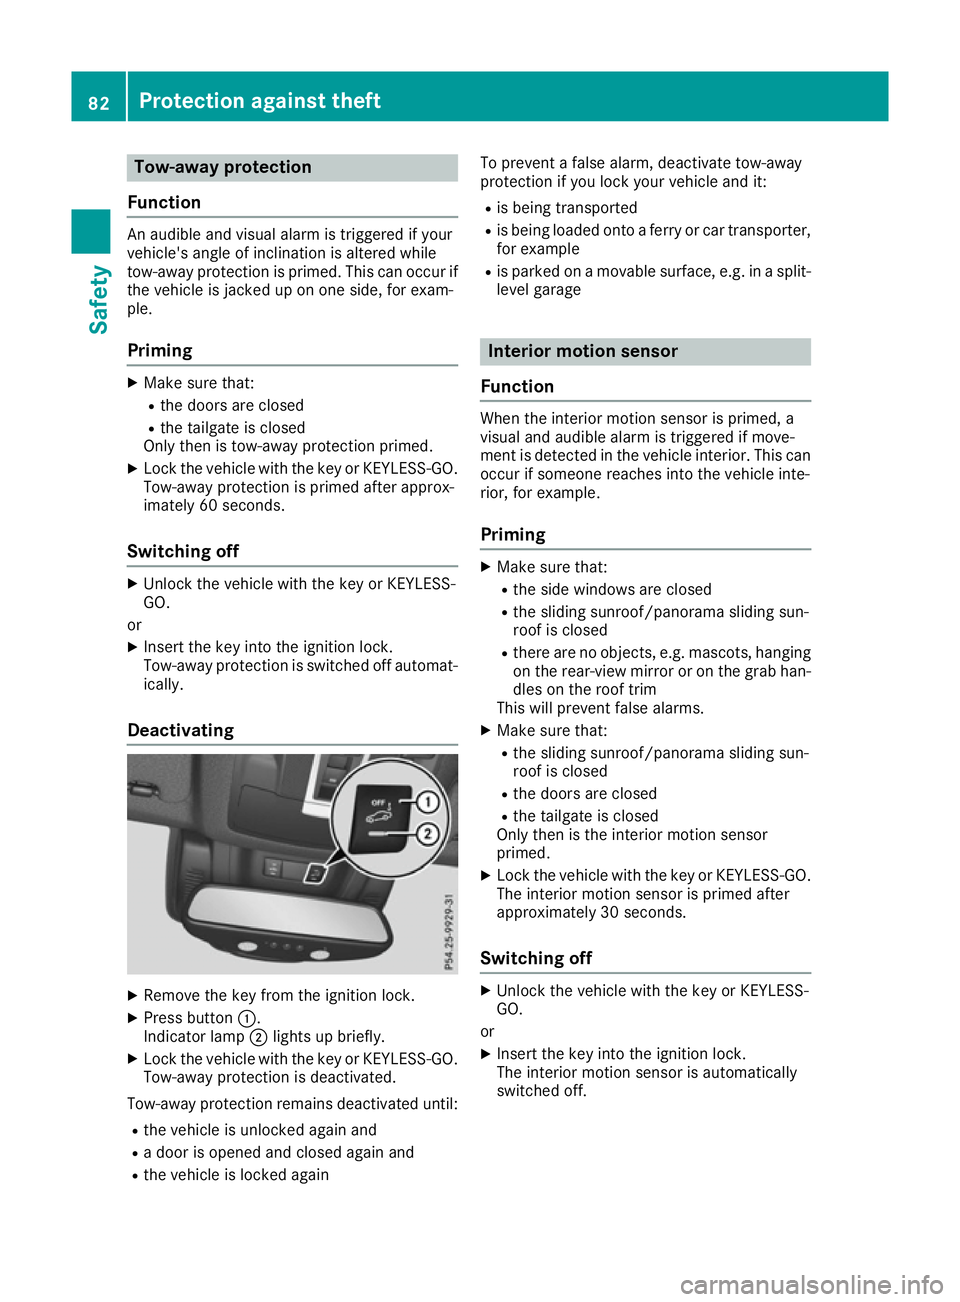
Deactivating X
Remove the key from the ignition lock.
X Press button :.
Indicator lamp ;lights up briefly.
X Lock the vehicle with the key or KEYLESS-GO.
Tow-away protection is deactivated.
Tow-away protection remains deactivated until:
R the vehicle is unlocked again and
R a door is opened and closed again and
R the vehicle is locked again To prevent a false alarm, deactivate tow-away
protection if you lock your vehicle and it:
R is being transported
R is being loaded onto a ferry or car transporter,
for example
R is parked on a movable surface, e.g. in a split-
level garage Interior motion sensor
Function When the interior motion sensor is primed, a
visual and audible alarm is triggered if move-
ment is detected in the vehicle interior. This can
occur if someone reaches into the vehicle inte-
rior, for example.
Priming X
Make sure that:
R the side windows are closed
R the sliding sunroof/panorama sliding sun-
roof is closed
R there are no objects, e.g. mascots, hanging
on the rear-view mirror or on the grab han-dles on the roof trim
This will prevent false alarms.
X Make sure that:
R the sliding sunroof/panorama sliding sun-
roof is closed
R the doors are closed
R the tailgate is closed
Only then is the interior motion sensor
primed.
X Lock the vehicle with the key or KEYLESS-GO.
The interior motion sensor is primed after
approximately 30 seconds.
Switching off X
Unlock the vehicle with the key or KEYLESS-
GO.
or X Insert the key into the ignition lock.
The interior motion sensor is automatically
switched off. 82
Protection against theftSafety
Page 95 of 453
You cannot unlock the vehicle centrally from the
inside if the vehicle has been locked from the
outside.
For all countries except the United Kingdom:
you can open a door from inside the vehicle evenif it has been locked.
Only for the United Kingdom: if the vehicle
has been locked with the key from the outside,
the double lock function is activated as stand-
ard. It is then not possible to open the doors
from inside the vehicle. You can deactivate the
double lock function by deactivating the interior
motion sensor (Y page 82). The doors can then
be opened from the inside after the vehicle has been locked from the outside.
For all countries: when a locked door is opened
from inside the vehicle, the previous unlocking
process will be observed if the vehicle has been:
R locked with the locking button for the central
locking or
R locked automatically
The vehicle will be fully unlocked if it had previ-
ously been fully unlocked. Only the door which
has been opened from the inside is unlocked if
only the driver's door had been previously
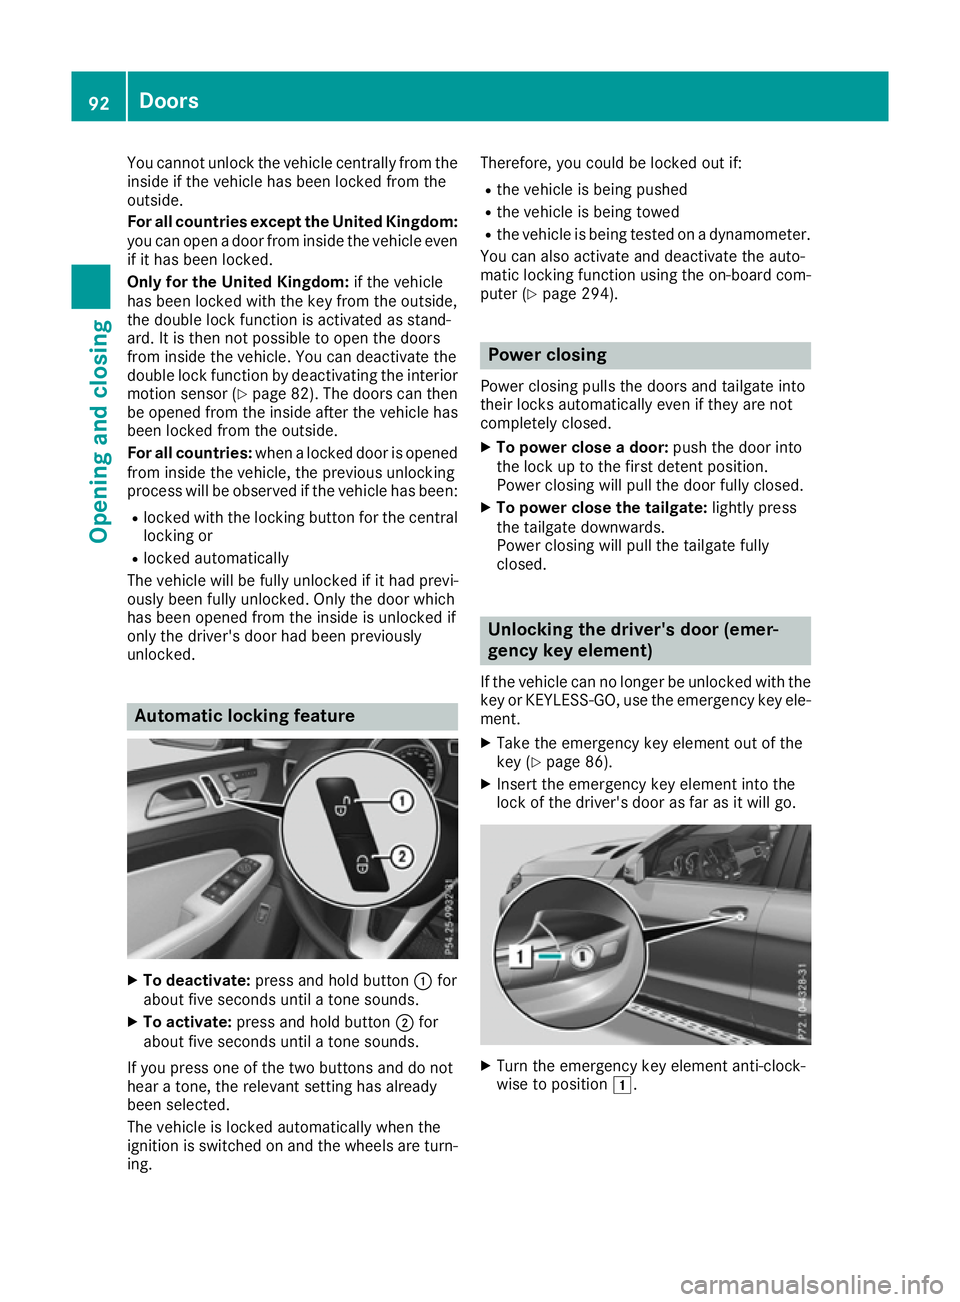
unlocked. Automatic locking feature
X
To deactivate: press and hold button :for
about five seconds until a tone sounds.
X To activate: press and hold button ;for
about five seconds until a tone sounds.
If you press one of the two buttons and do not
hear a tone, the relevant setting has already
been selected.
The vehicle is locked automatically when the
ignition is switched on and the wheels are turn-
ing. Therefore, you could be locked out if:
R the vehicle is being pushed
R the vehicle is being towed
R the vehicle is being tested on a dynamometer.
You can also activate and deactivate the auto-
matic locking function using the on-board com- puter (Y page 294). Power closing
Power closing pulls the doors and tailgate into
their locks automatically even if they are not
completely closed.
X To power close a door: push the door into
the lock up to the first detent position.
Power closing will pull the door fully closed.
X To power close the tailgate: lightly press
the tailgate downwards.
Power closing will pull the tailgate fully
closed. Unlocking the driver's door (emer-
gency key element)
If the vehicle can no longer be unlocked with the key or KEYLESS-GO, use the emergency key ele-ment.
X Take the emergency key element out of the
key (Y page 86).
X Insert the emergency key element into the
lock of the driver's door as far as it will go. X
Turn the emergency key element anti-clock-
wise to position 1.92
DoorsOpening and closing
Page 96 of 453
On right-hand-drive vehicles, turn the emer-
gency key element clockwise.
The door is unlocked.
X Turn the emergency key element back and
remove it.
X Insert the emergency key element into the
key (Y page 87).
If you use the emergency key element to unlock
and open the driver's door, the anti-theft alarm
system will be triggered. Switch off the alarm
(Y page 81). Locking the vehicle (emergency key
element)
If the vehicle can no longer be locked with the
key or KEYLESS-GO, use the emergency key ele- ment.
X Open the driver's door.
X Close the front-passenger door, the rear
doors and the tailgate.
X Press the locking button (Y page 91).
X Check whether the locking knobs on the
front-passenger door and the rear doors are
still visible. Press the locking knobs down by
hand if necessary.
X Close the driver's door.
X Take the emergency key element out of the
key (Y page 87).
X Insert the emergency key element into the
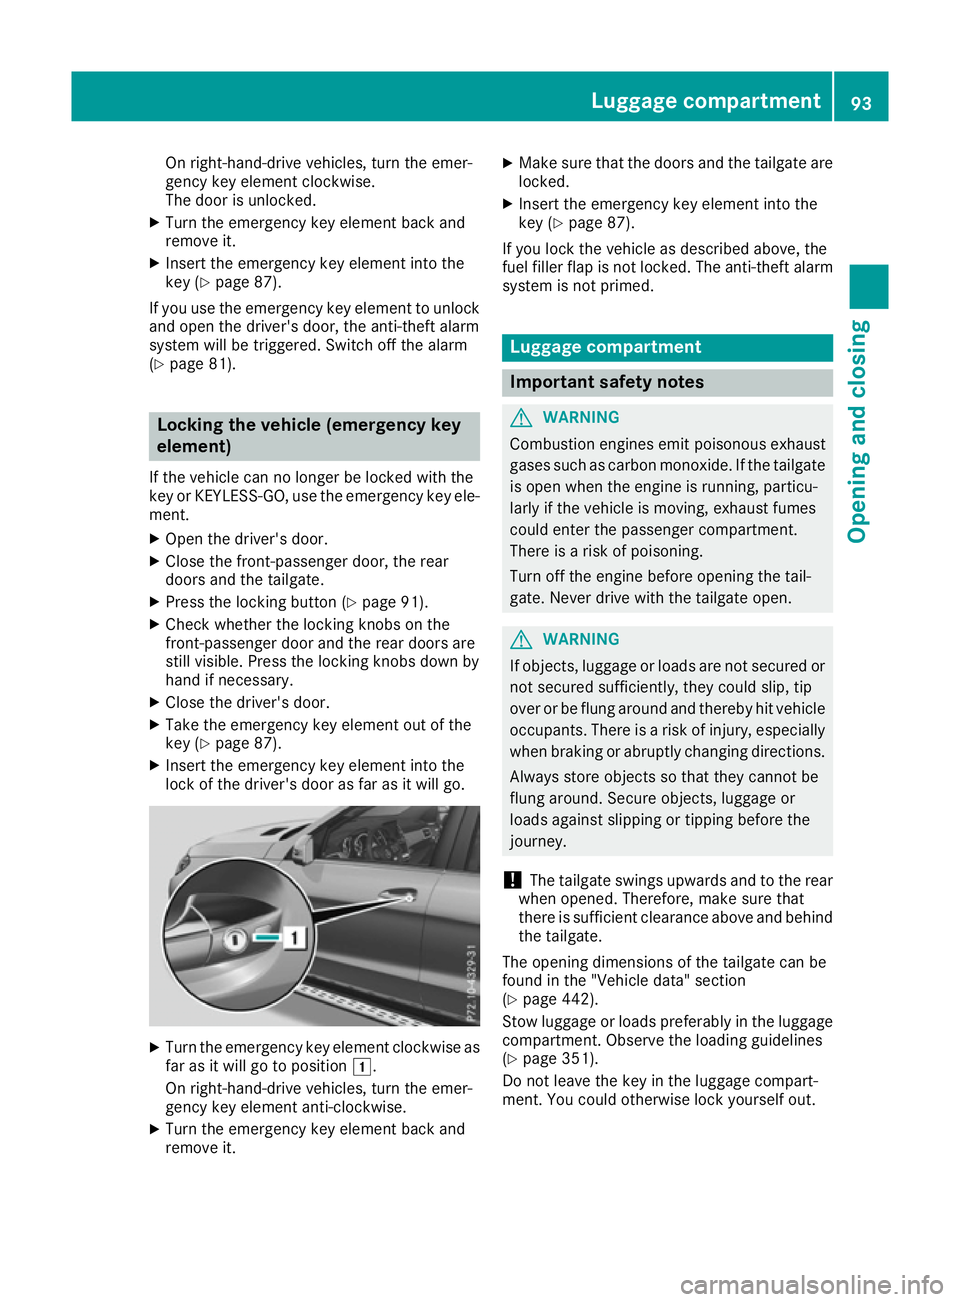
lock of the driver's door as far as it will go. X
Turn the emergency key element clockwise as
far as it will go to position 1.
On right-hand-drive vehicles, turn the emer-
gency key element anti-clockwise.
X Turn the emergency key element back and
remove it. X
Make sure that the doors and the tailgate are
locked.
X Insert the emergency key element into the
key (Y page 87).
If you lock the vehicle as described above, the
fuel filler flap is not locked. The anti-theft alarm
system is not primed. Luggage compartment
Important safety notes
G
WARNING
Combustion engines emit poisonous exhaust
gases such as carbon monoxide. If the tailgate is open when the engine is running, particu-
larly if the vehicle is moving, exhaust fumes
could enter the passenger compartment.
There is a risk of poisoning.
Turn off the engine before opening the tail-
gate. Never drive with the tailgate open. G
WARNING
If objects, luggage or loads are not secured or not secured sufficiently, they could slip, tip
over or be flung around and thereby hit vehicle
occupants. There is a risk of injury, especially when braking or abruptly changing directions.
Always store objects so that they cannot be
flung around. Secure objects, luggage or
loads against slipping or tipping before the
journey.
! The tailgate swings upwards and to the rear
when opened. Therefore, make sure that
there is sufficient clearance above and behind
the tailgate.
The opening dimensions of the tailgate can be
found in the "Vehicle data" section
(Y page 442).
Stow luggage or loads preferably in the luggage
compartment. Observe the loading guidelines
(Y page 351).
Do not leave the key in the luggage compart-
ment. You could otherwise lock yourself out. Luggage compartment
93Opening and closing Z
Page 160 of 453
Useful information
i This Owner's Manual describes all models,
series and optional equipment for your vehi-
cle that were available at the time of going to
press. National variations are possible. Note
that your vehicle may not be equipped with all
of the functions described. This is also the
case for systems and functions relevant to
safety.
i Read the information on qualified specialist
workshops: (Y page 28). Running-in notes
Important safety notes
In certain driving and driving safety systems, the
sensors adjust automatically while a certain dis- tance is being driven after the vehicle has beendelivered or after repairs. Full system effective-
ness is not reached until the end of this teach-in process.
Brake pads/linings and discs that are either new
or have been replaced only achieve optimum
braking effect after several hundred kilometres
of driving. Compensate for the reduced braking
effect by applying greater force to the brake
pedal. The first 1,500 km
If you treat the engine with sufficient care from
the very start, you will be rewarded with excel-
lent performance for the remainder of the
engine's life.
R Drive at varying vehicle speeds and engine
speeds for the first 1500 km.
R Avoid overstraining the vehicle during this
period, e.g. driving at full throttle.
R Change gear in good time, before the rev
counter needle is Ôof the way to the red area
of the rev counter.
R Do not shift down a gear manually in order to
brake.
R Try to avoid depressing the accelerator pedal
beyond the point of resistance (kickdown). Additional notes on running in Mercedes-AMG
vehicles:
R For the first 1,500 km do not drive at speeds
above 140 km/ h.
R Only allow the engine to reach a maximum
engine speed of 4,500 rpm briefly.
R Ideally, for the first 1,500 km, drive in the
Comfort drive program.
After 1,500 km, you may gradually accelerate
the vehicle to full road and engine speeds.
You should also observe these notes on running-
in if the engine or parts of the drive train on your vehicle have been replaced.
Always observe the maximum permissible
speed. Driving
Important safety notes
G
WARNING
Objects in the driver's footwell may restrict
the clearance around the pedals or block a
depressed pedal. This jeopardises the oper-
ating and road safety of the vehicle. There is a risk of an accident.
Stow all objects securely in the vehicle so that
they do not get into the driver's footwell.
Always fit the floormats securely and as pre-
scribed in order to ensure that there is always sufficient room for the pedals. Do not use
loose floormats and do not place several floor- mats on top of one another. G
WARNING
Unsuitable footwear can hinder correct usage of the pedals, e.g.:
R shoes with thick soles
R shoes with high heels
R slippers
There is a risk of an accident.
Wear suitable footwear to ensure correct
usage of the pedals. Driving
157Driving and parking Z
Page 172 of 453
X
If the transmission is in position Dor N: push
the DIRECT SELECT lever up past the first
point of resistance.
X If the transmission is in position P: depress
the brake pedal and push the DIRECT SELECT lever up past the first point of resistance.
Shifting to neutral N G
WARNING
If children are left unsupervised in the vehicle, they can:
R open doors and endanger other persons or
road users
R climb out and be injured by the traffic
R operate vehicle equipment and, for exam-
ple, trap themselves.
Children could also set the vehicle in motion, for example by:
R releasing the parking brake
R shifting the automatic transmission out of
park position P
R starting the engine.
There is a risk of an accident and injury.
When leaving the vehicle, always take the key
with you and lock the vehicle. Never leave
children unattended in the vehicle. Always
keep the key out of reach of children.
X If the transmission is in position Dor R: push
the DIRECT SELECT lever up or down to the
first point of resistance.
X If the transmission is in position P: depress
the brake pedal and push the DIRECT SELECT
lever up or down to the first point of resist-
ance.
If you switch the engine off with the transmis-
sion in position Ror D, the automatic transmis-
sion shifts to Nautomatically.
With the key: if you then open the driver's door
or the front-passenger door or remove the key
from the ignition, the automatic transmission
shifts to Pautomatically.
With the Start/Stop button: if you then open
the driver's door or the front-passenger door,
the automatic transmission shifts to Pautomat-
ically. If you want the automatic transmission to
remain in neutral
N, e.g. when having the vehicle
cleaned in an automatic car wash with a towing
system:
With the key:
X Switch the ignition on.
X Depress the brake pedal and keep it
depressed.
X Shift to neutral N.
X Release the brake pedal.
X Release the electric parking brake.
X Switch off the ignition and leave the key in the
ignition lock.
With the Start/Stop button: X Remove the Start/Stop button from the igni-
tion lock.
X Insert the key into the ignition lock.
X Switch the ignition on.
X Depress the brake pedal and keep it
depressed.
X Shift to neutral N.
X Release the brake pedal.
X Release the electric parking brake.
X Switch off the ignition and leave the key in the
ignition lock.
Engaging drive position D X
If the transmission is in position Ror N: push
the DIRECT SELECT lever down past the first
point of resistance.
X If the transmission is in position P: depress
the brake pedal and push the DIRECT SELECT lever down past the first point of resistance. Automatic transmission
169Driving and parking Z
Page 173 of 453
Transmission positions
B Park position
This prevents the vehicle from rolling away when stopped. Only shift the
transmission into position Pwhen
the vehicle is stationary
(Y page 225).
Park position Pis automatically
engaged if:
R you switch off the engine using the
key and remove the key
R you switch off the engine using the
key or using the Start/Stop button
and open the driver's door or front- passenger door
R you open the driver's door when
the vehicle is stationary or driving
at very low speed and the trans-
mission is in position Dor R C Reverse gear
Only shift the transmission into posi- tion Rwhen the vehicle is stationary. A Neutral
Do not shift the transmission to N
while driving. Otherwise, the auto-
matic transmission could be dam-
aged.
No power is transmitted from the
engine to the drive wheels.
Releasing the brakes will allow you to
move the vehicle freely, e.g. to push
it or tow it.
If ESP ®
is deactivated or faulty: shift
the transmission to position Nif the
vehicle is in danger of skidding, e.g.
on icy roads.
If you switch the engine off with the
transmission in position Ror D, the
automatic transmission shifts to N
automatically.
! Rolling in neutral
Ncan lead to
damage to the transmission. 7 Drive
The automatic transmission changes gear automatically. All forward gears
are available. Driving tips
Changing gear The automatic transmission shifts to the indi-
vidual gears automatically when it is in trans-
mission position
D. Gearshifting is determined
by:
R the selected drive program
R the position of the accelerator pedal
R the road speed
Accelerator pedal position Your style of driving influences how the auto-
matic transmission shifts gear:
R little throttle: early upshifts
R more throttle: late upshifts
Kickdown Use kickdown for maximum acceleration:
X Depress the accelerator pedal beyond the
pressure point.
The transmission shifts to a lower gear
depending on the engine speed.
X Ease off the accelerator pedal once the
desired speed is reached.
The automatic transmission shifts back up.
Gliding mode All vehicles (except Mercedes-AMG vehi-
cles)
Gliding mode is characterised by the following:
R the combustion engine is disconnected from
the drive train
R the engine speed is equal to the engine idling
speed
R the gear indicated after the transmission
position Ddisappears in the multifunction
display (Y page 168)
Gliding mode can be activated under the follow-
ing conditions:
R you select the "ECO" setting for the drive sys-
tem within the Individualdrive program. You
can find information about this in the Digital
Owner's Manual
R the speed is within a suitable range 170
Automatic transmissionDriving an
d parking
Page 174 of 453
R
the type of road is suitable, e.g. no steep gra-
dients
R you are no longer depressing the accelerator
pedal
Gliding mode is deactivated under the following
conditions:
R you depress the accelerator pedal
R you depress the brake pedal
R you use the DIRECT SELECT lever to switch
the transmission position (Y page 168)
R you use the DYNAMIC SELECT controller to
change the drive program (Y page 166)
R you activate manual gearshifting
(Y page 172)
R you leave the suitable speed range
Mercedes-AMG vehicles Gliding mode is characterised by the following:
R the combustion engine is disconnected from
the drive train
R the engine speed is equal to the engine idling
speed
R in the multifunction display, the gliding sym-
bol appears in the drive program display
Gliding mode can be activated under the follow-
ing conditions:
R the Comfort drive program is activated or you
select the "Comfort" setting for the drive sys-
tem within the Individualdrive program. You
can find information about this in the Digital
Owner's Manual
R the ECO start/stop function is activated
R you are driving carefully with low acceleration
of the vehicle
R the engine is at normal operating temperature
R the speed is within a suitable range
R the type of road is suitable, e.g. no steep gra-
dients
R you are no longer depressing the accelerator
pedal
Gliding mode is deactivated under the following conditions:
R you have deactivated the ECO start/stop
function
R you depress the accelerator pedal
R you depress the brake pedal
R you use the DIRECT SELECT lever to switch
the transmission position (Y page 168)R
you use the DYNAMIC SELECT controller to
change the drive program (Y page 166)
R you activate manual gearshifting
(Y page 172)
R you leave the suitable speed range
Towing a trailer X
Drive in the middle of the engine speed range
on uphill gradients.
X Depending on the uphill or downhill gradient,
use left-hand steering wheel gearshift paddle
(Y page 172) to select a lower gear, even if
cruise control, DISTRONIC PLUS, or SPEED-
TRONIC are activated. Drive programs
Slippery drive program The
Slippery drive program has the following
characteristics:
R reduced engine and transmission settings for
optimum propulsion on slippery or snow-cov-
ered roads.
R optimised ESP ®
stability control on slippery
or snow-covered roads.
R the vehicle has improved driving stability on
slippery or snow-covered roads, for example.
Comfort drive program The
Comfort drive program has the following
characteristics:
R comfort-orientated engine and transmission
settings.
R optimal fuel consumption resulting from the
automatic transmission shifting up sooner.
R the vehicle pulling away more gently in
forward and reverse gears unless the accel-
erator pedal is depressed fully.
R the automatic transmission shifting up
sooner. This results in the vehicle being driven
at lower engine speeds and the wheels being less likely to spin. Automatic transmission
171Driving and parking Z
Page 185 of 453
Centre. AdBlue
®
refill canisters are often sold
with a filler hose. A filler hose that does not
exactly fit the vehicle's AdBlue ®
tank offers no
protection against overfilling. AdBlue ®
may leak
out as a result of overfilling. Mercedes-Benz
offers a special disposable hose with overfill
protection. You can obtain this from any
Mercedes-Benz Service Centre. AdBlue ®
is
available in a variety of containers and recepta- cles. Only use the disposable hose with the
Mercedes-Benz AdBlue ®
refill canisters.
AdBlue ®
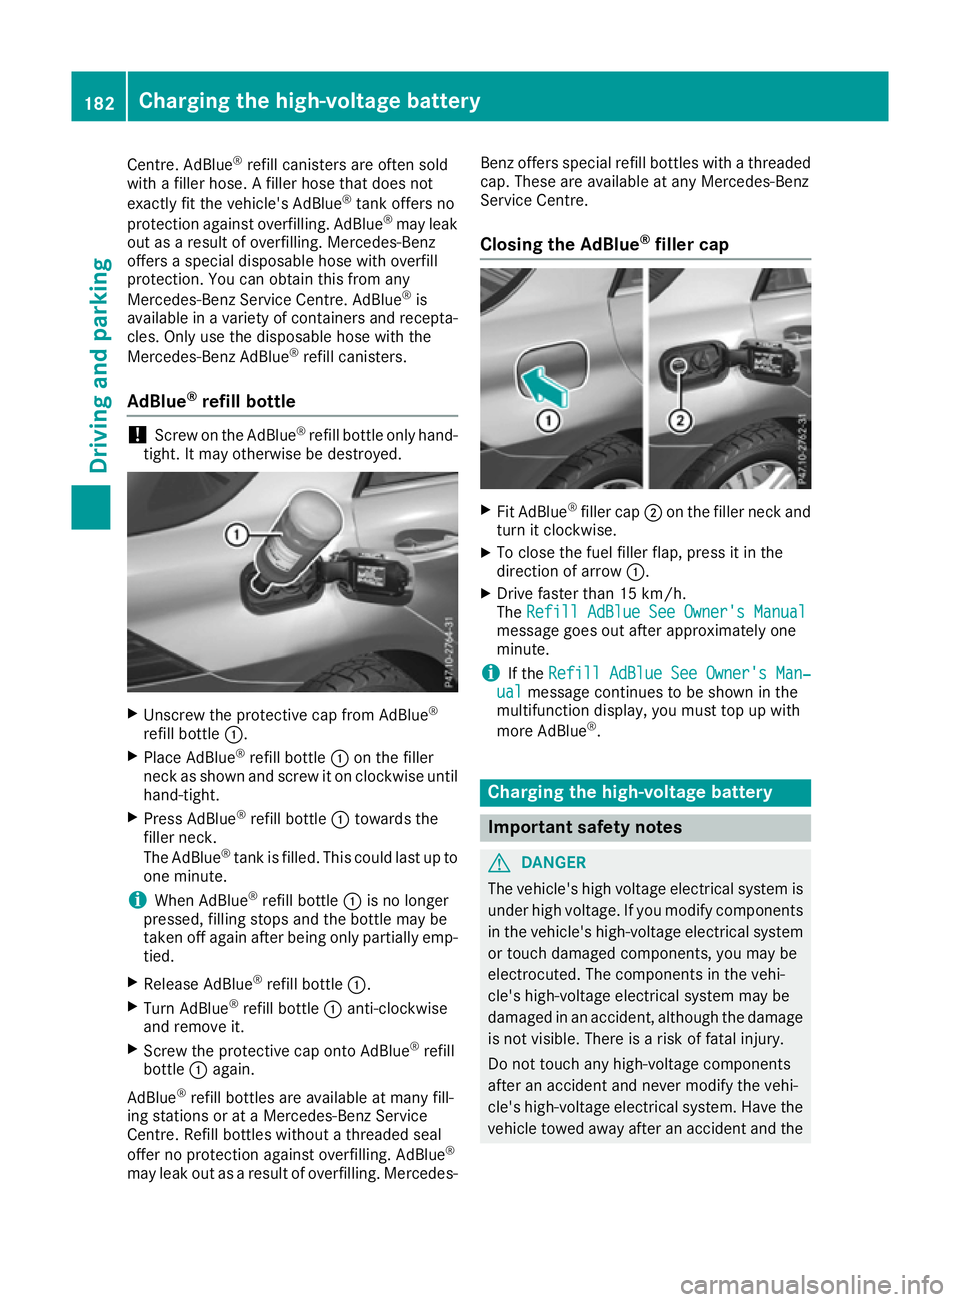
refill bottle !
Screw on the AdBlue ®
refill bottle only hand-
tight. It may otherwise be destroyed. X
Unscrew the protective cap from AdBlue ®
refill bottle :.
X Place AdBlue ®
refill bottle :on the filler
neck as shown and screw it on clockwise until hand-tight.
X Press AdBlue ®
refill bottle :towards the
filler neck.
The AdBlue ®
tank is filled. This could last up to
one minute.
i When AdBlue ®
refill bottle :is no longer
pressed, filling stops and the bottle may be
taken off again after being only partially emp- tied.
X Release AdBlue ®
refill bottle :.
X Turn AdBlue ®
refill bottle :anti-clockwise
and remove it.
X Screw the protective cap onto AdBlue ®
refill
bottle :again.
AdBlue ®
refill bottles are available at many fill-
ing stations or at a Mercedes-Benz Service
Centre. Refill bottles without a threaded seal
offer no protection against overfilling. AdBlue ®
may leak out as a result of overfilling. Mercedes- Benz offers special refill bottles with a threaded
cap. These are available at any Mercedes-Benz
Service Centre.
Closing the AdBlue ®
filler cap X
Fit AdBlue ®
filler cap ;on the filler neck and
turn it clockwise.
X To close the fuel filler flap, press it in the
direction of arrow :.
X Drive faster than 15 km/h.
The Refill AdBlue See Owner's Manual Refill AdBlue See Owner's Manual
message goes out after approximately one
minute.
i If the
Refill AdBlue See Owner's Man‐ Refill AdBlue See Owner's Man‐
ual
ual message continues to be shown in the
multifunction display, you must top up with
more AdBlue ®
. Charging the high-voltage battery
Important safety notes
G
DANGER
The vehicle's high voltage electrical system is under high voltage. If you modify components
in the vehicle's high-voltage electrical system or touch damaged components, you may be
electrocuted. The components in the vehi-
cle's high-voltage electrical system may be
damaged in an accident, although the damage
is not visible. There is a risk of fatal injury.
Do not touch any high-voltage components
after an accident and never modify the vehi-
cle's high-voltage electrical system. Have the vehicle towed away after an accident and the 182
Charging the high-voltage batteryDriving and parking