2015 MERCEDES-BENZ GLE SUV sensor
[x] Cancel search: sensorPage 103 of 453
door handle is held and the door is not
opened.
Notes on the automatic reversing feature for:
R the side windows (Y page 98)
R the sliding sunroof (Y page 102)
R the panorama sliding sunroof (Y page 102)
Using the key The key must be close to the vehicle. For vehi-
cles without KEYLESS-GO, the key must be near
the driver's door handle.
X Vehicles without KEYLESS-GO: point the tip
of the key at the door handle on the driver's
door.
X Press and hold the &button until the side
windows and the sliding sunroof or the pano-
rama sliding sunroof are fully closed.
X Make sure that all the side windows and the
sliding sunroof or panorama sliding sunroof
are closed.
On vehicles with a panorama sliding sunroof: X Press and hold the &button again until the
roller sunblinds of the panorama sliding sun-
roof close.
X To interrupt convenience closing: release
the & button.
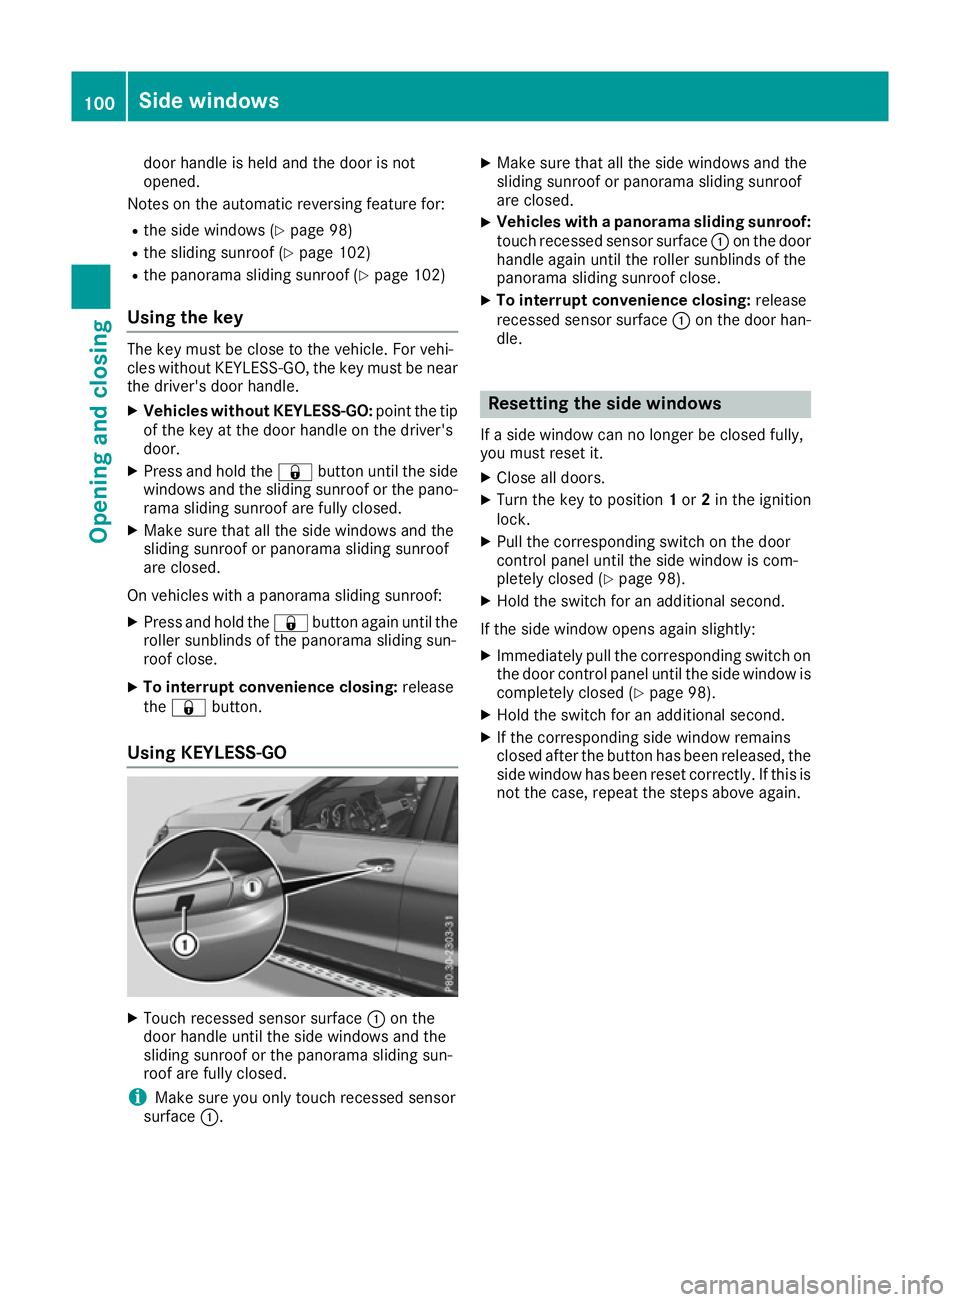
Using KEYLESS-GO X
Touch recessed sensor surface :on the
door handle until the side windows and the
sliding sunroof or the panorama sliding sun-
roof are fully closed.
i Make sure you only touch recessed sensor
surface :. X
Make sure that all the side windows and the
sliding sunroof or panorama sliding sunroof
are closed.
X Vehicles with a panorama sliding sunroof:
touch recessed sensor surface :on the door
handle again until the roller sunblinds of the
panorama sliding sunroof close.
X To interrupt convenience closing: release
recessed sensor surface :on the door han-
dle. Resetting the side windows
If a side window can no longer be closed fully,
you must reset it.
X Close all doors.
X Turn the key to position 1or 2in the ignition
lock.
X Pull the corresponding switch on the door
control panel until the side window is com-
pletely closed (Y page 98).
X Hold the switch for an additional second.
If the side window opens again slightly: X Immediately pull the corresponding switch on
the door control panel until the side window is completely closed (Y page 98).
X Hold the switch for an additional second.
X If the corresponding side window remains
closed after the button has been released, the
side window has been reset correctly. If this is
not the case, repeat the steps above again. 100
Side windowsOpening and closing
Page 106 of 453
slightly. The rain-closing feature is then deacti-
vated.
The sliding sunroof does not close if:
R it is raised at the rear.
R it is blocked.
R no rain is falling on the area of the windscreen
being monitored by the rain sensor, e.g.
because the vehicle is under a bridge or in a
carport.
Resetting !
If the sliding sunroof still cannot be opened
or closed fully after resetting, contact a quali-
fied specialist workshop.
Reset the sliding sunroof if it does not operate
smoothly.
X Turn the key to position 1or 2in the ignition
lock.
X Raise the sliding sunroof fully at the rear
(Y page 102).
X Keep the 2switch pressed for another
second.
X Make sure that the sliding sunroof can be fully
opened and closed again (Y page 102).
X If this is not the case, repeat the steps above
again. Operating the panorama sliding sun-
roof
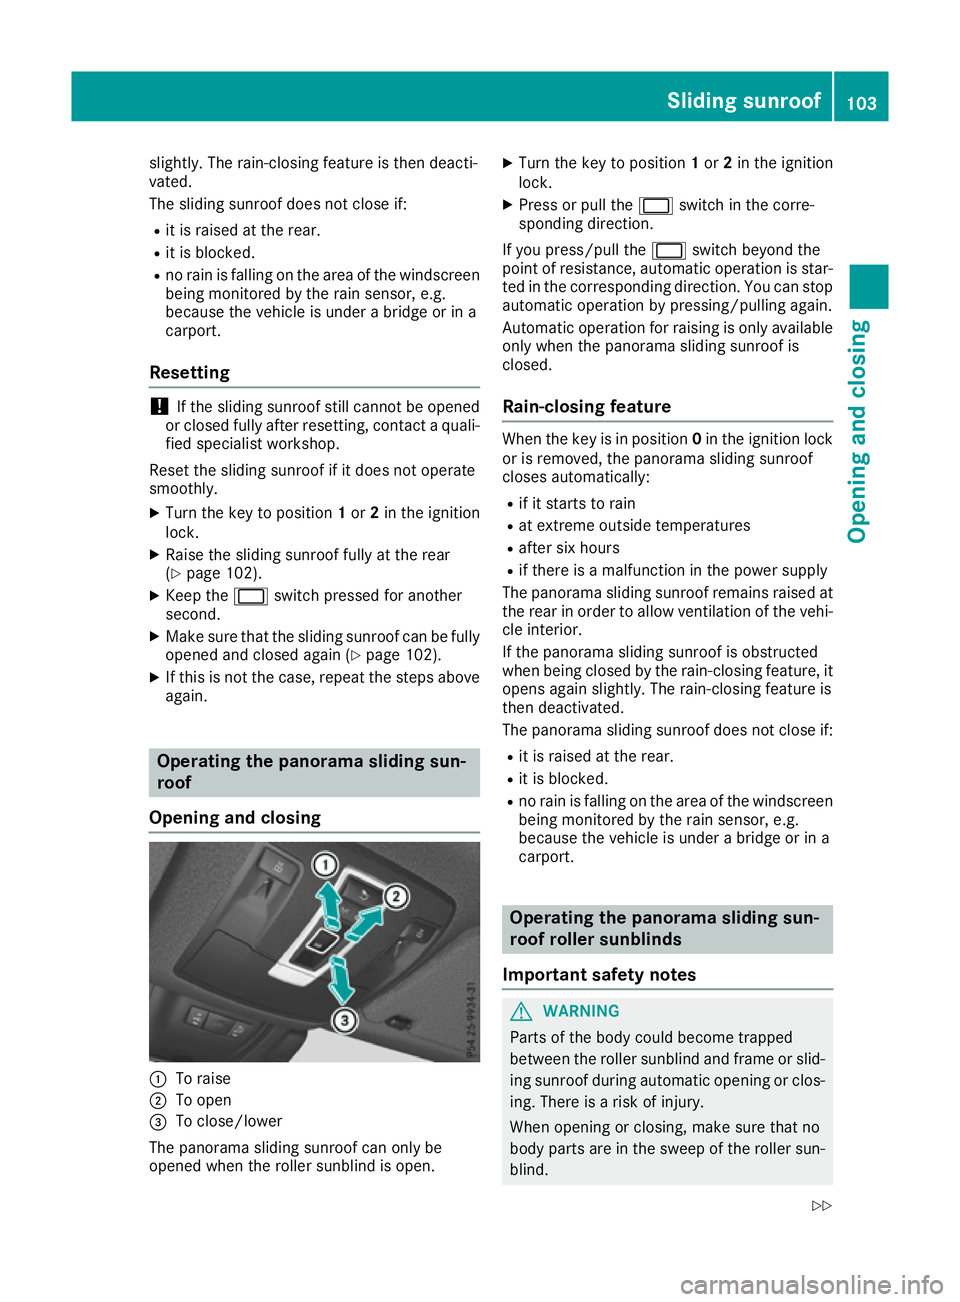
Opening and closing :
To raise
; To open
= To close/lower
The panorama sliding sunroof can only be
opened when the roller sunblind is open. X
Turn the key to position 1or 2in the ignition
lock.
X Press or pull the 2switch in the corre-
sponding direction.
If you press/pull the 2switch beyond the
point of resistance, automatic operation is star-
ted in the corresponding direction. You can stop automatic operation by pressing/pulling again.
Automatic operation for raising is only available
only when the panorama sliding sunroof is
closed.
Rain-closing feature When the key is in position
0in the ignition lock
or is removed, the panorama sliding sunroof
closes automatically:
R if it starts to rain
R at extreme outside temperatures
R after six hours
R if there is a malfunction in the power supply
The panorama sliding sunroof remains raised at
the rear in order to allow ventilation of the vehi-
cle interior.
If the panorama sliding sunroof is obstructed
when being closed by the rain-closing feature, it opens again slightly. The rain-closing feature is
then deactivated.
The panorama sliding sunroof does not close if:
R it is raised at the rear.
R it is blocked.
R no rain is falling on the area of the windscreen
being monitored by the rain sensor, e.g.
because the vehicle is under a bridge or in a
carport. Operating the panorama sliding sun-
roof roller sunblinds
Important safety notes G
WARNING
Parts of the body could become trapped
between the roller sunblind and frame or slid- ing sunroof during automatic opening or clos-
ing. There is a risk of injury.
When opening or closing, make sure that no
body parts are in the sweep of the roller sun- blind. Sliding sunroof
103Opening and closing
Z
Page 125 of 453
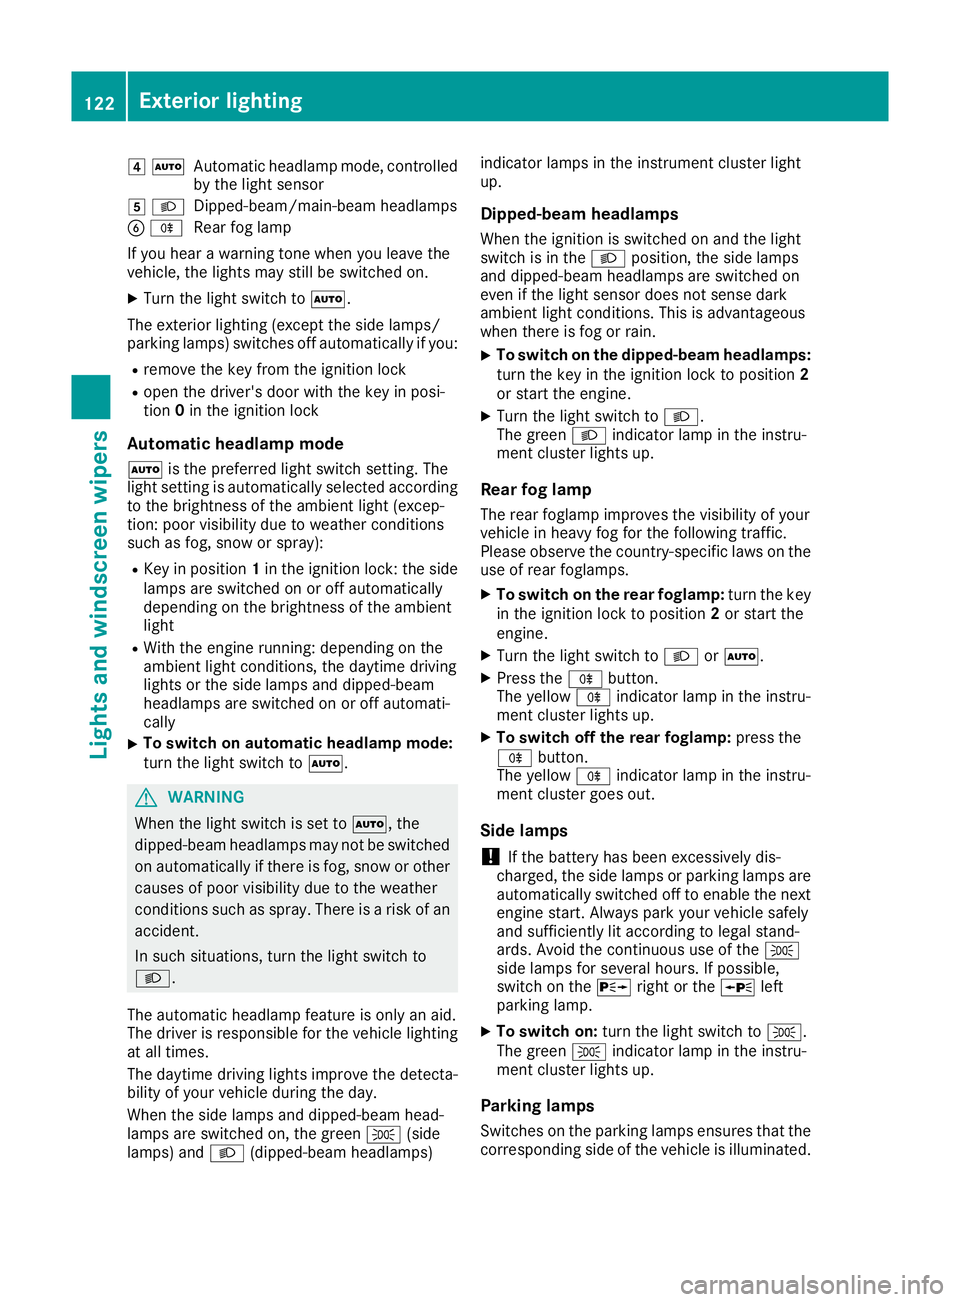
4
Ã
Automatic headlamp mode, controlled
by the light sensor
5 L
Dipped-beam/main-beam headlamps
B R
Rear fog lamp
If you hear a warning tone when you leave the
vehicle, the lights may still be switched on.
X Turn the light switch to Ã.
The exterior lighting (except the side lamps/
parking lamps) switches off automatically if you: R remove the key from the ignition lock
R open the driver's door with the key in posi-
tion 0in the ignition lock
Automatic headlamp mode
à is the preferred light switch setting. The
light setting is automatically selected according to the brightness of the ambient light (excep-
tion: poor visibility due to weather conditions
such as fog, snow or spray):
R Key in position 1in the ignition lock: the side
lamps are switched on or off automatically
depending on the brightness of the ambient
light
R With the engine running: depending on the
ambient light conditions, the daytime driving
lights or the side lamps and dipped-beam
headlamps are switched on or off automati-
cally
X To switch on automatic headlamp mode:
turn the light switch to Ã.G
WARNING
When the light switch is set to Ã, the
dipped-beam headlamps may not be switched on automatically if there is fog, snow or othercauses of poor visibility due to the weather
conditions such as spray. There is a risk of an
accident.
In such situations, turn the light switch to
L.
The automatic headlamp feature is only an aid.
The driver is responsible for the vehicle lighting at all times.
The daytime driving lights improve the detecta-
bility of your vehicle during the day.
When the side lamps and dipped-beam head-
lamps are switched on, the green T(side
lamps) and L(dipped-beam headlamps) indicator lamps in the instrument cluster light
up.
Dipped-beam headlamps When the ignition is switched on and the light
switch is in the Lposition, the side lamps
and dipped-beam headlamps are switched on
even if the light sensor does not sense dark
ambient light conditions. This is advantageous
when there is fog or rain.
X To switch on the dipped-beam headlamps:
turn the key in the ignition lock to position 2
or start the engine.
X Turn the light switch to L.
The green Lindicator lamp in the instru-
ment cluster lights up.
Rear fog lamp The rear foglamp improves the visibility of your
vehicle in heavy fog for the following traffic.
Please observe the country-specific laws on the
use of rear foglamps.
X To switch on the rear foglamp: turn the key
in the ignition lock to position 2or start the
engine.
X Turn the light switch to LorÃ.
X Press the Rbutton.
The yellow Rindicator lamp in the instru-
ment cluster lights up.
X To switch off the rear foglamp: press the
R button.
The yellow Rindicator lamp in the instru-
ment cluster goes out.
Side lamps ! If the battery has been excessively dis-
charged, the side lamps or parking lamps are
automatically switched off to enable the next engine start. Always park your vehicle safely
and sufficiently lit according to legal stand-
ards. Avoid the continuous use of the T
side lamps for several hours. If possible,
switch on the Xright or the Wleft
parking lamp.
X To switch on: turn the light switch to T.
The green Tindicator lamp in the instru-
ment cluster lights up.
Parking lamps Switches on the parking lamps ensures that the
corresponding side of the vehicle is illuminated. 122
Exterior lightingLights and
windscreen wipers
Page 129 of 453
Adaptive Highbeam Assist Plus
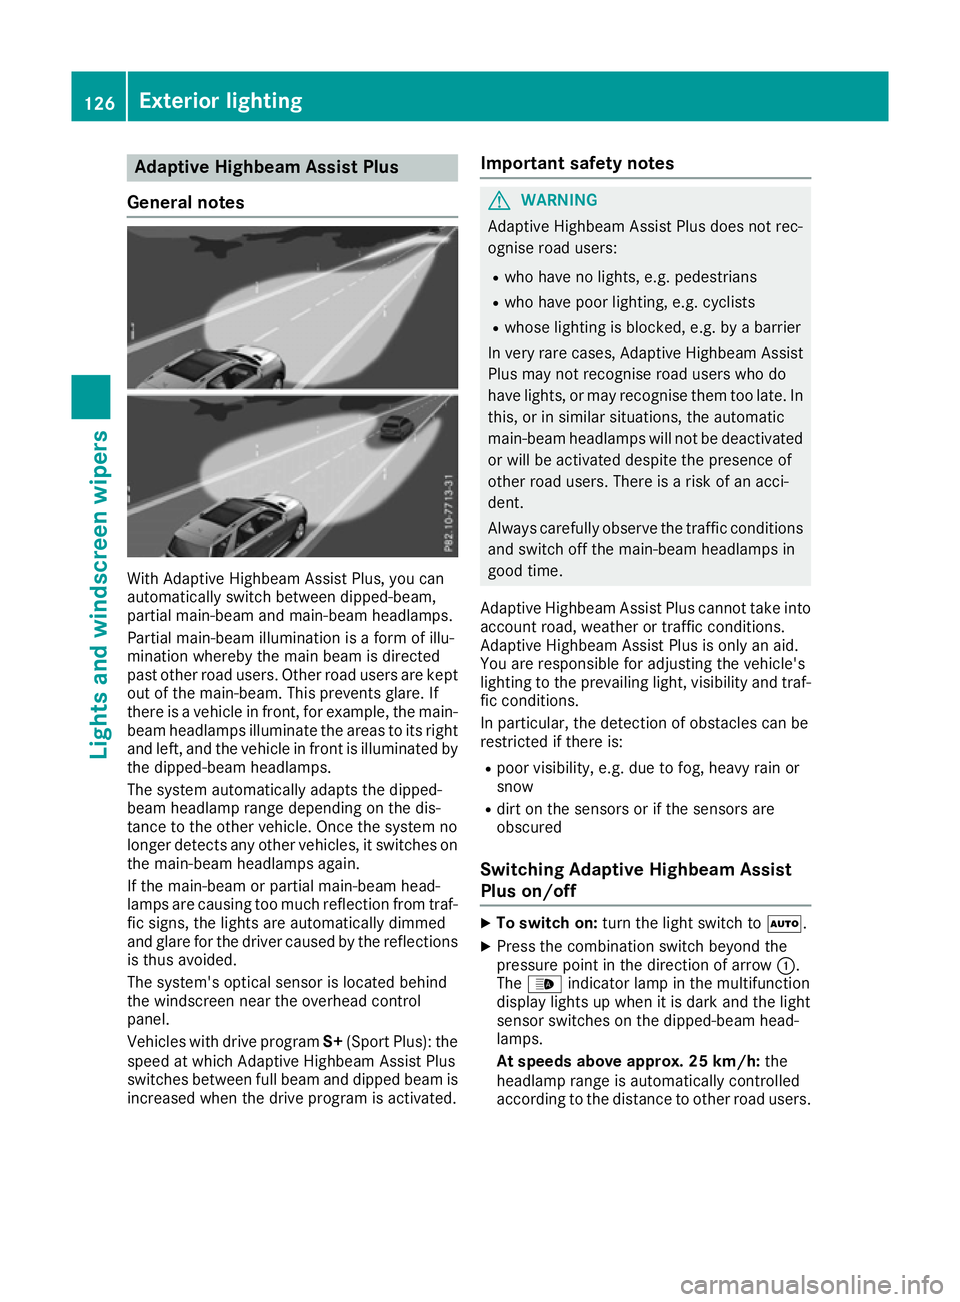
General notes With Adaptive Highbeam Assist Plus, you can
automatically switch between dipped-beam,
partial main-beam and main-beam headlamps.
Partial main-beam illumination is a form of illu-
mination whereby the main beam is directed
past other road users. Other road users are kept
out of the main-beam. This prevents glare. If
there is a vehicle in front, for example, the main- beam headlamps illuminate the areas to its right
and left, and the vehicle in front is illuminated by
the dipped-beam headlamps.
The system automatically adapts the dipped-
beam headlamp range depending on the dis-
tance to the other vehicle. Once the system no
longer detects any other vehicles, it switches on the main-beam headlamps again.
If the main-beam or partial main-beam head-
lamps are causing too much reflection from traf-fic signs, the lights are automatically dimmed
and glare for the driver caused by the reflections
is thus avoided.
The system's optical sensor is located behind
the windscreen near the overhead control
panel.
Vehicles with drive program S+(Sport Plus): the
speed at which Adaptive Highbeam Assist Plus
switches between full beam and dipped beam is
increased when the drive program is activated. Important safety notes G
WARNING
Adaptive Highbeam Assist Plus does not rec-
ognise road users:
R who have no lights, e.g. pedestrians
R who have poor lighting, e.g. cyclists
R whose lighting is blocked, e.g. by a barrier
In very rare cases, Adaptive Highbeam Assist
Plus may not recognise road users who do
have lights, or may recognise them too late. In this, or in similar situations, the automatic
main-beam headlamps will not be deactivated
or will be activated despite the presence of
other road users. There is a risk of an acci-
dent.
Always carefully observe the traffic conditions and switch off the main-beam headlamps in
good time.
Adaptive Highbeam Assist Plus cannot take into
account road, weather or traffic conditions.
Adaptive Highbeam Assist Plus is only an aid.
You are responsible for adjusting the vehicle's
lighting to the prevailing light, visibility and traf-
fic conditions.
In particular, the detection of obstacles can be
restricted if there is:
R poor visibility, e.g. due to fog, heavy rain or
snow
R dirt on the sensors or if the sensors are
obscured
Switching Adaptive Highbeam Assist
Plus on/off X
To switch on: turn the light switch to Ã.
X Press the combination switch beyond the
pressure point in the direction of arrow :.
The _ indicator lamp in the multifunction
display lights up when it is dark and the light
sensor switches on the dipped-beam head-
lamps.
At speeds above approx. 25 km/h: the
headlamp range is automatically controlled
according to the distance to other road users. 126
Exterior lightingLights and windscreen wipers
Page 133 of 453
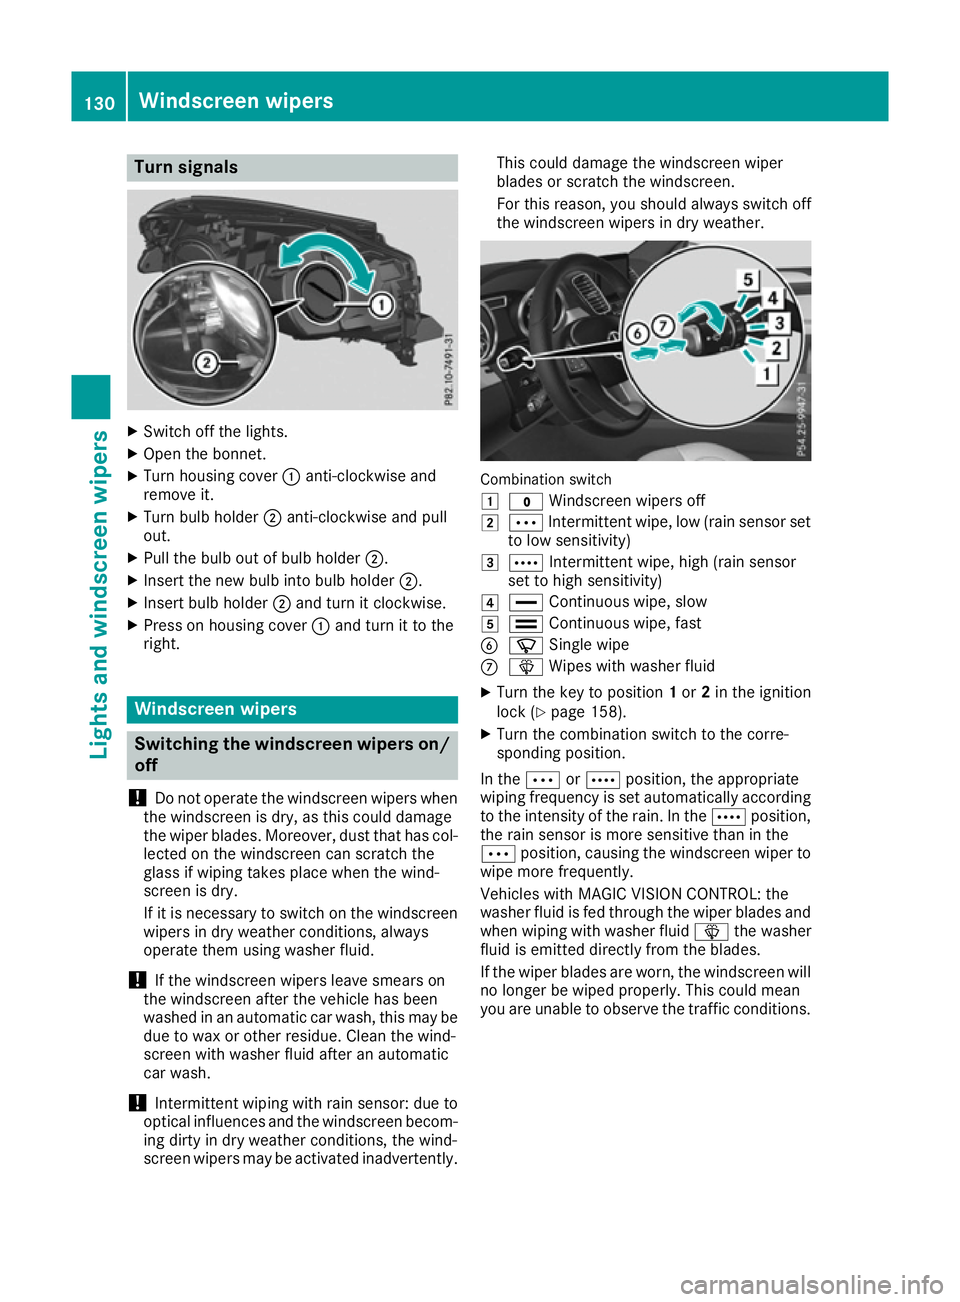
Turn signals
X
Switch off the lights.
X Open the bonnet.
X Turn housing cover :anti-clockwise and
remove it.
X Turn bulb holder ;anti-clockwise and pull
out.
X Pull the bulb out of bulb holder ;.
X Insert the new bulb into bulb holder ;.
X Insert bulb holder ;and turn it clockwise.
X Press on housing cover :and turn it to the
right. Windscreen wipers
Switching the windscreen wipers on/
off
! Do not operate the windscreen wipers when
the windscreen is dry, as this could damage
the wiper blades. Moreover, dust that has col-
lected on the windscreen can scratch the
glass if wiping takes place when the wind-
screen is dry.
If it is necessary to switch on the windscreen wipers in dry weather conditions, always
operate them using washer fluid.
! If the windscreen wipers leave smears on
the windscreen after the vehicle has been
washed in an automatic car wash, this may be
due to wax or other residue. Clean the wind-
screen with washer fluid after an automatic
car wash.
! Intermittent wiping with rain sensor: due to
optical influences and the windscreen becom-
ing dirty in dry weather conditions, the wind-
screen wipers may be activated inadvertently. This could damage the windscreen wiper
blades or scratch the windscreen.
For this reason, you should always switch off
the windscreen wipers in dry weather. Combination switch
1
$ Windscreen wipers off
2 Ä Intermittent wipe, low (rain sensor set
to low sensitivity)
3 Å Intermittent wipe, high (rain sensor
set to high sensitivity)
4 ° Continuous wipe, slow
5 ¯ Continuous wipe, fast
B í Single wipe
C î Wipes with washer fluid
X Turn the key to position 1or 2in the ignition
lock (Y page 158).
X Turn the combination switch to the corre-
sponding position.
In the ÄorÅ position, the appropriate
wiping frequency is set automatically according to the intensity of the rain. In the Åposition,
the rain sensor is more sensitive than in the
Ä position, causing the windscreen wiper to
wipe more frequently.
Vehicles with MAGIC VISION CONTROL: the
washer fluid is fed through the wiper blades and when wiping with washer fluid îthe washer
fluid is emitted directly from the blades.
If the wiper blades are worn, the windscreen will
no longer be wiped properly. This could mean
you are unable to observe the traffic conditions. 130
Windscreen
wipersLights and windscreen wipers
Page 160 of 453
Useful information
i This Owner's Manual describes all models,
series and optional equipment for your vehi-
cle that were available at the time of going to
press. National variations are possible. Note
that your vehicle may not be equipped with all
of the functions described. This is also the
case for systems and functions relevant to
safety.
i Read the information on qualified specialist
workshops: (Y page 28). Running-in notes
Important safety notes
In certain driving and driving safety systems, the
sensors adjust automatically while a certain dis- tance is being driven after the vehicle has beendelivered or after repairs. Full system effective-
ness is not reached until the end of this teach-in process.
Brake pads/linings and discs that are either new
or have been replaced only achieve optimum
braking effect after several hundred kilometres
of driving. Compensate for the reduced braking
effect by applying greater force to the brake
pedal. The first 1,500 km
If you treat the engine with sufficient care from
the very start, you will be rewarded with excel-
lent performance for the remainder of the
engine's life.
R Drive at varying vehicle speeds and engine
speeds for the first 1500 km.
R Avoid overstraining the vehicle during this
period, e.g. driving at full throttle.
R Change gear in good time, before the rev
counter needle is Ôof the way to the red area
of the rev counter.
R Do not shift down a gear manually in order to
brake.
R Try to avoid depressing the accelerator pedal
beyond the point of resistance (kickdown). Additional notes on running in Mercedes-AMG
vehicles:
R For the first 1,500 km do not drive at speeds
above 140 km/ h.
R Only allow the engine to reach a maximum
engine speed of 4,500 rpm briefly.
R Ideally, for the first 1,500 km, drive in the
Comfort drive program.
After 1,500 km, you may gradually accelerate
the vehicle to full road and engine speeds.
You should also observe these notes on running-
in if the engine or parts of the drive train on your vehicle have been replaced.
Always observe the maximum permissible
speed. Driving
Important safety notes
G
WARNING
Objects in the driver's footwell may restrict
the clearance around the pedals or block a
depressed pedal. This jeopardises the oper-
ating and road safety of the vehicle. There is a risk of an accident.
Stow all objects securely in the vehicle so that
they do not get into the driver's footwell.
Always fit the floormats securely and as pre-
scribed in order to ensure that there is always sufficient room for the pedals. Do not use
loose floormats and do not place several floor- mats on top of one another. G
WARNING
Unsuitable footwear can hinder correct usage of the pedals, e.g.:
R shoes with thick soles
R shoes with high heels
R slippers
There is a risk of an accident.
Wear suitable footwear to ensure correct
usage of the pedals. Driving
157Driving and parking Z
Page 210 of 453
The
SPEEDTRONIC passive
SPEEDTRONIC passive message in the
multifunction display disappears.
Deactivating variable SPEEDTRONIC
There are several ways to deactivate variable
SPEEDTRONIC:
X Briefly press the cruise control lever forwards
B .
or X Briefly press the cruise control lever in the
direction of arrow A.
LIM indicator lamp ;in the cruise control
lever goes out. Variable SPEEDTRONIC is
deactivated.
Cruise control or DISTRONIC PLUS is selec-
ted.
It is not possible to deactivate variable SPEED-
TRONIC by braking.
i The last speed stored is cleared when you
switch off the engine.
Permanent SPEEDTRONIC
You can use the on-board computer to perma-
nently limit the speed to a value between
160 km/h(e.g. for driving on winter tyres) and
the maximum design speed (Y page 294).
Shortly before the stored speed is reached, it
appears in the multifunction display.
Permanent SPEEDTRONIC remains active even
if variable SPEEDTRONIC is deactivated.
You cannot exceed the stored limit speed, even
if you depress the accelerator pedal beyond the
pressure point (kickdown). DISTRONIC PLUS
General notes DISTRONIC PLUS regulates the speed and auto-
matically helps you maintain the distance to the
vehicle detected in front. Vehicles are detected with the aid of the radar sensor system.
DISTRONIC PLUS brakes automatically so that
the set speed is not exceeded.
You must select a lower gear in good time on
long and steep downhill gradients, especially if
the vehicle is laden or towing a trailer. By doing
so, you will make use of the braking effect of the engine. This relieves the load on the brake sys-
tem and prevents the brakes from overheating
and wearing too quickly. If DISTRONIC PLUS detects that there is a risk of
a collision, you will be warned visually and
acoustically. Without your intervention,
DISTRONIC PLUS cannot prevent a collision. An intermittent warning tone will then sound and
the distance warning lamp will light up in the
instrument cluster. Brake immediately to
increase the distance to the vehicle driving in
front, or take evasive action, provided it is safe
to do so.
For DISTRONIC PLUS to assist you, the radar
sensor system must be operational.
DISTRONIC PLUS operates in the range
between 0 km/h and 200 km/h.
Do not use DISTRONIC PLUS while driving on
roads with steep gradients.
Important safety notes G
WARNING
DISTRONIC PLUS does not react to:
R people or animals
R stationary obstacles on the road, e.g. stop-
ped or parked vehicles
R oncoming and crossing traffic
As a result, DISTRONIC PLUS may neither give
warnings nor intervene in such situations.
There is a risk of an accident.
Always pay careful attention to the traffic sit- uation and be ready to brake. G
WARNING
DISTRONIC PLUS cannot always clearly rec-
ognise other road users and complex traffic
conditions.
In such cases, DISTRONIC PLUS may:
R give an unnecessary warning and then
brake the vehicle
R neither give a warning nor intervene
R accelerate or brake unexpectedly
There is a risk of an accident.
Continue to drive carefully and be prepared to
brake, particularly if DISTRONIC PLUS warns
you. Driving systems
207Driving and parking Z
Page 211 of 453

G
WARNING
DISTRONIC PLUS brakes your vehicle with up to 50% of the maximum possible deceleration.
If this deceleration is not sufficient,
DISTRONIC PLUS alerts you with a visual and
acoustic warning. There is a risk of an acci-
dent.
Apply the brakes yourself in these situations
and try to take evasive action.
! When DISTRONIC PLUS or the HOLD func-
tion is activated, the vehicle brakes automat- ically in certain situations.
To avoid damage to the vehicle, deactivate
DISTRONIC PLUS and the HOLD function in
the following or similar situations:
R when towing away
R in a car wash
If you fail to adapt your driving style, DISTRONIC PLUS can neither reduce the risk of an accident
nor override the laws of physics. DISTRONIC
PLUS cannot take road and weather conditions
or traffic conditions into account. DISTRONIC
PLUS is only an aid. You are responsible for the
distance to the vehicle in front, for vehicle
speed, for braking in good time and for staying in lane.
Do not use DISTRONIC PLUS:
R in road and traffic conditions which do not
allow you to maintain a constant speed, e.g. in
heavy traffic or on winding roads
R on smooth or slippery roads. Braking or accel-
erating can cause the drive wheels to lose
traction and the vehicle could then skid
R when there is poor visibility, e.g. due to fog,
heavy rain or snow
DISTRONIC PLUS may not detect narrow vehi-
cles driving in front, e.g. motorcycles, or vehi-
cles driving on a different line.
In particular, the detection of obstacles can be
impaired in the case of:
R dirt on the sensors or obscured sensors
R snow or heavy rain
R interference by other radar sources
R the possibility of strong radar reflections, for
example, in multi-storey car parks
If DISTRONIC PLUS no longer detects a vehicle
in front, it may unexpectedly accelerate to the
speed stored. This speed can:
R be too high for a filter lane or a slip road
R be so high in the right lane that you pass vehi-
cles driving on the left
R be so high in the left lane that you pass vehi-
cles driving on the right
If there is a change of drivers, advise the new
driver of the speed stored.
Cruise control lever :
To activate or increase speed
; To set the specified minimum distance
= LIM indicator lamp
? To activate at the current speed/last stored
speed
A To activate or reduce speed
B To switch between DISTRONIC PLUS and
variable SPEEDTRONIC
C To deactivate DISTRONIC PLUS
You can operate DISTRONIC PLUS and variable SPEEDTRONIC with the cruise control lever.
LIM indicator lamp =on the cruise control lever
indicates which function you have selected:
R LIM indicator lamp = =off: DISTRONIC PLUS
is selected
R LIM indicator lamp =
= on: variable SPEED-
TRONIC is selected
Selecting DISTRONIC PLUS X
Check whether LIM indicator lamp =is off.
If it is off, DISTRONIC PLUS is already selec-
ted.
If it is not, press the cruise control lever in the direction of arrow B.
LIM indicator lamp =in the cruise control
lever goes out. DISTRONIC PLUS is selected. 208
Driving systemsDriving and parking