2015 MERCEDES-BENZ GLE SUV fuel pressure
[x] Cancel search: fuel pressurePage 24 of 453
Sun blind
Rear side windows .........................3 63
Sun visor ............................................ 362
Suspension settings
AMG RIDE CONTROL sports sus-
pension .......................................... 224
SETUP (on-board computer) .......... 298
Switching the auxiliary heating/
ventilation
On/off .......................................... .150 T
Tail lamps Display message ............................ 314
Tailgate
Display message ............................ 333
Emergency unlocking ....................... 97
Important safety notes .................... 93
Limiting the opening angle .............. .97
Opening dimensions ......................4 42
Opening/closing (automatically
from inside) ...................................... 96
Opening/closing (automatically
from outside) ................................... 95
Opening/closing (from outside) ....... 94
Power closing .................................. 92
Tank
see Fuel tank
Technical data
Capacities ...................................... 435
Emergency spare wheel ................. 432
Information ................................... .433
Trailer loads ................................... 447
Tyres/wheels ................................. 418
Vehicle data ................................... 442
Telephone
Accepting a call (multifunction
steering wheel) .............................. 289
Display message ............................ 336
Menu (on-board computer) ............ 288
Number from the phone book ....... .289
Redialling ....................................... 289
Rejecting/ending a call ................. 289
Telephone compartment ................ 352
Temperature
Coolant (display in the instrumentcluster) .......................................... 282 Coolant (on-board computer,
Mercedes-AMG vehicles) ..............
.297
Coolant (on-board computer) ......... 292
Engine oil (on-board computer,
Mercedes-AMG vehicles) .............. .297
Outside temperature ..................... .282
Setting (climate control) ................ 141
Transmission oil (on-board com-
puter, Mercedes-AMG vehicles) ..... 297
TEMPOMAT
Function/notes ............................ .203
Through-loading ................................ 354
Time
see Separate Owner's manual
Timing (RACETIMER) ......................... 298
TIREFIT kit .......................................... 389
Important safety notes .................. 389
Storage location ............................ 387
Tyre pressure not reached ............. 391
Tyre pressure reached ................... 391
Top Tether ............................................ 60
Total distance recorder .................... 284
Tow-away protection
Activating ......................................... 82
Deactivating ..................................... 82
Function .......................................... .82
Tow-starting
Emergency engine starting ............ 402
Important safety notes .................. 399
Towing
Important safety notes .................. 399
Notes for 4MATIC vehicles ............ 402
Transporting the vehicle ................ 401
Towing a trailer
Active Blind Spot Assist ................. 249
Active Lane Keeping Assist ............ 252
Axle load, permissibl e.................... 447
ESP ®
(Electronic Stability Pro-
gram) ............................................... 77
Failure check for LEDs ................... 278
Pulling away with a traile r.............. 161
Swinging out the ball coupling ....... 274
Swinging the ball coupling in ......... 276
Trailer tow hitch display message .. 334
Towing away
Fitting the towing ey e.................... 400
Removing the towing eye ............... 401 Index
21
Page 26 of 453
see Flat tyre
U
Unlocking Emergency unlocking ....................... 92
From inside the vehicle (central
unlocking button) ............................. 91
Upshift indicator (on-board com-
puter, Mercedes-AMG vehicles) .......297 V
Vanity mirror (in sun visor) .............. 362
Variable SPEEDTRONIC
see SPEEDTRONIC
Vehicle
Correct use ...................................... 28
Data acquisition ............................... 28
Display message ............................ 332
Electronics ..................................... 433
Equipment ....................................... 26
Implied warranty .............................. 28
Individual settings .......................... 292
Leaving parked up ......................... 194
Locking (in an emergency) .............. .93
Locking (key) ................................... 85
Lowering ........................................ 417
Pulling away ................................... 161
Raising ........................................... 415
Registration ..................................... 28
Securing from rolling away ............ 414
Towing away .................................. 399
Transporting .................................. 401
Unlocking (in an emergency) ........... 92
Unlocking (key) ................................ 85
Vehicle data ................................... 442
Vehicle battery
see Battery (vehicle)
Vehicle data ....................................... 442
Vehicle data (off-road driving)
Approach/departure angle ............ 445
Fording depth ................................ 444
Maximum gradient climbing abil-
ity .................................................. 445
Vehicle dimensions ........................... 442
Vehicle emergency locking ................ 93Vehicle identification number
see VIN
Vehicle identification plate .............. 434
Vehicle level
AIRMATIC ...................................... 222
Vehicle level (display message) ....... 322
Vehicle tool kit .................................. 387
Video
Operating the DVD ......................... 288
VIN ...................................................... 434
Seat ............................................... 435
Type plate ...................................... 434 W
Warning and indicator lamps ABS ................................................ 341
Brakes ........................................... 339
Distance warning signal ................. 349
ESP ®
.............................................. 343
ESP ®
OFF ....................................... 344
Fuel tank ........................................ 347
Hybrid drive system ....................... 340
LIM (cruise control )........................ 203
LIM (DISTRONIC PLUS) .................. 208
LIM (variable SPEEDTRONIC) ......... 205
Overview .......................................... 34
Parking brake ................................ 346
PASSENGER AIR BAG ...................... 44
RBS (Recuperative Brake Sys-
tem) ............................................... 340
Reserve fuel ................................... 347
Seat belt ........................................ 337
Tyre pressure monitor ................... 350
Warning triangle ................................ 386
Warnings
Stickers ........................................... 41
Washer fluid
Display message ............................ 336
Wheel and tyre combinations
Tyres .............................................. 419
Wheel bolt tightening torque ........... 417
Wheel chock ...................................... 414
Wheels
Changing a whee l.......................... 413
Changing/replacing ....................... 413
Checking ........................................ 406
Cleaning ......................................... 381 Index
23
Page 28 of 453
Protection of the environment
General notes
H
Environmental note
Daimler's declared policy is one of compre-
hensive environmental protection.
Our objectives are to use the natural resour-
ces which form the basis of our existence on
this planet sparingly and in a manner which
takes the requirements of both nature and
humanity into consideration.
You too can help to protect the environment
by operating your vehicle in an environmen-
tally-responsible manner.
Fuel consumption and the rate of engine,
transmission, brake and tyre wear depend on
the following factors:
R operating conditions of your vehicle
R your personal driving style
You can influence both factors. Therefore,
please bear the following in mind:
Operating conditions:
R avoid short trips, as these increase fuel
consumption.
R observe the correct tyre pressure.
R do not carry any unnecessary weight in the
vehicle.
R remove the roof rack once you no longer
need it.
R a regularly serviced vehicle will contribute
to environmental protection. You should
therefore adhere to the service intervals.
R all maintenance work should be carried out
at a qualified specialist workshop.
Personal driving style:
R do not depress the accelerator pedal when
starting the engine.
R do not warm up the engine when the vehicle
is stationary.
R drive carefully and maintain a safe distance
from the vehicle in front.
R avoid frequent, sudden acceleration and
braking. R
change gear in good time and use each gear
only up to Ôof its maximum engine speed.
R switch off the engine in stationary traffic.
R monitor the vehicle's fuel consumption. Returning an end-of-life vehicle
EU countries only:
Mercedes-Benz will take back your old vehicle to
dispose of it in an environmentally-responsible
manner in accordance with the European Union (EU) End of Life Vehicles Directive.
There is a network of return points and disas-
sembly plants available. You can return your
vehicle to these plants free of charge. This
makes a valuable contribution to the recycling
process and the conservation of resources.
For further information on recycling old vehi-
cles, recovery and the terms of the policy, visit
the Mercedes-Benz homepage. Genuine Mercedes-Benz parts
H
Environmental note
Daimler AG also supplies reconditioned
assemblies and parts which are of the same
quality as new parts. For these, the same war-
ranty applies as for new parts.
! Airbags and seat belt tensioners, as well as
control units and sensors for these restraint
systems, may be installed in the following
areas of your vehicle:
R doors
R door pillars
R door sills
R seats
R dashboard
R instrument cluster
R centre console
Do not install accessories such as audio sys-
tems in these areas. Do not carry out repairs
or welding. You could impair the operating
efficiency of the restraint systems.
Have accessories retrofitted at a qualified
specialist workshop. Introduction
25 Z
Page 37 of 453
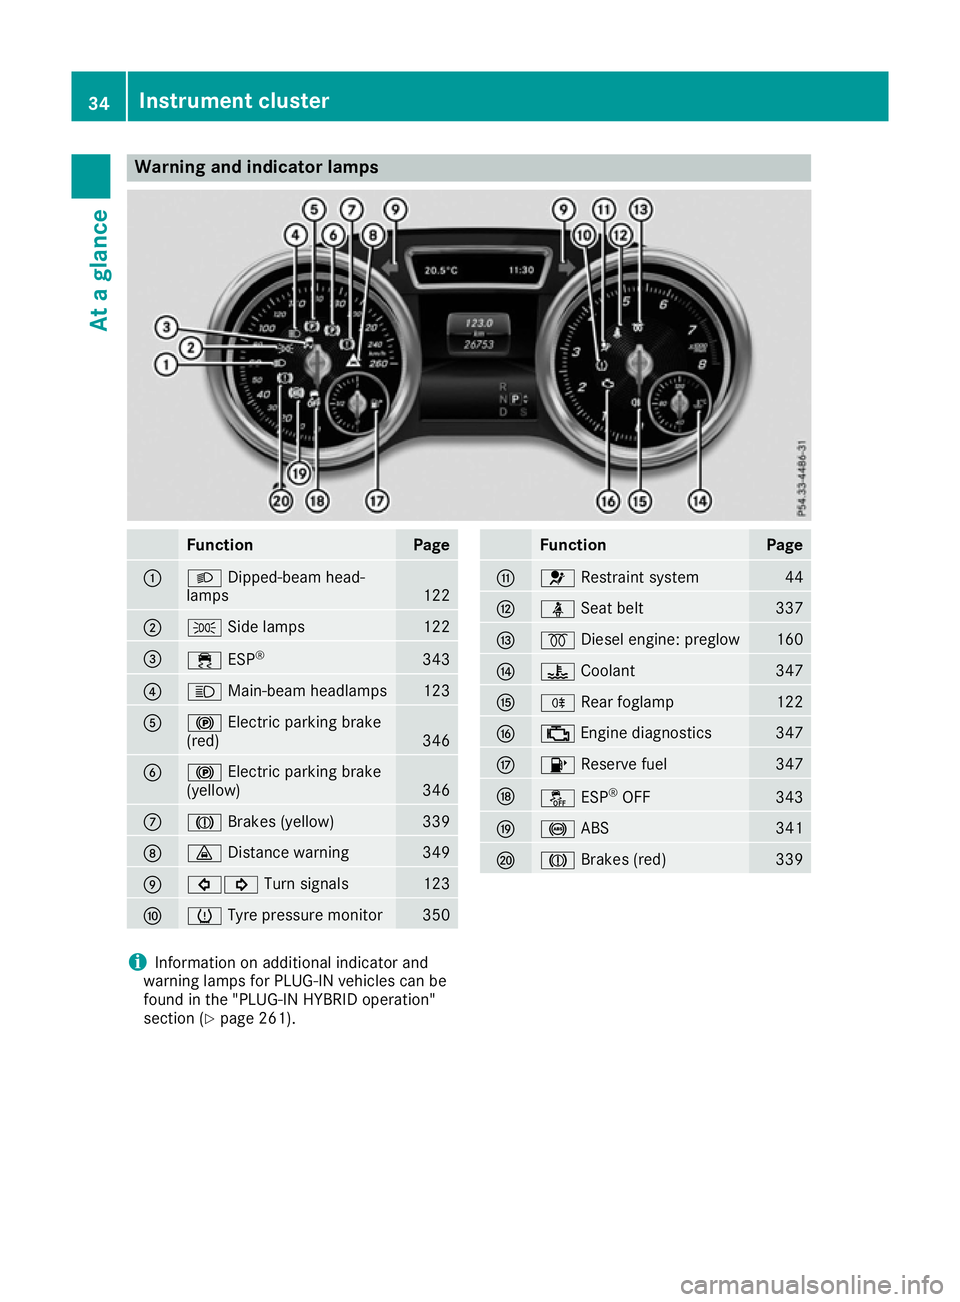
Warning and indicator lamps
Function Page
:
L
Dipped-beam head-
lamps 122
;
T
Side lamps 122
=
÷
ESP® 343
?
K
Main-beam headlamps 123
A
!
Electric parking brake
(red) 346
B
!
Electric parking brake
(yellow) 346
C
J
Brakes (yellow) 339
D
·
Distance warning 349
E
#!
Turn signals 123
F
h
Tyre pressure monitor 350 Function Page
G
6
Restraint system 44
H
ü
Seat belt 337
I
%
Diesel engine: preglow 160
J
?
Coolant 347
K
R
Rear foglamp 122
L
;
Engine diagnostics 347
M
8
Reserve fuel 347
N
å
ESP®
OFF 343
O
!
ABS 341
P
J
Brakes (red) 339
i
Information on additional indicator and
warning lamps for PLUG-IN vehicles can be
found in the "PLUG-IN HYBRID operation"
section (Y page 261). 34
Instrument clusterAt a glance
Page 61 of 453
Using the radar sensor system, PRE-SAFE
®
PLUS is able to detect that a head-on or rear-end
collision is imminent. In certain hazardous sit-
uations, PRE-SAFE ®
PLUS takes pre-emptive
measures to protect the vehicle occupants.
Important safety notes The intervention of PRE-SAFE
®
PLUS cannot
prevent an imminent collision.
The driver is not warned before the intervention
of PRE-SAFE ®
PLUS.
PRE-SAFE ®
PLUS does not intervene:
R if the vehicle is reversing
R when the vehicle is towing a trailer and there
is a risk of a rear-end collision
When driving, or when parking or exiting a park- ing space with assistance from Active Parking
Assist, PRE-SAFE ®
PLUS will not apply the
brakes.
Function PRE-SAFE
®
PLUS intervenes in certain situa-
tions if the radar sensor system detects an
imminent head-on or rear-end collision.
PRE-SAFE ®
PLUS takes the following measures
depending on the hazardous situation detected:
R if the radar sensor system detects that a
head-on collision is imminent, the seat belts
are pre-tensioned
R if the radar sensor system detects that a rear-
end collision is imminent:
- the rear hazard warning lamps are activa-
ted and flash at a higher frequency
- the brake pressure is increased if the driver
applies the brakes when the vehicle is sta-
tionary
- the seat belts are pre-tensioned.
The PRE-SAFE ®
PLUS braking application is can-
celled:
R if the accelerator pedal is depressed when a
gear is engaged
R if the risk of a collision passes or is no longer
detected
R if DISTRONIC PLUS indicates an intention to
pull away
If the hazardous situation passes without result- ing in an accident, the original settings are
restored. Automatic measures after an acci-
dent
Immediately after an accident, the following
measures may be implemented, depending on
the type and severity of the impact:
R the hazard warning lamps are activated
R the emergency lighting is activated
R the vehicle doors are unlocked
R the front side windows are lowered
R vehicles with a memory function: the electri-
cally adjustable steering wheel is raised
R the engine is switched off and the fuel supply
is cut off
R vehicles with the Mercedes-Benz emergency
call system: automatic emergency call
R vehicles with the hybrid drive system: the
hybrid system and the high-voltage electrical
system are deactivated Children in the vehicle
Important safety notes
Accident statistics show that children secured
in the rear seats are safer than children secured in the front-passenger seat. For this reason,
Mercedes-Benz strongly advises that you install
a child restraint system on a rear seat. Children
are generally better protected there.
If a child younger than twelve years old and
under 1.50 m in height is travelling in the vehi-
cle:
R always secure the child in a child restraint
system suitable for Mercedes-Benz vehicles.
The child restraint system must be appropri-
ate to the age, weight and size of the child.
R be sure to observe the instructions and safety
notes in this section in addition to the child
restraint system manufacturer's installation
instructions.
R always pay attention to the instructions and
safety notes on the automatic front-
passenger front airbag deactivation system
(Y page 51). 58
Children in the vehicleSafety
Page 177 of 453
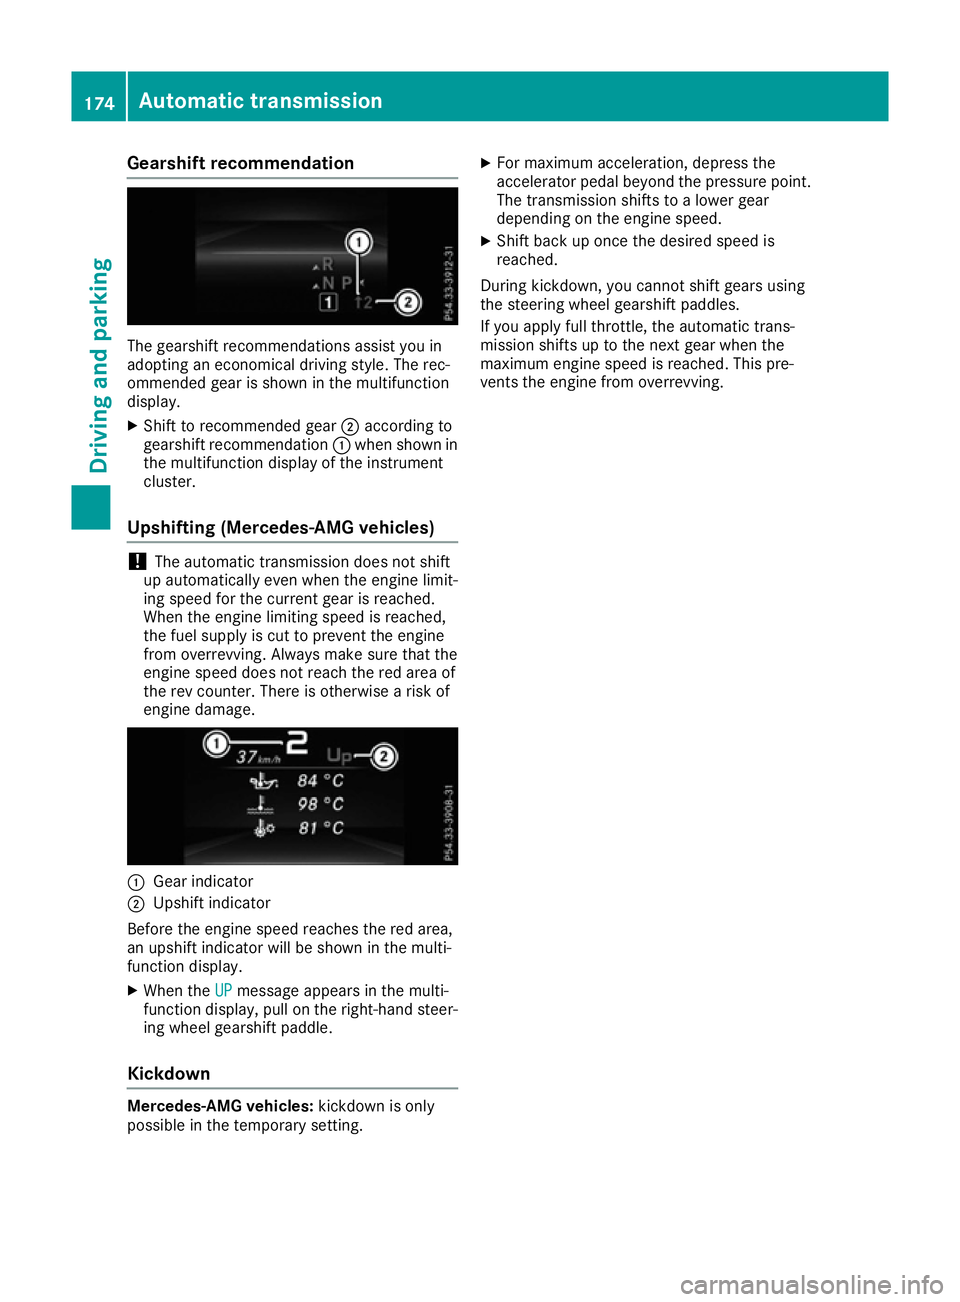
Gearshift recommendation
The gearshift recommendations assist you in
adopting an economical driving style. The rec-
ommended gear is shown in the multifunction
display.
X Shift to recommended gear ;according to
gearshift recommendation :when shown in
the multifunction display of the instrument
cluster.
Upshifting (Mercedes-AMG vehicles) !
The automatic transmission does not shift
up automatically even when the engine limit-
ing speed for the current gear is reached.
When the engine limiting speed is reached,
the fuel supply is cut to prevent the engine
from overrevving. Always make sure that the
engine speed does not reach the red area of
the rev counter. There is otherwise a risk of
engine damage. :
Gear indicator
; Upshift indicator
Before the engine speed reaches the red area,
an upshift indicator will be shown in the multi-
function display.
X When the UP
UP message appears in the multi-
function display, pull on the right-hand steer- ing wheel gearshift paddle.
Kickdown Mercedes-AMG vehicles:
kickdown is only
possible in the temporary setting. X
For maximum acceleration, depress the
accelerator pedal beyond the pressure point.
The transmission shifts to a lower gear
depending on the engine speed.
X Shift back up once the desired speed is
reached.
During kickdown, you cannot shift gears using
the steering wheel gearshift paddles.
If you apply full throttle, the automatic trans-
mission shifts up to the next gear when the
maximum engine speed is reached. This pre-
vents the engine from overrevving. 174
Automatic transmissionDriving and parking
Page 179 of 453
If you or others come into contact with fuel,
observe the following:
R Wash the fuel off any affected areas of skin
with water and soap immediately.
R If you get fuel in your eyes, rinse them thor-
oughly with clean water immediately. Seek
immediate medical attention.
R If fuel is swallowed, seek immediate medi-
cal attention. Do not induce vomiting.
R Change any clothing that has come into
contact with fuel immediately. G
WARNING
Electrostatic charge can cause sparks and
thereby ignite fuel vapours. There is a risk of
fire and explosion.
Always touch the vehicle body before opening the fuel filler flap or touching the fuel pump
nozzle. This discharges any electrostatic
charge that may have built up. G
WARNING
Vehicles with a diesel engine:
If you mix diesel fuel with petrol, the flash
point of this fuel mixture is lower than that of pure diesel fuel. When the engine is running,
components in the exhaust system may over-
heat unnoticed. There is a risk of fire.
Never refuel with petrol. Never add petrol to
diesel fuel.
! Do not use petrol to refuel vehicles with a
diesel engine. Do not switch on the ignition if you accidentally refuel with the wrong fuel.
Otherwise, fuel can enter the fuel system.
Even small amounts of the wrong fuel could
result in damage to the fuel system and the
engine. The repair costs are high. Notify a
qualified specialist workshop and have the
fuel tank and fuel lines drained completely.
! Do not use diesel to refuel vehicles with a
petrol engine. Do not switch on the ignition if you accidentally refuel with the wrong fuel.
Otherwise, the fuel will enter the fuel system.
Even small amounts of the wrong fuel can
result in damage to the fuel system and the
engine. Notify a qualified specialist workshop and have the fuel tank and fuel lines drained
completely.
! Overfilling the fuel tank could damage the
fuel system.
! Take care not to spill any fuel on painted
surfaces. You could otherwise damage the
paintwork.
! Use a filter when adding fuel from a fuel can.
The fuel lines and/or the fuel injection system could otherwise be blocked by particles fromthe fuel can.
Do not get into the vehicle again during the refu-
elling process. Otherwise, electrostatic charge
could build up again.
If you overfill the fuel tank, some fuel may spray out when you remove the fuel pump nozzle.
Further information on fuel and fuel quality
(Y page 436). Refuelling
General notes Observe the important safety notes
(Y
page 175).
PLUG-IN HYBRID vehicles: pressure in the fuel
tank must be released before refuelling.
Except PLUG-IN HYBRID vehicles: if you
unlock/lock the vehicle from the outside, the
fuel filler flap also unlocks/locks.
The position of the 8fuel filler cap is dis-
played in the instrument cluster. The arrow next to the filling pump indicates the side of the vehi-
cle.
Preparing to refuel X
Switch off the engine.
X Remove the key from the ignition lock.
or, on vehicles with KEYLESS‑GO: X Open the driver's door.
The on-board electronics now have status 0.
This is the same as the key having been
removed.
The driver's door can be closed again. 176
RefuellingDriving and parking
Page 180 of 453
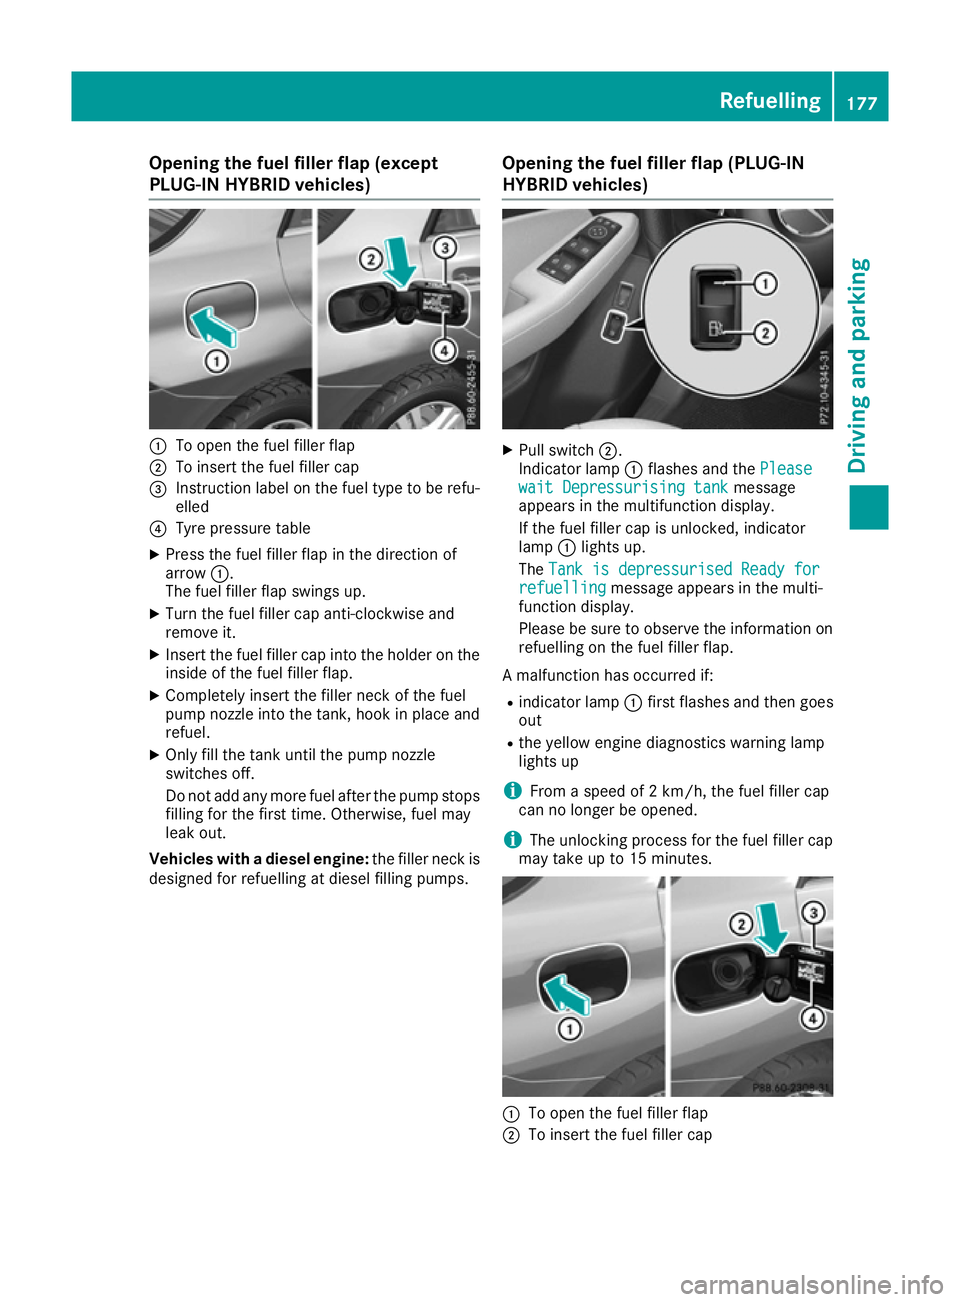
Opening the fuel filler flap (except
PLUG-IN HYBRID vehicles)
:
To open the fuel filler flap
; To insert the fuel filler cap
= Instruction label on the fuel type to be refu-
elled
? Tyre pressure table
X Press the fuel filler flap in the direction of
arrow :.
The fuel filler flap swings up.
X Turn the fuel filler cap anti-clockwise and
remove it.
X Insert the fuel filler cap into the holder on the
inside of the fuel filler flap.
X Completely insert the filler neck of the fuel
pump nozzle into the tank, hook in place and
refuel.
X Only fill the tank until the pump nozzle
switches off.
Do not add any more fuel after the pump stops filling for the first time. Otherwise, fuel may
leak out.
Vehicles with a diesel engine: the filler neck is
designed for refuelling at diesel filling pumps. Opening the fuel filler flap (PLUG-IN
HYBRID vehicles) X
Pull switch ;.
Indicator lamp :flashes and the Please Please
wait Depressurising tank
wait Depressurising tank message
appears in the multifunction display.
If the fuel filler cap is unlocked, indicator
lamp :lights up.
The Tank is depressurised Ready for Tank is depressurised Ready for
refuelling
refuelling message appears in the multi-
function display.
Please be sure to observe the information on refuelling on the fuel filler flap.
A malfunction has occurred if:
R indicator lamp :first flashes and then goes
out
R the yellow engine diagnostics warning lamp
lights up
i From a speed of 2 km/h, the fuel filler cap
can no longer be opened.
i The unlocking process for the fuel filler cap
may take up to 15 minutes. :
To open the fuel filler flap
; To insert the fuel filler cap Refuelling
177Driving and parking Z