2015 MERCEDES-BENZ GLE SUV fuel
[x] Cancel search: fuelPage 89 of 453
X
To unlock the vehicle: touch the inner sur-
face of the door handle.
X To lock the vehicle: touch sensor surface :
or ;.
Make sure that you do not touch the inner
surface of the door handle.
X Convenience closing feature: touch
recessed sensor surface ;for an extended
period.
For further information on the convenience clos-
ing feature (Y page 99).
If you pull on the handle of the tailgate, only the
luggage compartment of the vehicle is
unlocked.
Deactivating and activating If you do not intend to use a key for an extended
period of time, you can deactivate the KEYLESS-
GO function of the key. The key will then use very little power, thereby conserving battery power.
For the purposes of activation or deactivation,
the vehicle does not have to be nearby.
X To deactivate: press the&button on the
key twice in rapid succession.
The battery check lamp of the key flashes
twice briefly and lights up once, then KEY-
LESS-GO is deactivated (Y page 87).
X To activate: press any button on the key.
or
X Insert the key into the ignition lock.
KEYLESS-GO and all of its associated features
are available again. KEYLESS-GO start function
General notes Bear in mind that the engine can be started by
any of the vehicle occupants if there is a key in
the vehicle (Y page 160). Changing the settings of the locking
system
You can change the settings of the locking sys-
tem. This means that only the driver's door and
the fuel filler flap are unlocked when the vehicle is unlocked. This is useful if you frequently travel
alone. X
To change the setting: press and hold down
the % and& buttons simultaneously
for about six seconds until the battery indica-
tor lamp flashes twice (Y page 87).
If the setting of the locking system is changed
within the signal range of the vehicle, pressing
the & or% button:
R locks or
R unlocks the vehicle
The key now functions as follows:
X To unlock: press the%button once.
X To unlock centrally: press the%button
twice.
X To lock centrally: press the&button.
The KEYLESS-GO function is changed as fol-
lows:
X To unlock the driver's door: touch the inner
surface of the door handle on the driver's
door.
X To unlock centrally: touch the inner surface
of the door handle on the front-passenger
door or the rear door.
X To lock centrally: touch the outer sensor
surface on one of the door handles
(Y page 85).
X To restore the factory settings: press and
hold down the %and& buttons simul-
taneously for approximately six seconds until the battery check lamp flashes twice
(Y page 87). Emergency key element
General notes If the vehicle can no longer be locked or
unlocked with the key or with KEYLESS-GO, use
the emergency key element.
If you use the emergency key element to unlock
and open the driver's door, the anti-theft alarm
system will be triggered. Switch off the alarm
(Y page 81).
If you unlock the vehicle using the emergency
key element, the fuel filler flap will not be
unlocked automatically.
X To unlock the fuel filler flap: insert the key
into the ignition lock. 86
KeyOpening and closing
Page 94 of 453
G
WARNING
When the double locks are activated, the
doors can no longer be opened from the
inside. People in the vehicle can no longer get out, e.g. in hazardous situations. There is a
risk of injury.
Therefore, do not leave any people unsuper-
vised in the vehicle, particularly children, eld-
erly people or people in need of special assis-
tance. Do not activate the double lock when
people are in the vehicle.
If the vehicle has been locked with the key or
with KEYLESS-GO, the double lock function is
activated as standard. It is then not possible to
open the doors from inside the vehicle. You can deactivate the double lock function by deacti-
vating the interior motion sensor (Y page 82).
The doors can then be opened from the inside
after the vehicle has been locked from the out-
side. You can only open the rear doors from
inside the vehicle if they are not secured by the child-proof locks (Y page 69). The anti-theft
alarm system is triggered if the door is opened
from the inside. Switch off the alarm
(Y page 81). Unlocking and opening the doors
from the inside
For all countries except the United Kingdom: you can open a door from inside the vehicle even
if it has been locked. You can only open the rear doors from inside the vehicle if they are not
secured by the child-proof locks (Y page 69).
If the vehicle has previously been locked from
the outside, opening a door from the inside will
trigger the anti-theft alarm system. Switch off
the alarm (Y page 81).
Only for the United Kingdom: if the vehicle
has been locked with the key from the outside,
the double lock function is activated as stand-
ard. It is then not possible to open the doors
from inside the vehicle. You can deactivate the
double lock function by deactivating the interior motion sensor (Y page 82). The doors can then
be opened from the inside after the vehicle has
been locked from the outside. The anti-theft
alarm system is triggered if the door is opened
from the inside. Switch off the alarm
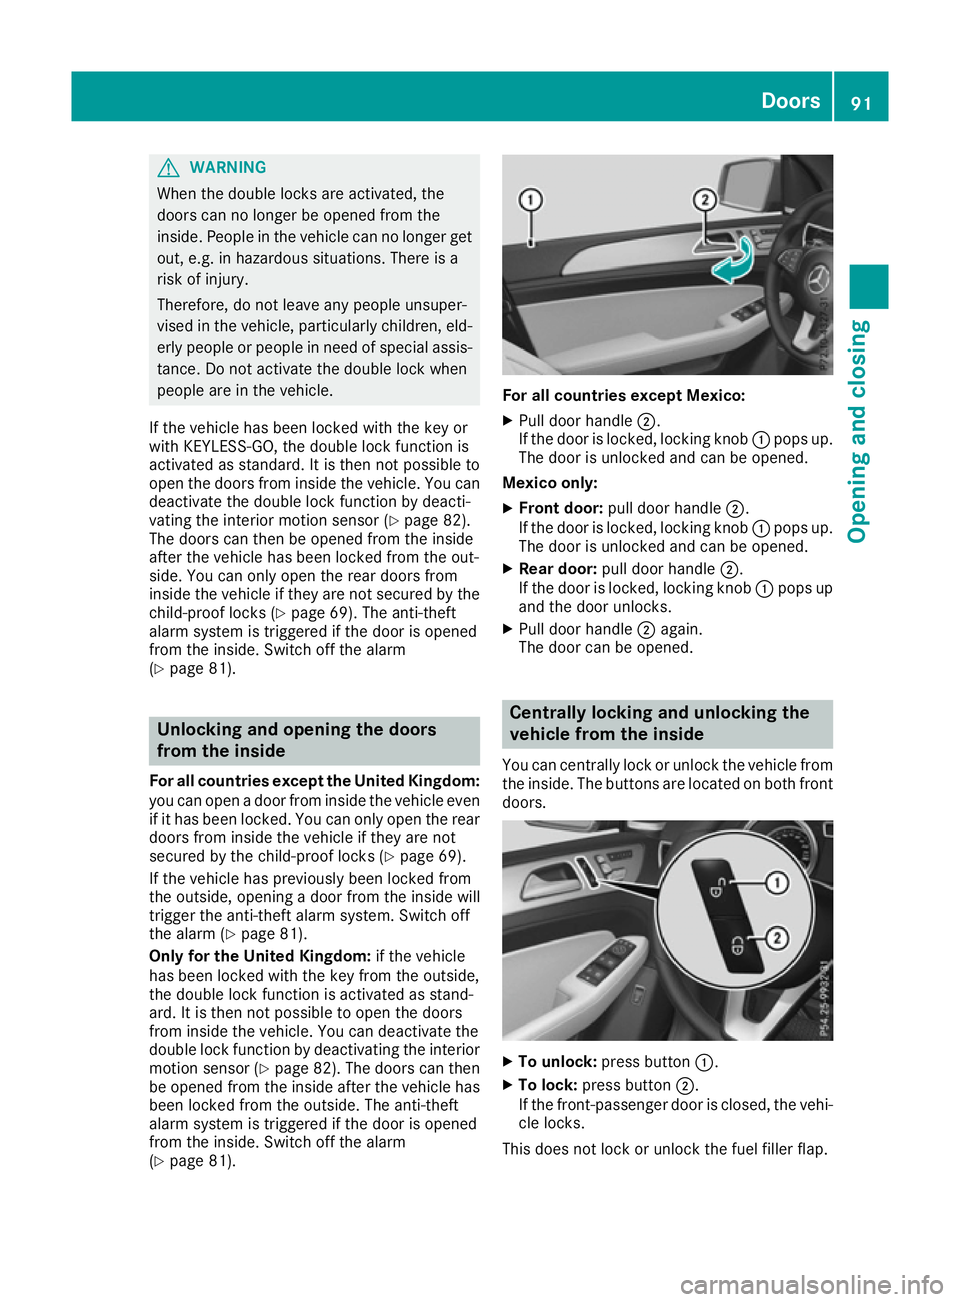
(Y page 81). For all countries except Mexico:
X Pull door handle ;.
If the door is locked, locking knob :pops up.
The door is unlocked and can be opened.
Mexico only: X Front door: pull door handle ;.
If the door is locked, locking knob :pops up.
The door is unlocked and can be opened.
X Rear door: pull door handle ;.
If the door is locked, locking knob :pops up
and the door unlocks.
X Pull door handle ;again.
The door can be opened. Centrally locking and unlocking the
vehicle from the inside
You can centrally lock or unlock the vehicle from the inside. The buttons are located on both frontdoors. X
To unlock: press button :.
X To lock: press button ;.
If the front-passenger door is closed, the vehi-
cle locks.
This does not lock or unlock the fuel filler flap. Doors
91Opening and closing Z
Page 96 of 453
On right-hand-drive vehicles, turn the emer-
gency key element clockwise.
The door is unlocked.
X Turn the emergency key element back and
remove it.
X Insert the emergency key element into the
key (Y page 87).
If you use the emergency key element to unlock
and open the driver's door, the anti-theft alarm
system will be triggered. Switch off the alarm
(Y page 81). Locking the vehicle (emergency key
element)
If the vehicle can no longer be locked with the
key or KEYLESS-GO, use the emergency key ele- ment.
X Open the driver's door.
X Close the front-passenger door, the rear
doors and the tailgate.
X Press the locking button (Y page 91).
X Check whether the locking knobs on the
front-passenger door and the rear doors are
still visible. Press the locking knobs down by
hand if necessary.
X Close the driver's door.
X Take the emergency key element out of the
key (Y page 87).
X Insert the emergency key element into the
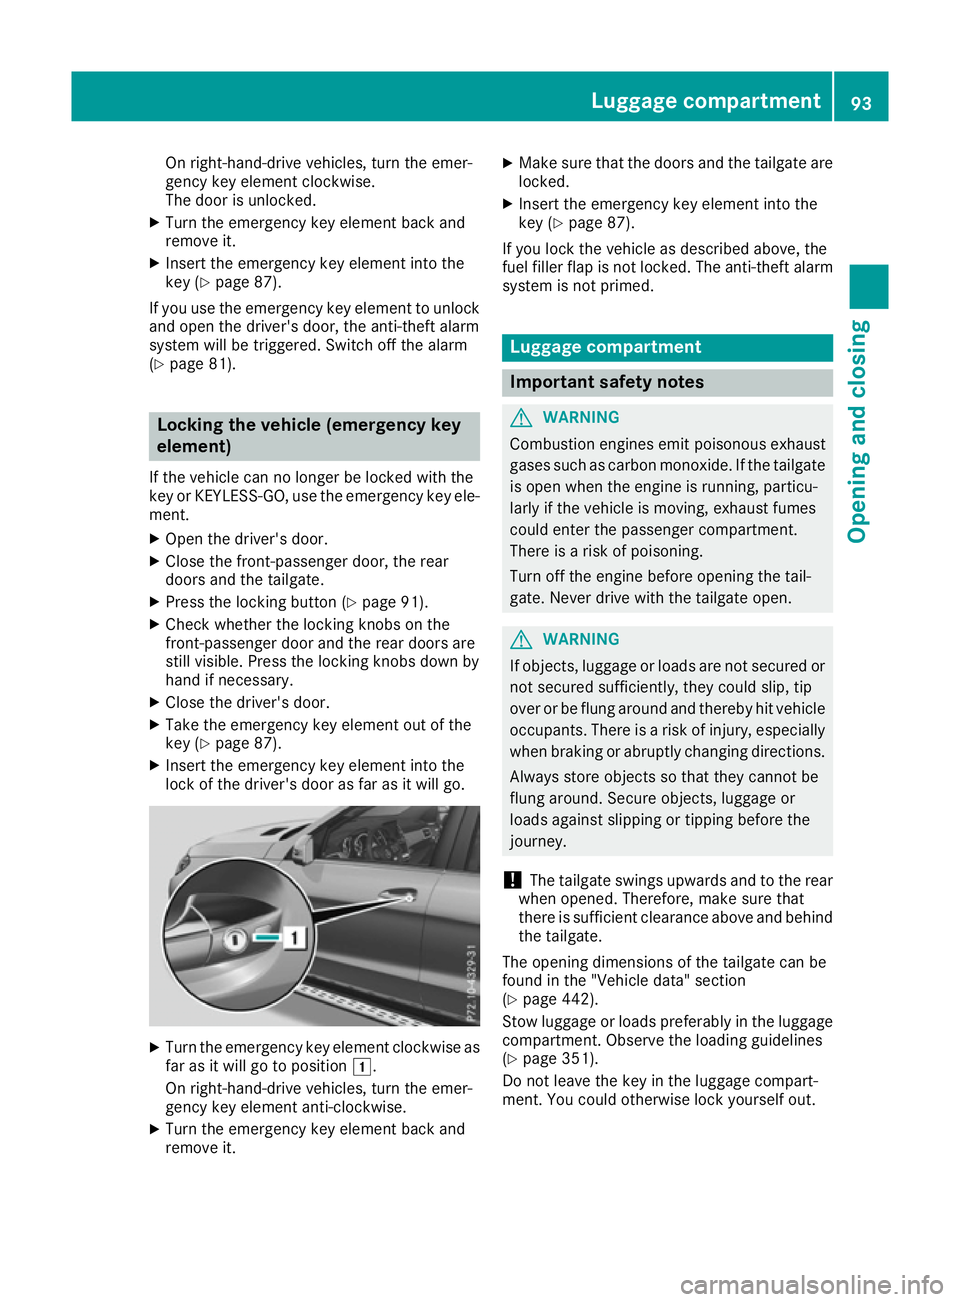
lock of the driver's door as far as it will go. X
Turn the emergency key element clockwise as
far as it will go to position 1.
On right-hand-drive vehicles, turn the emer-
gency key element anti-clockwise.
X Turn the emergency key element back and
remove it. X
Make sure that the doors and the tailgate are
locked.
X Insert the emergency key element into the
key (Y page 87).
If you lock the vehicle as described above, the
fuel filler flap is not locked. The anti-theft alarm
system is not primed. Luggage compartment
Important safety notes
G
WARNING
Combustion engines emit poisonous exhaust
gases such as carbon monoxide. If the tailgate is open when the engine is running, particu-
larly if the vehicle is moving, exhaust fumes
could enter the passenger compartment.
There is a risk of poisoning.
Turn off the engine before opening the tail-
gate. Never drive with the tailgate open. G
WARNING
If objects, luggage or loads are not secured or not secured sufficiently, they could slip, tip
over or be flung around and thereby hit vehicle
occupants. There is a risk of injury, especially when braking or abruptly changing directions.
Always store objects so that they cannot be
flung around. Secure objects, luggage or
loads against slipping or tipping before the
journey.
! The tailgate swings upwards and to the rear
when opened. Therefore, make sure that
there is sufficient clearance above and behind
the tailgate.
The opening dimensions of the tailgate can be
found in the "Vehicle data" section
(Y page 442).
Stow luggage or loads preferably in the luggage
compartment. Observe the loading guidelines
(Y page 351).
Do not leave the key in the luggage compart-
ment. You could otherwise lock yourself out. Luggage compartment
93Opening and closing Z
Page 153 of 453
Flammable materials such as leaves, grass or
twigs may ignite if they come into contact
with:
R hot parts of the exhaust system
R the exhaust gas itself
There is a risk of fire.
When the auxiliary heating is switched on,
make sure that:
R no flammable materials come into contact
with hot vehicle components
R the exhaust gas can escape from the
exhaust pipe unhindered
R the exhaust gas does not come into contact
with flammable materials.
The auxiliary heating is fitted under the front
wing on the left-hand side of the vehicle. The
emissions outlet is found behind the left front
wheel. ! Operating the auxiliary heating/ventilation
draws on the vehicle battery. After you have
heated or ventilated the vehicle a maximum of two times, drive for a longer distance.
Switch the auxiliary heating on regularly once a month for about ten minutes.
The auxiliary heating heats the air in the vehicle
interior to the set temperature. This occurs with- out using the heat of the running engine. The
auxiliary heating is operated directly using the
vehicle's fuel. For this reason, the tank content
must be at least at reserve fuel level to ensure
that the auxiliary heating functions.
The auxiliary heating or auxiliary ventilation
automatically adjusts to changes in tempera-
ture and weather conditions. For this reason,
the auxiliary heating could switch from ventila-
tion mode to heating mode or from heating
mode to ventilation mode.
The auxiliary heating switches off when the
engine is switched off. The auxiliary ventilation
switches off when you turn the key to position 2
(Y page 158).
The auxiliary heating switches off automatically after 50 minutes. This time limit can be altered.
To do this, visit a qualified specialist workshop.
You cannot use the auxiliary ventilation to cool
the vehicle interior to a temperature lower than
the outside temperature. Before switching on X
Turn the key to position 2in the ignition lock
(Y page 158).
X Set the desired temperature.
The auxiliary heating/ventilation can be activa-
ted even when climate control is set to manual.
Optimum comfort can be attained when the sys-
tem is set to automatic mode. Set the temper-
ature to 22 †.
The auxiliary heating or auxiliary ventilation can
be switched on/off using the button on the
centre console or the remote control.
The on-board computer can be used to specify
up to three departure times, one of which may
be preselected (Y page 295).
Switching the auxiliary heating/venti-
lation on or off using the button on the
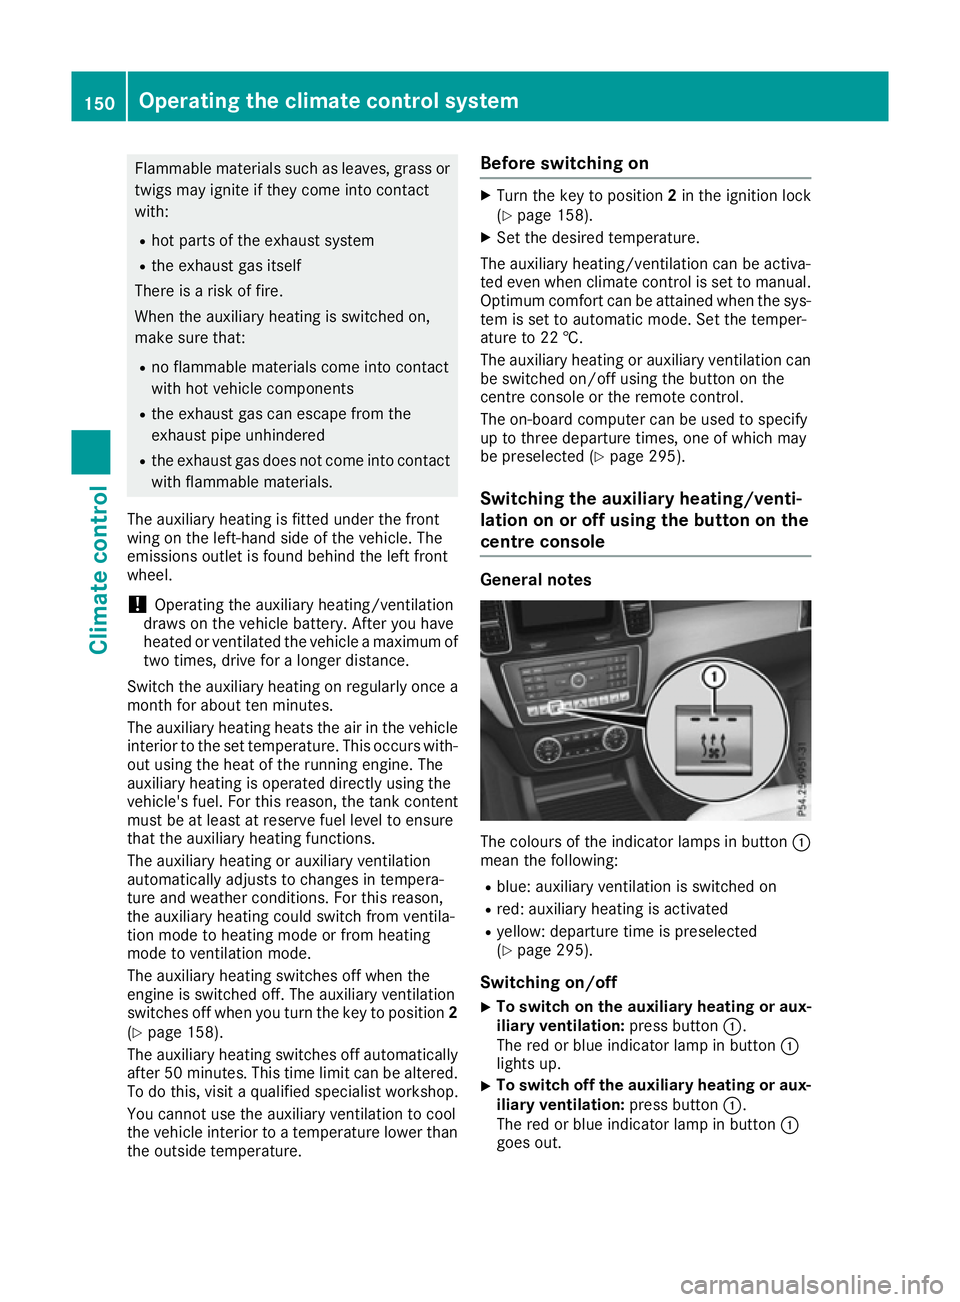
centre console General notes
The colours of the indicator lamps in button
:
mean the following:
R blue: auxiliary ventilation is switched on
R red: auxiliary heating is activated
R yellow: departure time is preselected
(Y page 295).
Switching on/off X To switch on the auxiliary heating or aux-
iliary ventilation:
press button:.
The red or blue indicator lamp in button :
lights up.
X To switch off the auxiliary heating or aux-
iliary ventilation: press button:.
The red or blue indicator lamp in button :
goes out. 150
Operating the climate control systemClimate control
Page 157 of 453
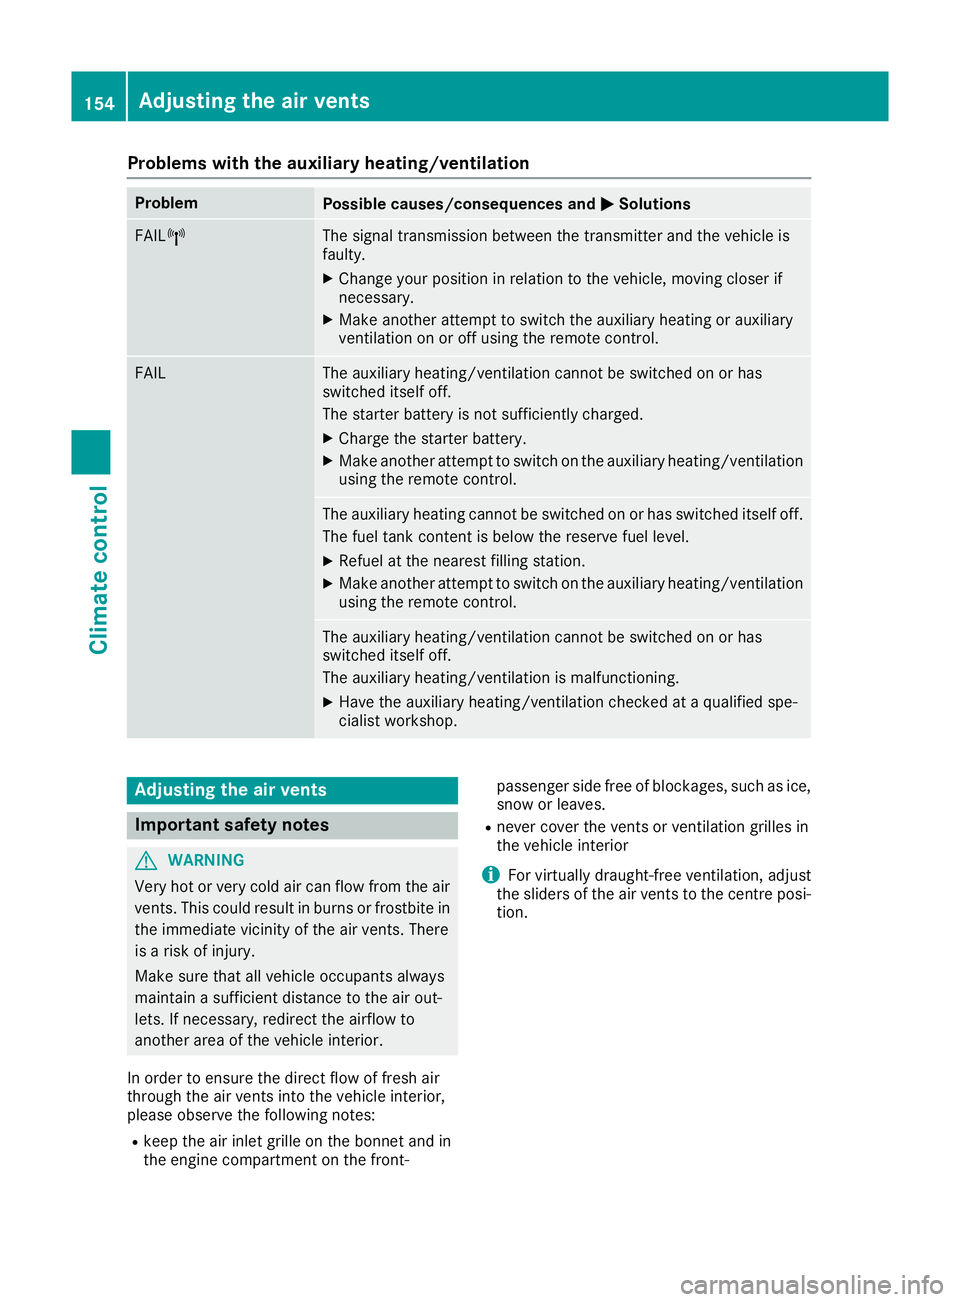
Problems with the auxiliary heating/ventilation
Problem
Possible causes/consequences and
M
MSolutions FAIL¨ The signal transmission between the transmitter and the vehicle is
faulty.
X
Change your position in relation to the vehicle, moving closer if
necessary.
X Make another attempt to switch the auxiliary heating or auxiliary
ventilation on or off using the remote control. FAIL The auxiliary heating/ventilation cannot be switched on or has
switched itself off.
The starter battery is not sufficiently charged.
X Charge the starter battery.
X Make another attempt to switch on the auxiliary heating/ventilation
using the remote control. The auxiliary heating cannot be switched on or has switched itself off.
The fuel tank content is below the reserve fuel level.
X Refuel at the nearest filling station.
X Make another attempt to switch on the auxiliary heating/ventilation
using the remote control. The auxiliary heating/ventilation cannot be switched on or has
switched itself off.
The auxiliary heating/ventilation is malfunctioning.
X Have the auxiliary heating/ventilation checked at a qualified spe-
cialist workshop. Adjusting the air vents
Important safety notes
G
WARNING
Very hot or very cold air can flow from the air vents. This could result in burns or frostbite in the immediate vicinity of the air vents. There
is a risk of injury.
Make sure that all vehicle occupants always
maintain a sufficient distance to the air out-
lets. If necessary, redirect the airflow to
another area of the vehicle interior.
In order to ensure the direct flow of fresh air
through the air vents into the vehicle interior,
please observe the following notes:
R keep the air inlet grille on the bonnet and in
the engine compartment on the front- passenger side free of blockages, such as ice,
snow or leaves.
R never cover the vents or ventilation grilles in
the vehicle interior
i For virtually draught-free ventilation, adjust
the sliders of the air vents to the centre posi- tion. 154
Adjusting the air ventsClimate control
Page 165 of 453
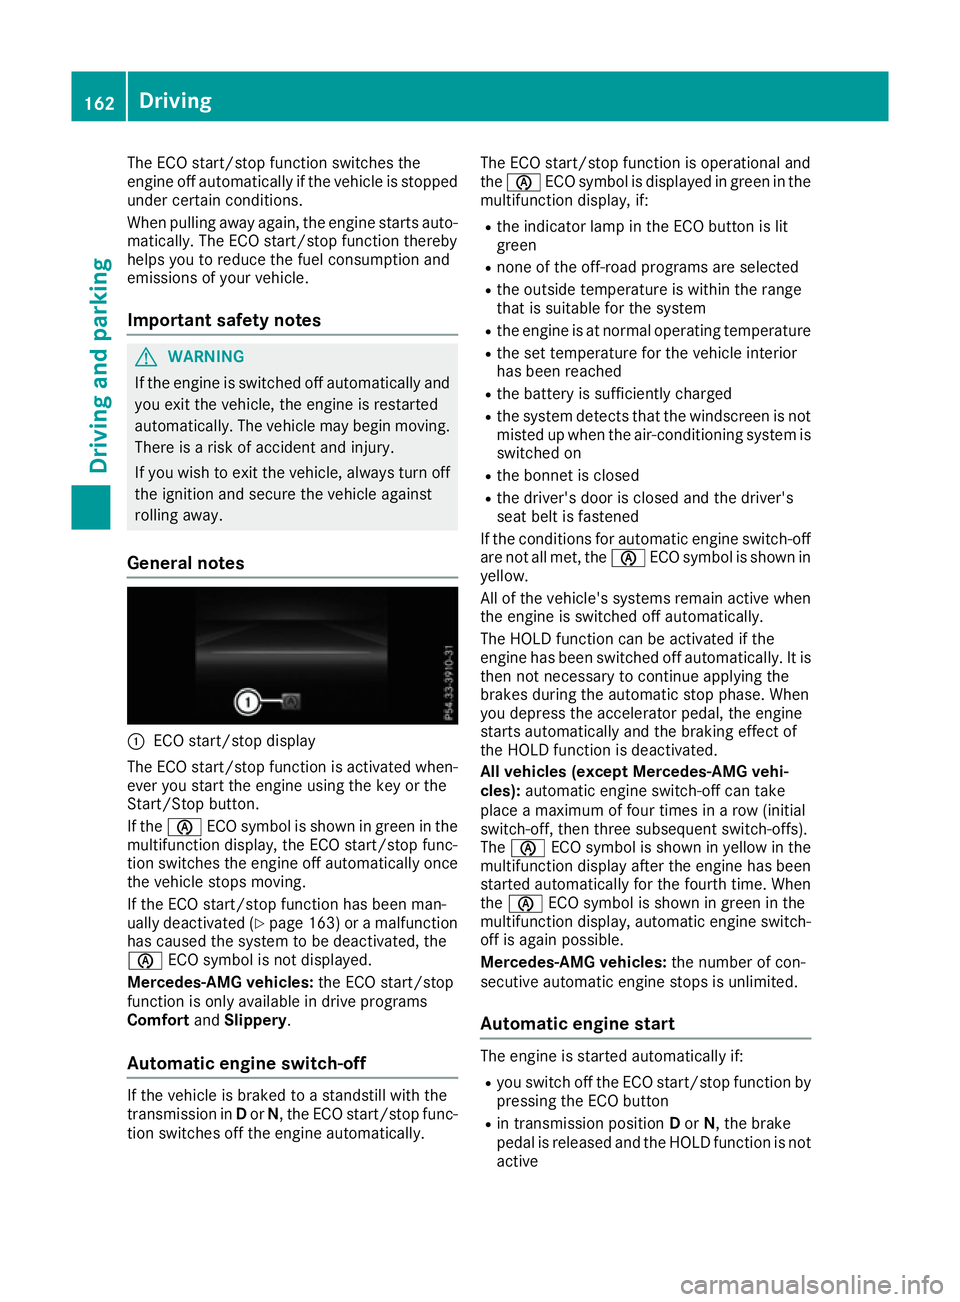
The ECO start/stop function switches the
engine off automatically if the vehicle is stopped
under certain conditions.
When pulling away again, the engine starts auto- matically. The ECO start/stop function thereby
helps you to reduce the fuel consumption and
emissions of your vehicle.
Important safety notes G
WARNING
If the engine is switched off automatically and you exit the vehicle, the engine is restarted
automatically. The vehicle may begin moving. There is a risk of accident and injury.
If you wish to exit the vehicle, always turn off
the ignition and secure the vehicle against
rolling away.
General notes :
ECO start/stop display
The ECO start/stop function is activated when-
ever you start the engine using the key or the
Start/Stop button.
If the è ECO symbol is shown in green in the
multifunction display, the ECO start/stop func-
tion switches the engine off automatically once
the vehicle stops moving.
If the ECO start/stop function has been man-
ually deactivated (Y page 163) or a malfunction
has caused the system to be deactivated, the
è ECO symbol is not displayed.
Mercedes-AMG vehicles: the ECO start/stop
function is only available in drive programs
Comfort andSlippery.
Automatic engine switch-off If the vehicle is braked to a standstill with the
transmission in Dor N, the ECO start/stop func-
tion switches off the engine automatically. The ECO start/stop function is operational and
the
è ECO symbol is displayed in green in the
multifunction display, if:
R the indicator lamp in the ECO button is lit
green
R none of the off-road programs are selected
R the outside temperature is within the range
that is suitable for the system
R the engine is at normal operating temperature
R the set temperature for the vehicle interior
has been reached
R the battery is sufficiently charged
R the system detects that the windscreen is not
misted up when the air-conditioning system is
switched on
R the bonnet is closed
R the driver's door is closed and the driver's
seat belt is fastened
If the conditions for automatic engine switch-off are not all met, the èECO symbol is shown in
yellow.
All of the vehicle's systems remain active when the engine is switched off automatically.
The HOLD function can be activated if the
engine has been switched off automatically. It isthen not necessary to continue applying the
brakes during the automatic stop phase. When
you depress the accelerator pedal, the engine
starts automatically and the braking effect of
the HOLD function is deactivated.
All vehicles (except Mercedes-AMG vehi-
cles): automatic engine switch-off can take
place a maximum of four times in a row (initial
switch-off, then three subsequent switch-offs).
The è ECO symbol is shown in yellow in the
multifunction display after the engine has been
started automatically for the fourth time. When
the è ECO symbol is shown in green in the
multifunction display, automatic engine switch-
off is again possible.
Mercedes-AMG vehicles: the number of con-
secutive automatic engine stops is unlimited.
Automatic engine start The engine is started automatically if:
R
you switch off the ECO start/stop function by
pressing the ECO button
R in transmission position Dor N, the brake
pedal is released and the HOLD function is not active 162
DrivingDriving and parking
Page 168 of 453
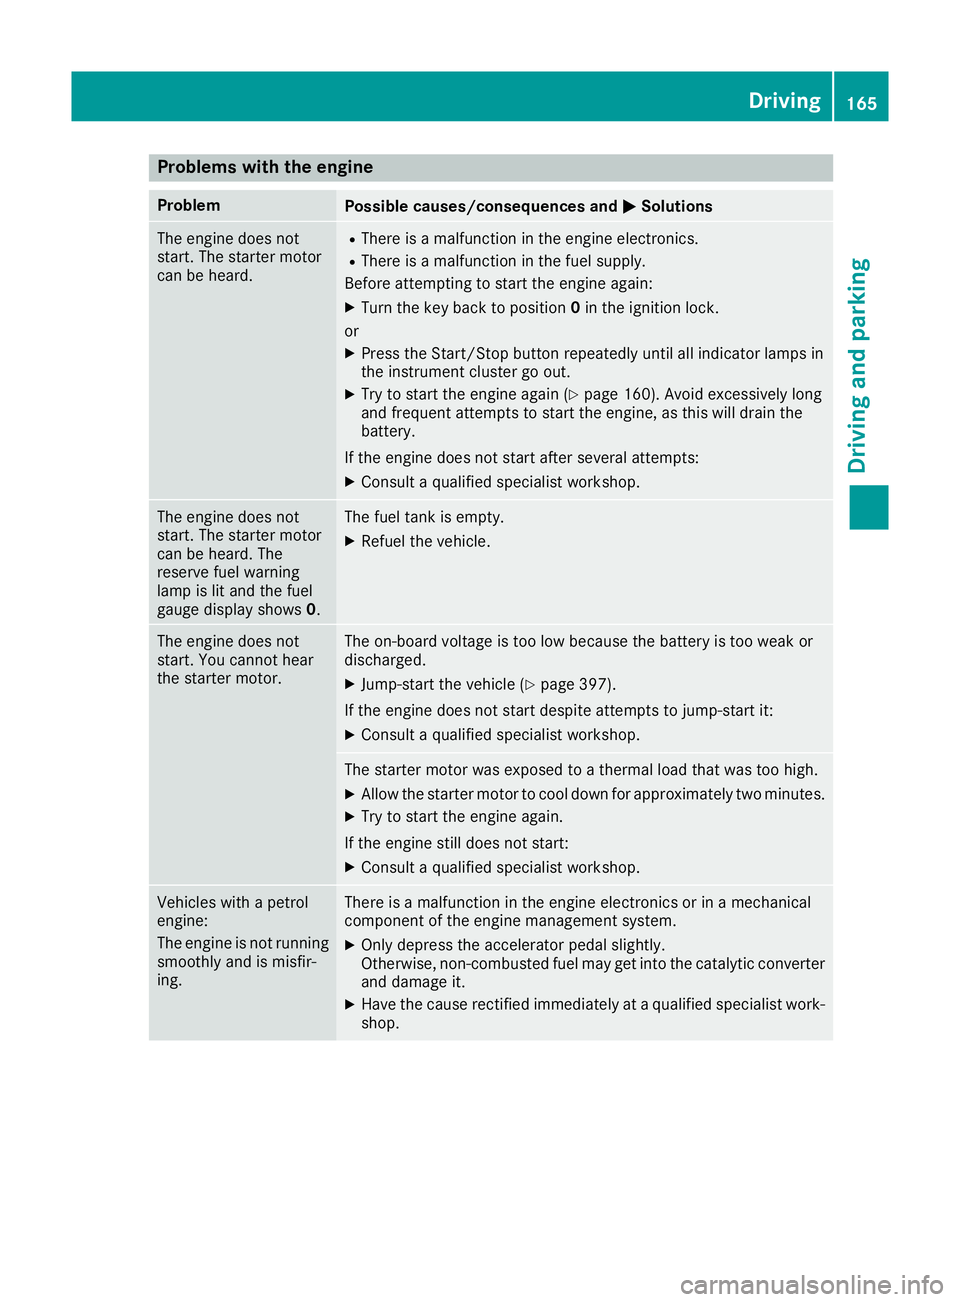
Problems with the engine
Problem
Possible causes/consequences and
M
MSolutions The engine does not
start. The starter motor
can be heard. R
There is a malfunction in the engine electronics.
R There is a malfunction in the fuel supply.
Before attempting to start the engine again:
X Turn the key back to position 0in the ignition lock.
or X Press the Start/Stop button repeatedly until all indicator lamps in
the instrument cluster go out.
X Try to start the engine again (Y page 160). Avoid excessively long
and frequent attempts to start the engine, as this will drain the
battery.
If the engine does not start after several attempts:
X Consult a qualified specialist workshop. The engine does not
start. The starter motor
can be heard. The
reserve fuel warning
lamp is lit and the fuel
gauge display shows
0. The fuel tank is empty.
X Refuel the vehicle. The engine does not
start. You cannot hear
the starter motor. The on-board voltage is too low because the battery is too weak or
discharged.
X Jump-start the vehicle (Y page 397).
If the engine does not start despite attempts to jump-start it:
X Consult a qualified specialist workshop. The starter motor was exposed to a thermal load that was too high.
X Allow the starter motor to cool down for approximately two minutes.
X Try to start the engine again.
If the engine still does not start: X Consult a qualified specialist workshop. Vehicles with a petrol
engine:
The engine is not running
smoothly and is misfir-
ing. There is a malfunction in the engine electronics or in a mechanical
component of the engine management system.
X Only depress the accelerator pedal slightly.
Otherwise, non-combusted fuel may get into the catalytic converter
and damage it.
X Have the cause rectified immediately at a qualified specialist work-
shop. Driving
165Driving and parking Z
Page 174 of 453
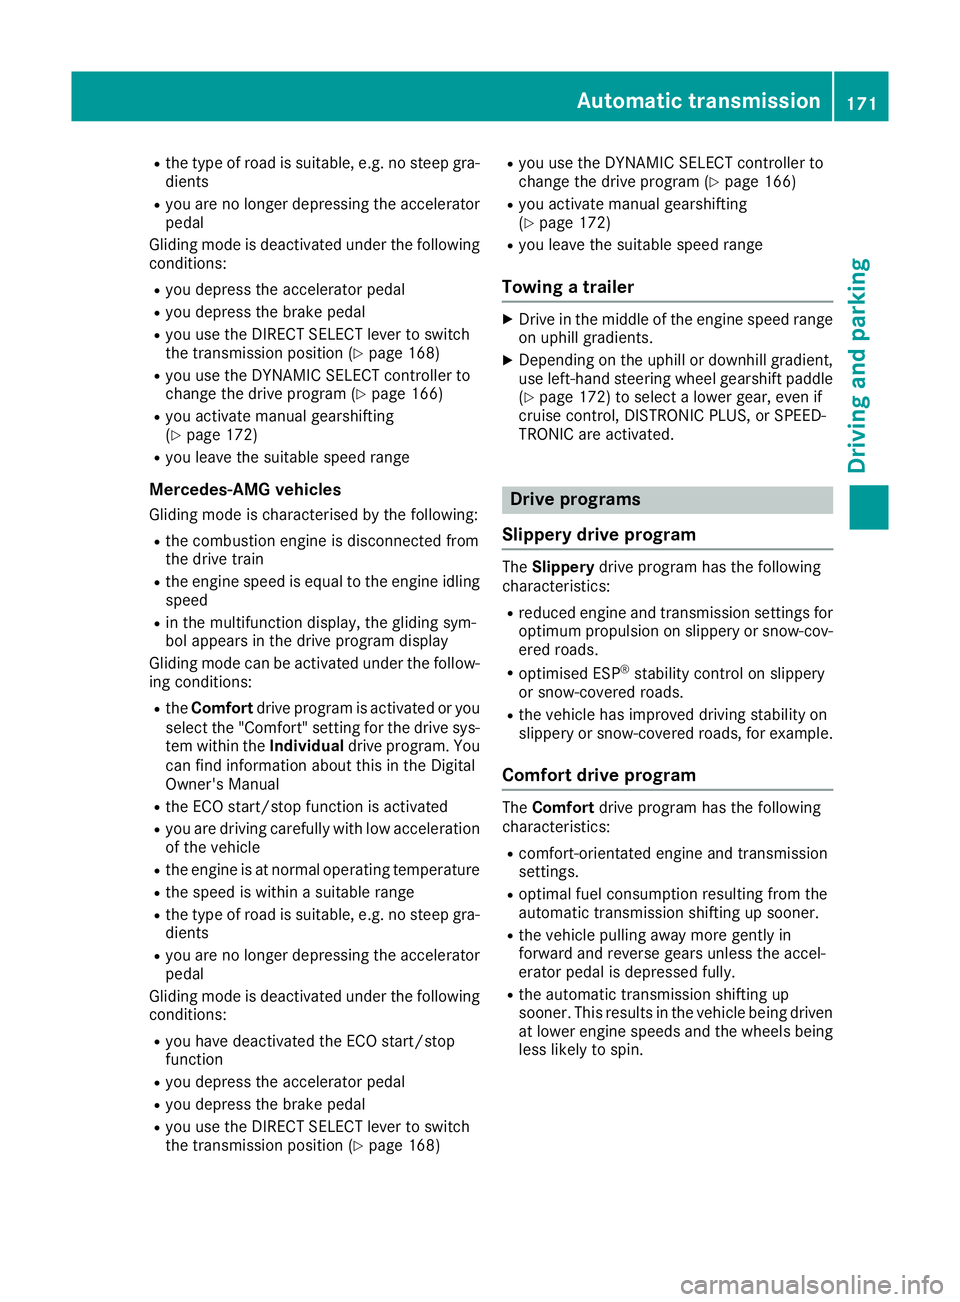
R
the type of road is suitable, e.g. no steep gra-
dients
R you are no longer depressing the accelerator
pedal
Gliding mode is deactivated under the following
conditions:
R you depress the accelerator pedal
R you depress the brake pedal
R you use the DIRECT SELECT lever to switch
the transmission position (Y page 168)
R you use the DYNAMIC SELECT controller to
change the drive program (Y page 166)
R you activate manual gearshifting
(Y page 172)
R you leave the suitable speed range
Mercedes-AMG vehicles Gliding mode is characterised by the following:
R the combustion engine is disconnected from
the drive train
R the engine speed is equal to the engine idling
speed
R in the multifunction display, the gliding sym-
bol appears in the drive program display
Gliding mode can be activated under the follow-
ing conditions:
R the Comfort drive program is activated or you
select the "Comfort" setting for the drive sys-
tem within the Individualdrive program. You
can find information about this in the Digital
Owner's Manual
R the ECO start/stop function is activated
R you are driving carefully with low acceleration
of the vehicle
R the engine is at normal operating temperature
R the speed is within a suitable range
R the type of road is suitable, e.g. no steep gra-
dients
R you are no longer depressing the accelerator
pedal
Gliding mode is deactivated under the following conditions:
R you have deactivated the ECO start/stop
function
R you depress the accelerator pedal
R you depress the brake pedal
R you use the DIRECT SELECT lever to switch
the transmission position (Y page 168)R
you use the DYNAMIC SELECT controller to
change the drive program (Y page 166)
R you activate manual gearshifting
(Y page 172)
R you leave the suitable speed range
Towing a trailer X
Drive in the middle of the engine speed range
on uphill gradients.
X Depending on the uphill or downhill gradient,
use left-hand steering wheel gearshift paddle
(Y page 172) to select a lower gear, even if
cruise control, DISTRONIC PLUS, or SPEED-
TRONIC are activated. Drive programs
Slippery drive program The
Slippery drive program has the following
characteristics:
R reduced engine and transmission settings for
optimum propulsion on slippery or snow-cov-
ered roads.
R optimised ESP ®
stability control on slippery
or snow-covered roads.
R the vehicle has improved driving stability on
slippery or snow-covered roads, for example.
Comfort drive program The
Comfort drive program has the following
characteristics:
R comfort-orientated engine and transmission
settings.
R optimal fuel consumption resulting from the
automatic transmission shifting up sooner.
R the vehicle pulling away more gently in
forward and reverse gears unless the accel-
erator pedal is depressed fully.
R the automatic transmission shifting up
sooner. This results in the vehicle being driven
at lower engine speeds and the wheels being less likely to spin. Automatic transmission
171Driving and parking Z