2015 MERCEDES-BENZ GLE SUV brake light
[x] Cancel search: brake lightPage 83 of 453
R
darkness
R if:
- pedestrians move quickly, e.g. into the path
of the vehicle
- the camera system no longer detects a
pedestrian as a person due to special cloth- ing or other objects
- a pedestrian is concealed by other objects
- the typical outline of a person is not distin-
guishable from the background
Following damage to the front end of the vehicle,
have the radar sensor settings and operation
checked at a qualified specialist workshop. This also applies to collisions at slow speeds where
there is no visible damage to the front of the
vehicle.
Following damage to the windscreen, have the
configuration and operation of the camera sys-
tem checked at a qualified specialist workshop.
Function X
To activate/deactivate: activate or deacti-
vate PRE-SAFE ®
Brake in the on-board com-
puter (Y page 290).
If the PRE-SAFE ®
Brake is not activated, the
æ symbol appears in the multifunction dis-
play.
If you have activated DSR (Y page 252), PRE-
SAFE ®
Brake is also deactivated.
This function will issue a warning if:
R at a speed of approximately 30 km/h or
higher, the distance maintained to the vehicle
travelling in front is insufficient for several
seconds.
The · distance warning lamp then lights
up in the instrument cluster.
R at a speed of around 7 km/ hor more, you
rapidly approach a vehicle in front or a pedes-
trian
An intermittent warning tone will then sound
and the ·distance warning lamp lights up
in the instrument cluster.
X Brake immediately to defuse the situation.
or X Take evasive action provided it is safe to do
so. The PRE-SAFE
®
Brake function can also brake
the vehicle automatically under the following
conditions:
R the driver and front passenger have their seat
belts fastened
and
R the vehicle speed is between approximately
7 km/h and 200 km/h
At a speed of up to approximately 70 km/h,
PRE-SAFE ®
Brake can also detect:
R stationary objects in the path of your vehicle,
e.g. stopped or parked vehicles
R pedestrians in the path of your vehicle
i If there is an increased risk of a collision,
preventive passenger protection measures
(PRE-SAFE ®
) are triggered (Y page 57).
If the risk of a collision with the vehicle in front
remains and you do not brake, take evasive
action or accelerate significantly, the vehicle
may perform automatic emergency braking, up
to the point of full brake application. Automatic
emergency braking is not performed until imme- diately prior to an imminent accident.
You can prevent the intervention of PRE-SAFE ®
Brake at any time by:
R depressing the accelerator pedal further
R activating kickdown
R releasing the brake pedal
The braking action of PRE-SAFE ®
Brake is ended
automatically if:
R you manoeuvre to avoid the obstacle
R there is no longer any danger of a collision
R there is no longer an obstacle detected in
front of your vehicle STEER CONTROL
General notes STEER CONTROL helps you by transmitting a
noticeable steering force to the steering wheel
in the direction required for vehicle stabilisation.
This steering support is provided in particular if:
R both right wheels or both left wheels are on a
wet or slippery road surface when you brake
R the vehicle starts to skid 80
Driving safety systemsSafety
Page 93 of 453
Problem
Possible causes/consequences and
M
MSolutions The engine cannot be
started using the key. the on-board voltage is too low.
X Switch off non-essential consumers, e.g. seat heating or interior
lighting, and try to start the engine again.
If this does not work:
X Check the starter battery and charge it if necessary (Y page 395).
or
X Jump-start the vehicle (Y page 397).
or
X Consult a qualified specialist workshop. The engine cannot be
started using the Start/
Stop button. The key is in
the vehicle. The vehicle is locked.
X Unlock the vehicle and try to start the vehicle again. The key battery is discharged or nearly discharged.
X Check the key battery (Y page 87) and replace if necessary
(Y page 87).
If this does not work: X Start your vehicle with the key in the ignition lock. There is interference from a powerful source of radio waves.
X Start your vehicle with the key in the ignition lock. You have lost a key. X
Have the key deactivated at a qualified specialist workshop.
X Report the loss immediately to the vehicle insurers.
X If necessary, have the locks changed as well. You have lost the emer-
gency key element. X
Report the loss immediately to the vehicle insurers.
X If necessary, have the locks changed as well. Doors
Important safety notes
G
WARNING
If children are left unsupervised in the vehicle, they can:
R open doors and endanger other persons or
road users
R climb out and be injured by the traffic
R operate vehicle equipment and, for exam-
ple, trap themselves. Children could also set the vehicle in motion,
for example by:
R releasing the parking brake
R shifting the automatic transmission out of
park position P
R starting the engine.
There is a risk of an accident and injury.
When leaving the vehicle, always take the key with you and lock the vehicle. Never leave
children unattended in the vehicle. Always
keep the key out of reach of children.
United Kingdom only: 90
DoorsOpening and closing
Page 127 of 453
deactivation of the main-beam headlamps
(Y page 126).
Headlamp flasher X
To switch on: turn the key in the ignition lock
to position 1or 2, or start the engine.
X Pull the combination switch in the direction of
arrow =. Hazard warning lamps
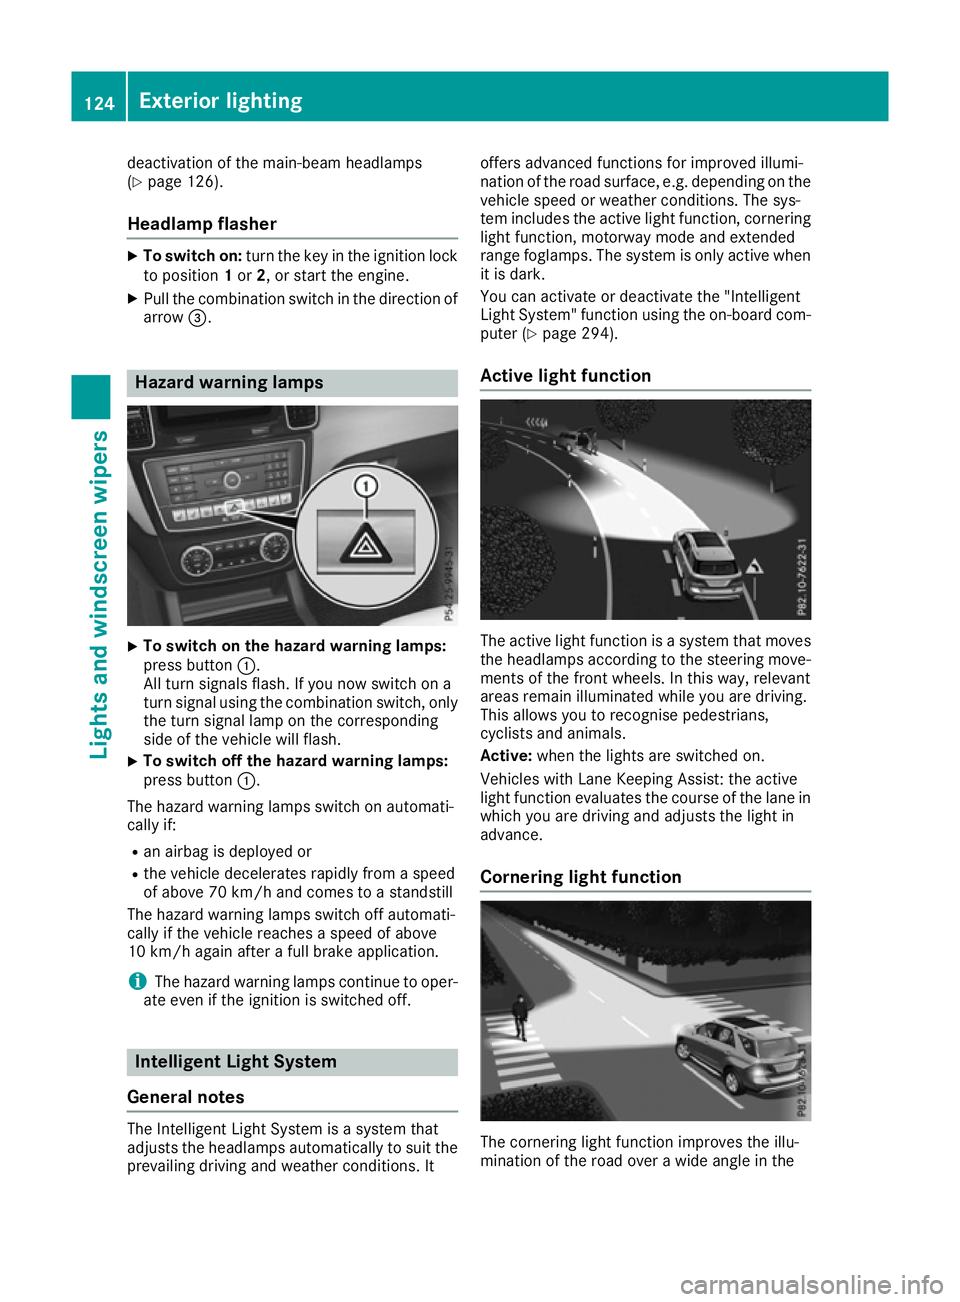
X
To switch on the hazard warning lamps:
press button
:.
All turn signals flash. If you now switch on a
turn signal using the combination switch, only the turn signal lamp on the corresponding
side of the vehicle will flash.
X To switch off the hazard warning lamps:
press button
:.
The hazard warning lamps switch on automati-
cally if:
R an airbag is deployed or
R the vehicle decelerates rapidly from a speed
of above 70 km/h and comes to a standstill
The hazard warning lamps switch off automati-
cally if the vehicle reaches a speed of above
10 km/ hagain after a full brake application.
i The hazard warning lamps continue to oper-
ate even if the ignition is switched off. Intelligent Light System
General notes The Intelligent Light System is a system that
adjusts the headlamps automatically to suit the
prevailing driving and weather conditions. It offers advanced functions for improved illumi-
nation of the road surface, e.g. depending on the
vehicle speed or weather conditions. The sys-
tem includes the active light function, corneringlight function, motorway mode and extended
range foglamps. The system is only active when it is dark.
You can activate or deactivate the "Intelligent
Light System" function using the on-board com-
puter (Y page 294).
Active light function The active light function is a system that moves
the headlamps according to the steering move-
ments of the front wheels. In this way, relevant
areas remain illuminated while you are driving.
This allows you to recognise pedestrians,
cyclists and animals.
Active: when the lights are switched on.
Vehicles with Lane Keeping Assist: the active
light function evaluates the course of the lane in which you are driving and adjusts the light in
advance.
Cornering light function The cornering light function improves the illu-
mination of the road over a wide angle in the124
Exterior lightingLights and windscreen wipers
Page 134 of 453
Switching the rear window wiper on/
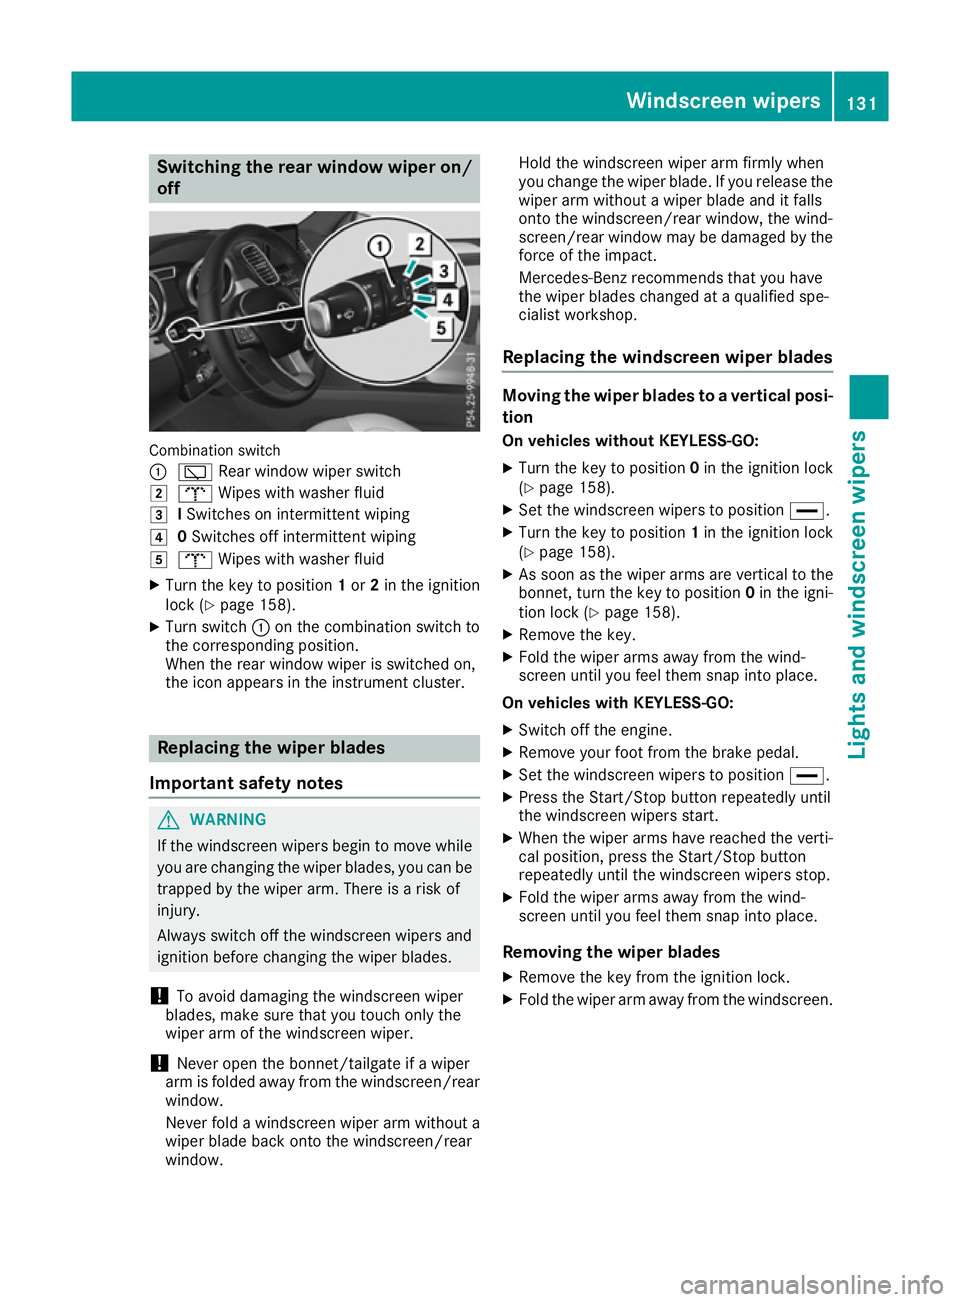
off Combination switch
:
è Rear window wiper switch
2 b Wipes with washer fluid
3 ISwitches on intermittent wiping
4 0Switches off intermittent wiping
5 b Wipes with washer fluid
X Turn the key to position 1or 2in the ignition
lock (Y page 158).
X Turn switch :on the combination switch to
the corresponding position.
When the rear window wiper is switched on,
the icon appears in the instrument cluster. Replacing the wiper blades
Important safety notes G
WARNING
If the windscreen wipers begin to move while
you are changing the wiper blades, you can be trapped by the wiper arm. There is a risk of
injury.
Always switch off the windscreen wipers and
ignition before changing the wiper blades.
! To avoid damaging the windscreen wiper
blades, make sure that you touch only the
wiper arm of the windscreen wiper.
! Never open the bonnet/tailgate if a wiper
arm is folded away from the windscreen/rear
window.
Never fold a windscreen wiper arm without a
wiper blade back onto the windscreen/rear
window. Hold the windscreen wiper arm firmly when
you change the wiper blade. If you release the
wiper arm without a wiper blade and it falls
onto the windscreen/rear window, the wind-
screen/rear window may be damaged by the
force of the impact.
Mercedes-Benz recommends that you have
the wiper blades changed at a qualified spe-
cialist workshop.
Replacing the windscreen wiper blades Moving the wiper blades to a vertical posi-
tion
On vehicles without KEYLESS-GO:
X Turn the key to position 0in the ignition lock
(Y page 158).
X Set the windscreen wipers to position °.
X Turn the key to position 1in the ignition lock
(Y page 158).
X As soon as the wiper arms are vertical to the
bonnet, turn the key to position 0in the igni-
tion lock (Y page 158).
X Remove the key.
X Fold the wiper arms away from the wind-
screen until you feel them snap into place.
On vehicles with KEYLESS-GO:
X Switch off the engine.
X Remove your foot from the brake pedal.
X Set the windscreen wipers to position °.
X Press the Start/Stop button repeatedly until
the windscreen wipers start.
X When the wiper arms have reached the verti-
cal position, press the Start/Stop button
repeatedly until the windscreen wipers stop.
X Fold the wiper arms away from the wind-
screen until you feel them snap into place.
Removing the wiper blades X Remove the key from the ignition lock.
X Fold the wiper arm away from the windscreen. Windscreen wipers
131Lights and windscreen wipers Z
Page 135 of 453
X
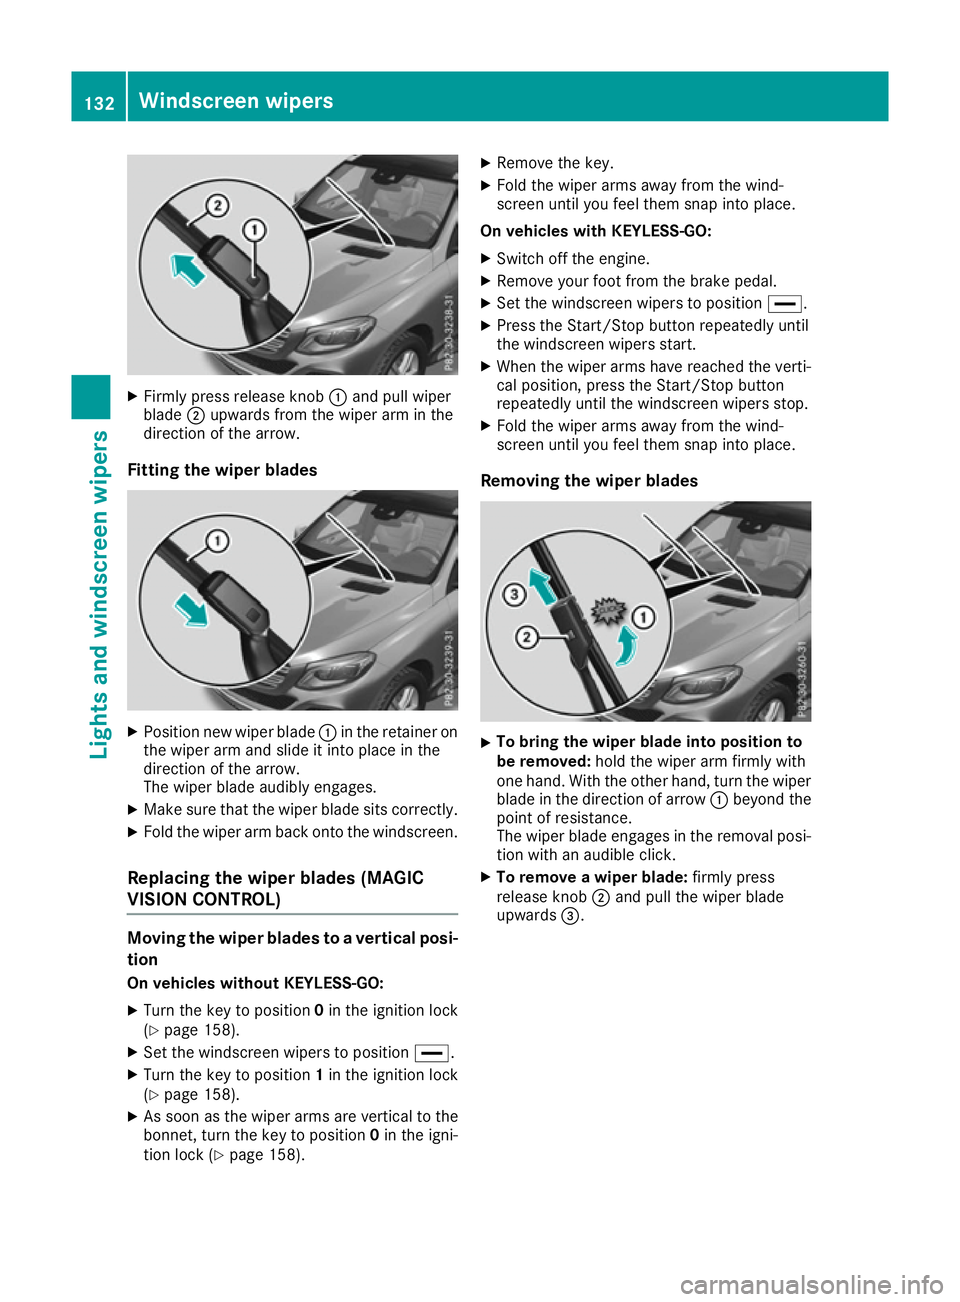
Firmly press release knob :and pull wiper
blade ;upwards from the wiper arm in the
direction of the arrow.
Fitting the wiper blades X
Position new wiper blade :in the retainer on
the wiper arm and slide it into place in the
direction of the arrow.
The wiper blade audibly engages.
X Make sure that the wiper blade sits correctly.
X Fold the wiper arm back onto the windscreen.
Replacing the wiper blades (MAGIC
VISION CONTROL) Moving the wiper blades to a vertical posi-
tion
On vehicles without KEYLESS-GO:
X Turn the key to position 0in the ignition lock
(Y page 158).
X Set the windscreen wipers to position °.
X Turn the key to position 1in the ignition lock
(Y page 158).
X As soon as the wiper arms are vertical to the
bonnet, turn the key to position 0in the igni-
tion lock (Y page 158). X
Remove the key.
X Fold the wiper arms away from the wind-
screen until you feel them snap into place.
On vehicles with KEYLESS-GO:
X Switch off the engine.
X Remove your foot from the brake pedal.
X Set the windscreen wipers to position °.
X Press the Start/Stop button repeatedly until
the windscreen wipers start.
X When the wiper arms have reached the verti-
cal position, press the Start/Stop button
repeatedly until the windscreen wipers stop.
X Fold the wiper arms away from the wind-
screen until you feel them snap into place.
Removing the wiper blades X
To bring the wiper blade into position to
be removed:
hold the wiper arm firmly with
one hand. With the other hand, turn the wiper blade in the direction of arrow :beyond the
point of resistance.
The wiper blade engages in the removal posi-
tion with an audible click.
X To remove a wiper blade: firmly press
release knob ;and pull the wiper blade
upwards =. 132
Windscreen wipersLights and windscreen wipers
Page 163 of 453
Starting the vehicle
Important safety notes G
WARNING
If children are left unsupervised in the vehicle, they can:
R open doors and endanger other persons or
road users
R climb out and be injured by the traffic
R operate vehicle equipment and, for exam-
ple, trap themselves.
Children could also set the vehicle in motion, for example by:
R releasing the parking brake
R shifting the automatic transmission out of
park position P
R starting the engine.
There is a risk of an accident and injury.
When leaving the vehicle, always take the key
with you and lock the vehicle. Never leave
children unattended in the vehicle. Always
keep the key out of reach of children. G
WARNING
Combustion engines emit poisonous exhaust
gases such as carbon monoxide. Inhaling
these exhaust gases leads to poisoning. There is a risk of fatal injury. Therefore never leave
the engine running in enclosed spaces with-
out sufficient ventilation. G
WARNING
Flammable materials introduced through
environmental influence or by animals can
ignite if in contact with the exhaust system or parts of the engine that heat up. There is a risk
of fire.
Carry out regular checks to make sure that
there are no flammable foreign materials in
the engine compartment or in the exhaust
system.
! Do not depress the accelerator when start-
ing the engine. General notes Vehicles with a petrol engine:
the catalytic
converter is preheated for up to 30 seconds
after a cold start. The sound of the engine may
change during this time.
Automatic transmission X
Shift the transmission to position P
(Y page 168).
The transmission position indicator in the
multifunction display shows P(Y page 168).
i You can start the engine in transmission
position Pand N.
Starting procedure with the key X
To start a diesel engine: turn the key to
position 2in the ignition lock (Y page 158).
The % preglow indicator lamp in the instru-
ment cluster lights up.
X Turn the key to position 3in the ignition lock
(Y page 158) and release it as soon as the
engine is running.
i Vehicles with a diesel engine:
you can
start the engine without preglow if the engine
is warm.
Using KEYLESS-GO to start the engine The Start/Stop button can be used to start the
vehicle without inserting the key into the ignition
lock. The key must be in the vehicle and the
Start/Stop button must be inserted in the igni-
tion lock. This mode for starting the engine oper-
ates independently of the ECO start/stop auto- matic engine start function.
X Depress the brake pedal and keep it
depressed.
X Press the Start/Stop button once
(Y page 158).
Vehicles with a petrol engine: the engine
starts.
Vehicles with a diesel engine: preglow is
activated and the engine starts. 160
DrivingDriving and parking
Page 166 of 453
R
you depress the accelerator pedal
R you engage reverse gear R
R you move the transmission out of position P
R you switch to the Sport PlusorSport drive
program (Mercedes-AMG vehicles)
R you activate manual gearshifting (Mercedes-
AMG vehicles)
R you switch to the Offroaddrive program
(vehicles without Off-Road Engineering pack- age)
R you switch to the OffroadorOffroad Plus
drive program (vehicles with Off-Road Engi-
neering package)
R you unfasten your seat belt or open the driv-
er's door
R the vehicle starts to roll
R the brake system requires this
R the temperature in the vehicle interior devi-
ates from the set range
R the system detects moisture on the wind-
screen when the air-conditioning system is
switched on
R the battery's charge status is too low
Shifting the transmission to position Pdoes not
start the engine.
If you shift the transmission from Rto D, the
ECO start/stop function is available again once
the è ECO symbol reappears in green in the
multifunction display.
Switching the ECO start/stop function
off/on All vehicles (except Mercedes-AMG vehi-
cles) X
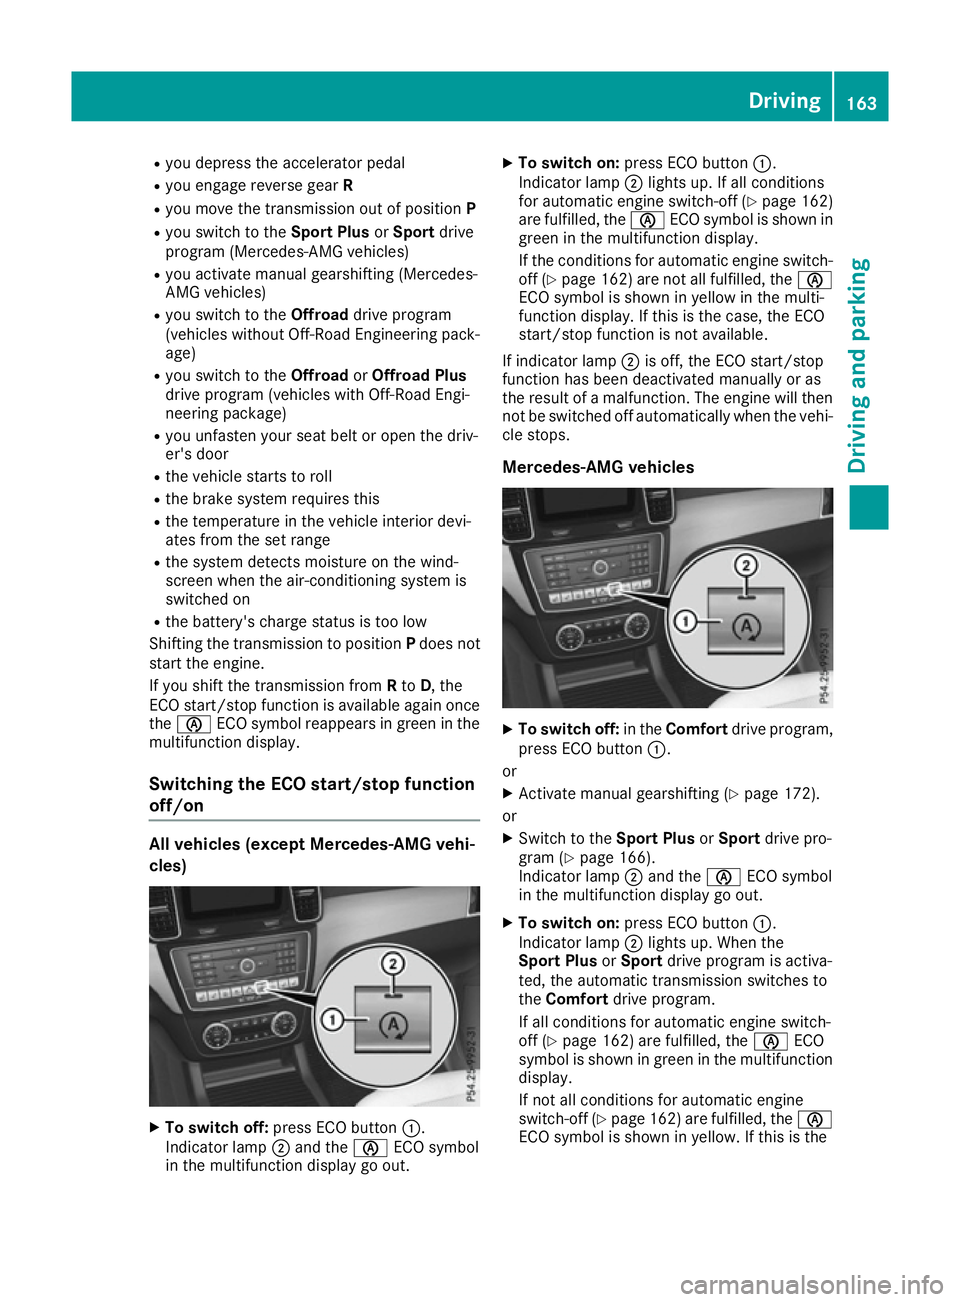
To switch off: press ECO button :.
Indicator lamp ;and the èECO symbol
in the multifunction display go out. X
To switch on: press ECO button :.
Indicator lamp ;lights up. If all conditions
for automatic engine switch-off (Y page 162)
are fulfilled, the èECO symbol is shown in
green in the multifunction display.
If the conditions for automatic engine switch-
off (Y page 162) are not all fulfilled, the è
ECO symbol is shown in yellow in the multi-
function display. If this is the case, the ECO
start/stop function is not available.
If indicator lamp ;is off, the ECO start/stop
function has been deactivated manually or as
the result of a malfunction. The engine will then
not be switched off automatically when the vehi-
cle stops.
Mercedes-AMG vehicles X
To switch off: in theComfort drive program,
press ECO button :.
or X Activate manual gearshifting (Y page 172).
or X Switch to the Sport PlusorSport drive pro-
gram (Y page 166).
Indicator lamp ;and the èECO symbol
in the multifunction display go out.
X To switch on: press ECO button :.
Indicator lamp ;lights up. When the
Sport Plus orSport drive program is activa-
ted, the automatic transmission switches to
the Comfort drive program.
If all conditions for automatic engine switch-
off (Y page 162) are fulfilled, the èECO
symbol is shown in green in the multifunction display.
If not all conditions for automatic engine
switch-off (Y page 162) are fulfilled, the è
ECO symbol is shown in yellow. If this is the Driving
163Driving and pa rking Z
Page 194 of 453
Problem
Possible causes/consequences and
M
MSolutions The charging cable con-
nector cannot be
removed from the vehi-
cle socket. The charging cable connector has not been unlocked.
X Press the %button on the key.
The Ì indicator lamp on the vehicle socket lights up. The charg-
ing cable connector is unlocked.
X Remove the charging cable connector from the vehicle socket. The charging cable connector is blocked.
X Pull the charging cable close enough to the charging cable connec-
tor so that the charging cable connector is not under strain.
X Lock the vehicle and unlock it again.
X Remove the charging cable connector from the vehicle socket.
X If the charging cable connector continues to be blocked, consult a
qualified specialist workshop. Parking
Important safety notes
G
WARNING
Flammable material such as leaves, grass or
twigs may ignite if they come into contact with hot parts of the exhaust system or exhaust
gas flow. There is a risk of fire.
Park the vehicle so that no flammable mate-
rial can come into contact with hot vehicle
components. In particular, do not park on dry grassland or harvested grain fields. G
WARNING
If you leave children unattended in the vehi-
cle, they may be able to set the vehicle in
motion if, for example, they:
R release the parking brake
R shift the automatic transmission out of park
position P
R start the engine
In addition, they may operate vehicle equip-
ment and become trapped. There is a risk of
an accident and injury.
When leaving the vehicle, always take the key
with you and lock the vehicle. Never leave
children unattended in the vehicle. !
Always secure the vehicle correctly against
rolling away. Otherwise, the vehicle or its driv-
etrain could be damaged.
To ensure that the vehicle is safeguarded
against rolling away unintentionally:
R the electric parking brake must be applied.
R the transmission must be in position Pand the
key must be removed from the ignition lock
R the front wheels must be turned towards the
kerb on steep uphill or downhill gradients
R the empty vehicle must be secured at the
front axle with a wheel chock or similar
object, for example, on uphill or downhill gra-
dients
R a laden vehicle must also be secured at the
rear axle with a wheel chock or similar object,
for example, on uphill or downhill gradients Switching off the engine
Important safety notes G
WARNING
The automatic transmission switches to neu-
tral position Nwhen you switch off the engine.
The vehicle may roll away. There is a risk of an
accident.
After switching off the engine, always switch
to parking position P. Prevent the parked vehi-
cle from rolling away by applying the parking
brake. Parking
191Driving and parking Z