2015 MERCEDES-BENZ GLE COUPE winter tyres
[x] Cancel search: winter tyresPage 24 of 393
Windows
Cleaning ......................................... 326
see Side windows
Windscreen
Demisting ...................................... 134
Windscreen washer fluid
see Windscreen washer system
Windscreen washer system
Important safety notes .................. 381
Topping up .................................... .322
Windscreen wipers
Problem (malfunction) ................... 125
Replacing the wiper blades ............ 122
Switching on/off ........................... 121
Winter driving
General notes ................................ 350
Winter operation
Overview ........................................ 350
Radiator cover ............................... 319
Slippery road surfaces ................... 174
Snow chains .................................. 351
Winter tyres
Limiting the speed (on-board com-
puter) ............................................. 247
M+S tyres ...................................... 350
Wiper blades
Cleaning ......................................... 327
Important safety notes .................. 122
Replacing ....................................... 122
Replacing (windscreen) .................. 122
Wooden trim (cleaning instruc-
tions) ................................................. .329 Z
ZONE function Switching on/off ........................... 134 Index
21
Page 67 of 393
Pets in the vehicle
G
WARNING
If you leave animals unsupervised or unse-
cured in the vehicle, they may push a button
or a switch, for example.
They could:
R activate vehicle equipment and become
trapped, for example
R switch vehicle systems on or off, thus
endangering other road users
In the event of an accident, sudden braking or
abrupt changes of direction, unsecured ani-
mals could be flung around the vehicle, injur-
ing the vehicle occupants. There is a risk of an accident and injury.
Never leave animals unattended in the vehi-
cle. Always secure animals correctly during a
journey, e.g. in an animal transport box. Driving safety systems
Driving safety systems overview
In this section, you will find information about
the following driving safety systems:
R ABS (Anti-lock BrakingSystem)
(Y page 64)
R BAS ( Brake Assist System) (Y page 65)
R BAS PLUS with Cross-Traffic Assist ( Brake
Assist System PLUS with Cross-Traffic Assist)
(Y page 65)
R COLLISION PREVENTION ASSIST PLUS
(Y page 67)
R Adaptive brake lights (Y page 69)
R ESP ®
(Electronic StabilityProgram)
(Y page 70)
R EBD ( electronic brake force distribution)
(Y page 72)
R ADAPTIVE BRAKE (Y page 72)
R PRE-SAFE ®
Brake (Y page 72)
R STEER CONTROL (Y page 74) Important safety notes
If you fail to adapt your driving style or if you are
inattentive, the driving safety systems can nei-
ther reduce the risk of an accident nor override the laws of physics. Driving safety systems are
merely aids designed to assist driving. You are
responsible for maintaining the distance to the
vehicle in front, for vehicle speed, for braking in
good time, and for staying in lane. Always adapt your driving style to suit the prevailing road and
weather conditions and maintain a safe distance from the vehicle in front. Drive carefully.
The driving safety systems described only work
as effectively as possible when there is ade-
quate contact between the tyres and the road
surface. Pay particular attention to the informa- tion regarding tyres, recommended minimum
tyre tread depths etc. in the "Wheels and tyres" section (Y page 348).
In wintry driving conditions, always use winter
tyres (M+S tyres) and, if necessary, snow
chains. Only in this way will the driving safety
systems described in this section work as effec-
tively as possible. ABS (Anti-lock Braking System)
General notes ABS regulates brake pressure in such a way that
the wheels do not lock when you brake. This
allows you to continue steering the vehicle when braking.
The ! ABS warning lamp in the instrument
cluster lights up when the ignition is switched
on. It goes out when the engine is running.
ABS works from a speed of about 8 km/h,
regardless of road-surface conditions. ABS
works on slippery surfaces, even when you only brake gently.
Important safety notes i
Observe the "Important safety notes" sec-
tion (Y page 64). G
WARNING
If ABS is faulty, the wheels could lock when
braking. The steerability and braking charac-
teristics may be severely impaired. Addition-
ally, further driving safety systems are deac- 64
Driving safety systemsSafety
Page 178 of 393
Indicated temperatures just above the freezing
point do not guarantee that the road surface is
free of ice. The road may still be icy, especially in wooded areas or on bridges. You should pay
special attention to road conditions when tem-
peratures are around freezing point.
Further information on driving with snow chains
(Y page 351).
Further information on driving with summer
tyres (Y page 350).
Observe the notes in the "Winter operation" sec-
tion (Y page 350). Off-road driving
Important safety notes G
WARNING
If you drive on a steep incline at an angle or
turn on a steep incline, the vehicle could slip
sideways, tip and overturn. There is a risk of
an accident.
When driving on an incline, drive into the line of fall (upwards or downwards in a straight
line) and do not turn. G
WARNING
Flammable material such as leaves, grass or
twigs may ignite if they come into contact with hot parts of the exhaust system. There is a risk of fire.
When driving off road or on unpaved roads,
check the vehicle's underside regularly. In
particular, remove parts of plants or other
flammable materials which have become
trapped. In the case of damage, contact a
qualified specialist workshop. G
WARNING
If the vehicle level is high, the vehicle centre of gravity is raised. This could cause the vehicleto tip over more easily on uphill or downhill
gradients. There is a risk of an accident.
Select the lowest possible vehicle level. !
There is a risk of damage to the vehicle if:
R the vehicle becomes stuck, e.g. on a high
kerb or an unpaved road
R you drive too fast over an obstacle, e.g. a
kerb or a pothole in the road
R a heavy object strikes the underbody or
parts of the chassis
In situations like this, the body, the under-
body, chassis parts, wheels or tyres could be
damaged without the damage being visible.
Components damaged in this way can unex-
pectedly fail or, in the case of an accident, no longer withstand the strain they are designed
for.
If the underbody panelling is damaged, com-
bustible materials such as leaves, grass or
twigs can gather between the underbody and
the underbody panelling. If these materials
come in contact with hot parts of the exhaust
system, they can catch fire.
In such situations, have the vehicle checked
and repaired immediately at a qualified spe-
cialist workshop. If, upon continuing your
journey, you notice that driving safety is
impaired, pull over and stop the vehicle imme- diately, paying attention to road and traffic
conditions. In such cases, consult a qualified
specialist workshop.
When driving off-road, substances such as sand,
mud and water or water mixed with oil may get
into the brakes. This may lead to a reduction in
braking performance or total brake failure as a
result of increased wear. The braking charac-
teristics will vary depending on the substances
that get into the brakes. Clean the brakes after
driving off-road. If you notice grinding noises or a reduction in braking performance, have the
brake system checked at a qualified specialist
workshop immediately. Adapt your driving style
to the altered braking characteristics.
Driving off-road increases the possibility of dam- age to the vehicle, which may cause assemblies
or systems to fail. Adapt your driving style to the conditions of the terrain. Drive carefully. Have
vehicle damage rectified immediately at a quali-
fied specialist workshop.
Do not shift into transmission position Nwhen
driving off-road. You could lose control of the
vehicle if you attempt to brake the vehicle using
the service brake. If the gradient is too steep for your vehicle, back up in reverse gear. Driving tips
175Driving and parking Z
Page 184 of 393
towing a trailer. By doing so, you will make use of
the braking effect of the engine. This relieves the load on the brake system and prevents the
brakes from overheating and wearing too
quickly.
You can set a variable or permanent limit speed:
R variable for speed limits, e.g. in built-up areas
R permanent for long-term speed restrictions,
e.g. when driving with winter tyres fitted
(Y page 182)
i The speed indicated in the speedometer
may differ slightly from the limit speed stored.
Important safety notes If you fail to adapt your driving style, SPEED-
TRONIC can neither reduce the risk of an acci-
dent nor override the laws of physics. SPEED-
TRONIC cannot take into account road, weather or traffic conditions. SPEEDTRONIC is only an
aid. You are responsible for the distance to the
vehicle in front, for vehicle speed, for braking in
good time, and for staying in lane.
If there is a change of drivers, advise the new
driver of the speed stored.
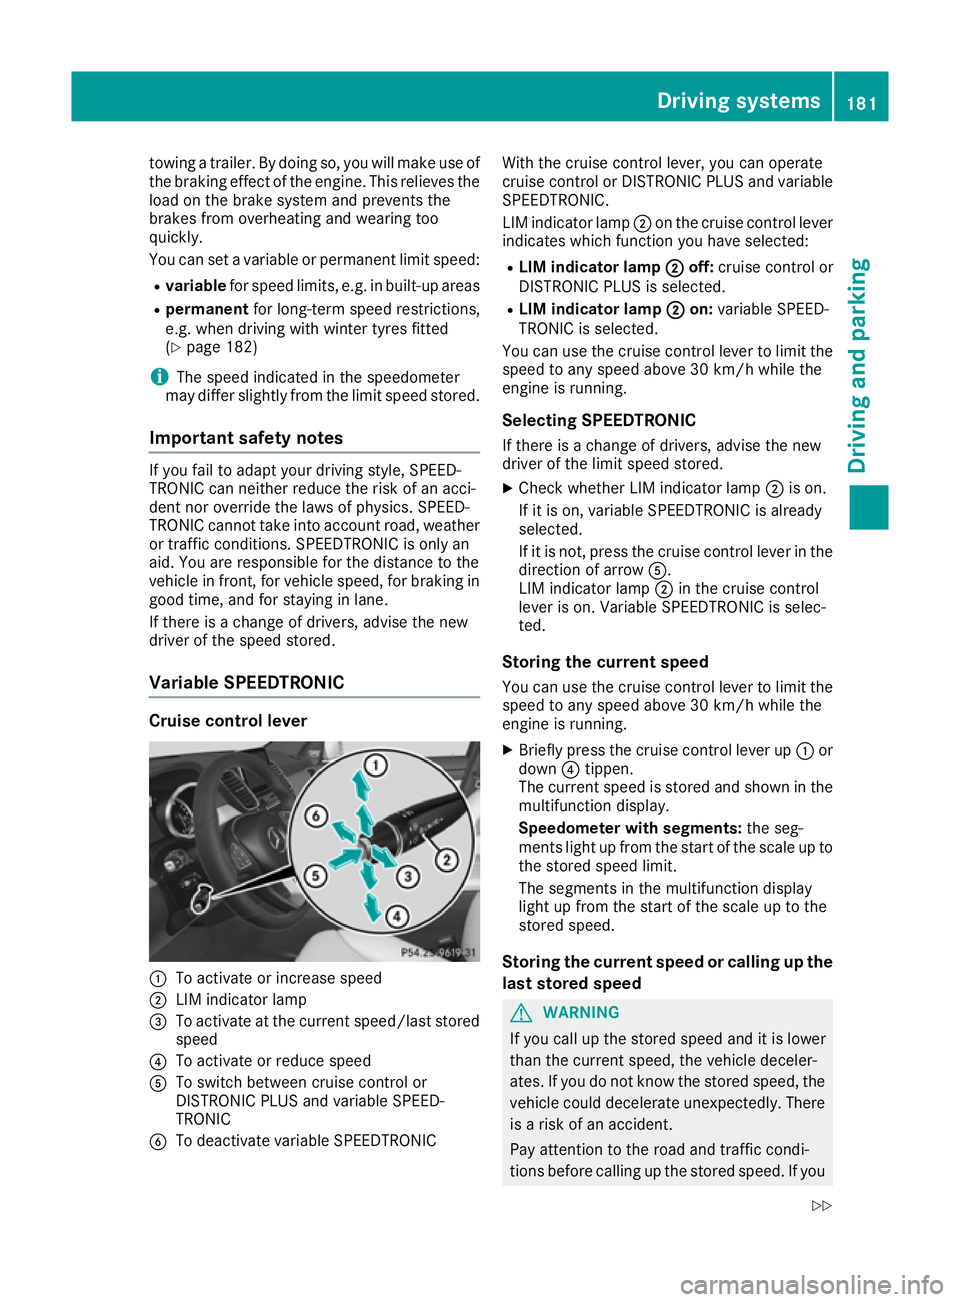
Variable SPEEDTRONIC Cruise control lever
:
To activate or increase speed
; LIM indicator lamp
= To activate at the current speed/last stored
speed
? To activate or reduce speed
A To switch between cruise control or
DISTRONIC PLUS and variable SPEED-
TRONIC
B To deactivate variable SPEEDTRONIC With the cruise control lever, you can operate
cruise control or DISTRONIC PLUS and variable
SPEEDTRONIC.
LIM indicator lamp ;on the cruise control lever
indicates which function you have selected:
R LIM indicator lamp ;
; off: cruise control or
DISTRONIC PLUS is selected.
R LIM indicator lamp ; ;on: variable SPEED-
TRONIC is selected.
You can use the cruise control lever to limit the
speed to any speed above 30 km/h while the
engine is running.
Selecting SPEEDTRONIC
If there is a change of drivers, advise the new
driver of the limit speed stored. X Check whether LIM indicator lamp ;is on.
If it is on, variable SPEEDTRONIC is already
selected.
If it is not, press the cruise control lever in the direction of arrow A.
LIM indicator lamp ;in the cruise control
lever is on. Variable SPEEDTRONIC is selec-
ted.
Storing the current speed
You can use the cruise control lever to limit the speed to any speed above 30 km/h while the
engine is running.
X Briefly press the cruise control lever up :or
down ?tippen.
The current speed is stored and shown in the
multifunction display.
Speedometer with segments: the seg-
ments light up from the start of the scale up to
the stored speed limit.
The segments in the multifunction display
light up from the start of the scale up to the
stored speed.
Storing the current speed or calling up the
last stored speed G
WARNING
If you call up the stored speed and it is lower
than the current speed, the vehicle deceler-
ates. If you do not know the stored speed, the vehicle could decelerate unexpectedly. There
is a risk of an accident.
Pay attention to the road and traffic condi-
tions before calling up the stored speed. If you Driving systems
181Driving and parking
Z
Page 185 of 393
do not know the stored speed, store the
desired speed again.
X Briefly pull the cruise control lever towards
you =.
Setting a speed X To adjust the set speed in 10 km/h incre-
ments: briefly press the cruise control lever
up : beyond the pressure point for a higher
speed, or down ?for a lower speed.
or X Keep the cruise control lever pressed beyond
the pressure point until the desired speed is
set. Press the cruise control lever up :for a
higher speed or down ?for a lower speed.
X To adjust the set speed in 1 km/h incre-
ments: briefly press the cruise control lever
up : to the pressure point for a higher speed
or down ?for a lower speed.
or
X Keep the cruise control lever pressed to the
pressure point until the desired speed is set.
Press the cruise control lever up :for a
higher speed or down ?for a lower speed.
Switching SPEEDTRONIC to passive If you depress the accelerator pedal beyond the
pressure point (kickdown), SPEEDTRONIC is
switched to passive mode. The following mes-
sage appears in the multifunction display:
SPEEDTRONIC passive
SPEEDTRONIC passive.
You can then exceed the stored speed. SPEED-
TRONIC is activated again if you:
R drive slower than the stored speed without
kickdown
R set a new speed or
R call up the last speed stored again
The SPEEDTRONIC passive SPEEDTRONIC passive message in the
multifunction display disappears. Deactivating variable SPEEDTRONIC
There are several ways to deactivate variable
SPEEDTRONIC:
X Briefly press the cruise control lever forwards
B .
or X Briefly press the cruise control lever in the
direction of arrow A.
LIM indicator lamp ;in the cruise control
lever goes out. Variable SPEEDTRONIC is
deactivated.
Cruise control or DISTRONIC PLUS is selec-
ted.
It is not possible to deactivate variable SPEED-
TRONIC by braking.
i The last speed stored is cleared when you
switch off the engine.
Permanent SPEEDTRONIC
You can use the on-board computer to perma-
nently limit the speed to a value between
160 km/h(e.g. for driving on winter tyres) and
the maximum design speed (Y page 247).
Shortly before the stored speed is reached, it
appears in the multifunction display.
Permanent SPEEDTRONIC remains active even
if variable SPEEDTRONIC is deactivated.
You cannot exceed the stored limit speed, even
if you depress the accelerator pedal beyond the
pressure point (kickdown). DISTRONIC PLUS
General notes DISTRONIC PLUS regulates the speed and auto-
matically helps you maintain the distance to the
vehicle detected in front. Vehicles are detected with the aid of the radar sensor system.
DISTRONIC PLUS brakes automatically so that
the set speed is not exceeded.
You must select a lower gear in good time on
long and steep downhill gradients, especially if
the vehicle is laden or towing a trailer. By doing
so, you will make use of the braking effect of the engine. This relieves the load on the brake sys-
tem and prevents the brakes from overheating
and wearing too quickly.
If DISTRONIC PLUS detects that there is a risk of
a collision, you will be warned visually and
acoustically. Without your intervention, 182
Driving systemsDriving and parking
Page 196 of 393
On steep uphill or downhill inclines or if there is
a malfunction, the transmission may also be
automatically shifted into position P.4MATIC
4MATIC ensures that all four wheels are perma-
nently driven. Together with ESP ®
and 4ETS, it
improves the traction of your vehicle whenever
a drive wheel spins due to insufficient grip.
If you fail to adapt your driving style, 4MATIC can
neither reduce the risk of an accident nor over-
ride the laws of physics. 4MATIC cannot take
account of road, weather and traffic conditions. 4MATIC is only an aid. You are responsible for
the distance to the vehicle in front, for vehicle
speed, for braking in good time and for staying in
lane.
! Never tow the vehicle with one axle raised.
This may damage the transfer case. Damage
of this sort is not covered by the Mercedes-
Benz implied warranty. All wheels must
remain either on the ground or be fully raised.
Observe the instructions for towing the vehi-
cle with all wheels in full contact with the
ground.
! A function or performance test should only
be carried out on a twin-axle dynamometer.
Before you operate the vehicle on such a
dynamometer, please consult a qualified
workshop. You could otherwise damage the
drive train or the brake system.
i In wintry driving conditions, the maximum
effect of 4MATIC can only be achieved if you
use winter tyres (M+S tyres), with snow
chains if necessary. DSR (Downhill Speed Regulation)
General notes DSR is an aid to assist you when driving down-
hill. It keeps the speed of travel at the speed
selected on the on-board computer. The steeper
the downhill gradient, the greater the DSR brak-
ing effect on the vehicle. When driving on flat
stretches of road or on an uphill gradient, the
DSR braking effect is minimal or non-existent.
DSR controls the vehicle’s speed when it is acti- vated and the transmission is in position D,Ror
N. By accelerating or braking, you can always drive at a higher or a lower speed than that set
on the on-board computer.
Important safety notes G
WARNING
If the speed driven and the set speed deviate and you activate DSR on a slippery road sur-
face, the wheels may lose traction. This
increases the risk of skidding and having an
accident.
Before switching DSR on, please take into
consideration the road surface and the differ-
ence between driving speed and the set
speed.
If you fail to adapt your driving style, DSR can
neither reduce the risk of accident nor override the laws of physics. DSR cannot take account ofroad, weather and traffic conditions. DSR is only
an aid. You are responsible for the distance to
the vehicle in front, for vehicle speed, for brak-
ing in good time and for staying in lane.
You are always responsible for keeping control
of the vehicle and for assessing whether the
downhill gradient can be managed. DSR may not
always be able to keep to the set speed, depend-
ing on road surface and tyre conditions. Select a set speed suitable for the prevailing conditions
and when necessary, apply the brakes manually.
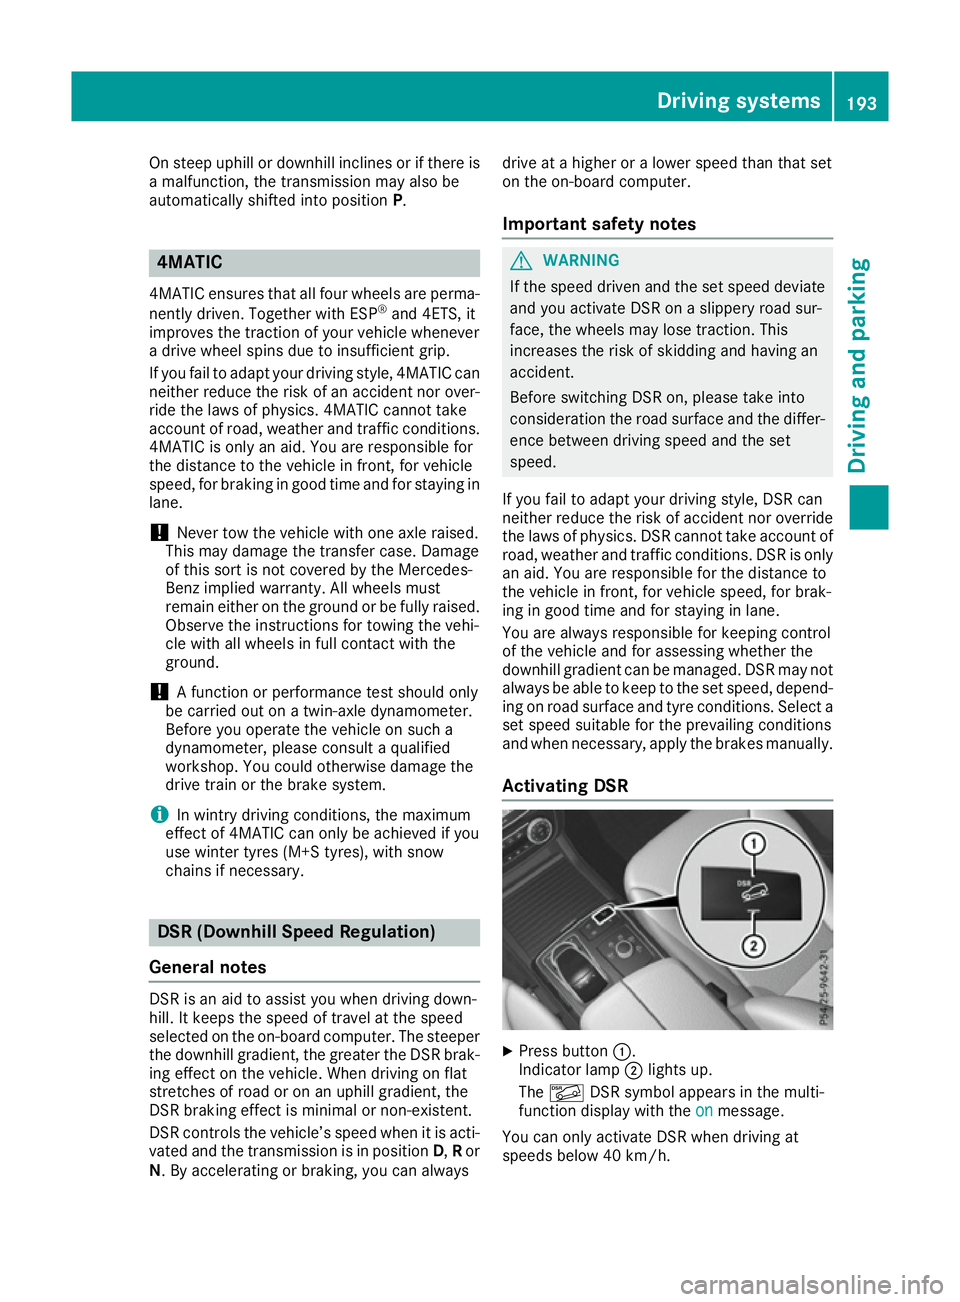
Activating DSR X
Press button :.
Indicator lamp ;lights up.
The à DSR symbol appears in the multi-
function display with the on onmessage.
You can only activate DSR when driving at
speeds below 40 km/h. Driving systems
193Driving and parking Z
Page 250 of 393
X
Press the :or9 button to select the
Dipped beams Setting for:
Dipped beams Setting for: function.
You will see the selected setting: Right-
Right-
side traffic
side traffic orLeft-side traffic
Left-side traffic.
X Press the abutton to save the setting.
If you change the setting, conversion does not
take place until the next time the vehicle is
stationary.
If you set the dipped-beam headlamps for driv-
ing on the right/left, then motorway mode and
the extended range foglamps are unavailable.
These are only deactivated if the setting for driv-
ing on the left/right is set opposite to your vehi- cle's country version.
A qualified specialist workshop can set the
dipped-beam headlamps for driving on the left/
right.
Vehicle submenu Setting permanent SPEEDTRONIC
X Press the =or; button on the steering
wheel to select the Settings Settingsmenu.
X Press the :or9 button to select the
Vehicle
Vehicle submenu.
X Press ato confirm.
X Press :or9 to select the Limit
Limit
speed (winter tyres):
speed (winter tyres): function.
You will see the current setting.
X Press ato confirm.
X Press the :or9 button to adjust per-
manent SPEEDTRONIC in increments of ten
(240 km/h 240 km/h to160 km/h 160 km/h). The Off
Offsetting
switches permanent SPEEDTRONIC off.
X Press the abutton to store the entry.
For further information on permanent SPEED-
TRONIC (Y page 182).
Activating/deactivating the automatic
locking feature
If you activate the Automatic door locks
Automatic door locks
function, the vehicle is centrally locked above a
speed of approximately 15 km/h.
X Press the =or; button on the steering
wheel to select the Settings
Settings menu.
X Press the :or9 button to select the
Vehicle
Vehicle submenu.
X Press ato confirm. X
Press the :or9 button to select the
Automatic door locks
Automatic door locks function.
When the Automatic
Automatic door
doorlocks
locks function is
activated, the vehicle doors are displayed in
orange in the multifunction display.
X Press the abutton to save the setting.
For further information on the automatic locking feature; see (Y page 86).
Activating/deactivating the acoustic
locking confirmation
If you switch on the Acoustic AcousticLock
Lockfunction, an
acoustic signal sounds when you lock the vehi-
cle.
X Press the =or; button on the steering
wheel to select the Settings Settingsmenu.
X Press the :or9 button to select the
Vehicle
Vehicle submenu.
X Press ato confirm.
X Press the :or9 button to select the
Acoustic Lock
Acoustic Lock function.
If the Acoustic Lock
Acoustic Lock function is activated,
the & symbol in the multifunction display
lights up orange.
X Press the abutton to save the setting.
Heating submenu Auxiliary heating departure time
G
DANGER
If the exhaust pipe is blocked or sufficient
ventilation is not possible, toxic exhaust
fumes can enter the vehicle, especially car-
bon monoxide. This is the case, e.g. in
enclosed spaces, or if the vehicle is stuck in
snow. There is a risk of fatal injuries.
You should switch off the auxiliary heating in
enclosed spaces which do not have an extrac- tion system, e.g. a garage. If the vehicle is
stuck in snow and you must leave the auxiliary
heating running, keep the exhaust pipe and
the area around the vehicle clear of snow. To guarantee a sufficient supply of fresh air, open
a window on the side of the vehicle away from the wind. Menus and submenus
247On-board computer and displays Z
Page 252 of 393
If someone is trapped:
R press one of the memory function position
buttons, or
R move the switch for steering wheel adjust-
ment in the opposite direction to that in
which the steering wheel is moving.
The adjustment process is stopped.
X Press the =or; button on the steering
wheel to select the Settings
Settings menu.
X Press the :or9 button to select the
Convenience
Convenience submenu.
X Press ato confirm.
X Using :or9, select the Easy EasyEntry/
Entry/
Exit
Exit function.
If the Easy
Easy Entry/Exit
Entry/Exit function is activated,
the vehicle steering wheel is displayed in
orange in the multifunction display.
X Press the abutton to save the setting.
Further information on the EASY-ENTRY/EXIT
feature (Y page 110).
Switching belt adjustment on/off
X Press the =or; button on the steering
wheel to select the Settings
Settings menu.
X Press the :or9 button to select the
Convenience
Convenience submenu.
X Press ato confirm.
X Press the :or9 button to select the
Belt adjustment Belt adjustment function.
If the Belt
Belt adjustment
adjustment function is activated,
the vehicle seat belt is shown in orange in the multifunction display.
X Press the abutton to save the setting.
For further information on belt adjustment, see
(Y page 41).
Switching the fold mirrors in when lock-
ing function on/off This function is only available when the vehicle is
equipped with the electrical fold-in function.
When you activate the Auto. fold-in mir‐ Auto. fold-in mir‐
rors
rors function, the exterior mirrors are folded in
when the vehicle is locked. The exterior mirrors fold out automatically again as soon as you
unlock the vehicle. X
Press the =or; button on the steering
wheel to select the Settings
Settings menu.
X Press the :or9 button to select the
Convenience Convenience submenu.
X Press ato confirm.
X Press the :or9 button to select the
Auto. fold-in mirrors
Auto. fold-in mirrors function.
If the Auto. fold-in mirrors
Auto. fold-in mirrors function is
switched on, the multifunction display shows
the exterior mirror in orange.
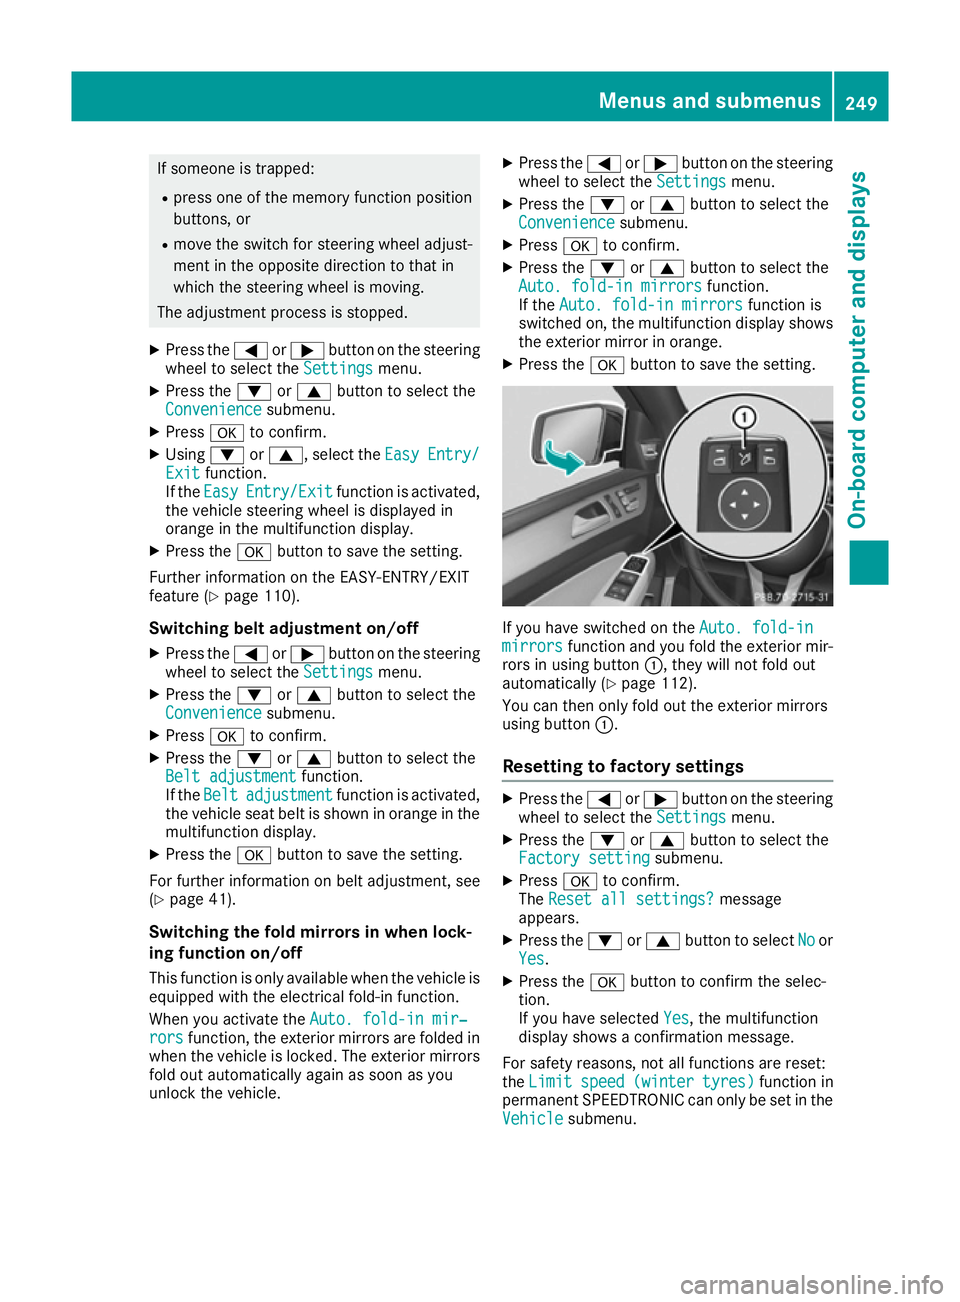
X Press the abutton to save the setting. If you have switched on the
Auto. fold-in
Auto. fold-in
mirrors
mirrors function and you fold the exterior mir-
rors in using button :, they will not fold out
automatically (Y page 112).
You can then only fold out the exterior mirrors
using button :.
Resetting to factory settings X
Press the =or; button on the steering
wheel to select the Settings Settingsmenu.
X Press the :or9 button to select the
Factory setting
Factory setting submenu.
X Press ato confirm.
The Reset all settings?
Reset all settings? message
appears.
X Press the :or9 button to select No
Noor
Yes
Yes.
X Press the abutton to confirm the selec-
tion.
If you have selected Yes Yes, the multifunction
display shows a confirmation message.
For safety reasons, not all functions are reset:
the Limit Limit speed
speed(winter
(winter tyres)
tyres)function in
permanent SPEEDTRONIC can only be set in the
Vehicle
Vehicle submenu. Menus and submenus
249On-board computer and displays Z