2015 MERCEDES-BENZ GLE COUPE fold seats
[x] Cancel search: fold seatsPage 19 of 393
Replacing the battery (auxiliary
heating remote control)
.................... 141
Rescue card ......................................... 25
Reserve (fuel tank)
see Fuel
Reserve fuel
Display messag e............................ 271
Warning lamp ................................. 294
Residual heat (climate control) ........ 137
Restraint system
Display message ............................ 262
Introduction ..................................... 37
Warning lamp ................................. 294
Warning lamp (function) ................... 38
Rev counter ........................................ 235
Reversing camera
Cleaning instructions ..................... 328
Display in the multimedia system .. 207
Function/note s............................. 206
Switching on/of f........................... 207
Reversing feature
Panorama sliding sunroo f................ 97
Side windows ................................... 92
Tailgate ............................................ 88
Reversing function
Roller sunblind ................................. 98
Reversing lamp (display message) .. 267
Roller sunblind
Panorama sliding sunroo f................ 98
Roof carrier ........................................ 305
Roof lining and carpets (cleaning
instructions) ...................................... 330
Roof load (maximum) ........................ 381
Route (navigation)
see Route guidance (navigation)
Route guidance (navigation) ............ 239S
Safety Children in the vehicle ..................... 52
see Occupant safety
SD memory card
Selecting ........................................ 241
Seat belt
Correct usage .................................. 40
Switching belt adjustment on/off
(on-board computer) ...................... 249 Seat belts
Adjusting the driver's and front-
passenger seat belt ......................... 41
Adjusting the height ......................... 41
Cleaning ......................................... 330
Display message ............................ 261
Fastening ......................................... 41
Important safety guidelines ............. 39
Introduction ..................................... 39
Rear seat belt status indicator ......... 42
Releasing ......................................... 41
Warning lamp ................................. 286
Warning lamp (function) ................... 41
Seats
Adjusting (electrically) ................... 103
Adjusting the head restraint .......... 103
Cleaning the cover ......................... 330
Correct driver's seat position ........ 101
Folding the rear bench seat for-
wards/back ................................... 302
Important safety notes .................. 102
Overview ........................................ 102
Seat heating problem .................... 107
Seat ventilation problem ................ 108
Storing settings (memory func-
tion) ............................................... 114
Switching seat heating on/of f....... 105
Switching the seat ventilation on/ off .................................................. 107
Section
Sliding sunroof ................................. 96
Selector lever
Cleaning ......................................... 329
Sensors (cleaning instructions) ....... 327
Service menu (on-board com-
puter) .................................................. 245
Service message
see ASSYST PLUS
Service products
AdBlue ®
special additive s.............. 377
Brake fluid ..................................... 380
Coolant (engine) ............................ 380
Engine oil ....................................... 378
Fuel ................................................ 375
Important safety notes .................. 374
Washer fluid ................................... 381
Setting the air distribution ............... 13316
Index
Page 39 of 393
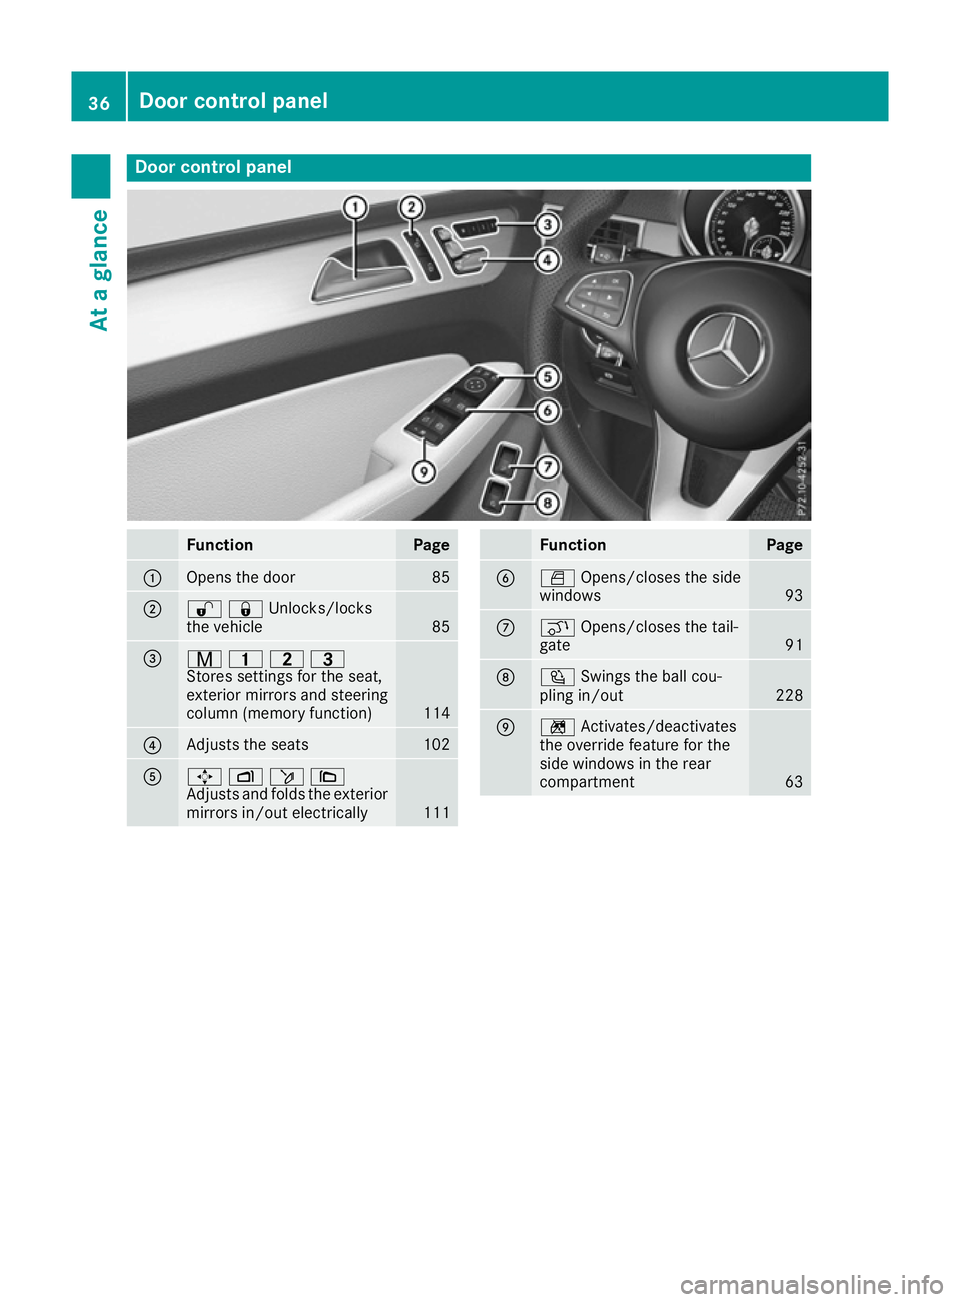
Door control panel
Function Page
:
Opens the door 85
;
%&Unlocks/locks
the vehicle
85
=
r
45=
Stores settings for the seat,
exterior mirrors and steering
column (memory function) 114
?
Adjusts the seats 102
A
7
Zö\
Adjusts and folds the exterior
mirrors in/out electrically 111 Function Page
B
W
Opens/closes the side
windows 93
C
q
Opens/closes the tail-
gate 91
D
Ü
Swings the ball cou-
pling in/out 228
E
n
Activates/deactivates
the override feature for the
side windows in the rear
compartment 6336
Door control panelAt a glance
Page 58 of 393
tem is fitted with a Top Tether belt, this should
always be used.
Important safety notes G
WARNING
If the rear seat backrests are not locked, they
could fold forwards in the event of an acci-
dent, heavy braking or sudden changes of
direction. As a result, child restraint systems
cannot perform their intended protective
function. Rear seat backrests that are not
locked can also cause additional injuries, e.g. in the event of an accident. This poses an
increased risk of injury or even fatal injury.
Always lock rear seat backrests after fitting a Top Tether belt. Adjust the rear seat backr-
ests so that they are positioned upright.
Make sure that the backrest in the rear com-
partment engages fully. To do so, pull firmly on
the seat backrest.
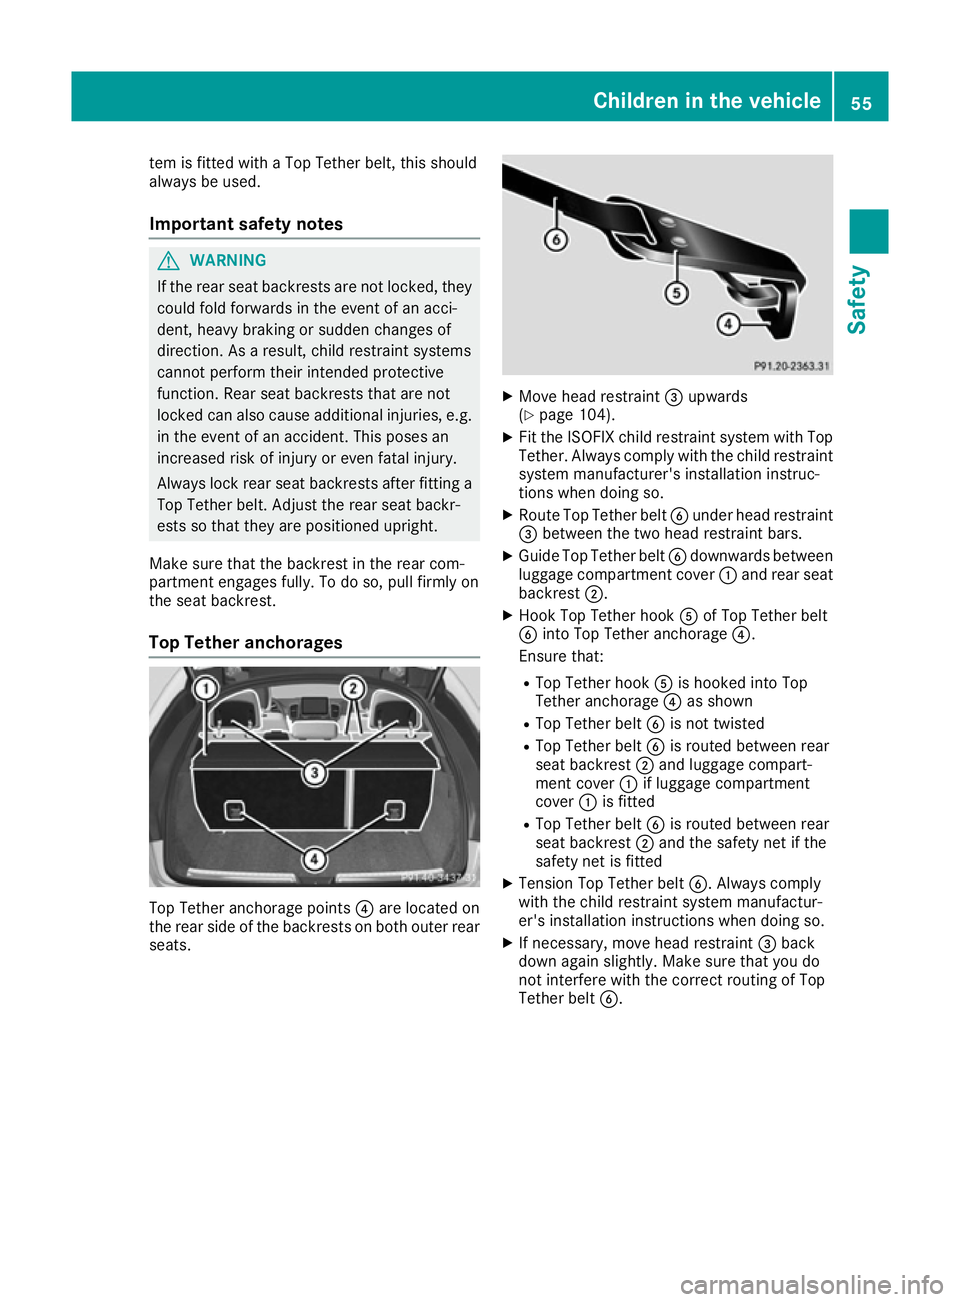
Top Tether anchorages Top Tether anchorage points
?are located on
the rear side of the backrests on both outer rear seats. X
Move head restraint =upwards
(Y page 104).
X Fit the ISOFIX child restraint system with Top
Tether. Always comply with the child restraint
system manufacturer's installation instruc-
tions when doing so.
X Route Top Tether belt Bunder head restraint
= between the two head restraint bars.
X Guide Top Tether belt Bdownwards between
luggage compartment cover :and rear seat
backrest ;.
X Hook Top Tether hook Aof Top Tether belt
B into Top Tether anchorage ?.
Ensure that:
R Top Tether hook Ais hooked into Top
Tether anchorage ?as shown
R Top Tether belt Bis not twisted
R Top Tether belt Bis routed between rear
seat backrest ;and luggage compart-
ment cover :if luggage compartment
cover :is fitted
R Top Tether belt Bis routed between rear
seat backrest ;and the safety net if the
safety net is fitted
X Tension Top Tether belt B. Always comply
with the child restraint system manufactur-
er's installation instructions when doing so.
X If necessary, move head restraint =back
down again slightly. Make sure that you do
not interfere with the correct routing of Top
Tether belt B. Children in the vehicle
55Safety Z
Page 106 of 393
!
Make sure that there are no objects in the
footwell under or behind the seats when mov-
ing the seats back. There is a risk that the
seats and/or the objects could be damaged.
i The head restraints cannot be removed from
the front and rear seats.
For more information, contact a qualified spe-
cialist workshop.
i Further related subjects:
R Luggage compartment enlargement (fold-
ing down the rear bench seat)
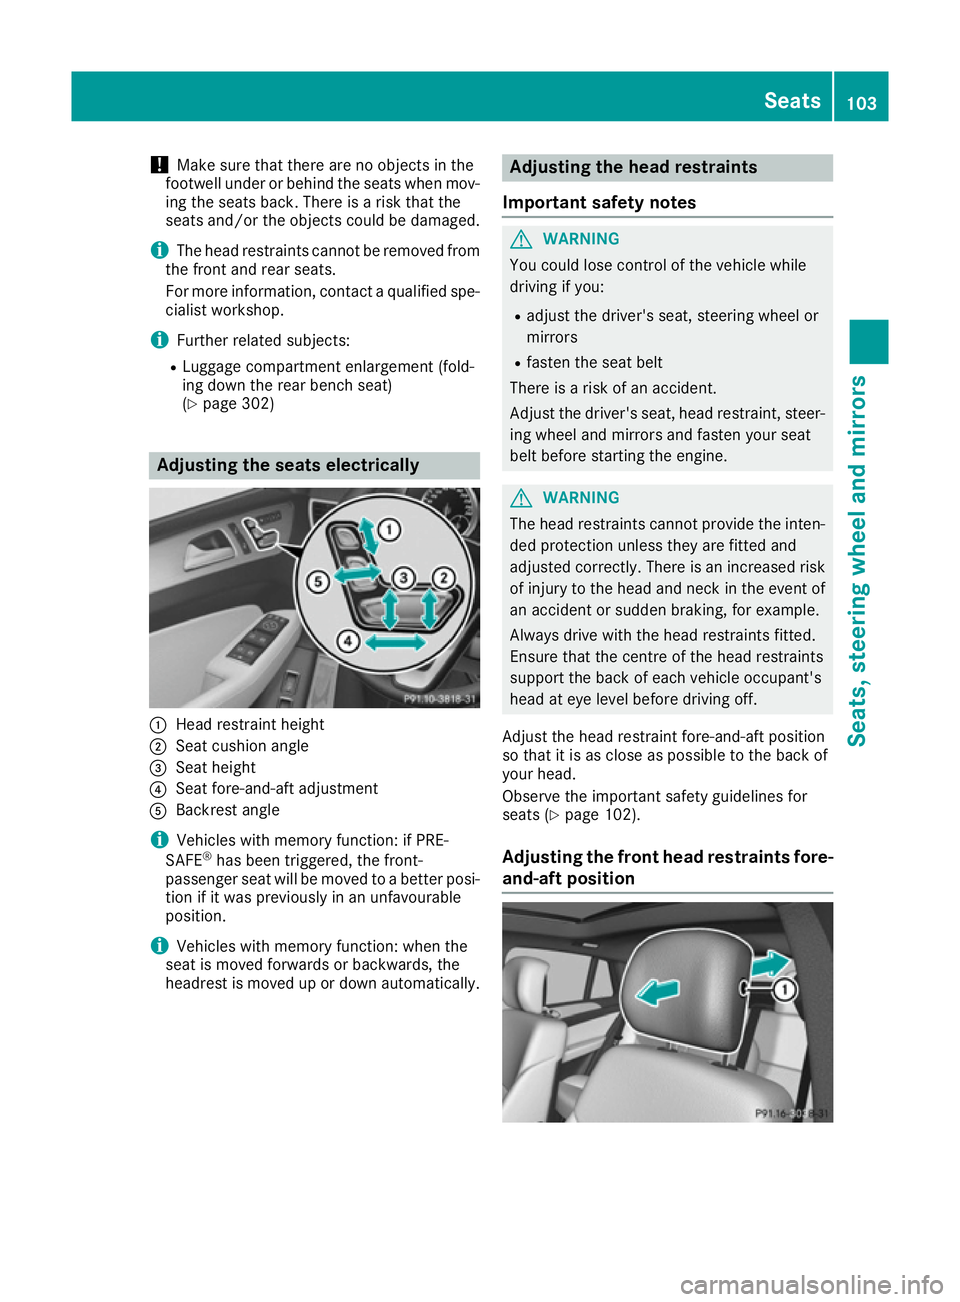
(Y page 302) Adjusting the seats electrically
:
Head restraint height
; Seat cushion angle
= Seat height
? Seat fore-and-aft adjustment
A Backrest angle
i Vehicles with memory function: if PRE-
SAFE ®
has been triggered, the front-
passenger seat will be moved to a better posi- tion if it was previously in an unfavourable
position.
i Vehicles with memory function: when the
seat is moved forwards or backwards, the
headrest is moved up or down automatically. Adjusting the head restraints
Important safety notes G
WARNING
You could lose control of the vehicle while
driving if you:
R adjust the driver's seat, steering wheel or
mirrors
R fasten the seat belt
There is a risk of an accident.
Adjust the driver's seat, head restraint, steer-
ing wheel and mirrors and fasten your seat
belt before starting the engine. G
WARNING
The head restraints cannot provide the inten-
ded protection unless they are fitted and
adjusted correctly. There is an increased risk of injury to the head and neck in the event of
an accident or sudden braking, for example.
Always drive with the head restraints fitted.
Ensure that the centre of the head restraints
support the back of each vehicle occupant's
head at eye level before driving off.
Adjust the head restraint fore-and-aft position
so that it is as close as possible to the back of
your head.
Observe the important safety guidelines for
seats (Y page 102).
Adjusting the front head restraints fore-
and-aft position Seats
103Seats, steering wheel and mirrors Z
Page 107 of 393
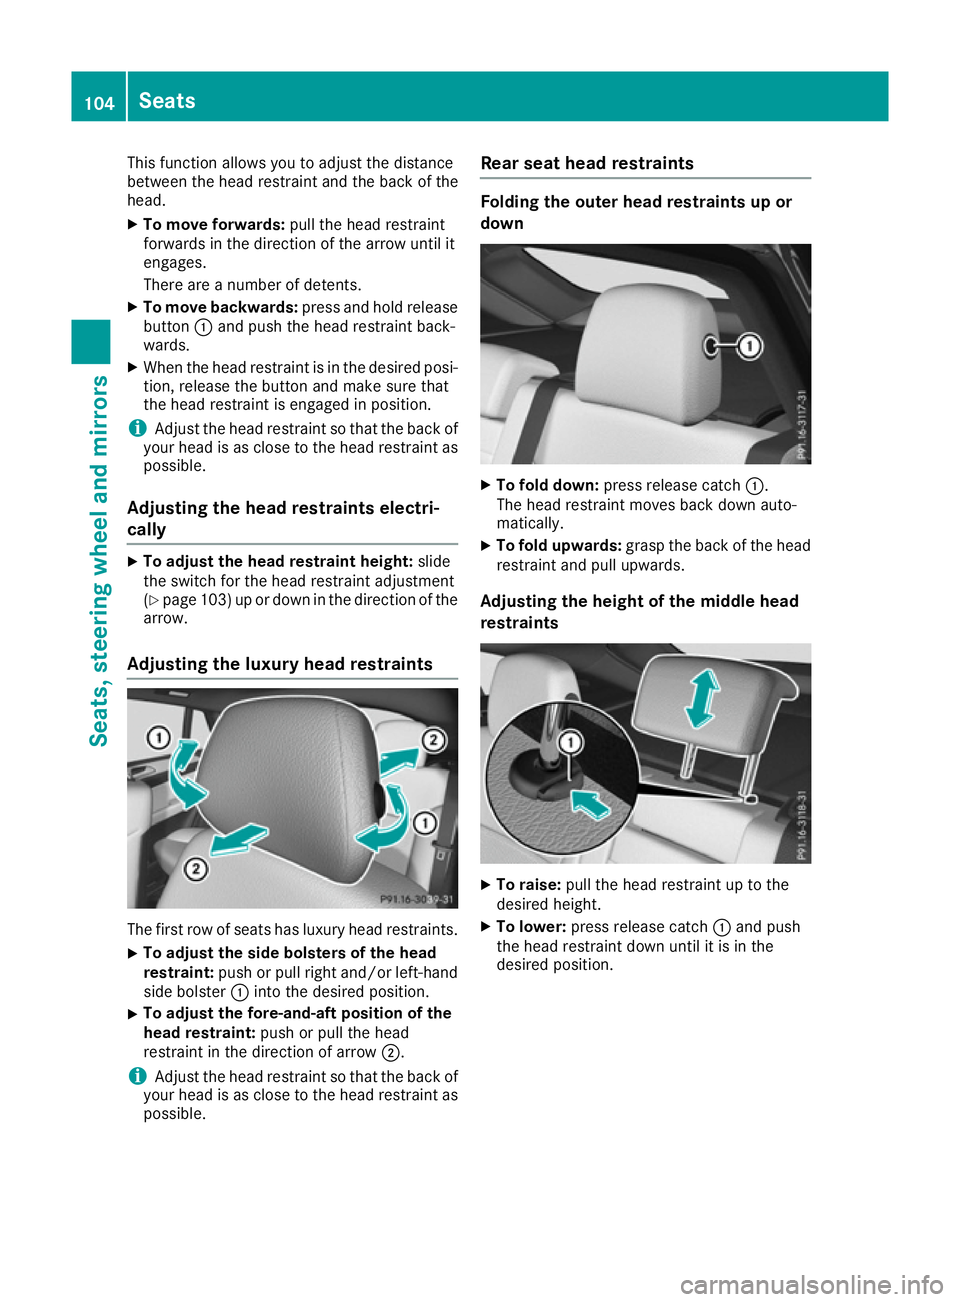
This function allows you to adjust the distance
between the head restraint and the back of the
head.
X To move forwards: pull the head restraint
forwards in the direction of the arrow until it
engages.
There are a number of detents.
X To move backwards: press and hold release
button :and push the head restraint back-
wards.
X When the head restraint is in the desired posi-
tion, release the button and make sure that
the head restraint is engaged in position.
i Adjust the head restraint so that the back of
your head is as close to the head restraint as possible.
Adjusting the head restraints electri-
cally X
To adjust the head restraint height: slide
the switch for the head restraint adjustment
(Y page 103) up or down in the direction of the
arrow.
Adjusting the luxury head restraints The first row of seats has luxury head restraints.
X To adjust the side bolsters of the head
restraint: push or pull right and/or left-hand
side bolster :into the desired position.
X To adjust the fore-and-aft position of the
head restraint:
push or pull the head
restraint in the direction of arrow ;.
i Adjust the head restraint so that the back of
your head is as close to the head restraint as possible. Rear seat head restraints Folding the outer head restraints up or
down
X
To fold down: press release catch :.
The head restraint moves back down auto-
matically.
X To fold upwards: grasp the back of the head
restraint and pull upwards.
Adjusting the height of the middle head
restraints X
To raise: pull the head restraint up to the
desired height.
X To lower: press release catch :and push
the head restraint down until it is in the
desired position. 104
SeatsSeats, steering wheel and mirrors
Page 115 of 393
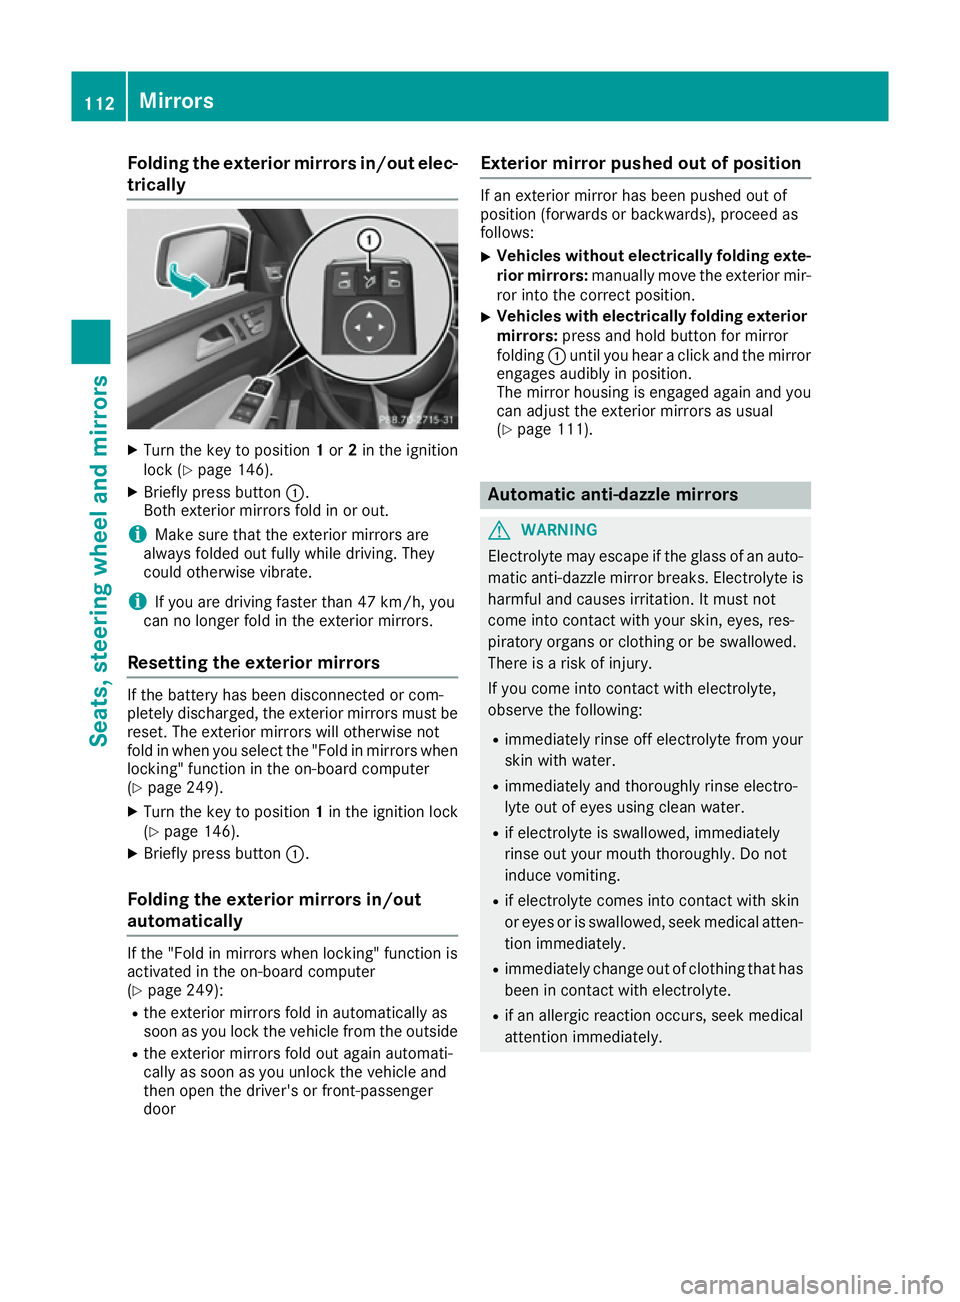
Folding the exterior mirrors in/out elec-
trically X
Turn the key to position 1or 2in the ignition
lock (Y page 146).
X Briefly press button :.
Both exterior mirrors fold in or out.
i Make sure that the exterior mirrors are
always folded out fully while driving. They
could otherwise vibrate.
i If you are driving faster than 47 km/h, you
can no longer fold in the exterior mirrors.
Resetting the exterior mirrors If the battery has been disconnected or com-
pletely discharged, the exterior mirrors must be
reset. The exterior mirrors will otherwise not
fold in when you select the "Fold in mirrors whenlocking" function in the on-board computer
(Y page 249).
X Turn the key to position 1in the ignition lock
(Y page 146).
X Briefly press button :.
Folding the exterior mirrors in/out
automatically If the "Fold in mirrors when locking" function is
activated in the on-board computer
(Y page 249):
R the exterior mirrors fold in automatically as
soon as you lock the vehicle from the outside
R the exterior mirrors fold out again automati-
cally as soon as you unlock the vehicle and
then open the driver's or front-passenger
door Exterior mirror pushed out of position If an exterior mirror has been pushed out of
position (forwards or backwards), proceed as
follows:
X Vehicles without electrically folding exte-
rior mirrors: manually move the exterior mir-
ror into the correct position.
X Vehicles with electrically folding exterior
mirrors: press and hold button for mirror
folding :until you hear a click and the mirror
engages audibly in position.
The mirror housing is engaged again and you can adjust the exterior mirrors as usual
(Y page 111). Automatic anti-dazzle mirrors
G
WARNING
Electrolyte may escape if the glass of an auto- matic anti-dazzle mirror breaks. Electrolyte is
harmful and causes irritation. It must not
come into contact with your skin, eyes, res-
piratory organs or clothing or be swallowed.
There is a risk of injury.
If you come into contact with electrolyte,
observe the following:
R immediately rinse off electrolyte from your
skin with water.
R immediately and thoroughly rinse electro-
lyte out of eyes using clean water.
R if electrolyte is swallowed, immediately
rinse out your mouth thoroughly. Do not
induce vomiting.
R if electrolyte comes into contact with skin
or eyes or is swallowed, seek medical atten-
tion immediately.
R immediately change out of clothing that has
been in contact with electrolyte.
R if an allergic reaction occurs, seek medical
attention immediately. 112
MirrorsSeats, steering wheel and
mirrors
Page 305 of 393
R
luggage nets on the right-hand side of the
luggage compartment
R folding coat hooks next to the grab handles in
the rear.
Observe the loading guidelines (Y page 299)
and the safety notes regarding stowage spaces
(Y page 299). Through-loading facility in the rear
compartment
If objects or loads are not secured when being
transported in the through-loading facility, they
could slip or be thrown around and thereby hit
vehicle occupants.
Observe the loading guidelines (Y page 299)
and the safety notes regarding stowage spaces
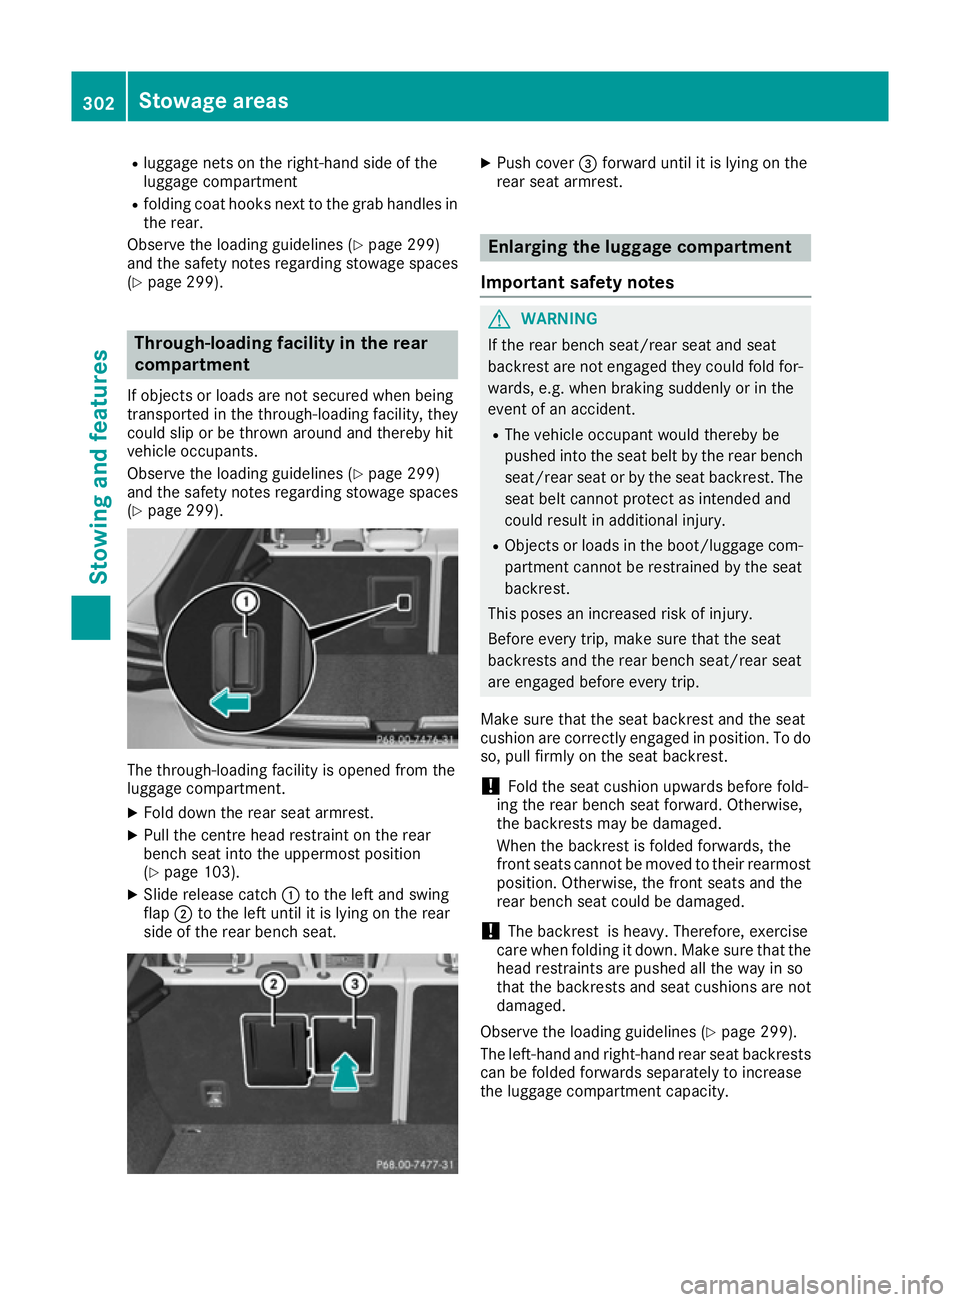
(Y page 299). The through-loading facility is opened from the
luggage compartment.
X Fold down the rear seat armrest.
X Pull the centre head restraint on the rear
bench seat into the uppermost position
(Y page 103).
X Slide release catch :to the left and swing
flap ;to the left until it is lying on the rear
side of the rear bench seat. X
Push cover =forward until it is lying on the
rear seat armrest. Enlarging the luggage compartment
Important safety notes G
WARNING
If the rear bench seat/rear seat and seat
backrest are not engaged they could fold for- wards, e.g. when braking suddenly or in the
event of an accident.
R The vehicle occupant would thereby be
pushed into the seat belt by the rear bench
seat/rear seat or by the seat backrest. The
seat belt cannot protect as intended and
could result in additional injury.
R Objects or loads in the boot/luggage com-
partment cannot be restrained by the seat
backrest.
This poses an increased risk of injury.
Before every trip, make sure that the seat
backrests and the rear bench seat/rear seat
are engaged before every trip.
Make sure that the seat backrest and the seat
cushion are correctly engaged in position. To do
so, pull firmly on the seat backrest.
! Fold the seat cushion upwards before fold-
ing the rear bench seat forward. Otherwise,
the backrests may be damaged.
When the backrest is folded forwards, the
front seats cannot be moved to their rearmost
position. Otherwise, the front seats and the
rear bench seat could be damaged.
! The backrest is heavy. Therefore, exercise
care when folding it down. Make sure that the
head restraints are pushed all the way in so
that the backrests and seat cushions are not
damaged.
Observe the loading guidelines (Y page 299).
The left-hand and right-hand rear seat backrests can be folded forwards separately to increase
the luggage compartment capacity. 302
Stowage areasStowing and features
Page 306 of 393
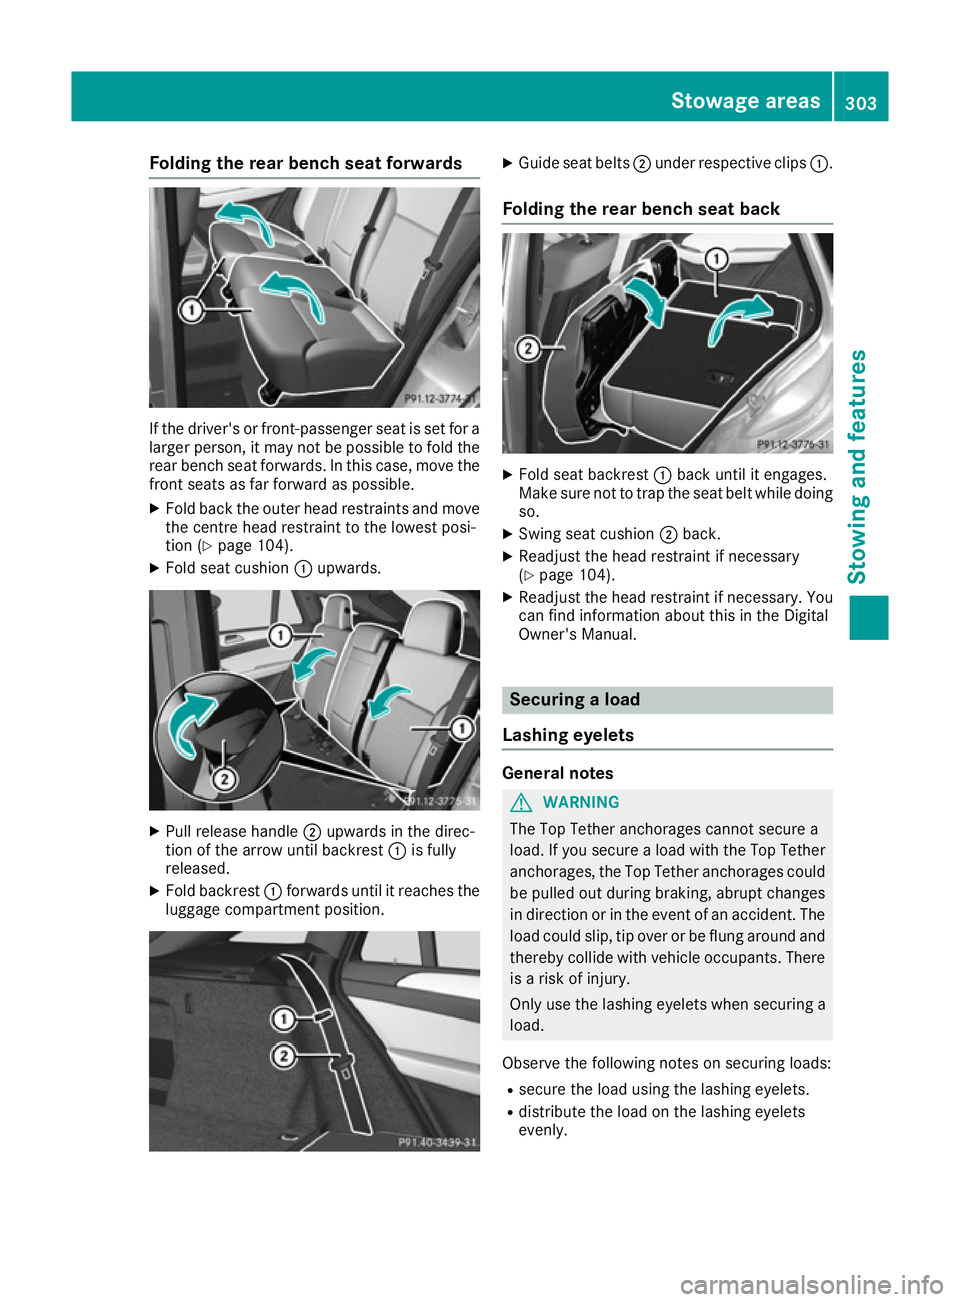
Folding the rear bench seat forwards
If the driver's or front-passenger seat is set for a
larger person, it may not be possible to fold the rear bench seat forwards. In this case, move the
front seats as far forward as possible.
X Fold back the outer head restraints and move
the centre head restraint to the lowest posi-
tion (Y page 104).
X Fold seat cushion :upwards. X
Pull release handle ;upwards in the direc-
tion of the arrow until backrest :is fully
released.
X Fold backrest :forwards until it reaches the
luggage compartment position. X
Guide seat belts ;under respective clips :.
Folding the rear bench seat back X
Fold seat backrest :back until it engages.
Make sure not to trap the seat belt while doing so.
X Swing seat cushion ;back.
X Readjust the head restraint if necessary
(Y page 104).
X Readjust the head restraint if necessary. You
can find information about this in the Digital
Owner's Manual. Securing a load
Lashing eyelets General notes
G
WARNING
The Top Tether anchorages cannot secure a
load. If you secure a load with the Top Tether
anchorages, the Top Tether anchorages could be pulled out during braking, abrupt changes
in direction or in the event of an accident. The load could slip, tip over or be flung around and
thereby collide with vehicle occupants. There is a risk of injury.
Only use the lashing eyelets when securing a
load.
Observe the following notes on securing loads: R secure the load using the lashing eyelets.
R distribute the load on the lashing eyelets
evenly. Stowage areas
303Stowing and featu res Z