2015 MERCEDES-BENZ GLE COUPE service indicator
[x] Cancel search: service indicatorPage 16 of 393
Luxury head restraint
.......................104 M
M+S tyres .......................................... .350
Main-beam headlamps
Adaptive Highbeam Assist PLUS .... 119
Display message ............................ 267
Switching on/off ........................... 117
Matt finish (cleaning instructions) .. 326
Media Interface
USB port in the armrest of the
centre console ............................... 300
see Separate operating instructions
Memory card (audio) ......................... 241
Memory function ............................... 114
Mercedes-Benz Contact
Display message ............................ 259
Mercedes-Benz emergency call
system
Switch in the overhead control
panel .............................................. 310
Mercedes-Benz Intelligent Drive
360°camera .................................. 210
Active Blind Spot Assist ................. 221
Active Lane Keeping Assist ............ 224
Active Parking Assist ..................... 202
ATTENTION ASSIST ........................ 214
Blind Spot Assist ............................ 218
DISTRONIC PLUS ........................... 182
DISTRONIC PLUS with Steering
Assist and Stop&Go Pilot .............. .190
General notes ................................ 178
Lane Keeping Assist ..................... .220
PARKTRONIC ................................. 199
PRE-SAFE ®
PLUS (anticipatory
occupant protection PLUS) .............. 51
Reversing camera .......................... 206
Traffic Sign Assist .......................... 216
Mercedes-Benz Service Centre
see Qualified specialist workshop
Message memory (on-board com-
puter) ................................................. .253
Mirrors
see Exterior mirrors
see Rear-view mirror
see Vanity mirror (in sun visor) Mobile phone
Frequencies ................................... 372
Installation ..................................... 372
Menu (on-board computer) ............ 242
Notes/placing in the bracket ......... 310
Transmission output (maximum) .... 372
Modifying the programming (key) ..... 80
MOExtended tyres .............................333
Motorway mode ................................ 118
MP3
Operating ....................................... 241
see Separate operating instructions
Multifunction display
Function/notes ............................ .237
Permanent display ......................... 246
Multifunction steering wheel
Operating the on-board computer .. 236
Overview .......................................... 32
Multimedia system
see Separate operating instructions N
Navigation Menu (on-board computer) ............ 239
see separate operating instructions
Notes on running in a new vehicle .. 145 O
Occupant safety Airbags ............................................ 42
Automatic front-passenger front
airbag deactivatio n.......................... 45
Automatic measures after an acci-
dent ................................................. 52
Children in the vehicle ..................... 52
Important safety notes .................... 37
PASSENGER AIRBAG indicator
lamp ................................................. 38
Pets in the vehicle ........................... 64
PRE-SAFE ®
(anticipatory occu-
pant protection) ............................... 51
PRE-SAFE ®
PLUS (anticipatory
occupant protection PLUS) .............. 51
Restraint system introduction .......... 37
Restraint system warning lamp ........ 38 Index
13
Page 19 of 393
Replacing the battery (auxiliary
heating remote control)
.................... 141
Rescue card ......................................... 25
Reserve (fuel tank)
see Fuel
Reserve fuel
Display messag e............................ 271
Warning lamp ................................. 294
Residual heat (climate control) ........ 137
Restraint system
Display message ............................ 262
Introduction ..................................... 37
Warning lamp ................................. 294
Warning lamp (function) ................... 38
Rev counter ........................................ 235
Reversing camera
Cleaning instructions ..................... 328
Display in the multimedia system .. 207
Function/note s............................. 206
Switching on/of f........................... 207
Reversing feature
Panorama sliding sunroo f................ 97
Side windows ................................... 92
Tailgate ............................................ 88
Reversing function
Roller sunblind ................................. 98
Reversing lamp (display message) .. 267
Roller sunblind
Panorama sliding sunroo f................ 98
Roof carrier ........................................ 305
Roof lining and carpets (cleaning
instructions) ...................................... 330
Roof load (maximum) ........................ 381
Route (navigation)
see Route guidance (navigation)
Route guidance (navigation) ............ 239S
Safety Children in the vehicle ..................... 52
see Occupant safety
SD memory card
Selecting ........................................ 241
Seat belt
Correct usage .................................. 40
Switching belt adjustment on/off
(on-board computer) ...................... 249 Seat belts
Adjusting the driver's and front-
passenger seat belt ......................... 41
Adjusting the height ......................... 41
Cleaning ......................................... 330
Display message ............................ 261
Fastening ......................................... 41
Important safety guidelines ............. 39
Introduction ..................................... 39
Rear seat belt status indicator ......... 42
Releasing ......................................... 41
Warning lamp ................................. 286
Warning lamp (function) ................... 41
Seats
Adjusting (electrically) ................... 103
Adjusting the head restraint .......... 103
Cleaning the cover ......................... 330
Correct driver's seat position ........ 101
Folding the rear bench seat for-
wards/back ................................... 302
Important safety notes .................. 102
Overview ........................................ 102
Seat heating problem .................... 107
Seat ventilation problem ................ 108
Storing settings (memory func-
tion) ............................................... 114
Switching seat heating on/of f....... 105
Switching the seat ventilation on/ off .................................................. 107
Section
Sliding sunroof ................................. 96
Selector lever
Cleaning ......................................... 329
Sensors (cleaning instructions) ....... 327
Service menu (on-board com-
puter) .................................................. 245
Service message
see ASSYST PLUS
Service products
AdBlue ®
special additive s.............. 377
Brake fluid ..................................... 380
Coolant (engine) ............................ 380
Engine oil ....................................... 378
Fuel ................................................ 375
Important safety notes .................. 374
Washer fluid ................................... 381
Setting the air distribution ............... 13316
Index
Page 41 of 393
Never modify parts of the restraint system. Do
not attempt to modify the wiring as well as
electronic components or their software.
If it is necessary to modify an airbag system to
accommodate a person with disabilities, con-
tact a Mercedes-Benz Service Centre. Restraint system warning lamp
The functions of the restraint system are
checked after the ignition is switched on and at
regular intervals while the engine is running.
Therefore, malfunctions can be detected in
good time.
The 6 restraint system warning lamp in the
instrument cluster lights up when the ignition is switched on. It goes out no later than a few sec-
onds after the vehicle is started. The compo-
nents of the restraint system are in operational
readiness.
A malfunction has occurred if the 6restraint
system warning lamp:
R does not light up after the ignition is switched
on
R does not go out after a few seconds with the
engine running
R lights up again while the engine is running G
WARNING
If the restraint system is malfunctioning,
restraint system components may be trig-
gered unintentionally or might not be trig-
gered at all in the event of an accident with a high rate of vehicle deceleration. This can
effect belt tensioners or airbags, for example. There is an increased risk of serious or even
fatal injuries.
Have the restraint system checked and
repaired immediately at a qualified specialist
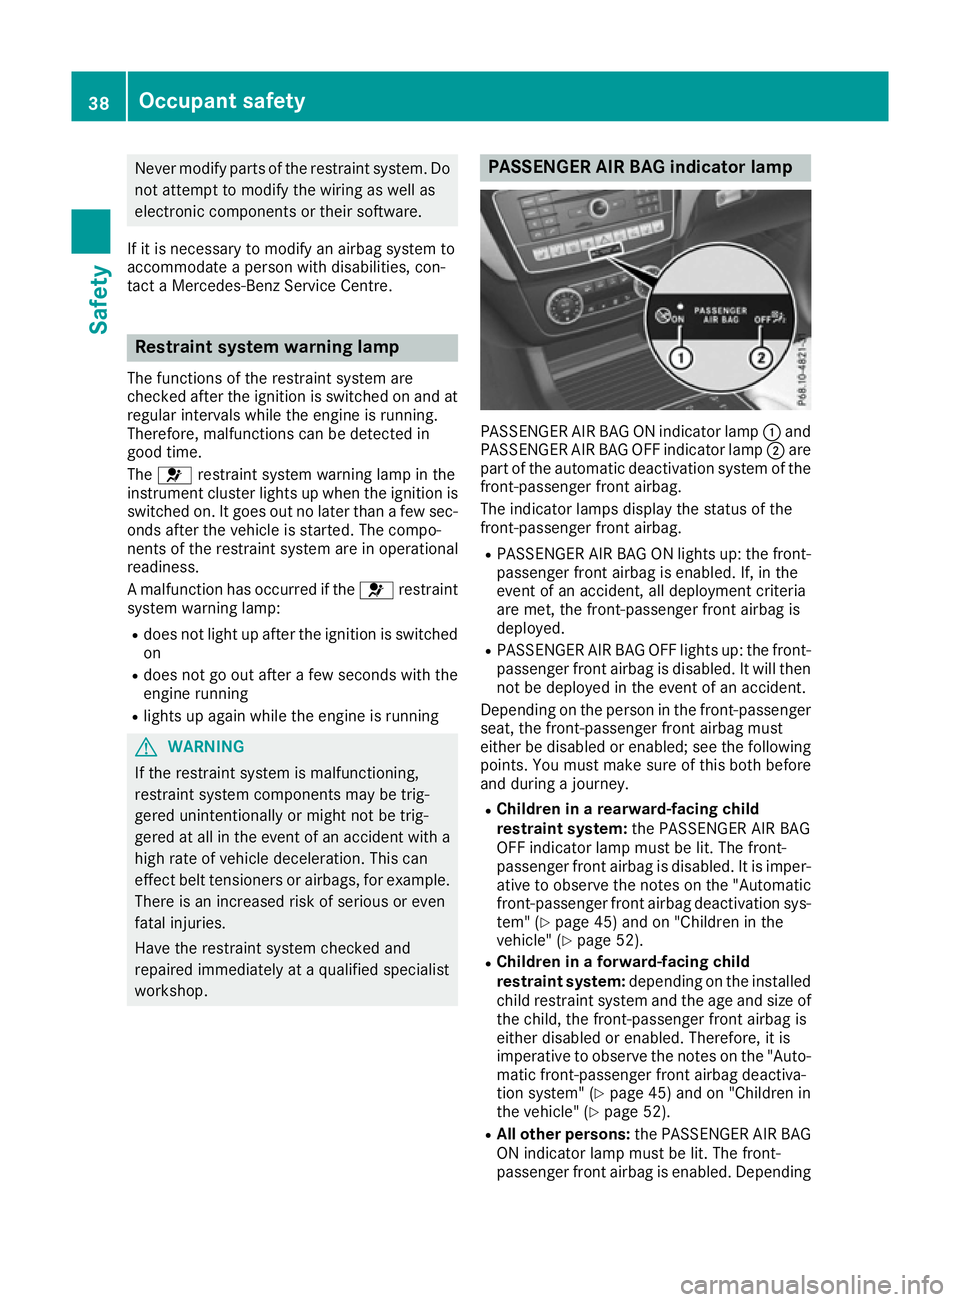
workshop. PASSENGER AIR BAG indicator lamp
PASSENGER AIR BAG ON indicator lamp
:and
PASSENGER AIR BAG OFF indicator lamp ;are
part of the automatic deactivation system of the front-passenger front airbag.
The indicator lamps display the status of the
front-passenger front airbag.
R PASSENGER AIR BAG ON lights up: the front-
passenger front airbag is enabled. If, in the
event of an accident, all deployment criteria
are met, the front-passenger front airbag is
deployed.
R PASSENGER AIR BAG OFF lights up: the front-
passenger front airbag is disabled. It will then
not be deployed in the event of an accident.
Depending on the person in the front-passenger seat, the front-passenger front airbag must
either be disabled or enabled; see the following
points. You must make sure of this both before
and during a journey.
R Children in a rearward-facing child
restraint system: the PASSENGER AIR BAG
OFF indicator lamp must be lit. The front-
passenger front airbag is disabled. It is imper-
ative to observe the notes on the "Automatic front-passenger front airbag deactivation sys-
tem" (Y page 45) and on "Children in the
vehicle" (Y page 52).
R Children in a forward-facing child
restraint system: depending on the installed
child restraint system and the age and size of the child, the front-passenger front airbag is
either disabled or enabled. Therefore, it is
imperative to observe the notes on the "Auto-
matic front-passenger front airbag deactiva-
tion system" (Y page 45) and on "Children in
the vehicle" (Y page 52).
R All other persons: the PASSENGER AIR BAG
ON indicator lamp must be lit. The front-
passenger front airbag is enabled. Depending 38
Occupant safetySafety
Page 50 of 393
If the automatic front-passenger front airbag
deactivation system detects that:
R the front-passenger seat is unoccupied, the
PASSENGER AIR BAG OFF indicator lamp
lights up after the system self-test and
remains lit. This indicates that the front-
passenger front airbag is disabled.
R the front-passenger seat is occupied by a
child in a rearward-facing child restraint sys-
tem, the PASSENGER AIR BAG OFF indicator
lamp lights up after the system self-test and
remains lit. This indicates that the front-
passenger front airbag is disabled.
But in the case of a child in a rearward-facing
child restraint, the PASSENGER AIR BAG ON
indicator lamp can light up after the system
self-test and remain lit. This indicates that the front-passenger front airbag is enabled. The
result of the classification is dependent on,
among other factors, the child restraint sys-
tem and the child's build. It is recommended
that you fit the child restraint system to a
suitable rear seat.
R the front-passenger seat is occupied by a
child in a forward-facing child restraint sys-
tem, either the PASSENGER AIR BAG ON or
PASSENGER AIR BAG OFF indicator lamp
lights up and remains lit after the system self-
test depending on the result of the classifica- tion. The result of the classification is depend-
ent on, among other factors, the child
restraint system and the child's build.
Move the front-passenger seat as far back as possible. Always observe the information in
"Child restraint systems on the front-
passenger seat" (Y page 56) and in "Suita-
ble positioning of the child restraint system"
(Y page 57). Alternatively, you can fit the
child restraint system to a suitable rear seat.
R the front-passenger seat is occupied by a per-
son with a smaller build (e.g. a teenager or
small adult), either the PASSENGER AIR BAG
ON or PASSENGER AIR BAG OFF indicator
lamp lights up and remains lit after the system self-test depending on the result of the clas-
sification.
- if the PASSENGER AIR BAG ON indicator
lamp lights up, move the front-passenger
seat as far back as possible. Alternatively, a person with a small build can sit on a rear
seat.
- if the PASSENGER AIR BAG OFF indicator
lamp is lit, a person with a smaller build
should not use the front-passenger seat.
R the front-passenger seat is occupied by an
adult or a person with a build corresponding
to that of an adult, the PASSENGER AIR BAG
ON indicator lamp lights up after the system
self-test and remains lit. This indicates that
the front-passenger front airbag is enabled.
If children are travelling in the vehicle, be sure to
observe the notes on "Children in the vehicle"
(Y page 52).
If the automatic front-passenger front airbag
deactivation system is malfunctioning, the red
6 restraint system warning lamp in the
instrument cluster and the PASSENGER AIR
BAG OFF indicator lamp light up simultaneously.
The front-passenger front airbag is disabled in
this case and does not deploy during an acci-
dent. Have the system checked as soon as pos-
sible by qualified technicians. Consult a
Mercedes-Benz Service Centre. The front-
passenger seat should only be repaired at a
Mercedes-Benz Service Centre.
If the front-passenger seat, the seat cover or the seat cushion is damaged, have the necessary
repair work carried out at a Mercedes-Benz Ser-vice Centre.
For safety reasons, Mercedes-Benz recom-
mends that you only use a child restraint system which has been tested and approved by
Mercedes-Benz in combination with the auto-
matic front-passenger front airbag deactivation
system.
System self-test G
DANGER
If both the PASSENGER AIR BAG OFF and
PASSENGER AIR BAG ON indicator lamps do
not light up during the system self-test, the
system is malfunctioning. The front-
passenger front airbag might be triggered
unintentionally or might not be triggered at all in the event of an accident with high deceler-
ation. This poses an increased risk of injury or even fatal injury.
In this case the front-passenger seat may notbe used. Do not install a child restraint system Occupant safety
47Safety
Z
Page 52 of 393
Problems with automatic front-passenger front airbag deactivation
Be sure to observe the notes on "System self-test" (Y
page 47).Problem
Possible causes/consequences and
M
MSolutions The PASSENGER AIR
BAG OFF indicator lamp
lights up and remains lit,
even though the front-
passenger seat is occu-
pied by an adult or a per-
son with a build corre-
sponding to that of an
adult. The classification of the person on the front-passenger seat is false.
X Make sure the conditions for a correct classification of the person
on the front-passenger seat are met (Y page 45).
X If the PASSENGER AIR BAG OFF indicator lamp remains lit, the front-
passenger seat may not be used.
X Have the automatic front-passenger front airbag deactivation sys-
tem checked as soon as possible at a Mercedes-Benz Service
Centre. The PASSENGER AIR
BAG OFF indicator lamp
does not light up and/or
does not stay on.
The front-passenger seatis:
R empty
R occupied with a rear-
ward-facing child
restraint system The automatic front-passenger front airbag deactivation system is
malfunctioning.
X Make sure there is nothing between the seat and the child restraint
system.
X Make sure that the entire base of the child restraint system rests on
the seat cushion of the front-passenger seat.
X When installing the child restraint system, make sure that the seat
belt is tight. Do not pull the seat belt tight with the front-passenger
seat adjustment. This could result in the seat belt and the child
restraint system being pulled too tightly.
X Check that the child restraint system is installed correctly.
X Make sure that no objects are applying additional weight to the
seat.
X If the PASSENGER AIR BAG OFF indicator lamp remains off and/or
the PASSENGER AIR BAG ON indicator lamp lights up, do not install
a rearward-facing child restraint system on the front-passenger
seat. It is recommended that you fit the child restraint system to a suitable rear seat.
X Have the automatic front-passenger front airbag deactivation sys-
tem checked as soon as possible at a Mercedes-Benz Service
Centre. Deployment of belt tensioners and air-
bags
Important safety notes G
WARNING
After the airbag deploys, the airbag parts are
hot. There is a risk of injury.
Do not touch the airbag parts. Have a
deployed airbag replaced at a qualified spe-
cialist workshop as soon as possible. G
WARNING
Pyrotechnic seat belt tensioners that have
been deployed are no longer operational and
are unable to perform their intended protec-
tive function. This poses an increased risk of
injury or even fatal injury.
Therefore, have pyrotechnic belt tensioners
which have been triggered immediately
replaced at a qualified specialist workshop.
Mercedes-Benz recommends that you have the
vehicle towed to a qualified specialist workshop
after an accident. Take this into account, par- Occupant safety
49Safety Z
Page 343 of 393
Keep away from fire and open flames. Do not
lean over the battery. Never charge the battery
if it is still fitted to the vehicle, unless you use a battery charger which has been tested and
approved by Mercedes-Benz. A battery charger
unit specially adapted for Mercedes-Benz vehi-
cles and tested and approved by Mercedes-
Benz is available as an accessory. This device
permits charging of the battery in position. Con-
tact a Mercedes-Benz Service Centre for infor-
mation and availability. Read the battery charg-
er's operating instructions before charging the
battery.
If the indicator/warning lamps do not light up at
low temperatures, it is very likely that the dis-
charged battery has frozen. In this case you may
neither jump-start the vehicle nor charge the
battery. The service life of a battery that has
been thawed may be reduced. The starting char-
acteristics may be impaired, especially at low
temperatures. Have the thawed battery
checked at a qualified specialist workshop. 340
Battery (vehicle)Breakdown assistance
Page 344 of 393
Jump-starting
For the jump-starting procedure, use only the jump-starting connection point, consisting of a pos- itive terminal and an earth point, in the engine compartment. G
WARNING
Battery acid is caustic. There is a risk of injury.
Avoid contact with the skin, eyes or clothing. Do not breathe in any battery gases. Do not lean over the battery. Keep the batteries out of the reach of children. Immediately rinse off battery acid
thoroughly with plenty of clean water and seek medical attention at once. G
WARNING
During charging and jump-starting, explosive gases can escape from the battery. There is a risk of an explosion.
Particularly avoid fire, naked flames, creating sparks and smoking. Ensure there is sufficient
ventilation while charging and jump-starting. Do not lean over a battery. G
WARNING
During the charging process, a battery produces hydrogen gas. If a short circuit occurs or sparks
are created, the hydrogen gas can ignite. There is a risk of an explosion.
R Make sure that the positive terminal of a connected battery does not come into contact with
vehicle parts.
R Never place metal objects or tools on a battery.
R It is important that you observe the described order of the battery terminals when connecting
and disconnecting a battery.
R When jump-starting, make sure that the battery poles with identical polarity are connected.
R It is particularly important to observe the described order when connecting and disconnecting
the jump leads.
R Never connect or disconnect the battery terminals while the engine is running. G
WARNING
A discharged battery can freeze at temperatures below freezing point. When jump-starting the
vehicle or charging the battery, gases can escape from the battery. There is a risk of an explosion.
Allow the frozen battery to thaw out before charging it or jump-starting.
! Vehicles with a petrol engine:
avoid repeated and lengthy starting attempts. Otherwise, the
non-combusted fuel may damage the catalytic converter.
If the indicator/warning lamps do not light up at low temperatures, it is very likely that the dis-
charged battery has frozen. In this case you may neither jump-start the vehicle nor charge the
battery. The service life of a battery that has been thawed may be reduced. The starting charac-
teristics may be impaired, especially at low temperatures. Have the thawed battery checked at a
qualified specialist workshop. Jump-starting
341Breakdown assistance Z
Page 349 of 393
Tow-starting (emergency engine
starting)
! Do not tow-start vehicles with automatic
transmission. You could otherwise damage
the automatic transmission.
You can find information on "Jump-starting"
under (Y page 341). Electrical fuses
Important safety notes
G
WARNING
If you manipulate, bridge or replace a faulty
fuse with a fuse of a higher amperage, the
electric cables could be overloaded. This may result in a fire. There is a risk of an accident
and injury.
Always replace faulty fuses with specified new fuses of the correct amperage.
! Only use fuses marked with an "S" for the
fuse box in the engine compartment and
under the rear bench seat. Components or
systems could otherwise be damaged.
The fuses in your vehicle disconnect faulty cir-
cuits. If a fuse blows, all the components on the
circuit and their functions will fail.
Blown fuses must be replaced with fuses of the same rating, which you can recognise by the
colour and fuse rating. The fuse ratings are listed
in the fuse allocation chart.
The fuse allocation chart is located in the fuse
box under the rear bench seat (Y page 347).
If the newly inserted fuse also blows, have the
cause traced and rectified at a qualified special-
ist workshop, e.g. a Mercedes-Benz Service
Centre. Before replacing a fuse
Observe the important safety notes
(Y page 346)
X Secure the vehicle against rolling away
(Y page 167).
X Switch off the engine.
X Switch off all electrical consumers. X
Remove the key from the ignition lock.
or, on vehicles with KEYLESS-GO start function
or KEYLESS ‑GO:
X Open the driver's door.
The on-board electronics now have status 0.
This is the same as the key having been
removed.
The driver's door can be closed again.
All indicator lamps in the instrument cluster
must be off.
The fuses are located in various fuse boxes:
R Fuse box on the front-passenger side of the
dashboard
R Fuse box in the engine compartment on the
right-hand side of the vehicle, when viewed in
the direction of travel
R Fuse box under the rear bench seat Dashboard fuse box
Observe the important safety notes
(Y page 346).
! Do not use a pointed object such as a screw-
driver to open the cover in the dashboard. You
could damage the dashboard or the cover.
! Make sure that no moisture can enter the
fuse box when the cover is open.
! When closing the cover, make sure that it is
lying correctly on the fuse box. Moisture seep-
ing in or dirt could otherwise impair the oper-
ation of the fuses. X
Open the front-passenger door.
X Open the glove compartment.
X To open: pull cover :outwards in the direc-
tion of the arrow and remove it. 346
Electrical fusesBreakdown assistance