2015 MERCEDES-BENZ GLE COUPE ad blue
[x] Cancel search: ad bluePage 6 of 393
1, 2, 3 ...
4ETS (Electronic Traction System) see ETS/4ETS (Electronic Trac-
tion System)
4MATIC (permanent four-wheel
drive) .................................................. 193
12 V socket
see Sockets
360° camera
Cleaning .........................................3 28
Display in the multimedia system .. 212
Function/notes ............................ .210 A
ABS (Anti-lock Braking System) Display message ............................ 254
Function/notes ................................ 64
Important safety notes .................... 64
Warning lamp ................................. 289
Accident
Automatic measures after an acci-
dent ................................................. 52
Activating/deactivating air-recir-
culation mode ................................... .136
Activating/deactivating cooling
with air dehumidification ................. 130
Active Blind Spot Assist
Activating/deactivating (on-
board computer) ............................ 245
Display message ............................ 275
Function/notes ............................ .221
Towing a trailer .............................. 224
Active Curve System
Display message ............................ 273
Function/notes ............................ .196
Active Driving Assistance package .. 221
Active Lane Keeping Assist
Activating/deactivating (on-
board computer) ............................ 245
Display message ............................ 274
Function/notes ............................ .224
Towing a trailer .............................. 226
Active light function ......................... 118
Active Parking Assist
Display message ............................ 275
Exiting a parking space .................. 205 Function/notes ............................
.202
Important safety notes .................. 202
Parking .......................................... 204
ADAPTIVE BRAKE ................................. 72
Adaptive Brake Assist
Function/notes ................................ 68
Adaptive brake lights .......................... 69
Adaptive Damping System
Function/notes ............................ .198
Adaptive Highbeam Assist Plus
Display message ............................ 268
Function/notes ............................ .119
Switching on/off ........................... 120
AdBlue ®
Display message ............................ 271
Filling capacity ............................... 378
Important safety notes .................. 377
Topping up ..................................... 164
Additives (engine oil) ........................ 379
ADS (Adaptive Damping System)
Function/notes ............................ .195
Air conditioning
General notes ................................ 126
Air filter (white display message) .... 271
AIR FLOW .......................................... .132
Air vents
Glove compartment ....................... 143
Important safety notes .................. 142
Rear ............................................... 143
Setting .......................................... .142
Setting the centre air vents ........... 143
Setting the side air vents .............. .143
Air-conditioning system
see Climate control
Airbag
Automatic front-passenger front
airbag deactivatio n .......................... 45
Introduction ..................................... 42
PASSENGER AIR BAG indicator
lamps ............................................... 38
Airbags
Display message ............................ 264
Front airbag (driver, front
passenger) ....................................... 43
Important safety guidelines ............. 42
Kneebag .......................................... .44
Sidebag ............................................ 44 Index
3
Page 8 of 393
Switching on/off (on the centre
console) ......................................... 139
Axle load, permissible (trailer tow-
ing) ...................................................... 385 B
Bag hook ............................................ 304
Ball coupling
Swinging in .................................... 231
Swinging out .................................. 228
BAS (Brake Assist System) ................. 65
BAS PLUS with Cross-Traffic Assist (Brake Assist PLUS with Cross-
Traffic Assist)
Function/note s................................ 65
Important safety notes .................... 66
Battery (key)
Checking .......................................... 81
Important safety notes .................... 81
Replacing ......................................... 81
Battery (vehicle)
Charging ........................................ 339
Display message ............................ 270
Important safety notes .................. 337
Jump starting ................................. 341
Overview ........................................ 337
Belt tensioner
Activation ......................................... 49
Blind Spot Assist
Activating/deactivating ................. 245
Display message ............................ 275
Notes/function .............................. 218
Trailer towing ................................. 220
see Active Blind Spot Assist
BlueTEC
Topping up AdBlue ®
....................... 164
BlueTEC (AdBlue ®
) ............................. 377
Bonnet
Active bonnet (pedestrian protec-tion) ............................................... 318
Closing ........................................... 319
Display message ............................ 283
Important safety notes .................. 318
Opening ......................................... 319
Boot
see Tailgate
Boot load (maximum) ........................ 381Brake fluid
Display message ............................ 259
Notes ............................................. 380
Brake force distribution
see EBD (electronic brake force
distribution)
Brake lamps
Adaptive ........................................... 69
Display message ............................ 267
Brakes
ABS .................................................. 64
Adaptive Brake Assist ...................... 68
BAS .................................................. 65
BAS PLUS with Cross-Traffic
Assist ............................................... 65
Brake fluid (notes) ......................... 380
Display message ............................ 254
Driving tips .................................... 172
Important safety notes .................. 172
Parking brake ................................ 169
Warning lamp ................................. 288
Breakdown
Where will I find...? ........................ 331
see Flat tyre
see Towing away
Brightness control (instrument
cluster lighting) ................................... 29 C
Calling up a fault see Display messages
Car wash (care) ................................. 324
Care
360° camera ................................. 328
Automatic car wash ....................... 324
Carpets .......................................... 330
Display ........................................... 329
Exhaust pipe .................................. 328
Exterior lighting ............................. 327
Gear or selector lever .................... 329
High-pressure cleaner .................... 325
Interior ........................................... 329
Matt paintwork .............................. 326
Note s............................................. 323
Paint .............................................. 325
Plastic trim .................................... 329
Reversing camera .......................... 328 Index
5
Page 19 of 393
Replacing the battery (auxiliary
heating remote control)
.................... 141
Rescue card ......................................... 25
Reserve (fuel tank)
see Fuel
Reserve fuel
Display messag e............................ 271
Warning lamp ................................. 294
Residual heat (climate control) ........ 137
Restraint system
Display message ............................ 262
Introduction ..................................... 37
Warning lamp ................................. 294
Warning lamp (function) ................... 38
Rev counter ........................................ 235
Reversing camera
Cleaning instructions ..................... 328
Display in the multimedia system .. 207
Function/note s............................. 206
Switching on/of f........................... 207
Reversing feature
Panorama sliding sunroo f................ 97
Side windows ................................... 92
Tailgate ............................................ 88
Reversing function
Roller sunblind ................................. 98
Reversing lamp (display message) .. 267
Roller sunblind
Panorama sliding sunroo f................ 98
Roof carrier ........................................ 305
Roof lining and carpets (cleaning
instructions) ...................................... 330
Roof load (maximum) ........................ 381
Route (navigation)
see Route guidance (navigation)
Route guidance (navigation) ............ 239S
Safety Children in the vehicle ..................... 52
see Occupant safety
SD memory card
Selecting ........................................ 241
Seat belt
Correct usage .................................. 40
Switching belt adjustment on/off
(on-board computer) ...................... 249 Seat belts
Adjusting the driver's and front-
passenger seat belt ......................... 41
Adjusting the height ......................... 41
Cleaning ......................................... 330
Display message ............................ 261
Fastening ......................................... 41
Important safety guidelines ............. 39
Introduction ..................................... 39
Rear seat belt status indicator ......... 42
Releasing ......................................... 41
Warning lamp ................................. 286
Warning lamp (function) ................... 41
Seats
Adjusting (electrically) ................... 103
Adjusting the head restraint .......... 103
Cleaning the cover ......................... 330
Correct driver's seat position ........ 101
Folding the rear bench seat for-
wards/back ................................... 302
Important safety notes .................. 102
Overview ........................................ 102
Seat heating problem .................... 107
Seat ventilation problem ................ 108
Storing settings (memory func-
tion) ............................................... 114
Switching seat heating on/of f....... 105
Switching the seat ventilation on/ off .................................................. 107
Section
Sliding sunroof ................................. 96
Selector lever
Cleaning ......................................... 329
Sensors (cleaning instructions) ....... 327
Service menu (on-board com-
puter) .................................................. 245
Service message
see ASSYST PLUS
Service products
AdBlue ®
special additive s.............. 377
Brake fluid ..................................... 380
Coolant (engine) ............................ 380
Engine oil ....................................... 378
Fuel ................................................ 375
Important safety notes .................. 374
Washer fluid ................................... 381
Setting the air distribution ............... 13316
Index
Page 110 of 393
Problems with the seat heating
Problem
Possible causes/consequences and
M
MSolutions The seat heating has
switched off prematurely
or cannot be switched
on. The on-board voltage is too low because too many electrical consum-
ers are switched on.
X Switch off electrical consumers that you do not need, such as the
rear window heating or interior lighting.
Once the battery is sufficiently charged, the seat heating will switch back on automatically. Switching the seat ventilation on/off
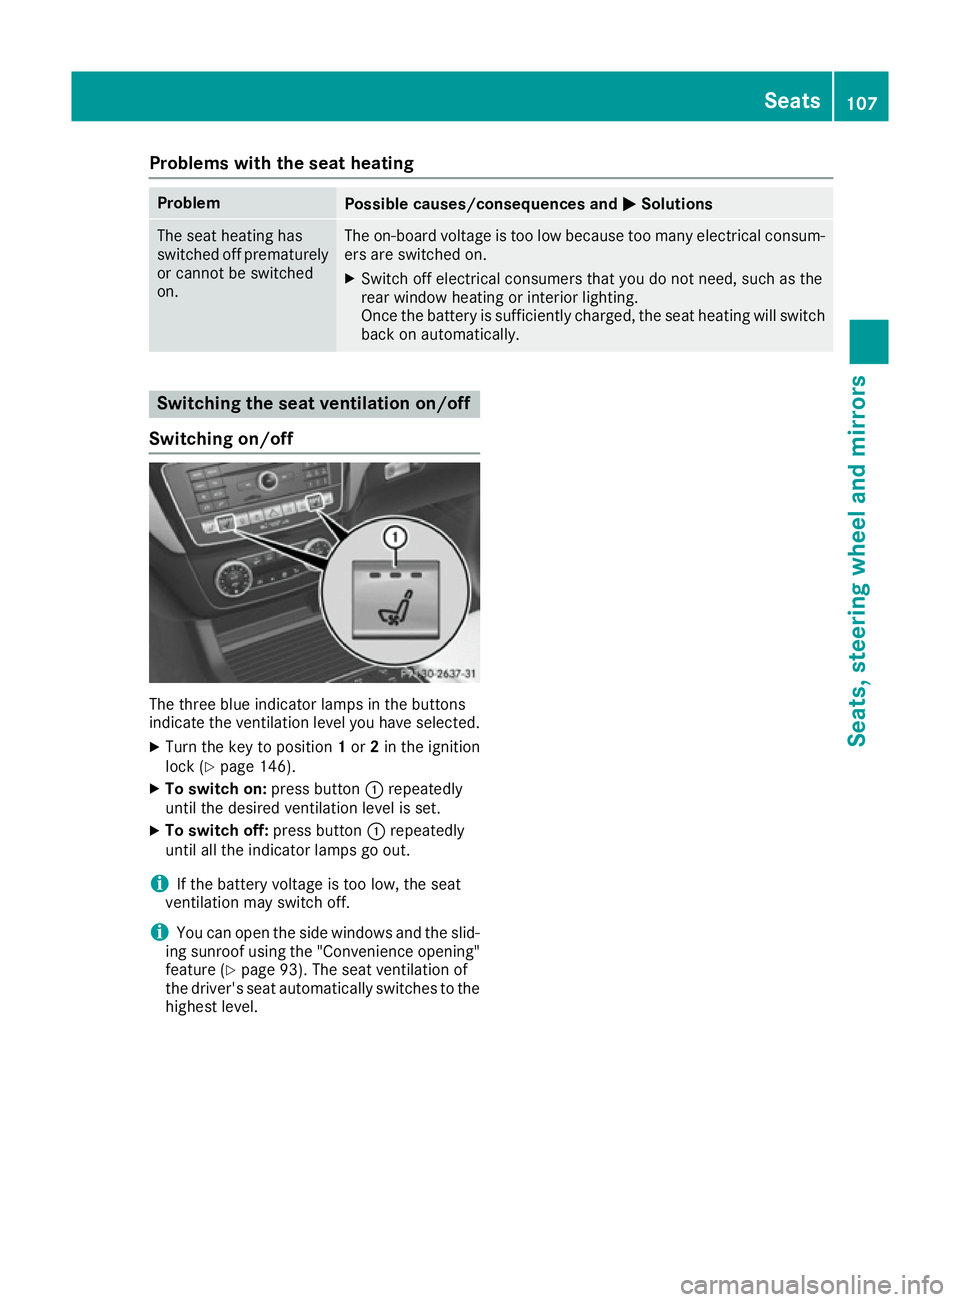
Switching on/off The three blue indicator lamps in the buttons
indicate the ventilation level you have selected.
X Turn the key to position 1or 2in the ignition
lock (Y page 146).
X To switch on: press button:repeatedly
until the desired ventilation level is set.
X To switch off: press button:repeatedly
until all the indicator lamps go out.
i If the battery voltage is too low, the seat
ventilation may switch off.
i You can open the side windows and the slid-
ing sunroof using the "Convenience opening" feature (Y page 93). The seat ventilation of
the driver's seat automatically switches to the
highest level. Seats
107Seats, steering wheel and mirrors Z
Page 120 of 393
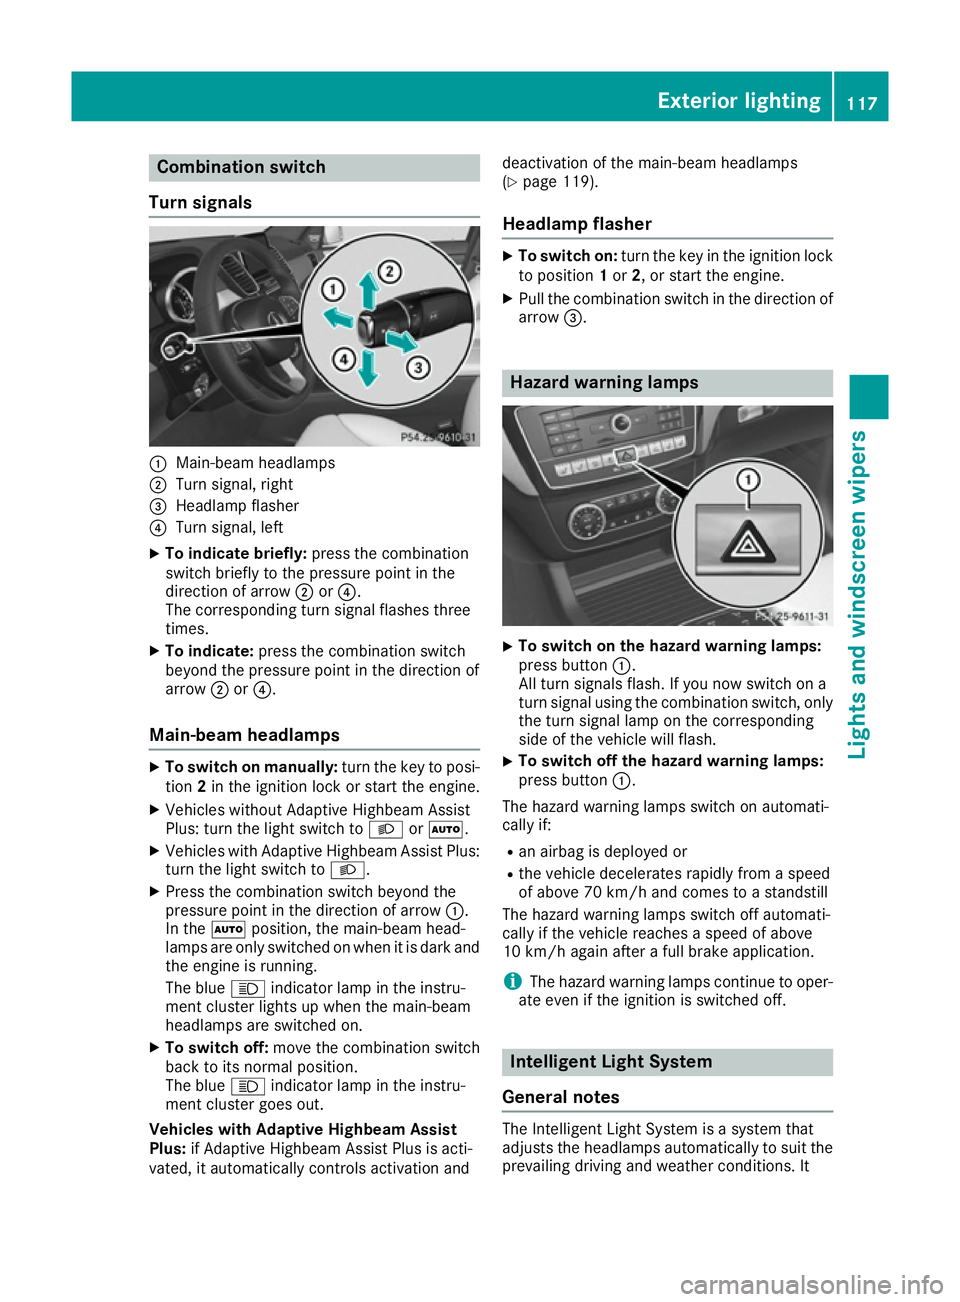
Combination switch
Turn signals :
Main-beam headlamps
; Turn signal, right
= Headlamp flasher
? Turn signal, left
X To indicate briefly: press the combination
switch briefly to the pressure point in the
direction of arrow ;or?.
The corresponding turn signal flashes three
times.
X To indicate: press the combination switch
beyond the pressure point in the direction of
arrow ;or?.
Main-beam headlamps X
To switch on manually: turn the key to posi-
tion 2in the ignition lock or start the engine.
X Vehicles without Adaptive Highbeam Assist
Plus: turn the light switch to LorÃ.
X Vehicles with Adaptive Highbeam Assist Plus:
turn the light switch to L.
X Press the combination switch beyond the
pressure point in the direction of arrow :.
In the Ãposition, the main-beam head-
lamps are only switched on when it is dark and
the engine is running.
The blue Kindicator lamp in the instru-
ment cluster lights up when the main-beam
headlamps are switched on.
X To switch off: move the combination switch
back to its normal position.
The blue Kindicator lamp in the instru-
ment cluster goes out.
Vehicles with Adaptive Highbeam Assist
Plus: if Adaptive Highbeam Assist Plus is acti-
vated, it automatically controls activation and deactivation of the main-beam headlamps
(Y
page 119).
Headlamp flasher X
To switch on: turn the key in the ignition lock
to position 1or 2, or start the engine.
X Pull the combination switch in the direction of
arrow =. Hazard warning lamps
X
To switch on the hazard warning lamps:
press button :.
All turn signals flash. If you now switch on a
turn signal using the combination switch, only the turn signal lamp on the corresponding
side of the vehicle will flash.
X To switch off the hazard warning lamps:
press button
:.
The hazard warning lamps switch on automati-
cally if:
R an airbag is deployed or
R the vehicle decelerates rapidly from a speed
of above 70 km/h and comes to a standstill
The hazard warning lamps switch off automati-
cally if the vehicle reaches a speed of above
10 km/h again after a full brake application.
i The hazard warning lamps continue to oper-
ate even if the ignition is switched off. Intelligent Light System
General notes The Intelligent Light System is a system that
adjusts the headlamps automatically to suit the
prevailing driving and weather conditions. It Exterior lighting
117Lights and windscreen wipers Z
Page 142 of 393
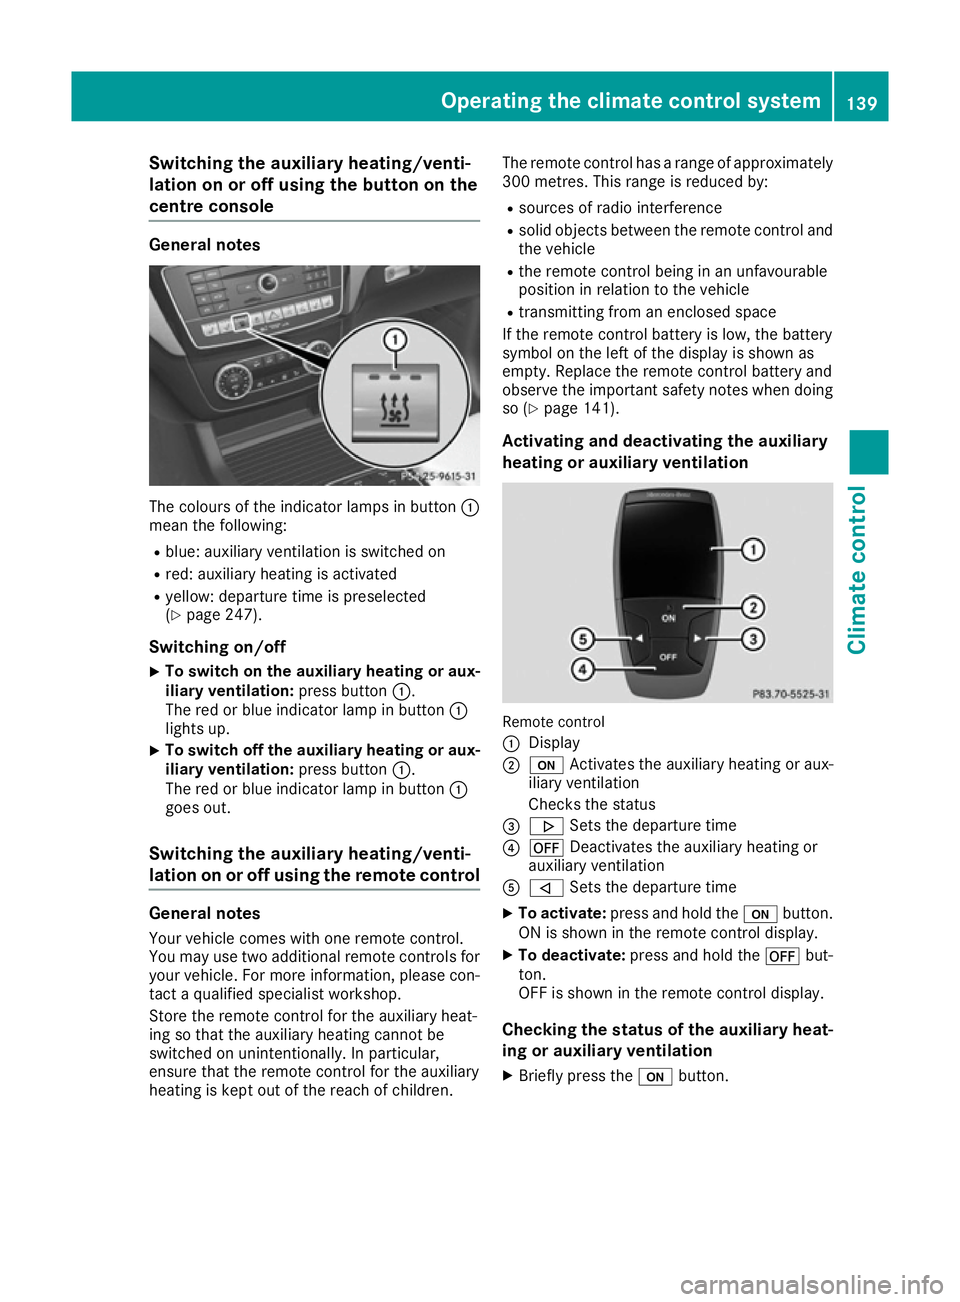
Switching the auxiliary heating/venti-
lation on or off using the button on the
centre console General notes
The colours of the indicator lamps in button
:
mean the following:
R blue: auxiliary ventilation is switched on
R red: auxiliary heating is activated
R yellow: departure time is preselected
(Y page 247).
Switching on/off X To switch on the auxiliary heating or aux-
iliary ventilation:
press button:.
The red or blue indicator lamp in button :
lights up.
X To switch off the auxiliary heating or aux-
iliary ventilation: press button:.
The red or blue indicator lamp in button :
goes out.
Switching the auxiliary heating/venti-
lation on or off using the remote control General notes
Your vehicle comes with one remote control.
You may use two additional remote controls for
your vehicle. For more information, please con-
tact a qualified specialist workshop.
Store the remote control for the auxiliary heat-
ing so that the auxiliary heating cannot be
switched on unintentionally. In particular,
ensure that the remote control for the auxiliary
heating is kept out of the reach of children. The remote control has a range of approximately
300 metres. This range is reduced by:
R sources of radio interference
R solid objects between the remote control and
the vehicle
R the remote control being in an unfavourable
position in relation to the vehicle
R transmitting from an enclosed space
If the remote control battery is low, the battery
symbol on the left of the display is shown as
empty. Replace the remote control battery and
observe the important safety notes when doing
so (Y page 141).
Activating and deactivating the auxiliary
heating or auxiliary ventilation Remote control
:
Display
; u Activates the auxiliary heating or aux-
iliary ventilation
Checks the status
= . Sets the departure time
? ^ Deactivates the auxiliary heating or
auxiliary ventilation
A , Sets the departure time
X To activate: press and hold the ubutton.
ON is shown in the remote control display.
X To deactivate: press and hold the ^but-
ton.
OFF is shown in the remote control display.
Checking the status of the auxiliary heat-
ing or auxiliary ventilation
X Briefly press the ubutton. Operating the climate control system
139Climate control Z
Page 167 of 393
Problems with the fuel and fuel tank
Problem
Possible causes/consequences and
M
MSolutions Fuel is leaking from the
vehicle.
G
WARNING
The fuel line or the fuel tank is faulty.
There is a risk of fire or explosion. X Apply the electric parking brake.
X Switch off the engine.
X Remove the key from the ignition lock.
or, on vehicles with KEYLESS-GO start function or KEYLESS ‑GO:
X Open the driver's door.
The on-board electronics now have status 0. This is the same as the
key having been removed.
X Do not restart the engine under any circumstances.
X Consult a qualified specialist workshop. The engine does not
start. The fuel tank of a vehicle with a diesel engine has been run completely
dry.
X Refuel the vehicle with at least 5 litres of diesel.
X Turn the ignition on for approximately ten seconds (Y page 146).
X Start the engine continuously for a maximum of ten seconds until it
runs smoothly.
If the engine does not start: X Turn the ignition on again for a maximum of ten seconds
(Y page 146).
X Start the engine again continuously for a maximum of ten seconds
until it runs smoothly.
If the engine does not start after three attempts:
X Consult a qualified specialist workshop. The fuel filler flap cannot
be opened. The fuel filler flap is not unlocked.
X Unlock the vehicle (Y page 79). The key battery is discharged or nearly discharged.
X Unlock the vehicle using the emergency key element (Y page 80).The fuel filler flap is unlocked, but the opening mechanism is jammed.
X Consult a qualified specialist workshop. AdBlue
®
(BlueTEC vehicles only)
General notes To function properly, BlueTEC exhaust gas after-
treatment must be operated with the reducing
agent AdBlue ®
. Topping up AdBlue ®
is part of
the maintenance work. Under normal operating conditions, a full tank of AdBlue
®
should last
until the next service due date.
When the supply of AdBlue ®
is down to approx-
imately 3.8 l, the Refill AdBlue See Own‐ Refill AdBlue See Own‐
er's Manual
er's Manual message is shown in the multi-
function display. 164
RefuellingDriving and parking
Page 168 of 393
X
Add at least 3.8 lof AdBlue ®
.
X Switch on the ignition for at least 60 seconds.
X Start the engine.
i You can also have the AdBlue ®
tank refilled
at a qualified specialist workshop.
Before driving your vehicle outside Europe, have
the AdBlue ®
supply checked at a qualified spe-
cialist workshop.
Further information about BlueTEC exhaust gas
aftertreatment and about AdBlue ®
can
be obtained from any Mercedes-Benz Service
Centre.
Important safety notes AdBlue
®
is a water-soluble fluid for the exhaust
gas aftertreatment of diesel engines. It is:
R non-toxic
R colourless and odourless
R non-flammable
If you open the AdBlue ®
tank, small amounts of
ammonia vapour may be released.
Ammonia vapours have a pungent odour and are
particularly irritating to the skin, to mucous
membranes and to the eyes. You may experi-
ence a burning sensation in your eyes, nose and throat. You may also experience coughing and
watery eyes.
Do not inhale any ammonia vapours that may be
released. Only fill the AdBlue ®
tank in well-ven-
tilated areas.
Do not swallow AdBlue ®
or let it come into con-
tact with skin, eyes or clothing. Keep AdBlue ®
away from children.
If you or others come into contact with AdBlue ®
,
observe the following:
R immediately rinse AdBlue ®
off your skin with
soap and water.
R if AdBlue ®
comes into contact with your eyes,
immediately rinse them thoroughly with clean water. Seek medical attention immediately.
R if AdBlue ®
is swallowed, immediately rinse
your mouth out thoroughly. Drink plenty of
water. Seek medical attention immediately.
R change immediately out of clothing that has
come into contact with AdBlue ®
.
! Only use AdBlue ®
in accordance with
ISO 22241. Do not mix any additives with AdBlue
®
, and do not dilute AdBlue ®
with
water. This may destroy the BlueTEC exhaust
gas aftertreatment system.
! In order to fill the AdBlue ®
tank, the vehicle
must be parked on a level surface. The
AdBlue ®
tank can only be filled as intended
with the vehicle parked on a level surface.
Fluctuations in capacity will thus be avoided.
Filling a vehicle standing on an uneven sur-
face is not permitted. There is a danger of
overfilling, which can cause damage to Blue-
TEC exhaust gas aftertreatment components.
! Surfaces which have come into contact with
AdBlue ®
while refilling should be rinsed
immediately with water, or remove AdBlue ®
with a moist cloth and cold water. If AdBlue ®
has already crystallised, use a sponge and
cold water to clean the area. AdBlue ®
residue
crystallises after a certain amount of time and soils the affected surfaces.
! AdBlue ®
is not a fuel additive and must not
be added to the fuel tank. If AdBlue ®
is added
to the fuel tank, this can lead to engine dam-
age.
Have the AdBlue ®
tank refilled at a qualified
specialist workshop. However, you can also top
up the AdBlue ®
tank:
R at a filling station with an AdBlue ®
filling pump
R with AdBlue ®
refill bottles
R with an AdBlue ®
refill canister
When the pump nozzle switches off automati-
cally during filling at a filling pump, the AdBlue ®
tank has been completely filled. Do not fill the
AdBlue ®
tank any further. AdBlue ®
may leak
out.
To avoid transporting already opened refill con-
tainers in the vehicle, completely empty refill
bottles or canisters when filling the AdBlue ®
tank, if possible.
Further information on AdBlue ®
(Y page 377). Refuelling
165Driving and parking Z