2015 MERCEDES-BENZ GLE COUPE tow
[x] Cancel search: towPage 148 of 393
Useful information
i This Owner's Manual describes all models,
series and optional equipment for your vehi-
cle that were available at the time of going to
press. National variations are possible. Note
that your vehicle may not be equipped with all
of the functions described. This is also the
case for systems and functions relevant to
safety.
i Read the information on qualified specialist
workshops: (Y page 25). Running-in notes
Important safety notes
In certain driving and driving safety systems, the
sensors adjust automatically while a certain dis- tance is being driven after the vehicle has beendelivered or after repairs. Full system effective-
ness is not reached until the end of this teach-in process.
Brake pads/linings and discs that are either new
or have been replaced only achieve optimum
braking effect after several hundred kilometres
of driving. Compensate for the reduced braking
effect by applying greater force to the brake
pedal. The first 1,500 km
If you treat the engine with sufficient care from
the very start, you will be rewarded with excel-
lent performance for the remainder of the
engine's life.
R Drive at varying vehicle speeds and engine
speeds for the first 1500 km.
R Avoid overstraining the vehicle during this
period, e.g. driving at full throttle.
R Change gear in good time, before the rev
counter needle is Ôof the way to the red area
of the rev counter.
R Do not shift down a gear manually in order to
brake.
R Try to avoid depressing the accelerator pedal
beyond the point of resistance (kickdown). Additional notes on running in Mercedes-AMG
vehicles:
R For the first 1,500 km do not drive at speeds
above 140 km/ h.
R Only allow the engine to reach a maximum
engine speed of 4,500 rpm briefly.
R Ideally, for the first 1,500 km, drive in the
Comfort drive program.
After 1,500 km, you may gradually accelerate
the vehicle to full road and engine speeds.
You should also observe these notes on running-
in if the engine or parts of the drive train on your vehicle have been replaced.
Always observe the maximum permissible
speed. Driving
Important safety notes
G
WARNING
Objects in the driver's footwell may restrict
the clearance around the pedals or block a
depressed pedal. This jeopardises the oper-
ating and road safety of the vehicle. There is a risk of an accident.
Stow all objects securely in the vehicle so that
they do not get into the driver's footwell.
Always fit the floormats securely and as pre-
scribed in order to ensure that there is always sufficient room for the pedals. Do not use
loose floormats and do not place several floor- mats on top of one another. G
WARNING
Unsuitable footwear can hinder correct usage of the pedals, e.g.:
R shoes with thick soles
R shoes with high heels
R slippers
There is a risk of an accident.
Wear suitable footwear to ensure correct
usage of the pedals. Driving
145Driving and parking Z
Page 158 of 393
Engaging park position P automatically
Park position
Pis automatically engaged if:
R you switch off the engine using the key and
remove the key
R you switch off the engine using the key or
using the Start/Stop button and open the
driver's door or front-passenger door
R you open the driver's door when the vehicle is
stationary or when driving at a very low speed
and the transmission is in position Dor R
Under certain conditions, the automatic trans-
mission shifts automatically to transmission
position Pif the HOLD function or DISTRONIC
PLUS is activated. Observe the information on
the HOLD function (Y page 192) and on
DISTRONIC PLUS (Y page 186).
Engaging reverse gear R !
Only shift the automatic transmission to
R
when the vehicle is stationary.
X If the transmission is in position Dor N: push
the DIRECT SELECT lever up past the first
point of resistance.
X If the transmission is in position P: depress
the brake pedal and push the DIRECT SELECT
lever up past the first point of resistance.
Shifting to neutral N G
WARNING
If children are left unsupervised in the vehicle, they can:
R open doors and endanger other persons or
road users
R climb out and be injured by the traffic
R operate vehicle equipment and, for exam-
ple, trap themselves.
Children could also set the vehicle in motion, for example by:
R releasing the parking brake
R shifting the automatic transmission out of
park position P
R starting the engine.
There is a risk of an accident and injury.
When leaving the vehicle, always take the key
with you and lock the vehicle. Never leave children unattended in the vehicle. Always
keep the key out of reach of children.
X If the transmission is in position Dor R: push
the DIRECT SELECT lever up or down to the
first point of resistance.
X If the transmission is in position P: depress
the brake pedal and push the DIRECT SELECT lever up or down to the first point of resist-
ance.
If you switch the engine off with the transmis-
sion in position Ror D, the automatic transmis-
sion shifts to Nautomatically.
With the key: if you then open the driver's door
or the front-passenger door or remove the key
from the ignition, the automatic transmission
shifts to Pautomatically.
With the Start/Stop button: if you then open
the driver's door or the front-passenger door,
the automatic transmission shifts to Pautomat-
ically.
If you want the automatic transmission to
remain in neutral N, e.g. when having the vehicle
cleaned in an automatic car wash with a towing
system:
With the key:
X Switch the ignition on.
X Depress the brake pedal and keep it
depressed.
X Shift to neutral N.
X Release the brake pedal.
X Release the electric parking brake.
X Switch off the ignition and leave the key in the
ignition lock.
With the Start/Stop button:
X Remove the Start/Stop button from the igni-
tion lock.
X Insert the key into the ignition lock.
X Switch the ignition on.
X Depress the brake pedal and keep it
depressed.
X Shift to neutral N.
X Release the brake pedal.
X Release the electric parking brake.
X Switch off the ignition and leave the key in the
ignition lock. Automatic transmission
155Driving and parking Z
Page 159 of 393
Engaging drive position D
X
If the transmission is in position Ror N: push
the DIRECT SELECT lever down past the first
point of resistance.
X If the transmission is in position P: depress
the brake pedal and push the DIRECT SELECT
lever down past the first point of resistance. Transmission positions
B Park position
This prevents the vehicle from rolling away when stopped. Only shift the
transmission into position Pwhen
the vehicle is stationary
(Y page 199).
Park position Pis automatically
engaged if:
R you switch off the engine using the
key and remove the key
R you switch off the engine using the
key or using the Start/Stop button
and open the driver's door or front- passenger door
R you open the driver's door when
the vehicle is stationary or driving
at very low speed and the trans-
mission is in position Dor R C Reverse gear
Only shift the transmission into posi- tion Rwhen the vehicle is stationary. A Neutral
Do not shift the transmission to
N
while driving. Otherwise, the auto-
matic transmission could be dam-
aged.
No power is transmitted from the
engine to the drive wheels.
Releasing the brakes will allow you to
move the vehicle freely, e.g. to push
it or tow it.
If ESP ®
is deactivated or faulty: shift
the transmission to position Nif the
vehicle is in danger of skidding, e.g.
on icy roads.
If you switch the engine off with the
transmission in position Ror D, the
automatic transmission shifts to N
automatically.
! Rolling in neutral
Ncan lead to
damage to the transmission. 7 Drive
The automatic transmission changes
gear automatically. All forward gears
are available. Driving tips
Changing gear The automatic transmission shifts to the indi-
vidual gears automatically when it is in trans-
mission position
D. Gearshifting is determined
by:
R the selected drive program
R the position of the accelerator pedal
R the road speed
Accelerator pedal position Your style of driving influences how the auto-
matic transmission shifts gear:
R little throttle: early upshifts
R more throttle: late upshifts 156
Automatic transmissionDriving and parking
Page 160 of 393
Kickdown
Use kickdown for maximum acceleration:
X Depress the accelerator pedal beyond the
pressure point.
The transmission shifts to a lower gear
depending on the engine speed.
X Ease off the accelerator pedal once the
desired speed is reached.
The automatic transmission shifts back up.
Gliding mode All vehicles (except Mercedes-AMG vehi-
cles)
Gliding mode is characterised by the following:
R the combustion engine is disconnected from
the drive train
R the engine speed is equal to the engine idling
speed
R the gear indicated after the transmission
position Ddisappears in the multifunction
display (Y page 154)
Gliding mode can be activated under the follow-
ing conditions:
R you select the "ECO" setting for the drive sys-
tem within the Individualdrive program. You
can find information about this in the Digital
Owner's Manual
R the speed is within a suitable range
R the type of road is suitable, e.g. no steep gra-
dients
R you are no longer depressing the accelerator
pedal
Gliding mode is deactivated under the following
conditions:
R you depress the accelerator pedal
R you depress the brake pedal
R you use the DIRECT SELECT lever to switch
the transmission position (Y page 154)
R you use the DYNAMIC SELECT controller to
change the drive program (Y page 153)
R you activate manual gearshifting
(Y page 158)
R you leave the suitable speed range Mercedes-AMG vehicles
Gliding mode is characterised by the following:
R the combustion engine is disconnected from
the drive train
R the engine speed is equal to the engine idling
speed
R in the multifunction display, the gliding sym-
bol appears in the drive program display
Gliding mode can be activated under the follow-
ing conditions:
R the Comfort drive program is activated or you
select the "Comfort" setting for the drive sys-
tem within the Individualdrive program. You
can find information about this in the Digital
Owner's Manual
R the ECO start/stop function is activated
R you are driving carefully with low acceleration
of the vehicle
R the engine is at normal operating temperature
R the speed is within a suitable range
R the type of road is suitable, e.g. no steep gra-
dients
R you are no longer depressing the accelerator
pedal
Gliding mode is deactivated under the following
conditions:
R you have deactivated the ECO start/stop
function
R you depress the accelerator pedal
R you depress the brake pedal
R you use the DIRECT SELECT lever to switch
the transmission position (Y page 154)
R you use the DYNAMIC SELECT controller to
change the drive program (Y page 153)
R you activate manual gearshifting
(Y page 158)
R you leave the suitable speed range
Towing a trailer X
Drive in the middle of the engine speed range
on uphill gradients.
X Depending on the uphill or downhill gradient,
use left-hand steering wheel gearshift paddle
(Y page 158) to select a lower gear, even if
cruise control, DISTRONIC PLUS, or SPEED-
TRONIC are activated. Automatic trans
mission
157Driving an d parking Z
Page 170 of 393
Centre. AdBlue
®
refill canisters are often sold
with a filler hose. A filler hose that does not
exactly fit the vehicle's AdBlue ®
tank offers no
protection against overfilling. AdBlue ®
may leak
out as a result of overfilling. Mercedes-Benz
offers a special disposable hose with overfill
protection. You can obtain this from any
Mercedes-Benz Service Centre. AdBlue ®
is
available in a variety of containers and recepta- cles. Only use the disposable hose with the
Mercedes-Benz AdBlue ®
refill canisters.
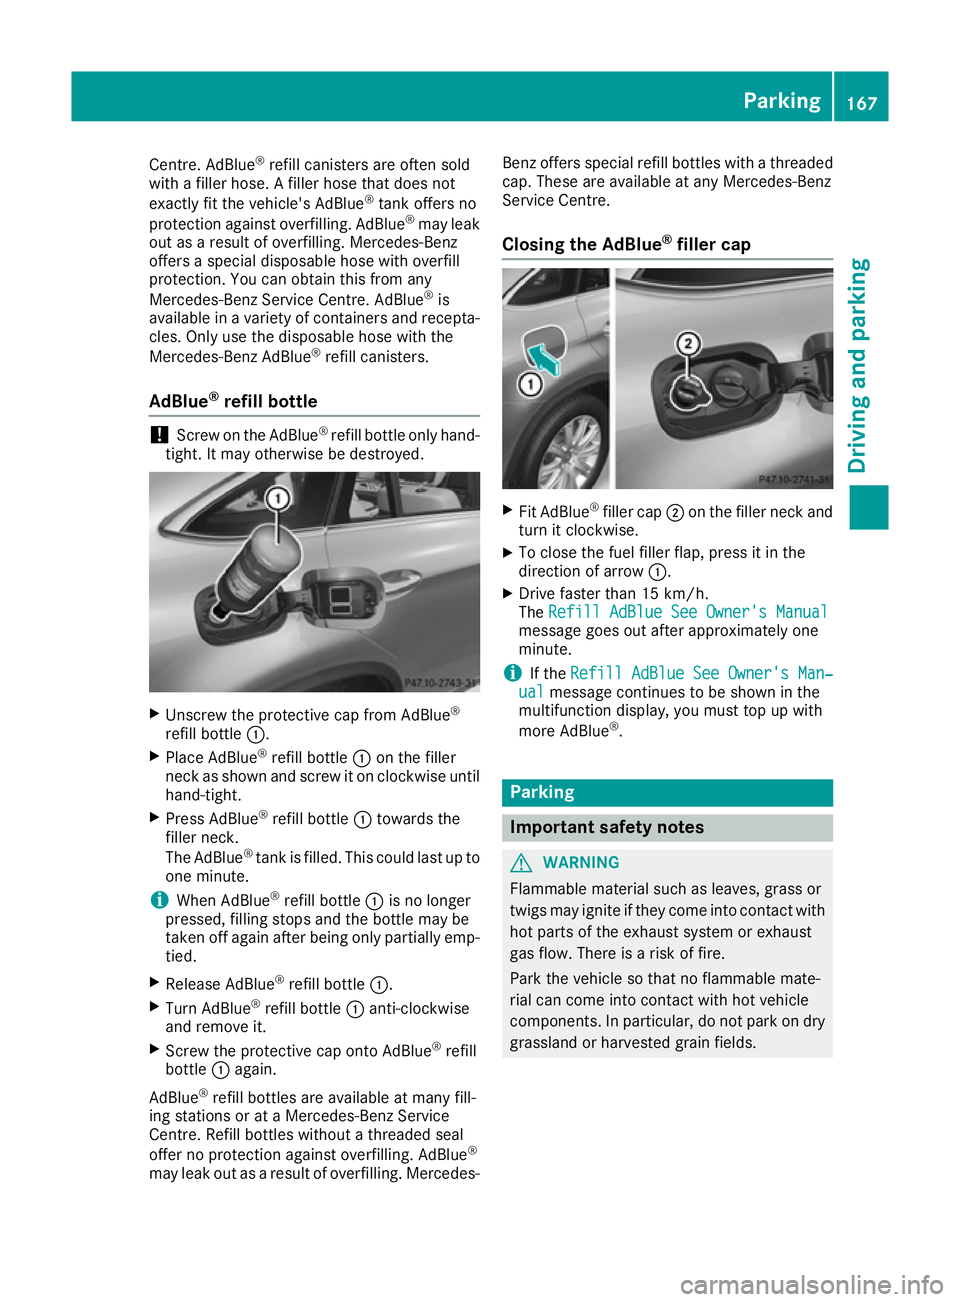
AdBlue ®
refill bottle !
Screw on the AdBlue ®
refill bottle only hand-
tight. It may otherwise be destroyed. X
Unscrew the protective cap from AdBlue ®
refill bottle :.
X Place AdBlue ®
refill bottle :on the filler
neck as shown and screw it on clockwise until hand-tight.
X Press AdBlue ®
refill bottle :towards the
filler neck.
The AdBlue ®
tank is filled. This could last up to
one minute.
i When AdBlue ®
refill bottle :is no longer
pressed, filling stops and the bottle may be
taken off again after being only partially emp- tied.
X Release AdBlue ®
refill bottle :.
X Turn AdBlue ®
refill bottle :anti-clockwise
and remove it.
X Screw the protective cap onto AdBlue ®
refill
bottle :again.
AdBlue ®
refill bottles are available at many fill-
ing stations or at a Mercedes-Benz Service
Centre. Refill bottles without a threaded seal
offer no protection against overfilling. AdBlue ®
may leak out as a result of overfilling. Mercedes- Benz offers special refill bottles with a threaded
cap. These are available at any Mercedes-Benz
Service Centre.
Closing the AdBlue ®
filler cap X
Fit AdBlue ®
filler cap ;on the filler neck and
turn it clockwise.
X To close the fuel filler flap, press it in the
direction of arrow :.
X Drive faster than 15 km/h.
The Refill AdBlue See Owner's Manual Refill AdBlue See Owner's Manual
message goes out after approximately one
minute.
i If the
Refill AdBlue See Owner's Man‐ Refill AdBlue See Owner's Man‐
ual
ual message continues to be shown in the
multifunction display, you must top up with
more AdBlue ®
. Parking
Important safety notes
G
WARNING
Flammable material such as leaves, grass or
twigs may ignite if they come into contact with hot parts of the exhaust system or exhaust
gas flow. There is a risk of fire.
Park the vehicle so that no flammable mate-
rial can come into contact with hot vehicle
components. In particular, do not park on dry grassland or harvested grain fields. Parking
167Driving and parking Z
Page 171 of 393
G
WARNING
If you leave children unattended in the vehi-
cle, they may be able to set the vehicle in
motion if, for example, they:
R release the parking brake
R shift the automatic transmission out of park
position P
R start the engine
In addition, they may operate vehicle equip-
ment and become trapped. There is a risk of
an accident and injury.
When leaving the vehicle, always take the key
with you and lock the vehicle. Never leave
children unattended in the vehicle.
! Always secure the vehicle correctly against
rolling away. Otherwise, the vehicle or its driv-
etrain could be damaged.
To ensure that the vehicle is safeguarded
against rolling away unintentionally:
R the electric parking brake must be applied.
R the transmission must be in position Pand the
key must be removed from the ignition lock
R the front wheels must be turned towards the
kerb on steep uphill or downhill gradients
R the empty vehicle must be secured at the
front axle with a wheel chock or similar
object, for example, on uphill or downhill gra- dients
R a laden vehicle must also be secured at the
rear axle with a wheel chock or similar object,
for example, on uphill or downhill gradients Switching off the engine
Important safety notes G
WARNING
The automatic transmission switches to neu-
tral position Nwhen you switch off the engine.
The vehicle may roll away. There is a risk of an
accident.
After switching off the engine, always switch
to parking position P. Prevent the parked vehi-
cle from rolling away by applying the parking
brake. Using the key X
Apply the electric parking brake.
X Shift the transmission to position P.
X Turn the key to position 0in the ignition lock
and remove it.
The immobiliser is activated.
If you switch the engine off with the transmis-
sion in position Ror D, the automatic transmis-
sion shifts to Nautomatically.
If you then open the driver's door or the front-
passenger door or remove the key from the igni- tion, the automatic transmission shifts to P.
If you want the automatic transmission to
remain in neutral N, e.g. when having the vehicle
cleaned in an automatic car wash with a towing
system:
X Switch the ignition on.
X Depress the brake pedal and keep it
depressed.
X Shift to neutral N.
X Release the brake pedal.
X Release the electric parking brake.
X Switch off the ignition and leave the key in the
ignition lock.
Using KEYLESS-GO X
Apply the electric parking brake.
X Shift the transmission to position P.
X Press the Start/Stop button (Y page 146).
The engine stops and all the indicator lamps in the instrument cluster go out.
If you switch the engine off with the transmis-
sion in position Ror D, the automatic transmis-
sion shifts to Nautomatically.
If you then open the driver's or front-passenger door, the automatic transmission shifts to P.
If you want the automatic transmission to
remain in neutral N, e.g. when having the vehicle
cleaned in an automatic car wash with a towing
system:
X Remove the Start/Stop button from the igni-
tion lock.
X Insert the key into the ignition lock.
X Switch the ignition on.
X Depress the brake pedal and keep it
depressed.
X Shift to neutral N.168
ParkingDriving and parking
Page 179 of 393
General notes
H
Environmental note
Protection of the environment is of primary
importance. Treat nature with respect.
Observe all prohibiting signs.
Read this section before driving your vehicle off- road. Practise by driving over more gentle off-
road terrain first.
The following driving systems are specially
adapted to off-road driving:
R AIRMATIC package (vehicle level)
(Y page 194)
R DSR (Downhill Speed Regulation)
(Y page 193)
Observe the following notes:
R Select a vehicle level suitable for the off-road
terrain. To avoid damaging the vehicle, make sure there is always sufficient ground clear-
ance.
R Make sure that items of luggage and loads are
stowed safely and are well secured
(Y page 303).
R Always keep the engine running and in gear
when driving on a downhill gradient. Activate
DSR (Y page 193).
R Drive slowly and evenly, if necessary at walk-
ing pace.
R Ensure that the wheels are in contact with the
ground at all times.
R Drive with extreme care on unknown off-road
routes where visibility is poor. For safety rea- sons, get out of the vehicle first and survey
the off-road route.
R Look out for obstacles such as rocks, holes,
tree stumps and furrows.
R Take care when turning on an uphill or down-
hill slope or when driving across a slope. The
vehicle could otherwise tip over.
R Always keep the doors, the tailgate and the
sliding sunroof closed while the vehicle is in
motion.
R Do not stray from marked routes or paths.
R Observe the notes on off-road fording
(Y page 174).
i Information about retrofitting special all-ter-
rain tyres is available from any qualified spe-
cialist workshop. i
Do not use the HOLD function when driving
off-road, on steep uphill or downhill gradients or on slippery or loose surfaces. The HOLD
function cannot hold the vehicle on such sur-faces.
Checklist before driving off-road X
Engine oil level: check the engine oil and top
it up if necessary.
When driving on steep gradients, the oil level must be sufficiently high to ensure a correct
oil supply in the vehicle.
X AdBlue ®
tank (BlueTEC vehicles): check
the level and top up if necessary
(Y page 164).
X Tyre-change tool kit: check that the jack is
working and make sure you have the wheel
wrench, a robust tow cable and a folding
spade in the vehicle.
X Wheels and tyres: check the tyre tread
depth and tyre pressure.
X Check for damage and remove any foreign
objects, e.g. small stones, from the wheels/
tyres.
X Replace any missing valve caps.
X Replace dented or damaged wheels.
X Wheels: dented or bent wheels can lead to a
loss of tyre pressure and damage to the tyre
bead. Before driving off-road, check the
wheels and replace them if necessary.
Checklist after driving off-road !
If you detect damage to the vehicle after
driving off-road, have the vehicle checked
immediately at a qualified specialist work-
shop.
Driving over rough terrain places greater
demands on your vehicle than driving on normal
roads. After driving off-road, check the vehicle.
This allows you to detect damage promptly and reduce the risk of an accident to yourself and
other road users.
X Deactivate DSR (Y page 193).
X Lower the vehicle level again to a level suita-
ble to the road conditions, e.g. to the normal
level.
X Clean the headlamps and rear lights and
check for damage.
X Clean the front and rear licence plates. 176
Driving tipsDriving and parking
Page 181 of 393
R
Avoid high engine speeds, except when driv-
ing on sandy and muddy routes with high driv-
ing resistance.
R Use the left-hand steering wheel gearshift
paddle to shift to a lower gear appropriate to the gradient.
R Use the left-hand gearshift paddle to shift to a
lower gear on long and steep downhill gradi-
ents.
Hill start assist will aid you when pulling away on
a hill. Further information on hill start assist
(Y page 149).
Do not shift into transmission position Nwhen
driving off-road. You could lose control of the
vehicle if you attempt to brake the vehicle using
the service brake. If the gradient is too steep for
your vehicle, back up in reverse gear.
Always observe the approach/departure angle
values (Y page 383).
Maximum gradient-climbing capability Always observe the maximum gradient climbing
ability values (Y page 384).
Hilltops When driving up an uphill gradient, slightly
reduce pressure on the accelerator immediately
before reaching the brow of the hill. Make use of the vehicle's own impetus to travel over the
brow.
This style of driving prevents:
R the vehicle from lifting off the ground on the
brow of a hill
R the vehicle from travelling too quickly down
the other side
Driving downhill R
Drive slowly.
R Do not drive at an angle down steep inclines.
Steer into the line of fall and drive with the
front wheels aligned straight. Otherwise, the
vehicle could slip sideways, tip and overturn.
R Before tackling steep downhill gradients, use
the left-hand steering wheel gearshift paddle
to shift to a lower gear.
R Activate DSR. If this is not sufficient, brake
gently. When doing so, make sure that the vehicle is facing in the direction of the line of
fall.
R Check that the brakes are working normally
after a long downhill stretch.
i Off-road ABS is activated when the off-road
program is selected.
At speeds below 30 km/h the front wheels
lock cyclically during braking. The digging-in
effect achieved in the process reduces the
stopping distance when driving off-road. The
steerability of the vehicle is considerably
reduced if the wheels lock. Driving systems
Intelligent Drive
Mercedes-Benz Intelligent Drive stands for inno- vative driver assistance and safety systems
which enhance comfort and support the driver in
critical situations. With these intelligent co-ordi- nated systems Mercedes-Benz has set a mile-
stone on the path towards autonomous driving.
Mercedes-Benz Intelligent Drive embraces all
elements of active and passive safety in one well thought-out system – for the safety of the vehi-
cle occupants and that of other road users.
Further information on driving safety systems
(Y page 64). Cruise control
General notes Cruise control maintains a constant road speed
for you. It brakes automatically in order to avoid
exceeding the set speed. You must select a
lower gear in good time on long and steep down-
hill gradients, especially if the vehicle is laden or towing a trailer. By doing so, you will make use of
the braking effect of the engine. This relieves the load on the brake system and prevents the
brakes from overheating and wearing too
quickly.
Use cruise control only if road and traffic con-
ditions are appropriate for maintaining a steady
speed for a prolonged period. You can store any road speed above 30 km/h. 178
Driving systemsDriving an
d parking