2015 MERCEDES-BENZ GLE COUPE battery
[x] Cancel search: batteryPage 155 of 393
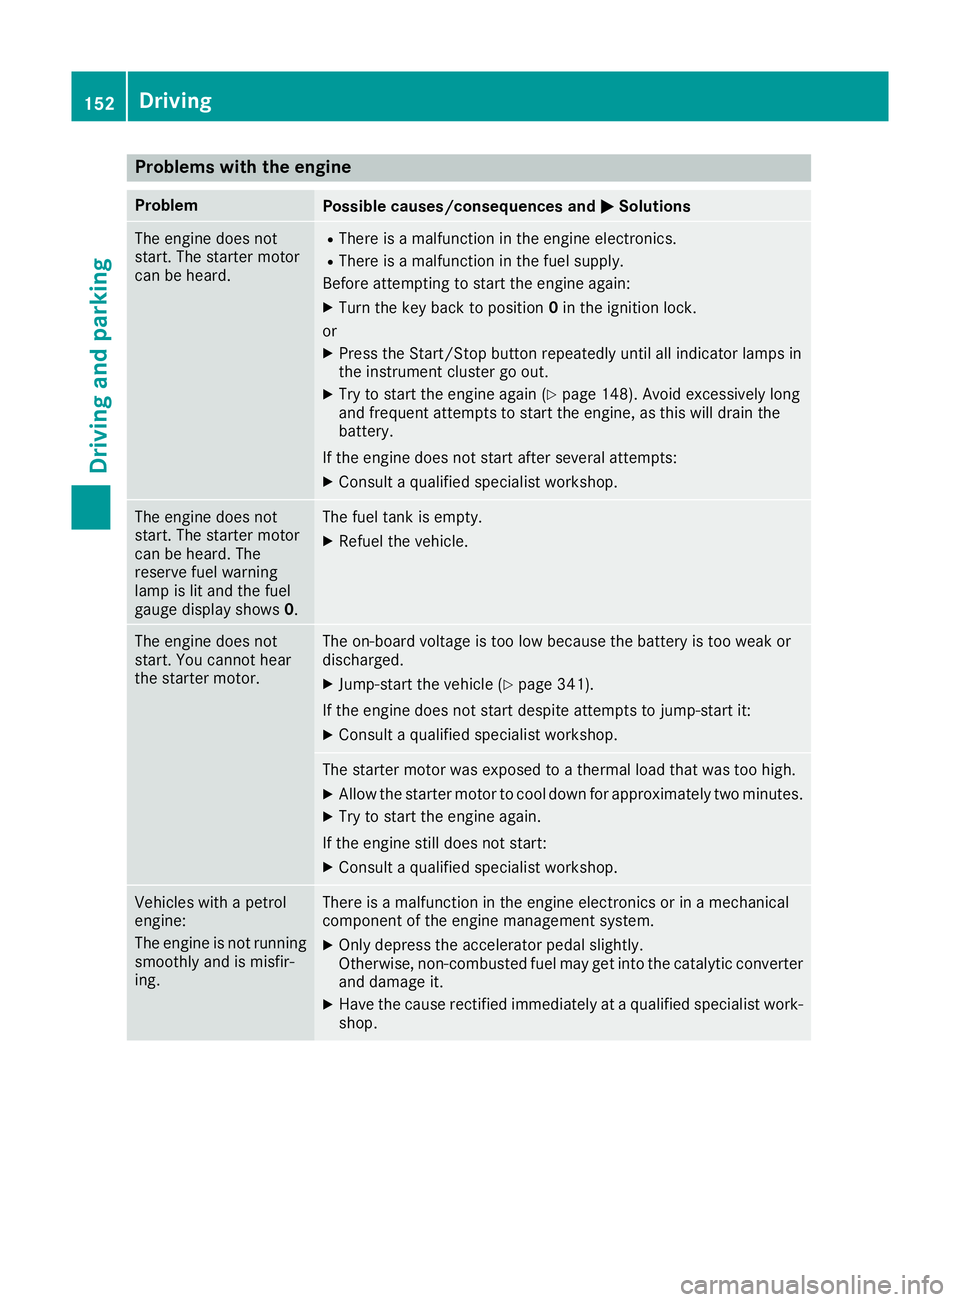
Problems with the engine
Problem
Possible causes/consequences and
M
MSolutions The engine does not
start. The starter motor
can be heard. R
There is a malfunction in the engine electronics.
R There is a malfunction in the fuel supply.
Before attempting to start the engine again:
X Turn the key back to position 0in the ignition lock.
or X Press the Start/Stop button repeatedly until all indicator lamps in
the instrument cluster go out.
X Try to start the engine again (Y page 148). Avoid excessively long
and frequent attempts to start the engine, as this will drain the
battery.
If the engine does not start after several attempts:
X Consult a qualified specialist workshop. The engine does not
start. The starter motor
can be heard. The
reserve fuel warning
lamp is lit and the fuel
gauge display shows
0. The fuel tank is empty.
X Refuel the vehicle. The engine does not
start. You cannot hear
the starter motor. The on-board voltage is too low because the battery is too weak or
discharged.
X Jump-start the vehicle (Y page 341).
If the engine does not start despite attempts to jump-start it:
X Consult a qualified specialist workshop. The starter motor was exposed to a thermal load that was too high.
X Allow the starter motor to cool down for approximately two minutes.
X Try to start the engine again.
If the engine still does not start: X Consult a qualified specialist workshop. Vehicles with a petrol
engine:
The engine is not running
smoothly and is misfir-
ing. There is a malfunction in the engine electronics or in a mechanical
component of the engine management system.
X Only depress the accelerator pedal slightly.
Otherwise, non-combusted fuel may get into the catalytic converter
and damage it.
X Have the cause rectified immediately at a qualified specialist work-
shop. 152
DrivingDriving and parking
Page 167 of 393
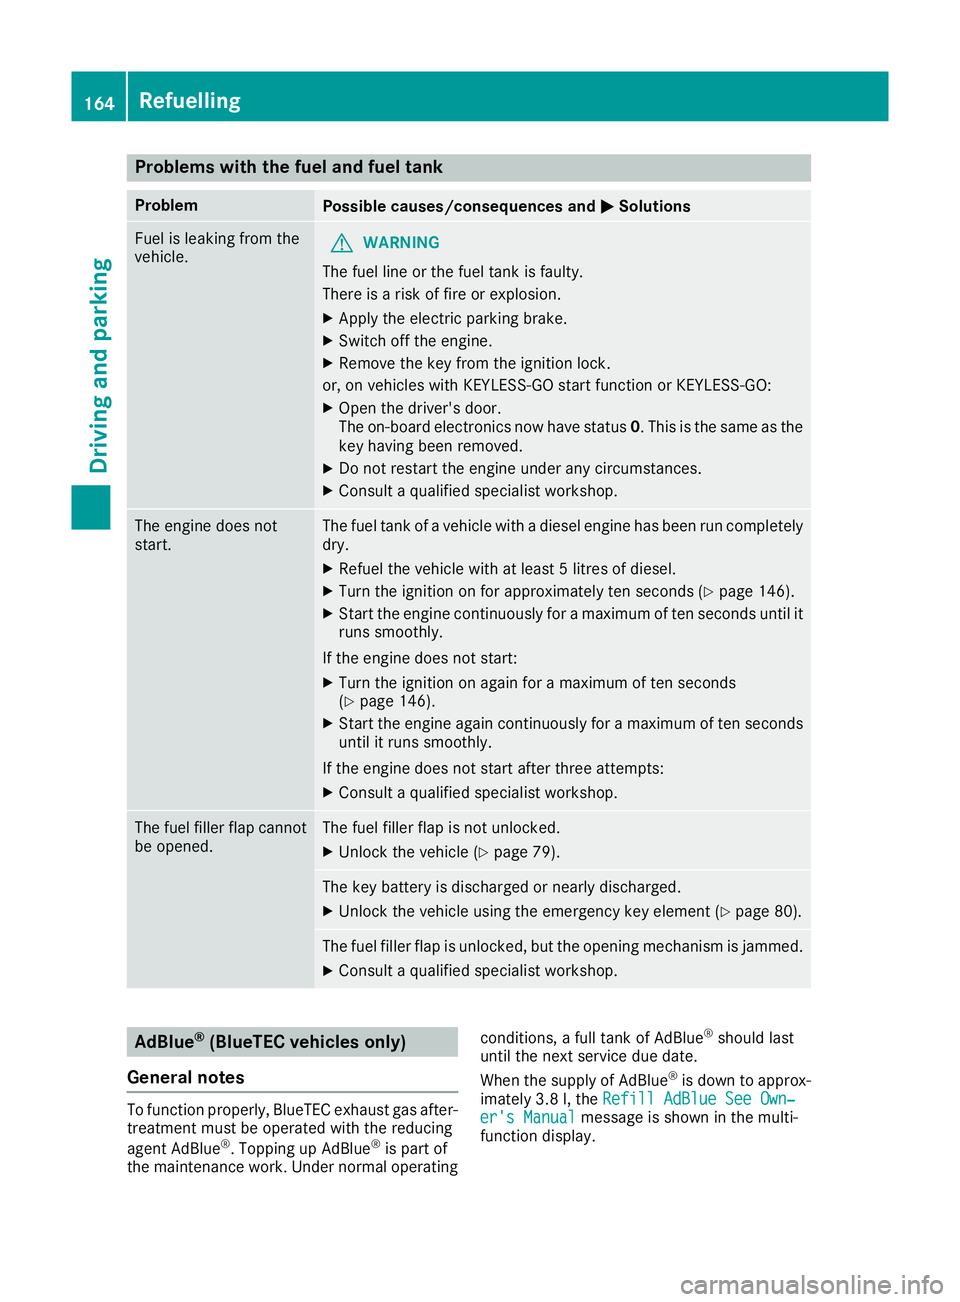
Problems with the fuel and fuel tank
Problem
Possible causes/consequences and
M
MSolutions Fuel is leaking from the
vehicle.
G
WARNING
The fuel line or the fuel tank is faulty.
There is a risk of fire or explosion. X Apply the electric parking brake.
X Switch off the engine.
X Remove the key from the ignition lock.
or, on vehicles with KEYLESS-GO start function or KEYLESS ‑GO:
X Open the driver's door.
The on-board electronics now have status 0. This is the same as the
key having been removed.
X Do not restart the engine under any circumstances.
X Consult a qualified specialist workshop. The engine does not
start. The fuel tank of a vehicle with a diesel engine has been run completely
dry.
X Refuel the vehicle with at least 5 litres of diesel.
X Turn the ignition on for approximately ten seconds (Y page 146).
X Start the engine continuously for a maximum of ten seconds until it
runs smoothly.
If the engine does not start: X Turn the ignition on again for a maximum of ten seconds
(Y page 146).
X Start the engine again continuously for a maximum of ten seconds
until it runs smoothly.
If the engine does not start after three attempts:
X Consult a qualified specialist workshop. The fuel filler flap cannot
be opened. The fuel filler flap is not unlocked.
X Unlock the vehicle (Y page 79). The key battery is discharged or nearly discharged.
X Unlock the vehicle using the emergency key element (Y page 80).The fuel filler flap is unlocked, but the opening mechanism is jammed.
X Consult a qualified specialist workshop. AdBlue
®
(BlueTEC vehicles only)
General notes To function properly, BlueTEC exhaust gas after-
treatment must be operated with the reducing
agent AdBlue ®
. Topping up AdBlue ®
is part of
the maintenance work. Under normal operating conditions, a full tank of AdBlue
®
should last
until the next service due date.
When the supply of AdBlue ®
is down to approx-
imately 3.8 l, the Refill AdBlue See Own‐ Refill AdBlue See Own‐
er's Manual
er's Manual message is shown in the multi-
function display. 164
RefuellingDriving and parking
Page 173 of 393
The electric parking brake is also applied auto-
matically if:
R DISTRONIC PLUS brings the vehicle to a
standstill or
R the HOLD function is keeping the vehicle sta-
tionary
R Active Parking Assist is keeping the vehicle
stationary
In addition, at least one of the following condi-
tions must be fulfilled:
R the engine is switched off
R the driver is not wearing a seat belt and the
driver's door is opened
R there is a system malfunction
R the power supply is insufficient
R the vehicle is stationary for a lengthy period
The red !indicator lamp in the instrument
cluster lights up.
The electric parking brake is not automatically
applied if the engine is switched off by the ECO
start/stop function.
Releasing automatically The electric parking brake is released automat-
ically when all of the following conditions are
fulfilled:
R
the engine is running
R the transmission is in position Dor R
R the seat belt is fastened
R you depress the accelerator pedal
If the transmission is in position R, the boot lid
must be closed.
If your seat belt is not fastened, the following
conditions must be fulfilled to automatically
release the electric parking brake:
R the driver's door is closed
R you have shifted out of transmission position
P or you have previously driven faster than
3 km/h
i Ensure that you do not depress the accel-
erator pedal unintentionally. Otherwise, the
parking brake will be released and the vehicle will start to move. Emergency braking
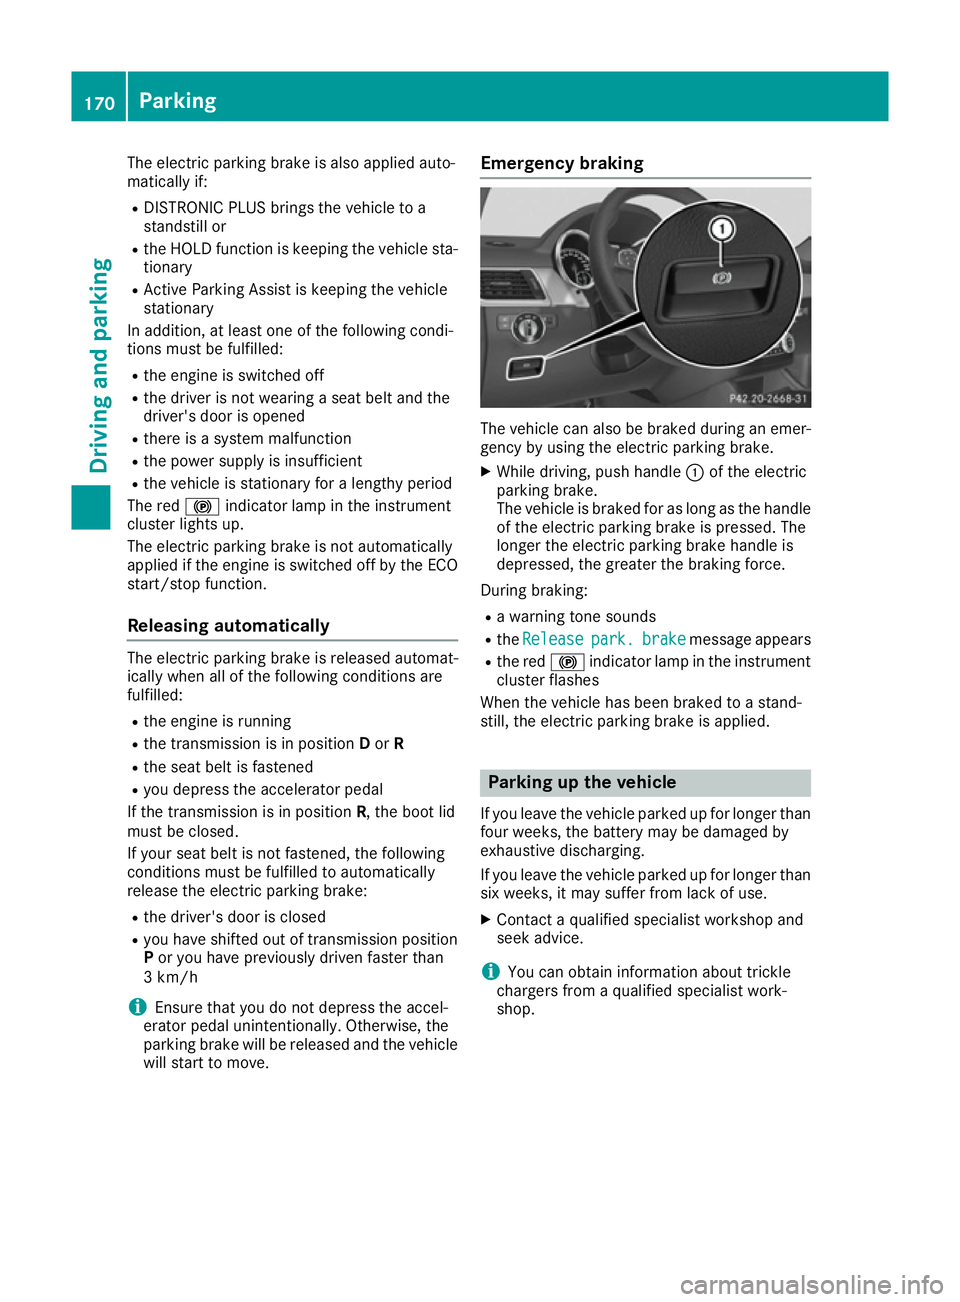
The vehicle can also be braked during an emer-
gency by using the electric parking brake.
X While driving, push handle :of the electric
parking brake.
The vehicle is braked for as long as the handle of the electric parking brake is pressed. The
longer the electric parking brake handle is
depressed, the greater the braking force.
During braking:
R a warning tone sounds
R the Release Release park.
park.brake
brakemessage appears
R the red !indicator lamp in the instrument
cluster flashes
When the vehicle has been braked to a stand-
still, the electric parking brake is applied. Parking up the vehicle
If you leave the vehicle parked up for longer than
four weeks, the battery may be damaged by
exhaustive discharging.
If you leave the vehicle parked up for longer than
six weeks, it may suffer from lack of use.
X Contact a qualified specialist workshop and
seek advice.
i You can obtain information about trickle
chargers from a qualified specialist work-
shop. 170
ParkingDriving and parking
Page 189 of 393
R
turn off at a motorway exit
R approach a tollgate
Even if the vehicle in front leaves the detection
range, DISTRONIC PLUS temporarily maintains
the current driving speed and does not acceler-
ate. This is based on the current map data in the navigation system.
Afterwards, the vehicle accelerates back to the
set speed you specified.
The system takes into account the fact that
overtaking on the right is not permitted on
motorways or high-speed major roads at speeds
above 80 km/h. The driving speed is adjusted to the speed of the queue of vehicles in the adja-
cent lane to the left.
i Prevention of overtaking on the right applies
to countries where traffic drives on the right.
In countries where traffic drives on the left,
overtaking on the left is prevented accord-
ingly.
Stopping G
WARNING
When leaving the vehicle, even if it is braked
only by DISTRONIC PLUS, it could roll away if:
R there is a malfunction in the system or in
the voltage supply.
R DISTRONIC PLUS has been deactivated
with the cruise control lever, e.g. by a vehi-
cle occupant or from outside the vehicle.
R the electrical system in the engine com-
partment, the battery or the fuses have
been tampered with.
R the battery is disconnected.
R the accelerator pedal has been depressed,
e.g. by a vehicle occupant.
There is a risk of an accident.
If you wish to exit the vehicle, always turn off
DISTRONIC PLUS and secure the vehicle
against rolling away.
If DISTRONIC PLUS detects that the vehicle in
front is stopping, it brakes your vehicle until it is stationary.
Once your vehicle is stationary, it remains sta-
tionary and you do not need to depress the
brake. After a short period, the vehicle is secured by
the electric parking brake, thus relieving the
service brake.
Depending on the specified minimum distance,
your vehicle will come to a standstill at a suffi-
cient distance behind the vehicle in front. The
specified minimum distance is set using the
control on the cruise control lever.
When the vehicle is stationary and DISTRONIC
PLUS is activated, position P is automatically
selected if:
R the driver's door is open and the driver's seat
belt is unfastened
R the engine is switched off, unless it is auto-
matically switched off by the ECO start/stop
function
The electric parking brake secures the vehicle
automatically if DISTRONIC PLUS is activated
when the vehicle is stationary and:
R a system fault occurs
R the power supply is insufficient
On steep uphill or downhill inclines or if there is
a malfunction, the transmission may also be
automatically shifted into position P.
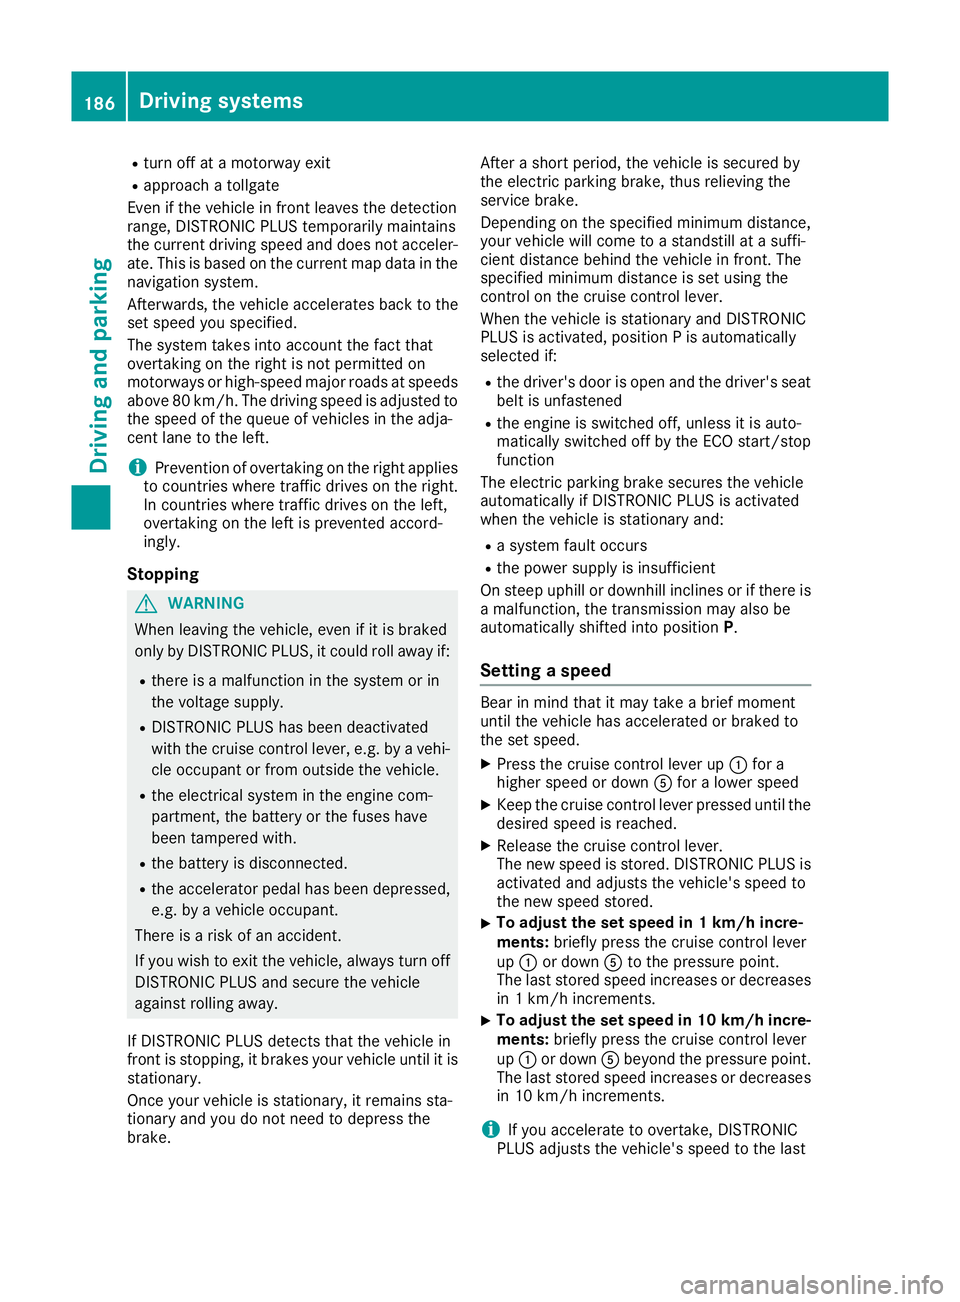
Setting a speed Bear in mind that it may take a brief moment
until the vehicle has accelerated or braked to
the set speed.
X Press the cruise control lever up :for a
higher speed or down Afor a lower speed
X Keep the cruise control lever pressed until the
desired speed is reached.
X Release the cruise control lever.
The new speed is stored. DISTRONIC PLUS is
activated and adjusts the vehicle's speed to
the new speed stored.
X To adjust the set speed in 1 km/h incre-
ments:
briefly press the cruise control lever
up : or down Ato the pressure point.
The last stored speed increases or decreases in 1 km/h increments.
X To adjust the set speed in 10 km/
hincre-
ments: briefly press the cruise control lever
up : or down Abeyond the pressure point.
The last stored speed increases or decreases
in 10 km/h increments.
i If you accelerate to overtake, DISTRONIC
PLUS adjusts the vehicle's speed to the last 186
Driving systemsDriving and parking
Page 195 of 393
Important safety notes
G
WARNING
When leaving the vehicle, it can still roll away despite being braked by the HOLD function if:
R there is a malfunction in the system or in
the voltage supply
R the HOLD function is deactivated by the
accelerator pedal being depressed, e.g. by
a vehicle occupant
R the electrical system in the engine com-
partment, the battery or the fuses are tam-
pered with
R the battery is disconnected
There is a risk of an accident.
Before leaving the vehicle, always deactivate
the HOLD function and secure the vehicle
from rolling away.
! When DISTRONIC PLUS or the HOLD func-
tion is activated, the vehicle brakes automat- ically in certain situations.
To avoid damage to the vehicle, deactivate
DISTRONIC PLUS and the HOLD function in
the following or similar situations:
R when towing away
R in a car wash
Deactivating the HOLD function (Y page 192).
Activation conditions You can activate the HOLD function if:
R the vehicle is stationary
R the engine is running or if it has been auto-
matically switched off by the ECO start/stop
function
R the driver's door is closed or if your seat belt
is fastened
R the electric parking brake is released
R the transmission is in position D,Ror N
R DISTRONIC PLUS is deactivated Activating the HOLD function X
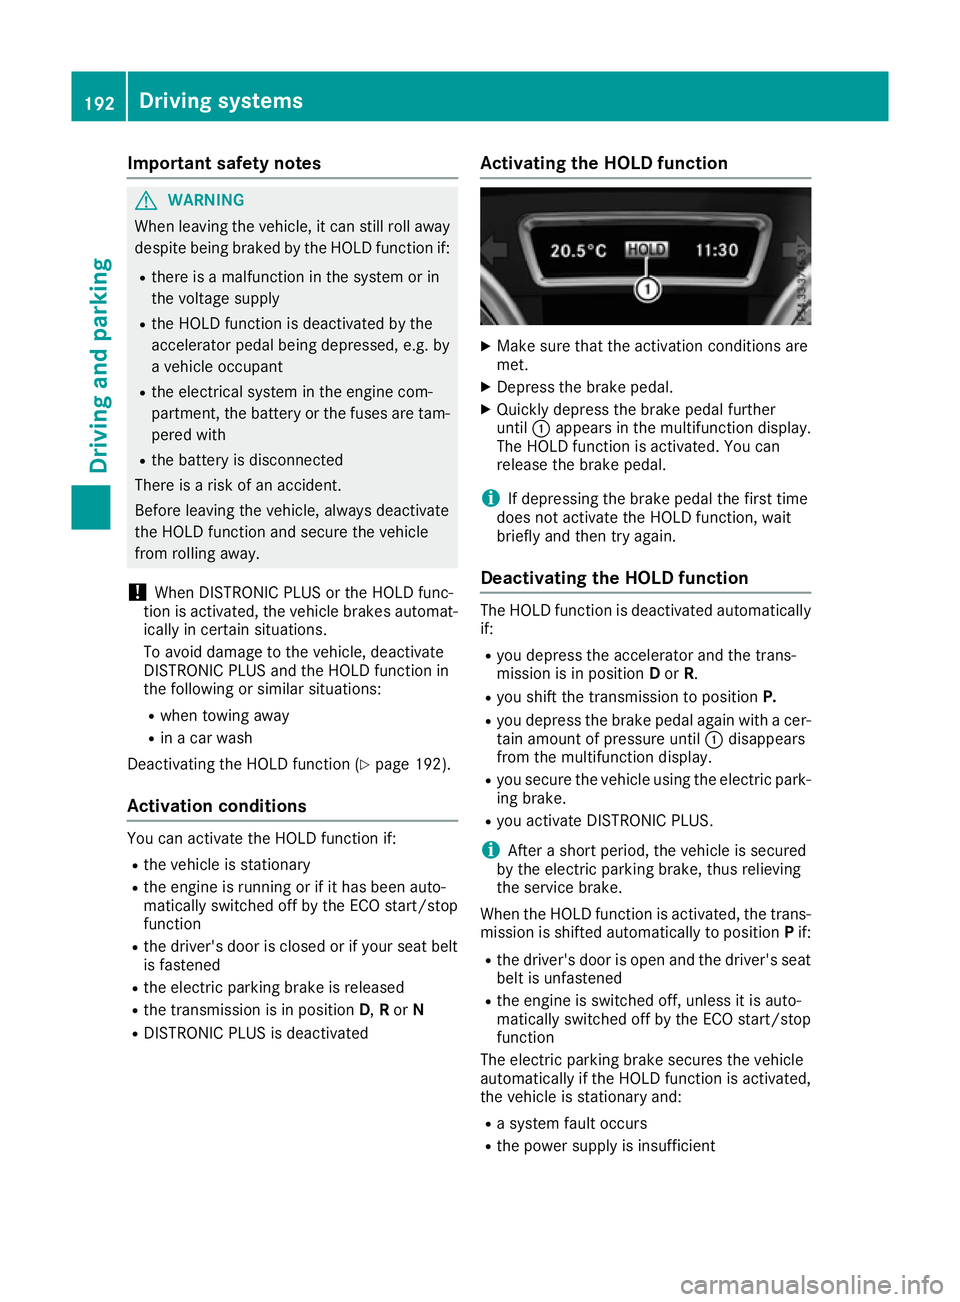
Make sure that the activation conditions are
met.
X Depress the brake pedal.
X Quickly depress the brake pedal further
until :appears in the multifunction display.
The HOLD function is activated. You can
release the brake pedal.
i If depressing the brake pedal the first time
does not activate the HOLD function, wait
briefly and then try again.
Deactivating the HOLD function The HOLD function is deactivated automatically
if:
R you depress the accelerator and the trans-
mission is in position Dor R.
R you shift the transmission to position P.
R you depress the brake pedal again with a cer-
tain amount of pressure until :disappears
from the multifunction display.
R you secure the vehicle using the electric park-
ing brake.
R you activate DISTRONIC PLUS.
i After a short period, the vehicle is secured
by the electric parking brake, thus relieving
the service brake.
When the HOLD function is activated, the trans-
mission is shifted automatically to position Pif:
R the driver's door is open and the driver's seat
belt is unfastened
R the engine is switched off, unless it is auto-
matically switched off by the ECO start/stop
function
The electric parking brake secures the vehicle
automatically if the HOLD function is activated,
the vehicle is stationary and:
R a system fault occurs
R the power supply is insufficient 192
Driving systemsDriving and pa
rking
Page 207 of 393
need to judge whether your vehicle will fit in
the parking space.
When driving at speeds below 30 km/h, you will
see parking symbol ;as a status indicator in
the instrument cluster. When a parking space
has been detected, an arrow towards the right or the left also appears. Active Parking Assist only
displays parking spaces on the front-passenger side as standard. Parking spaces on the driver's
side are displayed as soon as the turn signal on the driver's side is activated. When parking on
the driver's side, this must remain activated
until you confirm the use of Active Parking Assist by pressing the abutton on the multifunc-
tion steering wheel. The system automatically
determines whether the parking space is paral-
lel or at right angles to the direction of travel.
A parking space is displayed while you are driv-
ing past it, and until you are approximately 15 m away from it.
Parking G
WARNING
If you leave the vehicle when it is only being
braked by Active Parking Assist it could roll
away if:
R there is a malfunction in the system or in
the voltage supply.
R the electrical system in the engine com-
partment, the battery or the fuses are tam-
pered with.
R the battery is disconnected.
R the vehicle is accelerated, e.g. by a vehicle
occupant.
There is a risk of an accident.
Before leaving the vehicle, always secure it
against rolling away.
i When PARKTRONIC detects obstacles,
Active Parking Assist brakes automatically
during the parking process. You are respon-
sible for braking in good time. X
Stop the vehicle when the parking symbol
shows the desired parking space in the instru-
ment cluster.
X Shift the transmission to position R.
The Start Park Assist? Yes: OK No:
Start Park Assist? Yes: OK No:
% message appears in the multifunction
display.
X To cancel the procedure: press the%
button on the multifunction steering wheel or
pull away.
or X To park using Active Parking Assist: press
the a button on the multifunction steering
wheel.
The Park Assist active Accelerate
Park Assist active Accelerate
and brake Observe surroundings and brake Observe surroundings mes-
sage appears in the multifunction display.
X Release the multifunction steering wheel.
X Reverse the vehicle, being ready to brake at
all times. When reversing, drive at a speed
below 10 km/h. Otherwise, Active Parking
Assist will be cancelled.
Active Parking Assist brakes the vehicle to a
standstill when the vehicle approaches the
rear border of the parking space.
Manoeuvring may be required in tight parking spaces.
The Park Assist active Select D Park Assist active Select D
Observe surroundings
Observe surroundings message appears in
the multifunction display.
X Shift the transmission to position Dwhile the
vehicle is stationary.
Active Parking Assist immediately steers in
the other direction.
The Park Assist active Accelerate Park Assist active Accelerate
and brake Observe surroundings and brake Observe surroundings mes-
sage appears in the multifunction display.
i You will achieve the best results by waiting
for the steering procedure to complete before
pulling away.
X Drive forwards and be ready to brake at all
times.
Active Parking Assist brakes the vehicle to a
standstill.
The Park Assist active Select R Park Assist active Select R
Observe surroundings
Observe surroundings message appears in
the multifunction display.
As soon as the parking procedure is complete,
the Park Assist switched off
Park Assist switched off message
appears in the multifunction display and a warn- ing tone sounds. The vehicle is now parked. The 204
Driving systemsDriving an
d parking
Page 235 of 393
Further information:
R Display messages when towing a trailer
(Y page 281)
R Problems when swivelling the ball coupling
(Y page 233) Trailer power supply
! You can connect accessories with a power
rating of up to 180 W to the permanent power supply and with a power rating of up to 180 Wto the power supply that is switched on via the
ignition lock.
The trailer battery may not be charged from
the power supply.
When it leaves the factory, your vehicle's trailer
socket is equipped with a permanent power
supply and a power supply that is switched on
via the ignition lock.
The permanent power supply is supplied via
trailer socket pin 9.
The power supply that is switched on via the
ignition lock is supplied via trailer socket pin 10. The trailer's permanent power supply is
switched off in the event of low vehicle supply
voltage and after six hours at the latest.
You can find more information about fitting the
trailer electrics at a qualified specialist work-
shop.
X To switch the connected power supply on
or off: turn the key to position 2or 0respec-
tively (Y page 146). Failure check for LEDs
If LED lamps are fitted in the trailer, a malfunc-
tion message may appear in the multifunction
display even if there is no fault. The reason for
the error message may be that the current has
fallen below the minimum of 50 mA.
To ensure reliable indication of the failure, each LED chain in the trailer lighting must be guaran-
teed a minimum current of 50 mA. Trailer with 7-pin connector
General notes Trailer with 7-pin connector:
you can connect
to the 13-pin socket on the ball coupling using
an adapter or, if necessary, an adapter cable.
Both can be obtained at a qualified specialist
workshop.
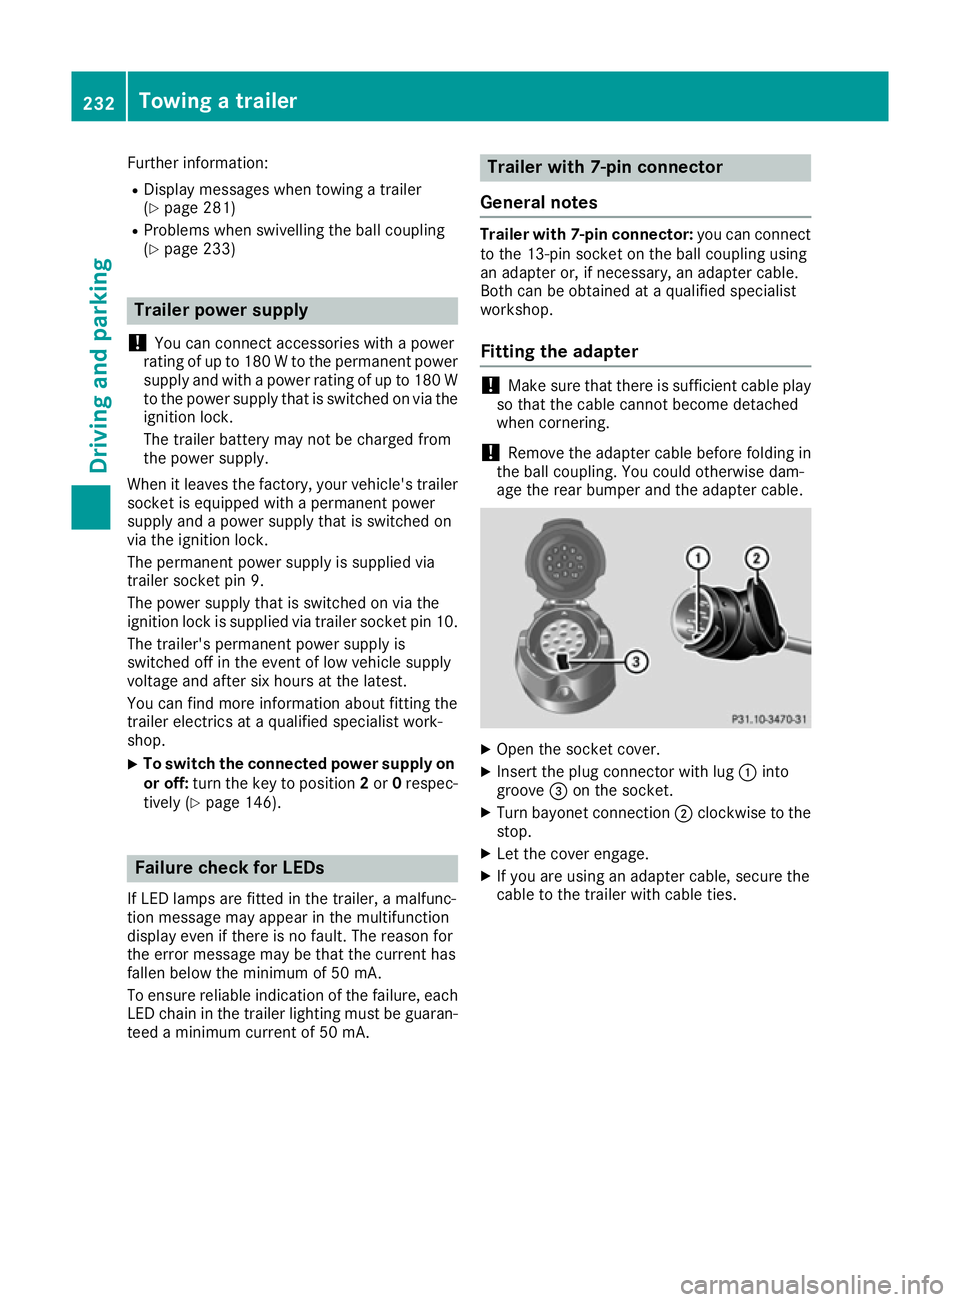
Fitting the adapter !
Make sure that there is sufficient cable play
so that the cable cannot become detached
when cornering.
! Remove the adapter cable before folding in
the ball coupling. You could otherwise dam-
age the rear bumper and the adapter cable. X
Open the socket cover.
X Insert the plug connector with lug :into
groove =on the socket.
X Turn bayonet connection ;clockwise to the
stop.
X Let the cover engage.
X If you are using an adapter cable, secure the
cable to the trailer with cable ties. 232
Towing a trailerDriving and parking
Page 242 of 393
If the ignition remains switched off for longer
than four hours, the ECO display will be auto-
matically reset.
Further information on the ECO display
(Y page 171).
Displaying the range and current fuel
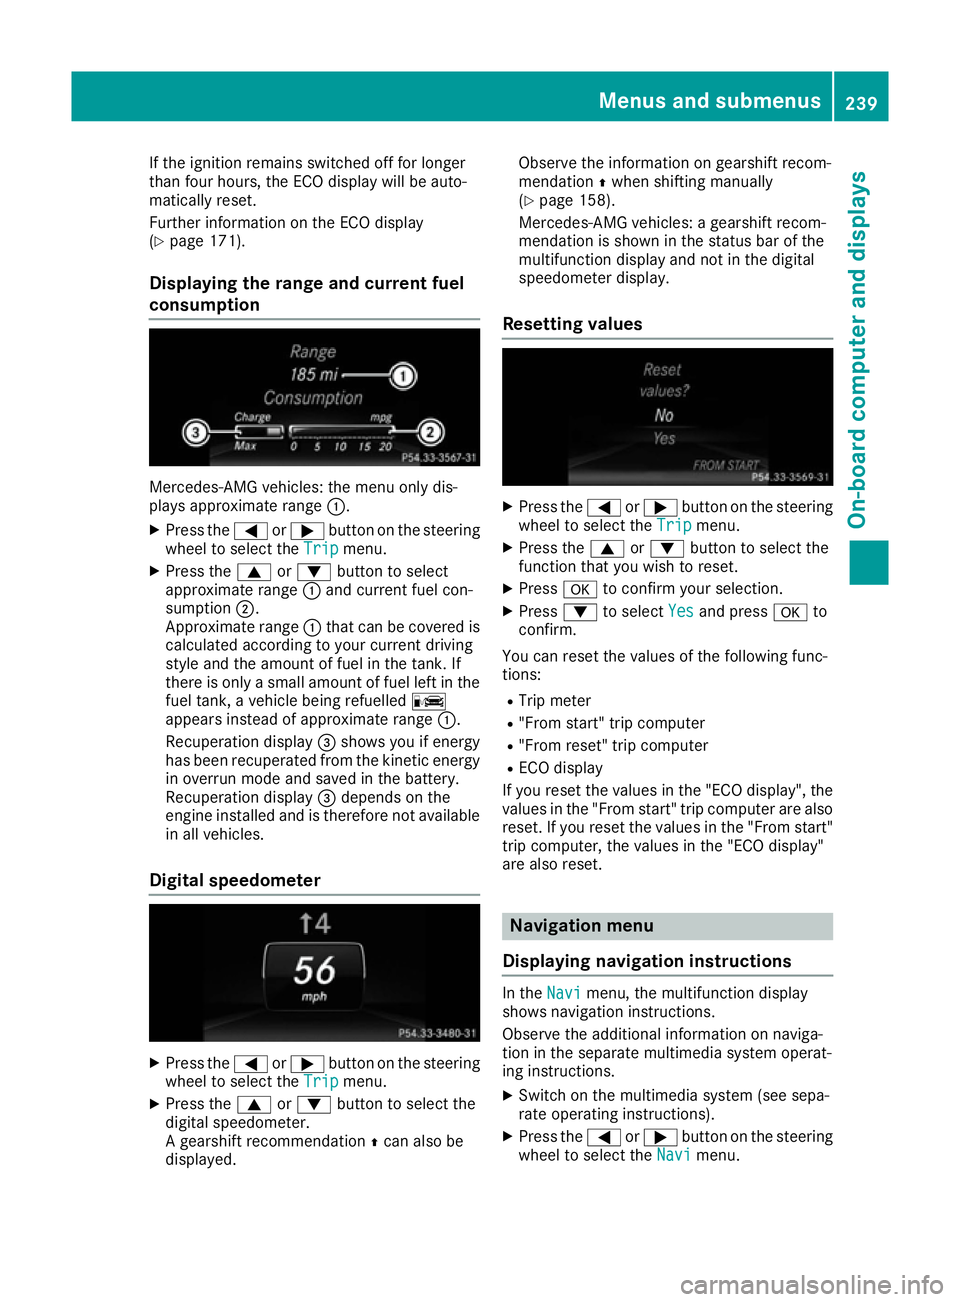
consumption Mercedes-AMG vehicles: the menu only dis-
plays approximate range
:.
X Press the =or; button on the steering
wheel to select the Trip
Trip menu.
X Press the 9or: button to select
approximate range :and current fuel con-
sumption ;.
Approximate range :that can be covered is
calculated according to your current driving
style and the amount of fuel in the tank. If
there is only a small amount of fuel left in the fuel tank, a vehicle being refuelled C
appears instead of approximate range :.
Recuperation display =shows you if energy
has been recuperated from the kinetic energy
in overrun mode and saved in the battery.
Recuperation display =depends on the
engine installed and is therefore not available in all vehicles.
Digital speedometer X
Press the =or; button on the steering
wheel to select the Trip
Trip menu.
X Press the 9or: button to select the
digital speedometer.
A gearshift recommendation Zcan also be
displayed. Observe the information on gearshift recom-
mendation
Zwhen shifting manually
(Y page 158).
Mercedes-AMG vehicles: a gearshift recom-
mendation is shown in the status bar of the
multifunction display and not in the digital
speedometer display.
Resetting values X
Press the =or; button on the steering
wheel to select the Trip Tripmenu.
X Press the 9or: button to select the
function that you wish to reset.
X Press ato confirm your selection.
X Press :to select Yes
Yesand press ato
confirm.
You can reset the values of the following func-
tions: R Trip meter
R "From start" trip computer
R "From reset" trip computer
R ECO display
If you reset the values in the "ECO display", the
values in the "From start" trip computer are also
reset. If you reset the values in the "From start" trip computer, the values in the "ECO display"
are also reset. Navigation menu
Displaying navigation instructions In the
Navi Navimenu, the multifunction display
shows navigation instructions.
Observe the additional information on naviga-
tion in the separate multimedia system operat-
ing instructions.
X Switch on the multimedia system (see sepa-
rate operating instructions).
X Press the =or; button on the steering
wheel to select the Navi
Navi menu. Menus and submenus
239On-board computer and displays Z