2015 MERCEDES-BENZ GLE COUPE power steering
[x] Cancel search: power steeringPage 11 of 393
Door
Automatic locking (on-board com-
puter) ............................................ .247
Automatic locking (switch) .............. .86
Central locking/unlocking (key) ...... 79
Control panel .................................. .36
Display message ............................ 283
Emergency locking ........................... 87
Emergency unlocking ....................... 86
Important safety note s.................... 84
Opening (from the inside) ................ 85
Power closing .................................. 86
Doors
Overview .......................................... 84
Drive program
Display (DIRECT SELECT lever) ...... 154
Drive programs
Automatic transmission ................. 158
Driver's door
see Door
Driving abroad
Mercedes-Benz Service ................. 323
Symmetrical dipped beam ............. 115
Driving assistance, crosswind ........... 72
Driving in mountainous terrain
Approach/departure angle ............ 177
Driving off-road
see Off-road driving
Driving safety system
BAS PLUS with Cross-Traffic
Assist ............................................... 65
COLLISION PREVENTION ASSIST
PLUS ................................................ 67
EBD (electronic brake force distri-bution) ............................................. 72
STEER CONTROL ............................. 74
Driving safety systems
ABS (Anti-lock Braking System) ....... 64
ADAPTIVE BRAK E............................. 72
Adaptive Brake Assist ...................... 68
Adaptive brake lights ....................... 69
BAS (Brake Assist System) .............. 65
Distance warning function ............... 67
ESP ®
(Electronic Stability Pro-
gram) ............................................... 69
Important safety guidelines ............. 64
Overview .......................................... 64 PRE-SAFE
®
Brake ............................. 72
Driving system
ADS ............................................... 195
AIRMATIC package ........................ 194
DISTRONIC PLUS with Steering
Assist and Stop&Go Pilot ............... 190
Driving systems
360°camera .................................. 210
Active Blind Spot Assist ................. 221
Active Curve System ...................... 196
Active Driving Assistance pack-
age ................................................. 221
Active Lane Keeping Assist ............ 224
Active Parking Assist ..................... 202
AMG RIDE CONTROL sports sus-
pension .......................................... 198
ATTENTION ASSIST ........................ 214
Blind Spot Assist ............................ 218
Cruise control ................................ 178
Display message ............................ 272
Distronic Plus ................................ 182
HOLD function ............................... 191
Lane Keeping Assist ...................... 220
PARKTRONIC ................................. 199
Reversing camera .......................... 206
SPEEDTRONIC ............................... 180
Traffic Sign Assist .......................... 216
Driving tips
Aquaplaning ................................... 173
Automatic transmission ................. 156
Brakes ........................................... 172
DISTRONIC PLUS ........................... 188
Downhill gradient ........................... 172
Driving abroad ............................... 115
Driving in winter ............................. 174
Driving on flooded roads ................ 174
Driving on sand .............................. 177
Driving on wet roads ...................... 173
Driving over obstacles ................... 177
Fuel ................................................ 171
General .......................................... 171
Icy road surfaces ........................... 174
Limited braking efficiency on sal-
ted roads ....................................... 173
New brake pads/linings ................ 173
Off-road driving .............................. 176
Off-road fording ............................. 174
Running-in tip s............................... 145 8
Index
Page 77 of 393
Following damage to the windscreen, have the
configuration and operation of the camera sys-
tem checked at a qualified specialist workshop.
Function X
To activate/deactivate: activate or deacti-
vate PRE-SAFE ®
Brake in the on-board com-
puter (Y page 244).
If the PRE-SAFE ®
Brake is not activated, the
æ symbol appears in the multifunction dis-
play.
If you have activated DSR (Y page 193), PRE-
SAFE ®
Brake is also deactivated.
This function will issue a warning if:
R at a speed of approximately 30 km/h or
higher, the distance maintained to the vehicle
travelling in front is insufficient for several
seconds.
The · distance warning lamp then lights
up in the instrument cluster.
R at a speed of around 7 km/h or more, you
rapidly approach a vehicle in front or a pedes-
trian
An intermittent warning tone will then sound
and the ·distance warning lamp lights up
in the instrument cluster.
X Brake immediately to defuse the situation.
or X Take evasive action provided it is safe to do
so.
The PRE-SAFE ®
Brake function can also brake
the vehicle automatically under the following
conditions:
R the driver and front passenger have their seat
belts fastened
and
R the vehicle speed is between approximately
7 km/h and 200 km/h
At a speed of up to approximately 70 km/h,
PRE-SAFE ®
Brake can also detect:
R stationary objects in the path of your vehicle,
e.g. stopped or parked vehicles
R pedestrians in the path of your vehicle
i If there is an increased risk of a collision,
preventive passenger protection measures
(PRE-SAFE ®
) are triggered (Y page 51).
If the risk of a collision with the vehicle in front
remains and you do not brake, take evasive action or accelerate significantly, the vehicle
may perform automatic emergency braking, up
to the point of full brake application. Automatic
emergency braking is not performed until imme- diately prior to an imminent accident.
You can prevent the intervention of PRE-SAFE ®
Brake at any time by:
R depressing the accelerator pedal further
R activating kickdown
R releasing the brake pedal
The braking action of PRE-SAFE ®
Brake is ended
automatically if:
R you manoeuvre to avoid the obstacle
R there is no longer any danger of a collision
R there is no longer an obstacle detected in
front of your vehicle STEER CONTROL
General notes STEER CONTROL helps you by transmitting a
noticeable steering force to the steering wheel
in the direction required for vehicle stabilisation.
This steering support is provided in particular if:
R both right wheels or both left wheels are on a
wet or slippery road surface when you brake
R the vehicle starts to skid
Important safety notes i
Observe the "Important safety notes" sec-
tion (Y page 64).
No steering support is provided from STEER
CONTROL, if: R ESP ®
is deactivated
R ESP ®
is malfunctioning
R the steering is faulty
If ESP ®
is malfunctioning, you will be assisted
further by the electrical power steering. 74
Driving safety systemsSafety
Page 149 of 393
G
WARNING
If you switch off the ignition while driving,
safety-relevant functions are only available
with limitations, or not at all. This could affect, for example, the power steering and the brake
boosting effect. You will require considerably
more effort to steer and brake. There is a risk of an accident.
Do not switch off the ignition while driving. G
WARNING
If the parking brake has not been fully
released when driving, the parking brake can:
R overheat and cause a fire
R lose its hold function.
There is a risk of fire and an accident. Release
the parking brake fully before driving off.
! Do not warm up the engine when the vehicle
is stationary. Drive off immediately. Avoid
high engine speeds and driving at full throttle
until the engine has reached its operating
temperature.
Only shift the automatic transmission to the
desired drive position when the vehicle is sta-
tionary.
Where possible, avoid spinning the drive
wheels when pulling away on slippery roads.
You could otherwise damage the drive train.
! Mercedes-AMG vehicles:
at low engine oil
temperatures (below +20 †), the maximum
engine speed is restricted in order to protect the engine. To protect the engine and main-
tain smooth engine operation, avoid driving at
full throttle when the engine is cold. Key positions
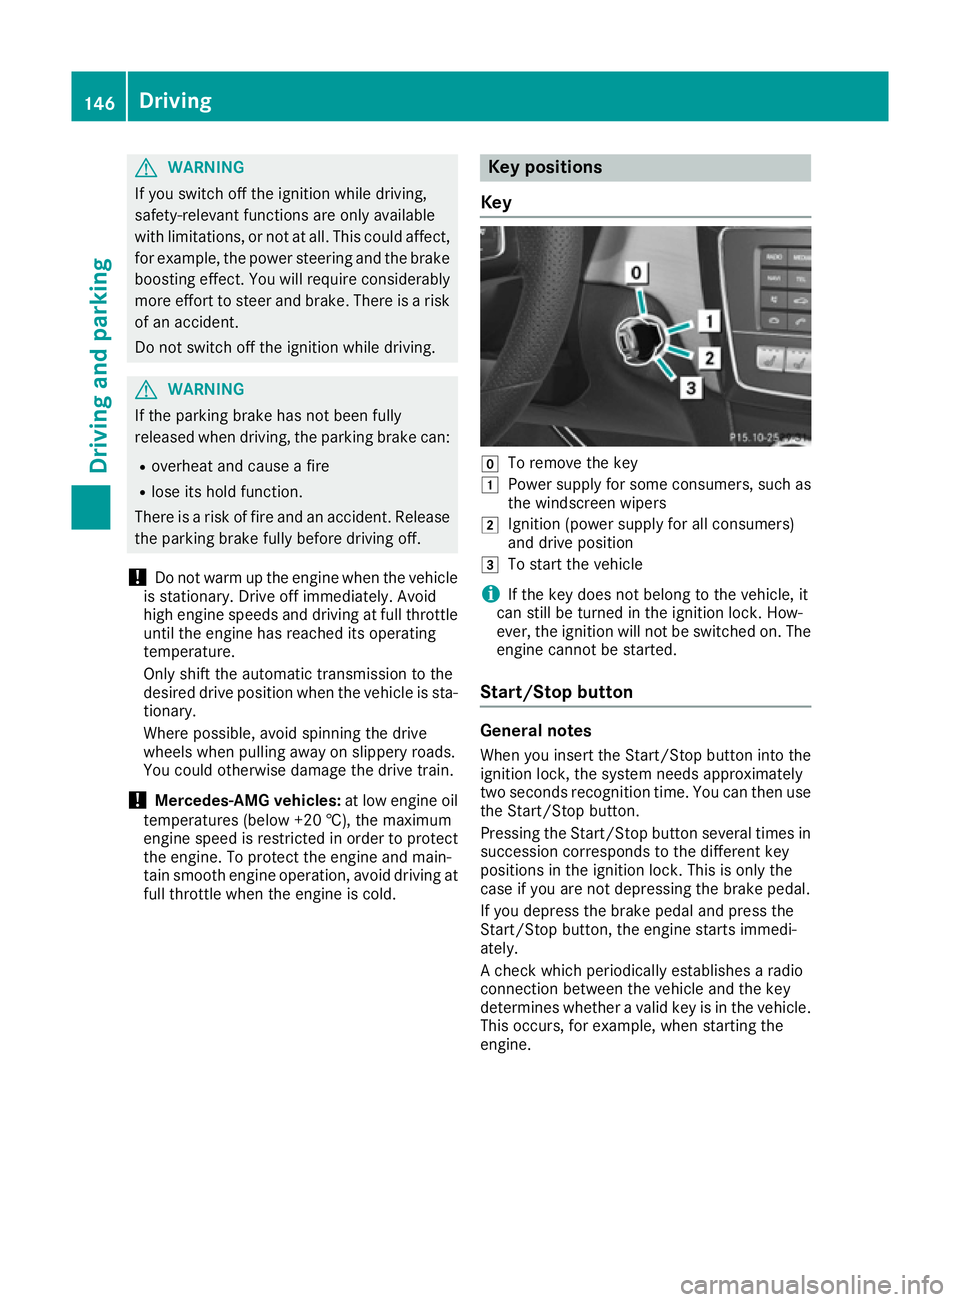
Key g
To remove the key
1 Power supply for some consumers, such as
the windscreen wipers
2 Ignition (power supply for all consumers)
and drive position
3 To start the vehicle
i If the key does not belong to the vehicle, it
can still be turned in the ignition lock. How-
ever, the ignition will not be switched on. The
engine cannot be started.
Start/Stop button General notes
When you insert the Start/Stop button into the ignition lock, the system needs approximately
two seconds recognition time. You can then use
the Start/Stop button.
Pressing the Start/Stop button several times in succession corresponds to the different key
positions in the ignition lock. This is only the
case if you are not depressing the brake pedal.
If you depress the brake pedal and press the
Start/Stop button, the engine starts immedi-
ately.
A check which periodically establishes a radio
connection between the vehicle and the key
determines whether a valid key is in the vehicle. This occurs, for example, when starting the
engine. 146
DrivingDriving and parking
Page 174 of 393
Driving tips
General notes
Important safety notes G
WARNING
If you switch off the ignition while driving,
safety-relevant functions are only available
with limitations, or not at all. This could affect, for example, the power steering and the brake
boosting effect. You will require considerably
more effort to steer and brake. There is a risk of an accident.
Do not switch off the ignition while driving.
Drive sensibly – save fuel Observe the following tips to save fuel:
X The tyres should always be inflated to the rec-
ommended tyre pressure.
X Remove unnecessary loads.
X Remove roof carriers when they are not nee-
ded.
X Warm up the engine at low engine speeds.
X Avoid frequent acceleration or braking.
X Have all maintenance work carried out as
indicated by the service intervals in the Ser-
vice Booklet or by the service interval display.
Fuel consumption also increases when driving in
cold weather, in stop-start traffic, on short jour- neys and in hilly terrain. ECO display
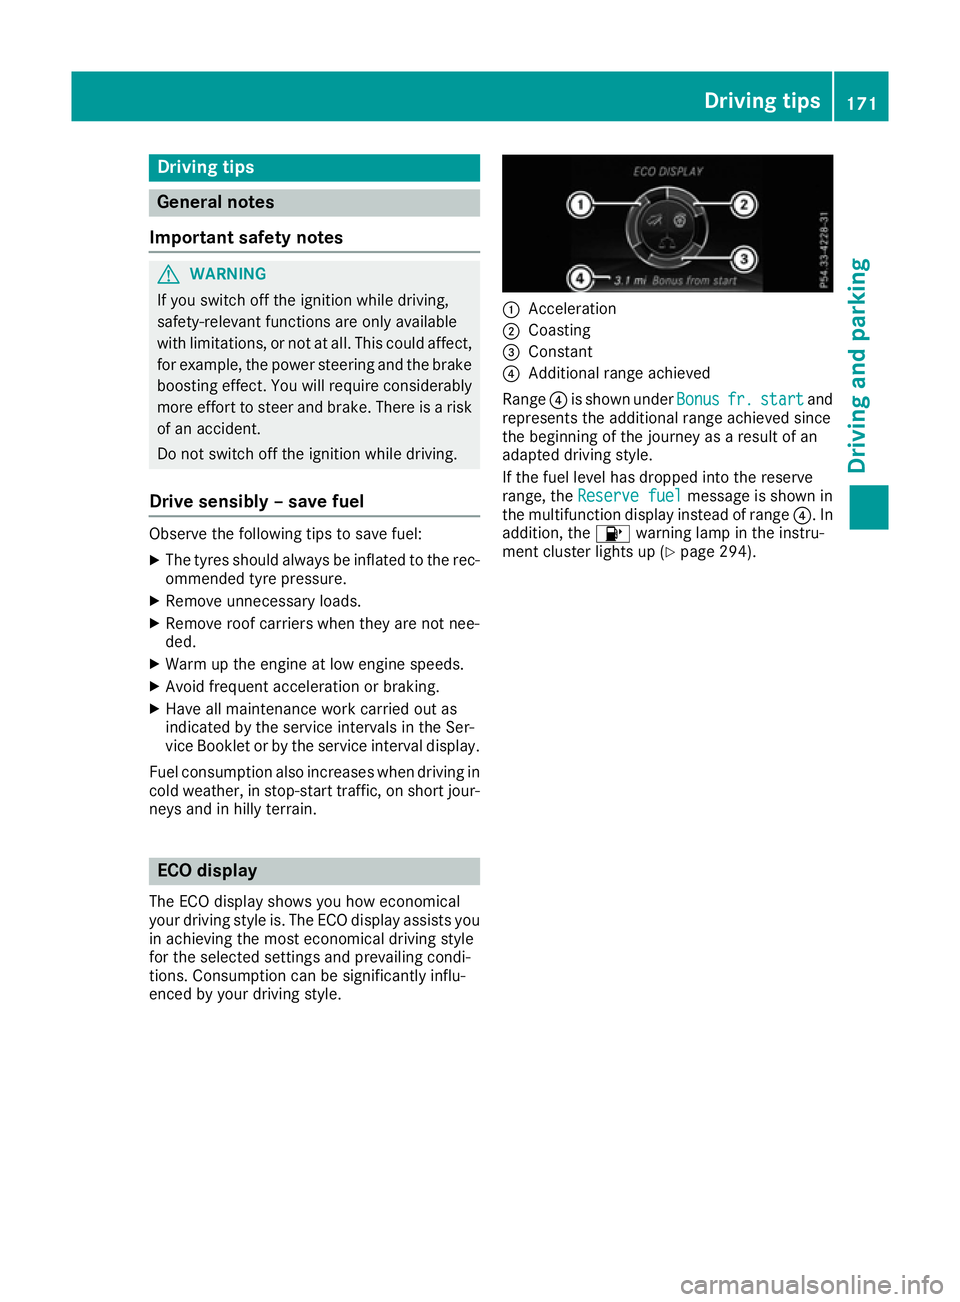
The ECO display shows you how economical
your driving style is. The ECO display assists you in achieving the most economical driving style
for the selected settings and prevailing condi-
tions. Consumption can be significantly influ-
enced by your driving style. :
Acceleration
; Coasting
= Constant
? Additional range achieved
Range ?is shown under Bonus Bonusfr.
fr.start
start and
represents the additional range achieved since
the beginning of the journey as a result of an
adapted driving style.
If the fuel level has dropped into the reserve
range, the Reserve fuel
Reserve fuel message is shown in
the multifunction display instead of range ?. In
addition, the 8warning lamp in the instru-
ment cluster lights up (Y page 294). Driving tips
171Driving and pa rking Z
Page 287 of 393
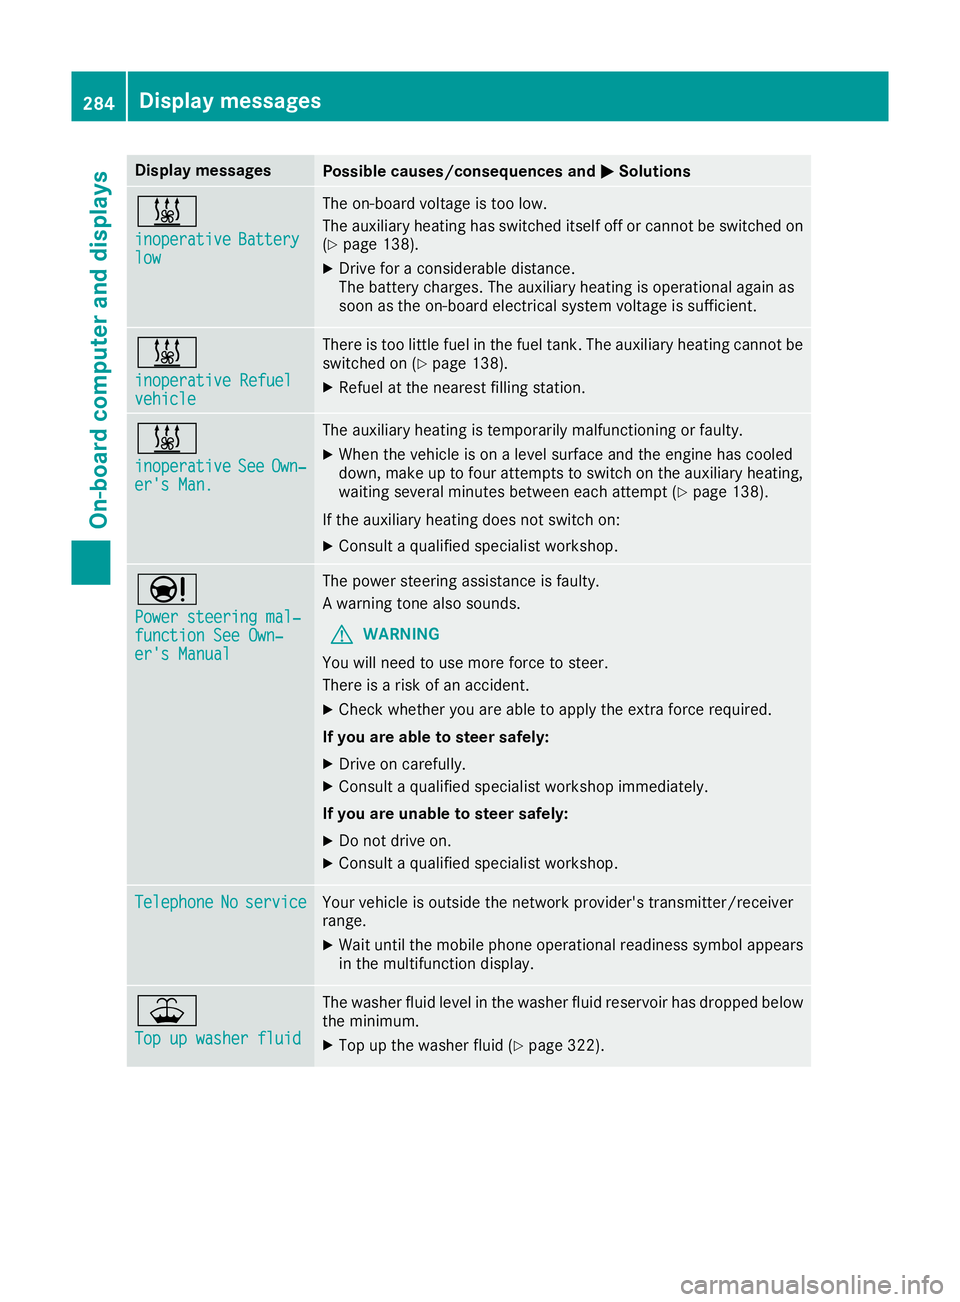
Display messages
Possible causes/consequences and
M
MSolutions &
inoperative inoperative
Battery
Battery
low
low The on-board voltage is too low.
The auxiliary heating has switched itself off or cannot be switched on
(Y page 138).
X Drive for a considerable distance.
The battery charges. The auxiliary heating is operational again as
soon as the on-board electrical system voltage is sufficient. &
inoperative Refuel inoperative Refuel
vehicle vehicle There is too little fuel in the fuel tank. The auxiliary heating cannot be
switched on (Y page 138).
X Refuel at the nearest filling station. &
inoperative inoperative
See
SeeOwn‐
Own‐
er's Man.
er's Man. The auxiliary heating is temporarily malfunctioning or faulty.
X When the vehicle is on a level surface and the engine has cooled
down, make up to four attempts to switch on the auxiliary heating,
waiting several minutes between each attempt (Y page 138).
If the auxiliary heating does not switch on: X Consult a qualified specialist workshop. Ð
Power steering mal‐ Power steering mal‐
function See Own‐ function See Own‐
er's Manual er's Manual The power steering assistance is faulty.
A warning tone also sounds.
G WARNING
You will need to use more force to steer.
There is a risk of an accident.
X Check whether you are able to apply the extra force required.
If you are able to steer safely:
X Drive on carefully.
X Consult a qualified specialist workshop immediately.
If you are unable to steer safely:
X Do not drive on.
X Consult a qualified specialist workshop. Telephone Telephone
No
Noservice
service Your vehicle is outside the network provider's transmitter/receiver
range.
X Wait until the mobile phone operational readiness symbol appears
in the multifunction display. ¥
Top up washer fluid Top up washer fluid The washer fluid level in the washer fluid reservoir has dropped below
the minimum.
X Top up the washer fluid (Y page 322).284
Display
messagesOn-board computer and displays
Page 346 of 393
X
Connect negative terminal ?of donor battery Bto earth point Aof your vehicle using the jump
lead, connecting the jump lead to donor battery Bfirst.
X Start the engine.
X Before disconnecting the jump leads, let the engines run for several minutes.
X First, remove the jump leads from earth point Aand negative terminal ?, then from positive
clamp ;and positive terminal =. Begin each time at the contacts on your own vehicle first.
X After removing the jump leads, close cover :of positive terminal clamp ;.
X Have the battery checked at a qualified specialist workshop.
Jump-starting is not considered to be a normal operating condition.
i Jump-starting cables and further information regarding jump starting can be obtained at any
qualified specialist workshop. Towing away and tow-starting
Important safety notes
G
WARNING
Safety-relevant functions are restricted or not
available if:
R the engine is not running.
R the brake system or the power steering is
malfunctioning
R the voltage supply or the vehicle's electrical
system is malfunctioning.
If your vehicle is towed, significantly greater
force may be required to steer the vehicle or
to brake. There is a risk of an accident.
In such circumstances, use a towing bar.
Make sure that the steering is moving freely
before towing. G
WARNING
When towing or tow-starting another vehicle
and its weight is greater than the permissible gross weight of your vehicle, the:
R towing eye may be torn off
R car/trailer combination may swerve or
even overturn
There is a risk of an accident.
When towing or tow-starting another vehicle,
its weight should not be greater than the per- missible gross weight of your vehicle. Details on the permissible gross vehicle weight
of your vehicle can be found on the vehicle iden-
tification plate (Y page 373).
! When COLLISION PREVENTION ASSIST
PLUS, DISTRONIC PLUS or the HOLD function is activated, the vehicle brakes automatically
in certain situations.
To avoid damage to the vehicle, deactivate
these systems in the following or similar sit-
uations:
R when towing away
R in a car wash
! Make sure that the electric parking brake is
released. If the electric parking brake is faulty,
visit a qualified specialist workshop.
! Only secure the tow cable or tow bar to the
towing eyes or, if available, to the trailer tow
hitch. You could otherwise damage the vehi-
cle.
! Observe the following points when towing
with a tow rope:
R Secure the tow rope on the same side on
both vehicles.
R Make sure that the tow rope is not longer
than legally permitted. Mark the tow rope in
the middle, e.g. with a white cloth
(30 x 30 cm). This will make other road
users aware that a vehicle is being towed.
R Only secure the tow cable to the towing
eyes or, if available, to the trailer tow hitch.
R Observe the brake lamps of the towing
vehicle while driving. Always maintain a dis- Towing away and tow-starting
343Breakdown assistance Z
Page 348 of 393
Towing the vehicle with both axles on
the ground
The automatic transmission automatically shifts to position Pwhen you open the driver's or front-
passenger door or when you remove the key
from the ignition lock.
In order to ensure that the automatic transmis-
sion stays in position Nwhen towing away the
vehicle, you must observe the following points:
X Make sure that the vehicle is stationary.
X Turn the key to position 2in the ignition lock.
X Depress the brake pedal and keep it
depressed.
X Shift the automatic transmission to position
N.
X Leave the key in position 2in the ignition lock.
X Release the brake pedal.
X Release the electric parking brake.
X Switch on the hazard warning lamps
(Y page 117).
In order to signal a change of direction when
towing the vehicle with the hazard warning
lamps switched on, use the combination switch
as usual. In this case, only the turn signals for
the desired direction flash. When you reset the
combination switch, the hazard warning lamps
start flashing again. Transporting the vehicle
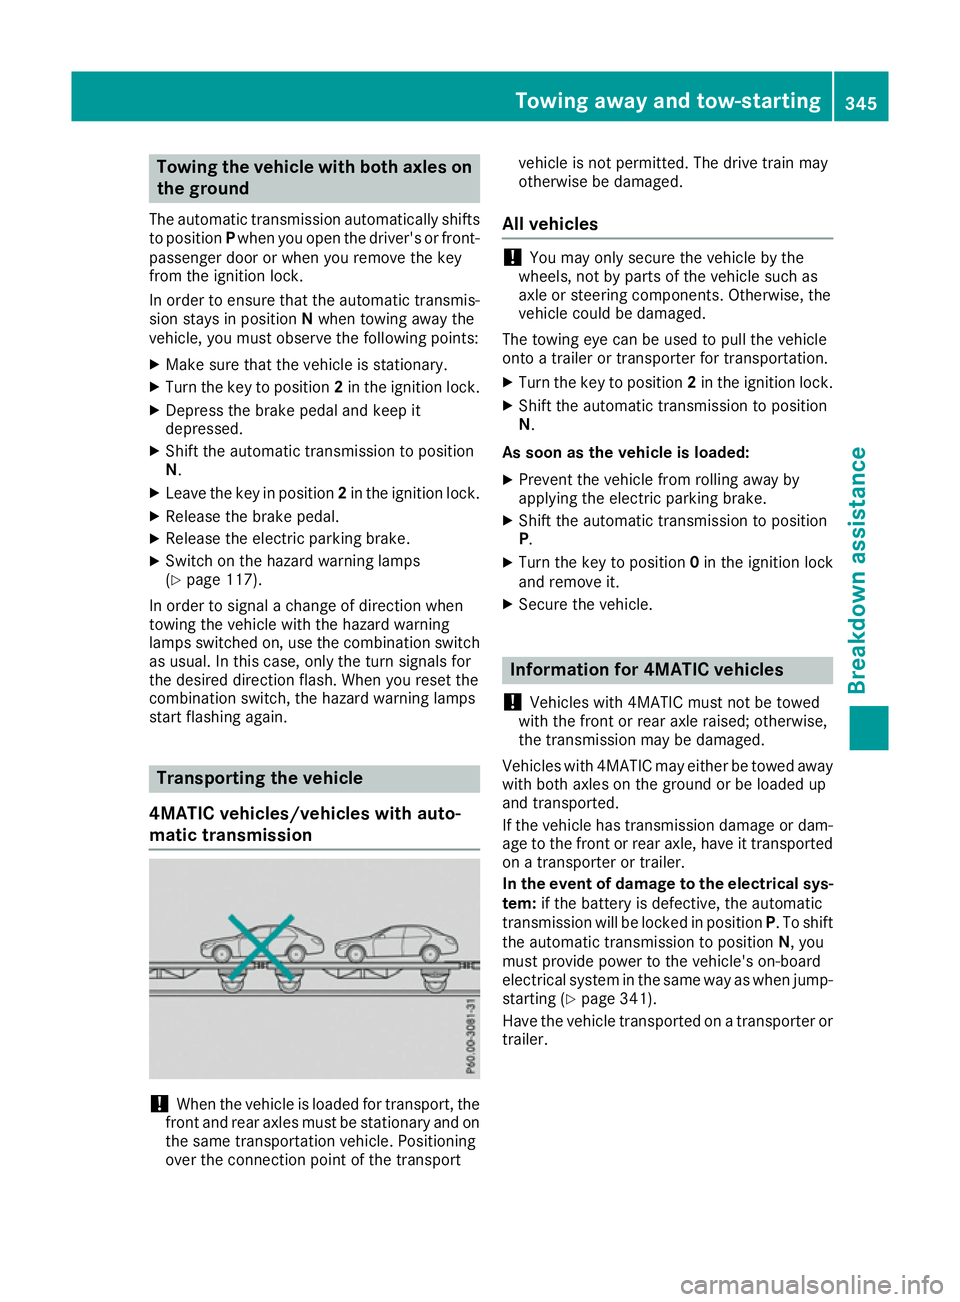
4MATIC vehicles/vehicles with auto-
matic transmission !
When the vehicle is loaded for transport, the
front and rear axles must be stationary and on
the same transportation vehicle. Positioning
over the connection point of the transport vehicle is not permitted. The drive train may
otherwise be damaged.
All vehicles !
You may only secure the vehicle by the
wheels, not by parts of the vehicle such as
axle or steering components. Otherwise, the
vehicle could be damaged.
The towing eye can be used to pull the vehicle
onto a trailer or transporter for transportation.
X Turn the key to position 2in the ignition lock.
X Shift the automatic transmission to position
N.
As soon as the vehicle is loaded:
X Prevent the vehicle from rolling away by
applying the electric parking brake.
X Shift the automatic transmission to position
P.
X Turn the key to position 0in the ignition lock
and remove it.
X Secure the vehicle. Information for 4MATIC vehicles
! Vehicles with 4MATIC must not be towed
with the front or rear axle raised; otherwise,
the transmission may be damaged.
Vehicles with 4MATIC may either be towed away
with both axles on the ground or be loaded up
and transported.
If the vehicle has transmission damage or dam- age to the front or rear axle, have it transportedon a transporter or trailer.
In the event of damage to the electrical sys-
tem: if the battery is defective, the automatic
transmission will be locked in position P. To shift
the automatic transmission to position N, you
must provide power to the vehicle's on-board
electrical system in the same way as when jump- starting (Y page 341).
Have the vehicle transported on a transporter or trailer. Towing away and tow-starting
345Breakdown assistance Z